Zeiss PhotoScope 85 T* FL Series User manual

Victory
Carl Zeiss
Sports Optics
PhotoScope 85 T* FL
Instructions for use
We make it visible.

I. General Information............................................................................... 4
Contact..................................................................................................... 4
Care and storage ...................................................................................... 5
Scope of supply ........................................................................................ 5
Safety instructions..................................................................................... 6
Disposal of batteries, normal and rechargeable ........................................ 7
II. Short Guide................................................................................................ 11
III. Detailed Instructions.............................................................................. 13
Preparation
Charging the batteries .............................................................................. 13
Inserting/removing the batteries ............................................................... 14
Mains operation........................................................................................ 14
Inserting/removing the SD card................................................................. 15
Observation with and without glasses ...................................................... 16
Diopter compensation and image definition ............................................. 16
Switching on the camera .......................................................................... 17
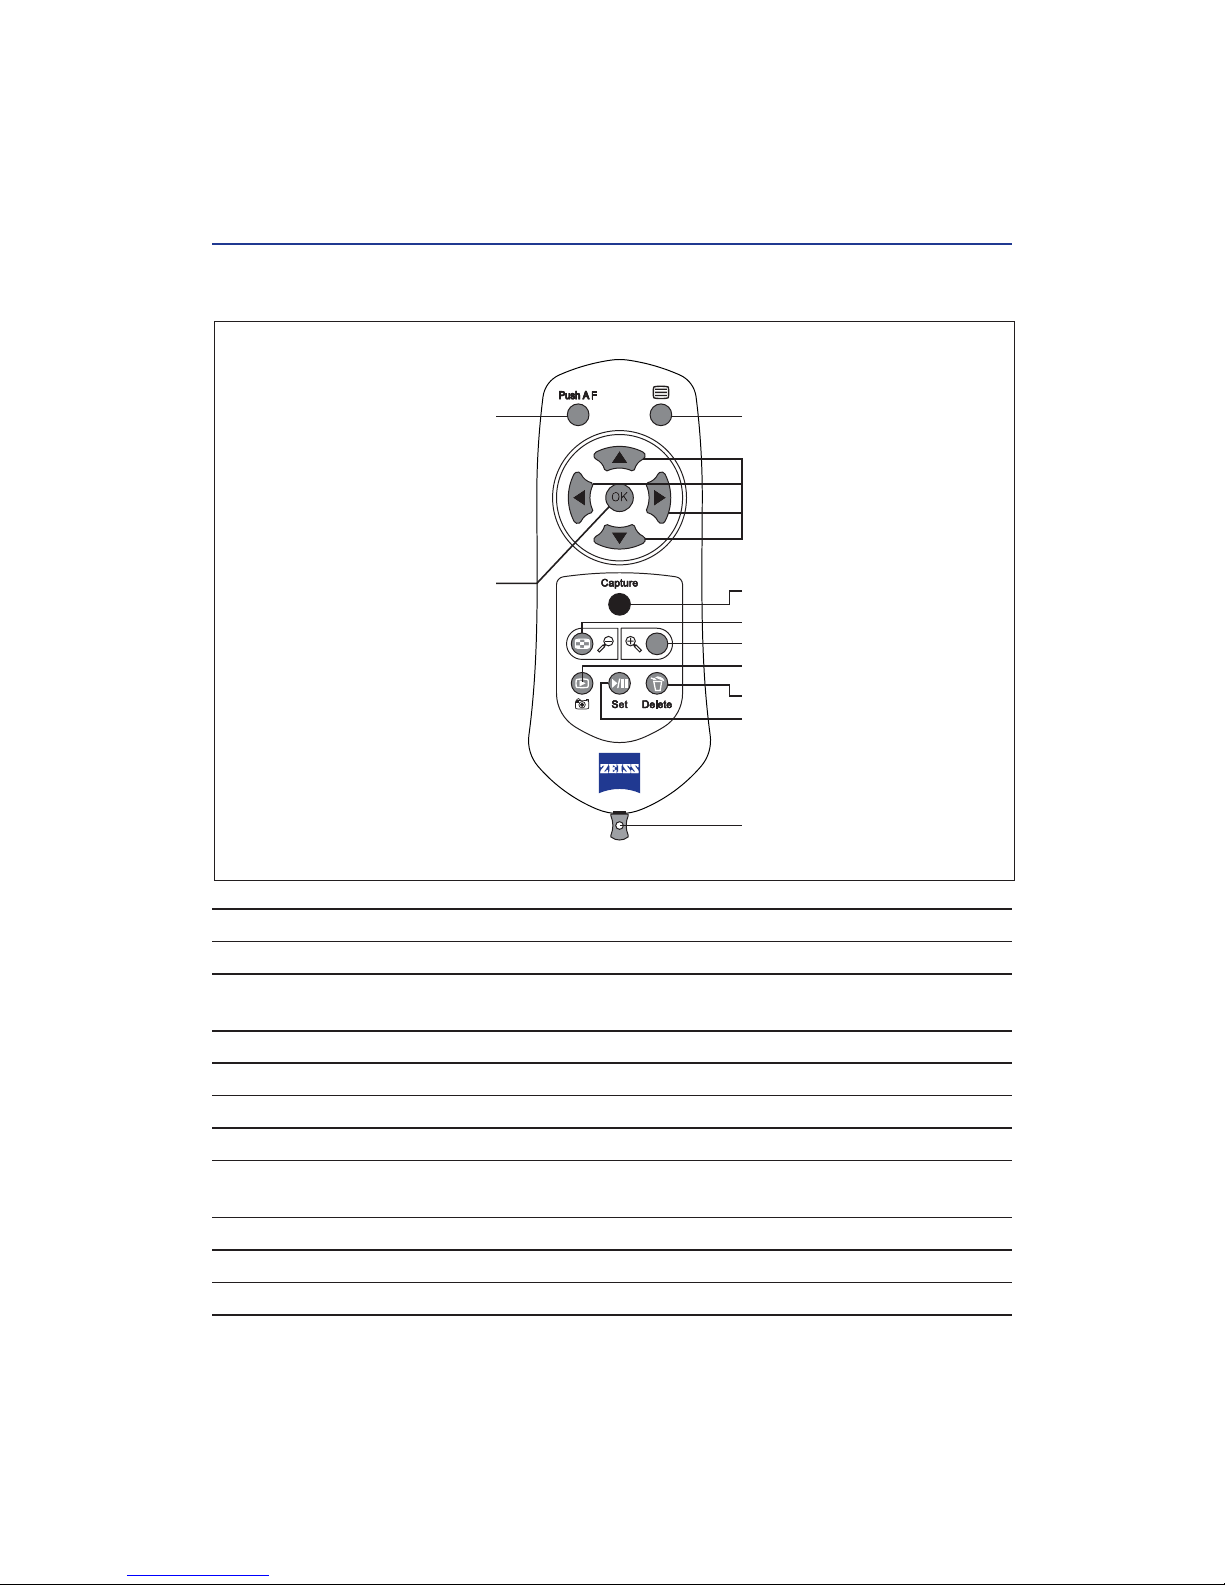
Remote control ......................................................................................... 17
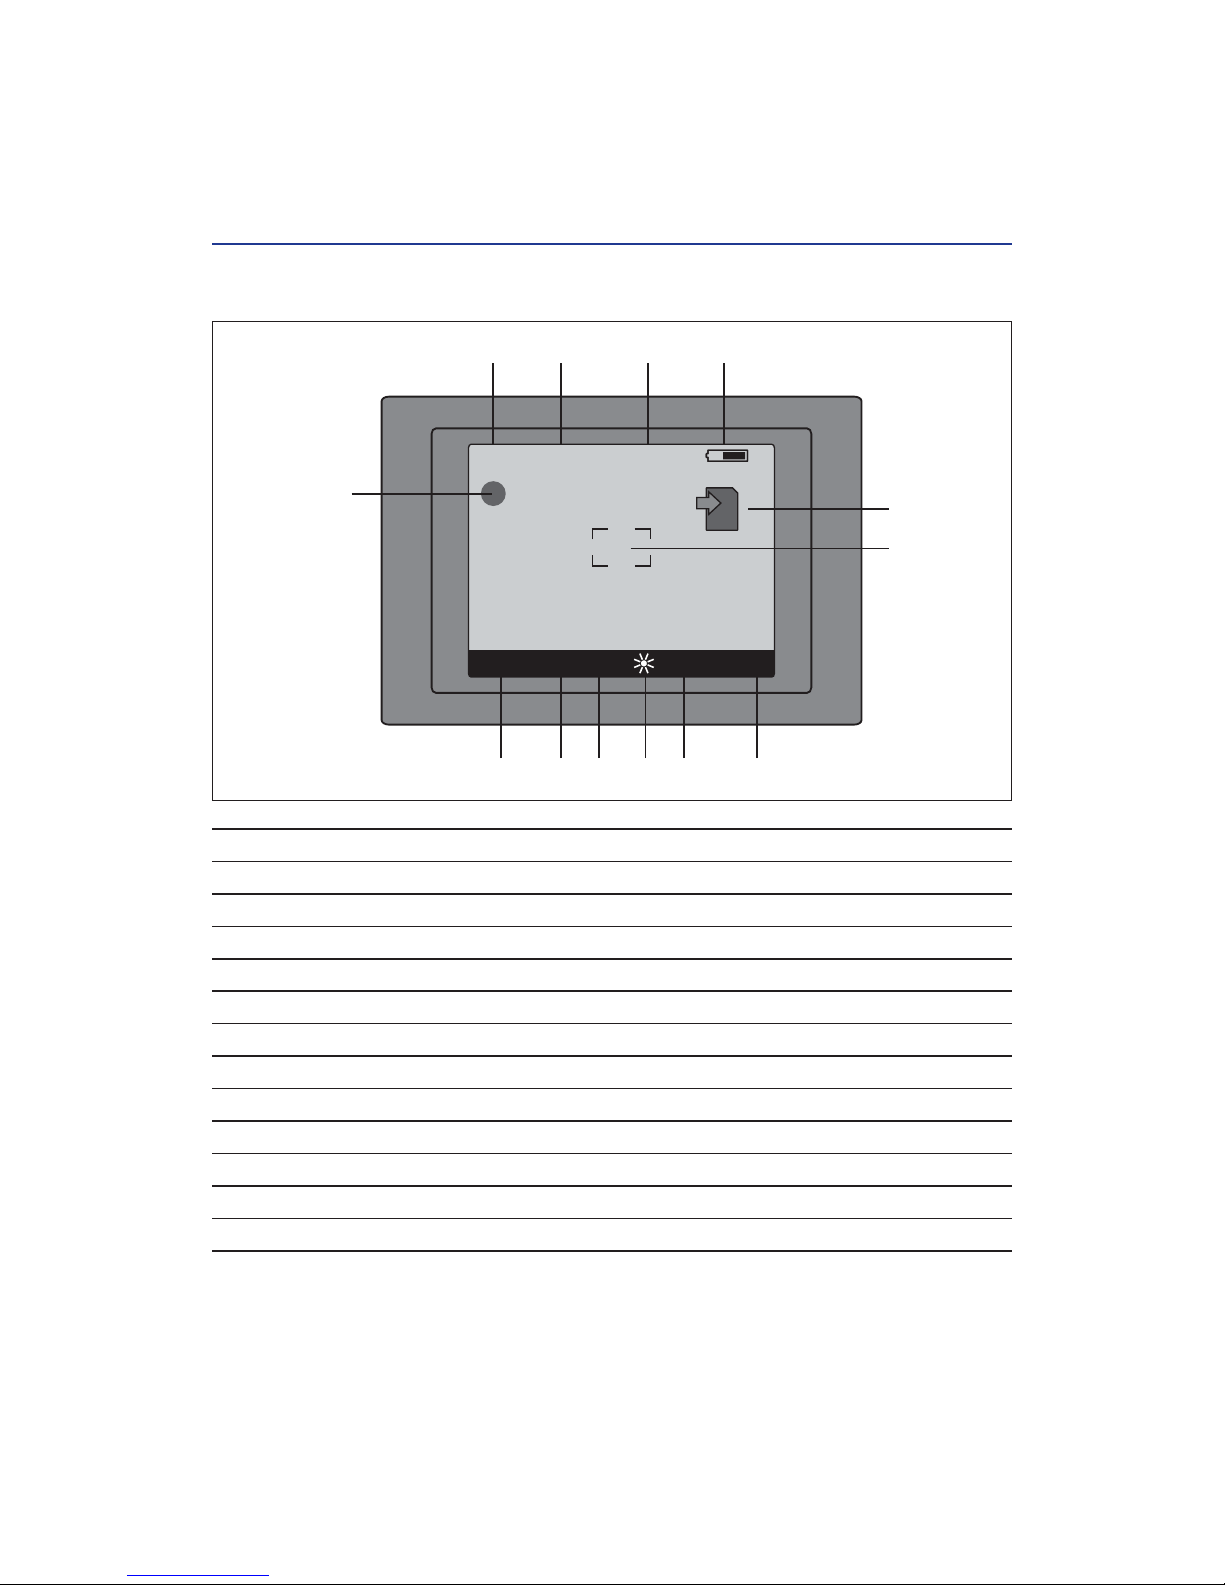
Monitor..................................................................................................... 18
Tripod ....................................................................................................... 18
Extendable sunshade................................................................................ 18
Menu settings
Introduction.............................................................................................. 19
Menu .............................................................................................. 20
ISO SENSITIVITY .............................................................................. 20
WHITE BALANCE............................................................................. 21
COLOR TEMPERATURE .................................................................... 22
AE COMPENSATION........................................................................ 22
AE MODE........................................................................................ 23
IMAGE SIZE..................................................................................... 24
QUALITY.......................................................................................... 25
Menu .............................................................................................. 26
PROGRAM ...................................................................................... 26
SHUTTER......................................................................................... 28
APERTURE....................................................................................... 28
SERIES CAPTURE............................................................................. 29
BRACKETING................................................................................... 30
FOCUS ASSIST................................................................................. 31
AE/AF LOCK .................................................................................... 31
AF SERIES ....................................................................................... 31
2
Contents
1
2

Menu (Image settings)..................................................................... 32
TIME STAMP ................................................................................... 32
ANTI HAZE...................................................................................... 32
NOISE REDUCTION ......................................................................... 33
SHARPNESS .................................................................................... 33
CONTRAST ...................................................................................... 34
COLOR ............................................................................................ 34
Menu (Monitor settings) ................................................................. 35
STATUS LINE ................................................................................... 35
LIVE IMAGE .................................................................................... 35
CONTRAST DISPLAY ........................................................................ 36
BRIGHTNESS DISPLAY ..................................................................... 36
SLIDESHOW .................................................................................... 37
IMAGE REVIEW............................................................................... 37
Menu SETUP .................................................................................. 38
AUTO POWER OFF .......................................................................... 38
DISPLAY OFF................................................................................... 39
LANGUAGE ..................................................................................... 39
DATE &TIME .................................................................................. 40
SOUND ........................................................................................... 40
FACTORY DEFAULTS......................................................................... 41
FIRMWARE ..................................................................................... 41
Menu SD card................................................................................ 42
FORMAT SD .................................................................................... 42
IMAGE NUMBER CONTINUOUSLY ................................................... 42
RESET IMAGE NUMBER................................................................... 43
Capture ....................................................................................................... 44
Modify capture parameters....................................................................... 45
CAPTURE button ....................................................................................... 45
Playback and image control........................................................................ 46
Delete image ............................................................................................ 47
Playback on PC......................................................................................... 47
Video Recording ........................................................................................... 48
Recording ................................................................................................. 48
Playback ................................................................................................... 48
End........................................................................................................... 48
IV. Technical Data .......................................................................................... 49
3
Contents
IMG
LCD
SD

Contact
Congratulations on your having the new PhotoScope 85 T* FL, which will provide you
with fascinating visual experiences and simultaneously impressive digital pictures.
As with all Carl Zeiss products, the PhotoScope 85 T* FL is characterised by outstand-
ing optical performance, precise workmanship and long service life.
Carefully read through the following operating instructions, so that you get optimal
use of your PhotoScope 85 T* FL and it will be your reliable companion for many
years.
Practice, precise settings and photographic knowledge are also very helpful.
Our customer service is available for you
from Monday to Friday from 8:00 am until 6:00 pm (CET).
Tel.: +49 (0) 64 41 - 4 67 61 (German/English)
Fax: +49 (0) 64 41 - 4 83 69
eMail: [email protected]
●Please note that the controls, components, menu options, etc. of your product
can differ slightly from those shown in these operating instructions.
●The SD logo is a trademark.
●Other printed names, companies and product designations in the operating instruc-
tions are trademarks or registered trademarks of the corresponding companies.
I. General Information
4

Care and storage
The PhotoScope does not require special care. Do not wipe coarse dirt particles (e.g. sand)
off from the lenses or the monitor, but rather blow off or remove with a hair brush.
Finger prints can attack the surface after a while. The simplest method of cleaning this
type of optical surface is to breathe on it and softly rub with a clean optical cleaning cloth.
Condensation/fogging can form on the monitor and outer lenses with strong temperature
fluctuations. Clean this with a soft, dry cloth.
Dry storage and good ventilation, especially in the tropics, help to prevent a possible
mould film on the optics.
The Cordura case included in the scope of delivery or the carrying case available as an
accessory are suitable primarily for safe storage and transportation (order no. 1678-578).
Scope of supply
●PhotoScope 85 T* FL
●Cordura case (order no. 1742-776)
●Remote control (order no. 0506-346) with carrying strap
and 2 AAA 1.5 V Micro (LR 03) batteries
●1 GB SD card
●1 rechargeable battery BP 511 (7.4 V/1400 mAh) (order no. 0500-637)
●Fast recharger (order no. 0504-821)
●Power plug with world plug set for connection to the charger or the PhotoScope
●Eyepiece cap (order no. 528100-0034)
●Lens cap (order no. 0505-836)
●USB cable (order no. 0476-546)
●Instructions and warranty card
5

Safety instructions
●Caution: Never look into the sun or into laser light sources with the PhotoScope.
This can lead to serious injury to the eyes.
●Do not leave the product for a long time in the sun without protective cap or not in a
case. The lens and eyepiece can function as a burning glass and damage the interior
components.
●To reduce the danger of a fire, an electric shock or annoying interferences, only use the
accessories authorised by Carl Zeiss and the original plug-in power supply unit,
order no. 0504-821 (12 V DC/800 mA with 5.5 mm barrel connector), as well as the
rechargeable batteries and battery types mentioned in the instructions.
●Do not leave the device in rain or moisture with mains operation.
Operating with the plug-in power supply unit is only permissible in closed buildings.
●You should only operate the device with the plug-in power supply unit if the nominal
voltage of the plug-in power supply unit matches the local mains voltage.
Check the nominal voltage of the device and make sure you use the correct power
plug.
●In emergencies (e.g. if the housing, controls or power line are damaged by penetration
of liquid or foreign bodies), turn the device off immediately, unplug the power plug,
remove the rechargeable battery and contact your retail store or our Hotline.
●Incorrect placement of the batteries or rechargeable batteries poses a risk of explosion.
●
Handle all batteries, rechargeable and normal, according to the manufacturer’s instructions.
They should not be thrown into a fire, heated, disassembled or broken.
Do not use faulty batteries. Normal batteries must never be recharged.
●Never open or disassemble the PhotoScope or the recharger or the batteries (risk of
electric shock, burning, acid).
●Never immerse the device in water.
●Do not force the monitor open and do not turn it beyond the permissible settings.
Do not press hard on the monitor. This can result in uneven colors on the monitor or
malfunctions.
6

Disposal of batteries, normal and rechargeable
Batteries do not belong in domestic waste!
Please use a recycling facility in your area to dispose of used batteries.
As a user you are obliged to return used batteries.
7
User information for disposal
of electrical and electronic devices
(private households)
This symbol on products and/or accompanying documents means that used electrical
and electronic products should not be mixed with common domestic waste.
Take these products for proper treatment, reclamation and recycling to the appropriate
collection sites where they will be accepted without cost.
In some countries it may be possible to turn in these products when buying a similar
new product at your local dealer. Proper disposal of this product protects the environ-
ment and prevents possible damaging effects to humans and the surroundings, which
could occur with improper handling of waste. More detailed information on the collec-
tion centre near you is available from your municipal government. In conformance with
national laws, fines can be levied for improper disposal of this type of waste.
For business customers in the European Union
Please contact your dealer or supplier if you want to dispose of electrical and electronic
devices. They will have further information available for you.
Information for disposal in other countries outside the European Union
This symbol only applies in the European Union. Please contact your municipal govern-
ment or your dealer if you want to dispose of this product and want to know the possi-
bilities of disposal.

8
Description of the Components
Fig. 1: PhotoScope 85 T* FL
16
17
18
Carl Zeiss
11
12
13
1415
Fig. 1
Carl Zeiss
10
8
9
Carl Zeiss
PhotoScope 85 FL
1 2 3 45
6
7
Carl Zeiss
PhotoScope 85 FL
1 Sunshade
with locating tool
2 Focusing ring
3 Zoom ring
4 Fold-out monitor
5 Eyecup
6 Dioptre adjustment ring
7 Tripod connection
8 Rechargeable battery compartment
9 Rechargeable battery compartment release
10 Plug for power connection
11 Eyepiece cap
12 Rechargeable battery
13 SD card slot
14 USB connection
15 DC input
16 Operating mode display
17 On/off button
18 IR receiver

1 Menu For calling up various menus
2 Scroll buttons For moving within the menus and moving the FOCUS ASSIST field of view
3 Picture Press until pressure point: Exposure and focus setting
(if FOCUS ASSIST is active); Push completely down: Take picture
4 Zoom minus For reducing size of monitor image
5 Zoom plus For enlarging size of monitor image
6 Playback To look at saved pictures
7 Delete For deleting a picture
8 Slideshow/Set For starting and stopping the slideshow or video and to change
between the menu bar and the FOCUS ASSIST field of view
9 Eyelet For fastening the carrying strap
10 OK For confirmation of the selected value
11 Push AF To activate the FOCUS ASSIST function for the following image
9
Fig. 2: Remote control
111
2
10 3
4
5
6
7
8
9

Fig. 3: Picture-monitor image with status lines
10
1 Time
2 Date
3 Bracketing setting (only if selected)
4 Battery status
5 SD card access display
6 Focus Assist measuring field/measuring field for spot metering
7 Display of still available pictures
8 Image size
9 White compensation
10 Exposure correction
11 Shutter/flashing indicators: risk of motion or underexposure
12 ISO setting
13 Focus Assist confirmation (blue)/video recording (red)
For long exposure times the time display blinks as a warning of blurring due to camera
shake.
In the picture mode the values of the lower status lines can be directly selected, depend-
ing on the selected exposure program, using the LEFT/RIGHT scroll buttons.
They appear in blue text. The values can be changed using the UP/DOWN scroll buttons.
The effects on the picture can be seen directly on the monitor image.
11:47 25.03.2009
ISO 100 2 0.0 7MP 28
SD
3x AF
1 2 3 4
12 11 10 9 8 7
5
6
13

11
II. Short Guide
Preparation
Charge the enclosed rechargeable battery BP 511 with the recharger. Open the recharge-
able battery compartment by pressing on the releasing button (Fig. 1/9) and insert the
rechargeable battery.
Push the SD card into the card slot (Fig. 1/13) with the label pointing upward, until you
hear a click.
Place the two enclosed LR 03 (Micro AAA) batteries in the remote control. Make sure the
polarity is correct, corresponding to the symbols on the battery compartment. If you use
glasses, turn the eyecups (Fig. 1/5) completely in; without glasses turn the eyecup out.
View through the eyepiece
Look through the eyepiece and set the circu-
lar segments in the viewing field by turning
the dioptre compensation (Fig. 1/6) in so that
the image is absolutely sharp.
Setting the circle segments carefully, so they
are sharp, is the prerequisite for good photo-
graphs. Therefore, take some time and look
through the eyepiece in a relaxed manner.
It is helpful to first set the visible image blurred, so that you can completely focus on the
circle segments. Turn on the camera with the on/off button (Fig. 1/17) and fold out the
monitor.
Set or change the desired menu language with the remote control:
MENU > SETTINGS/EINSTELLUNGEN > LANGUAGE/SPRACHE
If you do not understand the language on the display, you can change to English at any
time by pressing on the SET button (Fig. 2/8) for approx. 4 seconds.
Set the date and time:
MENU > SETTINGS > DATE/TIME
Formatrahmen
Kamera
Kreissegmente
Camera format
frame
Circle segments

12
You return to live image mode by (repeated) pressing on the MENU button.
Make sure that the remote control is always pointed in the direction of the IR receiver
(Fig. 1/18) on the PhotoScope. Otherwise the remote control cannot transfer signals to
the PhotoScope.
Picture
For fast and simple photography, select the program using the SCROLL buttons
(Fig. 2/2) in the menu .
Now align the PhotoScope on the desired
object and carefully focus the image using
the focusing (Fig. 1/2) on the spotting scope.
Use the zoom ring (Fig. 1/3) to change the
image window. You will see a live preview of
the image on the screen at the same time.
Light coming through the eyepiece can lead
to undesirable reflections on the image.
In this situation place the cap on the eye-
piece.
Press the CAPTURE button (Fig. 2/3) on the remote control to take a picture.
The camera default settings ensure good picture quality in most conditions.
However, it is recommended that you also read through the detailed instructions for use
on the enclosed CD-ROM, so that you can set the available options in the individual
menus.
Playback
Press the PLAYBACK button (Fig. 2/6) to display the picture taken on the monitor. With the
SCROLL buttons (Fig. 2/2) you can page back and forth through several saved pictures.
The ZOOM PLUS (Fig. 2/5) and ZOOM MINUS buttons (Fig. 2/4) are used for zooming in
and out. Return to the live image mode by pressing the PLAYBACK button (Fig. 2/6)
again.
1
AUTO
111
2
10 3
4
5
6
7
8
9
Fig. 2

13
III. Detailed Instructions
Preparation
Charging the batteries
Battery BP 511 is discharged on delivery of the unit. Before use, charge the battery using
the enclosed charger. So that the charger can be used in almost any country, the delivery
package contains various exchangeable mains plugs. Fit the appropriate plug and ensure
the correct mains voltage (110 V to 220 V).
The charger has the following status indicators:
Constant green light: Ready to use, but no battery inserted
Constant red light: Battery charging
Flashing green: Inserted battery is charged
Place the battery in the charger, ensuring that it is the correct way around. Then connect
the charger to the socket. After charging, the mains plug must be disconnected from the
socket. Charge the batteries at an ambient temperature of around 10°C to 35°C.
If the operating time is severely decreased even when the battery is charged correctly,
it is likely that the battery life of the battery has expired. In this case, use a new battery of
type BP 511. Use only high quality batteries with a minimum capacity of 1400 mAh.
A fully charged battery with a capacity of 1400 mAh will take around 400 images in
approx. 4 hours with the monitor constantly switched on. The exact number of images
that can be captured is highly dependent on the usage conditions.
Ensure that the screen is never switched on for longer than necessary. Using the SWITCH
OFF and POWER SAVE functions will significantly extend the useful life of the battery.
The remaining battery power is shown on the top right of the screen when the PhotoScope
is switched on. If the display flashes red, charge or change the battery immediately.
Note:
The battery does not charge in the PhotoScope when the mains plug unit is connected.

Preparation
14
Inserting/removing the batteries
Press the compartment release button (Fig. 1/9) to open the rain and dust-proof battery
compartment. When inserted, the battery contacts must point to the left.
Insert the battery on the right side of the battery compartment then push it to the left, in
the direction of the arrow (on the battery) until it clicks into place.
Insert the two enclosed batteries of type
LR 03 (Micro AAA) into the remote control.
Ensure the correct polarity for each, accord-
ing to the symbols in the battery compart-
ment. The enclosed carry cord can be fixed
to the eyelet on the bottom end of the
remote control.
Remove the batteries if the PhotoScope is to
remain unused for an extended period.
Mains operation
The mains unit of the battery charger also allows the PhotoScope to be operated directly
from the mains. To do this, connect the mains unit to the DC input (Fig. 1/15) on the
PhotoScope, which is located under the battery compartment cover.
The DC input plug can also be connected from outside with the battery compartment cover
closed. To do this, carefully press out the round seal plug (Fig. 1/10) in the battery com-
partment from inside.
After using the mains unit, the seal plug must be replaced in the battery compartment
cover. Only then is protection against dust and damp guaranteed.
Note:
The date and time settings are retained when the batteries are changed.
However, if the battery is removed for an extended period, the time setting is deleted.
In this case, reset the date and time.

Preparation
15
Inserting/removing the SD card
The battery compartment contains the slot (Fig. 1/13) for the SD card.
With the PhotoScope switched off, push the SD card into the slot until you feel it click into
place. The label must face upwards.
Ensure that the card is always pushed in until it clicks into place.
No photographs can be taken without the SD card inserted or with an unsuitable SD card.
If the card access indicator (Fig. 3/5) on the monitor is illuminated, images are saved,
read or deleted. The following actions are not to be carried out at this time:
●Switching off the PhotoScope
●Removing the battery or the card
●Shaking or knocking the PhotoScope
However, you can take the next picture whilst the card access indicator is illuminated.
The SD memory card has a write protection lock which is able to prevent overwriting and
formatting. If the lock is closed, it is not possible to write to the card.
Use only formatted SD cards with the SD logo. SD memory cards that have previously
been used in other units must be formatted in the PhotoScope before photographs can be
saved to them.
The number of images that can be stored on one SD card is dependent on resolution, card
size, and quality/file format. At the maximum PhotoScope resolution (7 MPx), it is possible
to save approximately the following number of images on a 1 GB card:
●DNG + JPG: 60
●DNG: 70
●JPG (high quality): 300

Preparation
16
Observation with and without glasses
When observing without glasses, use the PhotoScope with the eyecup (Fig. 1/5) extended.
To do this, twist the eyecup (Fig. 1/5) upwards by turning to the left.
When observing with glasses twist the eyecup right down. Intermediate stages are also
available for individual adjustment.
Diopter compensation and image definition
Fine segments of a double circle are arranged around the centre of the field of view.
The sharpness of these sectors appears greater or less depending on the adjustment of
the diopter compensation.
By turning the diopter compensation (Fig. 1/6), adjust these markings so they appear
absolutely in focus. Take a few seconds to do this and take a relaxed look through the
eyepiece. To check the correct diopter setting, select a subject and use the focusing ring
(Fig. 1/2) to focus on it. To check the definition, use the monitor rather than the eyepiece.
For precise adjustment, use the ZOOM PLUS button (Fig. 2/5) on the remote control.
Nearby vertical lines e.g. window frames are ideal. Now look through the eyepiece and
check the image definition here too. If the subject appears out of focus, correct the
diopter compensation on the eyepiece until the definition effect is correct.
After diopter compensation, the image on the monitor, the image in the eyepiece and the
circle segments should all appear in focus at the same time.
The diopter compensation requires adjusting only once. Before each use, read off the set
diopter value on the scale (Fig. 1/6) and check that the value has not been adjusted
accidentally. Readjustment is required only if someone else has used the unit or if the set
value is no longer correct for you. New diopter compensation is also required when
changing from observation with glasses to observation without glasses or vice versa.

Preparation
17
The circle segments must appear absolutely in focus.
The format frame shows the border of the area captured.
Switching on the camera
To switch on the camera, hold the ON/OFF button (Fig. 1/17) depressed for a minimum of
0.3 seconds. All other camera settings are then executed via the remote control.
Remote control
Ensure that the remote control is always pointed towards the IR receiver (Fig. 1/18) on the
PhotoScope. If this is not the case, the remote control will be unable to transmit a signal
to the PhotoScope.
Formatrahmen
Kamera
Kreissegmente
Camera format
frame
Circle segments

Preparation
18
Monitor
The foldout OLED monitor is located on the left hand side of the PhotoScope.
Fold out the monitor by 90° then turn the monitor to the appropriate position.
The monitor can be turned up to 90° from the vertical position.
Tripod
The use of a good tripod is essential in order to minimise shaking.
Zeiss provides tripods that have been optimised specifically for use with the PhotoScope.
Tripod adapter plates with 1/4˝ and 3/8˝connecting threads may be used on the PhotoScope.
Unscrew the 1/4˝ thread insert when using 3/8˝adapter plates.
Extendable sunshade
The extendable sunshade keeps disruptive sunlight off of the lens which can result in
reflections and stray light. The locating tool (Fig. 1/1) on the aperture facilitates easier
object sighting.
Note:
If the PhotoScope is very cold when switched on, the image on the monitor will initially
appear slightly darker. Normal brightness is recovered after a short period.

Introduction
To open the camera settings, press the MENU button on the remote control.
The menu structure appears in the form in which it was last left.
Use the SCROLL buttons (Fig. 2/2) to select the desired menu item and activate it with
the OK button (Fig. 2/10). This method can be used to activate any available settings or
to return to a menu level.
The screen now displays the selected menu item
in white text on a blue background.
Settings that cannot be selected are skipped
when scrolling and shown in grey.
Click again on the MENU button (Fig. 2/1) to
leave the menu settings and return to the live
image.
Six different menus are available:
To set capture parameters
To set the camera software for image optimisation
To set the display parameters or the monitor
To set basic defaults e.g. date or language
To set the storage parameters e.g. image number of formatting
Menu settings
19
1
2
IMG
LCD
SD
111
2
10 3
4
5
6
7
8
9
Fig. 2

Menu settings
2020
Menu
ISO SENSITIVITY
Use the ISO SENSITIVITY option to change the light sensitivity of the CCD sensor.
In addition to , there are 5 further levels that can be selected manually
(ISO 50/100/200/400/800). The best image quality will be achieved with levels ISO 50
and ISO 100. What is known as image noise increases with higher ISO values.
1
AUTO
Table of contents
Other Zeiss Telescope manuals
Popular Telescope manuals by other brands

Vixen
Vixen Refractors A81M instruction manual

Orion
Orion Shorttube 4.5" EQ 9083 instruction manual

William Optics
William Optics ZenithStar 66 SD APO instruction manual

National Geographic
National Geographic NG50MM instruction manual

Meade
Meade ETX Astro Telescope/ETX Spotting Scope instruction manual

Celestron
Celestron 12-36x50mm manual