ZEN Cedar User manual

Cedar Hot Tub Assembly Instructions
Introduction:
Thank you for selecting a Zen Bathworks tub! Your hot
tub will provide many years of soaking enjoyment.
Assembly will be easier if you follow the correct
sequence of steps and use the proper tools. Please take
the time to read the instructions completely and
carefully before starting the assembly process.
How wooden tubs hold water: The tub is
assembled dry. Because dry wood will swell a
significant amount when saturated with water, all
the joints compress tightly allowing the tub to hold
water.
Special note: It is important to keep the tub floor and
side staves stored in a dry place until assembly time. If
the tub gets wet prior to assembly, the wood may swell to
a larger size making assembly much more difficult and
slowing the sealing of the tub.
Figure 1.1: Cover, floor panels, staves, compression
straps, benches.
Section 1: Packing List
Locate the enclosed packing list to identify and confirm
that all items are included. A copy of the packing list is
inside the packaging. See Figure 1.1 to help identify the
major parts.
Section 2: Tools and Supplies Needed
A few basic tools and items are needed to complete the
assembly of your new tub. Gather what you will need
before you start.
Figure 2.1 tools required
✔A large rubber mallet (handle the length of a
normal hammer, head the size of a soup can)
✔Small tape measure
✔Screw gun
✔#2 square drive and Philips bit for screw gun
✔Carpenters’ level (2’ or longer)
✔15/16” open end, socket, or crescent wrench
✔Vise Grip pliers
✔Caulking gun or squeeze tube of clear silicone
✔Medium sized pipe wrench
✔4” x 6” timbers for floor support - referred to as
“chine joists” in section 4
Section 3: Site Preparation
Before assembling your tub, prepare a suitable spot for it.
Hot tubs will weigh from 1500 to 8000 lbs. when full of
water - so a stable foundation is essential. Cedar tubs
should be installed outdoors. You must provide for good
drainage and a solid foundation.
Outdoor installation: Good drainage is vital so that
water from splashing, overflow, cleaning and draining
operations can be carried away from the site.
There are four basic styles of foundation for your tub.
You may consider a concrete pad, a gravel pad, piers
made of concrete or treated wood, or a deck.
See Figures 3.1 through 3.4 for ideas.
REV: 2018.01.11

3.1 A concrete pad forms an excellent base for your tub.
A properly poured 4” reinforced pad will be stable and
resistant to frost heave. Size the pad so that the sides are
about as long as the diameter of the tub. Example: For a
tub 6’ in diameter, pour a 6’ x 6’ pad.
3.2 A gravel pad can be a simple foundation for a tub in
some cases. If the ground on the site is compact and
stable soil, sand, gravel or rock; a layer of pea gravel (or
course sand) on top can be used to establish a level
foundation for your tub. However, if the soil is unstable,
soft, duffy or muskeg, a gravel pad will settle unevenly
under the weight of the tub and is not a good choice. If
you choose a gravel pad, make it larger than the diameter
of the tub by about 3 feet. Example: For a 6’ tub, make
the pad 9’ in diameter. The thickness can vary depending
on how much gravel is needed to level the site.
Typically, 2 to 4 inches is sufficient. Smooth with a rake
and check with a carpenter’s level.
3.3 Another alternative is to use adjustable concrete pier
blocks as a foundation. This type of pier block is
available at most home improvement stores and allows
you to adjust the level of the tub after it is in place. Piers
can be set into the ground to make a solid foundation for
the tub. This method involves building a small but strong
wooden frame or cribbing to support your tub.
Typically, four piers should be used, and the wood
timbers should be 4” x 6” or bigger. The bottom of the
piers must rest on stable material. See Figure 3.3 for an
example.
Figure 3.3 Pier block foundation
3.4 Another option is to install the tub on a deck.
Installation on a wooden deck can be a good choice.
Be sure that your deck has been designed to support
the weight of a full tub (1500 - 8000 lbs. depending
on the size of the tub). Have the deck inspected by a
qualified architect or building engineer prior to
proceeding. See Figures 3.4 for deck installation.
Figure 3.4.1 Tub surrounded by deck or on top of deck.
If surrounded by a deck, the deck can hide the heating
system plumbing. If on top of deck, the beauty of the tub
can be better appreciated.
Figure 3.4.2 Tub on perimeter of deck with stairs on each
side. This arrangement allows for plumbing to be hidden
under the deck and for most of the tub to be seen. Good
choice for any heating system.
2
REV: 2018.01.11
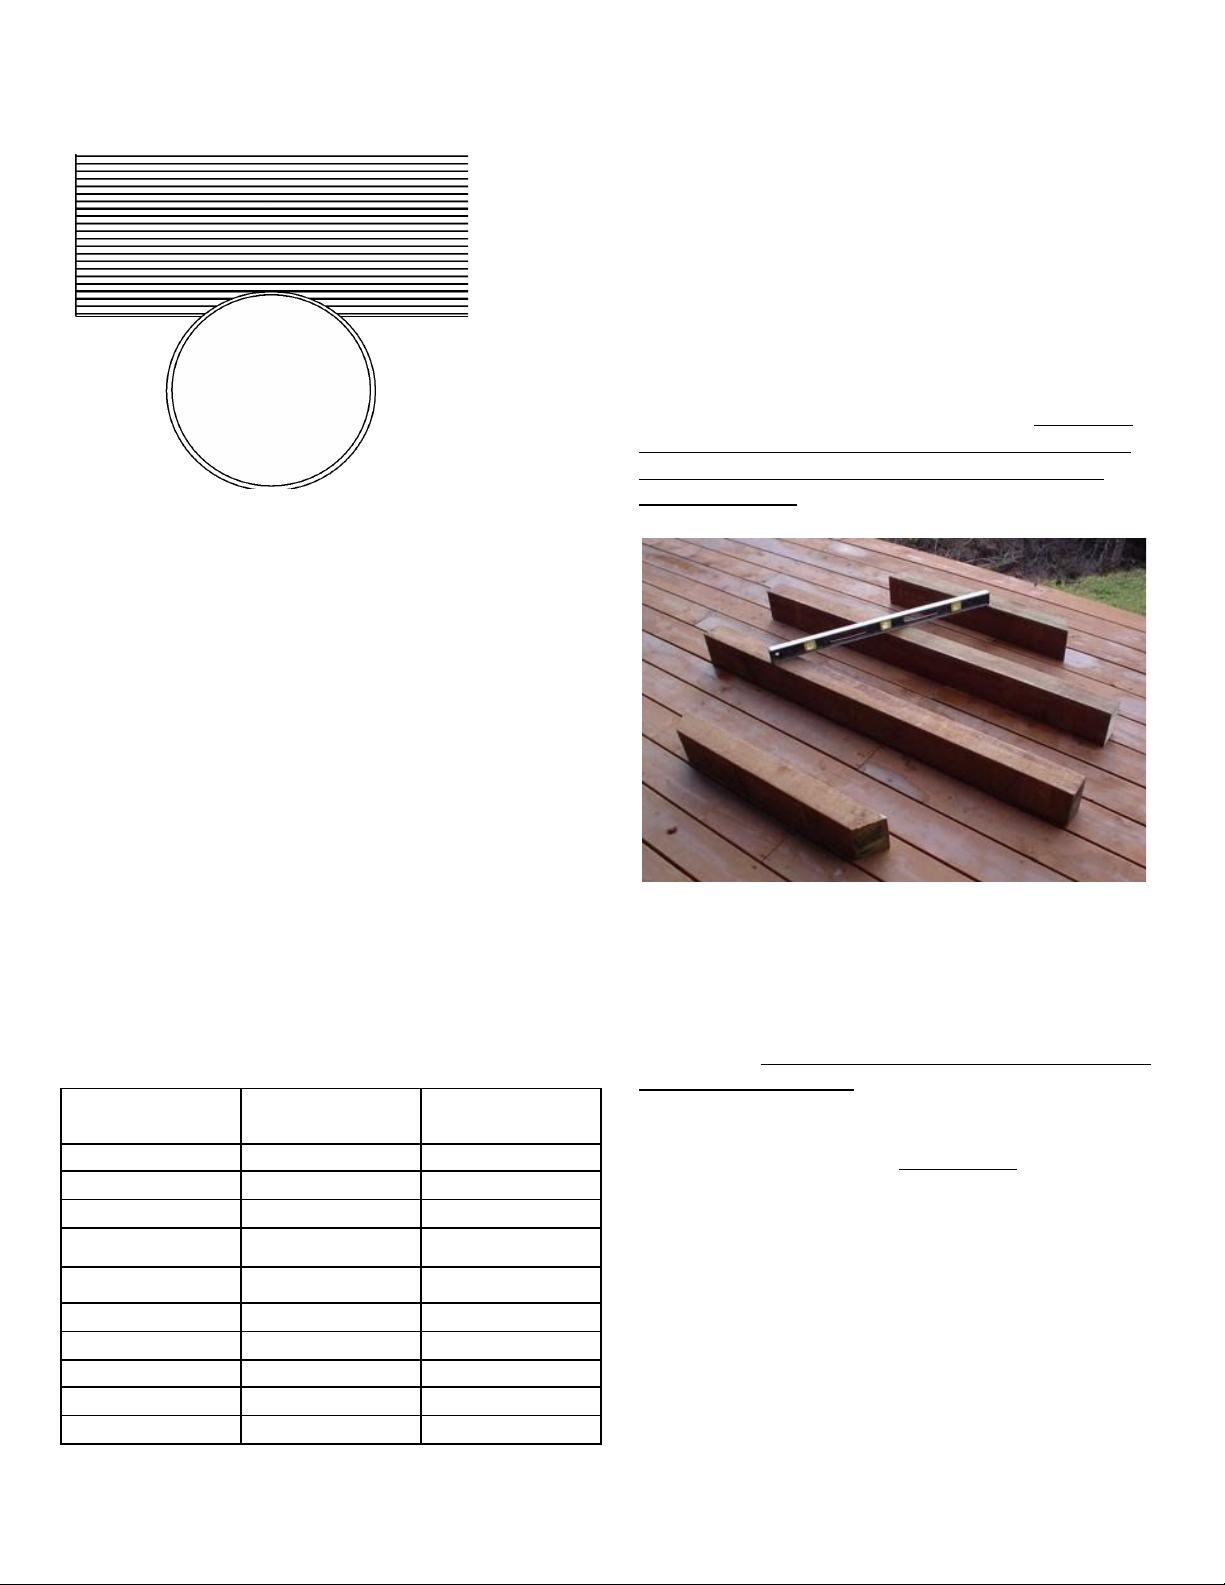
Figure 3.4.3 Tub on perimeter of deck with small cutout.
This design allows easy access to the tub from the deck
while allowing the heater to be away from the deck with
proper ventilation.
Regardless of the type of foundation you choose, make
sure it is level before proceeding.
NOTE: During assembly, you will need about 3 feet of
space all around the tub for the tightening process. If
necessary, assemble the tub a few feet away from its final
position, then lift, slide or lower it into position (with
enough helpers!)
Section 4: Tub Supports - Chine Joists
Time needed: Approximately 40 minutes
Important! Choose a dry day to assemble your tub. The
floor of your tub is supported by chine joists (not
included.) The recommended dimension is 4” x 6”. Refer
to Figure 4.1 for the proper number and length of the
chine joists for your size tub.
Tub size, shape
# of joists
Joist lengths
(inches)
4’ circle
3
30, 43, 30
5’ circle
4
33, 48, 48, 33
6’ circle
4
34, 62, 62, 34
7’ circle
5
48, 72, 78, 72, 48
8’ circle
5
52, 78, 90, 78, 52
4’ ellipse
3
20, 40, 20
5’ ellipse
3
30, 52, 30
6’ ellipse
4
34, 62,62, 34
7’ ellipse
4
42, 72, 72, 42
8’ ellipse
4
48, 80, 80, 48
Figure 4.1 Chine joist specifications - Note: lengths are
approximate
The chine joists must be 4x6 or larger. Pressure treated
lumber is recommended because it will not decay. The
joists will be placed with the 6” side vertical to get the
proper 6” height of the supports.
Prepare the chine joists by cutting them to the proper
length. The tub floor will sit directly on these. This
allows air space under the tub and allows the drain
enough clearance to pass under the staves. The weight
of the tub must be borne on the floor of the tub which is
supported on the timbers. The staves do not bear the
weight of the tub!
Figure 4.2 Level the chine joists
Once again: DO NOT SUPPORT THE WEIGHT OF
THE TUB ON THE BOTTOM OF THE STAVES.
The flat floor of the tub should be directly on the timbers.
Use your level to get the joists level in all directions
(Figure 4.2.) Chine joists must run perpendicular (at right
angle to) the floor seam. See Figure 4.3 for the proper
position. Take care that they do not interfere with the
preferred position of the floor drain. If necessary move
the chine joists slightly. It is not necessary to glue or nail
the chine joists in place. NOTE: Chine joists spacing is
about 12”-16” apart. Adjust as necessary.
3
REV: 2018.01.11

Figure 4.3 Typical placement and orientation of support
timbers, drain, benches and floor seam (benches shaded
grey)
Section 5: Floor and Drain Assembly
Time needed: approximately 20 minutes
Install the floor drain and drain hose at this time in the
recessed hole in one half of the floor. The recess is in the
topside of the floor. Put a medium sized bead of silicone
around the corner of the recessed hole, and a small
amount on the threads of the drain (Figure 5.1.) Slip the
drain in place with the rubber gasket on the top side
(inside the tub) and tighten the large nut underneath hand
tight. Finish with 1/2 turn with a pipe wrench - do not
over tighten! Next, thread the drain pipe (about 18” long)
with elbow attached into the drain fitting.
Make sure this drain pipe is extending beyond the
perimeter of the tub for easy access. Install the rubber
drain plug inside the tub - hand tighten. Tip: you can
attach a garden hose fitting to the end of the drain hose so
that a standard garden hose can be used to direct the
drained water to the desired location. Water from your
tub is safe for watering lawns or other landscape plants.
Do not use on vegetables.
Place the long 1/16 x 3/4 inch stainless steel spline in the
slot on the edge of one half of the floor (this may have
been done in advance by us.) Tap the spline with the
mallet so that it goes in about halfway. Place a thin 1/8”
bead of silicone in the corner on each side of this spline.
Insert the two dowels in the pre-cut dowel holes below
the spline. The sole purpose of the dowels is to keep the
floor panels aligned.
Figure 5.1 Drain assembly and silicone bead being
applied to the recessed hole.
Place the two halves of the floor on the timbers with the
BEVEL SIDE DOWN, nicely sanded side up, so the floor
seam runs perpendicular to (right angle to) the chine
joists.
Check that the drain is placed properly and that the joists
do not interfere with it. At this time consider the
placement of the benches as well - making sure that the
drain will not be underneath a bench where it will be hard
to access. See Figure 4.3 for the relationship between the
drain, benches and floor. Make adjustments now as
needed.
Be sure that the mating edges of the floor are clean and
free of debris. Make sure you have a consistent bead
(1/8” inch diameter) of silicone on each of the mating
edges of the floor seam before assembly.
4
REV: 2018.01.11
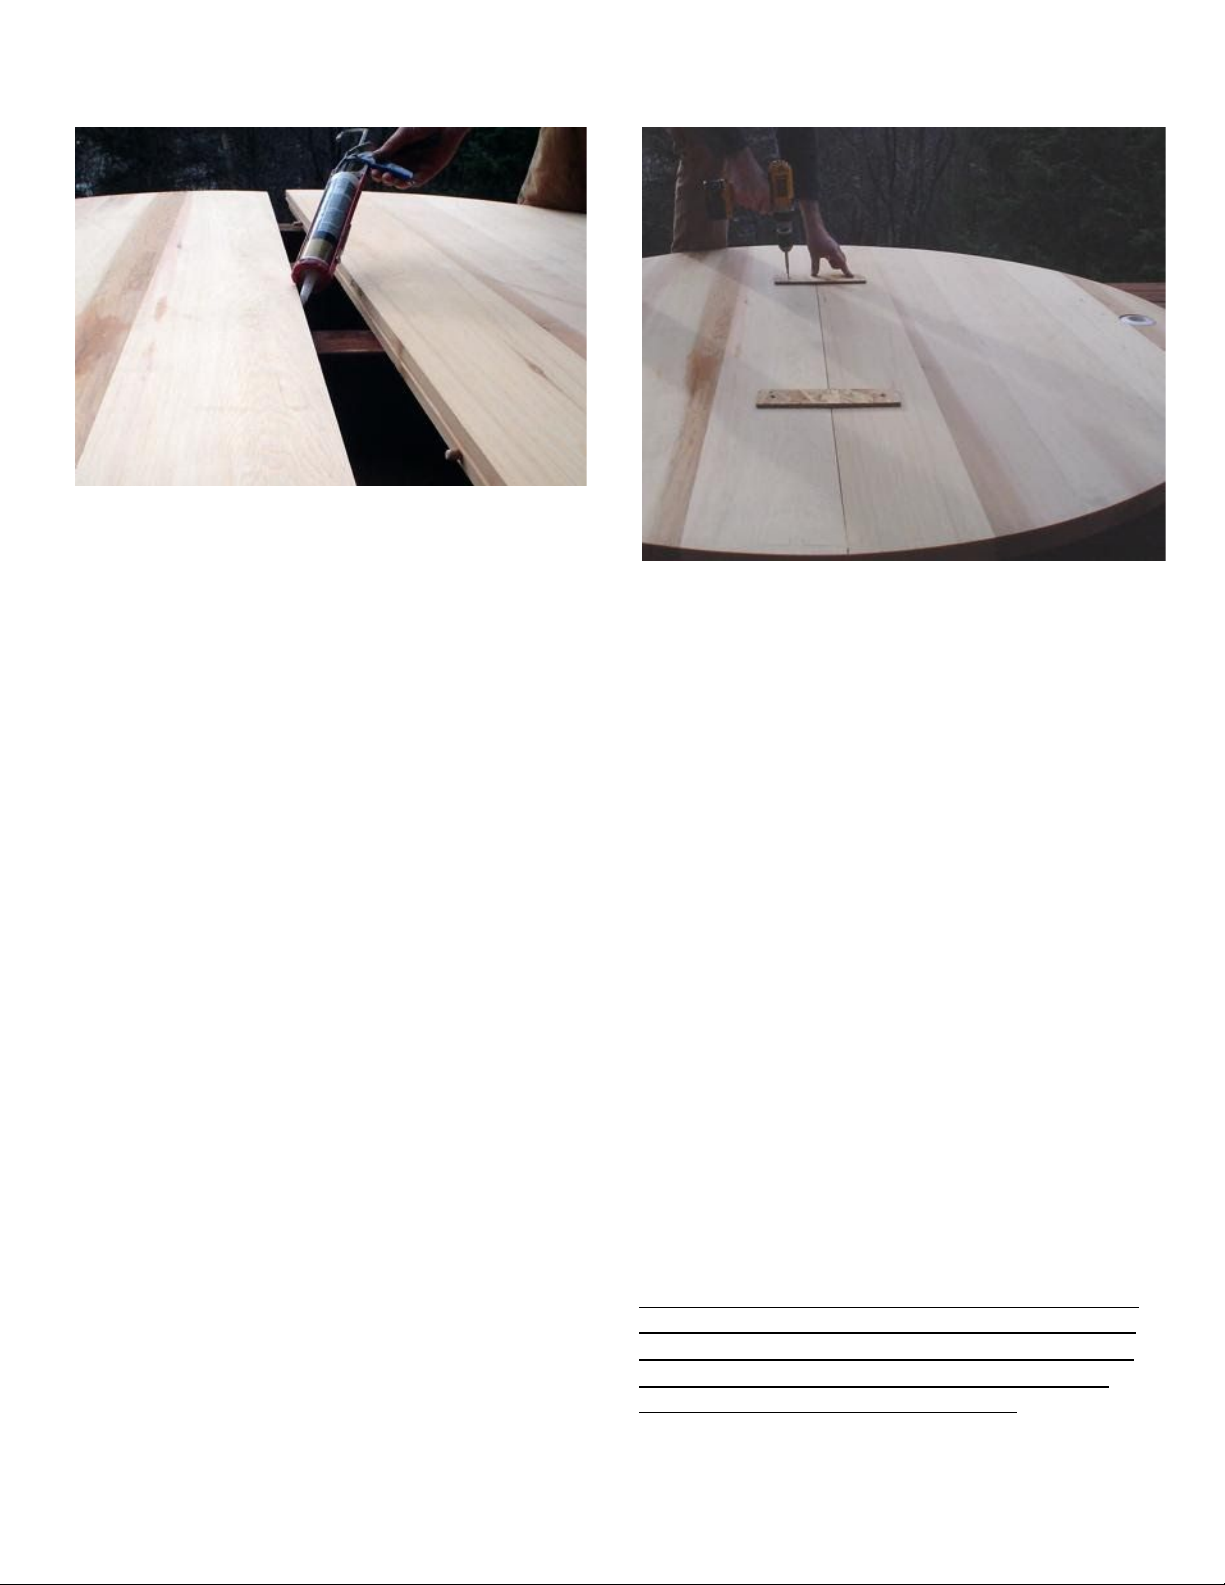
Figure 5.2 Floor seam, dowels and silicone
Align the floor panels and use a mallet to tap them
together so spline and dowels line up and the seam is as
tight as possible. If you have access to a long enough
pipe clamp(s) you can use it to squeeze the panels
together. A small gap between the panels is acceptable
and will swell shut when water is introduced.
Use the two small pieces of scrap plywood provided as
temporary floor braces and lay them across the floor seam
several inches from each side of the tub. Temporarily
screw them directly to the top of floor with the four short
screws provided. (Figure 5.3) This will help keep the
center seam from opening up during assembly. They will
be removed in a later step after the tub is assembled.
Failure to use these braces will cause problems during
assembly. The small holes caused by the screws will
swell closed later.
Figure 5.3 Temporary floor braces
Now check that the floor is level and oriented as you want
it. Also check that the ends of the chine joists are at least
2 inches inside the edge of the tub floor (inside of the
bevel) so that they will not interfere with the placement of
staves. You may want the floor to have a slight tilt
toward the drain (1/4”). This can be accomplished by
shims or gravel UNDERNEATH the chine joists - i.e.
between the ground and the joists. This way the tub floor
is still fully supported. Take your time with this step -
the goal is a tub floor that is stable and level. Once the
floor is level and stable, go on to section 6.
Section 6: Staves
Time needed: approximately 45 minutes
The staves are the vertical wood parts that make up the
sides of the tub. Sort through the set of staves and
separate out the special staves (carvings, heater holes,
etc.) and set them aside. Now is the time to plan where
you want them placed on your tub. For example, place
the suctions and jets where they work best for your
installation. Review the instructions for the type of
heating system for your tub for more details before
continuing.
Your packing list shows the correct number of staves for
your tub. Count the staves now and make sure you have
the correct number. In some cases, we include a SPARE
stave, which is not to be used unless it is necessary to
replace one that is damaged. (Call us first)
5
REV: 2018.01.11
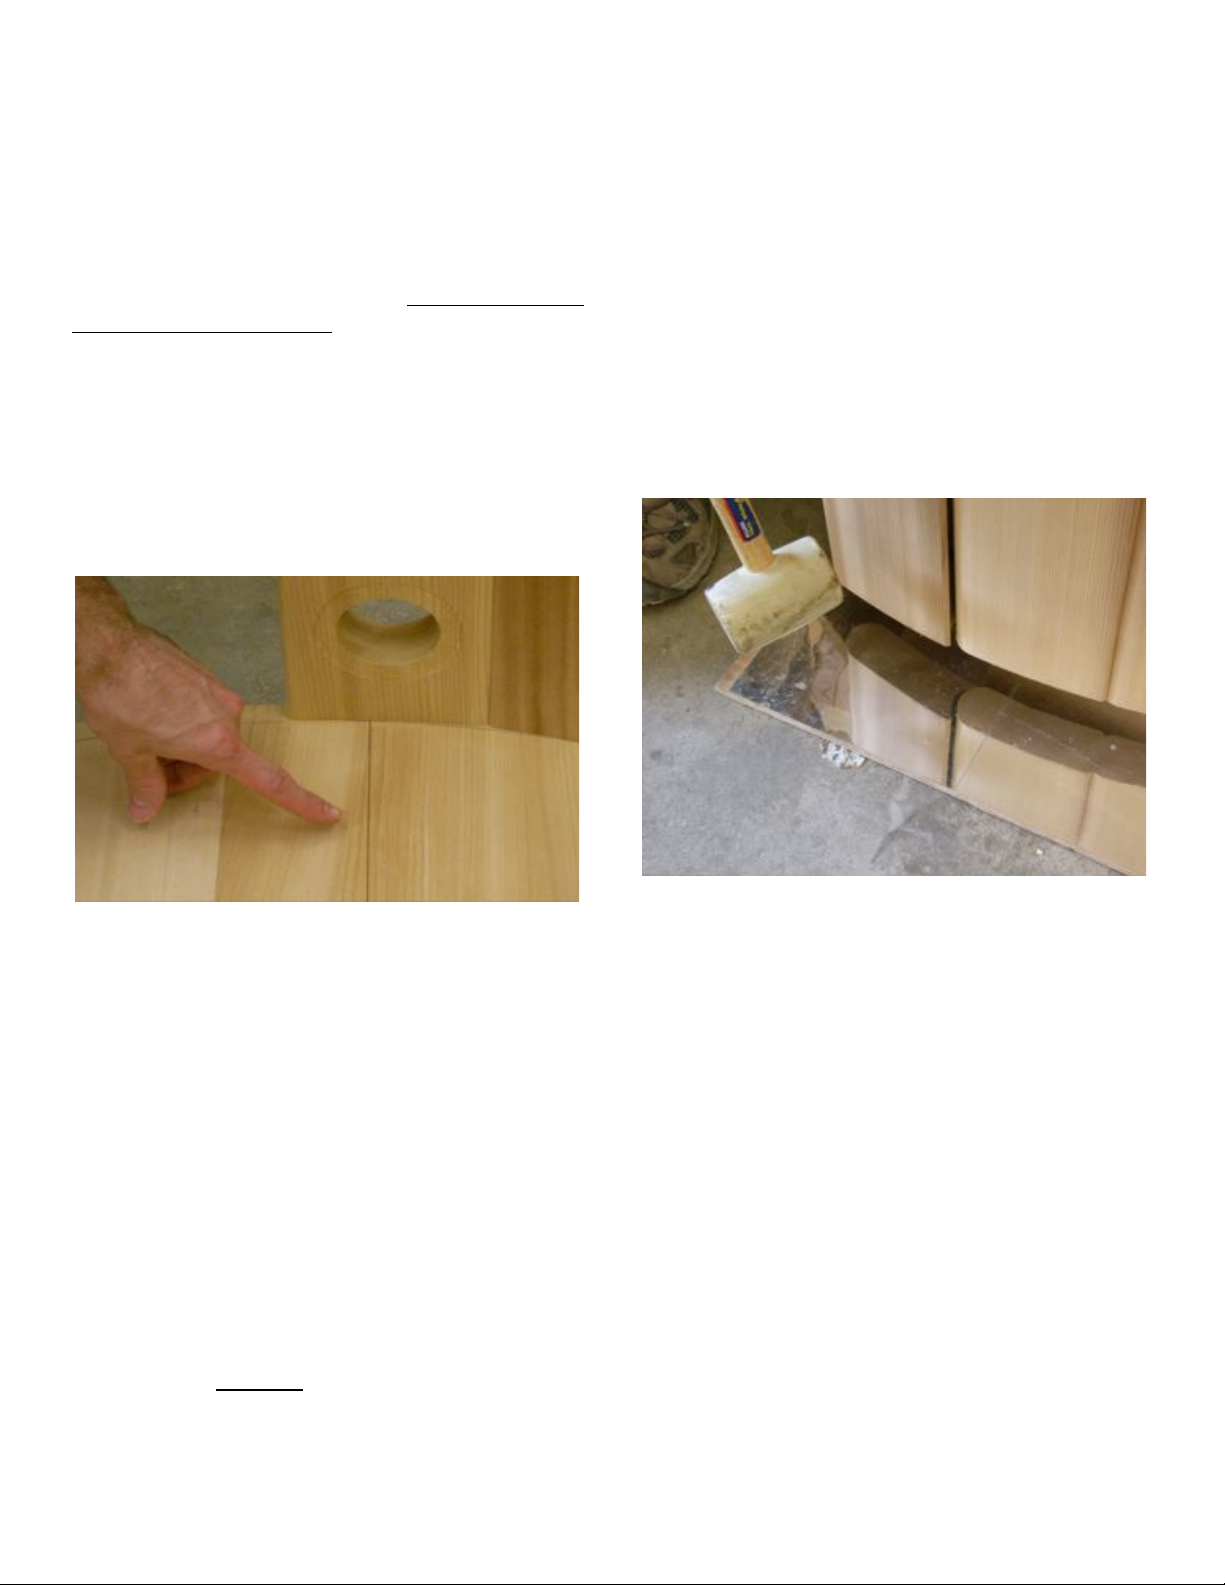
Choose a stave and place it so that it straddles the seam
between floor sections (Figure 6.1). The dado (groove
cut across the inside of the stave) fits over the edge of the
floor. With the rubber mallet, give the stave a light tap
on the outside about 4 inches from the bottom, directly
over the dado. The stave should then stand on its own
from the friction of the tapered joint. The amount of force
to use at this point is minimal
- just enough to get the
stave to bite the floor enough to stand on its own. Don’t
worry - you’ll get to hit them harder soon!
Notice that a pencil line has been scribed about 3/4 inch
from the edge of the top of the tub floor. Use this as a
reference line to judge if the staves are seated evenly as
you progress. At this point the staves will not reach the
reference line. That is normal.
Figure 6.1 First stave straddles floor seam (4’ellipse tub
has one piece floor and no floor seam, all others do).
AS YOU PROCEED - Check the edges of each stave
and remove any dirt or wood particles that could
interfere with a good seal.
VERY IMPORTANT! Use of the small mirror
included in the kit: A reflective mirror approximately 4”
x 10” is used to see what is going on the bottom of the
staves. The mirror may have a protective plastic sheet
over the reflective surface – Peel this layer off. Place the
mirror on the ground directly under the staves you are
adding. Use it to observe how tight and consistent the
gap is between staves. Use the mirror and mallet to adjust
this gap to keep it tight and consistent as you proceed.
Now work clockwise (to your left) and add a second stave
next to the first. DO NOT put silicone between the
staves. Use the mallet to gently tap the new stave first
sideways - mating the ball and socket - until snug with the
first stave inside and out, then tap it inward gently until it
to stays in place on its own. Tap the staves only on the
ball edge, NOT the socket edge which is more fragile and
could be damaged by the mallet. Add a third stave the
same way - always snug them tight sideways first, then
inward. It is not necessary to use much force at this time.
It is important to keep the staves tight sideways - however
a few small gaps (of 1/32 to 1/16”) are okay for now. This
is an important step so take your time. See Figure 6.2.
Work your way around the tub adding staves. The staves
will stay upright by friction from the bottom joint and
from the support given by the ball and socket design.
Figure 6.1.1 Mirror allows you to see the bottom of the
staves. USE IT!
After each set of about five staves is added, go back and
tap the previous staves inward to keep them from bulging
outward. Use the mallet to go back and lightly tap the
previous staves inward as they may loosen as you add
new ones. Use the scribed line to keep track of how
things are aligned. Small gaps at this point are okay (1/32
- 1/16 inch.) Use the mirror to constantly check for
consistency on the joints.
6
REV: 2018.01.11
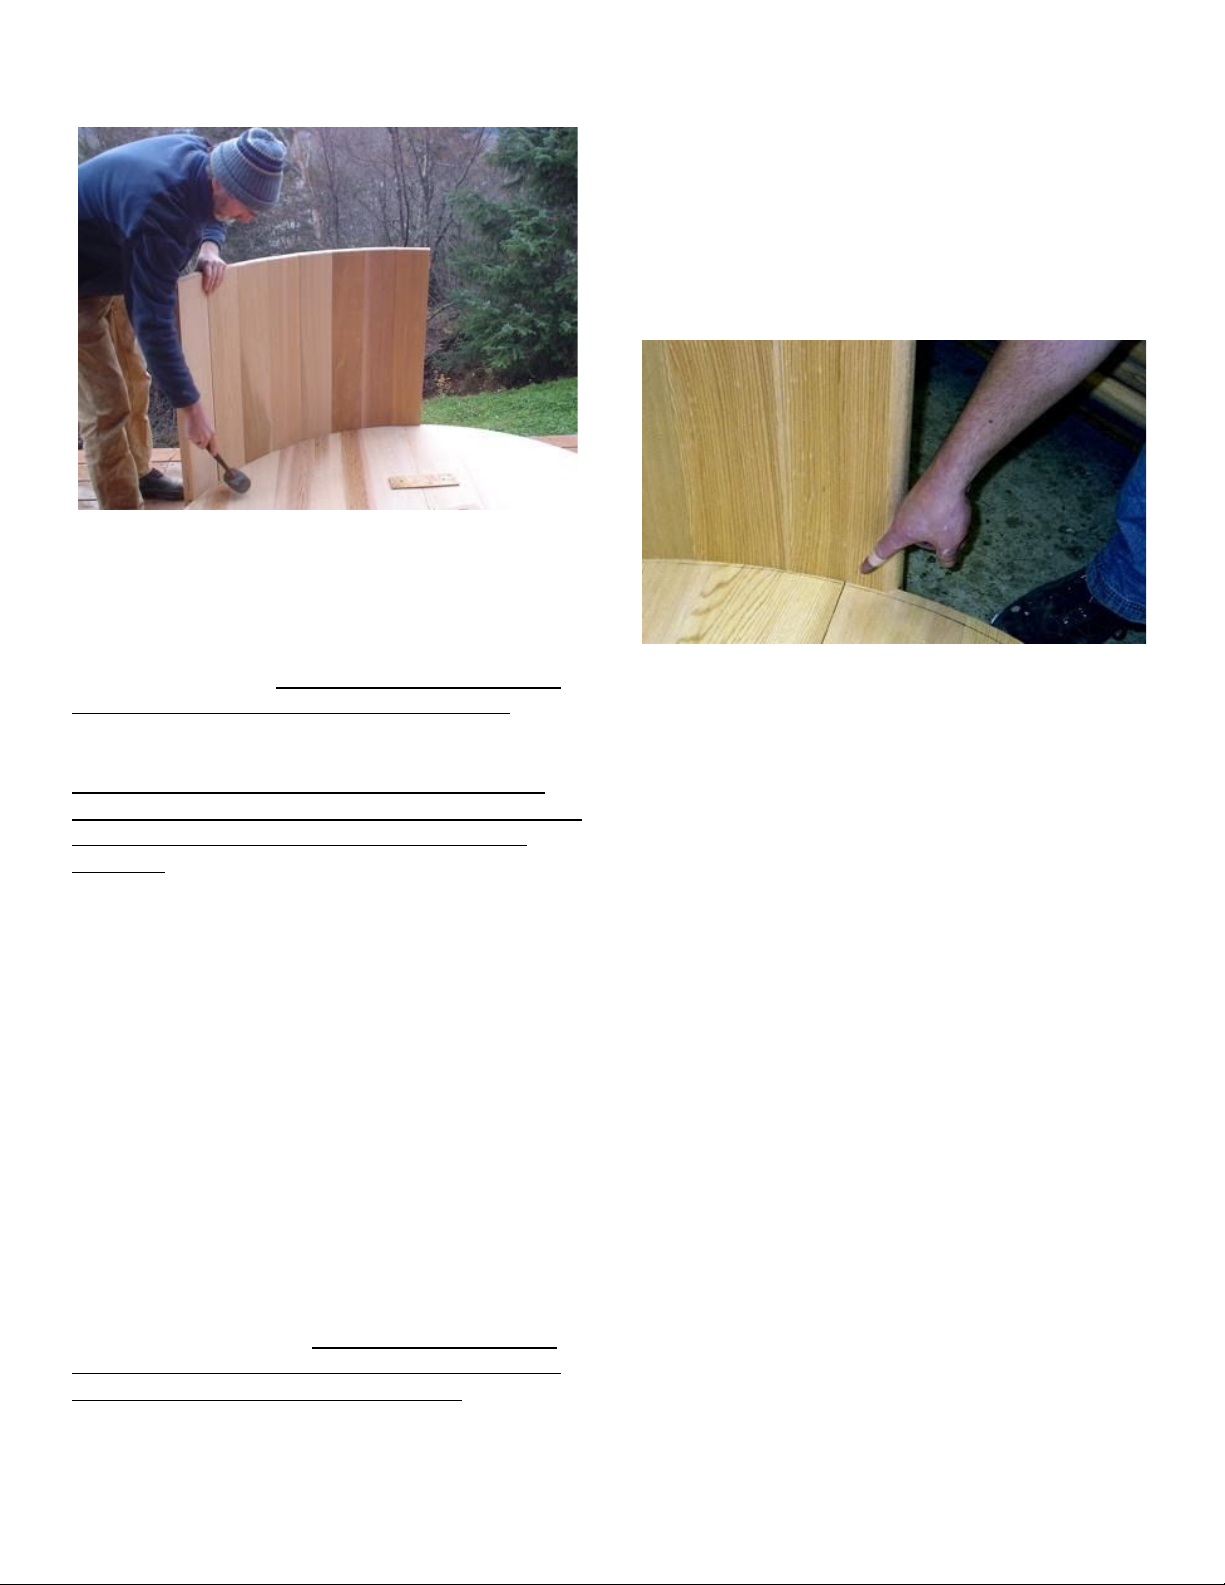
Figure 6.2 Adding staves
As you reach the places where the special staves go
(heating holes for example) add them in.
The other spot that needs special attention is the opposite
end of the floor seam. You must avoid having the floor
seam line up directly with a seam between staves. If it
works out that way, sort through the staves and find a
couple of narrower or wider staves to solve the problem.
If necessary, start over and shift the first stave over to
correct the problem. Arrange so the floor seam and stave
seam are a minimum of 3/4 inch apart. This is very
important! See Figure 6.3.
Keep an eye on the floor seam in the process of installing
staves. It should stay closed. If it spreads a bit - rap the
opposing sides of the floor with your mallet. Make sure
that the plywood brace is in place and doing its job.
Take your time and work your way around the tub adding
staves until you get back near the starting point. Stop
periodically to tap inward any staves that have loosened
in the process of adding others. Check the pencil
reference line to judge how you are doing. Use the mirror
to check for consistent tight joints or minimal gap (less
than 1/16”. The set of staves were custom cut to fit your
particular tub, so the last stave will fit right in if you have
been careful to keep the staves tight.
If the last stave seems a loose fit, first make sure that
you did not leave one out. Your packing list shows the
correct number of staves for your tub. Count the staves
and make sure you have the correct number. It is okay
for the last stave to be a loose fit, HOWEVER, will need
to distribute that excess space (gap) around the tub by
adjusting the position of the staves. Use the mirror and
mallet to work the staves sideways so that the excess is
distributed among several small gaps of 1/32 to 1/16th
inch or less. In other words, we want several tiny gaps
instead of one or two large ones. These will be taken care
of when the tub is tightened.
Figure 6.3 Make sure that the floor seam is straddled by stave
If the last stave seems too big, this is also a normal
condition that can occur if the staves have been driven
inward prematurely or there is more accumulated gap
between staves than we want.
Step 1: Close up any noticeable gaps between staves to
make more room. Do this by using the mallet on the
inside and your hand on the outside to tap the staves
sideways. Driving them inward only makes the circle
smaller and compounds the problem. Use your mirror to
find larger gaps and adjust as needed. It may seem
counter-intuitive, but loosen the staves by lightly tapping
out from inside first, then snug them together sideways to
close excess gap. Check all around the tub with the
mirror and fix any problem areas. Now see if your last
stave fits in. Repeat if necessary. Your tub kit was
custom fit in our shop checked for proper fit before
shipment.
If this does not solve the problem, do not force things,
instead stop and give us a call for assistance 888 810
7717.
Section 7: Compression Straps
Time needed: approximately 15 minutes
Once all the staves are in place you are ready for the
bottom compression strap. Locate the stainless steel
7
REV: 2018.01.11

compression straps. They supply the external support
needed to tighten and support the tub. Refer to table
below for the proper number of straps for your tub.
Tub Shape,
Size
Tub Heights
# of Straps
4’ Circle
28 36 42
2, 2, 3
5’ Circle
28 36 42
2, 3, 3
6’ Circle
28 36 42
3, 3, 4
7’ Circle
28 36 42
3, 4, 5
8’ Circle
28 36 42
4, 5, 5
4’ Ellipse
28 36 42
2, 2, 3
5’ Ellipse
28 36 42
2, 3, 3
6’ Ellipse
28 36 42
3, 3, 4
7’ Ellipse
28 36 42
3, 4, 4
8’ Ellipse
28 36 42
4, 5, 5
Locate the large 8” x 5/8” bolts for the clamps. Remove
the nuts. We strongly recommend putting a little grease,
Vaseline, or never-seeze on the nut threads so they will
not corrode in the future. With your helper, fit the first
strap around the tub at 4.75 inches measured from the
bottom of the staves to the top of the compression strap.
This measurement is crucial so that pressure is applied
directly over the floor.
The fit may be tight, but you will
be able to pull the ends close enough to slip the bolt in
place and get the nut started. See Figure 7.1. Use your
15/16” socket wrench to take up a little slack so the strap
will stay in place - only a few turns.
Figure 7.1 first compression strap loosely in place.
Now install the other straps and position as shown in
Figure 7.2. The position of each bolt clamp should be
staggered. Also, the bolt clamp should straddle a seam
between staves.
Alternative strap technique: Loosen bolt almost all the
way, but leave attached – maximizing the diameter. You
should be able to drop the strap over the top of the tub
and into position.
The bottom strap should always be at 4 3/4 inches from
the bottom, measured from the bottom of the stave to the
top of the band. Use your wrench to slightly tighten each
band enough so they hold their position. Go around the
tub with a tape measure and check the height of each
band and make sure they look level, moving them up or
down as needed.
Figure 7.2 Proper placements of straps and bolts. Note
how bolts straddle a seam between staves and are
staggered.
Tub Height
# of
Straps
Measurements from
bottom (inches)
28
2
4.75, 24
28
3
4.75, 14, 24
28
4
4.75, 11, 17.5, 24
36
2
4.75, 30
36
3
4.75, 17.75, 30
36
4
4.75, 13, 21.5, 30
36
5
4.75, 11, 17, 23.5, 30
42
3
4.75, 20, 36
42
4
4.75, 15, 25, 36
42
5
4.75, 12, 20, 28, 36
Heights of compression straps measured from bottom of
stave to top of strap.
8
REV: 2018.01.11

Section 8: Tightening
Time needed: approximately 30 minutes
This step is best done with two people, however it can be
done with one.
VERY VERY Important! Look under the tub rim (with
mirror) and confirm that any gaps between staves are
evenly distributed around the circumference of the tub.
Gaps larger that 1/16 inch should be addressed. The goal
at this point is to have any gaps between the bottom of
staves be no more than 1/16” AND distributed evenly
around the tub circumference. NOT all in one section. If
necessary, use your mallet to strike the staves from the
INSIDE OUT using a glancing blow to adjust the gaps
around the perimeter of the tub to achieve this even
distribution.
Now you can tighten each strap a little at a time - starting
with the bottom one. Tighten the staves incrementally in
stages - bottom first, then upper(s); this will be repeated
several times. One person will be tightening the bolt
clamp as the other person uses the rubber mallet and starts
on the side opposite the bolts, rapping each stave with
moderate force just above the lower strap where the
staves and floor join, driving them inward. Constantly
monitor with the mirror to confirm that the joints are
getting tight.
Always start opposite the bolts and do one half of the tub,
then the other. Have your helper take up the slack in the
bands by tightening the bolts as you do this. The staves
should be driven on slowly. The object is to set the staves
evenly around the tub. Work from the opposite side
toward the bolts in one direction, then from the opposite
side toward the bolts in the other direction. In this way
the tub is tightened evenly.
Work around the tub, hitting each stave with a firm rap
right on the bottom strap. You will see each stave seat a
little tighter. After one round of tightening the bottom
strap, stop and take up slack in the upper strap(s) so they
stay in position. Note: do not over tighten the upper
straps; they do not require as much tension as the
bottom one.
Figure 8.1 Hitting staves directly on the strap.
Double check the vertical placement of the straps now
before things get too tight. It is easier to move the straps
now. Use a tape measure to adjust the straps so they are
placed as shown in Figure 7-2 and Table. Step back and
make sure that the straps look level. Adjust as needed.
Now do another round of rapping with the mallet while
tightening the bottom bolt. Use the mirror continuously
to monitor any gaps as you go. This time hitting each
stave a little harder - a good full swing on each one as
your helper tightens the bolts. Alternate tightening each
strap a little bit, so that you can keep the tension on the
upper straps less than the bottom one.
Figure 8.2 Using pliers to resist as you tighten. Stop
when you see noticeable deflection of the aluminum
blocks. This indicates bottom strap is tight enough.
Upper straps should not be as tight.
Turn your attention to the tops of the staves. They should
be lined up nicely giving a smooth interior. If any need
alignment, use the mallet to hit them inward or outward to
bring them into adjustment. Do another revolution of
9
REV: 2018.01.11

hitting each stave a little harder now as the bottom strap is
tightened. Don’t be afraid to hit pretty hard. Continue
tightening with wrench. At this point using the mirror,
any gaps should be virtually gone. If not, stop, back up a
few steps – loosen the straps a bit and distribute the gap
as described earlier.
Now do a final tightening - but don’t overdo it. The
bottom strap is pressing against the floor on the inside, so
it will reach a point where you can tell it is tight - don’t
force it beyond that. Use vise grip pliers to clamp onto
the aluminum block that the bolt passes through to keep it
from twisting as you do the final tightening. Stop when
you see noticeable deflection of the aluminum blocks.
This indicates bottom strap is tight enough.
The upper
straps don’t need to be as tight as the bottom. If it feels
tight, it is. Do a final adjustment on the top of the staves
at this time. Remember - the wood will swell to tighten
all joints further once water is introduced.
TIP: If you have a torque wrench – the bottom strap
should be tightened to about 40 lbs. of torque (similar to
a lug nut on a vehicle), the upper ones to a lesser amount
- about 25 lbs. of torque.
Next climb inside the tub and remove the temporary floor
braces. With a tube of clear silicone caulk, place a very
small (1/4”) neat bead all around the inside corner where
the floor and the staves meet. Use your finger or a
rounded piece of wood like a tongue depressor to smooth
the bead. Also put a very small bead on the top of the
floor seam. The purpose of the silicone is to slow the
initial seepage from the dry tub - allowing the wood to
absorb more water and swell more quickly. Your tub will
hold water as a result of the expansion of the wood,
causing the joints to compress.
Your tub is now ready for installation of the heating
system and any other accessories.
Section 9: Accessories
Install any accessories in this order:
1. Heating system - see separate instructions for
your type of heater
2. Benches - see below
3. Tub Shelf
4. Access Steps - see below
5. Cover - see below
Benches:
The bench system is simple. These instructions are
specifically for circular tubs. The elliptical tub benches
fit at opposite ends, and the larger ellipse tubs (6 or 7
foot) have one or two side benches respectively. Each
bench is one section of the circle. See the table below for
the arrangement of benches for your size tub.
Tub Diameter
(feet)
Number of
benches
Bench
arrangement
4 round
1
One end
5 round
3
Full circle
6 round
3
Full circle
7 round
4
Full circle
8 round
4
Full circle
4 ellipse
1
One end
5 ellipse
2
Opposite ends
6 ellipse
3
Opposite ends,
one side
7 ellipse
4
Opposite ends,
two sides
Figure 9.2 Aligning and attaching bench blocks – DO
NOT drive a screw into a seam between staves! This will
cause a leak.
A bench is typically held in place with four blocks, which
act as legs, which are screwed directly to the inside of the
staves with the included 3” stainless screws. The bench is
then screwed down to the top of those four blocks with 3”
deck screws. Place the blocks so you can screw down
through the bench frame between the slats and into the
top of the blocks. Place the benches so the drain is
accessible. See Figure 4.3 for typical orientation of
10
REV: 2018.01.11
Other manuals for Cedar
1
Table of contents
Popular Bathtub manuals by other brands


Lyons
Lyons Elite ETLxx663219 Series manual

Woodbridge
Woodbridge BJ500 Installation and care guide

Whirlpool
Whirlpool Ariel ARL-702 installation manual

TEIKO
TEIKO EXCELLENT DUO user manual

American Standard
American Standard Colony 5-1/2' x 32" Specification sheet

American Standard
American Standard 3052OD.X0X Installation instructions and owner's manual


