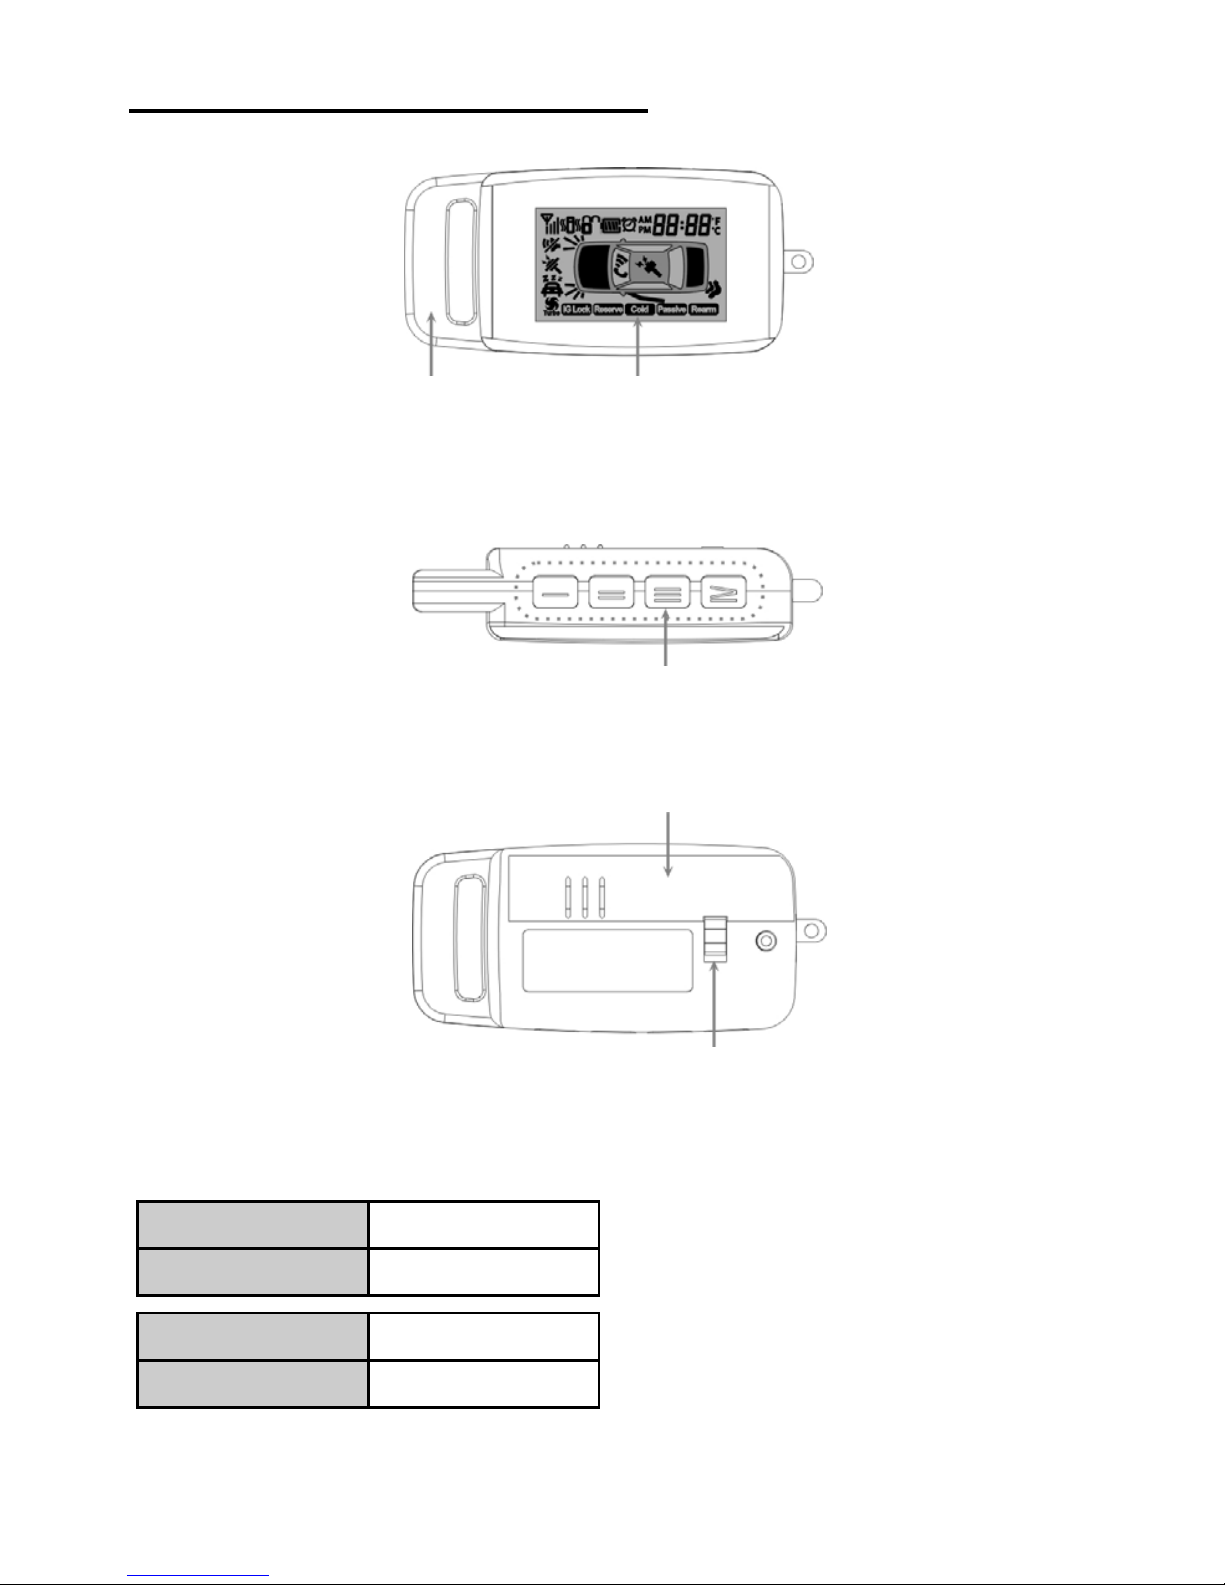
Zenesis ZN-502 A User manual

ZN-502 A/S/AS
USER MANUAL

Thank you for purchasing our product. Our systems have all been
designed and tested to be compatible with the earliest to latest
vehicles available throughout the world. Our primary goal was to
provide a reliable and stable product. Our secondary goal was to
ensure that our systems are easy to install. Our final goal was to
provide features that would benefit the user and installer. We are
confident that our products will meet and exceed your expectations.
We are constantly working to research, design, and build next
generation products. We would not expect anything less since we
use our products in our own vehicles.
REMOTE CONTROL (2-way)
FCC ID: WJ3ALC-502
ANTENNA MODULE
FCC ID: WJ3MB-SFA
2

CAUTION!
PLEASE READ CAREFULLY
The user and installer should completely read the User Manual, Installation
Manual, and the vehicle’s manual completely before installing and operat-
ing this system. Not reading the manuals completely may result in injury or
damage to the user(s), installer(s), and/or the vehicle. Installation and use
of this system is acknowledgment that the user and installer have fully read
the manuals and indemnify Zenesis Electronics Corporation from any
injuries or damages resulting from wrong use and/or installation of our
system. Please take the following minimum precautions.
1. When using remote start, place the gear in Park(P) (automatic
transmission) or Neutral (manual transmission) and set the
parking brake (emergency brake).
2. The transmission (Tx) and reception (Rx) distance will vary from
interference from other radio signals.
3. If any defects are discovered, do not open or attempt to repair the
system. Ask the installer for assistance.
4. Zenesis Electronics Corporation will not be responsible for any
theft and/or damages to your vehicle.
5. The user of this system will be responsible for any injuries and/or
damages resulting from misuse.
6. Zenesis Electronics Corporation does not condone the installation
of ANY remote starter equipped product into a convertible or
open-concept type vehicle.
3

CONTENTS
1. Introduction
1.1 System Contents 6
1.2 Remote Control Button Layout 7
1.3 LCD Display Introduction 8
1.4 Remote Control Button Introduction 9
2. Primary Features
2.1 Door Lock (Arm) 11
2.2 Door Unlock (Disarm) 11
2.3 Arm / Disarm Status 11
2.4 Car Find & Status 12
2.5 LCD Screen Status 12
2.6 Panic 12
2.7 Remote Start 13
2.8 Trunk Release 14
2.9 Valet Mode 14
3. Secondary Features
3.1 Remote Control Beep Mute 16
3.2 Siren 16
3.3 Passive Lock (Arm) 17
3.4 Safety Relock (Rearm) 17
3.5 Ignition Lock 18
3.6 Cold Start Timer 18
3.7 Turbo Timer 19
3.8 Option 1 Input 19
3.9 Remote Control Registration 20
3.10 Remote Start Registration 20
3.11 User Programmable Options 21
3.12 Time, Time Alarm, Timer Remote Start Reservation Set 22
3.13 Aux 1 Output 23
3.14 Aux 2 Output 23
3.15 Shock Sensor Option 23
3.16 Shock Sensor Sensitivity Adjustment 24
3.17 Z-Pass Touch 24
4. Factory Reset 25
5.Others 26
6.WarrantyCard 27
4

1. INTRODUCTION
1.1 System Contents
1.2 Remote Control Button Layout
1.3 LCD Display Introduction
1.4 Remote Control Button Introduction
5

1.1 System Contents
Main Control Module Remote Control Antenna
Wiring Harness Z-PASS TOUCH
Shock Sensor Manuals Siren
6

1.2 Remote Control Button Layout
Front View
Antenna OLCD / UCLCD
Buttons
Battery 1.5 V AAA
Back View
Lock / Unlock
2-way Remote Control Specifications
Radiation ± 20 ppm / year
Dimensions 34 x 67 x 18 mm
Temperature - 40°C ~ +80°C
Weight 26.7g (without battery)
7

1.3 LCD Display Layout
8
CAUTION
NEVER use the system except for its intended use.
This is an electronic system with complex circuitry.
Avoid dropping the components or cause any other
physical damage as that will void the warranty.

1.4 Remote Control Button Introduction
LEGEND:
“ - “ means to hold for 2 seconds - press and hold button(s)
until 1st beep is heard from the remote control.
“ ~ “ means to hold for 4 seconds - press and hold button(s)
until 2nd beep are heard from the remote control.
9
Button(s) Duration* Description
Ⅰ0.5 sec Arm / Door Lock
Ⅱ0.5 sec Disarm / Door Unlock
Ⅲ× 3 Times 0.5 sec Remote Control Hold ON/OFF
Ⅳ0.5 sec Vehicle Status / Car Finder
Ⅰ- 2+ sec Panic
Ⅲ- 2+ sec Remote Start
Ⅳ- 2 sec Trunk Release
Ⅱ~ 4 sec Time / Alarm / Remote Start Timer Set
Ⅰ+ Ⅳ0.5 sec Remote Control Beep Mute ON/OFF
Ⅱ+ Ⅲ0.5 sec Siren Mute ON/OFF
Ⅰ+ Ⅱ0.5 sec Aux 1
Ⅲ+ Ⅳ0.5 sec Aux 2

2. PRIMARY FEATURES
2.1 Arm (Door Lock)
2.2 Disarm (Door Unlock)
2.3 Arm / Disarm Status
2.4 Car Find & Status
2.5 LCD Screen Status
2.6 Panic
2.7 Remote Start
2.8 Trunk Release
2.9 Valet Mode
10

11
2.1 Door Lock (Arm) ButtonⅠ0.5 sec
Successful Arm (Door Lock)
Failed Arm (Door Lock)
If a door, trunk and/or hood is open while arming, 4 siren chirps and 4 parking light
flashes will occur immediately.
Please ensure any doors, trunk and/or hood that is open, is closed. Rearm the
system.
2.2 Door Unlock (Disarm) Button Ⅱ0.5 sec
Successful Disarm (Door Unlock)
2.3 Arm / Disarm Status Ⅱ0.5 sec
After the alarm is triggered, pressing Button II will stop the siren from sounding.
The system is still armed at this point. Pressing Button II again will disarm the
system. The LED’s on the Z-Pass module (while Discreet Mode is OFF) and the
LED on the Antenna Module will indicate the status of the system. If a door is
opened and closed, the Triggered Alarm status on the Z-Pass will be cleared.
The siren duration can be programmed through the User Programmable
Options
Remote Control & flash. 1 beep will occur.
Vehicle 1 parking light flash & 1 siren chirp
Remote Control & will flash. 2 beeps will
occur.
Vehicle 2 parking light flashes & 2 siren chirps.
11
Status Z-Pass LED’s
Armed Mode Normal Flash
Disarmed Mode No Flash
Triggered Alarm Fast Flash

2.4 Vehicle Status / Car Finder Button Ⅳ0.5 sec
Open Door Open Hood Open Trunk
Remote Start On Shock Sensor Trigger Option 1 Input Trigger
2.5 Remote Control Hold ButtonⅢ0.5 sec x 3 Times
Pressing Button Ⅲ3 times for 0.5 second each will put the remote control buttons
into “Hold” mode. Any button presses will be ignored. To come out of “Hold” mode,
press Button III 3 times for 0.5 second each again.
Hold ON Hold OFF
2.6 Panic ButtonⅠ2+ sec
If there is a potential threat, you can alert those around you by using this feature.
The siren will sound for 2 minutes and the parking lights will flash. Press either
Button Ⅰor Button Ⅱto turn off panic mode.
Remote Control
6 blinks & the vehicle’s inner
temperature will be displayed. The
following status indications will be
checked and displayed. If the status is
normal, only the temperature will be
displayed. 4 beeps will occur.
Vehicle 6 parking light flashes & 6 siren chirps
12

2.7 Remote Start ButtonⅢ2+ sec
Successful Remote Start
Failed Remote Start
If Button Ⅲis pressed for 2+ seconds while remote start is on, remote start will turn
off. The default remote start engine running time is 15 minutes. The time can be
changed through the User Programmable Options.
CAUTION: Do not use the remote start feature if the vehicle is in an enclosed area.
Do not use the remote start feature where laws prevent its usage. Do
not turn the key to the Start position or else damage may be done to the
starter motor. Ensure that the parking brake (emergency brake) is
always engaged. Do not use the remote start feature with convertible
and/or open concept cars such as utility vehicles.
13
Remote Control
& will blink until remote start is
turned off. 1 beep will occur if the main
control module communicates with the
remote control. 5 beeps will occur after
remote start is successful.
Vehicle
1 parking light flash & 1 siren chirp if the
main control module communicates with the
remote control. 5 parking light flashes & 5
siren chirps after remote start is successful.
Reason for Failure Vehicle Remote
Control
Key at ON Position 1 parking light flash & 1 siren
chirp 3 beeps
Open Door 3 parking light flashes & 3
siren chirps 3 beeps
Open Hood and/or
Trunk
4 parking light flashes & 4
siren chirps 3 beeps
Failed Remote Start
Reservation for Manual
Transmission Vehicles
7 parking light flashes & 7
siren chirps 3 beeps

2.8 Trunk Release Button Ⅳ2 sec
Trunk release will unlock the door(s) and disarm the system.
NOTE: On manual transmission vehicles, trunk release will turn off
remote start.
2.9 Valet Mode ButtonsⅠ+ Ⅲ4 sec
Valet Mode ON
Valet mode OFF
Valet mode without remote control (Emergency shut off)
1. Insert the key into the key cylinder and turn to the ON position.
2. Within 3 seconds, press the foot brake 6 times.
3. On the 6th press, hold down the foot brake until 1 parking light flash and 1
siren chirp occur.
NOTE: This feature can be used to turn off the alarm with the key if the system
has been triggered.
NOTE: Valet mode can only be turned off via the remote control.
Remote Control & & will blink. 2
beeps will occur.
Vehicle 2 x parking light flashes & 2 siren chirps
Remote Control & 1 will blink. will stay
ON.
Vehicle 1 parking light flash & 1 siren chirp
Remote Control & will blink. will turn
OFF.
Vehicle 2 parking light flashes & 2 siren chirps
14

3.SECONDARY FEATURES
3.1 Remote Control Beep Mute
3.2 Siren Mute
3.3 Passive Lock (Arm)
3.4 Safety Relock (Rearm)
3.5 Ignition Lock
3.6 Cold Start Timer
3.7 Turbo Timer
3.8 Option 1 Input
3.9 Remote Control Registration
3.10 Remote Start Reservation
3.11 User Programmable Options
3.12 Time, Time Alarm, Timer Remote Start Reservation Set
3.13 Aux 1 Output
3.14 Aux 2 Output
3.15 Shock Sensor Option
3.16 Shock Sensor Sensitivity Adjustment
3.17 Z-Pass Touch
15

3.1 Remote Control Beep Mute ButtonsⅠ+ Ⅳ0.5 sec
Remote Control Beep Mute ON - Vibrate ON
When Remote Control Mute is ON, the remote control will use vibration alerts.
Remote control mute OFF - Beeper ON
3.2 Siren Mute ButtonsⅡ+ Ⅲ0.5 sec
Siren Mute ON - Siren OFF
No siren chirps will occur unless for alarm alerts (door trigger, hood trigger, trunk
trigger, shock trigger, and/or Option 1 trigger) and panic mode.
Siren Mute OFF - Siren ON
Remote Control & will blink. will
stay ON.
Vehicle 1 parking light flash & 1 siren chirp
Remote Control & will blink . will stay
ON.
Vehicle 1 parking light flash & 1 siren chirp
Remote Control & will blink. will turn
OFF.
Vehicle 2 parking light flashes & 2 siren chirps
16

3.3 Passive Arm (Lock) ButtonsⅠ+Ⅱ4 sec + Brake Pedal
To activate or deactivate this function, the Brake Pedal must be held down at the
same time while Buttons I + II are pressed for 4 seconds. Once a door is opened
and closed and the system is not armed via the remote control, the system will
automatically arm and lock the doors. The system will arm and lock the doors af-
ter
25 seconds of the last door closing. Every 5 seconds, 1 parking light flash and 1
siren chirp will occur. On the 5th occurrence, the system will arm and the doors
will
lock.
Passive Arm (Lock) ON
Passive Arm (Lock) OFF
3.4 Safety Rearm (Relock) ButtonsⅡ+ Ⅲ4 sec + Brake Pedal
To activate or deactivate this function, the Brake Pedal must be held down at the
same time while Buttons II + III are pressed for 4 seconds. If the system is in the
armed state and the system is disarmed but a door is not opened, the system will
Safety Rearm automatically within 30 seconds.
Safety Rearm (Relock) ON
Safety Rearm (Relock) OFF
Remote Control & will blink. will
stay ON.
Vehicle 1 parking light flash & 1 siren chirp
Remote Control & will blink. will
turn OFF.
Vehicle 2 parking light flashes & 2 siren chirps
Remote Control & will blink. will
stay ON.
Vehicle 1 parking light flash & 1 siren chirp
Remote Control & will blink. will
turn OFF.
Vehicle 2 parking light flashes & 2 siren chirps
17

3.5 Ignition Lock ButtonsⅠ+ Ⅳ4 sec
To activate or deactivate this function, the Brake Pedal must be held down at the
same time while Buttons I + IV are pressed for 4 seconds. Ignition lock will lock the
doors when the foot brake is pressed after the key is put into key cylinder and turned
to the ON position. If a door is opened while the key is in the ON position, the doors
will lock again once the door is closed and the foot brake is pressed again.
Ignition Lock ON
Ignition Lock OFF
3.6 Cold Start Timer ButtonsⅡ+ Ⅳ4 sec
To activate or deactivate this function, the Brake Pedal must be held down at the
same time while Buttons II+ IV are pressed for 4 seconds. Once Cold Start Timer I
s turned ON, the vehicle will remote start automatically every 1, 2, or 3 hour(s) as
specified by the User Programmable Options. If the vehicle is driven or remote start
is turned ON, the timer will automatically restart once the engine is turned OFF.
The timer can be set through the User Programmable Options.
Cold start timer ON
Cold start timer OFF
Remote Control & will blink. will
stay ON.
Vehicle 1 parking light flash & 1 siren chirp
Remote
Control & will blink. will turn
OFF.
Vehicle 2 parking light flashes & 2 siren chirps
Remote Control & will blink. will stay ON.
Vehicle 1 parking light flash & 1 siren chirp
Remote Control & will blink. will turn
OFF.
Vehicle 2 parking light flashes & 2 siren chirps
18

3.7 Turbo Timer ButtonsⅢ+ Ⅳ4 sec
To activate or deactivate this function, the Brake Pedal must be held down at the
same time while Buttons III + IV are pressed for 4 seconds. This feature will allow
turbocharged or supercharged vehicles to cool down by idling the engine for a
specified amount of time even though the key is turn to the OFF position. The
engine will continue to idle.
Turbo Timer ON
Turbo Timer OFF
The duration for idling can be specified through the User Programmable Options.
CAUTION: Please ensure that the vehicle is in Park (automatic transmission) or
Neutral (manual transmission). Also, ensure that the parking brake
(emergency brake) is engaged. Do not idle the vehicle in an enclosed
area. Do not idle the vehicle if any laws prohibit this action. Do not idle
the vehicle if it is a convertible or open concept type of vehicle.
3.8 Option 1 Input
Additional sensors can be added to the system using Option 1 input. No additional
programming is required. When the sensor is triggered, the parking lights will flash
and the siren will sound.
Remote Control & will blink. will stay ON.
Vehicle 1 parking light flash & 1 siren chirp
Remote Control & will blink. will stay OFF.
Vehicle 2 parking light flash & 2 siren chirp
19

3.9 Remote Control Registration
1. Insert key and turn the key to ON position (engine is OFF).
2. Press brake pedal 4 times.
3. On the 4th press, hold the brake pedal down.
4. 3 parking light flashes and 3 siren chirps will confirm remote control program-
ming mode.
5. Press Button Ⅰ(Lock Button) .
6. After each remote control is added, there will be a confirmation of 2 parking
light flashes and 2 siren chirps. You can add up to 3 2-way remote controls
and 2 1-way remote controls per system.
7. Once the key is turned to the OFF position or 10 seconds without adding a
remote control passes, the system will exit remote control programming
mode.
※Each time a remote control is added, all remote controls must be
reprogrammed to the system. Adding a remote control erases
previously stored remote controls from the system.
3.10 Remote Start Reservation
Manual transmission vehicles require remote start reservation in order to ensure
that the vehicle is properly prepared for remote start. There are 2 remote start
reservation modes: automatic and manual. Please note that automatic and
manual do not refer to the transmission type. Rather, automatic and manual refer
to the type of remote start reservation.
1. Automatic Remote Start Reservation (Default)
a. Before turning off the engine, put the transmission into Neutral. Ensure that
the parking brake (emergency brake) is engaged. Take foot off of the foot
brake.
b. Turn the key to the OFF position. The engine should still be running.
c. Exit the vehicle within 2 minutes.
d. Once the last door is closed, the engine will turn off.
e. Arm the system. Remote start is ready to be used.
2. Manual Remote Start Reservation
a. Before turning off the engine, put the transmission into Neutral. Ensure that
the parking brake (emergency brake) is engaged. Take foot off the foot brake.
b. Press Button Ⅲfor 2 seconds.
c. Turn the key to the OFF position. The engine should still be running.
d. Exit the vehicle within 2 minutes.
e. Once the last door is closed, the engine will turn off.
f. Arm the system. Remote start is ready to be used.
NOTE1: Remote start reservation type can be changed through the User
Programmable Options.
NOTE2: If a door, trunk, or hood is opened, remote start reservation will be
cancelled and remote start will not be available.
20
Other manuals for ZN-502 A
1
This manual suits for next models
2
Table of contents
Other Zenesis Car Alarm manuals