Zenith ZFS3584W User manual

Instruction Manual
ZFS3584W
ZFS4584W

Please read these instructions first before using your appliance
Thank you for choosing a Beko appliance.
Please take some time to read this user manual before using your appliance, to
ensure you know how to safely operate the controls and functions.
Carefully follow all unpacking and installation instructions to ensure the
appliance is correctly connected and fitted prior to use.
Please write your product model and serial number on the last page of this
user manual, and store in a safe location close to the appliance for easy future
reference.
This user manual may also be applicable for several other models. Differences
between models will be listed.
If you have any questions or concerns, please call our contact centre or find
help and information online at www.beko.co.uk
Symbols and their descriptions
This instruction manual contains the following symbols:
CImportant information or useful usage tips.
AWarning against dangerous conditions for life and property.
BWarning against electric voltage.
A
A
A
C
SUPPLIER’S NAME MODEL IDENTIFIER (*)
INFORMATION
C
The model information as stored in the product data base
can be reached by entering following website and searching
for your model identifier (*) found on energy label.
https://eprel.ec.europa.eu/

EN
3
1 Your refrigerator 4
2 Safety and Environment
Instructions 5
General Safety............................................ 5
Intended Use............................................... 7
Child Safety..................................................8
Compliance with WEEE Directive and
Disposing of the Waste Product .........8
Compliance with RoHS Directive.........8
Package Information................................8
3 Installation 9
Transportation Instructions..................9
Installation Instructions .........................9
Reversing the doors............................... 11
4 Before operating 13
Final Check .................................................13
Temperature Control And
Adjustment................................................14
5 Using your refrigerator 15
Defrosting of the appliance................15
Storing Frozen Food ...............................15
Freezing Fresh Food...............................15
Making ice cubes......................................16
How to Freeze Fresh Foods ...............16
Recommendations for Preservation
of ....................................................................18
Deep Freezer Information....................18
Defrosting the frozen foods ...............18
Recommended Temperature
Settings.......................................................19
6 Maintenance and
cleaning 22
7 Do's and Don'ts 23
Problem Solvıng ...................................... 24
EN
4
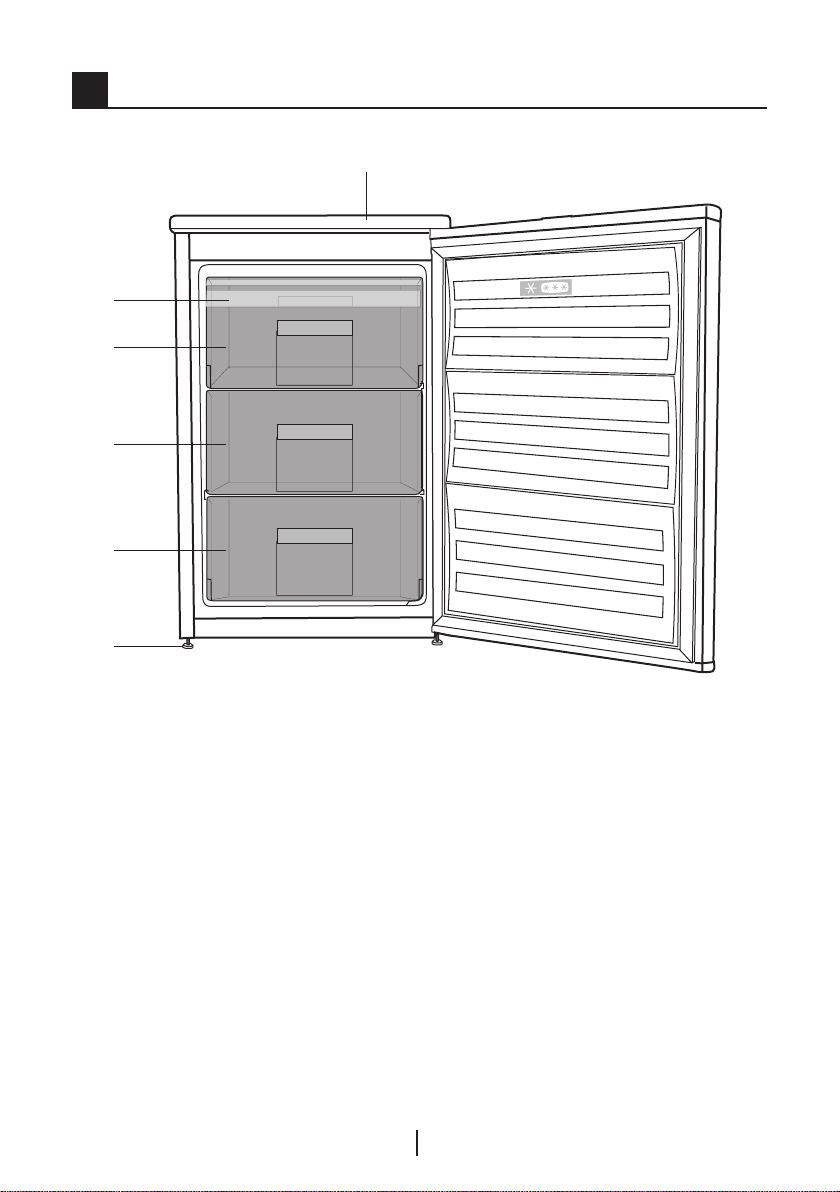
1Your freezer
CFigures that take place in this instruction manual are schematic and may not
correspond exactly with your product. If the subject parts are not included in
the product you have purchased, then it is valid for other models.
1. Top trim
2. Ice bank
3. Fast-freeze compartment
4. Frozen-food compartments
5. Adjustable front feet
2
4
4
3
5
1

EN
5
2Safety and Environment Instructions
This section provides the safety
instructions necessary to prevent the
risk of injury and material damage.
Failure to observe these instructions
will invalidate all types of product
warranty.
Intended use
A
WARNING:
Keep ventilation openings,
in the appliance enclosure or
in the built-instructure, clear
of obstruction.
A
WARNING:
Do not use mechanical
devices or other means to
accelerate the defrosting
process, other than those
recommended by the
manufacturer.
AWARNING:
Do not damage the
refrigerant circuit.
A
WARNING:
Do not use electrical
appliances inside the food
storage compartments
of the appliance, unless
they are of the type
recommended by the
manufacturer.
A
WARNING:
Do not store explosive
substances such as aerosol
cans with a flammable
propellant in this appliance.
General Safety
• This product should not be
used by persons with physical,
sensory and mental disabilities,
without sufficient knowledge and
experience or by children. The device
can only be used by such persons
under supervision and instruction of
a person responsible for their safety.
Children should not be allowed to
play with this device.
• In case of malfunction, unplug the
device.
• After unplugging, wait at least 5
minutes before plugging in again.
• Unplug the product when not in use.
• Do not touch the plug with wet
hands! Do not pull the cable to plug
off, always hold the plug.
• Do not plug in the refrigerator if the
socket is loose.
• Unplug the product during
installation, maintenance, cleaning
and repair.
• If the product will not be used for
a while, unplug the product and
remove any food inside.
• Do not use the product when the
compartment with circuit cards
located on the upper back part of
the product (electrical card box
cover) (1) is open.

EN
6
1
1
• Do not use steam or steamed
cleaning materials for cleaning the
refrigerator and melting the ice
inside. Steam may come into contact
with the electrified areas and cause
short circuit or electric shock!
• Do not wash the product by spraying
or pouring water on it! Danger of
electric shock!
• In case of malfunction, do not use
the product, as it may cause electric
shock. Contact the authorized
service before doing anything.
• Plug the product into an earthed
socket. Earthing must be done by a
qualified electrician.
• If the product has LED type lighting,
contact the authorized service for
replacing or in case of any problem.
• Do not touch frozen food with wet
hands! It may adhere to your hands!
• Do not place liquids in bottles and
cans into the freezer compartment.
They may burst out!
• Place liquids in upright position after
tightly closing the lid.
• Do not spray flammable substances
near the product, as it may burn or
explode.
• Do not keep flammable materials
and products with flammable gas
(sprays, etc.) in the refrigerator.
• Do not place containers holding
liquids on top of the product.
Splashing water on an electrified
part may cause electric shock and
risk of fire.
• Exposing the product to rain,
snow, sunlight and wind will cause
electrical danger. When relocating
the product, do not pull by holding
the door handle. The handle may
come off.
• Take care to avoid trapping any part
of your hands or body in any of the
moving parts inside the product.
• Do not step or lean on the door,
drawers and similar parts of the
refrigerator. This will cause the
product to fall down and cause
damage to the parts.
• Take care not to trap the power
cable.
• When positioning the appliance,
ensure the supply cord is not
trapped or damaged.
• Do not locate multiple portable
socket-outlets or portable power
supplies at the rear of the appliance.

EN
7
• Children aged from 3 to 8 years
are allowed to load and unload
refrigerating appliances.
• To avoid contamination of food,
please respect the following
instructions:
• – Opening the door for long
periods can cause a significant
increase of the temperature in the
compartments of the appliance.
• – Clean regularly surfaces that
can come in contact with food and
accessible drainage systems.
• – Clean water tanks if they have not
been used for 48 h; flush the water
system connected to a water supply
if water has not been drawn for 5
days.
• – Store raw meat and fish in suitable
containers in the refrigerator, so that
it is not in contact with or drip onto
other food.
• – Two-star frozen-food
compartments are suitable for
storing pre-frozen food, storing or
making icecream and making ice
cubes.
• – One-, two- and three-star
compartments are not suitable for
the freezing of fresh food.
• – If the refrigerating appliance is
left empty for long periods, switch
off, defrost, clean, dry, and leave
the door open to prevent mould
developing within the appliance.
1.1.1 HC Warning
If the product comprises a cooling
system using R600a gas, take care to
avoid damaging the cooling system
and its pipe while using and moving
the product. This gas is flammable. If
the cooling system is damaged, keep
the product away from sources of fire
and ventilate the room immediately.
C
The label on the inner left
side indicates the type of
gas used in the product.
1.1.2 For Models with
Water Dispenser
• Pressure for cold water inlet shall
be maximum 90 psi (6.2 bar). If
your water pressure exceeds 80
psi (5.5 bar), use a pressure limiting
valve in your mains system. If you
do not know how to check your
water pressure, ask for the help of a
professional plumber.
• If there is risk of water hammer
effect in your installation, always
use a water hammer prevention
equipment in your installation.
Consult Professional plumbers if you
are not sure that there is no water
hammer effect in your installation.
• Do not install on the hot water inlet.
Take precautions against of the
risk of freezing of the hoses. Water
temperature operating interval shall
be 33°F (0.6°C) minimum and 100°F
(38°C) maximum.
• Use drinking water only.
Intended Use
• This product is designed for home
use. It is not intended for commercial
use.
• The product should be used to store
food and beverages only.
• Do not keep sensitive products
requiring controlled temperatures
(vaccines, heat sensitive medication,
medical supplies, etc.) in the
refrigerator.

EN
8
• The manufacturer assumes no
responsibility for any damage due to
misuse or mishandling.
• Original spare parts will be provided
for 10 years, following the product
purchasing date.
Child Safety
• Keep packaging materials out of
children’s reach.
• Do not allow the children to play
with the product.
• If the product’s door comprises a
lock, keep the key out of children’s
reach.
Compliance with WEEE
Directive and Disposing of
the Waste Product
This product complies with
EU WEEE Directive (2012/19/EU). This
product bears a classification symbol
for waste electrical and electronic
equipment (WEEE).
This product has been
manufactured with high
quality parts and materials
which can be reused and
are suitable for recycling.
Do not dispose of the
waste product with
normal domestic and other wastes at
the end of its service life. Take it to the
collection center for the recycling of
electrical and electronic equipment.
Please consult your local authorities
to learn about these collection
centers.
Compliance with RoHS
Directive
• This product complies with EU WEEE
Directive (2011/65/EU). It does
not contain harmful and prohibited
materials specified in the Directive.
Package Information
Packaging materials of the product
are manufactured from recyclable
materials in accordance with our
National Environment Regulations. Do
not dispose of the packaging materials
together with the domestic or other
wastes. Take them to the packaging
material collection points designated
by the local authorities.

EN
9
3Installation
Transportation
Instructions
1. The appliance should be
transported only in a vertical upright
position. The packing as supplied
must be intact during transportation.
2. If during the course of
transport the appliance has to be
transported horizontally, it must only
be laid on its right hand side when
standing in the front of the appliance.
After bringing it to upright position,it
must not be operated for at least 4
hours to allow the system to settle.
3. Failure to comply with the
above instructions could result in
damage occuring to the appliance.
The manufacturer will not be held
responsible if these instructions are
disregarded.
4. The appliance must be
protected against rain, moisture and
other atmospheric influences.
5. Empty any water in the drain
tray before moving see section
“Defrosting” and “Cleaning & Care” for
further information
Important :Make sure the plastic
evaporating pan at the back of the
product collects water properly.
Important : Care must be taken
whle cleanng / carryng the
applance to avod touchng the
bottom of the condenser metal wres
at the back of theapplance as you
mght njure your fngers and hands
Important : Ths applance s not
desgned for stackng wth any other
applance.When postonng your
applance, take care not to damage
your floorng, ppes,wall coverngs etc.
Do not move the applance by pullng
by the door or handle.Do not attempt
to st or stand on top of your applance
as t s not desgned for such use. You
could njure yourself or damage the
applance.
Important : Make sure that mans
cable s not caught under the
applance durng and after carryng
/ movng the applance, to avod
the mans cable becomng cut or
damaged.”Do not allow chldren to
play wth the applance or tamper
wth the controls.
BEKO declines to accept any liability
should the instructions not be
followed.
Installation Instructions
1. If possible avoid placing the
appliance near cookers, radiators or in
direct sunlight as this will cause the
compressor to run for long periods. If
installed next to a source of heat or
refrigerator, maintain the following
minimum side clearances:
From Cookers 2” (50 mm)
From Radiators 12” (300 mm)
From Refrigerators or Larder Fridge
1” (25 mm)
2. No gap is required at sides
and top. See item 3 below to ensure
a gap is obtained at the rear of the
appliance. If a gap is available on side
and top, retain it if possible as it would
improve the air circulation around the
appliance.
3. Fit the two plastic wall spacers
supplied with the appliance on to
the condenser at the back of the

EN
10
refrigerator by rotating 1/4 turn (see
diagram).
4. The appliance should be
located on a smooth surface. The two
front feet can be adjusted as required.
To ensure that, your appliance is
standing upright adjust the two
front feet by turning clockwise or
anti-clockwise, until the product is in
firm contact with the floor. Correct
adjustment of feet avoids excessive
vibration and noise.
5. Refer to “Cleaning and Care”
section to prepare your appliance for
use.
6. This appliance has been
designed to operate in ambient
temperatures between +10 and
+32 degrees C (50 and 90 degrees
F).However if the appliance is
installed in an unheated / cold room
(E.g.: Conservatory /annex / shed
/ garage etc.) it will still operate
satisfactorily thanks to Freezer Guard
system developed by Beko,down to
-15°C ambient temperature.
7. A special receptacle is supplied
to store the mains plug during transit.
The receptacle is fixed at the back of
the cabinet, on the right hand side of
the compressor. (See diagram) Gently
remove the plug from the receptacle.
Never pull the mains cord, you may
damage the appliance. In the case
of transportation, ensure you locate
the plug in the receptacle provided to
avoid transit damage.
8. The space in the room where
the appliance is installed must not be
smaller than 10 cubic metres.

EN
11
Reversing the doors
Proceed in numerical order
1
60°
10
6
2
3
4
5
8
7
9

EN
12
1. Switch off at the socket outlet
and pull out the mains plug.
2. Remove all food, loose items
and fittings from inside the appliance
and door shelves.
3. Carefully tilt the appliance
on its back side. (1) (You may need
somebody to help you.) Take care not
to damage the appliance by laying
on some protective material (e.g. its
original packaging). Make sure that
you tilt the appliance on its back side,
otherwise compressor oil may block
the pipes and you may damage the
appliance.
4. Unscrew and remove the LHS
front feet and bolt (2).
5. Unscrew the bolts and remove
the bottom hinge while holding the
door (3).
6. Remove the door carefully from
the top hinge by sliding down wards
(4).
7. Reposition top hinge bushing
and blanking plug on the opposite
side and stand the door safely (5).
You may find it easier to remove the
bushing and the plug with the tip of
a small screwdriver. Take care not to
mark the door.
8. Reposition the top hinge on
the opposite side (6 and 7).
9. To refit the door, locate the
top hinge in the door, attach to the
cabinet and hold the door (8).
10. Fit the bottom hinge (9). If
necessary adjust and then tighten
the bolts. Ensure,that the door opens
and closes easily and that there are
no gaps allowing air into the cabinet.
If there are gaps between the door
seal and the cabinet, adjust the door
seal by gently pulling away from the
door using fingers.
11. Fit the other front feet (10).
12. Carefully stand your appliance.
(You may need somebody to help
you.)Adjust the front feet (See
Installation Instructions)
13. Put back all, loose items and
fittings.
14. Wait for at least 4 hours to
allow the system to settle before
switching on.Spare plastic parts
supplied with the appliance are
for your future use during door
repositioning.

EN
13
4Before operating
Final Check
Before you start usng the frdge/
freezer check that:
1. The feet have been adjusted
for perfect levelling.
2. The interior is dry and air can
circulate freely at the rear.
3. Clean the interior as
recommended under “CLEANING AND
CARE.”
4. Insert the plug into the
wall socket and switch on the
electricity supply.Avoid accidental
disconnection by taping over the
switch.
5. You will hear a noise as the
compressor starts up. The liquid and
gases sealed within the refrigeration
system may also give rise to noise,
whether the compressor is running or
not which is quite normal.
6. If you are going to store already
frozen food you don’t need to change
the thermostat setting.
7. Slight undulation of the top of
the cabinet is quite normal due to the
manufacturing process used, so do
not worry, it is not a defect.
8. Front edges of the cabinet may
feel warm. This is normal. These areas
are designed to be warm to avoid
condensation.
9. We recommend that you
set the thermostat knob at 3
and monitor the temperature to
ensure the appliance maintains
desired storage temperatures (see
section Temperature Control and
Adjustment).
10. Do not load the appliance
immediately after it is switched
on. Wait until the correct storage
temperature has been reached.
We recommend that you check
the temperature with an accurate
thermometer (see; Temperature
Control and Adjustment).
Important Notes :
1. If there is a power failure
do not open the door. Frozen food
should not be affected if the failure
lasts for less than 13 hours. If the
failure is longer, then the food
should be checked and either eaten
immediately or cooked and then re-
frozen.
2. If you find the freezer door
difficult to open just after you have
closed it, don’t worry. This is due to
the pressure difference which will
equalise and allow the door to open
normally after a few minutes.
3. Always wrap food using a
suitable packaging material before
storing in your appliance to avoid
contact with the appliance surface
and food remains for hygiene
reasons.

EN
14
Temperature Control And Adjustment
OFF
Temperature is controlled by the
thermostat which is located on the
rear wall of the cabinet (see the
diagram on page 5). Thermostat knob
is located on the thermostat housing.
"Number 4" is the coldest setting. The
normal storage temperature of your
appliance should be -18 °C (0 °F).
Lower temperatures may be obtained
by adjusting the thermostat knob
towards 'number 4 ' position.
We recommend that you check the
temperature with a thermometer to
ensurethatthestoragecompartments
are kept to the desired temperature.
Remember you must take your reading
very quickly since the thermometer
temperature will rise very rapidly after
you remove it from the freezer.
Please remember each time the door
is opened cold air escapes and the
internal temperature rises. Therefore
never leave the door open and ensure
it is closed immediately after food is
put in or removed.

EN
15
5Using your freezer
Defrosting of the appliance
Defrost twice a year or when a frost
layer of around 7 mm (1/4”) has
formed.
To start defrosting procedure turn the
thermostat knob to zero position
(Alternatively you may switch off the
freezer at the socket outlet and pull
out the mains plug.)
All food should be wrapped in several
layers of newspaper and stored in a
cool place (e.g. fridge or larder).
Remove all freezer drawers.The special
defrost collection basin collects the
defrost water. Therefore defrosting
can be conducted without mess.
Containers full of warm water may be
placed carefully in the freezer to
speed up the defrosting.
Do not use pointed or sharp edged
objects such as knives, forks to
remove the frost.
Never use hairdryers, electrical heaters
and other similar electrical
appliances for defrosting.
When defrosting has finished, sponge
out any defrost water which collects
at the bottom of the freezer and
dry the interior thoroughly. Turn
the thermostat knob to 2. Close
the freezer door. Insert the plug
into the wall socket and switch on
the electricity supply. Don’t forget
to tape over the switch to avoid
accidental disconnection.
Storing Frozen Food
Prepacked commercially frozen
food should be stored in accordance
with the frozen food manufacturer’s
instructions for a frozen food
storage compartment.
The freezing area is marked with
symbol on the door liner.
To ensure that the high quality
achieved by the frozen food
manufacturer and the food retailer is
maintained the following should be
remembered:
1. Put packets in the freezer as
quickly as possible after purchase.
2. Do not exceed “Use By”, “Best
Before” dates on the packaging.
3. Please note that drawers,
baskets, flaps, trays are all removable.
Freezing Fresh Food
Freezing capacity of your appliance
in a 24 hours period is 10.5 kg (23 lb).
Never exceed this maximum capacity.
If you are using the maximum
freezing capacity, turn the thermostat
knob to position 4.
Fast freeze compartment (3) is
shown in diagram.
Take special care not to mix already
frozen food and fresh food.
If the fast freeze compartment
(3) is filled with fresh food, other
compartments can also be used to
freeze fresh food.

EN
16
Making ice cubes
Fill the ice-cube tray 3/4 full with
water and place it in the freezer.
As soon as the water has turned into
ice, you can take out the ice cubes.
Never use sharp objects such as
knives or forks to remove the ice
cubes. There is a risk of injury!
Let the ice cubes slightly thaw
instead, or put the bottom of the tray
in hot water for a short moment.
Warning:
Do not use any copper pots or dıshes
ınsıde the cabinet !
Do not load any food wıthout
packaging.!
How to Freeze Fresh Foods
• Foods to be frozen must be divided
into portions according to a size to
be consumed, and frozen in separate
packages. In this way, all the food
should be prevented from being re-
frozen by thawing.
• In order to protect the nutritional
value, the aroma and the color of
the foods as much as possible,
vegetables should be boiled for a
short period of time before freezing.
(Boiling is not necessary for foods
such as cucumber, parsley.) Cooking
time of the vegetables frozen in this
way is shortened by 1/3 than that of
the fresh vegetables.
• To extend the storage times of
frozen foods, boiled vegetables
must first be filtered and then
hermetically packaged as in the all
types of foods.
• Foods should not be placed in the
freezer compartment without
package.
• The packaging material of the food
to be stored should be air-tight, thick
and durable and should not deform
with cold and humidity. Otherwise,
the food that is hardened by
freezing might pierce the package.
Sealing the package well is also
important in terms of securely
storing the food.
The following packaging types are
suitable for use to freeze the food:
Polyethylene bag, aluminum foil,
plastic foil, vacuum bags and cold-
resistant storage containers with
caps.

EN
17
The use of the following types of
packaging is not recommended to
freeze the food;
Packaging paper, parchment
paper,cellophane (gelatin paper),
garbage bag, used bags and shopping
bags.
• Hot foods should not be placed in
the freezer compartment without
cooling.
• When placing unfrozen fresh foods
in the freezer compartment, please
note that it does not contact with
frozen foods. Cool-pack (PCM)
(if any) can be placed to the rack
immediately below the quick freezer
rack for preventing them from being
getting warm.
• During the freezing time (24 hours)
do not place other food to the
freezer.
• Place your foods to the freezing
shelves or racks by spreading them
so that they will not be cramped (it
is recommended that the packaging
does not come into contact with
each other).
• Frozen foods must be immediately
consumed in a short period of time
after defrosting and must never be
frozen again.
• We recommend you to attach a label
onto the package and write the
name of the foods in the package
and the freezing time.
Foods suitable for freezing:
• Fish and seafood, red and white
meat, poultry, vegetables, fruit,
herbaceous spices, dairy products
(such as cheese, butter and strained
yoghurt), pastries, ready or cooked
meals, potato dishes, souffle and
desserts.
•Foods not suitable for freezing:
• Yoghurt, sour milk, cream,
mayonnaise, leaved salad, red
radish, grapes, all fruits (such as
apple, pears and peaches).
• For foods to be frozen quickly and
thoroughly, the following specified
amounts per package should not be
exceeded.
-Fruits and vegetables, 0.5-1 kg
-Meat, 1-1.5 kg
• A small amount of foods (maximum
2 kg) can also be frozen without the
use of the quick freezing function.
To obtain the best result, apply the
following instructions:
1. Switch the adjusting knob to
MAX or 4 position 24 hours before
placing your fresh foods to freeze.
2. 24 hours after turning the
thermostat knob, place your food that
you want to freeze to the front of top
drawer with higher freezing capacity.
If you have food remained, place them
to the sides of the middle section.
3. Do not forget to turn the
thermostat knob to its previous
position, after placing your food.
4. Do not try to freeze a large
quantity of food at a time. Within 24
hours, this product can freeze the
maximum food quantity specified as
«Freezing Capacity 10.5 kg/24 hours»
on its type label. It is not convenient
to put more unfrozen/fresh foods to
the freezer compartment than the
quantity specified on the label.

EN
18
• You can review the Meat and
Fish, Vegetables and Fruits, Dairy
Products tables for placing and
storing your foods in the deep-
freezer.
Recommendations for
Preservation of
Frozen Foods
• While purchasing your frozen foods,
make sure that they are frozen at
appropriate temperatures and their
packages are not broken.
• Put the packages on the freezer
compartment as soon as possible
after purchasing them.
• Make sure that the expiration
date indicated on the packaging
is not expired before consuming
the packaged ready meals that
you remove from the freezer
compartment.
Deep Freezer Information
The EN 62552 standard requires
(according to specific measurement
conditions) that at least 4.5 kg of
food for each 100 liter of freezer
compartment volume can be frozen
at a room temperature of 25°C in 24
hours.
Defrosting the frozen
foods
Depending on the food diversity and
the purpose of use, a selection can be
made between the following options
for defrosting:
• At room temperature (it is not very
suitable to defrost the food by
leaving it at room temperature for
a long time in terms of maintaining
the food quality)
• In the refrigerator
• In the electrical oven (in models with
or without fan)
• In the microwave oven
CAUTION:
• Never put acidic beverages in glass
bottles and cans into your freezer
due to the risk of explosion.
• If there is moisture and abnormal
swelling in the packaging of frozen
foods, it is likely that they were
previously stored in an improper
storage condition and their contents
deteriorated. Do not consume these
foods without checking.
• Since some spices in cooked meals
may change their taste when
exposed to long-term storage
conditions, your frozen foods should
be less seasoned or the desired
spices should be added to the foods
after the thawing process.

EN
19
Recommended Temperature Settings
Freezer compartment
setting
Remarks
1.2 This is the default recommended temperature
setting.
3These settings are recommended when the
ambient temperature is higher than 30°C or
when you think the refrigerator is not cool
enough due to frequent opening and closing of
the door.
Quick freezing (MAX or
4*)
Use when you want to freeze your food in a
short time.It is recommended to be applied to
preserve the quality of your fresh food. You
do not need to use the quick freezing function
when putting your frozen food.You do not need
to use the quick freezing function to freeze a
small amount of fresh food, up to 2 kg per day.

EN
20
Meat and Fish Preparation
Longest
storage
time
)month(
Meat
products
Veal
Steak By cutting them 2 cm thick and placing foil between them or wrapping
tightly with stretch
6 – 8
Roast By packing the pieces of meat in a refrigerator bag or wrapping them
tightly with stretch
6 – 8
Cubes In small pieces 6 – 8
Schnitzel,
chops
By placing foil between cut slices or wrapping individually with stretch 6 – 8
Mutton
Chops By placing foil between meat pieces or wrapping individually with stretch 4 - 8
Roast By packing the pieces of meat in a refrigerator bag or wrapping them
tightly with stretch
4 - 8
Cubes By packing the shredded meats in a refrigerator bag or wrapping them
tightly with stretch
4 - 8
Beef
Roast By packing the pieces of meat in a refrigerator bag or wrapping them
tightly with stretch
8-12
Steak By cutting them 2 cm thick and placing foil between them or wrapping
tightly with stretch
8-12
Cubes In small pieces 8-12
Boiled
meat
By packaging in small pieces in a refrigerator bag 8-12
Mince Without seasoning, in flat bags 1 - 3
Offal (piece) In pieces 1 - 3
Fermented sausage - Salami It should be packaged even if it has casing. 1-2
Jambon By placing foil between cut slices 2-3
Poultry
and
hunting
animals
Chicken and Turkey By wrapping in foil 4 – 6
Goose By wrapping in foil (portions should not exceed 2.5 kg) 4 – 6
Duck By wrapping in foil (portions should not exceed 2.5 kg) 4-6
Deer, Rabbit, Roe Deer By wrapping in foil (portions should not exceed 2.5 kg, and their bones
should be separated)
6 – 8
Fish and
seafood
Freshwater fish (Trout, Carp,
Crane, Catfish)
After thoroughly cleaning the inside and scales, it should be washed and
dried, and the tail and head parts should be cut when necessary.
2
Lean fish (Sea bass, Turbot, Sole) 4-6
Fatty fish (Bonito, Mackerel,
Bluefish, Red Mullet, Anchovy)
2 - 4
Shellfish Cleaned and in bags 4 - 6
Caviar In its packaging, in an aluminum or plastic container 2 - 3
This manual suits for next models
1
Table of contents
Other Zenith Freezer manuals


