Zenoah GZ4350 User manual

GZ4350
EN Operator's manual 2-37
DE Bedienungsanweisung 38-75
EL Οδηγίες χρήσης 76-114
ES Manual de usuario 115-151
FR Manuel d'utilisation 152-189
IT Manuale dell'operatore 190-226
PT Manual do utilizador 227-264

Contents
Introduction..................................................................... 2
Safety..............................................................................4
Assembly........................................................................ 9
Operation...................................................................... 10
Maintenance................................................................. 21
Troubleshooting............................................................ 33
Transportation and storage...........................................34
Technical data.............................................................. 34
Accessories.................................................................. 35
EC Declaration of Conformity....................................... 37
Introduction
Product description
The Zenoah GZ4350 is a chainsaw model with a
combustion engine.
Work is constantly in progress to increase your safety
and efficiency during operation. Speak to your servicing
dealer for more information.
Intended use
This product is intended for sawing in wood.
Note: National regulations can set limit to the operation
of the product.
Product overview
2
4
5
6
7
8
10
9
11
12
25
13
24
23
14
15
16
3
3
20
21
17
26 27 28
18
3
22
19
29
1. Air filter cover
2. Air filter
3. Vibration damping system, 3 units
4. Throttle trigger lockout
5. Rear handle
6. Throttle trigger
7. Start/stop switch
8. Fuel tank
9. Adjuster screws carburetor
10. Starter rope handle
2320 - 008 - 24.10.2018

11. Starter housing
12. Chain oil tank
13. Muffler
14. Chain brake and front hand guard
15. Front handle
16. Right hand guard
17. Clutch cover
18. Chain tensioning screw
19. Brake band
20. Oil pump adjustment screw
21. Chain catcher
22. Spiked bumper
23. Saw chain
24. Guide bar
25. Bar tip sprocket
26. Transport guard
27. Operator's manual
28. Combination wrench
29. Choke control
Symbols on the product
Careless or incorrect use of this product can
result in serious or fatal injury to the operator
or others.
Read the operator's manual carefully and
make sure you understand the instructions
before you use this product.
Always wear approved protective helmet,
approved hearing protection and protective
goggles or a visor.
This product is in accordance with
applicable EC Directives.
Noise emission to the environment
according to the EC Directive. The product's
emission is specified in the Technical data
chapter and on the label.
Both of the operator's hands must be used
to operate the chainsaw.
Never operate the chainsaw holding it with
one hand only.
Never let the guide bar tip come in contact
with any object.
Warning! Kickback may occur when the
nose or tip of the guide bar touches an
object, and cause a lightning fast reverse
reaction, kicking the guide bar up and
towards the operator. May cause serious
personal injury.
Chain brake, activated (right). Chain brake,
not activated (left).
Choke lever in "open position".
Choke lever in "closed position".
Air purge.
Refuelling.
Chain oil fill.
Adjustment of the oil
pump.
yyyywwxxxxx
The rating plate showing
serial number. yyyy is the
production year, ww is the
production week.
Note: Other symbols/decals on the product refer to
certification requirements for certain markets.
EU V
WARNING: Tampering with the engine
voids the EU type-approval of this product.
320 - 008 - 24.10.2018 3

Safety
Safety definitions
Warnings, cautions and notes are used to point out
specially important parts of the manual.
WARNING: Used if there is a risk of injury or
death for the operator or bystanders if the
instructions in the manual are not obeyed.
CAUTION: Used if there is a risk of damage
to the product, other materials or the
adjacent area if the instructions in the
manual are not obeyed.
Note: Used to give more information that is necessary in
a given situation.
General safety instructions
WARNING: Read the warning instructions
that follow before you use the product.
• A chainsaw is a dangerous tool if used carelessly or
incorrectly and can cause serious injury or death. It
is very important that you read and understand the
contents of this operator’s manual.
• Under no circumstances may the design of the
product be modified without the permission of the
manufacturer. Do not use a product that appears to
have been modified by others and only use
accessories recommended for this product. Non-
authorized modifications and/or accessories can
result in serious personal injury or the death of the
operator or others.
• The inside of the muffler contain chemicals that may
be carcinogenic. Avoid contact with these elements
in the event of a damaged muffler.
• Long term inhalation of the engine’s exhaust fumes,
chain oil mist and sawdust can represent a health
risk.
• This product produces an electromagnetic field
during operation. This field may under some
circumstances interfere with active or passive
medical implants. To reduce the risk of serious or
fatal injury, we recommend persons with medical
implants to consult their physician and the medical
implant manufacturer before operating this product.
• The information in this operator's manual is never a
substitute for professional skills and experience. If
you get into a situation where you feel unsafe, stop
and seek expert advice. Contact your servicing
dealer or an experienced chainsaw user. Do not
attempt any task that you feel unsure of!
Safety instructions for operation
WARNING: Read the warning instructions
that follow before you use the product.
• Before using the product you must understand the
effects of kickback and how to avoid them. Refer to
Kickback information on page 11
for instructions.
• Never use a product that is faulty.
• Never use a product with visible damage to the
spark plug cap and ignition cable. A risk of sparking
arises, which can cause a fire.
• Never use the product if you are fatigued, while
under the influence of alcohol or drugs, medication
or anything that could affect your vision, alertness,
coordination or judgement.
• Do not use the product in bad weather such as
dense fog, heavy rain, strong wind, intense cold,
etcetera. Working in bad weather is tiring and often
brings added risks, such as icy ground,
unpredictable felling direction, etcetera.
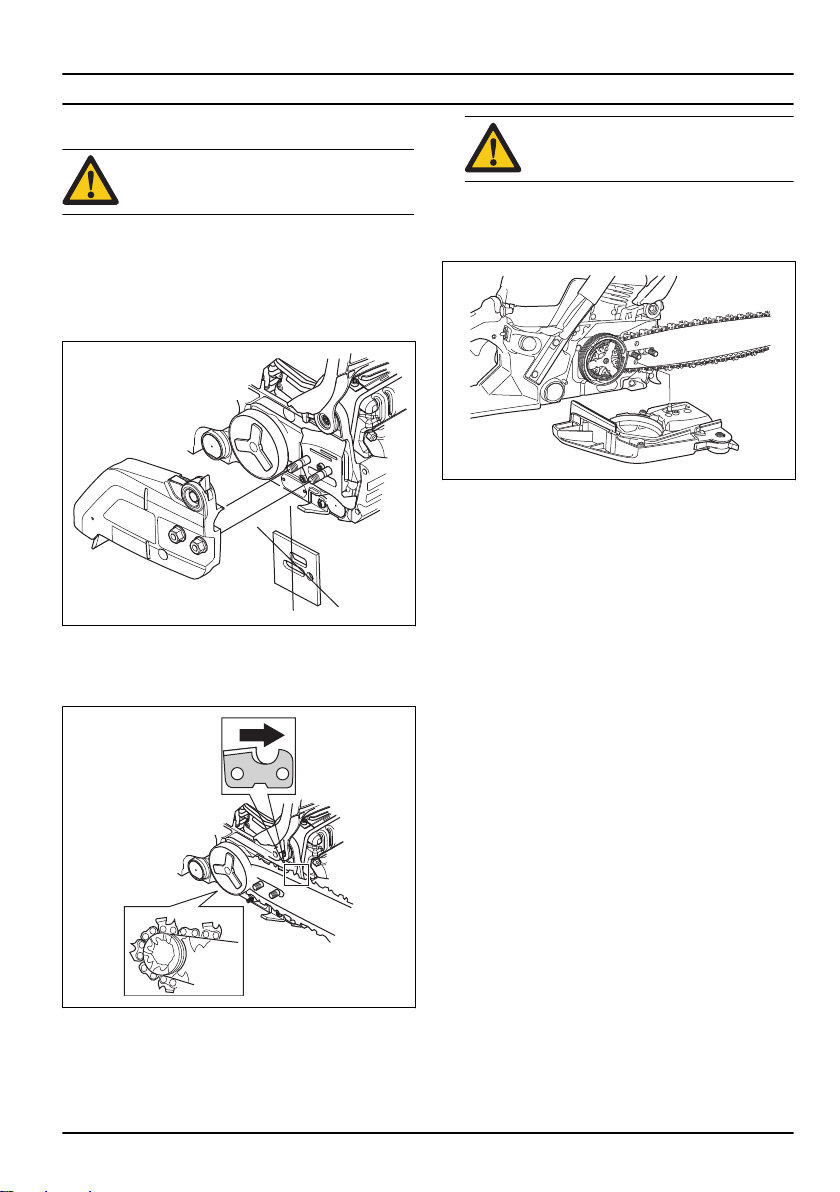
• Never start a product unless the guide bar, saw
chain and all covers are fitted correctly. Refer to
Assembly on page 9
for instructions. Without a bar
and saw chain attached to the product the clutch can
come loose and cause serious injury.
• Never start the product indoors. Exhaust fumes can
be dangerous if inhaled.
• The exhaust fumes from the engine are hot and can
contain sparks, which can start a fire. Never start the
product near flammable material!
• Observe your surroundings and make sure that there
is no risk of people or animals coming in contact with
or affect your control of the product.
• Never allow children to use or be in the vicinity of the
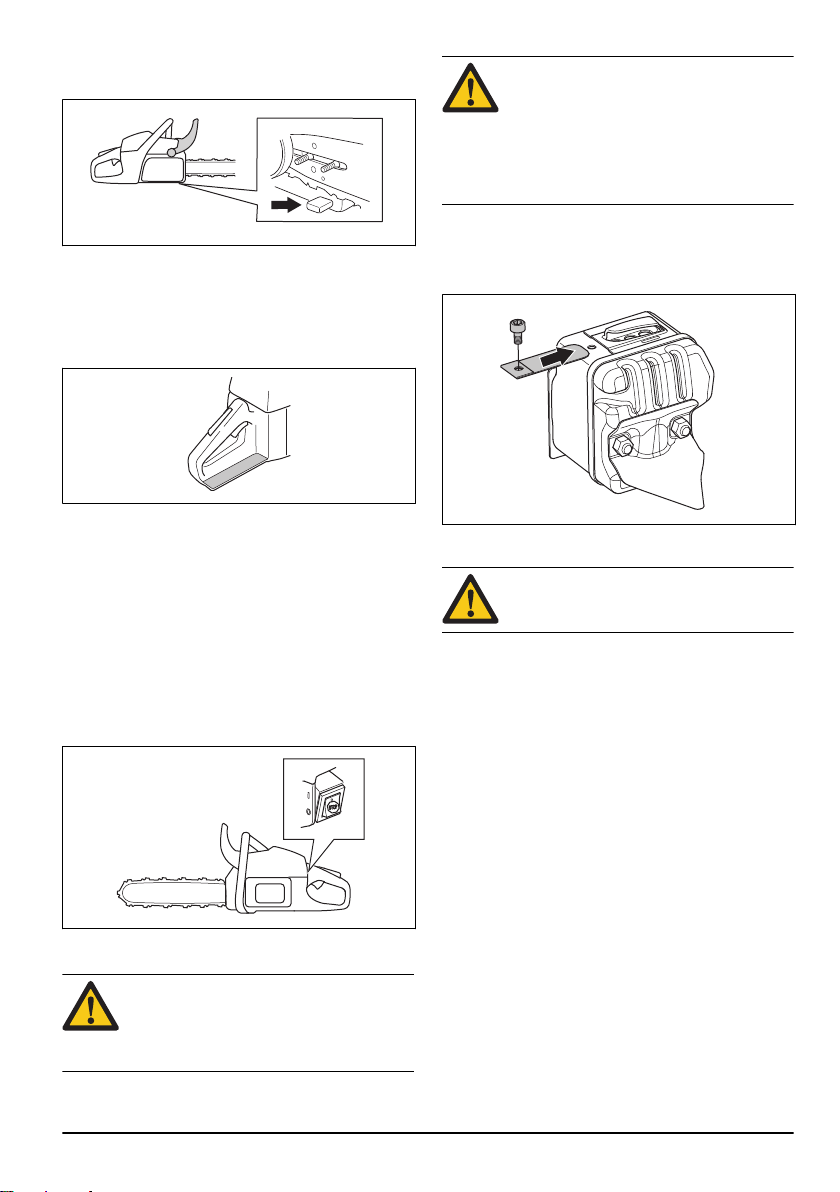
product. As the product is equipped with a spring-
loaded start/stop switch and can be started by low
speed and force on the starter handle, even small
children under some circumstances can produce the
force necessary to start the product. This can mean
a risk of serious personal injury. Therefore remove
the spark plug cap when the product is not under
close supervision.
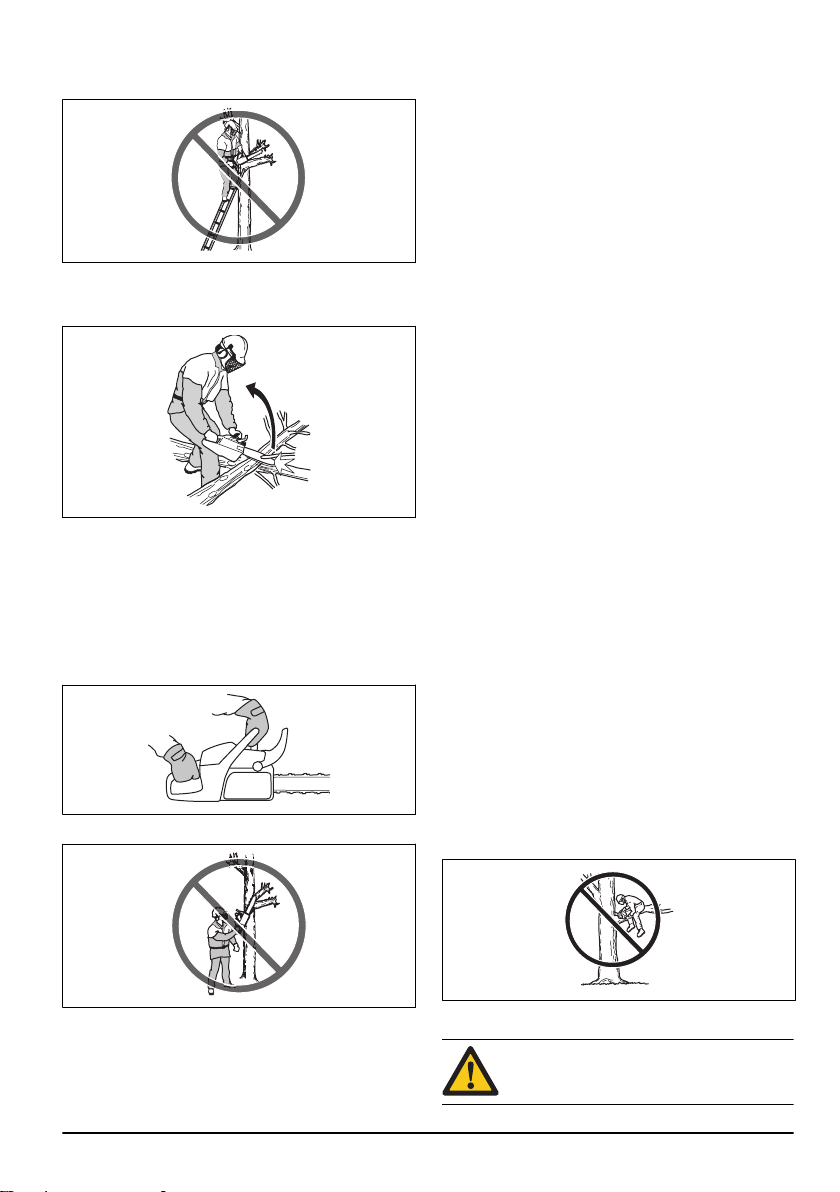
• You must have a steady stance in order to have full
control of the product. Never work standing on a
4320 - 008 - 24.10.2018

ladder, in a tree or where you do not have a firm
ground to stand on.
• Lack of concentration can lead to kickback if the
kickback zone of the bar accidentally touches a
branch, nearby tree or some other object.
• Never use the product by holding it with one hand.
This product is not safely controlled with one hand.
• Always hold the product with both hands. The right
hand should be on the rear handle, and the left hand
on the front handle. All people, whether right or left
handed, should use this grip. Use a firm grip with
thumbs and fingers encircling the handles. This grip
minimizes the risk of kickback and lets you keep the
product under control. Do not let go of the handles!
• Never use the product above shoulder height.
• Do not use the product in a situation where you
cannot call for help in case of an accident.
• Before moving your product, switch off the engine
and lock the saw chain using the chain brake. Carry
the product with the guide bar and saw chain
pointing backwards. Fit a transportation guard to the
guide bar before transporting the product or carrying
it for any distance.
• When you put the product on the ground, lock the
saw chain using the chain brake and ensure you
have a constant view of the product. Switch the
engine off before leaving your product for any length
of time.
• Sometimes chips get stuck in the clutch cover
causing the saw chain to jam. Always stop the
engine before cleaning.
• Running an engine in a confined or badly ventilated
area can result in death due to carbon monoxide
poisoning.
• The exhaust fumes from the engine are hot and may
contain sparks which can start a fire. Do not start the
product indoors or near flammable material.
• Use the chain brake as a parking brake when you
start the product and when you move short
distances. Always carry the product in the front
handle. This decreases the risk that you or a person
near you get hit by the saw chain.
• Overexposure to vibration can lead to circulatory
damage or nerve damage in people who have
impaired circulation. Contact your doctor if you
experience symptoms of overexposure to vibration.
Such symptoms include numbness, loss of feeling,
tingling, pricking, pain, loss of strength, changes in
skin colour or condition. These symptoms normally
appear in the fingers, hands or wrists. These
symptoms may be increased in cold temperatures.
• It is not possible to cover every conceivable situation
you can face when using this product. Always
exercise care and use your common sense. Avoid all
situations which you consider to be beyond your
capability. If you still feel uncertain about operating
procedures after reading these instructions, you
should consult an expert before continuing. Do not
hesitate to contact your dealer or Zenoah if you have
any questions about the use of the product. We will
willingly be of service and provide you with advice as
well as help you to use your product both efficiently
and safely. Attend a training course in chainsaw
usage if possible. Your dealer, forestry school or
your library can provide information about which
training materials and courses are available.
Personal protective equipment
WARNING: Read the warning instructions
that follow before you use the product.
320 - 008 - 24.10.2018 5

• Most chainsaw accidents occur when the saw chain
touches the operator. You must use approved
personal protective equipment during operation.
Personal protective equipment does not give you full
protection from injuries but it decreases the degree
of injury if an accident occurs. Speak to your
servicing dealer for recommendations about which
equipment to use.
• Your clothing must be close-fitting but not limit your
movements. Regularly do a check of the condition of
the personal protective equipment.
• Use an approved protective helmet.
• Use approved hearing protection. Long-term
exposure to noise can result in permanent damage
to the hearing.
• Use protective glasses or a face visor to decrease
the risk of injury from thrown objects. The product
can throw objects, such as wood chips, small pieces
of wood and more, at large force. This can result in
serious injury, especially to the eyes.
• Use gloves with saw protection.
• Use pants with saw protection.
• Use boots with saw protection, steel toe-cap and
non-slip sole.
• Always have a first-aid kit with you.
• Risk of sparks. Keep fire extinguishing tools and a
shovel near to prevent forest fires.
Safety devices on the product
WARNING: Read the warning instructions
that follow before you use the product.
• Do not use a product with defective safety devices.
• Do a check of the safety devices regularly. Refer to
Maintenance and checks of the safety devices on
the product on page 23
.
• If the safety devices are defective, speak to your
Zenoah servicing dealer.
Chain brake and front hand guard
Your product has a chain brake that stops the saw chain
if you get a kickback. The chain brake decreases the
risk of accidents, but only you can prevent them.
The chain brake engages (A) manually by your left hand
or automatically by the inertia release mechanism. Push
the front hand guard (B) forward to engage the chain
brake manually.
A
B
Pull the front hand guard rearward to disengage the
chain brake.
Throttle trigger lockout
The throttle trigger lockout prevents accidental operation
of the throttle trigger. If you put your hand around the
handle and press the throttle trigger lockout (A), it
releases the throttle trigger (B). If you release the
handle, the throttle trigger and the throttle trigger lockout
move back to their initial positions. This function locks
the throttle trigger at idle speed.
A
B
Chain catcher
The chain catcher catches the saw chain if it breaks or
comes loose. Correct saw chain tension and correctly
6320 - 008 - 24.10.2018

applied maintenance on the saw chain and guide bar,
decrease the risk of accidents.
Right hand guard
The right hand guard is a protection for your hand on the
rear handle. The right hand guard gives you protection if
the saw chain breaks or derails. The right hand guard
also gives you protection from branches or twigs.
Vibration damping system
The vibration damping system decreases vibration in the
handles. Vibration damping units operate as a
separation between the product body and the handle
unit.
Refer to
Product overview on page 2
for information
about where the vibration damping system is on your
product.
Start/stop switch
Use the start/stop switch to stop the engine.
Muffler
WARNING: The muffler becomes very hot
during/after operation and at idle speed.
There is a risk of fire, especially when you
operate the product near flammable
materials and/or fumes.
WARNING: Do not operate a product
without a muffler or with a defective muffler.
A defective muffler can increase the noise
level and the risk of fire. Keep fire
extinguishing tools near. Do not use a
product without, or with a broken, spark
arrestor mesh if you must have a spark
arrestor mesh in your area.
The muffler keeps the noise levels to a minimum and
points the exhaust fumes away from the operator. In
areas with a hot, dry weather there is a high risk of fire.
Obey local regulations and maintenance instructions.
Fuel safety
WARNING: Read the warning instructions
that follow before you use the product.
• Make sure there is plenty of ventilation when
refuelling or mixing fuel (petrol and two-stroke oil).
• Fuel and fuel vapour are highly flammable and can
cause serious injury when inhaled or allowed to
come in contact with the skin. For this reason
observe caution when handling fuel and make sure
there is adequate ventilation.
• Take care when handling fuel and chain oil. Be
aware of the risks of fire, explosion and those
associated with inhalation.
• Do not smoke and do not place any hot objects in
the vicinity of fuel.
• Always stop the engine and let it cool for a few
minutes before refuelling.
• When refuelling, open the fuel cap slowly so that any
excess pressure is released gently.
• Tighten the fuel cap carefully after refuelling.
• Never refuel the machine while the engine is
running.
320 - 008 - 24.10.2018 7

• Always move the product at least 3 m (10 ft) away
from the refuelling area and fuel source before
starting.
After refuelling, there are some situations where you
must never start the product:
• If you have spilled fuel or chain oil on the product.
Wipe off the spillage and allow remaining fuel to
evaporate.
• If you have spilled fuel on yourself or on your
clothes. Change your clothes and wash any part of
your body that has come in contact with fuel. Use
soap and water.
• If the product leaks fuel. Regularly do a check for
leaks from the fuel tank, fuel cap and fuel lines.
Safety instructions for maintenance
WARNING: Read the warning instructions
that follow before you do maintenance on
the product.
• Do only the maintenance and servicing given in this
operator's manual. Let professional servicing
personnel do all other servicing and repairs.
• Regularly do the safety checks, maintenance and
service instructions given in this manual. Regular
maintenance increases the life of the product and
decreases the risk of accidents. Refer to
Maintenance and checks of the safety devices on
the product on page 23
for instructions.
• If the safety checks in this operator's manual is not
approved after you do maintenance, speak to your
servicing dealer. We guarantee that there are
professional repairs and servicing available for your
product.
Safety instructions for the cutting
equipment
WARNING: Read the warning instructions
that follow before you use the product.
• Only use the guide bar/saw chain combinations and
filing equipment that we recommend. Refer to
Accessories on page 35
for instructions.
• Use protective gloves when you use or do
maintenance on the saw chain. A saw chain that
does not move can also cause injuries.
• Keep the cutting teeth correctly sharpened. Obey the
instructions and use the recommended file gauge. A
saw chain that is damaged or incorrectly sharpened
increases the risk of accidents.
• Keep the correct depth gauge setting. Obey the
instructions and use the recommended depth gauge
setting. Too large depth gauge setting increases the
risk of kickback.
• Make sure that the saw chain has the correct
tension. If the saw chain is not tight against the guide
bar, the saw chain can derail. An incorrect saw chain
tension increases wear on the guide bar, saw chain
and chain drive sprocket. Refer to
To adjust the
tension of the saw chain on page 30
.
• Do maintenance on the cutting equipment regularly
and keep it correctly lubricated. If the saw chain is
not correctly lubricated, the risk of wear on the guide
bar, saw chain and chain drive sprocket increases.
8320 - 008 - 24.10.2018

Assembly
Introduction
WARNING: Read and understand the safety
chapter before you assemble the product.
To assemble the guide bar and saw
chain
1. Disengage the chain brake.
2. Remove the bar nuts and the clutch cover. Remove
the transportation guard (A).
A
3. Assemble the guide bar onto the bar bolt. Move the
guide bar to its most rear position.
4. Install the saw chain correctly around the drive
sprocket and put it in the groove on the guide bar.
WARNING: Always use protective
gloves when you assemble the saw
chain.
5. Make sure that the edges of the cutters point forward
on the top edge of the guide bar.
6. Align the hole in the guide bar with the chain adjuster
pin and install the clutch cover.
7. Tighten the bar nut finger tight.
8. Tighten the saw chain. Refer to
To adjust the tension
of the saw chain on page 30
for instructions.
9. Tighten the bar nuts.
320 - 008 - 24.10.2018 9

Operation
Introduction
WARNING: Read and understand the safety
chapter before you use the product.
To do a function check before you
use the product
1. Make sure that the chain brake operates correctly
and that it is not damaged.
2. Make sure that the right hand guard is not damaged.
3. Make sure that the throttle lockout operates correctly
and that it is not damaged.
4. Make sure that the start/stop switch operates
correctly and that it is not damaged.
5. Make sure that there is no oil on the handles.
6. Make sure that the vibration damping system
operates correctly and that it is not damaged.
7. Make sure that the muffler is correctly attached and
that it is not damaged.
8. Make sure that all parts of the product are correctly
attached and not damaged or missing.
9. Make sure that the chain catcher is correctly
attached.
10. Do a check of the saw chain tension.
710
9
1
2
3
6,8
4
Fuel
This product has a two-stroke engine.
CAUTION: Incorrect type of fuel can result
in engine damage. Use a mixture of gasoline
and two-stroke oil.
Premixed fuel
• Use Zenoah premixed alkylate fuel of a good quality,
for best performance and extension of the engine
life. This fuel contains less harmful chemicals
compared to regular fuel, which decreases harmful
exhaust fumes. The quantity of remains after
combustion is lower with this fuel, which keeps the
components of the engine more clean.
To mix fuel
Gasoline
• Use good quality unleaded gasoline with a maximum
of 10% ethanol contents.
CAUTION: Do not use gasoline with an
octane grade less than 90 RON/87 AKI.
Use of a lower octane grade can cause
engine knocking, which causes engine
damages.
• We recommend that you use gasoline of a higher
octane grade for work with continuously high rpm.
Two-stroke oil
• For best results and performance use Zenoah two-
stroke oil.
• If Zenoah two-stroke oil is not available, use a two-
stroke oil of good quality for air-cooled engines.
Speak to your servicing dealer to select the correct
oil.
CAUTION: Do not use two-stroke oil for
water-cooled outboard engines, also
referred to as outboard oil. Do not use oil
for four-stroke engines.
To mix gasoline and two-stroke oil
Gasoline, liter Two-stroke
oil, liter
2% (50:1)
5 0.10
10 0.20
15 0.30
20 0.40
CAUTION: Small errors can influence the
ratio of the mixture drastically when you mix
small quantities of fuel. Measure the quantity
of oil carefully and make sure that you get
the correct mixture.
10 320 - 008 - 24.10.2018

1. Fill half the quantity of gasoline in a clean container
for fuel.
2. Add the full quantity of oil.
3. Shake the fuel mixture.
4. Add the remaining quantity of gasoline to the
container.
5. Carefully shake the fuel mixture.
CAUTION: Do not mix fuel for more than 1
month at a time.
To fill the fuel tank
1. Clean the area around the fuel tank cap.
2. Shake the container and make sure that the fuel is
fully mixed.
3. Tighten the fuel tank cap carefully.
4. Move the product 3 m/10 ft or more away from the
refueling area and fuel source before starting.
Note: To see where the fuel tank is on you product,
refer to
Product overview on page 2
.
To do a run-in
• During the first 10 hours of operation, do not apply
full throttle without load for extended periods.
To use the correct chain oil
WARNING: Do not use waste oil, which can
cause injury to you and the environment.
Waste oil also causes damage to the oil
pump, the guide bar and the saw chain.
WARNING: The saw chain can break if the
lubrication of the cutting equipment is not
sufficient. Risk of serious injury or death to
the operator.
WARNING: This product has a function that
lets the fuel run out before the chain oil. Use
the correct chain oil for this function to
operate correctly. Speak to your servicing
dealer when you select your chain oil.
Note: This product has an automatic chain lubrication
system. You can also adjust the oil flow. Refer to
To
adjust the chain oil flow on page 32
.
• Use Zenoah chain oil for maximum saw chain life
and to prevent negative effects on the environment.
If Zenoah chain oil is not available, we recommend
you to use a standard chain oil.
• Use a chain oil with good adherence to the saw
chain.
• Use a chain oil with correct viscosity range that
agrees with the air temperature.
CAUTION: If the oil is too thin, it runs out
before the fuel. In temperatures below
0°C/32°F some chain oils become too
thick, which can cause damage to the oil
pump components.
• Use the recommended cutting equipment. Refer to
Accessories on page 35
.
• Remove the cap to the chain oil tank.
• Fill the chain oil tank with chain oil.
• Attach the cap carefully.
Note: To see where the chain oil tank is on you product,
refer to
Product overview on page 2
.
Kickback information
WARNING: A kickback can cause serious
injury or death to the operator or others. To
decrease the risk you must know the causes
of kickback and how to prevent them.
A kickback occurs when the kickback zone of the guide
bar touches an object. A kickback can occur suddenly
320 - 008 - 24.10.2018 11

and with large force, which throws the product in the
direction of the operator.
Kickback always occurs in the cutting plane of the guide
bar. Usually, the product is thrown against the operator
but can also move in a different direction. It is how you
use the product when the kickback occurs that causes
the direction of the movement.
A smaller bar tip radius decreases the force of the
kickback.
Use a low kickback saw chain to decrease the effects of
kickback. Do not let the kickback zone touch an object.
WARNING: No saw chain fully prevents
kickback. Always obey the instructions.
Common questions about kickback
•Will the hand always engage the chain brake
during a kickback?
No. It is necessary to use some force to push the
front hand guard forward. If you do not use the force
necessary, the chain brake will not be engaged. You
must also hold the handles of the product stable with
two hands during work. If a kickback occurs, it is
possible that the chain brake does not stop the saw
chain before it touches you. There are also some
positions in which your hand can not touch the front
hand guard to engage the chain brake. An example
of this is in the felling position.
•Will the inertia release mechanism always
engage the chain brake during kickback?
No. First, the chain brake must operate correctly.
Refer to
To do a check of the chain brake on page
23
for instructions about how to do a check of the
chain brake. We recommend you to do this each
time before you use the product. Second, the force
of the kickback must be large to engage the chain
brake. If the chain brake is too sensitive, it can
engage during rough operation.
•Will the chain brake always protect me from
injury during a kickback?
No. The chain brake must operate correctly to give
protection. The chain brake must also be engaged
during a kickback to stop the saw chain. If you are
near the guide bar, it is possible that the chain brake
does not have time to stop the saw chain before it
hits you.
WARNING: Only you and the correct
working technique can prevent kickbacks.
To start the product
To prepare to start with a cold engine
WARNING: The chain brake must be
engaged when the product is started to
decrease the risk of injury.
1. Move the front hand guard forward to engage the
chain brake.
2. Push the air purge bulb approximately 6 times or
until fuel starts to fill the bulb. It is not necessary to
fill the air purge bulb fully.
12 320 - 008 - 24.10.2018

3. Set the choke to choke position.
4. Continue to
To start the product on page 13
for
more instructions.
To prepare start with a warm engine
WARNING: The chain brake must be
engaged when the product is started to
decrease the risk of injury.
1. Move the front hand guard forward to engage the
chain brake.
2. Push the air purge bulb approximately 6 times or
until fuel starts to fill the bulb. It is not necessary to
fill the air purge bulb fully.
Note: Do not set the choke to the choke position.
3. Continue to
To start the product on page 13
for
more instructions.
To start the product
WARNING: You must keep your feet in a
stable position when you start the product.
WARNING: If the saw chain rotates at idle
speed, speak to your servicing dealer and
do not use the product.
1. Put the product on the ground.
2. Put your left hand on the front handle.
3. Put your right foot into the footgrip on the rear
handle.
4. Pull the starter rope handle slowly with your right
hand until you feel resistance.
WARNING: Do not twist the starter rope
around your hand.
5. Pull the starter rope handle quickly and with force.
CAUTION: Do not pull the starter rope to
full extension and do not let go of the
starter rope handle. This can cause
damage to the product.
a) If you start your product with a cold engine, pull
the starter rope handle until the engine fires.
Note: You can identify when the engine fires
through a "puff" sound.
b) Push the start/stop switch down to disengage the
choke.
6. Pull the starter rope handle until the engine starts.
320 - 008 - 24.10.2018 13

7. Quickly disengage the throttle trigger lockout to set
the product to idle speed.
8. Move the front hand guard rearward to disengage
the chain brake.
9. Use the product.
To stop the product
• Push the start/stop switch to position 0 to stop the
engine.
Pull stroke and push stroke
You can cut through wood with the product in 2 different
positions.
• To cut on the pull stroke is when you cut with the
bottom of the guide bar. The saw chain pulls through
the tree when you cut. In this position you have
better control of the product and the position of the
kickback zone.
• To cut on the push stroke is when you cut with the
top of the guide bar. The saw chain pushes the
product in the direction of the operator.
WARNING: If the saw chain is caught in
the trunk, the product can be pushed at
you. Hold the product tightly and make
sure that the kickback zone of the guide
bar does not touch the tree and causes a
kickback.
To use the cutting technique
WARNING: Use full throttle when you cut
and decrease to idle speed after each cut.
CAUTION: Engine damage can occur if the
engine runs for too long at full throttle
without load.
1. Put the trunk on a saw horse or runners.
WARNING: Do not cut trunks in a pile.
That increases the risk of kickback and
can result in serious injury or death.
2. Remove the cut pieces from the cutting area.
14 320 - 008 - 24.10.2018

WARNING: Cut pieces in the cutting
area increase the risk of kickback and
that you can not keep your balance.
To cut a trunk on the ground
1. Cut through the trunk on the pull stroke. Keep full
throttle but be prepared for sudden accidents.
WARNING: Make sure that the saw
chain does not touch the ground when
you complete the kerf.
2. Cut approximately ⅔ through the trunk and then
stop. Turn the trunk and cut from the opposite side.
1. 2.
To cut a trunk that has support on one end
WARNING: Make sure that the trunk does
not break during cutting. Obey the
instructions below.
1. Cut on the push stroke approximately ⅓ through the
trunk.
2. Cut through the trunk on the pull stroke until the two
kerfs touch.
1.
2.
To cut a trunk that has support on two
ends
WARNING: Make sure that the saw chain
does not get caught in the trunk during
cutting. Obey the instructions below.
1. Cut on the pull stroke approximately ⅓ through the
trunk.
2. Cut through the remaining part of the trunk on the
push stroke to complete the cut.
1.
2.
WARNING: Stop the engine if the saw chain
gets caught in the trunk. Use a lever to open
up the kerf and remove the product. Do not
try to pull the product out by hand. This can
result in injury when the product suddenly
breaks free.
To use the limbing technique
Note: For thick branches, use the cutting technique.
Refer to
To use the cutting technique on page 14
.
WARNING: There is a high accident risk
when you use the limbing technique. Refer
to
Kickback information on page 11
for
instructions how to prevent kickback.
WARNING: Cut limbs one by one. Be
careful when you remove small limbs and do
not cut bushes or many small limbs at the
same time. Small limbs can get caught in the
saw chain and prevent safe operation of the
product.
320 - 008 - 24.10.2018 15

Note: Cut the limbs piece by piece if it is necessary.
1
2
3
1. Remove the limbs on the right side of the trunk.
a) Keep the guide bar on the right side of the trunk
and keep the body of the product against the
trunk.
b) Select the applicable cutting technique for the
tension in the branch.
WARNING: If you are not sure about
how to cut the branch, speak to a
professional chainsaw operator
before you continue.
2. Remove the limbs on the top of the trunk.
a) Keep the product on the trunk and let the guide
bar move along the trunk.
b) Cut on the push stroke.
3. Remove the limbs on the left side of the trunk.
a) Select the applicable cutting technique for the
tension in the branch.
WARNING: If you are not sure about
how to cut the branch, speak to a
professional chainsaw operator
before you continue.
Refer to
To cut trees and branches that are in tension on
page 20
for instructions on how to cut branches that
are in tension.
To use the tree felling technique
WARNING: You must have experience to
fell a tree. If possible, engage in a training
course in chainsaw operation. Speak to an
operator with experience for more
knowledge.
16 320 - 008 - 24.10.2018

To keep a safe distance
1. Make sure that persons around you keep a safe
distance at a minimum of 2 1/2 tree lengths.
2. Make sure that no person is in the risk zone before
or during felling.
To calculate the felling direction
1. Examine in which direction it is necessary for the
tree to fall. The goal is to fell it in a position where
you can limb and cut the trunk easily. It is also
important that you are stable on your feet and can
move about safely.
WARNING: If it is dangerous or not
possible to fell the tree in its natural
direction, fell the tree in a different
direction.
2. Examine the natural fall direction of the tree. For
example the tilt and bend of the tree, wind direction,
the location of the branches and weight of snow.
3. Examine if there are obstacles, for example other
trees, power lines, roads and/or buildings around.
4. Look for signs of damage and rot in the stem.
WARNING: Rot in the stem can mean a
risk that the tree falls before you
complete the cutting.
5. Make sure the tree has no damaged or dead
branches that can break off and hit you during
felling.
6. Do not let the tree fall onto a different standing tree.
It is dangerous to remove a caught tree and there is
a high accident risk. Refer to
To free a trapped tree
on page 19
.
WARNING: During critical felling
operations, lift your hearing protection
immediately when the sawing is
complete. It is important that you hear
sounds and warning signals.
To clear the trunk and prepare your path of
retreat
Cut off all branches from your shoulder height and
down.
1. Cut on the pull stroke from the top down. Make sure
that the tree is between you and the product.
2. Remove undergrowth from the work area around the
tree. Remove all cut off material from the work area.
3. Do a check of the area for obstacles such as stones,
branches and holes. You must have a clear path of
retreat when the tree starts to fall. Your path of
retreat must be approximately 135 degrees away
from the felling direction.
1. The danger zone
2. The path of retreat
3. The felling direction
320 - 008 - 24.10.2018 17

1
2
2
1
3
To fell a tree
Zenoah recommends you to make the directional cuts
and then use the safe corner method when you fell a
tree. The safe corner method helps you to make a
correct felling hinge and control the felling direction.
WARNING: Do not fell trees with a diameter
that is more than two times larger than the
guide bar length. For this, you must have
special training.
The felling hinge
The most important procedure during tree felling is to
make the correct felling hinge. With a correct felling
hinge, you control the felling direction and make sure
that the felling procedure is safe.
The thickness of the felling hinge must be equal and a
minimum of 10% of the tree diameter.
WARNING: If the felling hinge is incorrect or
too thin, you have no control of the felling
direction.
To make the directional cuts
1. Make the directional cuts ¼ of the diameter of the
tree. Make a 45°-70° angle between the top
directional cut and bottom directional cut.
45º-70º
a) Make the top directional cut. Align the felling
direction mark (1) of the product with the felling
direction of the tree (2). Stay behind the product
and keep the tree on your left side. Cut with a
pull stroke.
b) Make the bottom directional cut. Make sure that
the end of the bottom directional cut is at the
same point as the end of the top directional cut.
2
1
2. Make sure that the bottom directional cut is
horizontal and at a 90° angle to the felling direction.
To use the safe corner method
The felling cut must be made slightly above the
directional cut.
WARNING: Be careful when you cut with
the guide bar tip. Start to cut with the lower
section of the guide bar tip as you make a
bore cut into the trunk.
18 320 - 008 - 24.10.2018

1. If the usable cutting length is longer than the tree
diameter, do these steps (a-d).
a) Make a bore cut straight into the trunk to
complete the felling hinge width.
b) Cut on the pull stroke until ⅓ of the trunk is left.
c) Pull the guide bar 5-10 cm/2-4 in rearward.
d) Cut through the remaining of the trunk to
complete a safe corner that is 5-10 cm/2-4 in
wide.
2. If the usable cutting length is shorter than the tree
diameter, do these steps (a-d).
a) Make a bore cut straight into the trunk. The bore
cut must extend 3/5 of the tree diameter.
b) Cut on the pull stroke through the remaining
trunk.
c) Cut straight into the trunk from the other side of
the tree to complete the felling hinge.
d) Cut on the push stroke, until ⅓ of the trunk is left,
to complete the safe corner.
3. Put a wedge in the kerf straight from behind.
4. Cut off the corner to make the tree fall.
Note: If the tree does not fall, hit the wedge until it
does.
5. When the tree starts to fall, use the path of retreat to
move away from the tree. Move a minimum of 5
m/15 ft away from the tree.
To free a trapped tree
WARNING: It is very dangerous to remove a
trapped tree and there is a high accident
risk. Keep out of the risk zone and do not try
to fell a trapped tree.
The safest procedure is to use one of the following
winches:
• Tractor-mounted
• Portable
320 - 008 - 24.10.2018 19

To cut trees and branches that are in
tension
1. Figure out which side of the tree or branch that is in
tension.
2. Figure out where the point of maximum tension is.
3. Examine which is the safest procedure to release the
tension.
Note: In some situations the only safe procedure is
to use a winch and not your product.
4. Keep a position where the tree or branch can not hit
you when the tension is released.
5. Make one or more cuts of sufficient depth necessary
to decrease the tension. Cut at or near the point of
maximum tension. Make the tree or branch break at
the point of maximum tension.
WARNING: Do not cut straight through a
tree or branch that is in tension.
WARNING: Be very careful when you
cut a tree that is in tension. There is a
risk that the tree moves quickly before or
after you cut it. Serious injury can occur
if you are in an incorrect position or if
you cut incorrectly.
6. If you must cut across tree/branch, make 2 to 3 cuts,
1 in. apart and with a depth of 2 in.
7. Continue to cut more into the tree until the tree/
branch bends and the tension is released.
8. Cut the tree/branch from the opposite side of the
bend, after the tension is released.
To use the product in cold weather
CAUTION: Snow and cold weather can
cause operation problems. Risk of too low
engine temperature or ice on the air filter
and the carburetor.
1. In temperatures below 0°C/32°F, move the plug from
position 1 to position 2.
1
2
20 320 - 008 - 24.10.2018
Other manuals for GZ4350
2
Table of contents
Languages:
Other Zenoah Chainsaw manuals

Zenoah
Zenoah G4501 User manual

Zenoah
Zenoah G6200 User manual

Zenoah
Zenoah G2500 User manual

Zenoah
Zenoah GZ4500 Manual

Zenoah
Zenoah GZ400 User manual

Zenoah
Zenoah KOMATSU G5000AVS User manual

Zenoah
Zenoah G3300 User manual

Zenoah
Zenoah G3800/G3800EZ User manual

Zenoah
Zenoah G3000 Owner's manual

Zenoah
Zenoah G6200 User manual

Zenoah
Zenoah CHTZ2460 User manual

Zenoah
Zenoah G4100 User manual

Zenoah
Zenoah G3800 User manual

Zenoah
Zenoah G4500 User manual

Zenoah
Zenoah G2000 User manual

Zenoah
Zenoah G621AVS Manual

Zenoah
Zenoah GZ3500T User manual

Zenoah
Zenoah G3300 User manual

Zenoah
Zenoah G3800 User manual

Zenoah
Zenoah G621AVS User manual