ZEPCAM T1 Setup guide

ONLINE
MANUAL
ZEPCAM T1
ZEPCAM T1XT
ZEPCAM T1 LIVE

2

TABLE OF CONTENTS
List of buttons + Symbols
Zepcam T1-XT live system
INTRODUCTION
Zepcam functions
Live Module
Remote control
Activating the Zepcam
Preparing the Zepcam
Charging the battery
Activating the Zepcam
Getting started
Zepcam Main Menu
How to use the Zepcam - RECORDING
Recording preparations
Recording
Movies
Playing movies at pc/ mac
How to use the Zepcam - ZEPCAM LIVE
Setting up Wi-Fi networks
Setting up 3g network
Live streaming
Viewing Live videos
Wi-Fi adhoc connections
Safe paper, print double-sides! This document is made for it!
3

LIST OF SYMBOLS
Battery empty GPS Disabled Wi-Fi strong signal 3G strong signalRemote disabledSD not available
Battery charged GPS - No x Wi-Fi error 3G oine
Battery charging No GPS signal
Status unknown GPS - Satellite lock
Battery full GPS - No satellite Wi-Fi no signal 3G weak signalRemote connectedSD usage
These symbols are displayed on the top of the screen and are used to indicate functions and errors of the Zepcam
List of symbols possibly visible on the Zepcam recorder
4
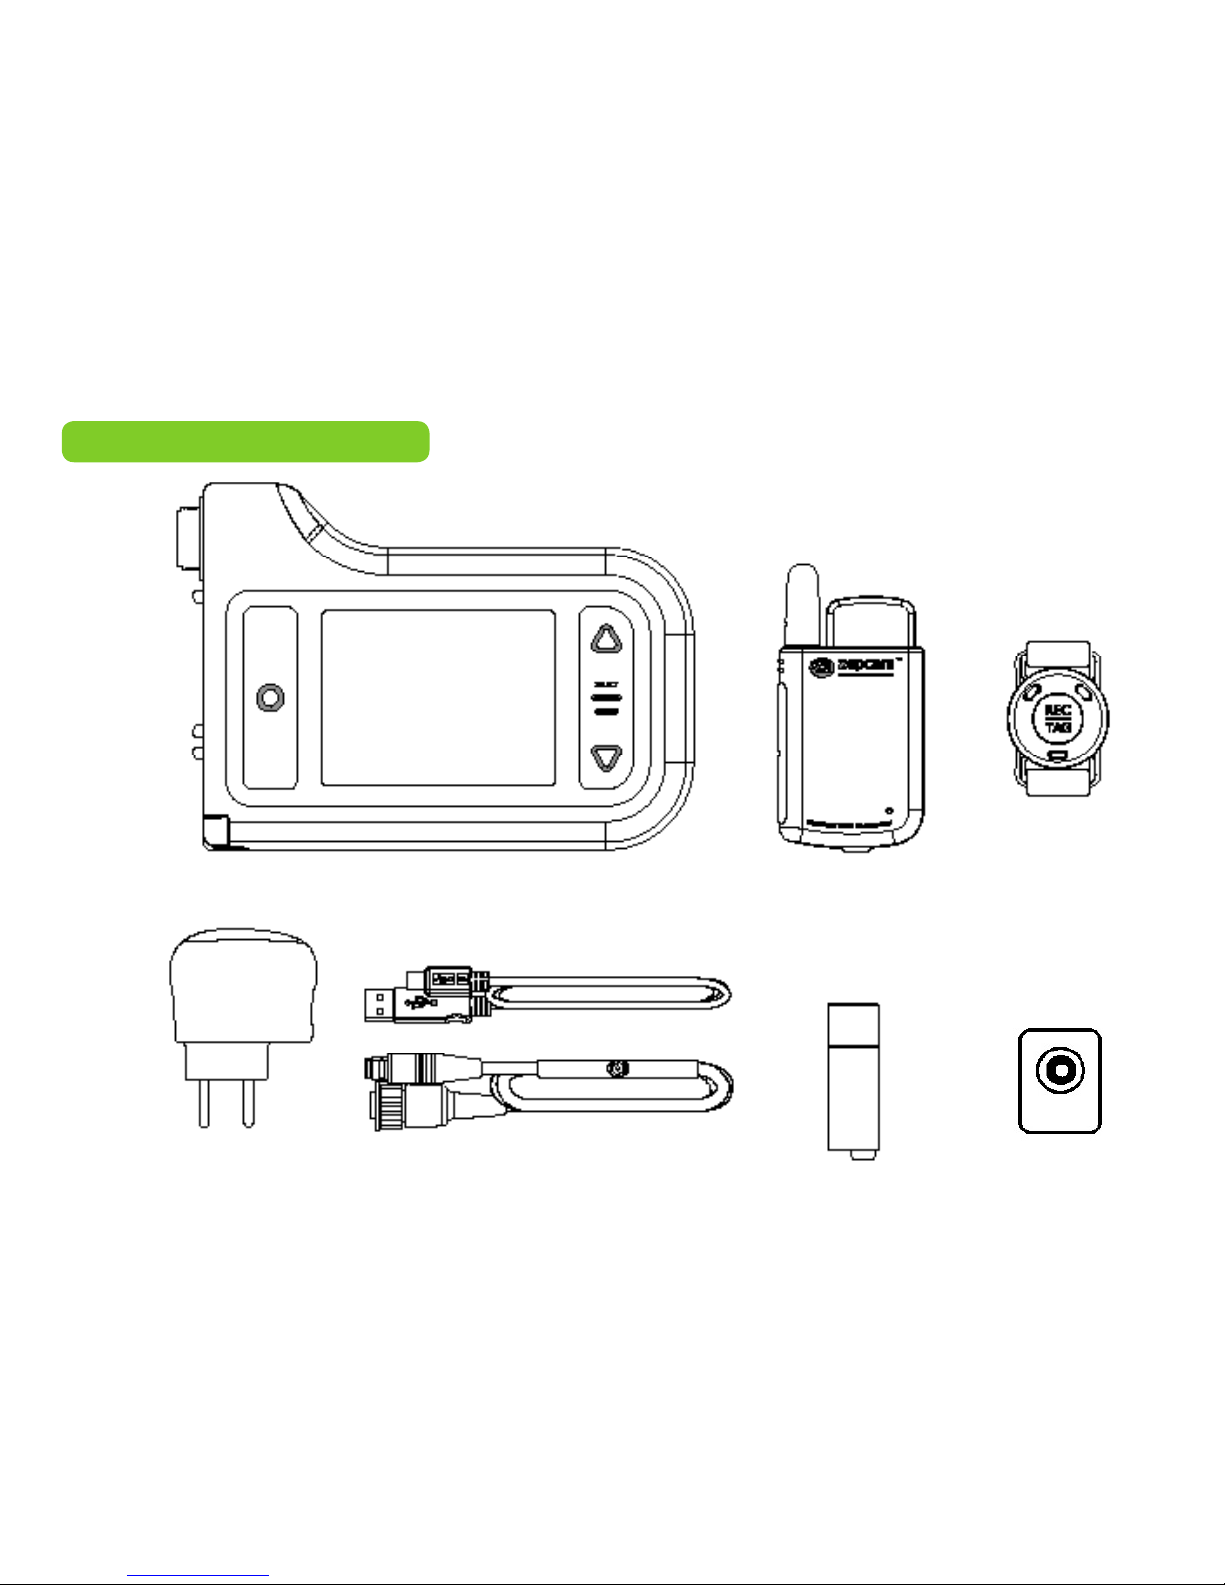
1. Zepcam T1-XT recorder 2. Zepcam Live module
3. Zepcam remote
control
4. USB charger
5. USB cable
6. Video cable
7a. Zepcam
Bullet camera
7b. Zepcam
Clipcam
ZEPCAM T1XT LIVE SYSTEM
7b. Zepcam
Compact camera
Zepcam T1-XT live package content
5

ZEPCAM INTRODUCTION
Zepcam functions
Live Module
Remote control
Activating the Zepcam
Preparing the Zepcam
Charging the battery
Activating the Zepcam
Getting started
6
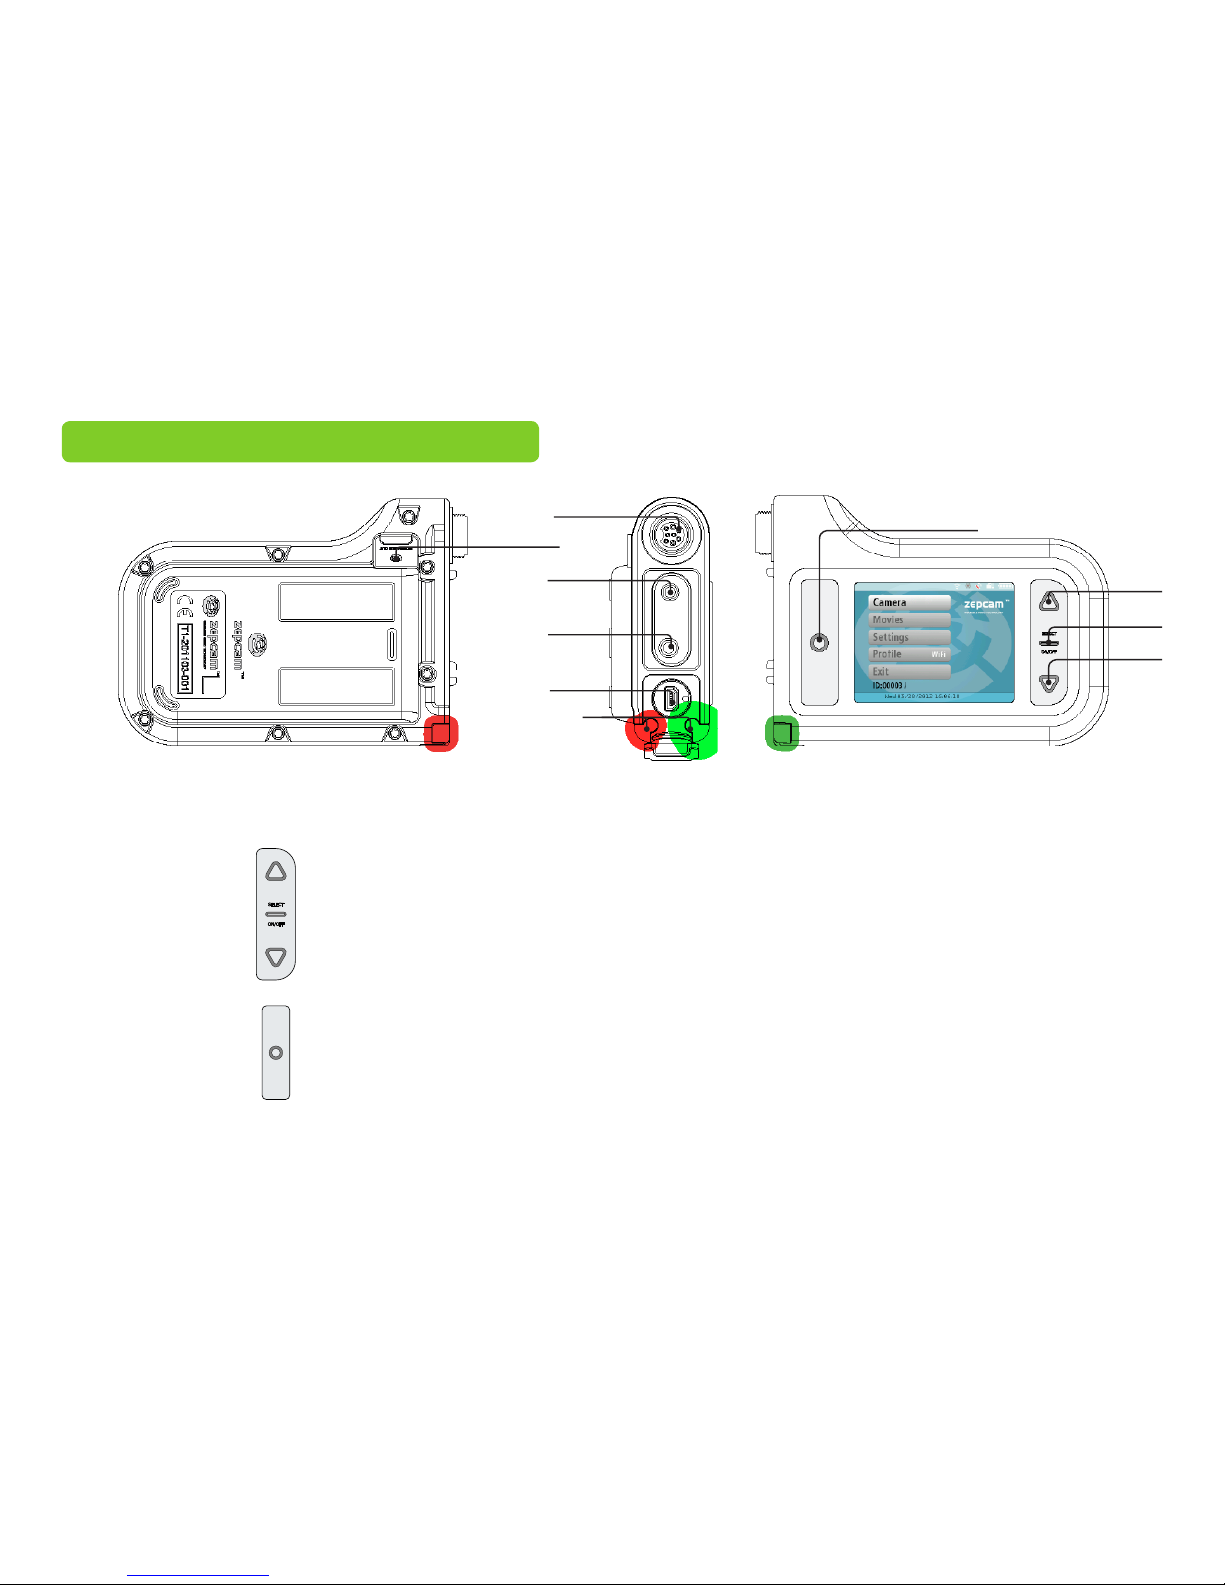
UP
Select
On/O button
Down
Large Button
Mic in
Video/ Audio out
Use the UP button to browse through the menus
Use the SELECT button to select an option in a menu
Use the SELECT button to switch the Zepcam on and o
Press SELECT for 10 sec. to reset the Zepcam
Use the DOWN button to browse through menus
This button has several functions
• Go directly to CAMERA from the MAIN MENU
• Start recording
• Insert a TAG
• To stop recording press and hold this button for a few seconds
• Return to previous screen
To connect a microphone
To connect earphones or a display
ZEPCAM T1, T1XT, T1 LIVE FUNCTIONS
Large button
USB
connection
Indicator
lights
Mic in
A/V
output
Camera
connector
Live module
connector
v
Select
Down
Zepcam T1-XT recorder functions
7
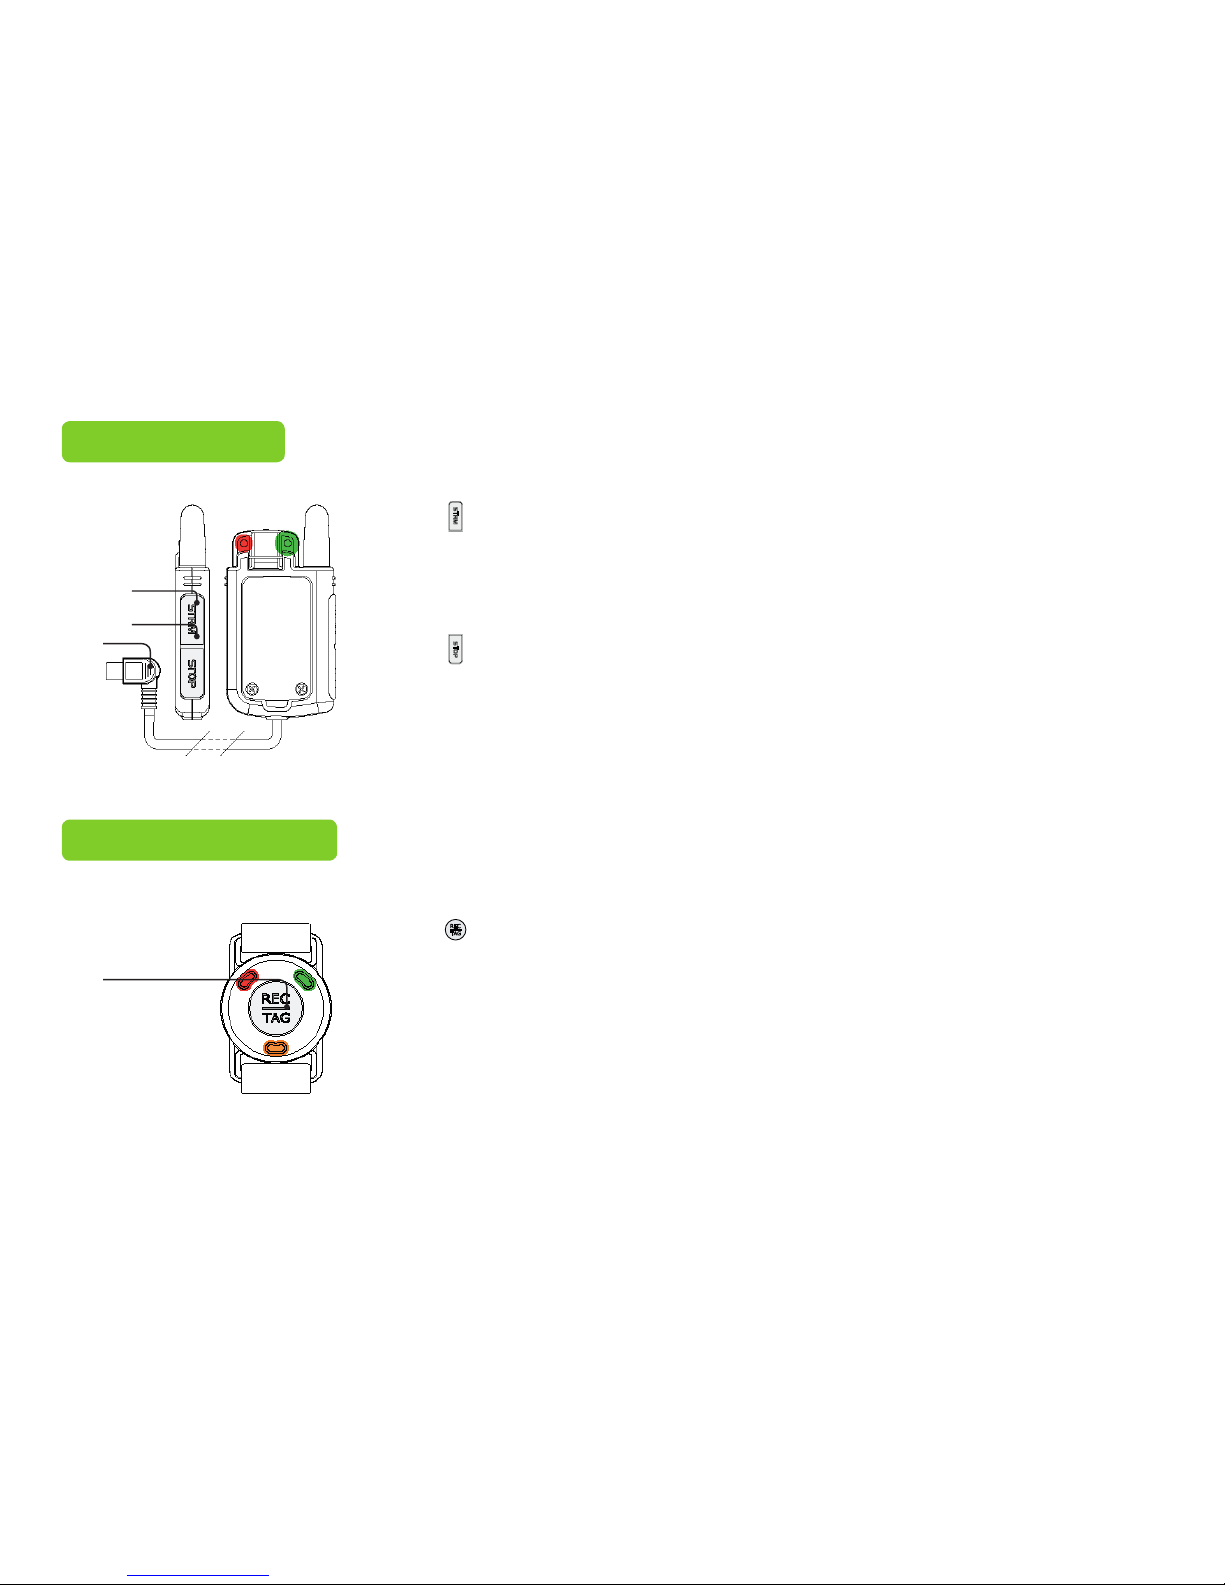
STRM
STOP
Connector
Use the connector to connect the Live module to the Zepcam recorder
Press the STRM (=Stream) button to start streaming
Audio signal: single beep
Press the STRM button to add a TAG in the video le while streaming
Led feedback:
1. Green: connected to selected network
2. Red: Zepcam is streaming
Use the STOP button to stop streaming and save your video le
LIVE MODULE
REMOTE CONTROL
The REC/ TAG button has several functions:
• Start recording / Start streaming
• Insert TAG
• Press and hold the REC/ TAG button for a few seconds to stop recording
REC/
TAG
Stream
Stop
Connector
REC/
TAG
Remote needs to be paired with Zepcam.
Pair remote in SETTINGS >ADVANCED SETTINGS >REMOTE CONTROL > PAIRING, see page 11
Zepcam live module functions
Zepcam remote control functions
8
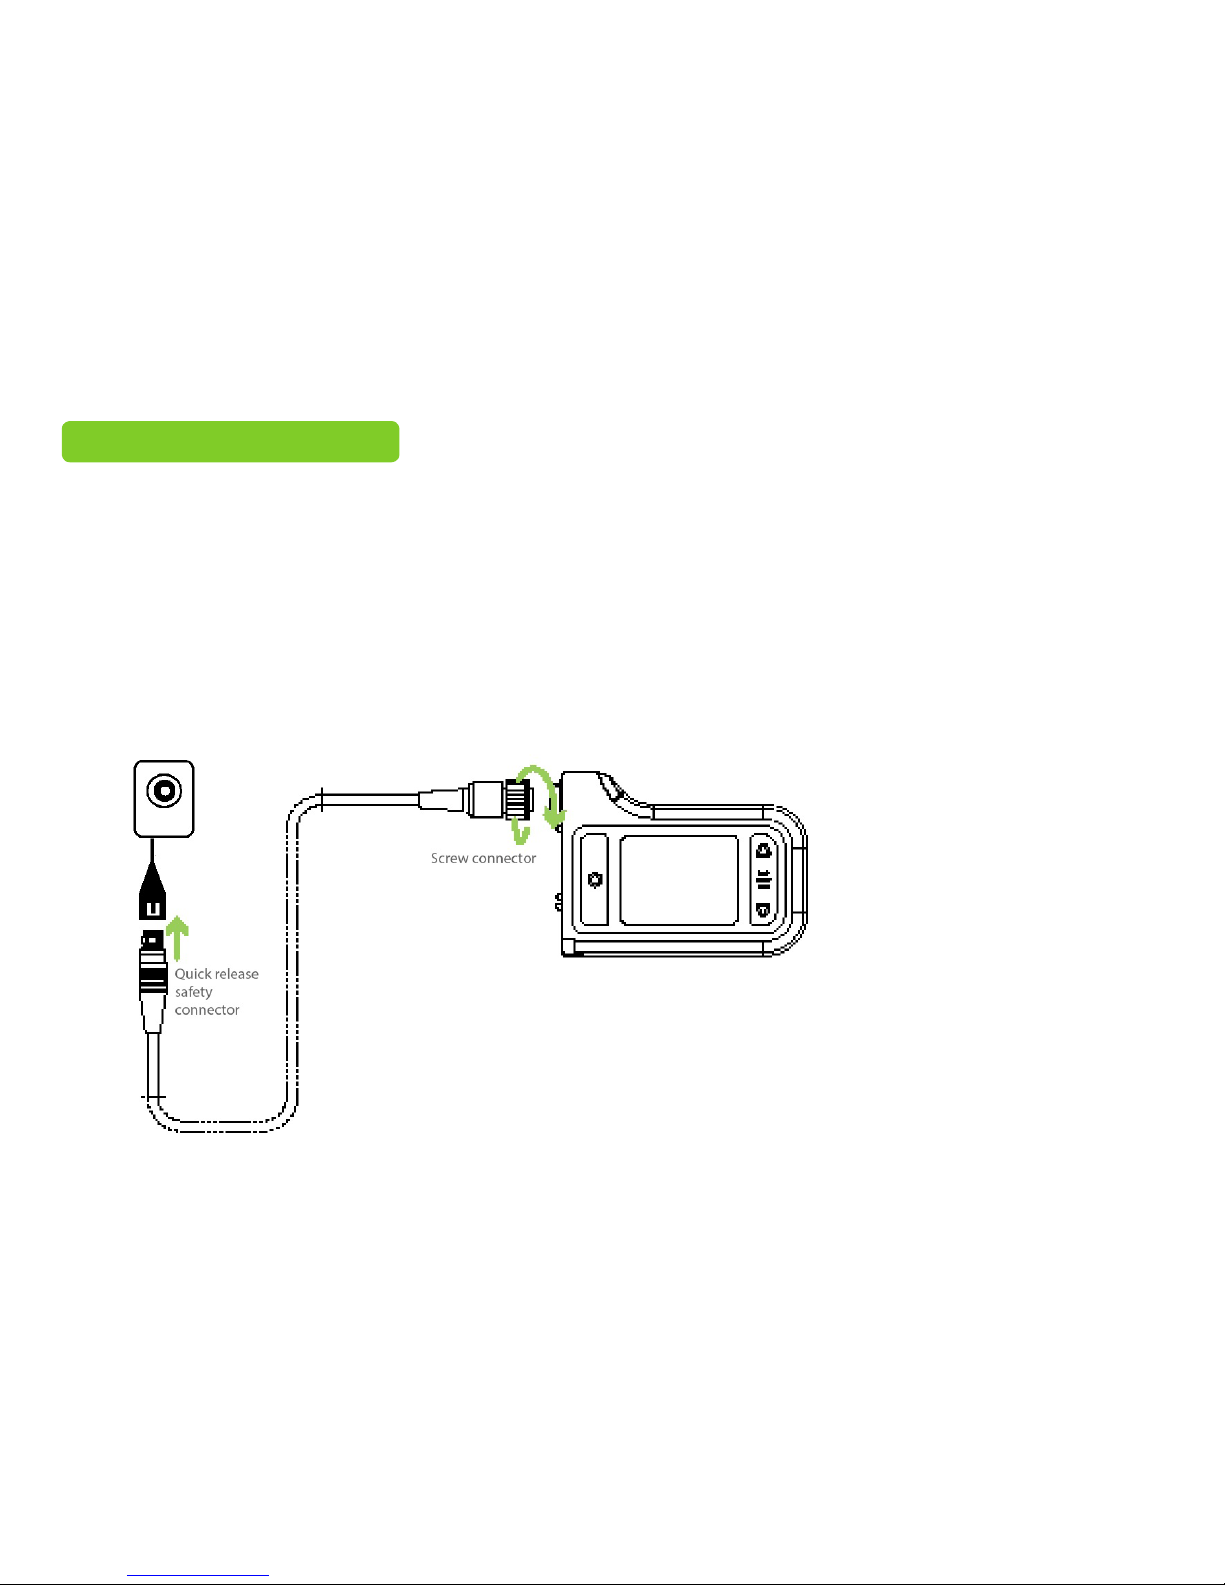
PREPARING THE ZEPCAM
Connect camera to Zepcam recorder
The camera and recorder are two separate parts of the Zepcam. Before the Zepcam can start recording both
need to be connected to each other, using the video cable. Both the Bulletcam and Clipcam video cable are
tted out with a quick release safety connector, enabling the fast and safe release of the video cable.
The Bulletcam video cable includes a microphone for sound recording.
Recorder to video cable
Use the screw connector to attach the video cable to the Zepcam T1-XT recorder
Video cable to camera
Press the quick release safety connector into the connector of the camera
Screw connector
Quick release
safety
connector
Zepcam T1-XT connectors
9

CHARGING THE BATTERY
Charging times depend on the combination Zepcam and charger model.
These times are indicators, actual times can vary!
CHARGING the BATTERY
CHARGING INDICATORS
CHARGING TIMES
Led on =
Charged
USB CONNECTOR
Flash =
Charging
Zepcam Zepcam XT
Normal
charger
6-8 hours 12-16 hours
Fast charger 3-4 hours 6-8 hours
Before using the Zepcam, the Zepcam must be charged via the USB connection under
the rubber cover on the Zepcam recorder.
The Zepcam can be charged by:
• Connecting the Zepcam recorder and charger with the USB cable
• Connecting the Zepcam recorder and PC with USB cable
(Charging by computer takes more time to charge)
• Using the external battery
If the Zepcam is charging it is indicated by the following indicators;
• On screen; battery sign indicator: Red ash: Battery is charging
Green ash: Battery is charged
• On Zepcam; LED charger indicator status: Blue LED ashing: Battery is charging
Blue LED on: Battery is fully charged
For fastest charging results make sure the Zepcam is switched o
Process of charging the battery.
10
Other manuals for T1
2
This manual suits for next models
1
Table of contents


