Zoning ZOE User manual

ES
EN
FR
IT
Z
MASTER
OFF
ON
SYST
ECO
PROG
1234567
246810 12 14 16 18 20 22 24
ºC
TIMER
INFO
CLEAR
SET
DAY
PROG
COPY
ECO
FRESH
Cronotermostato ZOE
Manual del usuario
Timer-thermostat ZOE
User Manual
Chronothermostat ZOE
Manuel de l'utilisateur
Cronotermostato ZOE
Manuale utente
P.O. BOX 5
08540 Centelles (Barcelona)
T +34 93 889 80 91
www.zoning.es


Cronotermostato ZOE
v 0.V 09/170 TAGBASE 1
ES
WEE (RAEE)
No desechar los Aparatos Eléctricos y Electrónicos, como desechos urbanos.
Estos aparatos deben ser retirados para poder ser reciclados. Actuar según la
legislación en vigor.
Presentación del sistema ....................................................... 3
Características técnicas ......................................................... 3
Ubicación de los termostatos (fig. 1) .................................... 3
Cambio de pilas (fig. 2) .......................................................... 3
Teclas e indicadores (fig. 3) ................................................... 4
Utilización ................................................................................ 4
Localización de averías .......................................................... 6
Configuración básica (SE1, fig. 6),
a realizar sólo por un instalador acreditado ........................ 7
Configuración avanzada,
a realizar sólo por un instalador acreditado ......................... 7

Manual del usuario
2Manual del usuario V 09/17

Cronotermostato ZOE
v 0.V 09/170 TAGBASE 3
ES
A Presentación del sistema
Los cronotermostatos ZOE están diseñados para funcionar
conjuntamente con las centrales de control ZONING
SYSTEM, para controlar la temperatura de hasta 6 zonas
independientes.
El cronotermostato ZOE se comunica con la central de
control. La central gestiona una o varias compuertas
motorizadas (que regulan el flujo de aire), así como el
arranque y paro del equipo de climatización, que
proporciona el flujo de aire.
B Características técnicas
Termostato ZOE
•Alimentación 2 baterías 1,5 V LR06 AA (alcalinas)
•Autonomía media 1 año (o superior). Las baterías se
suministran con el equipo
•Testigo desgaste de pilas.
•Frecuencia portadora (Banda ISM, norma I-ETS 300-
220): 433.34 MHz (Opcional: 434.92 MHz)
•Alcance medio: 50 m en campo libre, 20 m en el hábitat
•Temperatura de funcionamiento: 0ºC a 55ºC
•Temperatura de almacenamiento: -10 ºC a 60 ºC
•Rango de Humedad: 10-90% (sin condensación)
•Fijación mural mediante tornillos (suministrados)
•Índice de protección: IP 20
•Sonda de temperatura NTC10K. Precisión 0,1ºC
•Histéresis de control configurable +/-0,2 a 0,5ºC
•Precisión de regulación CA según norma EN15500.
CA=0.3 (Test repport CLMS17-741. CSTB)
•Modo ECO económico (variación de la temperatura de
consigna en ±3ºC)
•Protección anti-hielo para T<7ºC+/-3ºC
•Dimensiones (LxHxZ): 70x110x19 mm
•Peso 0,13 kg (con pilas)
Central de control (regulador de función prefijada)
•Alimentación 230 VAC/ 50-60 Hz
•Consumo ZITY: 6 VA
•Alcance medio Radio: 50 m en campo libre, 20 m en el
hábitat. Antena externa orientable.
•Frecuencia 434,33 MHz (Opcional: 433,92 MHz). Ciclo
de trabajo <10%
•Para instalaciones a una altura hasta 2000 m del nivel
del mar. Receptor, CAT II.
•Salidas relé 230 VAC/5A (carga máxima: 5A, cos φ=1)
•Índice de protección: IP 20
•Protección aislamiento eléctrico, CAT II
•Temperatura de funcionamiento: 0 ºC a 55ºC
•Temperatura de almacenamiento: -10 ºC a 60 ºC
•Dimensiones (LxHxZ): 160x90x65 mm
•Peso 0,5 kg
Por medio de la presente MADEL ATD declara que los
equipos ZOE / KRCPLUS / KSP / KFCPLUS / ZITY
cumplen con los requisitos esenciales y cualesquiera otras
disposiciones aplicables o exigibles de disposiciones de
las Directivas 2014/35/UE LVD, 2014/30/UE EMC y 2014/
53/UE RED, 2011/65/UE ROHS, 2001/95/CE Seguridad
general de productos, 2012/19/UE RAEE y Reglamento
1907/2006 REACH.
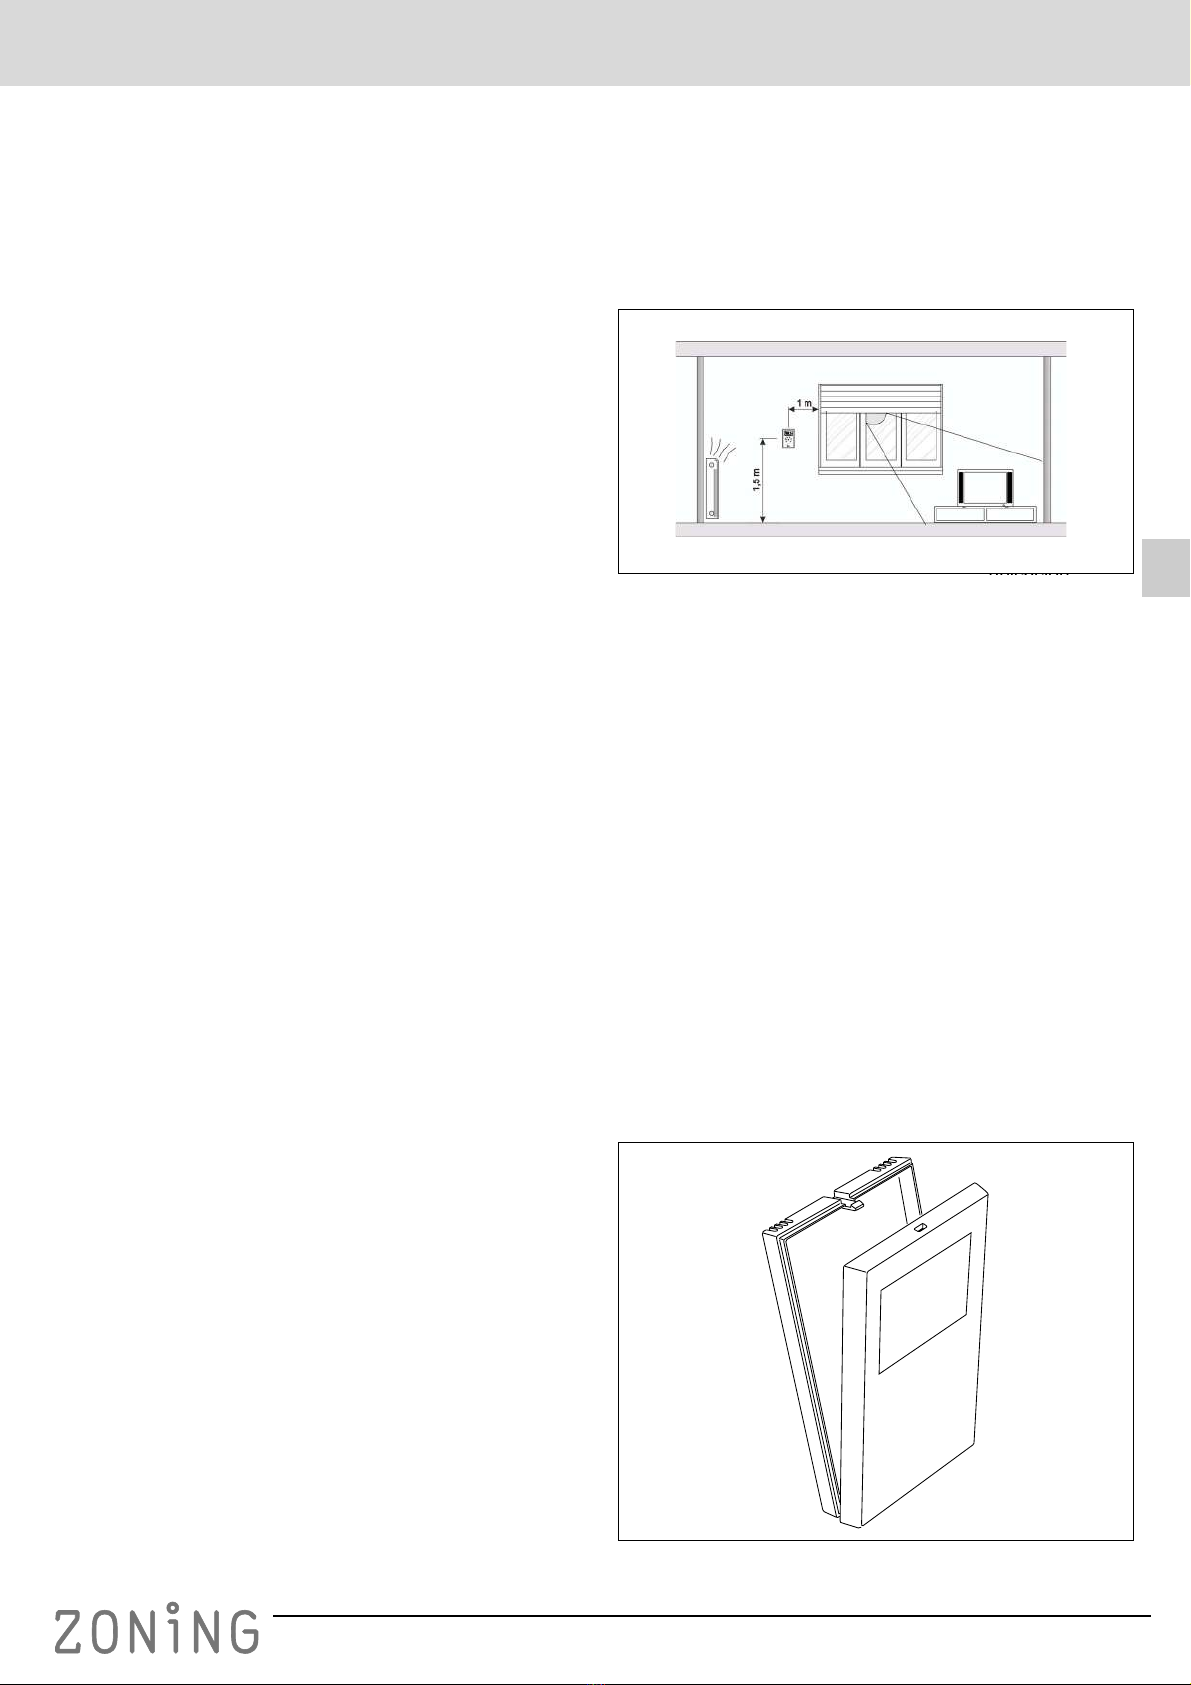
C Ubicación de los termostatos (fig. 1)
Fig. 1 Ubicación de los termostatos
•Ubique cada termostato en un lugar significativo de la
estancia.
•Posicione a una altura aproximada de 1.5 m, evitando
las fuentes de calor directas y las corrientes de aire no
deseadas.
•Evite situar los termostatos cerca de masas metálicas y
elementos conductores.
Los cronotermostatos ZOE se alimentan mediante pilas,
por lo que no es necesario realizar conexiones.
D Cambio de pilas (fig. 2)
Cuando en el display del termostato aparece el indicador
de falta de batería, dispone aproximadamente de 2
semanas para realizar el cambio.
•Extraiga la tapa frontal del termostato, pulsando la
lengüeta de la parte superior con una herramienta de
punta fina.
•Cambie las pilas, para una mayor duración utilice pilas
del tipo alcalino (LR06 AA).
Fig. 2 Cambio de las pilas
ubicacion

Manual del usuario
4Manual del usuario V 09/17
E Teclas e indicadores (fig. 3)
Fig. 3
F Utilización
Configuración
Antes de utilizar el termostato ZOE, debe haber sido
configurado por un instalador acreditado, tal como se
explica al final de este manual.
Encender el sistema
El encendido del sistema de zonificación sólo puede
hacerse mediante el termostato MASTER, que
normalmente está instalado en el recinto más concurrido:
1Pulse la tecla “ON/OFF” (16).
2Seleccione el modo de funcionamiento FRÍO / CALOR
/ CALDERA (14).
3Seleccione la temperatura de consigna mediante las
teclas “+” “-” (15/8).
Climatizar las zonas
Realice los siguientes pasos para cada uno de los
termostatos:
1Pulse la tecla “ON/OFF”.
2Seleccione la temperatura de consigna (teclas “+” / “-”).
Apagar las zonas
El apagado de una zona concreta se realiza desde su
termostato correspondiente:
1Pulse la tecla “ON/OFF” para cada zona que desee
desactivar.
Apagar todo el sistema
El apagado del sistema completo sólo puede hacerse
mediante el termostato MASTER:
1Pulse la tecla “ON/OFF” 2 veces, hasta que en el
display aparezca la palabra OFF y debajo del indicador
de zona aparezca MASTER. Indica el paro de toda la
instalación.
Modo Económico
El modo ECO modifica la temperatura de consigna en
±3ºC. Se activa en zonas desocupadas temporalmente
para mantener un cierto grado de confort, sin producir un
consumo excesivo de energía.
1Pulse la tecla “ECO” (11) para activar y desactivar esta
función.
Modo de funcionamiento (invierno/verano)
Sólo se puede cambiar mediante el termostato MASTER.
1Pulse la tecla (14) para cambiar de frío a calor o
viceversa.
2En el caso de comandar una caldera, posicionar en la
llama. El termostato MASTER actuará como termostato
de calefacción (sólo si la central lo permite).
3Para equipos que no permitan sustituir el termostato
máquina, el cambio de ciclo de frío-calor se debe
realizar tanto en el termostato máquina como en el
termostato maestro. Para evitar el paro del equipo de
climatización, el termostato de la máquina debe estar
siempre en demanda, siendo los termostatos de zona
los que asumen el control de temperatura.
Z
MASTER
OFF
ON
SYST
ECO
PROG
1234567
246810 12 14 16 18 20 22 24
ºC
TIMER
INFO
CLEAR
SET
DAY
PROG
COPY
ECO
FRESH
1 2 3
4
5
6
8
9
10
11
12
13
14
15
16
17
18
19
7
1 Temperatura de consigna / ambiente
2 Indicador velocidad ventilador
3 Indicador reloj
4 Indicador desgaste pilas
5 Indicadores Zona y Master
6 Indicador día de la semana
7 Indicador tramos horarios
8 Tecla bajar temperatura
9 Tecla “FAN” velocidad ventilador
10 Tecla “PROG” activar/desactivar programación semanal
11 Tecla “ECO”(modo económico ±3ºC)
12 Tecla “INFO” información sobre la configuración
13 Tecla “SET” acceso a la programación
14 Tecla “MODO” de funcionamiento (frío/calor/caldera)
15 Tecla subir temperatura
16 Tecla marcha/paro “ON/OFF”
17 Indicadores menú programación
18 Indicador termostato OFF
19 Indicadores modo de funcionamiento (frío/calor/caldera)

Cronotermostato ZOE
v 0.V 09/170 TAGBASE 5
ES
Ajuste de la hora (SE3, fig. 4)
Es necesario ajustar la hora para poder realizar la
programación semanal. Se realiza de la manera siguiente
(siga el diagrama de la figura 4):
1Con el termostato encendido, pulse la tecla “SET”
(aparece SET), a continuación “INFO” (aparece SE3), y
a continuación “ON/OFF” para confirmar.
2Con las teclas +/- seleccione la hora (al mantener
pulsado avanza rápido) y confirme pulsando “ON/OFF”.
3Con la tecla +/- seleccione el día de la semana y
confirme pulsando “ON/OFF” .
4El display muestra “rEC” y termina la programación.
Fig. 4
Bloquear el mando (SE4)
Puede bloquear el funcionamiento de las teclas “MODO”,
“FAN”, “PROG” y “ECO”, para evitar desajustes no
deseados.
•Pulse “SET”, a continuación “FAN” (aparece SE4) y
“ON/OFF” para confirmar.
–Si aparece la indicación “bL00” el mando queda
desbloqueado.
–Si aparece la indicación “bL01” el mando queda
bloqueado.
–Si aparece la indicación “bL02” el botón “Modo Frío/
Calor” queda bloqueado.
–Si aparece la indicación “bL03” el botón “Modo Frío/
Calor” y la función MASTER/OFF quedan
bloqueados.
Activar la programación semanal
Se puede establecer una programación semanal del
arranque y paro de cada zona. Se pueden ajustar, en
tramos de 1 h, hasta 3 intervalos de paro / marcha distintos
y con 2 niveles de temperatura CONFORT y ECOnomico.
•Pulse la tecla “PROG” (10) para activar la opción.
•Pulse otra vez la tecla “PROG” para desactivarla.
Ajuste de la programación semanal (SE5, fig. 5)
La programación semanal se realiza de la manera
siguiente (siga el diagrama de la figura 5):
1Con el termostato encendido, pulse la tecla “SET”
(aparece SET), a continuación “PROG” (aparece SE5)
y finalmente “ON/OFF” para confirmar.
2Pulsando “SET/DAY”, seleccione el día que desea
programar.
3Pulsando las teclas +/-, seleccione la hora de inicio del
tramo (conexión del sistema) y confirme pulsando “ON/
OFF”.
–Avance pulsando +/- para programar temperatura de
confort (se marcan las dos filas de puntos sobre las
horas de funcionamiento)
–Avance pulsando ECO para programar temperatura
económica (se marca sólamente la fila de puntos
inferior, sobre las horas de funcionamiento)
4Finalice el tramo (desconexión del sistema) pulsando
“ON/OFF”
5Si lo deesa, repita las operaciones 3 y 4 para programar
otro tramo. Puede programar un máximo de tres tramos
diarios.
6Pulse “SET/DAY” para grabar el día y pasar al
siguiente.
•Es posible pasar al día siguiente, copiando los tramos
del día, pulsando “PROG/COPY”.
•Si desea borrar todos los tramos del día, pulse la tecla
“INFO/CLEAR” (primero tiene que seleccionar el día
deseado como se indica en el paso 2).
7Para salir de la programación, avance pulsando “SET/
DAY” hasta el final. De lo contrario, la programación no
se grabará.
Z
MASTER
MASTER
OFF
OFF
ON
ON
SYST
SYST
ECO
PROG
PROG
1 2 3 4 567
2468
10
10
12
12
14
14
16
16
18
18
20
20
22
22
24
24
ºC
TIMER
TIMER
Z
MASTER
MASTER
OFF
OFF
ON
ON
SYST
SYST
ECO
PROG
PROG
1 2 3 4 567
2468
10
10
12
12
14
14
16
16
18
18
20
20
22
22
24
24
ºC
TIMER
TIMER
MASTER
MASTER
OFF
OFF
ON
ON
SYST
SYST
ECO
PROG
PROG
1 2 3 4 567
2468
10
10
12
12
14
14
16
16
18
18
20
20
22
22
24
24
TIMER
TIMER
Z
MASTER
MASTER
OFF
OFF
ON
ON
SYST
SYST
ECO
PROG
PROG
1234567
2468
10
10
12
12
14
14
16
16
18
18
20
20
22
22
24
24
ºC
TIMER
TIMER
SET
DAY
INFO
CLEAR ON/OFF
Z
MASTER
MASTER
OFF
OFF
ON
ON
SYST
SYST
ECO
PROG
PROG
1 2 3 4 567
2468
10
10
12
12
14
14
16
16
18
18
20
20
22
22
24
24
ºC
TIMER
TIMER
Z
MASTER
MASTER
OFF
OFF
ON
ON
SYST
SYST
ECO
PROG
PROG
1 2 3 4 567
2468
10
10
12
12
14
14
16
16
18
18
20
20
22
22
24
24
ºC
TIMER
TIMER
MASTER
MASTER
OFF
OFF
ON
ON
SYST
SYST
ECO
PROG
PROG
1 2 3 4 567
2468
10
10
12
12
14
14
16
16
18
18
20
20
22
22
24
24
TIMER
TIMER
Z
MASTER
MASTER
OFF
OFF
ON
ON
SYST
SYST
ECO
PROG
PROG
1234567
2468
10
10
12
12
14
14
16
16
18
18
20
20
22
22
24
24
ºC
TIMER
TIMER
SET
DAY
INFO
CLEAR
ON/OFF
/
ON/OFF ON/OFF
/
123 4
1

Manual del usuario
6Manual del usuario V 09/17
Fig. 5
G Localización de averías
Z
MASTER
MASTER
OFF
OFF
ON
ON
SYST
SYST
ECO
PROG
PROG
1 2 3 4 567
2468
10
10
12
12
14
14
16
16
18
18
20
20
22
22
24
24
ºC
TIMER
TIMER
Z
MASTER
MASTER
OFF
OFF
ON
ON
SYST
SYST
ECO
PROG
PROG
1 2 3 4 567
2468
10
10
12
12
14
14
16
16
18
18
20
20
22
22
24
24
ºC
TIMER
TIMER MASTER
OF
FOFF
ON
ON
SYST
SYST
PROG
PROG
1 2 3 4 567
2468
10
10
12
12
14
14
16
16
1
818 20 22 24
TIMER
TIMER
Z
MASTER
MASTER
OFF
OFF
ON
ON
SYST
SYST
ECO
PROG
PROG
1234567
2468
10
10
12
12
14
14
16
16
18
18
20
20
22
22
24
24
ºC
TIMER
TIMER
SET
DAY
PROG
COPY ON/OFF
Z
MASTER
MASTER
OFF
OFF
ON
SYST
SYST
ECO
PROG
1234567
246810 12 14 16 18 20 22 24
ºC
TIMER
TIMER
Z
MASTER
MASTER
OFF
ON
ON
SYST
SYST
ECO
PROG
PROG
1234567
246810 12 14 16 18 20 22 24
ºC
TIMER
TIMER
ON/OFF ON/OFF
/
SET
DAY /ECO
FRESH
23 4
Z
MASTER
MASTER
OFF
ON
SYST
SYST
ECO
PROG
PROG
1234567
246810 12 14 16 18 20 22 24
ºC
TIMER
TIMER
Z
MASTER
MASTER
OFF
OFF
ON
SYST
SYST
ECO
PROG
1234567
246810 12 14 16 18 20 22 24
ºC
TIMER
TIMER
Z
MASTER
MASTER
OFF
ON
SYST
SYST
ECO
PROG
PROG
1234567
246810 12 14 16 18 20 22 24
ºC
TIMER
TIMER
Z
MASTER
MASTER
OFF
ON
ON
SYST
SYST
ECO
PROG
PROG
1234567
246810 12 14 16 18 20 22 24
ºC
TIMER
TIMER
ON/OFF
ON/OFF
/
/ECO
FRESH
5
6
SET
DAY
1
Averías Causas y soluciones
Alguna zona no funciona
Verificar que:
•No hay ninguna programación activada.
•El termostato MASTER no está en OFF.
•La temperatura ECO no está activada.
•Pilas descargadas.
Alguna zona tarda mucho en cerrar
•La última zona que queda abierta, se cierra siempre con un retarde de 30
segundos. No es ninguna anomalía, si ocurre sólo en la última zona abierta.
•Pilas descargas.
Algunas teclas están bloqueadas
•Si al pulsar un tecla aparece SLAV, este termostato está configurado como
Esclavo y las teclas pulsadas no tienen función. Realice las operaciones en el
termostato Master.
•Si aparece BLOC, el termostato tiene funciones bloqueadas por el instalador.
Consulte a su instalador para el desbloqueo.
•Si la programación semanal no se activa, consulte a su instalador para el
desbloqueo.

Cronotermostato ZOE
v 0.V 09/170 TAGBASE 7
ES
H Configuración básica (SE1, fig. 6), a realizar sólo por un instalador acreditado
NOTA PARA EL USUARIO: esta configuración debe ser
realizada sólo por un instalador acreditado y no debe
modificarse por el usuario. En caso contrario, el sistema
podría dejar de funcionar.
Antes de utilizar el cronotermostato, es necesario realizar
la configuración básica. Esta configuración dispone de 4
menús:
•C-SP (programación semanal no habilitada) / Cron
(programación semanal habilitada) / ZITY
•Número ID de la central de control KSP
•Zona correspondiente al termostato
•Termostato MAESTRO o ESCLAVO. Algunas
operaciones sólo es posible realizarlas mediante el
maestro (encender y apagar el sistema completo, etc).
La programación básica se realiza de la manera siguiente
(siga el diagrama de la figura 6):
1Con el termostato encendido, presione “SET”, a
continuación “+” (el display muestra SE1) y a
continuación “ON/OFF” para confirmar.
2Mediante las teclas “+” y “-”, elija la opción deseada
(“Cron” / “C-SP” / “ZITY”) y pulse “ON/OFF” para
confirmar.
3Mediante las teclas “+” y “-”, seleccione el ID de la
central y pulse “ON/OFF” para confirmar.
4Mediante las teclas “+” y “-”, seleccione la zona
correspondiente al termostato y pulse “ON/OFF” para
confirmar.
5Mediante las teclas “+” y “-”, elija la opción deseada
(“mAST” / “SLAv”) y pulse “ON/OFF” para confirmar.
6El display muestra “rEC” y termina la programación.
Fig. 6
I Configuración avanzada, a realizar sólo por un instalador acreditado
La configuración avanzada se explica en el manual de
instalación ZITY y debe realizarse exclusivamente por un
instalador acreditado.
Z
MASTER
MASTER
OFF
OFF
ON
ON
SYST
SYST
ECO
PROG
PROG
1 2 3 4 567
2468
10
10
12
12
14
14
16
16
18
18
20
20
22
22
24
24
ºC
TIMER
TIMER
Z
MASTER
MASTER
OFF
OFF
ON
ON
SYST
SYST
ECO
PROG
PROG
1 2 3 4 567
2468
10
10
12
12
14
14
16
16
18
18
20
20
22
22
24
24
ºC
TIMER
TIMER MASTER
OOFF
ON
ON
SYST
SYST
PROG
PROG
1 2 3 4 567
2468
10
10
12
12
14
14
16
16 18 20 22 24
TIMER
TIMER
Z
MASTER
MASTER
OFF
OFF
ON
ON
SYST
SYST
ECO
PROG
PROG
1234567
2468
10
10
12
12
14
14
16
16
18
18
20
20
22
22
24
24
ºC
TIMER
TIMER
SET
DAY ON/OFF
Z
MASTER
MASTER
OFF
OFF
ON
SYST
SYST
ECO
PROG
1234567
246810 12 14 16 18 20 22 24
ºC
TIMER
TIMER
Z
MASTER
MASTER
OFF
ON
ON
SYST
SYST
ECO
PROG
PROG
1234567
246810 12 14 16 18 20 22 24
ºC
TIMER
TIMER
ON/OFF ON/OFF
//
234
Z
MASTER
MASTER
OFF
ON
SYST
SYST
ECO
PROG
PROG
1234567
246810 12 14 16 18 20 22 24
ºC
TIMER
TIMER
/
Z
MASTER
MASTER
OFF
ON
SYST
SYST
ECO
PROG
PROG
1234567
246810 12 14 16 18 20 22 24
ºC
TIMER
TIMER
Z
MASTER
MASTER
OFF
ON
ON
SYST
SYST
ECO
PROG
PROG
1234567
246810 12 14 16 18 20 22 24
ºC
TIMER
TIMER
ON/OFF
ON/OFF
/
56
1

Manual del usuario
8Manual del usuario V 09/17

Timer-thermostat ZOE
v 0.V 09/170 TAGBASE 9
EN
WEE (RAEE)
This product may not be treated as household waste. Instead it shall be handed
over to the applicable collection point for the recycling of electrical and electronic
equipment. For more detailed information about recycling of this product, please
contact your local city office or your household waste disposal service.
System presentation ............................................................ 11
Technical characteristics ..................................................... 11
Location of the thermostats (fig. 1) ..................................... 11
Battery change (fig. 2) .......................................................... 11
Keys and indicators (fig. 3) .................................................. 12
Use ......................................................................................... 12
Troubleshooting ................................................................... 14
Basic configuration (SE1, fig. 6),
to be carried out only by an accredited installer ............... 15
Advanced settings,
to be carried out only by an accredited installer ............... 15

User Manual
10 Manual del usuario V 09/17

Timer-thermostat ZOE
v 0.V 09/170 ZOE Timer-thermostat 11
EN
A System presentation
ZOE timer-thermostats are designed to work alongside
ZONING SYSTEM control units in order to control
temperature for up to 6 different zones.
The ZOE timer-thermostat communicates with the control
unit. The central unit manages one or several motorised
gates (which regulate the airflow), as well as starting up/
shutting down the climate control unit, which provides the
airflow.
B Technical characteristics
ZOE thermostat
•Power 2 1.5 V LR06 AA batteries (alkaline)
•Average battery life 1 year (or longer). The batteries are
supplied with the unit
•Battery life indicator.
•Carrier frequency (ISM band, Standard I-ETS 300-220):
433.34 MHz (Optional: 434.92 MHz)
•Mean range: 50 m in open field, 20 m in habitat
•Operating temperature: 0ºC to 55ºC
•Storage temperature: -10ºC to 60ºC
•Humidity Range: 10-90% (no condensation)
•Wall mount with bolts (supplied)
•Protection grade: IP 20
•NTC10K Temperature sensor. Accuracy 0.1ºC
•Configurable control hysteresis +/-0.2 to 0.5°C
•CA control accuracy according to Standard EN15500.
CA=0.3 (Test report CLMS17-741. CSTB)
•Economy ECO mode (±3ºC setpoint temperature
variation)
•Frost protection for T<7ºC+/-3ºC
•Dimensions (LxHxZ): 70x110x19 mm
•Weight 0.13 kg (with batteries)
Control unit (preset function controller)
•Power 230 VAC/50-60 Hz
•ZITY consumption: 6 VA.
•Mean range Radio: 50 m in open field, 20 m in habitat.
Orientable external antenna.
•Frequency 434.33 MHz (Optional: 433.92 MHz). Work
cycle <10%
•For installation up to 2000 m above sea level. Receiver,
CAT II.
•230 VAC/5A relay outputs (maximum load: 5A, cos φ=1)
•Protection grade: IP 20
•Electrical insulation protection, CAT II
•Operating temperature: 0 ºC to 55ºC
•Storage temperature: -10ºC to 60ºC
•Dimensions (LxHxZ): 160x90x65 mm
•Weight 0.5 kg.
MADEL ATD hereby declares that the ZOE / KRCPLUS /
KSP / KFCPLUS / ZITY equipment complies with the
essential requirements and any other applicable or
enforceable provisions of Directives 2014/35/EU LVD,
2014/30/EU EMC and 2014/53/UE RED, 2011/65/EU
ROHS, 2001/95/EC General product safety, 2012/19/UE
RAEE and Regulation 1907/2006 REACH.
C Location of the thermostats (fig. 1)
Fig. 1 Location of the thermostats
•Place the thermostat in a significant location.
•Place at a height of approximately 1.5 m, avoiding direct
heat sources and unwanted air currents.
•Avoid placing the thermostats close to metal masses
and conductor elements.
ZOE time thermometers are powered by batteries,
meaning connections are not necessary.
D Battery change (fig. 2)
When the thermostat display shows the low battery
indicator, you have approximately 2 weeks to make the
change.
•Remove the front cover from the thermostat, pressing
the tab in the top with a thin pointed tool.
•Change the batteries; use alkaline batteries for longer
life (LR06 AA).
Fig. 2 Battery change
bi i

User Manual
12 Manual del usuario V 09/17
E Keys and indicators (fig. 3)
Fig. 3
FUse
Configuration
Configuration by an accredited installer must be completed
before using the ZOE thermostat, as explained at the end
of this manual.
Turning the system on
The zoning system can only be turned on using the
MASTER thermostat, which is normally installed in the
most used site:
1Press the "ON/OFF" key (16).
2Select COLD / HEAT / BOILER operation mode (14).
3Select the setpoint temperature using the keys "+" "-"
(15/8).
Conditioning the zones
Carry out the following steps for each of the thermostats:
1Press the "ON/OFF" key.
2Select the setpoint temperature ( "+" / "-" keys).
Turning off the zones
Specific zones are turned off from the corresponding
thermostat:
1Press the "ON/OFF" key for each zone to be disabled.
Turning off the whole system
The complete system can only be turned off using the
MASTER thermostat:
1Press the "ON/OFF" key twice until the display shows
the word OFF and MASTER appears underneath the
zone indicator. Indicates shutting down of the entire
facility.
Economy Mode
ECO mode changes setpoint temperature by ¬±3¬½C.
This is enabled in provisionally unoccupied zones, in order
to maintain a certain degree of comfort without excessive
energy consumption.
1Press the "ECO" key (11) to enable and disable this
function.
Operation mode (winter/summer)
It can only be changed using the MASTER thermostat.
1Press the key (14) to change from cold to heat, or vice
versa.
2When commanding a boiler, place in the flame. The
MASTER thermostat will act as a heating thermostat
(only if the central unit so allows).
3In equipment in which the machine-thermostat cannot
be replaced, the cold-heat cycle change must be carried
out on both the machine thermostat and the master
thermostat. The machine thermostat must always be in
demand in order to stop the climate control unit from
shutting down, with the zone thermostats taking over
temperature control.
Z
MASTER
OFF
ON
SYST
ECO
PROG
1234567
246810 12 14 16 18 20 22 24
ºC
TIMER
INFO
CLEAR
SET
DAY
PROG
COPY
ECO
FRESH
1 2 3
4
5
6
8
9
10
11
12
13
14
15
16
17
18
19
7
1 Setpoint/ambient temperature
2 Fan speed indicator
3 Clock indicator
4 Battery use indicator
5 Zone and Master indicators
6 Day of the week indicator
7 Timeslots indicator
8 Reduce temperature key
9 "FAN" key, fan speed
10 "PROG" key to enable/disable weekly programming
11 "ECO" key (economy mode ±3ºC)
12 "INFO" key, information on configuration
13 "SET" key, access to programming
14 "MODE" operation key (cold/heat/boiler)
15 Increase temperature key
16 "ON/OFF" key
17 Programming menu indicators
18 Thermostat OFF indicator
19 Operating mode indicators (cold/heat/boiler)

Timer-thermostat ZOE
v 0.V 09/170 ZOE Timer-thermostat 13
EN
Setting the time (SE3, fig. 4)
Time must be set in order to carry out weekly programming.
This is carried out as follows (follow the diagram in figure 4):
1With the thermostat on, press the "SET" key (SET
appears), then "INFO" (SE3 appears), followed by "ON/
OFF" to confirm.
2Use the +/- keys to select the time (keeping fast forward
pressed down) and confirm by pressing "ON/OFF".
3Use the +/- key to select the day of the week and confirm
by pressing "ON/OFF".
4The display shows "rEC" and programming finishes.
Fig. 4
Locking the control (SE4)
Operation of the "MODE", "FAN", "PROG" and "ECO" keys
can be locked to prevent loss of setting.
•Press "SET" followed by "FAN" (SE4 appears) and "ON/
OFF" to confirm.
–If "bL00" appears, the control is unlocked.
–If "bL01" appears, the control is locked.
–If "bL02" is displayed, the "Heat/Cool Mode" button
is locked.
–If "bL03" is displayed, the "Heat/Cool Mode" button
and the MASTER/OFF function are locked.
Enabling weekly programming
Weekly startup and shutdown programming can be
established for each zone. Up to 3 different shutdown/
startup intervals can be adjusted in 1-hour timeslots with 2
COMFORT and ECONOMY temperature levels.
•Press the "PROG" key (10) to enable the option.
•Press the "PROG" key again to disable it.
Setting weekly programming (SE5, fig. 5)
Weekly programming is carried out as follows (follow the
diagram in figure 5):
1With the thermostat on, press the "SET" key (SET
appears), then "PROG" (SE5 appears), and finally "ON/
OFF" to confirm.
2Press "SET/DAY" to select the day to be programmed.
3Pressing the +/- keys, select the start of the timeslot
(system connection) and confirm by pressing "ON/
OFF".
–Move forward by pressing +/- to programme comfort
temperature (marking the two rows of dots on the
operating hours)
–Move forward by pressing ECO to programme
economy temperature (marking only the bottom row
of dots, on the operating hours)
4Finish the timeslot (system disconnection) by pressing
"ON/OFF"
5If required, repeat operations 3 and 4 to programme
another timeslot. A maximum of three daily timeslots
can be programmed.
6Press "SET/DAY" to programme the day and move onto
the next one.
•Press "PROG/COPY" to move onto the next day,
copying the day’s timeslots.
•The day's timeslots can be cleared by pressing the
"INFO/CLEAR" key (first selecting the required day, as
indicated in step 2).
7Move forward by pressing "SET/DAY" to the end to exit
programming. Failure to do this will mean the
programming is not stored.
Z
MASTER
MASTER
OFF
OFF
ON
ON
SYST
SYST
ECO
PROG
PROG
1 2 3 4 567
2468
10
10
12
12
14
14
16
16
18
18
20
20
22
22
24
24
ºC
TIMER
TIMER
Z
MASTER
MASTER
OFF
OFF
ON
ON
SYST
SYST
ECO
PROG
PROG
1 2 3 4 567
2468
10
10
12
12
14
14
16
16
18
18
20
20
22
22
24
24
ºC
TIMER
TIMER
MASTER
MASTER
OFF
OFF
ON
ON
SYST
SYST
ECO
PROG
PROG
1 2 3 4 567
2468
10
10
12
12
14
14
16
16
18
18
20
20
22
22
24
24
TIMER
TIMER
Z
MASTER
MASTER
OFF
OFF
ON
ON
SYST
SYST
ECO
PROG
PROG
1234567
2468
10
10
12
12
14
14
16
16
18
18
20
20
22
22
24
24
ºC
TIMER
TIMER
SET
DAY
INFO
CLEAR ON/OFF
Z
MASTER
MASTER
OFF
OFF
ON
ON
SYST
SYST
ECO
PROG
PROG
1 2 3 4 567
2468
10
10
12
12
14
14
16
16
18
18
20
20
22
22
24
24
ºC
TIMER
TIMER
Z
MASTER
MASTER
OFF
OFF
ON
ON
SYST
SYST
ECO
PROG
PROG
1 2 3 4 567
2468
10
10
12
12
14
14
16
16
18
18
20
20
22
22
24
24
ºC
TIMER
TIMER
MASTER
MASTER
OFF
OFF
ON
ON
SYST
SYST
ECO
PROG
PROG
1 2 3 4 567
2468
10
10
12
12
14
14
16
16
18
18
20
20
22
22
24
24
TIMER
TIMER
Z
MASTER
MASTER
OFF
OFF
ON
ON
SYST
SYST
ECO
PROG
PROG
1234567
2468
10
10
12
12
14
14
16
16
18
18
20
20
22
22
24
24
ºC
TIMER
TIMER
SET
DAY
INFO
CLEAR
ON/OFF
/
ON/OFF ON/OFF
/
123 4
1

User Manual
14 Manual del usuario V 09/17
Fig. 5
G Troubleshooting
Z
MASTER
MASTER
OFF
OFF
ON
ON
SYST
SYST
ECO
PROG
PROG
1 2 3 4 567
2468
10
10
12
12
14
14
16
16
18
18
20
20
22
22
24
24
ºC
TIMER
TIMER
Z
MASTER
MASTER
OFF
OFF
ON
ON
SYST
SYST
ECO
PROG
PROG
1 2 3 4 567
2468
10
10
12
12
14
14
16
16
18
18
20
20
22
22
24
24
ºC
TIMER
TIMER
MASTER
MASTER
OFF
OFF
ON
ON
SYST
SYST
ECO
PROG
PROG
1 2 3 4 567
2468
10
10
12
12
14
14
16
16
18
18
20
20
22
22
2
424
TIMER
TIMER
Z
MASTER
MASTER
OFF
OFF
ON
ON
SYST
SYST
ECO
PROG
PROG
1234567
2468
10
10
12
12
14
14
16
16
18
18
20
20
22
22
24
24
ºC
TIMER
TIMER
SET
DAY
PROG
COPY ON/OFF
Z
MASTER
MASTER
OFF
OFF
ON
SYST
SYST
ECO
PROG
1234567
246810 12 14 16 18 20 22 24
ºC
TIMER
TIMER
Z
MASTER
MASTER
OFF
ON
ON
SYST
SYST
ECO
PROG
PROG
1234567
246810 12 14 16 18 20 22 24
ºC
TIMER
TIMER
ON/OFF ON/OFF
/
SET
DAY /ECO
FRESH
23 4
Z
MASTER
MASTER
OFF
ON
SYST
SYST
ECO
PROG
PROG
1234567
246810 12 14 16 18 20 22 24
ºC
TIMER
TIMER
Z
MASTER
MASTER
OFF
OFF
ON
SYST
SYST
ECO
PROG
1234567
246810 12 14 16 18 20 22 24
ºC
TIMER
TIMER
Z
MASTER
MASTER
OFF
ON
SYST
SYST
ECO
PROG
PROG
1234567
246810 12 14 16 18 20 22 24
ºC
TIMER
TIMER
Z
MASTER
MASTER
OFF
ON
ON
SYST
SYST
ECO
PROG
PROG
1234567
246810 12 14 16 18 20 22 24
ºC
TIMER
TIMER
ON/OFF
ON/OFF
/
/ECO
FRESH
5
6
SET
DAY
1
Failures Causes and solutions
There is a zone which does not work
Check that:
•There is no programming enabled.
•The MASTER thermostat is not OFF.
•ECO temperature is not enabled.
•Batteries flat.
There is a zone which takes a long
time to close
•The last zone which remains open always closes with a 30-second delay. This
is not an anomaly, occurring only in the last open zone.
•Batteries flat.
Some keys are locked
•If SLAV appears when pressing a key, this thermostat is configured as the
Slave and the keys pressed do not have any functions. Carry out the operations
in the Master thermostat.
•If BLOC appears, the thermostat has functions locked by the installer. Check
with your installer for unlocking.
•If weekly programming is not enabled, check with your installer for unlocking.

Timer-thermostat ZOE
v 0.V 09/170 ZOE Timer-thermostat 15
EN
H Basic configuration (SE1, fig. 6), to be carried out only by an accredited installer
NOTE FOR USERS: this configuration must only be carried
out by an approved installer and must not be modified by
the user. Tampering with the unit may cause it to fail.
Basic configuration must be completed before using the
timer-thermostat. This configuration has 4 menus:
•C-SP (weekly programming not enabled) / Cron (weekly
programming enabled) / ZITY
•ID number of the KSP control unit
•Thermostat zone
•MASTER or SLAVE thermostat. Some operations can
only be carried out using the master (turn the complete
system on and off, etc).
Advanced programming is carried out as follows (follow the
diagram in figure 6):
1With the thermostat on, press "SET", then "+" (the
display shows SE1) followed by "ON/OFF" to confirm.
2Use the "+" and "-" keys to choose the required option
("Cron" / "C-SP"/ “ZITY”) and press "ON/OFF" to
confirm.
3Use the "+" and "-" keys to select the unit ID and press
"ON/OFF" to confirm.
4Use the "+" and "-" keys to select the zone for the
thermostat and press "ON/OFF" to confirm.
5Use the "+" and "-" keys to choose the required option
("mAST" / "SLAv") and press "ON/OFF" to confirm.
6The display shows "rEC" and programming finishes.
Fig. 6
I Advanced settings, to be carried out only by an accredited installer
Advanced settings are explained in the ZITY installation
manual and must only be carried out by an accredited
installer.
Z
MASTER
MASTER
OFF
OFF
ON
ON
SYST
SYST
ECO
PROG
PROG
1 2 3 4 567
2468
10
10
12
12
14
14
16
16
18
18
20
20
22
22
24
24
ºC
TIMER
TIMER
Z
MASTER
MASTER
OFF
OFF
ON
ON
SYST
SYST
ECO
PROG
PROG
1 2 3 4 567
2468
10
10
12
12
14
14
16
16
18
18
20
20
22
22
24
24
ºC
TIMER
TIMER
MASTER
MASTER
OFF
OFF
ON
ON
SYST
SYST
ECO
PROG
PROG
1 2 3 4 567
2468
10
10
12
12
14
14
16
16
18
18
20
20
22
22
2
424
TIMER
TIMER
Z
MASTER
MASTER
OFF
OFF
ON
ON
SYST
SYST
ECO
PROG
PROG
1234567
2468
10
10
12
12
14
14
16
16
18
18
20
20
22
22
24
24
ºC
TIMER
TIMER
SET
DAY ON/OFF
Z
MASTER
MASTER
OFF
OFF
ON
SYST
SYST
ECO
PROG
1234567
246810 12 14 16 18 20 22 24
ºC
TIMER
TIMER
Z
MASTER
MASTER
OFF
ON
ON
SYST
SYST
ECO
PROG
PROG
1234567
246810 12 14 16 18 20 22 24
ºC
TIMER
TIMER
ON/OFF ON/OFF
//
234
Z
MASTER
MASTER
OFF
ON
SYST
SYST
ECO
PROG
PROG
1234567
246810 12 14 16 18 20 22 24
ºC
TIMER
TIMER
/
Z
MASTER
MASTER
OFF
ON
SYST
SYST
ECO
PROG
PROG
1234567
246810 12 14 16 18 20 22 24
ºC
TIMER
TIMER
Z
MASTER
MASTER
OFF
ON
ON
SYST
SYST
ECO
PROG
PROG
1234567
246810 12 14 16 18 20 22 24
ºC
TIMER
TIMER
ON/OFF
ON/OFF
/
56
1

User Manual
16 Manual del usuario V 09/17

Chronothermostat ZOE
v 0.V 09/170 TAGBASE 17
FR
WEE (RAEE)
Ne jeter pas les Appareils électriques or électroniques à la poubelle. Ces
appareils doivent être retirées pour être recyclées. Référer aux lois en vigueur.
Présentation du système ..................................................... 19
Caractéristiques techniques ................................................ 19
Emplacement des thermostats (fig. 1) ................................ 19
Changement de piles (fig. 2) ................................................ 19
Touches et indicateurs (fig. 3) ............................................. 20
Utilisation .............................................................................. 20
Localisation de pannes ........................................................ 22
Configuration basique (SE1, fig. 6),
à réaliser uniquement par un installateur certifié .............. 23
Configuration avancée,
à réaliser uniquement par un installateur certifié .............. 23

Manuel de l'utilisateur
18 Manuel de l'utilisateur V 09/17
Table of contents
Languages:
Other Zoning Thermostat manuals
Popular Thermostat manuals by other brands

Carrier
Carrier A07051 installation instructions

TECH
TECH EU-R-8PZ Plus user manual

Comet
Comet Z-Wave 700226 quick start guide

Aube Technologies
Aube Technologies TH140-28 Installation and user guide

LUX
LUX DMH110b Installation and operating instructions

Honeywell
Honeywell CM507A Installation and user guide