Zoom Q8 User manual

User Guide
Safety and Operation
Precautions must be read
before using this unit.
© 2015 ZOOM CORPORATION
Copying or reproduction of this User Guide in
part or in whole without permission is prohibited.
Q8

Contents
1
Contents
Contents .................................................. 1
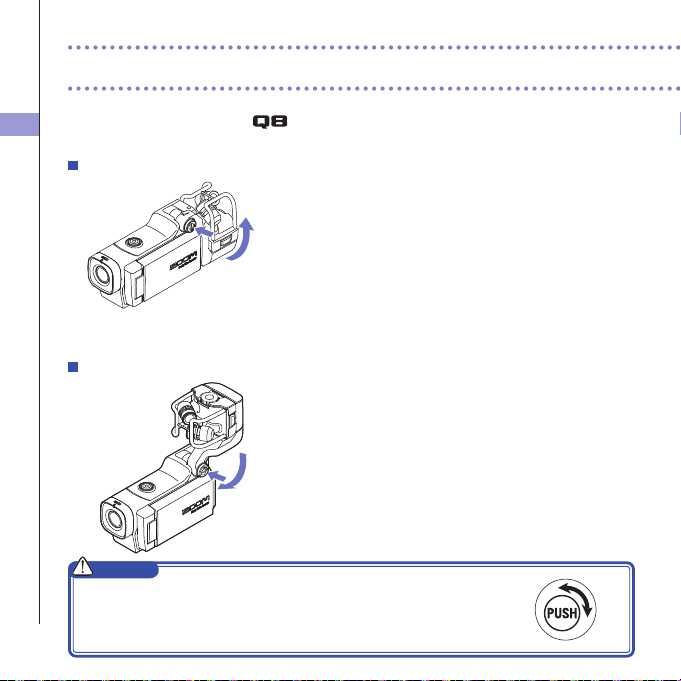
Parts and their functions ........................ 2
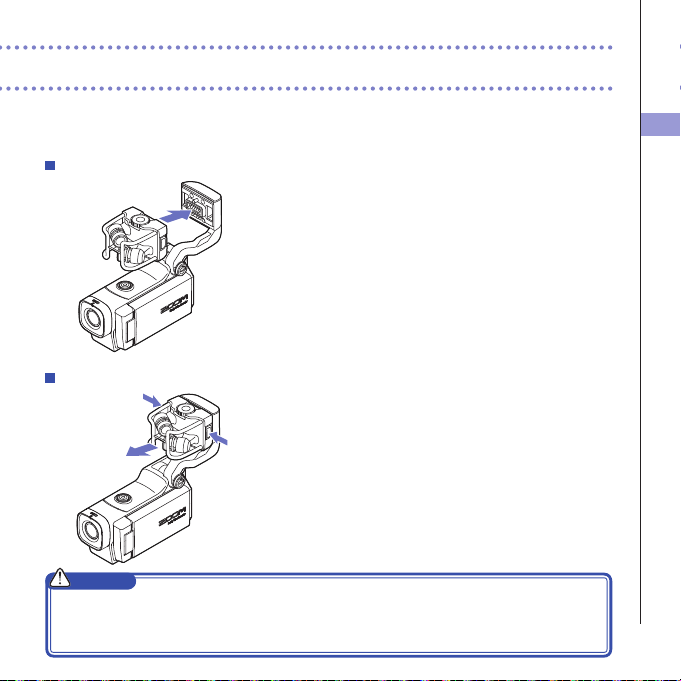
Mic overview........................................... 5
Connecting mics to Inputs 1 and 2........ 7
Display overview .................................... 8
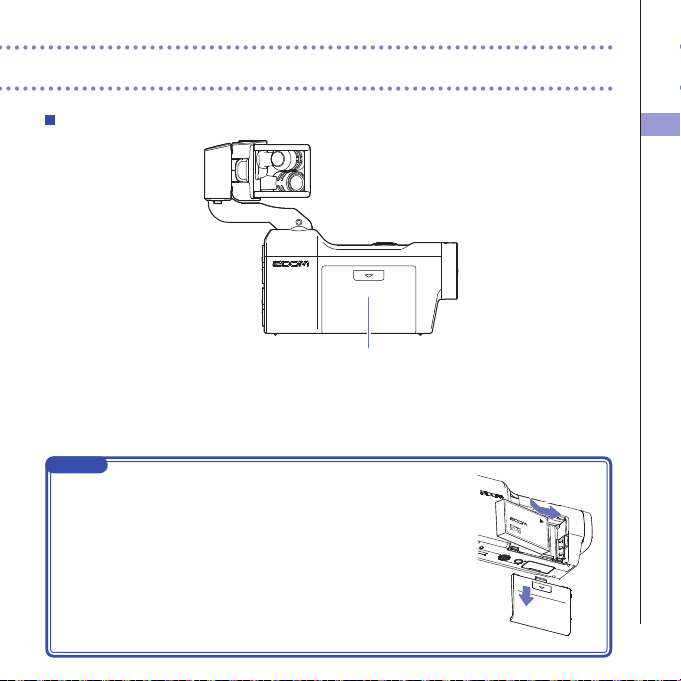
Charging the battery..............................11
Turning the power ON and OFF........... 12
Setting the date and time..................... 13
Formatting SD cards..............................14
Recording mode overview................... 15
Selecting tracks to record......................19
Adjusting recording levels................... 21
Adjusting the angle of view ................. 22
Recording .............................................. 23
Audio monitoring settings ................... 24
Recording mode settings ..................... 25
Camera settings .................................... 27
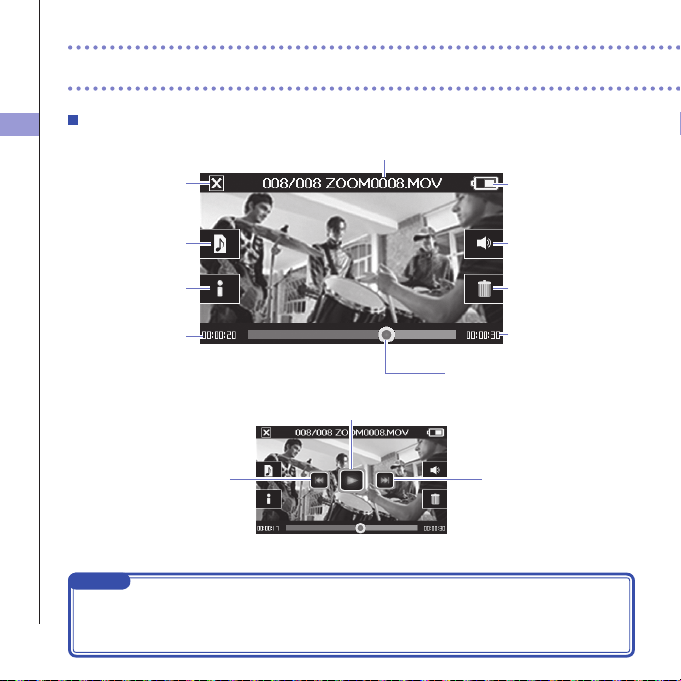
Playing recordings................................ 28
Deleting recordings .............................. 31
Mixer Screen settings........................... 32
Headphones/line and HDMI output..... 40
USB connections .................................. 41
LCD Rotation and FILE list.................... 43
System settings..................................... 44
Updating the firmware......................... 45
Troubleshooting.................................... 46
Specifications........................................ 47
Safety Precautions................................ 48
Usage Precautions................................ 49
Warnings and requests regarding safe
battery use............................................. 50

Parts and their functions
2
Parts and their functions
Left side
To p
XY mic
REC
button
MIC GAIN
adjustment knob
(Can be changed)
Mic attachment
(sold separately)
POWER
button
Track
buttons
Input
volume 2
Input
volume 1
PLAY/PAUSE
button
Speaker
UNLOCK
button

Parts and their functions
3
Front
Video
recording
LED
Lens
Display
Opening and closing the LCD screen
Parts and their functions (continued)
HDMI port
USB port
Headphones
jack
Input 2
jack
Input 1
jack
Charging LED
Back
1
2
3
XLR
TRS
1 : GND
2 : HOT
3 : COLD
TIP : HOT
RING : COLD
SLEEVE : GND

Parts and their functions
4
Battery cover
Right side
NOTE
Connecting the battery
1Slide the battery cover down to remove it.
2Install the battery as shown in the illustration and reattach the battery
cover.
11
22

Mic overview
5
Raising the mic
1. While pressing the UNLOCK button, raise the mic
until it reaches the fixed position.
Lowering the mic
1. While pressing the UNLOCK button, lower the mic.
CAUTION
Do not force the mic arm without pushing the UNLOCK button. Doing so
could damage the main unit.
Mic overview
The XY mic included with the can be swapped with another mic attachment according
to your need.

Mic overview
6
Attaching the mic
1. Attach the mic to the main unit and push it into
place until it locks.
Disconnecting the mic
1. While pressing the buttons on the left and right
sides of the mic, pull it out of the main unit.
CAUTION
• Whendisconnectingthemic,donotusetoomuchforce.Excessiveforcecoulddamagethemicor
the main unit.
• Videorecordingwillstopifamicisremovedduringrecording.

Connecting mics to Inputs 1 and 2
7
You can connect mics, mixers and other devices to the Inputs 1 and 2. The L/R input
from the XY mic and Inputs 1/2 can be used together to record up to 4 tracks at the same
time.
Connection examples
Recording audio is possible in the following kinds of situations.
Concert video recording
•L/Rinputmic:Performanceonstage
•Inputs1/2:Lineoutputsfrommixer
PA mixer
Input 2
Input 1
L/R inputs
Guitar performance video recording
•L/Rinputmic:Off-micrecording ofvocaland
guitar
•Input1:Vocalmic
•Input2:Guitarmic(direct)
Vocal mic
Guitar mic
Input 2
Input 1
L/R inputs
Connecting mics to Inputs 1 and 2
NOTE
ConnectdynamicandcondensermicswithXLRplugstoInputs1and2.Phantompower
(+12V/+24V/+48V)canbesuppliedtocondensermics.(→P.36)

Display overview
8
Display overview
Main Screen
Level meters
PAD setting
Phantom power
setting
LO CUT setting DYNAMICS settings
Stereo link setting
Timecode
When recording: shows recording time
When paused: shows available recording time
Recording mode
Remaining battery
charge
Connected mic
Type of connected mic capsule
Camera SCENE setting
Open Menu Screen
Output volume
Adjust volume of headphones/
built-in speaker
Open Playback Screen
Open FILE list
Record/stop
Audio quality setting
Video resolution
setting
Open Mixer Screen
Zoom in/out
Upsidedown
Image inversion
LCDLock
Shows locked screen orientation
NOTE
Ifyoutouchanywhereotherthanabuttonorallowsometimetopasswithoutoperation,thebuttons
will disappear and only the level meters will be shown.

Display overview
9
Display overview (continued)
Playback screen
Playback position bar
Shows video playback positionTouch to change
the playback position
File name
Name of video file playing
Remaining battery
charge
Output volume
Adjust volume of headphones/
built-in speaker
When paused
Delete
Delete the video currently
playing
Video length
Audio switch
Select the audio played
(only appears for files recorded
using MOV+WAV or
MULTI AUDIO)
Main Screen
Return to Main Screen
Information
Show information about the
video currently playing
Timecode
Shows elapsed playback time
Play/Pause
Skiptobeginningor
previousvideo
Next video
NOTE
• Aftersometimepasseswithoutoperation,onlythevideoimagewillbeshown.Touchthescreen
to show the buttons again.
• Levelmeterscanbeshownontheplaybackscreen.(See"Systemsettings"onpage44.)

Display overview
10
Mixer Screen
NOTE
When Inputs 1/2 are stereo-linked, they appear
differentlyontheMixerScreen. (See"Stereo link
setting"onpage35.)
Return to
Main Screen
L/R tracks Input 1 Input 2
Input1/2 shared settings
Settings that affect both Inputs 1 and 2
(stereolink,phantompower,pad)
Mic option
Set according to the mic type
(shown only when using compatible mics)
Level faders
Adjust individual track
volumes
Pan knobs
Adjust audio left-right
balance
LO CUT
(See "LO CUT" on page 39.)
DYNAMICS
(See "DYNAMICS" on page
38.)

Charging the battery
11
Charging the battery
1. Turn the off.
2. Connect a USB power source (running computer or
ZOOM AD-17 AC adapter (sold separately)).
Whilethe batteryisrecharging,theChargingLEDon
the back of the will stay lit.
3. After charging completes, disconnect the cable from
the USB power source.
Afterrecharginghascompleted,theChargingLEDwill
become unlit.
NOTE
Recharging thebatterycompletely(100%)takesabout4hours 30minutes whenconnected toa
computerand about2 hours45 minuteswhen usinganACadapter. (Theamountof timerequired
willvarydependingontheconditions.)
CAUTION
• Thebatterywillnotchargewhiletherecorderison.
• Thesurroundingtemperatureshouldbebetween5°Cand35°C(41°Fand95°F)whencharging.
Atothertemperatures,thebatterycouldbecomehot,damagedorweakened.
• Donotleavethecableconnectedforalongtimeafterchargingcompletes.
• Youmustalsofollowthehandlinginstructionsin"Warningsandrequestsregardingsafebattery
use"onpage50.
2
2

Turning the power ON and OFF
12
Turning the power ON and OFF
Turning the power ON
1. Open the LCD.
2. Press .
Turning the power OFF
1. Press and hold .
After"GoodbyeSeeYou!"appears,thepowerturnsoff.
2
1
Display
1

Setting the date and time
13
Setting the date and time
If the date and time are set, the recorder can add the recording date and time to files.
1. On the menu screen, touch .
2. In the sub menu, touch "Set Date".
3. Touch an item to be changed to select it, and touch
and to set the current date and time.
4. After completing the setting, touch to close the
submenu.
1
2
3
4

Formatting SD cards
14
Formatting SD cards
You should format SD cards for use with the .
1. On the menu screen, touch .
2. Touch .
3. In the sub menu, touch "SD Card".
4. In the sub menu, touch "Format".
5. On the confirmation screen, touch "Yes".
ThiswillstartSDcardformatting.Select"No"toreturn
totheSETTINGmenu.
Afterformattingcompletes,"Done"willappearandthe
SETTINGmenuwillreopen.
NOTE
IftheSDcard’swrite-protectionswitchisON,itcannotbeformatted.
CAUTION
• AfterpurchasinganewSDcard,alwaysformatitusingthe tomaximizeperformance.
• AlldatapreviouslysavedontheSDcardwillbedeletedwhenitisformatted.
4
5
3
2

Recording mode overview
15
MOV mode
ThefourchannelsofaudiofromthemiccapsuleL/Rinputsandexternal1/2inputsaremixedto
stereoandsavedtogetherwiththevideoinasinglevideole(MOVformat).
The can save individual unmixed audio files at the same time as video files. Use the
RECORDING MODE menu to change the recording mode. (See "Recording mode settings"
on page 25.)
Video file
ZOOM0001.MOV
Mixer
Video
Input 1
Mic capsule
Input 2
Recording mode overview

Recording mode overview
16
MOV+WAV mode
Audioles(WAVformat)aresavedforeachaudiotrackatthesametimeasvideoles.Theaudio
fromthemiccapsuleL/Rinputsandtheaudiofromtheexternal1/2inputsaresavedasseparate
files.
Audio file
ZOOM0001_LR.WAV
ZOOM0001_INPUT12.WAV ZOOM0001_INPUT1.WAV
ZOOM0001_INPUT2.WAV
Video file
ZOOM0001.MOV
Mixer
Video
Input 1
Mic capsule
Input 2
Stereo link: ON Stereo link: OFF
NOTE
• Only44.1/48kHzWAVformats(16/24-bit)canbeselectedwhenrecordinginMOV+WAVmode.
• InMOV+WAVmode,audiocannotbeoutputfromanHDMITV.
• Audiowillbesavedtoaudiolesbeforepassingthroughmixerlevelandpanadjustments.

Recording mode overview
17
STEREO AUDIO mode
ThefourchannelsofaudiofromthemiccapsuleL/Rinputsandexternal1/2inputsaremixedto
stereoandsavedasasinglestereoaudiole.Videoisnotrecorded.
Audio file
ZOOM0001.WAV
Input 1
Mic capsule
Input 2
Mixer
Recording mode overview (continued)

Recording mode overview
18
MULTI AUDIO mode
TheaudiofromthemiccapsuleL/Rinputsandtheaudiofromtheexternal1/2inputsaresavedas
separateaudioles(WAVformat).Videoisnotrecorded.
Audio file
ZOOM0001.WAV
ZOOM0001_INPUT12.WAV ZOOM0001_INPUT1.WAV
ZOOM0001_INPUT2.WAV
Input 1
Mic capsule
Input 2
Stereo link: ON Stereo link: OFF
NOTE
• Only44.1/48kHzWAVformats(16/24-bit)canbeselectedwhenrecordinginMULTIAUDIOmode.
• InMULTIAUDIOmode,thenamesofthelescreateddependontheON/OFFstatusofeachtrack.
(See"Selectingtrackstorecord"onpage19.)
• InMULTIAUDIOmode,audiocannotbeoutputfromanHDMITV.
• Audiowillbesavedtoaudiolesbeforepassingthroughmixerlevelandpanadjustments.

Selecting tracks to record
19
1. Press the buttons of the tracks that you want to
record.
NOTE
Theindicatorsof theselected trackbuttonslightred,
and you will be able to monitor the signals input on
thesetracksthroughheadphones/lineoutput.
2. To record Inputs 1/2 as a stereo file (stereo link),
press both of their track buttons at the same time.
Toendthestereolink,pressthetrackbuttonsfor
Inputs1/2atthesametime.
NOTE
ThestereolinkoftheL/Rtrackscannotbedisabled.
NOTE
StereolinksettingscanalsobemadeusingtheInput1/2sharedsettingsontheMixerScreen.(See
page35.)
Selecting tracks to record
1
Other manuals for Q8
3
Table of contents
Other Zoom Camcorder manuals