Zotac VR GO User manual


ZOTAC VR GO
1
ZOTAC VR GO
User’s Manual
No part of this manual, including the products and software described in it, may
be reproduced, transmitted, transcribed, stored in a retrieval system, or translated
into any language in any form or by any means, except documentation kept by the
purchaser for backup purposes, without the express written permission of ZOTAC.
Products and corporate names mentioned in this manual may not be registered
trademarks or copyrights of their respective companies, and are used for identication
purposes only. All trademarks are the property of their respective owners.
Every effort has been made to ensure that the contents of this manual are correct and
up to date. However, the manufacturer makes no guarantee regarding the accuracy of
its contents, and reserves the right to make changes without prior notice.
CAUTION:
Risk of explosion if the battery is replaced with an incorrect type. Batteries should be
recycled where possible. Disposal of used batteries must be in accordance with local
environmental regulations.

ZOTAC VR GO
2
Table of Contents
Product specications ----------------------------------------------------------------------------------------3
Safety information ----------------------------------------------------------------------------------------------4
Setting up your system-------------------------------------------------------------------------------------4
Care during use ----------------------------------------------------------------------------------------------4
Welcome -----------------------------------------------------------------------------------------------------------5
Package contents -------------------------------------------------------------------------------------------5
Getting to know your ZOTAC VR GO ---------------------------------------------------------------------6
Top view--------------------------------------------------------------------------------------------------------6
Left view -------------------------------------------------------------------------------------------------------6
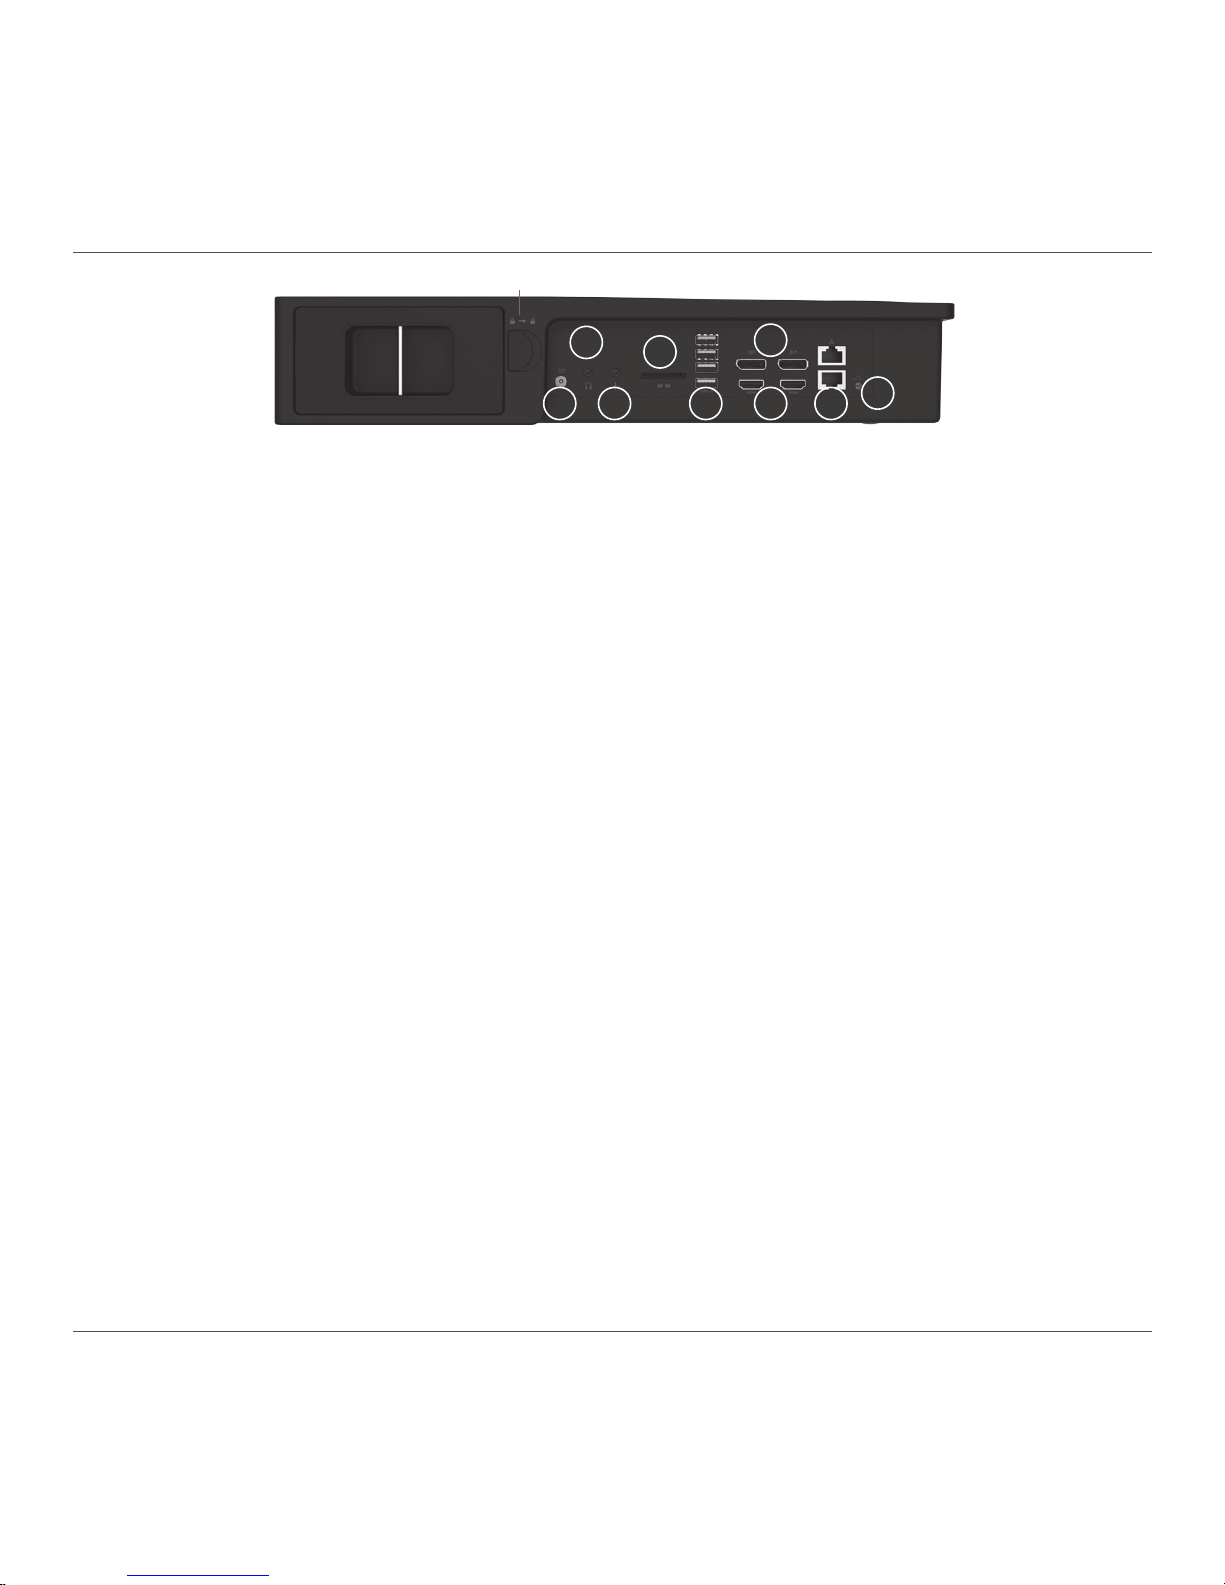
Right view -----------------------------------------------------------------------------------------------------7
Installing Hardware inside ZOTAC VR GO--------------------------------------------------------------8
Installing a hard drive/SSD (optional) ------------------------------------------------------------------9
Installing Battery ---------------------------------------------------------------------------------------------11
Battery Charging---------------------------------------------------------------------------------------------13
Setting up your ZOTAC VR GO -----------------------------------------------------------------------------15
Attaching backpack --------------------------------------------------------------------------------------------17
Recommended layout -----------------------------------------------------------------------------------------19
Detaching backpack -------------------------------------------------------------------------------------------20
Getting started with Windows 10 home 64-bit --------------------------------------------------------22
Using your ZOTAC VR GO -----------------------------------------------------------------------------------26
Conguring a wireless connection ----------------------------------------------------------------------26
Conguring a wired connection --------------------------------------------------------------------------26
Using a static IP -----------------------------------------------------------------------------------------26
Using a dynamic IP (PPPoE connection) ---------------------------------------------------------27
Conguring audio output-----------------------------------------------------------------------------------27
Travel Jacket------------------------------------------------------------------------------------------------------28

ZOTAC VR GO
3
Product specications
qMicroprocessor support
vIntel Core i7-6700T, quad core 2.8GHz (8M Cache, up to 3.6 GHz)
qOnboard Graphics support
vNVIDIA GeForce GTX 1070 w/ 8GB GDDR5, 256-bit
vThree HDMI 2.0 ports, two DP 1.3 outputs (supports 4K @ 60 Hz) (max 4 displays)
qOperating systems:
v Windows 10 Home 64-bit pre-installed
qSystem Memory support
v 16 GB DDR4 SO-DIMM
qUSB Ports
v Six USB 3.0 ports
qOnboard Serial ATA
v 2.5’’ SATAIII HDD/SSD bay
qExpansion slot
v240 GB M.2 SATA SSD (compatible with PCIE x4/SATA 2240/2260/2280)
q Onboard Dual LAN
v Supports 10/100/1000 Mbps operation
vSupports IEEE 802.3
q WiFi/Bluetooth support
v Compliant with IEEE802.11ac standard
vBluetooth v4.2
qOnboard Audio
v Stereo analog audio output and Microphone input
qPower
v 19.5V/180W AC-DC Power adapter (For stand-alone PC or charging dock)
v Two Li-ion 14.4V batteries for backpack PC (hot-swappable)
qProduct Size
v 410mm x 270mm x 76mm

ZOTAC VR GO
4
Safety information
Your ZOTAC VR GO is designed and tested to meet the latest standards of safety for information
technology equipment. However, to ensure your safety, it is important that you read the following safety
instructions.
Setting up your system
Read and follow all instructions in the documentation before operating your system.
Do not use this product near water or a heat source such as a radiator.
Set up the system on a stable surface.
Openings on the chassis are for ventilation. Do not block or cover these openings. Make sure
you leave plenty of space around the system for ventilation. Never insert objects of any kind into
the ventilation openings.
Use this product in environments with ambient temperatures between 0℃and 35℃.
If you use an extension cord, please use the UL listed cord and make sure that the total
ampere rating of the devices plugged into the extension cord does not exceed its ampere
rating.
Care during use
Do not walk on the power cord or allow anything to rest on it.
Do not spill water or any other liquids on your system.
When the system is turned off, a small amount of electrical current still ows. Always unplug all
power, modem, and network cables from the power outlets before cleaning the system.
If you encounter the following technical problems with the product, unplug the power cord and
contact a qualied service technician or your retailer.
¾The power cord or plug is damaged.
¾Liquid has been spilled into the system.
¾The system does not function properly even if you follow the operating instructions.
¾The system was dropped or the cabinet is damaged.
¾The system performance changes.

ZOTAC VR GO
5
Welcome
Congratulations on your purchase of the ZOTAC VR GO. The following illustration displays the
package contents of your new ZOTAC VR GO. If any of the below items is damaged or missed,
contact your retailer.
Package contents
• 1 x ZOTAC VR GO
• 1 x Backpack Strap Add-on
• 1 x AC Adapter
• 1 x Power Cord
• 2 x Batteries
• 1 x Battery Charging Dock
• 1 x User Manual & Quick Start Guide
• 1 x Support DVD
• 1 x USB ash drive with OS drivers
• 1 x OS recovery DVD

ZOTAC VR GO
6
Getting to know your ZOTAC VR GO
Top view
1. Power output (DC12V)
The power output is used to connect the supplied power to the VR display unit.
2. HDMI port
The HDMI (High Denition Multimedia Interface) port supports a UHD device such as an LCD
TV or monitor to allow viewing on a larger external display.
3. USB 3.0 ports
The USB 3.0 port supports the SuperSpeed USB 3.0 devices and is backwards compatible
with USB 2.0/1.1 devices. Use this port for USB 3.0 devices for maximum performance with
USB 3.0 compatible devices.
12 3
Left view
1. Power switch
The power switch allows powering ON and OFF the system. The ring LED can be disabled
in BIOS setting.
2. Battery lock
Use this battery lock to lock or unlock the battery.
12

ZOTAC VR GO
7
Right view
1. Power input (DC19.5V)
The supplied power adapter converts AC power to DC power for use with this jack. Power
supplied through this jack supplies power to the PC only. It does not charge the batteries. To
prevent damage to the PC, always use the supplied power adapter.
2. Headphone/Audio Out jack
The stereo headphone jack (3.5mm) is used to connect the system’s audio out signal to
amplied speakers or headphones.
3. Microphone jack
The microphone jack is designed to connect the microphone used for video conferencing,
voice narrations or simple audio recordings.
4. Memory card slot
The Memory card slot is compatible with SD/SDHC/SDXC cards used in devices like digital
cameras, MP3 players, mobile phones and PDAs.
5. USB 3.0 ports
The USB 3.0 port supports the SuperSpeed USB 3.0 devices and is backwards compatible
with USB 2.0/1.1 devices. Use this port for USB 3.0 devices for maximum performance with
USB 3.0 compatible devices.
6. DisplayPorts
DisplayPorts supports both external (box-to-box) and internal (laptop LCD panel) display
connections.
7. HDMI ports
The HDMI (High Denition Multimedia Interface) port supports a UHD device such as an LCD
TV or monitor to allow viewing on a larger external display.
8. LAN ports
The eight-pin RJ-45 LAN ports support standard Ethernet cables for connection to a local
network.
9. Power output (DC12V)
The power output is used to connect the supplied power to the VR display unit.
The power adapter may become warm to hot when in use. Do not cover the adapter and keep it away from your body.
1
2
3
4
5
6
7 8 9
Battery lock

ZOTAC VR GO
8
Installing Hardware inside ZOTAC VR GO
Before installing hardware, please follow the instructions below to remove the cover of your
ZOTAC VR GO. Refer to page 20 to detach the backpack.
1. Lay the ZOTAC VR GO on a at surface with the back cover facing upwards.
2. Locate the screws and remove.
Note: a philips screwdriver tool is required. Not included.
2. Lift the cover off the ZOTAC VR GO.

ZOTAC VR GO
9
Installing a hard drive/SSD (optional)
1. Locate the 2.5-inch SATA hard drive/SSD slot and the drive bracket. Remove the thumb
screw and bracket.
2. Install the hard drive/SSD to the drive bracket.

ZOTAC VR GO
10
3. Insert the bracket into the SATA slot.
4. Reinstall the thumb screw.

ZOTAC VR GO
11
Installing Battery
1. To ensure correct battery installation, locate the batteries and place them to the side of the
system. Make sure the battery status indicators are visible face up and on the side facing
the system. See below illustration.
2. Locate the battery case. Push and hold the battery lock to “Unlock” position, and insert
the battery into the case.

ZOTAC VR GO
12
3. Ensure that the battery is installed in place, and release the battery lock to “Lock”
position.
Note: Only change one battery at a time to maintain power to the system when the system
is powered on.

ZOTAC VR GO
13
Battery Charging
The VR GO does not support charging the batteries directly. Please follow the instructions below
to charge the batteries.
1. Insert the batteries into the battery charging dock.
2. Connect the AC adapter to the battery charging dock.

ZOTAC VR GO
14
3. All battery LEDs will be OFF when fully charged.
4. Press the battery status button to check battery status.

ZOTAC VR GO
15
Setting up your ZOTAC VR GO
You need to connect peripherals before using your ZOTAC VR GO.
12
3456
7

ZOTAC VR GO
16
1. Connecting to a headphone/audio out device
Connect audio out device like headphone to the headphone/audio out jack.
2. Connecting to microphone device
Connect microphone device to the microphone jack.
3. Connecting to USB 3.0 devices
Connect USB 3.0 devices such as external hard drives, SSDs and ash drives to the USB 3.0
port on the system rear panel.
4. Connecting to DisplayPort displays
Connect the DisplayPort connectors to the DP ports of the monitor or display.
5. Connecting to HDMI displays
Connect one end of an HDMI cable to the HDMI port on the system rear panel and the other
end to a HDMI-compatible display such as an HDTV or monitor.
6. Connecting to a network device
Connect one end of a network cable to the LAN port on the system rear panel and the other
End to a hub or switch.
7. Connecting the power adapter to stand-alone VR GO PC
Connect the supplied AC adapter to the DC IN jack on the system rear panel and then press
the power switch on the front panel to turn on the system.
When your ZOTAC VR GO is not in use, unplug the power adapter or switch off the AC outlet
to save power.

ZOTAC VR GO
17
Attaching backpack
1. Lay the ZOTAC VR GO on a at surface with the backcover facing upwards.
2. Lay the backpack on the back of ZOTAC VR GO. Push the backpack and ensure it is
installed in place.

ZOTAC VR GO
18
3. Open the Velcro cover on the backpack.
4. Turn the knob to “Lock” position.
5. Close and attach the Velcro cover on the backpack.

ZOTAC VR GO
19
Recommended layout
Note: VR devices are not included.
Other manuals for VR GO
1
Table of contents