Zubr ZPL-350-190 User manual

Instruction Manual
Band Saw
ZPL-350-190
ZPL-305
171232
Version: 210119
www.kraftool.hk
KRAFTOOL HONG KONG LIMITED
G/F, MOD595, RECLAMATION STREET, KOWLOON, HONG KONG
MASTER

www.kraftool.hk
Band Saw | 1

Instruction Manual
www.kraftool.hk
|
2
4
6
5
2
1
3
10
9
30
11
7
15
6
12
15
13
14
8

www.kraftool.hk
Band Saw | 3
Dear customer!
When purchasing product:
`require the verication of its serviceability by trial switching-on, as well as completeness according to
the delivery kit;
`make sure that the warranty slip is duly executed and contains the date of sale, the stamp of the store
and the seller’s signature.
Before using the product for the rst time, carefully read this instruction manual and strictly follow the
requirements. Only in this way you will be able to learn how to handle the product correctly and avoid errors
and dangerous situations. Keep this manual throughout the life of your product.
Remember! The product is a source of high traumatic danger.
Purpose and scope
Band Saw is designed for sawing of workpieces from
wood and its derivatives at various angles, along the
radius, and also at an inclination.
Please read this manual carefully, including the
«Safety instructions» section and the «Basic Safety
Instructions» appendix. Only in this way you will be
able to learn how to handle the tool correctly and
avoid errors and dangerous situations.
The product is intended for short time works with
medium intensity loads in areas with a moderate
climate with a characteristic temperature of -10 to
+40 ° C, relative air humidity of not more than 80%
and the absence of direct exposure to atmospheric
precipitation and excessive dustiness of the air.
This manual contains the most complete information
and requirements that are necessary and sufcient
for reliable, efcient and safe operation of the product.
In connection with the continuation of the work on
improving the product, the manufacturer reserves
the right to introduce into its design minor changes
that are not reected in this manual and do not affect
the effective and safe operation of the product.
ATTENTION!
Do any work with the saw blade in gloves.
Some parts of the product are heated during
operation. Do not touch them immediately after
work is nished and until it cools down completely.
Application of the product in industrial volumes,
in conditions of high intensity of work and
superheavy loads, reduces its service life.

Instruction Manual
www.kraftool.hk
|
4
ATTENTION!
Ensure that there is no visible mechanical damage on the product and accessories that may have
occurred during transportation.
Specication
Model ZPL-350-190 ZPL-305
Continuous rating Input, W 350 750
Rating Voltage 220V±10% / 50Hz
Blade speed, m/s 14,7 6,3 / 13,2
Thickness cutting capacity, mm 80 170
Width cutting capacity, mm 190 305
Blade:
`length, mm
`width, mm
`thickness, mm
`teeth, quantity/inch (TPI)
1425
8
0,35
12
2320
12,7
0,4
4
Minimum cutting radius, mm 20 35
Table tilt angle, degrees 0-45
Table size, mm 290х290 495х390
Dust extraction sleeve diameter, mm 40 40 / 70
Sound power, (k=1.5), dB 103 98
Sound pressure, dB 90 85
RMS vibration acceleration, (k=1.5), м/с2– –
Safety level I level
Net weight, kg 28,3 59
Service life, years 5
Delivery Set
Band saw 1 pc
Service table 1 pc
Table tightening handle with washer 1 pc
Longitudinal guide rail 1 pc
Angle detent (protractor) 1 pc
Pusher 1 pc –
Hex key 3 pcs 5 pcs
Ruler –2 pcs
Переходник патрубка пылеотводного –1 pc
Safety Instruction 1 pc
Instruction Manual 1 pc

www.kraftool.hk
Band Saw | 5
Operating
Instruction
Components
1 Switch
2 Work table
3 Longitudinal guide
4 Screw of the blade tension
5 Limiter of blade
6 Fixing screw of cover
7 Angle detent (protractor)
8 Table bracket with a tilt pointer
9 Jigsaw blade
10 Regulator of blade limiter
11 Table lock handle
12 Screw of wheel adjustment
13 Engine
14 Dust-removing socket
15 Table ruler
16 Adjusting screw
17 Tightened screw
18 Bracket of Guide rail
19 Locking Handle
20 Guide rail
21 Leading pulley
22 Driving Belt
23 Lower wheel (slave)
24 Limiting pin
25 Fixing screw
26 Adjusting screw
27 Detent Bearing
28 Fixing Screw
29 Locking Screw
30 Handle of lower wheel adjustment
(for ZPL-305 only)
Assembly
ATTENTION!
All works related to the assembly, adjustment
and replacement, should be done with
electrically disconnected product.
Install the product on a at horizontal surface.
`Note! To avoid injury and damage of the
workpiece or the product there is HIGHLY
recommended that you anchor the base on the
support surface.
`How to install the work table:
`Set the table 2 with a bracket 33 on the base
bracket 31 by passing the blade through the table
slot;
`Fix the special washer with the pin of the handle
11 and lock the table by tightening of the handle;
`set the bar 32 (for ZPL-305;
2
33
32
31
11
for ZPL-305:
`Set the table ruler 15 (two pcs) on the front edge
of the table and x these two pcs with y screws
on the underside of the table.
`Check and adjust (if necessary) the horizontal
position of the table:
`Loosen the xing of table tilt by loosening the
xing screw of bracket 8;
`Set the angle of the table so that it rests upon
the limiter (table below);
`using setsquare, check the perpendicularity
of a blade and table surface. If adjustment is
required, loosen the locknut of the limiter and
adjust the perpendicularity using limiting pin.
Tighten the locknut.
Set Longitudinal guide and Angle detent:
`Set Angle detent 7, by inserting the detent’s
guide into the appropriate slot of the table;

Instruction Manual
www.kraftool.hk
|
6
protractor
guide railpointer
fixing screw
For ZPL-350-190: set guide 3 on the table and x it
by lowering the handle 19.
20
17
16
18
19
There is set standard sawing blade for wood on
your product. To replace it (for the corresponding
job or for a new one in case of wearout):
`Remove the screws 6 of a fastening of the
cover and open the cover;
4
`Loosen the belt tension by turning of the screw
4 counterclockwise and moving the upper drive
wheel down to the stop or tapping on the screw
by hand down to the stop;
`remove the blade from the upper and lower
wheels and pull it out through the slot of the
table;
ATTENTION!
To avoid injury and damages STRONGLY
recommend that you contact with saw blade
wearing in gloves.
`install a new blade in reverse order so that the
blade teeth are downward. Adjust the position of
the blade strictly on the center of wheels;
Note! New blade is unstretched and may not be
put on wheels. For ease of installation put a blade
on the lower wheel, pull it, as far as possible, on
the upper wheel and, by turning of the wheel, get
full installation of the blade. This method is also
convenient to adjust a centering of blade.
`by rotating of the screw 4 clockwise, do the blade
tension according to the section Getting Started.
Check and, if necessary, adjust an alignment of the
planes of upper and lower wheels:
`turn the upper wheel clockwise for several turns
and check a disalignment of blade from the center
of the wheel;
`if the blade dislocated to the front of the
machine, you should get an unavailability
of disalignment by rotation of the screw 12
clockwise. Here again adjust the position of the
blade in the center;
`if the blade dislocated to the rear of the machine,
an adjustment should be performed by rotating
the screw 12 counterclockwise;
`check the position of the blade on the lower
wheel. If necessary, adjust the position of the
blade by the center of the wheel;
`by the rotation of the upper wheel for some turns,
be sure in an unavailability of disalignment
from the center position. If necessary, repeat the
adjustment;
`close the machine cover and tighten the screws 6.
A list of the respective blades can be found on page
12.
To avoid vibrations of the saw blade and poor
cutting results during working operation, adjust
the limiters (upper limiter 5 and bottom limiter):
Note! Adjust the limiters after the blade tension
only. Adjustment is described on the example
of ZPL-305. For ZPL-350-190 all operations are
similar.
а) Adjustment of the upper limiter:

www.kraftool.hk
Band Saw | 7
26
27
28
25
29
25
24
23
`provide a safety detent of a blade by a bearing
27 in avoid of its disalignment under pressure of
the workpiece. To do this, rotate the adjusting
screw 26 and adjust the clearance between
the bearing and the rear edge of the blade is
equal to 0.7-1mm. Tighten the locking screw;
Note! To prevent premature run-out of the bearing,
the bearing must not be pressed against the blade.
`provide a limit of blade vibrations by releasing (use
a hex key) of xing screws 25 and adjusting the
position of the pins 24 in the vicinity of the blade
(without its touching). Tighten the screws;
`закройте крышку изделия и заверните винты 6.
b) Adjustment of the lower limiter:
`loosen the xing screws 6 of the cover and open
it. Limiter is under work table;
`provide a safety detent of a blade by a bearing
in avoid of its disalignment under pressure of the
workpiece. To do this, loosen the locking screw
29 and adjust the clearance between the bearing
and the blade is equal to 0.7-1mm. Tighten the
locking screw;
`the setting of the lower limiter’s pins is similar
as for upper pins.
Getting Started
Check the tension of the blade. The properly
tensioned blade should NOT slip on the drive
wheels. If necessary, you can increase the tension
of the blade by rotating of the screw 4 clockwise.
Based on the workpiece and the nature of the
work:
а) Adjust the position of the upper limiter 5:
`loosen the screw of the regulator 10;
`adjust the position of the lowest point of the
limiter at a height of 2-3 sm from the top of
the workpiece by rotating of the fly screw (for
ZPL-305) or manually (for ZPL-350-190),
depending on the thickness of the workpiece;
`tighten the screw of the regulator 10.
b) Adjust the position of the longitudinal
guide 3:
`lift the locking handle 19 of the guide;
`set the edge of guide according to the saw off width
of the workpiece;
`lock the guide.
Note! To avoid uneven cutting, as well as damage
(due to bending and twisting) of the saw blade,
always use the longitudinal guide when cutting.
c) If necessary an oblique cutting of workpiece, set
the angle detent at the desired angle.
d) If necessary to cut the workpiece with any angle
up to 45°, to set the angle of the table:
`loosen the xing of table tilt by the handle 11;
`set the desired angle of cutting with a tilt pointer
of the table bracket 8;
`lock the table tilt by the handle 11.
e) Check the tension of the driving belt 22 (only
for ZPL-305). Well tensioned belt means that
when you press on it at the center between the
pulleys, the deflection should not exceed 1sm.
Otherwise, adjust the belt tension by the rotation
of the handle 30.
f) Check (only for ZPL-305) an adjusted speed of
blade. It should match to the workpiece material
and to the upcoming kind of the work. To do this:
`remove the fastening screws 6 of the lower
cover and open the cover;
`check the position of the belt 22 on the pulleys
and determine the current speed:
– the belt on a front pair of pulleys - higher
speed of movement of the blade;
– the belt on a rear pair of pulleys - lower speed
of movement of the blade.
If necessary, you can set the speed that you need:

Instruction Manual
www.kraftool.hk
|
8
24
23
22
21
30
`loosen the belt tension by rotating the handle
30;
`remove the belt and install it on the other pair
of pulleys;
`tighten the belt in accordance with Section
ASSEMBLY, by rotation of the handle 30 in the
opposite direction;
`close the product cover and tighten the screws 6.
To reduce the amount of dust when working, we
recommend to connect a vacuum cleaner (not
included) to the dust-removing socket 14. Socket
diameter is 40 mm (for ZPL-305 - 40/70 mm). You
may need an adapter (not included).
Prepare for your work:
`make sure that the saw blade is on the wheels,
correctly installed and strained;
`remove all keys and not necessary objects away
from the rotating parts of the machine and from the
working area;
`make sure that the workpiece has no metal
objects (nails, screws and so on).
Operating procedure
Connect the product to the power.
ATTENTION!
The machine complies with the level I of
protection against electric shock, i.e. it must be
grounded (for that ground contacts are provided
in the plug). Do not modify the plug by yourself
if it does not t into your socket. Let a qualied
electrician install the proper plug.
Switching-on is enable by press on the button «I»
of switch 1.
Note! The type of the switch is electromagnetic.
If the power supply will disappear and then
subsequently appears, the product will not
turn on by its own. In this case press the
button «I» again to activate the product.
Put one the edge of the workpiece on the table, press
it to the guide (with the adjusted cutting width) and
start feeding the workpiece toward the blade.
If necessary to make oblique sawing, press the
workpiece against the detent 7. For feeding of the
workpiece use the sliding detent.
ATTENTION!
During the cutting always FIRMLY hold the
workpiece by both hands.
When operating the machine, follow for the
motor speed. The drop of speed by 20% or
more indicates an overload. In this case it is
necessary to reduce the feeding speed of the
workpiece.
When nished, turn off the machine by pressing of
button «0». Unplug the machine from the power.
Carefully remove all residua from the table and
from under the cover.
Periodic inspection
During the operation life, the followings are
periodically required (as needed):
а) Replacement of blade;
b) Inspection of tension of blade;
c) Adjustment of blade limiters;

www.kraftool.hk
Band Saw | 9
For performing the above, refer to the ASSEMBLY
section.
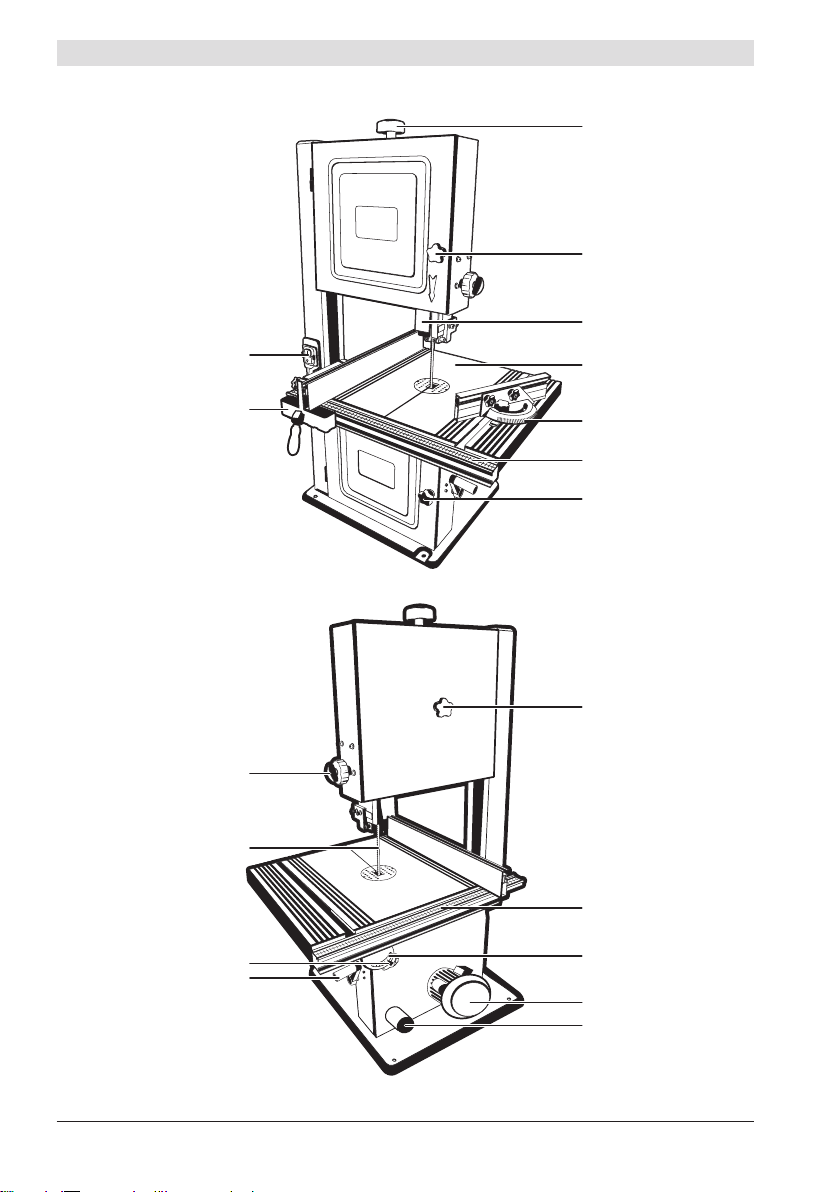
d) Adjusting of the angle pointer of the table:
`turn off the product and unplug it out of the
power;
`loosen the table tilt angle lock by releasing of
handle 11;
`using a setsquare (not included), set the right
angle between the plane of the blade and the
surface of the table;
`check a position of a bracket pointer 8. If the
position is not zero, release the pointer xing
screw, adjust its position, tighten the screw.
e) Adjusting of the longitudinal guide rail:
`using a setsquare (not included), check the
angle between the plane of the guide and the
edge of the table. If the angle is not a right angle,
release the two screws at the top of the plane of
the guide and adjust the angle of the guide.
`tighten the screws.
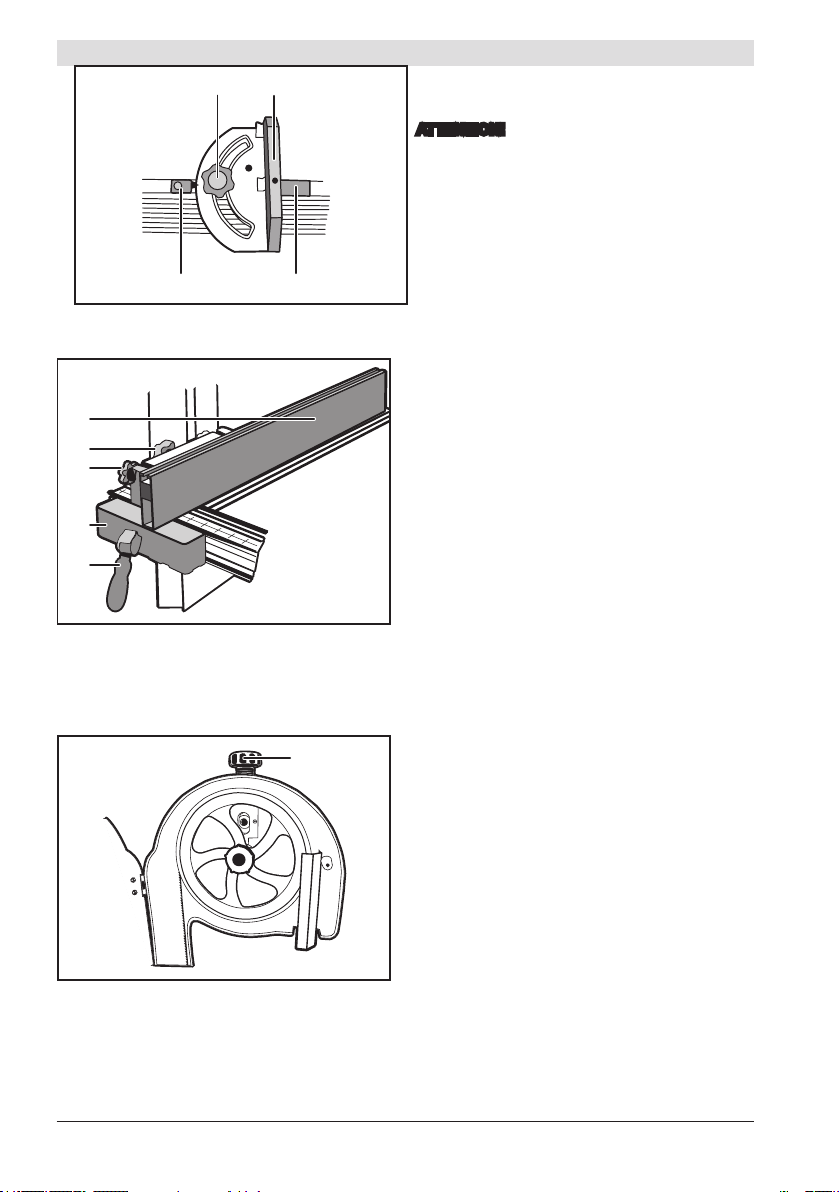
f) Adjusting of the angle detent pointer:
`loosen the xing screw of the detent;
`with the help of a setsquare, set the right angle
between the plane of the detent and the guide
groove;
`check whether protractor’s index is 90° or not. If
not, release the xing screw of the pointer - adjust
its position - tighten the screw.
g) Cleaning of the coating of driving wheels. To
clean the coating from dirt, use a hard-wearing
brush. DO NOT use solvents or other chemicals for
cleaning.
Operating Instructions
Make sure that the voltage of your power supply
corresponds to the rated voltage of the product.
Connect the product to the power when you are
ready to work only.
Before using the product for the rst time, turn it on
without any load and let it run for 10-20 seconds. If at
this time you hear a strange noise, feel an increased
vibration or the smell of burning, turn off the product,
disconnect the power cord from the power and nd
out the cause of this phenomenon. Do not operate
the product before the cause of the malfunction is
found and rectied.
Provide good lighting, ventilation (or connect a
vacuum cleaner to the product - dust is generated
in large quantities during the sawing process) and
workplace order - insufcient lighting and foreign
objects can lead to damage and injuries.
To avoid accidents, each time before turning on the
product, make sure that:
`the saw blade is correctly installed and tensed;
`wheels and limiters are adjusted;
`You removed all hand tools and foreign objects out of
the rotating parts of the product and out of the work area;
`there are no metal objects (nails, screws, etc.) in
the workpiece.
For electrical safety, the product corresponds to the
1st class of protection against electric shock, i.e. it
must be grounded (grounding contacts are provided
for this purpose). Do not modify the plug yourself if
it does not t into your socket. Instead, a qualied
electrician must install a suitable plug.
The product is designed ONLY for sawing wood
products and derived materials (plywood, chipboard,
berboard, MDF), as well as laminated panels and
various types of plastic.
DO NOT cut other materials (metal, ceramics, stone),
and also do not install a different interchangeable tool
(of other types, with dimensions different from those
indicated in the characteristics, damaged - with worn
teeth, cracks, twisted).
For your work we recommend to use a replaceable
tool of the «3Y6P» brand.
To avoid injury, do not place your hands in the
sawing area.
DO NOT saw the workpieces (especially long ones,
with uneven surfaces), just holding them with your
hands. ALWAYS use the longitudinal guide rail.
Always FIRMLY hold the workpiece.
DO NOT ever saw:
`rounded workpieces;
`workpieces that are so small that you can not
hold them;
`several workpieces simultaneously.

Instruction Manual
www.kraftool.hk
|
10
Do not apply excessive force when working with
the product. This will not speed up the sawing
process, but will only reduce the quality of work
and shorten the life of the product.
Watch the condition of the blade. At the increased run-
out of a blade (it is shown in the complicated sawing,
uctuations at insufcient tension and a curvature at
an overheat) replace it with a new one. To replace the
blade, follow the steps in the ASSEMBLY section.
To avoid overheating, take sufcient pauses in the
work to cool the product.
When working without connecting a vacuum cleaner,
it is recommended to take pauses in the work more
frequently, to clean the inner surface under the cover
of the product.
If the blade is jammed, immediately turn off the
product with the «0» button of the switch. Check
the workpiece for the presence of metal objects, as
well as the condition and tension of the blade and,
if necessary, replace it (see ASSEMBLY section).
Continue working only after installing and eliminating
the cause of jamming.
Unplug the product immediately after use.
Turn off the product only with the «0» button of the
switch. Do not turn it off just by unplugging the cable
from the power supply (removing the plug from the
socket).
Periodically clean the frame, cable and ventilation
holes from dirt and dust.
All maintenance works must be carried out with
the cable disconnected from the power grid.
The product does not require any other special
maintenance.
All repair work should be carried out only by
specialists of service centers.
Watch for good condition of the product. In case of
appearance of suspicious smells, smoke, re, sparks
- turn off the product, disconnect it from the power
supply and contact a specialized service center.
If something seems to you abnormal in the work
of the product, immediately stop using it.
Due to the technical complexity of the product, the
limit state criteria can not be determined by the user
independently. In case of an obvious or suspected
malfunction, refer to the section «Possible
malfunctions and methods of their elimination». If
there is no fault description in the list or you could
not solve it, contact a specialized service center.
Conclusion on the limit state of the product or its
parts the service center issues in the form of the
relevant Act.
Safety Instructions
Before using the product, make sure that there
is no visible mechanical damages to the product
itself, the cable and the sawing blade. Do not use
the product with visible mechanical damage.
All work on the assembly, adjustment and
replacement of elements is performed only if the
product is disconnected from the power supply.
To avoid accidents, each time before turning on
the product, make sure that You removed all hand
tools and foreign objects out of the rotating parts of the
product and out of the work area.
For electrical safety, the product corresponds to the
1st class of protection against electric shock, i.e. it
must be grounded (grounding contacts are provided
for this purpose). Do not modify the plug yourself if
it does not t into your socket. Instead, a qualied
electrician must install a suitable plug.
During operation, the blade is very hot - do not
touch it immediately after work is nished and until
it cools down completely.
To avoid injury and damage, we recommend that
you work with a saw blade in gloves.
Conditions for
transportation, storage
and disposal
Keep the product in a safe, dry and out of reach
of children place.
Store and transport the product in box or cabinet.
The end of life product, additional accessories and
packaging should be recycled in an environmentally
friendly manner.

www.kraftool.hk
Band Saw | 11
Warranty Liabilities
We constantly care about improving the quality of
service for our customers, therefore, if you have
any complaints about the quality, please report this
to 3Y6P support by e-mail at [email protected].
This guarantee neither limit the buyer’s right to
claim, nor limit the legitimate rights of consumers.
We provide a guarantee for 3Y6P tools on the
following conditions:
1) The warranty is provided by free elimination of
the tool’s defects within the established warranty
period, which is proved to be caused by defects in
material or workmanship.
2) The warranty period starts from the date of
purchase of the tool by the rst owner.
The warranty period is 12 months from the date of
sale, only with unconditionally household use of the
tool for personal needs.
The warranty period is 6 months from the date
of sale when using the tool for work related to
professional activity under conditions of moderate
intensity, with the exception of industrial work under
conditions of high intensity and superheavy loads.
3) The guarantee does not cover:
a) parts that are subjects to work and other
types of natural run-out, as well as tool
failures caused by this type of run-out
b) Malfunctions caused by non-observance of
the operating instructions or malfunctions
by resulting of the use of the tool for other
purposes, during use in abnormal environmental
conditions, inappropriate operating conditions,
due to overloads or insufcient, inadequate
maintenance or care. Unconditional signs
of product overload include, among others:
the appearance of tarnishing colors, the
simultaneous failure of the rotor and stator,
the deformation or fusion of the parts and
components of the product, the darkening or
charring of the electric motor wires under the
inuence of high temperature.
c) When using the product in conditions of high
work intensity and superheavy loads
d) For maintenance of the tool, for example:
lubrication, washing
e) Malfunctions of the tool due to the use of
accessories and spare parts that are not original
accessories / parts of «3Y6P»
f) For mechanical damages (cracks, chips,
etc.) and damages caused by an inuence
of corrosive environment, high humidity and
high temperatures, foreign objects entering
the ventilation orices of power tools, as well
as damages caused by improper storage and
corrosion of metal parts
g) Accessories, fast run-out parts and consumables
that fail due to normal run-out, such as: drive
belts, batteries, guiding rollers, safety covers,
collets, cartridges, soles, saw chains, saw blades,
sprockets, tires, carbon brushes, knives, saws,
abrasives, drills, borax, trimmer line etc.
h) The tool, in the construction of which were
made changes or additions
j) Minor deviation from the declared properties of
the instrument, not affecting its value and the
possibility of using it for its intended purpose
4) Elimination of malfunctions admitted as
a guarantee case is carried out at Kraftool
company’s choice by repairing or replacing the
faulty instrument with a new one (possibly the
next generation model). Replaced tools and parts
become the property of the company.
5) Warranty claims are accepted during the warranty
period. To claim the warranty case: show or send
the faulty instrument to the service center specied
in the Instruction manual or 3Y6P business card,
enclosing the receipt (the bill) conrming the date
of purchase and its name.
The tool, sent to the dealer or to the service center in
partially or completely disassembled form, does not
cover by the warranty. All risks associated with the
transfer of the instrument to the dealer or the service
center are borne by the owner of the tool.
6) Other claims, other than the mentioned right to
free removal of the shortcomings of the instrument,
do not fall within the scope of the warranty.
7) The service life of the product is 5 years.

Instruction Manual
www.kraftool.hk
|
12
Possible malfunction Possible reason Action to eliminate
The product does not turn on
No mains voltage Check the mains voltage
Defective switch, motor or other
component
Contact the service center for repair or
replacement
Jamming of a blade or mechanism
Release the blade, adjust the tension (see
Assembly section), clean the wheel cover or
contact the service center for repair
The product turns on, but does not work
at full power
Low mains voltage Check the mains voltage
Burned winding or break in the motor
winding Contact the service center for repair
Defective switch, motor or other
component
Contact the service center for repair or
replacement
Jamming or slipping of the blade Replace the saw blade (see Assembly section)
The product or the blade stopped
during operation
The mains voltage was lost Check the mains voltage
Jamming, slippage or breakage of
the blade
Adjust the blade tension or clean the wheel
cover. Adjust the blade limiters (see Getting
Started section)
Defective switch, motor or other
component Contact the service center for repair
Unsatisfactory sawing result
The saw blade is blunted or damaged
(curved, lost teeth, cracks) Replace the blade (see Assembly section)
The blade slips on wheels Adjust the position of the blade (see Assembly
section)
Increased swinging of the blade Contact the service center for repair
Insufcient motor power or speed (see
malfunction 2 above) Perform actions on malfunction 2
The product overheats
Intensive operation mode, work with
maximum load Change the operating mode, reduce the load
High ambient temperature, poor
ventilation, blocked ventilation orices
Take measures to reduce temperature, improve
ventilation, clean ventilation orices
Lack of lubrication, wedging in the
mechanism Contact the service center for repair
Burned winding or break in the motor
winding Contact the service center for repair
Band Saw Article Blade Article Name Features
ZPL-350-190 155810-190-2 Band Saw 3Y6P L-1425mm, Н-8,0mm, teeth pitch-2mm
(12ТРI), carbon steel-65
ZPL-350-190 155810-190-4 Band Saw 3Y6P L-1425mm, Н-8,0mm, teeth pitch-4mm
(6ТРI), carbon steel-65
ZPL-305 155815-305-2 Band Saw 3Y6P L-2320mm, Н-12,7mm, teeth pitch-4mm
(8ТРI), carbon steel-65
ZPL-305 155815-305-4 Band Saw 3Y6P L-2320mm, Н-12,7мм, teeth pitch-6мм
(4ТРI), carbon steel-65
POSSIBLE MALFUNCTIONS AND METHODS OF THEIR ELIMINATION
SAWING BLADES

www.kraftool.hk
Notes | 13
Acceptance and packing information
The product is manufactured and accepted in accordance with the requirements of the
manufacturer’s specications and is considered usable. The product is packed according
to the requirements of the manufacturer’s specications.
Warranty Slip
Product
Модель
Өрнек
Модель
Product #
Trader
Date of Sale
ATTENTION!
When purchasing a product, ask the seller to check the proper quality and completeness, as well as the correct
lling in of the warranty slip. I have read and agree with the terms of the guarantee and the warranty service. The
product is received in a working order and is fully manned. No claims to the appearance.
Customer Signature

Notes
www.kraftool.hk
14
|
Shop 3, G/F, MOD 595, Reclamation street, Kowloon, Hong Kong
www.kraftool.hk
3184-0265, 3184-0368
This manual suits for next models
1
Table of contents