manuals.online logo
Brands
  1. Home
  2. •
  3. Brands
  4. •
  5. Sealey
  6. •
  7. Saw
  8. •
  9. Sealey SA72 User manual

Sealey SA72 User manual

Thank you for purchasing a Sealey Product. Manufactured to a high standard this product will, if used according to these instructions
and properly maintained, give you years of trouble free performance.
IMPORTANT: PLEASE READ THESE INSTRUCTIONS CAREFULLY. NOTE THE SAFE OPERATIONAL
REQUIREMENTS, WARNINGS AND CAUTIONS. USE THIS PRODUCT CORRECTLY AND WITH CARE FOR THE
PURPOSE FOR WHICH IT IS INTENDED. FAILURE TO DO SO MAY CAUSE DAMAGE AND/ OR PERSONAL
INJURY AND WILL INVALIDATE THE WARRANTY. PLEASE KEEP INSTRUCTIONS SAFE FOR FUTURE USE.
1. SAFETY INSTRUCTIONS
INSTRUCTIONS FOR:
AIR SHEET SAW
MODEL No: SA72
ITEM PART NO. DESCRIPTION
1 SA72/01 DRIVE GEAR SHAFT
2 SA72/02 NEEDLE ROLLER
3 SA72/03 BEVEL GEAR
4 SA72/04 BEARING
5 SA72/05 SAW BLADE FLANGE HOLDER
6 SA72/06 SAW BLADE BOLT FLANGE
7 SA72/07 BOLT,HEX SOCKET CAP HEAD
8 SA72/08 BEVEL GEAR CASING (GREY)
9 SA72/09 BEARING
10 SA72/10 EXTERNAL STOP RING
11 SA72/11 CASING COVER
12 SA72/12 GUIDE PLATE
13 SA72/13 SPRING WASHER
14 SA72/14 BOLT
15 SA72/15 MAIN SHAFT
16 SA72/16 NEEDLE ROLLER
17 SA72/17 BEARING
18 SA72/18 SPACER COLLAR
19 SA72/19 IDLER GEAR
20 SA72/20 INTERNAL GEAR
21 SA72/21 BEARING SUPPORT
22 SA72/22 DRIVE SHAFT
23 SA72/23 BEARING
24 SA72/24 INTERNAL GEAR
25 SA72/25 INTERNAL STOP RING
ITEM PART NO. DESCRIPTION
26 SA72/26 DISTANCE NUT
27 SA72/27 THROTTLE HANDLE
28 SA72/28 AIR INLET BUSHING
29 SA72/29 THROTTLE VALVE
30 SA72/30 VALVE
31 SA72/31 O-RING
32 SA72/32 THROTTLE SPRING
33 SA72/33 THROTTLE VALVE PLUG
34 SA72/34 O-RING
35 SA72/35 THROTTLE LEVER
36 SA72/36 SPRING PIN
37 SA72/37 ROTOR
38 SA72/38 REAR END PLATE
39 SA72/39 SPRING PIN
40 SA72/40 BEARING
41 SA72/41 ROTOR BLADE
42 SA72/42 CYLINDER
43 SA72/43 FRONT END PLATE
44 SA72/44 BEARING CAP
45 SA72/45 WASHER
46 SA72/B BLADE, 50x1x12.7mm 150 TPU. HSS
47 SA72/47 WRENCH, L-SHAPED
48 SA72/48 WRENCH, HEX, L-SHAPED
49 SA72/49 BEARING
Issue Date: 230701
Issue No: 1
Date Modified: N/A
WARNING! Ensure Health & Safety, local authority, and general workshop practice regulations are adhered
to when using this equipment.
WARNING! Disconnect from air supply before changing the blade, servicing or performing maintenance.
Maintain the saw in good condition (use an authorised service agent).
Replace or repair damaged parts. Use genuine parts only. Non-authorised parts may be dangerous and
will invalidate the warranty.
Use in suitable clean and tidy working area, free from unrelated materials and ensure there is adequate
lighting.
WARNING! Always wear approved eye, face and hand protection when operating the saw
Remove ill fitting clothing. Remove ties, loose jewellery, and contain and/or tie back long hair.
Wear appropriate protective clothing and keep hands and body clear of working parts.
Maintain correct balance and footing. Ensure the floor is not slippery and wear non-slip shoes.
Keep children and unauthorised persons away from the working area.
Check moving parts alignment on a regular basis.
Ensure workpiece is secure before operating the saw. Never hold a workpiece by hand. Use a vice or clamps.
WARNING! Ensure correct air pressure is maintained and not exceeded. Recommended pressure 50-90psi.
Keep air hose away from heat, oil and sharp edges. Check air hose for wear before each use and ensure
that all connections are secure.
Prolonged exposure to vibration from this saw poses a health risk. It is the Employers/Owners and
operator’s responsibility to correctly assess the potential hazard and issue guidelines for safe periods of use
and offer suitable protective equipment.
DO NOT use any power source except an air compressor.
DO NOT operate the saw near any inflammable substance or on any container that once contained an
inflammable substance.
DO NOT use the saw for a task it is not designed to perform.
DO NOT operate saw if
any parts are damaged or
missing as this may cause
failure and/or personal
injury.
DO NOT carry the saw by
the hose, or yank the hose
from the air supply.
DO NOT operate saw
when you are tired, under
the influence of alcohol,
drugs or intoxicating
medication.
DO NOT carry the saw with your finger on the trigger.
DO NOT direct air from the air hose at yourself or others.
When not in use disconnect from air supply and store in a safe, dry, childproof location.
SA72 Issue No.2 21/09/09
2. INTRODUCTION & SPECIFICATION
3.1. Air Supply
3.1.1. Remove protective plug from air inlet and connect to the air supply as described below.
3.1.2. You will require an air pressure of 90psi, and an air flow according to the specification above.
3.1.3. WARNING! Ensure the air supply is clean and does not exceed 90 psi while operating the saw.
Too high an air pressure and unclean air will shorten the product life due to excessive wear, and may be
dangerous causing damage and/or personal injury.
3.1.4. Drain the air tank daily. Water in the air line will damage the saw and will invalidate your warranty.
3.1.5. Clean air inlet filter weekly. Recommended hook-up procedure is shown in fig 1.
3.1.6. Line pressure should be increased to compensate for unusually long air hoses (over 8 metres).
The minimum hose diameter should be 1/4” I.D. and fittings must have the same inside dimensions.
3.1.7. Keep hose away from heat, oil and sharp edges. Check hoses for wear, and make certain that all
connections are secure.
3.2. Couplings.
Vibration may cause failure if a quick change coupling is connected
directly to the air saw. To overcome this, connect a leader hose to the
saw. A quick change coupling may then be used to connect the leader
hose to the air line recoil hose. See fig 1 & 2.
WARNING! Disconnect saw from air supply before changing the blade, servicing or performing
maintenance. Replace or repair damaged parts.
Use genuine parts only. Non-authorised parts may be dangerous and will invalidate the warranty.
5.1. Lubricate the air saw daily with a few drops of the air tool oil supplied, dripped into the air inlet before
use. ( To re-order air tool oil use Sealey part Nos. ATO/500 or ATO1000.)
5.2. Loss of power or erratic action may be due to the following:
a) Excessive drain on the air line. Moisture or restriction in the air pipe. Incorrect size or type of hose
connectors. To remedy check the air supply and follow instructions in chapter 3.
b) Grit or gum deposits in the saw may also reduce performance. If your model has an air strainer
(located in the area of the air inlet), remove the strainer and clean it. Flush the saw out with gum
solvent oil or an equal mixture of SAE No 10 oil and kerosene. Allow to dry before use.
If you continue to experience problems, contact your local Sealey service agent.
5.3. For a full service contact your local Sealey service agent.
5.4. When not in use, disconnect from air supply, clean saw and store in a safe, dry, childproof location.
3. PREPARING SAW FOR USE
4. OPERATING INSTRUCTIONS
5. MAINTENANCE
WARNING! Ensure you read, understand and apply safety instructions before use.
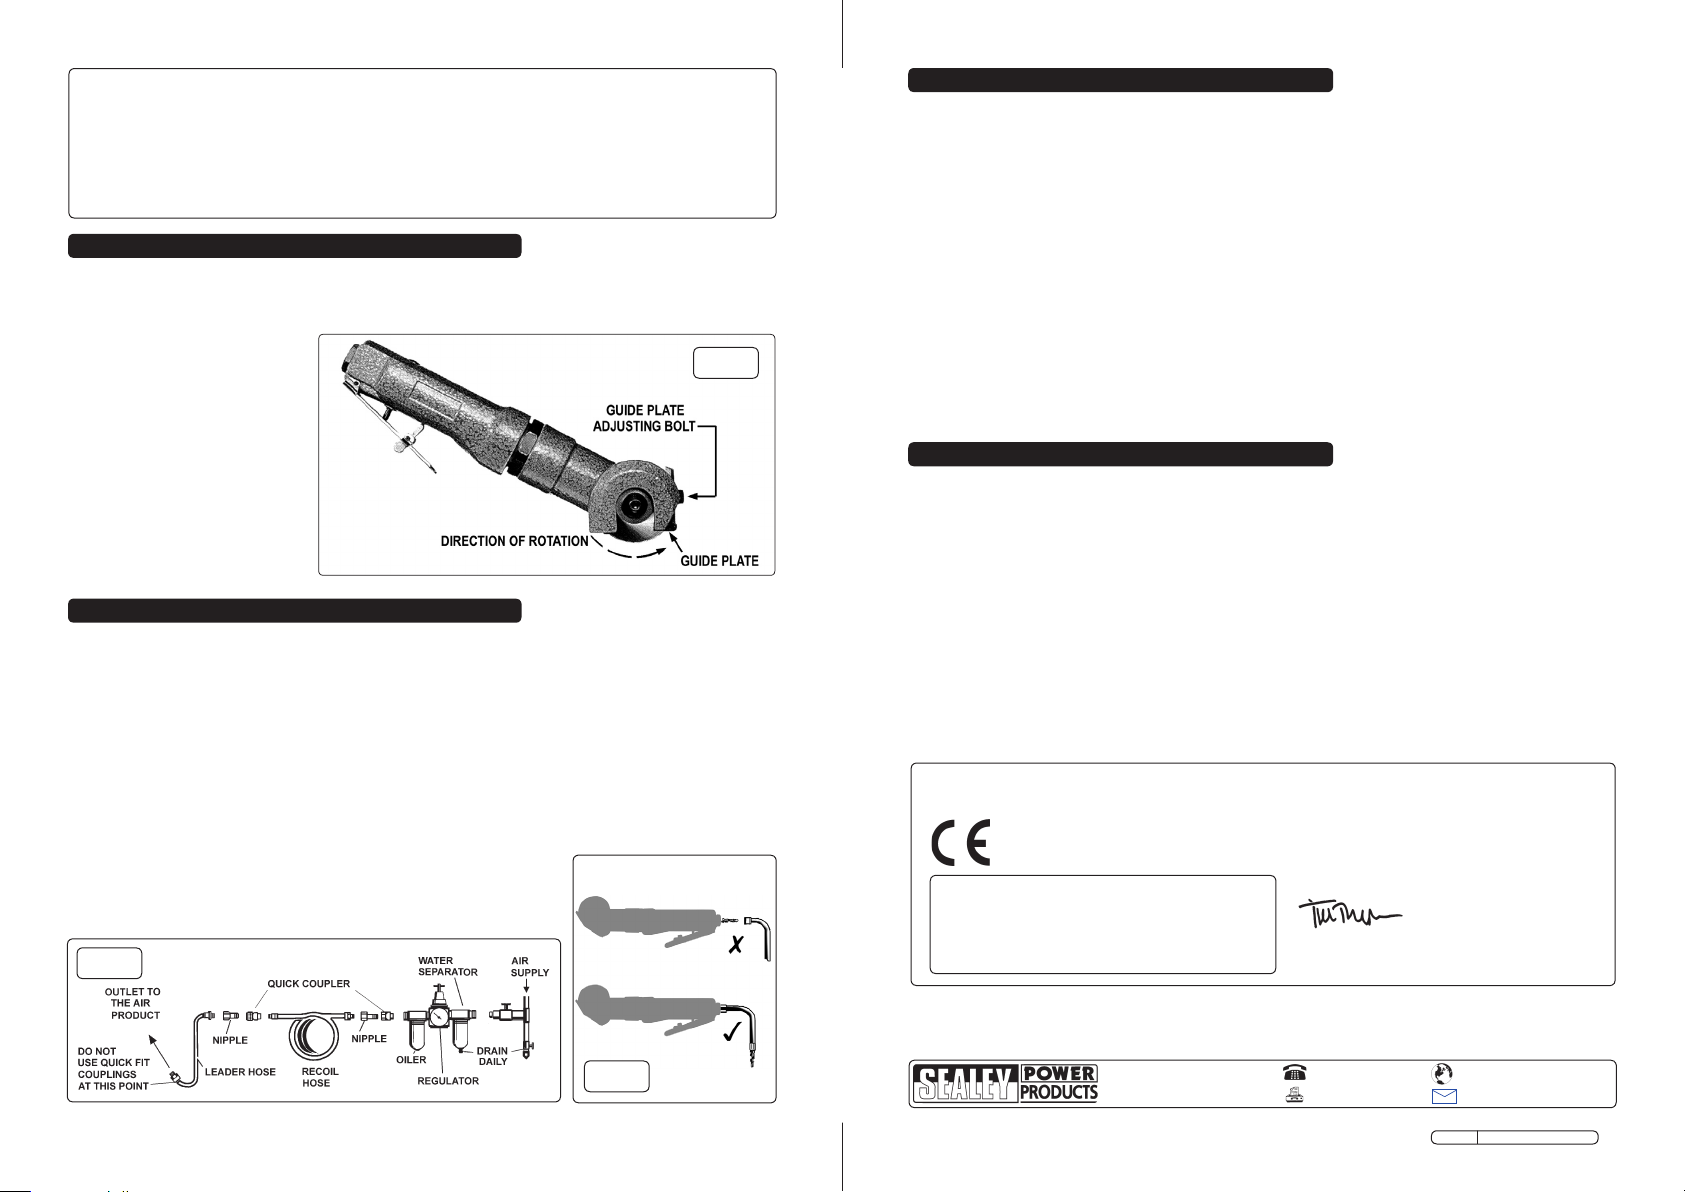
4.1 The saw is designed to cut with the black guide plate flat against the surface being cut. To aid this the
cutting blade cuts upwards to help to draw the guide plate down onto the workpiece.
4.2 Loosen the hex bolt at the front of the guide plate and adjust the height of the plate so that the cutting
depth is slightly deeper than the sheet material to be cut.
4.3 Ensure that your workpiece is properly secured and marked out. Rest the leading edge of the saw’s
guide plate onto the edge of the workpiece and align the blade with the previously marked out line.
4.4 When you are satisfied with the alignment, start the saw and progress steadily along the marked line with
the guide plate flat to the cutting surface.
4.5 If the cut stops within the sheet material allow the blade to come to a stop before removing the saw from
the workpiece.
4.6 If the cut starts within the bounds of the material cut a starter slot by hand to drop the blade into.
4.7 Do not allow the saw to run freely for any length of time as this will damage the bearings.
4.8 To change the blade firstly disconnect the saw from the airline. Loosen the hex socket bolt using a 4mm
key and remove the bolt, washer and retaining disc. Lift the blade upwards from its mounting boss and
slide it down and out of the guard. When fitting the new blade, be sure to orientate it so that the teeth will
be cutting upwards. ( see direction of rotation in fig.3.) When replacing the retaining disc make sure that
the two spigots on the back of the disc engage in the slots in the blade mounting boss. Replace the
washer and bolt and fully tighten.
fig.1
Specification .......... Model No.SA72
Free speed ........................... 600 rpm
Operating Pressure .................. 90psi
Air Consumption ........................6cfm
Air Inlet ............................... 1/4”BSP
Weight .......................................1.6kg
Saw blade ..............................SA72/B
Noise ................................... 86.4dB.A
The SA72 has an aluminium housing which has an integral safety guard. The unit also has a safety trigger
control. It is suitable for cutting steel up to a maximum thickness of 1.6mm, and aluminium sheet up to a
maximum of 2.5mm.
We, the sole importer into the UK, declare that the product listed here is in conformity with the
following EEC standards and directives. The construction file for this product is held by the
Manufacturer and may be inspected, by a national authority, upon request to Jack Sealey Ltd.
For Jack Sealey Ltd. Sole importer into the
UK of Sealey Power Products.
Air Sheet Saw
Model: SA72
93/68/EEC CE Marking Directive
2006/42/EC Machinery Directive
21st September 2009
Declaration of Conformity
Signed by Tim Thompson
fig.3
fig.2
NOTE: It is our policy to continually improve products and as such we reserve the right to alter data, specifications and component parts
without prior notice. IMPORTANT: No liability is accepted for incorrect use of this product. WARRANTY: Guarantee is 12 months from
purchase date, proof of which will be required for any claim. INFORMATION: For a copy of our catalogue and latest promotions call us on
01284 757525 and leave your full name, address and postcode.
01284 757500
01284 703534
Sole UK Distributor
Sealey Group,
Bury St. Edmunds, Suffolk.
[email protected]
www.sealey.co.uk
Web
email
SA72 Issue No.2 21/09/09
Risk of Hand Arm Vibration Injury.
The SA72 Medium Stroke Air Hammer, when operated in accordance with these instructions and tested in accordance with EN
28662-2: 1994 results in the following vibration emission declared in accordance with BS EN12096: 1996.
Measured vibration emission value: .................... 0.47m/s2 Uncertainty: ........................................ 0.19m/s2
These values are suitable for comparison with emission levels of other tools that have been subject to the same test.
This tool may cause hand-arm vibration syndrome if its use is inadequately managed.
Recommended Measures to reduce risk of hand-arm vibration syndrome: This item represents a low Hand Arm Vibration risk
to users. The calculated maximum usage period exceeds 8 hours. We recommend appropriate safety equipment is utilised and
regular breaks for the operator are employed to reduce any residual risk of fatigue or repetitive strain injury.

Other Sealey Saw manuals

Sealey SM8 User manual

Sealey

Sealey SM8 User manual

Sealey MG305/230VCE User manual

Sealey

Sealey MG305/230VCE User manual

Sealey TS10SEW User manual

Sealey

Sealey TS10SEW User manual

Sealey CP1208 User manual

Sealey

Sealey CP1208 User manual

Sealey CP108VCSBO User manual

Sealey

Sealey CP108VCSBO User manual

Sealey SRS850.V2 User manual

Sealey

Sealey SRS850.V2 User manual

Sealey HTS8 User manual

Sealey

Sealey HTS8 User manual

Sealey SCT125 User manual

Sealey

Sealey SCT125 User manual

Sealey Quality MACHINERY SM44 User manual

Sealey

Sealey Quality MACHINERY SM44 User manual

Sealey SM1303.V2 User manual

Sealey

Sealey SM1303.V2 User manual

Sealey Quality MACHINERY SM225 User manual

Sealey

Sealey Quality MACHINERY SM225 User manual

Sealey MG314/230V.V3 User manual

Sealey

Sealey MG314/230V.V3 User manual

Sealey SM300 User manual

Sealey

Sealey SM300 User manual

Sealey SA341 User manual

Sealey

Sealey SA341 User manual

Sealey TS10CZ User manual

Sealey

Sealey TS10CZ User manual

Sealey MG214/230V.V2 User manual

Sealey

Sealey MG214/230V.V2 User manual

Sealey TS10P.V2 User manual

Sealey

Sealey TS10P.V2 User manual

Sealey SM6582 User manual

Sealey

Sealey SM6582 User manual

Sealey Quality MACHINERY SM2504 User manual

Sealey

Sealey Quality MACHINERY SM2504 User manual

Sealey TS10P User manual

Sealey

Sealey TS10P User manual

Sealey Siegen S01045.V3 User manual

Sealey

Sealey Siegen S01045.V3 User manual

Sealey Quality MACHINERY SM5.V3 User manual

Sealey

Sealey Quality MACHINERY SM5.V3 User manual

Sealey SM35CE.V4 User manual

Sealey

Sealey SM35CE.V4 User manual

Sealey SA650.V3 User manual

Sealey

Sealey SA650.V3 User manual

Popular Saw manuals by other brands

Cosen MH-460M instruction manual

Cosen

Cosen MH-460M instruction manual

Target SUPER 60 Operating instructions and parts list

Target

Target SUPER 60 Operating instructions and parts list

Bosch GKS 190 Professional operating instructions

Bosch

Bosch GKS 190 Professional operating instructions

DeWalt D28730 Series instruction manual

DeWalt

DeWalt D28730 Series instruction manual

Metabo KGS 216 M Original instructions

Metabo

Metabo KGS 216 M Original instructions

EINHELL KGST 250 Profi operating instructions

EINHELL

EINHELL KGST 250 Profi operating instructions

Craftsman 124.32607 Operator's manual

Craftsman

Craftsman 124.32607 Operator's manual

General International 90-140 M1 Setup & operation manual

General International

General International 90-140 M1 Setup & operation manual

Rockwell ShopSeries RK7240.1 instruction manual

Rockwell

Rockwell ShopSeries RK7240.1 instruction manual

Makita DHS680RMJ instruction manual

Makita

Makita DHS680RMJ instruction manual

DeWalt DW716 instruction manual

DeWalt

DeWalt DW716 instruction manual

Grizzly G1023Z instruction manual

Grizzly

Grizzly G1023Z instruction manual

Partner K950 Active Operator's manual

Partner

Partner K950 Active Operator's manual

Porter-Cable PCC780 instruction manual

Porter-Cable

Porter-Cable PCC780 instruction manual

Würth MHKS 28-A Translation of the original operating instructions

Würth

Würth MHKS 28-A Translation of the original operating instructions

Craftsman 21807 - 10 in. Table Saw Operator's manual

Craftsman

Craftsman 21807 - 10 in. Table Saw Operator's manual

YILMAZ ACK 420 manual

YILMAZ

YILMAZ ACK 420 manual

MULTIQUIP SP113H18 Operation and parts manual

MULTIQUIP

MULTIQUIP SP113H18 Operation and parts manual

manuals.online logo
manuals.online logoBrands
  • About & Mission
  • Contact us
  • Privacy Policy
  • Terms and Conditions

Copyright 2025 Manuals.Online. All Rights Reserved.