manuals.online logo
Brands
  1. Home
  2. •
  3. Brands
  4. •
  5. ZUCCHETTI
  6. •
  7. Lawn Mower
  8. •
  9. ZUCCHETTI L50BEU User manual

ZUCCHETTI L50BEU User manual

1User’s manual
EN
FR
DE
ES
NL
DA
FI
SV
IT
EN
FR
DE
ES
NL
DA
FI
SV
IT
Congratulazioni per aver acquistato questo prodotto,
che potrà soddisfare le vostre esigenze ed aspettative.
Questo progetto nasce da ZUCCHETTI CENTRO SISTEMI
S.p.A. (Azienda certificata UNI EN ISO 9001) software
house che, dal 1982, ha consolidato la propria attività e
la propria presenza sul mercato internazionale. Applicare
soluzioni informatiche avanzate al settore dell’automazione
industriale significa ottimizzare le attività produttive e
semplificare le procedure di lavoro. E’ proprio sulla base
della costante attività di ricerca dei laboratori ZUCCHETTI
che nasce questo prodotto
.
Congratulations on having purchased this product,
which we are sure will satisfy your requirements and
meet your expectations. This is a ZUCCHETTI CENTRO
SISTEMI S.p.A. project. Zucchetti (a UNI EN ISO 9001
certified company) is a software house which, since
1982, has consolidated its activity and presence on the
international market. Applying advanced informatics
solutions for the industrial automation means optimizing
production activities and simplifying work procedures. This
product derives from the constant research activity of the
ZUCCHETTI laboratories
.
Nous vous félicitons pour avoir acheté ce produit qui
pourra satisfaire vos exigences et vos attentes. Ce projet
a vu le jour chez ZUCCHETTI CENTRO SISTEMI S.p.A.
(Entreprise certifiée UNI EN ISO 9001) maison de logiciel
qui, à partir 1982, a consolidé son activité et sa présence
sur le marché international. Appliquer des solutions
informatiques évoluées au secteur de l’automatisation
industrielle signifie optimiser les activités productives et
simplifier les procédures de travail. C’est justement sur la
base de la constante activité de recherche des laboratoires
ZUCCHETTI que ce produit a vu le jour.
Wir gratulieren Ihnen zum Kauf dieses Produktes,
das Ihre Bedürfnisse und Erwartungen mit Sicherheit
erfüllen kann. Dieses Projekt wurde von der Firma
ZUCCHETTI CENTRO SISTEMI S.p.A. (zertifiziert nach
UNI EN ISO 9001) Software House entwickelt, die seit
1982 ihre Produktion und damit auch ihre Stellung auf dem
internationalen Markt immer weiter ausbaut. Durch die
Anwendung zukunftsweisender Software-Lösungen in der
industriellen Automation werden die Produktion optimiert
und die Arbeitsprozesse vereinfacht. Die Entwicklung
dieses Produktes basiert auf den stetigen Forschungsakti-
vitäten der ZUCCHETTI-Labore
.
Gracias por haber comprado este producto que
podrá satisfacer sus exigencias y expectativas. Este
proyecto nace de la experiencia de ZUCCHETTI CENTRO
SISTEMI S.p.A. (empresa certificada de conformidad con
la norma UNI EN ISO 9001), empresa de software que
desde el año 1982 ha consolidado su propia actividad y
presencia en el mercado internacional. Aplicar soluciones
informáticas avanzadas al sector de la automatización
industrial significa optimizar las actividades productivas
y simplificar los procedimientos de trabajo. Este producto
es fruto de la constante actividad de investigación de los
laboratorios ZUCCHETTI.
Van harte gefeliciteerd met uw aankoop van dit
product dat aan al uw eisen en verwachtingen zal voldoen.
Dit project werd ontwikkeld door ZUCCHETTI CENTRO
SISTEMI S.p.A. (UNI EN ISO 9001 gecertificeerd bedrijf)
software house, sinds 1982 actief op de internationale markt
waar het een sterke positie verworven heeft. Het toepassen
van innoverende computeroplossingen in de sector van
industriële automatisering leidt tot optimalisering van de
productiewerkzaamheden en werkprocedures. Dit product
is vrucht van de continu inspanningen van de vorsers van de
ZUCCHETTI laboratoria.
Tillykke med dit nye produkt, som vi er overbevist
om, vil tilfredsstille alle dine behov og forventninger.
Dette projekt blev født hos ZUCCHETTI CENTRO
SISTEMI S.p.A. (som er et selskab med UNI EN ISO 9001
certificering) og deres softwarehouse, som siden 1982
har konsolideret sine aktiviteter og sin tilstedeværelse på
det internationale marked. Anvendelsen af avancerede
it-løsninger indenfor industriel automatisering betyder en
optimering af produktionsaktiviteterne og en forenkling af
arbejdsprocedurerne.
Det er netop på grund af en konstant forskningsaktivitet hos
ZUCCHETTI-laboratorierne, at dette produkt er blevet til.
Onnittelemme sinua tämän tuotteen hankkimisen
johdosta. Olemme varmoja, että tuote täyttää tarpeesi ja
odotuksesi. Tämän tuotteen on kehittänyt ZUCCHETTI
CENTRO SISTEMI S.p.A (sertifioitu UNI EN ISO 9001),
ohjelmistoalan yritys, joka on perustamisvuodestaan 1982
lähtien vahvistanut toimintaansa ja rooliaan kansainvälisillä
markkinoilla. Pitkälle kehitettyjen ohjelmistoratkaisujen
käyttö tehdasautomaatiossa tarkoittaa tuotantotoimintojen
optimointia sekä työprosessin yksinkertaistamista. Tämä
tuote on kehitetty ZUCCHETTIN tutkimuslaboratorioiden
jatkuvan tutkimustyön tuloksena.
Tack för att ni har köpt denna produkt som kan
tillfredsställa era behov och förväntningar.
Detta projekt kommer ursprungligen från ZUCCHETTI
CENTRO SISTEMI S.p.A.(AB) programvaruhus (företag
certifierat enligt UNI EN ISO 9001) som, sedan 1982, har
befäst sin verksamhet och närvaro på den internationella
marknaden. Tillämpning av avancerade IT-lösningar inom
den industriella automationssektorn innebär en optimering
av den produktiva verksamheten och en förenkling av
arbetsprocedurerna. Det är just till följd av den konstanta
forskningen som pågår i ZUCCHETTI’s laboratorier som
denna produkt har tillkommit.
EN
FR
DE
ES
NL
DA
FI
SV
IT
MD-CT-RO-01 - XX - REV 3.0 - EN - 09-2009 - ( L50BEU-L50BUS-L50DEU-L50DUS)
2
User’s manual
EN
FR
DE
ES
NL
DA
FI
SV
IT
EN
FR
DE
ES
NL
DA
FI
SV
IT
3User’s manual
EN
FR
DE
ES
NL
DA
FI
SV
IT
EN
FR
DE
ES
NL
DA
FI
SV
IT
TABLES OF CONTENTS
General information....................................................................................... 5
Technical information .................................................................................... 7
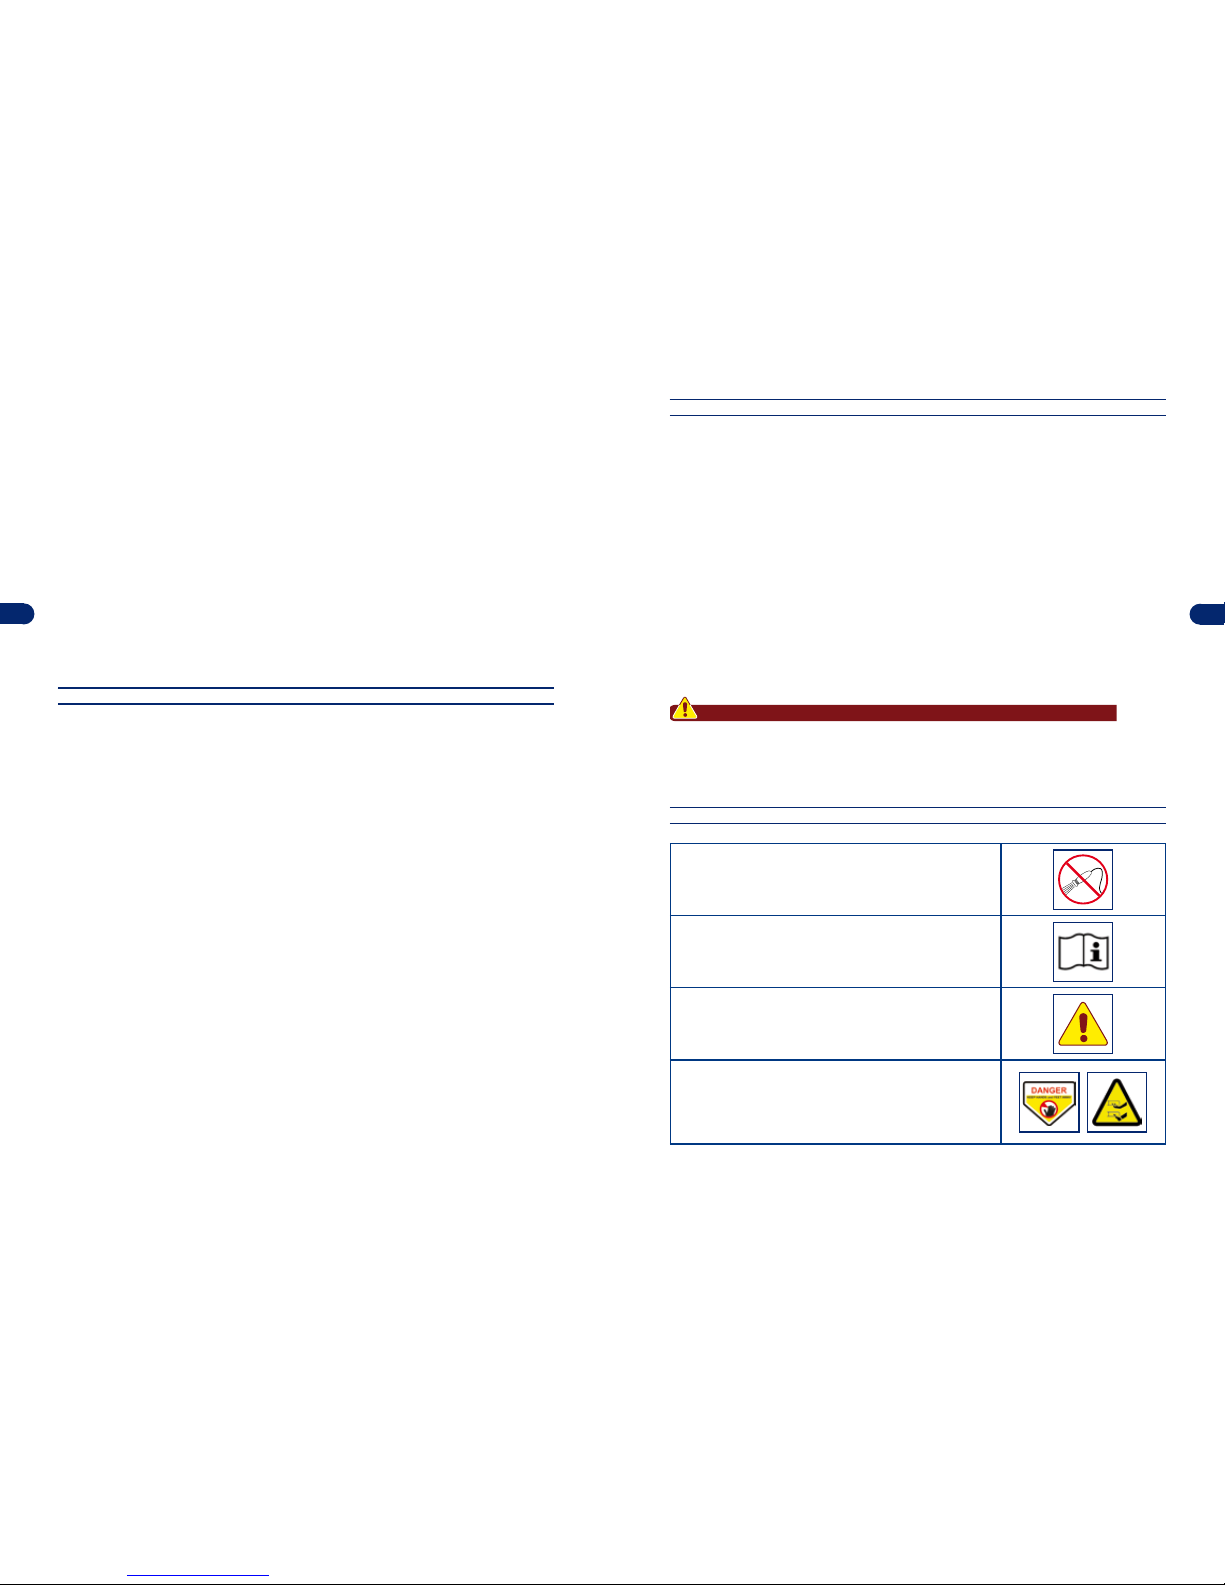
Safety information ....................................................................................... 11
Installation ................................................................................................... 14
Adjustments................................................................................................. 24
Use and operation....................................................................................... 25
Maintenance ................................................................................................ 34
Troubleshooting Guide................................................................................ 36
Parts Replacement...................................................................................... 40
DETAILED INDEX
A
Adjustment of cutting height, 24
Appliance and Manufacturer, identification, 6
Appliance, general description, 7
B
Battery recharge after prolonged inactivity, 33
Battery recharge on first use, 23
Blade, height adjustment, 24
Blade replacement, 40
C
Changing the curb drop-off sensor, 41
Cutting height, adjustment, 24
D
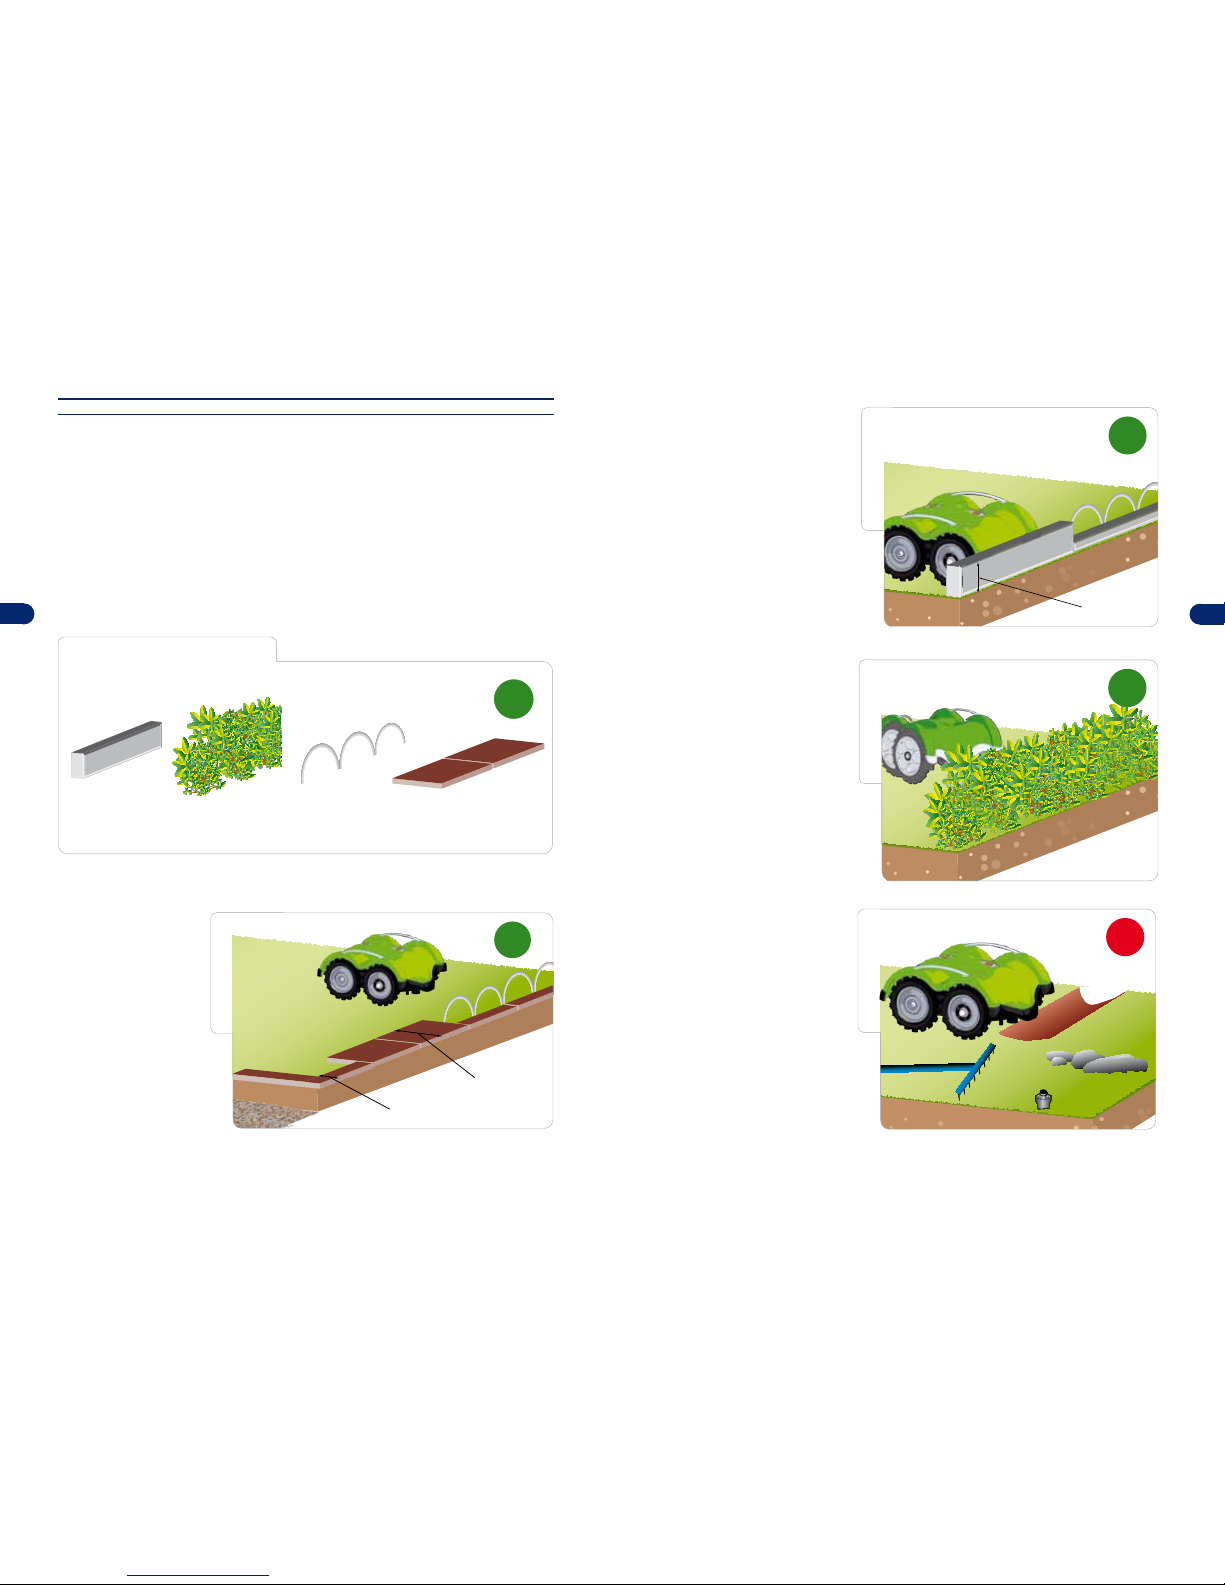
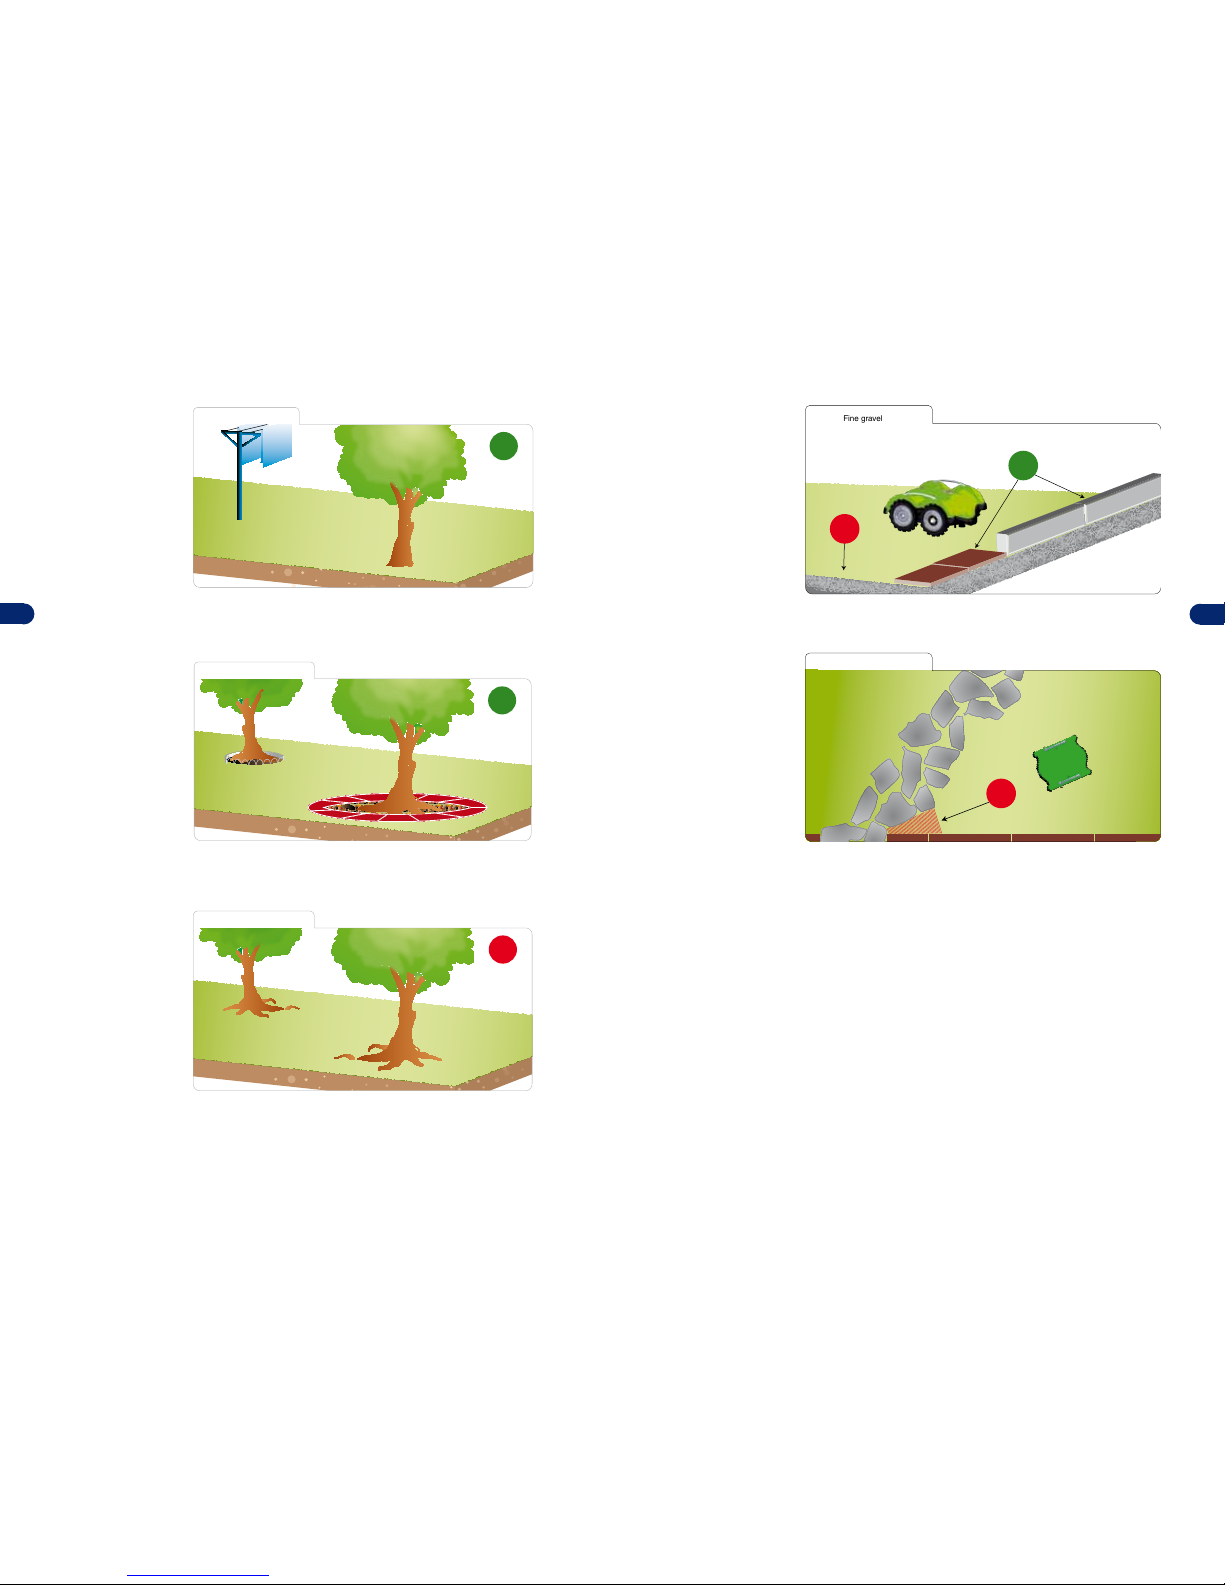
Defining the boundaries of the work areas, 16
Description of robot commands, 25
G
General description of the appliance, 7
I
Identification of manufacturer and appliance, 6
Initial start up, 28
L
LED lights combinations, meaning, 26
M
Main organs, 8
Maintenance recommendations, 34
Manual, purpose of, 5
Manufacturer and appliance, identification, 6
O
Operating tips, 34
P
Packing and unpacking, 14
Parts replacement, recommendations for, 40
Plant and appliance installation, planning, 15
IT: Dichiarazione di conformità / GB: Declaration of conformity / FR: Déclaration de conformité
DE: Konformitätsbestätigung / ES: Declaración de conformidad / NL: Verklaring van overeenstemming
DA: Overensstemmelseserklæring / FI: Vaatimustenmukaisuusvakuutus / SV: Konformitetsdeklaration
ZUCCHETTI Centro Sistemi S.p.A. Via Lungarno 305/A Terranuova B.ni (AR) ITALY
IT Dichiara sotto la propriaresponsabilità
che il prodotto modello L50BEU, L50BUS,
L50DEU, L50DUS è conforme alle seguenti
norme europee :
Sicurezza: CEI EN (50338: 2007-06) -
(60335-1: 2008-07)
Compatibilità Elettromagnetica : CEI EN
(55014-1: 2008 -01) - (55014-2: 1998 -10) -
(55014-2/A1: 2002 -08) - (55014-2/A2: 2008
-12)
CEI EN (61000-3-2: 2007-04) - (61000-3-3:
1997-06) - (61000-3-3/A1: 2002-05)
E’ conforme ai requisiti essenziali delle
seguenti Direttive :
Direttiva Bassa Tensione 2006/95 CE -
Compatibilità Elettromagnetica 2004/108
CE - Rumore Aereo 2006/42 CE
DE Erklärung in eigener Verantwortung:
dieses Produkt der Modelle L50BEU,
L50BUS, L50DEU, L50DUS entspricht
folgenden europäischen Normen:
Sicherheit: CEI EN (50338: 2007-06) -
(60335-1: 2008-07)
Elektromagnetische Konformität: CEI EN
(55014-1: 2008 -01) - (55014-2: 1998 -10) -
(55014-2/A1: 2002 -08) - (55014-2/A2: 2008
-12)
CEI EN (61000-3-2: 2007-04) - (61000-3-3:
1997-06) - (61000-3-3/A1: 2002-05)
Es entspricht im wesentlichen den
Anforderungen folgender Richtlinien:
Niederspannungsrichtlinie 2006/95 EG
– Elektromagnetische Kompatibilität
2004/108 EG – Luftschall 2006/42 EG
DA Erklærer på eget ansvar, at
produktet model L50BEU, L50BUS,
L50DEU, L50DUS er i overensstemmelse
med følgende europæiske standarder :
Sikkerhed : IEC EN (50338: 2007-06) -
(60335-1: 2008-07)
Elektromagnetisk kompatibilitet : IEC
EN (55014-1: 2008 -01) - (55014-2: 1998
-10) - (55014-2/A1: 2002 -08) - (55014-2/
A2: 2008 -12)
IEC EN (61000-3-2: 2007-04) - (61000-3-3:
1997-06) - (61000-3-3/A1: 2002-05)
Er i overensstemmelse med de væsentligste
krav i følgende direktiver :
Lavstrømsdirektiv 2006/95 EC - Direktiv
for eletromagnetisk kompatibilitet
2004/108 EC - Direktiv for luftbåren støj
2006/42 EC
EN Hereby declares under their full
responsibility that the products, models
L50BEU, L50BUS, L50DEU, L50DUS
conform to the following European standards:
Safety: CEI EN (50338: 2007-06) –
(60335-1: 2008-07).
Electromagnetic compatibility: CEI EN
(55014-1: 2008-01) – (55014-2: 1998-10)
– (55014-2/A: 2002-08) – (55014-2/A2:
2008-12) – CEI EN (61000-3-2: 2007-04)
– (61000-3-3: 1997-06) – (61000-3-/A1:
2002-05)
They conform to the essential
requirements of the following Directives:
Low Voltage Directive 2006/95 EC –
Electromagnetic Compatibility 2004/108
EC – Aerial Noise 2006/42 EC
ES Declarabajosupropiaresponsabilidad
que el producto modelo L50BEU, L50BUS,
L50DEU, L50DUS es conforme a las
siguientes normas europeas:
Seguridad: CEI EN (50338: 2007-06) -
(60335-1: 2008-07)
Compatibilidad electromagnética: CEI
EN (55014-1: 2008 -01) - (55014-2: 1998
-10) - (55014-2/A1: 2002 -08) - (55014-2/
A2: 2008 -12)
CEI EN (61000-3-2: 2007-04) - (61000-3-3:
1997-06) - (61000-3-3/A1: 2002-05)
Es conforme a los requisitos esenciales de
las siguientes Directivas:
Directiva de baja tensión 2006/95 CE
- Compatibilidad electromagnética
2004/108 CE - Ruido aéreo 2006/42 CE
FI Vakuuttaa omalla vastuullaan, että
tuote mallia L50BEU, L50BUS, L50DEU,
L50DUS vastaa seuraavien eurooppalaisten
standardien vaatimuksia:
Turvallisuus : CEI EN (50338: 2007-06) -
(60335-1: 2008-07)
Sähkömagneettinen yhteensopivuus :
CEI EN (55014-1: 2008 -01) - (55014-2:
1998 -10) - (55014-2/A1: 2002 -08) -
(55014-2/A2: 2008 -12)
CEI EN (61000-3-2: 2007-04) - (61000-3-3:
1997-06) - (61000-3-3/A1: 2002-05)
Vastaa seuraavien direktiivien oleellisia
vaatimuksia :
Pienjännitedirektiivi 2006/95/EY -
Sähkömagneettinen yhteensopivuus
2004/108/EY - Konedirektiivi 2006/42/
EY
FR Déclare sous sa responsabilité
que le produit modèle L50BEU, L50BUS,
L50DEU, L50DUS est conforme aux
normes européennes suivantes :
Sécurité : CEI EN (50338: 2007-06) -
(60335-1: 2008-07)
Compatibilité électromagnétique : CEI
EN (55014-1: 2008 -01) - (55014-2: 1998
-10) - (55014-2/A1 : 2002 -08) - (55014-2/
A2 : 2008 -12)
CEI EN (61000-3-2: 2007-04) - (61000-3-3:
1997-06) - (61000-3-3/A1 : 2002-05)
Est conforme aux conditions requises
essentielles des Directives suivantes :
Directive Basse Tension 2006/95 CE
- Compatibilité Électromagnétique
2004/108 CE - Bruit Aérien 2006/42 CE
NL Verklaart onder zijn verantwoorde-
lijkheid dat het product model L50BEU,
L50BUS, L50DEU, L50DUS conform de
volgende Europese normen is:
Veiligheid: CEI EN (50338: 2007-06) -
(60335-1: 2008-07)
Elektromagnetische Compatibiliteit: CEI
EN (55014-1: 2008 -01) - (55014-2: 1998
-10) - (55014-2/A1: 2002 -08) - (55014-2/
A2: 2008 -12)
CEI EN (61000-3-2: 2007-04) - (61000-3-3:
1997-06) - (61000-3-3/A1: 2002-05)
En conform de essentiële vereisten van de
volgende Richtlijnen is:
Richtlijn Laagspanning 2006/95 EG
- Elektromagnetische Compatibiliteit
2004/108 EG - Lawaai 2006/42 EG
SV Förklarar under eget ansvar att
produktmodellerna L50BEU, L50BUS,
L50DEU och L50DUS överensstämmer med
följande europeiska standarder:
Säkerhet: CEI EN (50338: 2007-06) -
(60335-1: 2008-07)
Elektromagnetisk kompatibilitet: CEI EN
(55014-1: 2008 -01) - (55014-2: 1998 -10)
- (55014-2/A1: 2002 -08) - (55014-2/A2:
2008 -12)
CEI EN (61000-3-2: 2007-04) - (61000-3-3:
1997-06) - (61000-3-3/A1: 2002-05)
Det överensstämmer med de nödvändiga
kraven i följande direktiv:
Lågspänningsdirektivet 2006/95/
EG - Elektromagnetisk kompatibilitet
2004/108/EG - Luftburet buller 2006/42/
EG
Bernini Fabrizio - Terranuova B.ni 06 April 2009
(Amministratore delegato) - (Chief executive officer) - (Administrateur délegué) - (Geschäftsführer)
(Director general) - (Diracteur) - (Administrerende direktør) - (Pääjohtaja) - (Styrelseordförande)
4
User’s manual
EN
FR
DE
ES
NL
DA
FI
SV
IT
EN
FR
DE
ES
NL
DA
FI
SV
IT
5User’s manual
EN
FR
DE
ES
NL
DA
FI
SV
IT
EN
FR
DE
ES
NL
DA
FI
SV
IT
GENERAL INFORMATION
PURPOSE OF THE MANUAL
• This manual forms an integral part of the appliance and was produced by the Manufacturer to
provide the necessary information to people authorised to interact with it during its expected
working life.
• Operators of the appliance must adopt correct working techniques and must carefully read and
follow the instructions contained in this manual.
• This information is provided by the Manufacturer in its original language of Italian and may be
translated into other languages for legal and/or commercial purposes.
• Carefully read the instructions in this manual to avoid unnecessary risks relating to personal
health and safety and economic damages.
• Keep this manual in a safe and easily accessible place for quick reference.
• Some information and illustrations contained in this manual may not perfectly correspond to the
appliance in your possession, however, this does not compromise its functioning.
• The manufacturer has the right to make changes without notice.
• The following symbols are used throughout this manual to highlight particularly important
information or to indicate important specifications.
Danger - Attention
This symbol identifies situations of imminent danger, which, if ignored, could
lead to serious bodily injury or death.
Warning - Caution
This symbol identifies situations where it is necessary to behave in a certain
way to avoid serious bodily injury and to not cause damage to the appliance.
Important
This symbol identifies particularly important technical information, which , if not
followed, could lead to damage to the robot.
Preparation and defining the boundaries of the work areas, 16
Prolonged inactivity and restarting, 33
Purpose of the manual, 5
R
Recommendations for parts replacement, 40
Recommendations for the regulations, 24
Robot automatic stop, 32
Robot cleaning, 35
Robot safety devices, 12
Robot safety stop, 31
S
Safety distances, possible elements inside the work area, 22
Safety for man and the environment during disposal, 13
Safety regulations, 11
Safety, robot devices, 12
Safety signals, 13
Slopes, 20
Steep slopes, 21
T
Technical assistance, 6
Technical specifications, 9
Tips, operating, 34
Troubleshooting, 36
U
Unpacking and packing, 14
User recommendations, 25
W
Work areas, preparation and boundaries, 16
Reproduction, even partial, of this document without the Manufacturer’s written authorisation is strictly forbidden. The manufacturer implements a po-
licy of continual improvement and reserves the right to modify this document without prior notice on condition that the modifications do not constitute
a health and safety risk. © 2008 – Text, illustrations and page layout by Tipolito La Zecca. The text can be reproduced, in whole or in part, on condition
that the author is mentioned.
6
User’s manual
EN
FR
DE
ES
NL
DA
FI
SV
IT
EN
FR
DE
ES
NL
DA
FI
SV
IT
7User’s manual
EN
FR
DE
ES
NL
DA
FI
SV
IT
EN
FR
DE
ES
NL
DA
FI
SV
IT
TECHNICAL INFORMATION
GENERAL DESCRIPTION OF THE APPLIANCE
The appliance is a robot designed and built to automatically cut grass in gardens and lawns at
any time of the day.
It is small, compact, silent and easy to handle depending on the type of lawn that is being
mowed.
During operation, the robot mows the area delimited by paving and/or barriers (fences, walls,
etc.). When the robot detects that there is no grass or encounters an obstacle, it changes route
in a random manner and starts mowing again in a new direction.
Based on its operating principle (“random”), the robot automatically mows the entire delimited
area of the lawn (see figure).
The maximum lawn surface that the robot can mow depends on a series of factors, such as:
•thecharacteristicsofthearea(irregularperimeters,unevensurfaces,dividedareas,etc.)
•thecharacteristicsofthelawn(typeandheightofthegrass,humidity,etc.)
•theconditionoftheblade(levelofsharpness,grassordebrisbuildup,etc.)
•themodeloftherobotandtypeofbatteriesinstalled
The robot is available in multiple versions (L50BEU – L50BUS – L50DEU – L50DUS) versions,
and has a lithium battery installed to guarantee long running time to mow areas up to 400 m2
(4300 sq. ft.).
RANDOM OPERATION
IDENTIFICATION OF MANUFACTURER AND APPLIANCE
The data plate shown is ap-
plied directly onto the applian-
ce. It contains references to
information which is essential
for safely operating the ma-
chine.
A–Manufacturer Identification.
B–CE conformity label.
C–Serial model/number and
manufacturing year.
D–Technical specifications.
(C) Manufacturing year
(C) Model
(B) CE conformity
label
(A) Identification of manufacturer
(D) Technical
specifications
(C) Serial number
DATA PLATE
REQUESTING TECHNICAL ASSISTANCE
For any technical requirement, please contact the Technical service centre of the Manufacturer
or an authorised centre.
For technical assistance, indicate the data reported on the data plate, the approximate operating
hours and the type of fault detected.
8
User’s manual
EN
FR
DE
ES
NL
DA
FI
SV
IT
EN
FR
DE
ES
NL
DA
FI
SV
IT
9User’s manual
EN
FR
DE
ES
NL
DA
FI
SV
IT
EN
FR
DE
ES
NL
DA
FI
SV
IT
TECHNICAL DATA
Description Model
L50BEU L50DEU L50BUS L50DUS
Maximum recommended surface that can be mowed
Each daily working
cycle
m2 (sq
ft) 400 (4300 sq ft)
Characteristics
Size (W x H x D) mm
(in.)
409 x 199 x 335
(16,10 x 7,83 x 13,19 in)
488 x 287 x 488 (
19,21 x
11,30 x 19,21
in)
Robot weight (inc.
battery) kg 7,9 8,2 10,3 10,6
Cutting height
(Min-Max)
mm
(in.)
34-40 (1,34-1,58 in)
Adjustable with 1 6-mm spacer
(0,24 in)
48-72 (1,88-2,84 in)
Adjustable with 4 6-mm spacers
(0,24 in)
4-pronged blade
diameter
mm
(in.) 250 (9,84)
Drive system 4WD
Electric motors V cc (25,2V)
Cutting blade speed RPM 4000 Cut 2200 Maintenance
Ground speed
Me-
ters/
minute
16 (52,48 ft.)
Suggested
maximum slope ° 27° according to lawn condition
Ambient working
temperature -10°(14 F.) (Min) +50° (122 F.) (Max)
Measured sound
output dB(A) 72(Max) - 65(Lawn maintenance)
Water protection
class IP IP21
Electric features
Charger (for lithium
batteries)
Classe 2 (Vin 90 - 264Vac)
AC current (typ.) 1.2A/115Vac 0.7A/230Vac
Input Frequency range 47 - 63Hz
Battery type and charger
Rechargeable Li-Ion
battery V-A 25,2V – 6,9Ah
Charger V-A 29,3 Vcc - 2,0 Ah
Minimum rechar-
ging time and
method
3 hours - manual
Average working
time * Hours 3,5
MAIN COMPONENTS
A–Battery: supplies power to the blade and wheel motors
B–Power Supply Unit: used to recharge or keep the batteries charged (A).
C–Mother board: controls the automatic functions of the robot.
D–Control keyboard: used to set and display the operating modes of the robot.
E–Cutting blade: mows the lawn.
F–Electric motor: operates the cutting blade (E).
G–Electric motor: one operates the right wheel transmission unit, while the other operates the
left wheel.
H–Sensors: used to recognise the characteristics of the ground on which the robot is operating.
I – Curb drop-off sensors: detect any holes or empty spaces. They are positioned in line with
the wheels making it easy to change direction before any steps.
LAMA 2
A
B
FG
C
E
H
H
LOWBATTERY
PAUSE
START
STOP
HIGHBATTERY
ON
OFF
ON
DI
10
User’s manual
EN
FR
DE
ES
NL
DA
FI
SV
IT
EN
FR
DE
ES
NL
DA
FI
SV
IT
11 User’s manual
EN
FR
DE
ES
NL
DA
FI
SV
IT
EN
FR
DE
ES
NL
DA
FI
SV
IT
SAFETY INFORMATION
SAFETY REGULATIONS
• During the design and construction, the Manufacturer carefully considered the personal
health and safety risks of those operating with the robot. In addition to respecting the
applicable current laws, the Manufacturer adopted all the “regulations of good manufacturing
techniques”. The purpose of this information is to advise users on placing special attention
to prevent risks of injury. However, prudence and caution is irreplaceable. Safety is also in the
hands of operators who interact with the appliance.
• When using the robot for the first time, it is recommended to carefully read the entire
manual and to fully understand it, particularly any and all safety information.
• Carefully read the instructions in this manual and those that apply directly to the machine,
especially the safety information. Carefully study this manual to prevent injury or accidents. It
is always too late to remember what you should have done after the fact.
• Lift and move the robot according to the information reported directly on the packaging, on
the appliance and in the user instructions provided by the Manufacturer.
• Pay attention to the symbols that appear on the robot and in this manual; their shape and
colour are important for safety purposes. Keep them legible and follow the instructions.
• The lawn mower can only be used by people who know how to operate it and who have read
and understood the instructions in this manual.
• Only use the robot for the intended purposes specified by the manufacturer. Improper use of
the robot may lead to serious injury or death.
• Before using the lawn mower, make sure that there are no objects on the lawn (toys, branches,
clothing items, etc.).
• When using the robot, make sure the work area is clear of people (in particular, children, the
elderly or disabled people) and domestic animals to prevent safety risks. To prevent this risk,
it is recommended to operate the production activity of the robot in suitable times.
• Never allow people to sit on the robot.
• Never lift the robot to inspect the blade during operation.
• Do not place hands and feet under the robot at any time.
• Do not tamper with, sidestep, eliminate or bypass the safety devices installed.
The non-observance of this requirement may cause serious personal injury or death.
• Keep the lawn mower in conditions of maximum efficiency by carrying out the maintenance
operations provided for by the Manufacturer. Proper maintenance will allow obtaining the
best performances and longer operating times.
• Before carrying out any maintenance and adjustments, disconnect the electric power supply.
The user must ensure that all the necessary safety conditions are in place, especially when
working on the lower part of the lawn mower, following the Manufacturer’s procedures.
• Use the personal protection devices prescribed for by the Manufacturer, in particular, always
wear gloves when working on the blades and cutting disc.
• Before replacing the batteries, always remove the blade.
Safety blade stop
Anti-tilting sensor Standard equipment
Lifting sensor Standard equipment
Equipment
Grass detection
sensor (patented) N. 6
Curb drop-off sen-
sors (Step)
(Patented)
Optional Standard
equipment Optional Standard
equipment
Blade modulation Standard equipment
Mowed lawn
detection sensors
(patented)
Standard equipment
Border accessories Optional
8-pronged blade
Specifically for early season rapid growth and for lawns that
need greater mowing power.
Optional
Cleaning disc
(patented)
Disc that is fitted above the cutting blade. It helps keep the
underbody clean.
Specially indicated for areas where the grass is very wet.
Optional
* Based on the conditions of the grass and grassy surface.
12
User’s manual
EN
FR
DE
ES
NL
DA
FI
SV
IT
EN
FR
DE
ES
NL
DA
FI
SV
IT
13 User’s manual
EN
FR
DE
ES
NL
DA
FI
SV
IT
EN
FR
DE
ES
NL
DA
FI
SV
IT
SAFETY FOR MAN AND THE ENVIRONMENT DURING DISPOSAL
• Do not disregard material into the environment. Dispose of the robot according to the appli-
cable regulations.
• In reference to the WEEE Directive (Waste of Electrical and Electronic Equipment), during the
phasing out of the machine, the user must separate the electrical and electronic components
and dispose of them in special authorised waste collection centres, or take them back to the
retailer when purchasing a new one.
• All the parts, which must be collected separated and disposed of in a specific manner, are
marked with a special label.
• Unauthorised disposal of Waste of Electric and Electronic Equipment (WEEE) is punishable
with sanctions regulated by the laws in force in the territory where the infraction has been
verified.
• To implement the European directives (2002/95/CE, 2002/96/CE, 2003/108/CE) in the Italian
territory, for example, a legislative decree was issued (No. 151 of 25 July 2005) which provi-
des for an administrative fine of 2000÷5000 Euro.
Danger - Attention
Electric and Electronic Equipment may contain hazardous substances having
potentially harmful effects on the environment and people. It is recommended to
correctly dispose of this waste.
SAFETY SIGNALS
Attention! Do not use a water hose to clean or wash the
robot.
Read the instructions and ensure that you fully under-
stand them before using the robot.
The warnings and safety instructions given in this manual
must be followed. Failure to do so could lead to machine
breakage and/or serious bodily injury.
Keep hands and feet well away from the cutting blade. Do
not place your hands or feet beneath the body or close to
the robot when it is working.
• Only qualified persons, having the necessary technical expertise and skill, should attempt to
work on or repair this robot. Failure to observe these requirements could result in serious
injury.
• The Manufacturer shall not be held liable if non-original spare parts are used.
• Replace worn parts with original spare parts to guarantee the functionality and safety level.
• Do not use the robot on too wet grass or when it is raining.
• Never use and recharge the robot in explosive and/or flammable environments.
ROBOT SAFETY DEVICES
1. Lift sensor
In the event that the robot is lifted from the ground, the blade will stop rotating in less than two
seconds.
2. Bumpers
The bumper sensor is activated when the mower strikes a solid object, which will stop the mo-
vement in that direction and reverse itself away from the obstacle.
3. Inclinometer
If the robot works on a slope which is steeper than the maximum limit, or tips over, the robot will
stop the movement in that direction and reverse to avoid the slope.
4. Emergency stop switch
Located on the top outer surface of the robot, red in colour. Pressing this button at any time
during operation will stop immediately all mower movements and stop the rotation of the blades
within two seconds (< 2 seconds).
5. Over-current protection
Each of the motors (blade and wheels) are monitored continuously during operation for any
situation that may cause these motors to overheat. If this occurs in the wheel motor, the robot
will attempt to move in the opposite direction. If the over-current persists, the robot will stop
and signal an error. If the cutting motor overheats, then there are two types of intervention. If
the parameters fall within the first range, the robot will carry out the manoeuvre to unblock the
cutting blade. If the over-current is below the protection range, the robot will stop and signal a
motor error.
14
User’s manual
EN
FR
DE
ES
NL
DA
FI
SV
IT
EN
FR
DE
ES
NL
DA
FI
SV
IT
15 User’s manual
EN
FR
DE
ES
NL
DA
FI
SV
IT
EN
FR
DE
ES
NL
DA
FI
SV
IT
PLANNING OF PLANT INSTALLATION
The robot is not difficult to install, but requires some preliminary planning in order to define the
best area for installing the power supply unit and the boundaries of the robot’s work area.
Position the power supply unit in an easy to access zone.
– The power supply unit must be in a well-ventilated area, protected from direct sunlight and
exposure to the elements.
– The power supply unit must not be in direct contact with the ground or humid environments.
Danger - Attention
Do not recharge the robot in explosive and/or flammable environments.
Warning - Caution
When connecting the electricity, it is necessary that a power outlet is positioned
next to the installation area. Make sure that the connection to the mains power
conforms to the applicable regulations and standards.
Important
It is recommended to install the unit in a cabinet for electric components (for
outdoor or indoor use), well-ventilated to maintain a correct air re-circulation
and equipped with a key lock so that access to the power supply unit is only
permitted to authorised personnel.
INSTALLATION AREA
INSTALLATION
PACKING AND UNPACKING
The robot is delivered suitably packed. When unpacking, carefully remove it and check the in-
tegrity of the parts.
The contents contain all necessary equipment for operating the robot.
Packing contents
A–Robot
B–Power supply unit
C–Spacer-ring kit
D–User Manual
Important
• The list only includes standard parts. Check the quantity and integrity of any
optional accessories requested.
• Keep the packing materials for future use.
ROBOT
PACKING BOX
MANUAL
POWER SUPPLY
UNIT
A
BLADE SPACER RING KIT
TO ADJUST THE CUTTING
HEIGHT
C
B
D
16
User’s manual
EN
FR
DE
ES
NL
DA
FI
SV
IT
EN
FR
DE
ES
NL
DA
FI
SV
IT
17 User’s manual
EN
FR
DE
ES
NL
DA
FI
SV
IT
EN
FR
DE
ES
NL
DA
FI
SV
IT
Perimeter wall, which defines the
boundary of the work area at a
height above 9 cm. (3.54 in.). If the
walls are shorter, protect the area
with arches or adequate paving.
minimum high
9 cm. / 3,5 inc.
OK
MURETTO
WALL
The work area can also be effectively
delimited by hedges.
OK
SIEPE
HEDGING
The work area cannot be delimited
by ditches or holes which must not
be present inside the grassy area
to mow. Before starting the robot,
check that there are no objects on
the lawn such as toys, small stones,
branches or sprinklers protruding
from the ground which could impede
correct functioning or cause damage
to the blade.
NO
BUCA
HOLES
PREPARATION AND DEFINING THE BOUNDARIES OF THE WORK AREAS
Preparation of the lawn to mow
1. Make sure that the lawn to mow is even and does not contain holes, stones or other obstacles.
Otherwise, prepare the lawn by filling in any holes and removing any obstacles. If some obsta-
cles cannot be removed, it is necessary to properly define and protect the interested areas.
2. Check that all the areas of the lawn do not exceed the allowable slopes (see “Technical Speci-
fications”, page 9).
The sensors, which recognise the presence of the grassy surface, allow the robot to move freely
inside the lawn. The lawn must be suitably checked and adjusted so that the robot has enough
space for recognising when there is no grass. Carefully follow the below points for the correct and
safe use of the robot.
DEFINING THE BOUNDARIES
PROTECTIONS
OK
DELIMITAZIONI
WALL
higher than
9 cm. / 3,5 inc.
PAVING
wider than 25 cm. / 9,8 inc.
With the curb drop-off sensor installed,
Minimum width 10 cm / 4.0 inches
HEDGING SMALL ARCHES
Types of boundaries/protections that can be used for correctly defining the limits of the robot’s work area.
The robot requires at least 25
cm (9.84 in) without any grass
for it to stop safely and change
direction. For lawns with paths
or curbs, they must be at least
25 cm (9.84 in.) wide. Any curbs
that are less than 25 cm (9.84
in.) side, must be protected with
paving or arches in the ground,
as shown in the figure, so that
the robot impacts with them.
The robot with the curb drop-off
sensor installed needs 10 cm/4
inches) without any grass.
PAVIMENTAZIONE
PAVEMENT
minum width of 25 cm. / 9,8 inc.
With the curb drop-off sensor installed,
Minimum width 10 cm / 4.0 inches
OK
18
User’s manual
EN
FR
DE
ES
NL
DA
FI
SV
IT
EN
FR
DE
ES
NL
DA
FI
SV
IT
19 User’s manual
EN
FR
DE
ES
NL
DA
FI
SV
IT
EN
FR
DE
ES
NL
DA
FI
SV
IT
Attention!
If fine gravel, leaves or
small stones are used to
border the lawn, they are
not detected correctly
by the robot. Protect the
lawn with other borders.
Fine gravel
OK
NO
Attention!
In areas of the lawn that
end in narrow spaces as
shown in the figure, the
robot cannot move easily,
therefore this part of the
lawn must be excluded
because the robot would
exit the borders.
Sharp corners
NO
The illustrations show an
example of the internal
and peripheral elements
of the correct work area.
If elements such as tree
roots or exposed wires are
present, it is necessary
to delimit the perimeter
of these elements with
paving, walls or barriers to
prevent the malfunctioning
of the robot. Elements
(trees, poles, etc. ref. fig.
obstacles) which do not
impede the robot’s normal
functioning do not require
delimiting.
ALBERO
OK
NO
OK
OBSTACLES
ROOTS
PROTECTIONS
ALBERO
OK
NO
OK
OBSTACLES
ROOTS
PROTECTIONS
Do not, under any circum-
stance, leave areas which
have not been delimited
by barriers inside the work
area, as these will prevent
the robot from functioning
properly (roots, external
pipes, work tools, etc.).
ALBERO
OK
NO
OK
OBSTACLES
ROOTS
PROTECTIONS
20
User’s manual
EN
FR
DE
ES
NL
DA
FI
SV
IT
EN
FR
DE
ES
NL
DA
FI
SV
IT
21 User’s manual
EN
FR
DE
ES
NL
DA
FI
SV
IT
EN
FR
DE
ES
NL
DA
FI
SV
IT
STEEP SLOPES
The robot’s safety system will interpret sudden changes in the slope (greater than 15°) as an ano-
maly and therefore, will reverse the direction and bring the robot back to safety continuing to mow
the lawn. Tree trunks which gradually rise from the ground or stones positioned to mark the bounda-
ry of flower-strips which gently descend onto the grassy surface are also interpreted as slope
changes.
Important
Check the robot when using for the first time on slopes that are at the limit of
the specifications.
OK
UPWARD SLOPE
DOWNWARD SLOPE
+15°
OK
included between 0° and +15°
included between 0° and -15°
-15°
PENDENZA RIPIDA
The robot can tackle height differences with
slopes of up to 15° if they slope down suddenly.
OK
UPWARD SLOPE
DOWNWARD SLOPE
+15°
OK
included between 0° and +15°
included between 0° and -15°
-15°
PENDENZA RIPIDA
Important
Areas with slopes greater than those specified cannot be mowed with the robot.
SLOPES
Check that all the areas of the lawn do not exceed the admissible slopes (see “Technical Specifi-
cations”, page 9).
Areas with steeper slopes or that are incompatible with the correct functioning of the robot (see
following points) cannot be mowed. Steeper slopes must be delimited.
ù
Important
The sensors of the robot can detect slopes greater than the robot can manage.
The direction is reversed in order to prevent the robot from tipping over or
malfunctioning. In addition, as a further protection, it is necessary to delimit the
areas, which have slopes that cannot be managed.
It is recommended to test the robot when using for the first time on slopes that
are at the limit of the specifications.
OK
included between 0° and +27°
pendenza morbida
1 m.
Greater than 1 m. / 39,3 inc.
OK
1 m.
+27°
-27°
UPWARD SLOPE
DOWNWARD SLOPE
included between 0° and -27°
Greater than 1 m. / 39,3 inc.
The robot can tackle height differences with a slope
of up to 27° provided that they gradually slope down
over a distance of more than one metre.
OK
included between 0° and +27°
pendenza morbida
1 m.
Greater than 1 m. / 39,3 inc.
OK
1 m.
+27°
-27°
UPWARD SLOPE DOWNWARD SLOPE
included between 0° and -27°
Greater than 1 m. / 39,3 inc.
22
User’s manual
EN
FR
DE
ES
NL
DA
FI
SV
IT
EN
FR
DE
ES
NL
DA
FI
SV
IT
23 User’s manual
EN
FR
DE
ES
NL
DA
FI
SV
IT
EN
FR
DE
ES
NL
DA
FI
SV
IT
BATTERY RECHARGE ON FIRST USE
Position the robot next to the recharging zone.
1. Check that the power supply unit is connected to the electricity power (110V or 220V).
2. Connect the black plug to the wheel containing the black “-” symbol.
3. Connect the red plug to the wheel containing the red “+” symbol.
Once connected, the robot automatically turns on to show the recharging level of the batteries.
(see “meaning of LED combination” on page 26).
At the end of the charging cycle, first disconnect the red cable and then the black one. Press the
“OFF” key.
Correctly connect the
recharging knobs to the
nuts found on the wheels
of the robot.
LOWBATTERY
PAUSE
START
STOP
HIGHBATTERY
ON
OFF
ON
BATTERIA
LOWBATTERY
PAUSE
START
STOP
HIGHBATTERY
ON
OFF
ON
BATTERIA
The figure shows the
correct installation of the
robot’s recharging zone.
Important
On first recharge, the batteries be charged connected for at least 24 hours.
POSSIBLE ELEMENTS INSIDE THE WORK
AREA AND RELATIVE SAFETY DISTANCES
Minimum pavement width of
50 cm. / 19,6 inc.
minimum wall height of
9 cm. / 3,5 inc.
protection arches
APPROPRIATE POOL PREPARATION
INAPPROPRIATE POOL PREPARATION
minimum width of non-grassy
ground of 70 cm. / 27,5 inc. OK
PISCINA
WATER
Pavement width less than
50 cm. / 19,6 inc.
wall height less than
9 cm. / 3,5 inc.
land width less than
70 cm. / 27,5 inc.
no presence of non-grassy ground NO
WATER
The figure above shows a work area which has been correctly delimited for the correct functioning
of the robot.
Important
Foliage is usually detected as grass. In case of foliage, we suggest to increase the
distance from the edge by about 20 cm (7,88 inc).
Minimum pavement width of
50 cm. / 19,6 inc.
minimum wall height of
9 cm. / 3,5 inc.
protection arches
APPROPRIATE POOL PREPARATION
INAPPROPRIATE POOL PREPARATION
minimum width of non-grassy
ground of 70 cm. / 27,5 inc. OK
PISCINA
WATER
Pavement width less than
50 cm. / 19,6 inc.
wall height less than
9 cm. / 3,5 inc.
land width less than
70 cm. / 27,5 inc.
no presence of non-grassy ground NO
WATER
The figure above shows a work area where the robot’s operating areas have not been correctly
delimited, thus preventing it from functioning properly.
24
User’s manual
EN
FR
DE
ES
NL
DA
FI
SV
IT
EN
FR
DE
ES
NL
DA
FI
SV
IT
25 User’s manual
EN
FR
DE
ES
NL
DA
FI
SV
IT
EN
FR
DE
ES
NL
DA
FI
SV
IT
USE AND OPERATION
USER RECOMMENDATIONS
Important
• When using the robot for the first time, it is recommended to carefully read the entire
manual and to fully understand it, especially the safety information.
• Only use the robot for the uses intended by the Manufacturer and do not tamper with
any device to obtain different performances.
DESCRIPTION OF ROBOT COMMANDS
LOWBATTERY
PAUSE
START
STOP
HIGHBATTERY
ON
OFF
ON
LOWBATTERY
PAUSE
START
STOP
HIGHBATTERY
ON
OFF
ON
LOWBATTERY
PAUSE
START
STOP
HIGHBATTERY
ON
OFF
ON
LOWBATTERY
PAUSE
START
STOP
HIGHBATTERY
ON
OFF
ON
The illustration shows the position of the commands on the machine.
A – ON/OFF: press to turn the robot on and off.
B – START/STOP: press to start or stop the robot when it is on standby.
ADJUSTMENTS
RECOMMENDATIONS FOR ADJUSTMENTS
Important
•The user must follow the procedures described in this manual when making
any adjustments. Do not make any adjustment which is not expressly indicated
in this manual.
•Any special adjustments, not expressly indicated in this manual, must only be
carried out by personnel from the Manufacturer’s Authorised Service Centres.
ADJUSTMENT OF CUTTING HEIGHT
1–Stop the robot safely by
pressing the ON/OFF key (see
“Robot safety stop”, page 31).
2 – Turn over the robot and
position it so as not to ruin the
covering hood.
Important
Use protective gloves to
prevent injury to your hands.
3 – Unscrew the screws to
remove the blade.
4 – Insert one or more spacers
to adjust the cutting height as
shown in the table on page 9.
5 – Reposition the blade (see
page 35) and fasten the screws.
6 – Turn the robot over to its
operating position.
INSERTING SPACERS
WITH SCREWS
INSERTING BLADE
WITH SCREWS
check that the slope of the blade,
with the robot in the start position,
is facing downwards.
Important
Reduce the cutting height gradually. It is recommended to add the spacers
every 2÷3 days in order to gradually reach the ideal height of the grassy surface.
26
User’s manual
EN
FR
DE
ES
NL
DA
FI
SV
IT
EN
FR
DE
ES
NL
DA
FI
SV
IT
27 User’s manual
EN
FR
DE
ES
NL
DA
FI
SV
IT
EN
FR
DE
ES
NL
DA
FI
SV
IT
MEANING OF LED COMBINATIONS
HIGH BATTERY
ON
OFF
ON
LOW BATTERY
PAUSE
START
STOP
IN OPERATION
STEADY ON robot in operation
STEADY ON low battery level
1
HIGH BATTERY
ON
OFF
ON
LOW BATTERY
PAUSE
START
STOP
RECHARGING
STEADY ON low battery level
STEADY ON full battery level
1 FLASH medium battery level
1
1
STEADY ON in pause
in pause due to low battery
1 FLASH the lawn has been mowed
2 FLASHES no grass present
1
2
STEADY ON full battery level
STEADY ON robot in operation
1 FLASH medium battery level
28
User’s manual
EN
FR
DE
ES
NL
DA
FI
SV
IT
EN
FR
DE
ES
NL
DA
FI
SV
IT
29 User’s manual
EN
FR
DE
ES
NL
DA
FI
SV
IT
EN
FR
DE
ES
NL
DA
FI
SV
IT
GRASS SENSOR OFF
CURB DROP-OFF SENSOR ON
GRASS SENSOR ON
CURB DROP-OFF SENSOR OFF
Keep the START button pressed
for 4 seconds.
Release the button
Wait for
2 beeps 2 flashes
+
Keep the START button pressed
for 8 seconds.
Release the button
Wait for
3 beeps 3 flashes
+
GRASS SENSOR OFF
CURB DROP-OFF SENSOR OFF
Keep the START button pressed
for 12 seconds.
Release the button
Wait for
4 beeps 4 flashes
+
4 sec.
8 sec.
12 sec.
Grass Sensor On – Curb drop-off
sensor Off:
Press the START/STOP button and
keep it pressed for 8 seconds until
3 consecutive beeps are heard and
the PAUSE led flashes three times.
This mode must only be used on
models with the curb drop-off sensor
installed, and it allows working with
just the front grass detector sensors.
This mode is recommended with
uneven surfaces with lots of sharp
dips or sparse grass.
GRASS SENSOR
Minimum width 25 cm / 9.8 inches.
ATTENTION! The robot requires more space with this mode to change the direction. Respect the
distances that are given for models without the curb drop-off sensor.
GRASS SENSOR OFF
CURB DROP-OFF SENSOR ON
GRASS SENSOR ON
CURB DROP-OFF SENSOR OFF
Keep the START button pressed
for 4 seconds.
Release the button
Wait for
2 beeps 2 flashes
+
Keep the START button pressed
for 8 seconds.
Release the button
Wait for
3 beeps 3 flashes
+
GRASS SENSOR OFF
CURB DROP-OFF SENSOR OFF
Keep the START button pressed
for 12 seconds.
Release the button
Wait for
4 beeps 4 flashes
+
4 sec.
8 sec.
12 sec.
INITIAL START-UP
1. Check that the grassy surface of the lawn to mow is at a height which is compatible with the
proper functioning of the robot (see technical specifications on page 9).
2. Adjust the desired cutting height (see cutting height adjustment on page 24).
3. Check that the work area is correctly delimited and that there are no impediments to the
correct functioning of the robot as indicated in the section “Preparation and defining the
boundaries of the work areas” and following sections.
4. Disconnect the robot from the recharging area (page 23).
5. Position the robot inside the grassy surface in an area where the grass is at least 1 metre (40.0
in.) from any obstacle.
6. Press the OFF/ON key and wait a few seconds for the robot to turn on completely.
7. Press START/STOP key to start the robot.
Once the robot has stopped due to the reasons described in the chapter “Robot Stop”, activate
the safety stop and reposition the robot inside the power supply unit for recharging (see page 23).
Important
For a better cutting performance and correct functioning of the recognition
sensor, do not start the robot in case of rain or in very humid conditions. The
best results are obtained in the middle of the day.
STARTING THE ROBOT WITH THE SENSORS TURNED OFF
In certain lawn conditions, the robot can be started with the lawn and curb drop-off sensors
deactivated, which means the robot can be started when lawn conditions are such that correct
functions are not guaranteed, for example with very short or patchy grass.
This mode requires very special attention from the user, and the dealer should be consulted
before attempting to operate in this mode.
When the robot is on Pause, these modes can be activated following this procedure:
Grass Sensor Off – Curb drop-off
sensor On:
Press the START/STOP button and keep it
pressed for 4 seconds until 2 consecutive
beeps are heard and the PAUSE led
flashes twice. This mode must only be
used on models with the curb drop-off
sensor installed, and it allows working
with just the 4 curb drop-off sensors. This
mode is recommended in gardens where
the lawn is lower than the sensors but still
very uniform.
GULF
With the curb drop-off sensor installed,
minimum width 10 cm /4.0 inches.
30
User’s manual
EN
FR
DE
ES
NL
DA
FI
SV
IT
EN
FR
DE
ES
NL
DA
FI
SV
IT
31 User’s manual
EN
FR
DE
ES
NL
DA
FI
SV
IT
EN
FR
DE
ES
NL
DA
FI
SV
IT
ROBOT SAFETY STOP
When using the robot, you may safely stop it at any time by pressing the “ON/OFF” key.
LOW BATTERY
PAUSE
START
STOP
HIGH BATTERY
ON
OFF
ON
LOW BATTERY
PAUSE
START
STOP
HIGH BATTERY
ON
OFF
ON
Important
The robot safety stop is necessary when carrying out any maintenance and repai-
rs (for example: cleaning, adjustments to cutting height, etc.).
Grass Sensor Off – Curb drop-off
sensor Off:
Press the START/STOP button and
keep it pressed for 12 seconds until
4 consecutive beeps are heard and
the PAUSE led flashes 4 times. This
mode allows working without any
sensors. It is useful in particular with
poor lawn conditions. This mode
should only be used if the lawn is
protected by a wall, fence or hedge.
LAWN PROTECTION
GRASS SENSOR OFF
CURB DROP-OFF SENSOR ON
GRASS SENSOR ON
CURB DROP-OFF SENSOR OFF
Keep the START button pressed
for 4 seconds.
Release the button
Wait for
2 beeps 2 flashes
+
Keep the START button pressed
for 8 seconds.
Release the button
Wait for
3 beeps 3 flashes
+
GRASS SENSOR OFF
CURB DROP-OFF SENSOR OFF
Keep the START button pressed
for 12 seconds.
Release the button
Wait for
4 beeps 4 flashes
+
4 sec.
8 sec.
12 sec.
32
User’s manual
EN
FR
DE
ES
NL
DA
FI
SV
IT
EN
FR
DE
ES
NL
DA
FI
SV
IT
33 User’s manual
EN
FR
DE
ES
NL
DA
FI
SV
IT
EN
FR
DE
ES
NL
DA
FI
SV
IT
PROLONGED INACTIVITY AND RESTARTING
If the robot has not been used for a long period of time, it is necessary to carry out a series of
operations to guarantee the correct functioning at the time of its reuse.
1 – Accurately clean the robot (see “Robot Cleaning”, page 35).
2–Recharge the battery at least every 5 months for lithium batteries.
3–Store the robot in a protected and dry location with an ambient temperature between 10° and
30 °C (50°F - 86°F), out of reach of children, animals, etc.
4–Disconnect the power point from the power supply unit.
Restarting
Follow these procedures before restarting the robot after a long period of inactivity:
1–Connect the plug of the power supply unit to the electrical outlet.
2–Reactivate the main electrical power supply.
3–Place the button of the power supply unit on “ON”.
4–Recharge the batteries of the robot for at least 12 hours.
5–Once the recharging has been completed, operate the robot normally.
BATTERY RECHARGE AFTER PROLONGED INACTIVITY
Position the robot next to the recharging zone.
1. Check that the recharging nuts on the wheels are clean.
2. Check that the power supply unit is connected to the electrical power (110V or 220V).
3. Connect the black plug to the wheel containing the black “-” symbol.
4. Connect the red plug to the wheel containing the red “+” symbol.
5. Once connected, the robot automatically turns on to show the recharging level of the batteries.
(see “meaning of LED combination” on page 26).
At the end of the charging cycle, first disconnect the red cable and then the black one. Press
the “OFF” key.
Important
Recharge the battery at least every 5 months for lithium batteries.
ROBOT STOP
The robot stops automatically if the following conditions are detected:
• Lawn mowed: The sensor has detected that the lawn has been mowed and therefore, does
not require further mowing. Recharge the batteries and start the robot again after one or two
days based on the growth of the grass.
• No grass: The grass-detection sensors have not detected the presence of grass for an ex-
tended period.
• Discharged batteries: The batteries have used up their operating capacity.
• Batteries in protection: When the batteries have reached a capacity which is lower than the
level of the discharged batteries, the robot completely turns off without displaying any indica-
tion. In this case, connect the robot to the recharger. The robot will not turn on immediately,
as normally occurs, but only after a few minutes.
HIGH BATTERY
ON
OFF
ON
LOW BATTERY
PAUSE
START
STOP
IN PAUSE
STEADY ON
in pause
1 FLASHING
the lawn has been mowed
1
2 FLASHING
no grass present
2
STEADY ON
discharged batteries
STEADY ON
34
User’s manual
EN
FR
DE
ES
NL
DA
FI
SV
IT
EN
FR
DE
ES
NL
DA
FI
SV
IT
35 User’s manual
EN
FR
DE
ES
NL
DA
FI
SV
IT
EN
FR
DE
ES
NL
DA
FI
SV
IT
ROBOT CLEANING
1 – Stop the robot safely (see “Robot safety stop”, page 31).
Warning - Caution
Use protective gloves to avoid the risk of injury.
2–Clean the outside surfaces of the robot with a sponge using warm water and mild detergent.
Wring the sponge out well to remove any excess water before use.
Warning - Caution
Do not use a water hose to clean the robot.
Water could get inside the robot and damage the
components.
3 – Do not use solvents or benzene so as not to damage the painted surfaces and plastic com-
ponents.
4 – Do not wash the internal parts of the robot and do not use jets of pressurised water so as not
to damage the electric and electronic components.
Warning - Caution
In order to not cause irreversible damage to the electric and electronic compo-
nents, do not immerse the robot, in water because it is not watertight.
5 – Check the lower part of the robot (cutting blade area and wheels) and remove any deposits
and/or residuals that may obstruct the correct functioning of the robot.
6 – To remove any deposits and/or other residuals from the blade, use a suitable brush.
7 – Clean the battery recharge knobs and remove any oxidations or residuals caused by electric
contacts with a dry cloth and, if necessary, with fine abrasive paper.
8 – Check the level of sharpness of the cutting blade. If necessary, sharpen.
OPERATING TIPS
Below are some helpful operating tips when using the robot.
• Even after being suitably informed on the use of the robot, simulate some test manoeuvres
on first use to identify the commands and main functions.
• Check and secure the fastening screws of the main components.
• Mow the lawn frequently to avoid excessive growth of the grass.
• Do not use the robot to mow grass which is shorter than 3 cm (1.18 in.) in respect to the
cutting blade.
• If the lawn is equipped with an automatic sprinkler system, make sure the robot finishes its
work cycle at least one hour before the start of the watering to prevent damage to the robot
itself and to the sprinklers.
• Check the slope of the ground and make sure the maximum values admissible are not exce-
eded so that the use of the robot does not cause dangers.
• When using the robot, make sure the area to mow is clear of people (in particular, children, the
elderly, or disabled people) and domestic animals to prevent safety risks.
To minimize chance of injury, operate the robot during times when the yard is not being used.
• Do not use the robot in case of rain or strong humidity. The best results are obtained in the
middle of the day.
ORDINARY MAINTENANCE
MAINTENANCE RECOMMENDATIONS
Important
• During maintenance operations, use personal protection equipment indicated
by the Manufacturer, especially when working on the blade.
• Before carrying out any maintenance, make sure the robot is turned OFF (see
“Robot Safety Stop”, page 31).
SCHEDULED MAINTENANCE TABLE
Frequency Part Type of maintenance Reference
Weekly
Blade
Clean and check the efficiency of
the blade
See “Robot
Cleaning”, page 35
Replace the blade if bent due to
an impact or if it is worn out.
See “Blade
replacement”,page 40
Curb drop-off
sensor
Remove any excess grass.
Change the sensors if they are
damaged.
See “Changing
the curb drop-off
sensors” page 41.
Battery recharge
knobs Clean and remove any oxidations See “Robot Cleaning”
Monthly Robot Clean the robot See “Robot Cleaning”
36
User’s manual
EN
FR
DE
ES
NL
DA
FI
SV
IT
EN
FR
DE
ES
NL
DA
FI
SV
IT
37 User’s manual
EN
FR
DE
ES
NL
DA
FI
SV
IT
EN
FR
DE
ES
NL
DA
FI
SV
IT
Problem Cause Remedy
The work area is not comple-
tely mowed.
Not enough work hours Extend the working times
Cutting blade fouled with
deposits and/or residuals
Stop the robot safely (see
“Robot safety stop”, page
31). Use protective gloves to
avoid the risk of injury. Clean
the cutting blade.
Cutting blade worn.
Replace the blade with
original spare parts (see
“Blade Replacement”, page
40).
Work area is too big compa-
red to the actual capacity of
the robot
Adjust the work area (see
“Technical Specifications”,
page 9).
The batteries are about to
end their life cycle
Replace the batteries with
original spare parts.
The batteries do not rechar-
ge completely
Clean and remove any
oxidizations from the contact
points of the batteries (see
“Robot Cleaning, page 35).
Recharge the batteries for at
least 12 hours.
The “wheel motor error”
LED flashes.
(1 or 2 flashes of the green
ON LED).
Uneven ground or ground
with obstacles that impede
movement
Check that the lawn to mow
is even and does not have
any holes, stones or other
obstacles.
If so, fill in any holes and
remove any obstacles (see
“Preparation and defining
the boundaries of the work
areas”, page 16).
One or both wheel motors
has a fault.
Have the motor repaired
or replaced by the nearest
authorised service centre
FAILURES, CAUSES AND REMEDIES
TROUBLESHOOTING
The information below is designed to help identify and correct any faults and/or malfunctions
which may occur during operation.
Some failures can be resolved by the user; others require specific technical skills or special abi-
lities and therefore must only be resolved by qualified personnel with certified experience gained
in the specific field of intervention.
Problem Cause Remedy
The robot is very noisy
Cutting blade damaged.
Replace the blade with
a new one (see “Blade
Replacement”, page 40).
Cutting blade fouled (tapes,
ropes, plastic fragments,
etc.).
Stop the robot safely (see
“Robot safety stop”, page
31). Use protective gloves
to avoid the risk of injury.
Remove the debris from the
blade.
The robot was started too
close to obstacles (less than
1 m. (40 in.) away) or in the
presence of unexpected
obstacles (fallen branches,
forgotten objects, etc.).
Stop the robot safely (see
“Robot safety stop”, page
31).
Remove the obstacles and
restart the robot.
Electric motor failure
Have the motor repaired
or replaced by the nearest
authorised service centre.
Too high grass.
Increase the cutting height
(see “Cutting height
adjustment” on page 24).
Carry out a preliminary cut-
ting of the area with a normal
lawnmower.
38
User’s manual
EN
FR
DE
ES
NL
DA
FI
SV
IT
EN
FR
DE
ES
NL
DA
FI
SV
IT
39 User’s manual
EN
FR
DE
ES
NL
DA
FI
SV
IT
EN
FR
DE
ES
NL
DA
FI
SV
IT
The robot does not turn on.
Batteries in protection under the
minimum level.
Connect the robot to the
recharger and wait for up to
4 hours.
If it still does not turn on,
contact the nearest authori-
sed service centre.
The power supply unit does
not turn on.
No electricity.
Check that the power supply
unit is correctly connected to
the power outlet.
Fuse interrupted.
Have the fuse replaced by the nearest authorised service
centre.
HIGH BATTERY
ON
OFF
ON
LOW BATTERY
PAUSE
START
STOP
ERROR SIGNALS
1 FLASH right motor error
1
2 FLASHES left motor error
2
3 FLASHES blade error
3
4 FLASHES tip-over error
4
5 FLASHES curb drop-off sensor error
5
Problem Cause Remedy
The flashing of the LEDs
signals a “motor/blade error”.
3 flashes of the green ON LED.
Cutting blade damaged.
Replace the blade with a
new one (see “Blade Repla-
cement”, page 40).
Cutting blade fouled (tape,
ropes, plastic fragments,
etc.)
Stop the robot safely (see
“Robot Safety Stop”, page
31). Use protective gloves
to avoid the risk of injury.
Remove the cause of fouling
of the blade.
The robot was started too
close to obstacles (less than
1 m. (40.0 in.) away) or in
the presence of unexpected
obstacles (fallen branches,
forgotten objects, etc.).
Stop the robot safely (see
“Robot safety stop”, page
31).
Remove the obstacles and
restart the robot.
Electric motor failure
Have the motor repaired
or replaced by the nearest
authorised service centre.
Too high grass.
Increase the cutting height
(see “Cutting height
adjustment,” page 24).
Carry out a preliminary cut-
ting of the area with a normal
lawnmower.
The “tip-over error” LED
flashes.
4 LEDs flashing consecuti-
vely.
ON
OFF
ON
4 FLASHES
tip-over error
4
Ground with too much slope
or with undefined borders.
Check the installation rules.
“See page 16 and following
pages.”
Tip-over sensor failure.
Try to restart the robot. If the
problem persists, have the
robot repaired by the nearest
authorised service centre.
The flashing led signals “Gulf
error” Led (X) 5 consecutive
flashes.
When the robot is started
it does not detect the curb
drop-off sensor data correctly.
Clean the sensors and
start the robot again. If the
problem continues, decide
whether to start the robot
with the curb drop-off
sensors off, otherwise
contact the Authorised
Service Centre closest to
you.

Other manuals for L50BEU

1

This manual suits for next models

3

Other ZUCCHETTI Lawn Mower manuals

ZUCCHETTI LB85EL User manual

ZUCCHETTI

ZUCCHETTI LB85EL User manual

ZUCCHETTI L50BEU Installation and operation manual

ZUCCHETTI

ZUCCHETTI L50BEU Installation and operation manual

Popular Lawn Mower manuals by other brands

MTD 115-102-000 owner's guide

MTD

MTD 115-102-000 owner's guide

Craftsman 917.384530 owner's manual

Craftsman

Craftsman 917.384530 owner's manual

Craftsman 944.362201 owner's manual

Craftsman

Craftsman 944.362201 owner's manual

Rollersafe RS SKATE Get started guide

Rollersafe

Rollersafe RS SKATE Get started guide

Troy-Bilt 550 Series Operator's manual

Troy-Bilt

Troy-Bilt 550 Series Operator's manual

Toro 74385 TimeCutter ZS 3200 Operator's manual

Toro

Toro 74385 TimeCutter ZS 3200 Operator's manual

Stiga EL 340 Li 48 Operator's manual

Stiga

Stiga EL 340 Li 48 Operator's manual

MTD Series 830 Operator's manual

MTD

MTD Series 830 Operator's manual

Klippo AB triumph instruction manual

Klippo AB

Klippo AB triumph instruction manual

Hyundai power products HYM530SPER instruction manual

Hyundai power products

Hyundai power products HYM530SPER instruction manual

Hyundai power products HYM400P instruction manual

Hyundai power products

Hyundai power products HYM400P instruction manual

AL-KO Silver 34 E Comfort manual

AL-KO

AL-KO Silver 34 E Comfort manual

Simplicity 18.5HP parts manual

Simplicity

Simplicity 18.5HP parts manual

Toro Z Master 74919TE Operator's manual

Toro

Toro Z Master 74919TE Operator's manual

Toro 73542 Operator's manual

Toro

Toro 73542 Operator's manual

Craftsman 917.376169 owner's manual

Craftsman

Craftsman 917.376169 owner's manual

Toro 72201 Operator's manual

Toro

Toro 72201 Operator's manual

Craftsman EZ3 917.377540 owner's manual

Craftsman

Craftsman EZ3 917.377540 owner's manual

manuals.online logo
manuals.online logoBrands
  • About & Mission
  • Contact us
  • Privacy Policy
  • Terms and Conditions

Copyright 2025 Manuals.Online. All Rights Reserved.