ZuniDigital Travel Connect ZTRP150 User manual

Page | 1
ZuniDigital Travel Connect
Portable Wireless Router
with USB Charging Station
User’s Guide
ZTRP150

Page | 2
Table of Contents
Introduction…..2
Retail Package Contents…..2
Safety Information…..2
Product Overview…..3
Key Features…..4
Other Features…..4
Setup Instructions
Router Mode…..5
WISP Mode…..10
Charging Station…..16
Frequently Asked Questions
General Questions…..18
Travel Router Specific…..18
USB Charging Station Specific…..18
Troubleshooting Information
Router Mode…..21
WISP Mode…..22
Charging Station…..22
Technical Specifications…..24
Warranty Information…..26
FCC Certification Information…..27
Introduction
Congratulations on your purchase of the ZuniDigital Travel Connect. Before installing and using this innovative
product, please read this user’s guide thoroughly, and retain it for future use. This user’s guide will explain how
to setup and use the travel router / USB charging station.
Retail Package Contents
ZuniConnect Travel Router PREMIUM™
Power Adapter
Travel Case
Ethernet Cable (optional)
Quick Start Guide
User’s Guide
Safety Information
For indoor use and in dry locations only. To decrease the risk of electrical shock, unplug the travel router and
allow it to cool before cleaning.

Page | 3
Product Overview
Designed for people on-the-go, this travel friendly device lets you create a secure wireless network whenever a
wired Broadband connection is available, and it also provides a convenient charging station for portable
electronic devices like: cell phones, smart phones, tablet / pad computers, e-readers, MP3 players, digital
cameras, and portable gaming systems.
Convenient & Easy-to-Use High Speed Wireless Routing
This high-speed wireless router allows Internet ready devices a convenient way to connect to and share a wired
Broadband connection. This is especially convenient for smartphones, tablet PC’s, and e-reader users since
most of these products lack a traditional RJ-45 Ethernet port needed to plug in a network cable. Utilizing patent
pending Intelli+IP technology, this device easily creates a reliable and secure wireless network from a wired
Broadband connection. Once established, users can connect multiple devices to a personal Wi-Fi Hotspot, which
is useful for tradeshows, hotel rooms, or anywhere multiple users need to share an Internet connection.
Smart USB Charging Station
Our patent pending process, incorporating smart power charging technology, permits the simultaneous charging
of multiple devices such as a smart phone, tablet computer, or e-reader from one convenient location. Travelers
won’t have to use the plug in the bathroom to charge their personal electronics, nor do they have to carry all the
heavy / bulky wall charger transformers with them.

Page | 4
Key Features
Intelli+IP Sensing Technology –Patent pending technology that detects the main network’s IP address, and if
there is a network conflict, the Intelli+IP sensing technology will automatically change the travel router’s IP
address to resolve the issue.
Smart USB Charging Station with QuickCharge –Two (1) Standard and (1) QuickCharge USB charging ports
utilizing patent pending smart power allocation technology allow for the simultaneous charging of two portable
electronic devices without interrupting power to the wireless travel router. The QuickCharge ports provide
additional power and will provide faster charging of tablet / pad computers and e-readers.
Fast & Secure Network Connectivity –802.11N wireless technology offers data transfer rates up to 300 Mbps
and WPA / WPA2 / WEP data encryptions with dual-active firewalls provide a safe and secure network
connection.
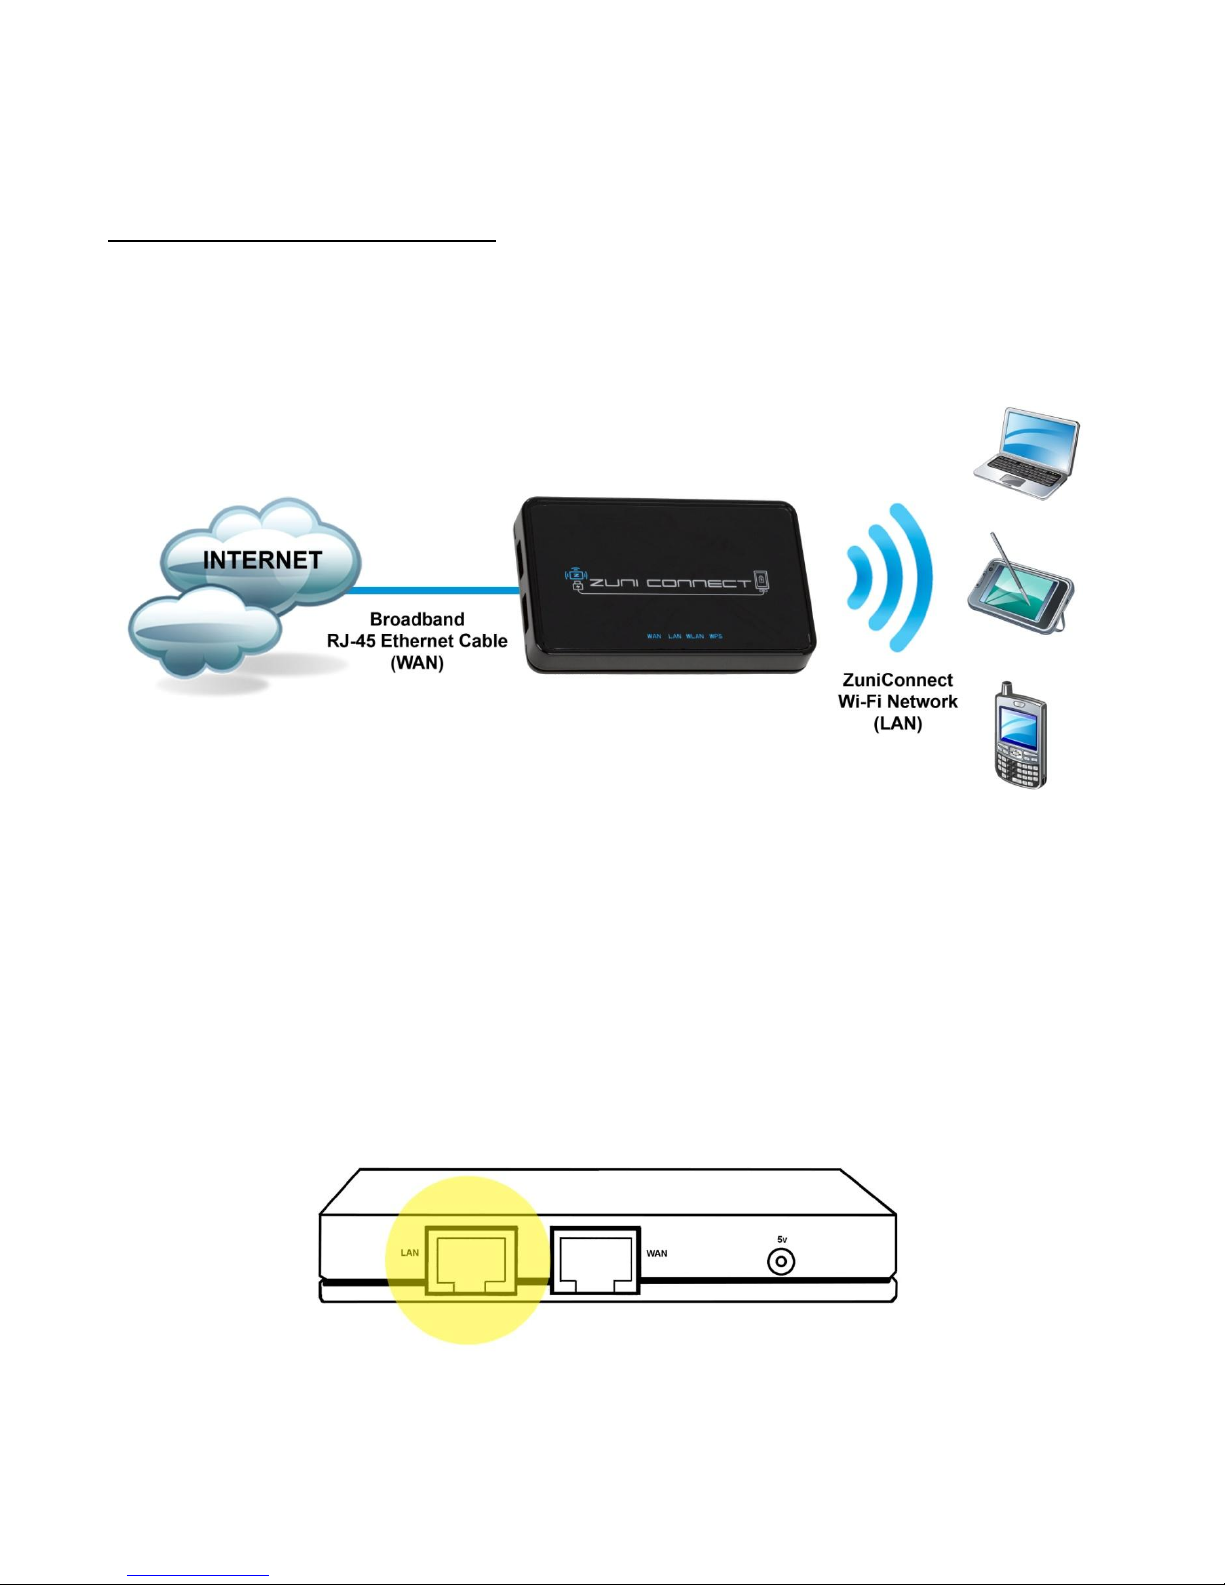
Travel Friendly Design –Small and lightweight, this travel router packs neatly into luggage and lets you keep
bulky / heavy wall charger transformers at home.
Router AP Mode or Wireless ISP Function –User selectable standard routing AP or Wi-Fi IN / OUT modes.
Other Features
-Compatible with IEEE 802.11N and 802.11B/G Wireless Standards
-Intelli+IP Sensing Technology
-(2) Smart USB Charging Ports (one QuickCharge)
-User Selectable Routing Modes
-Data Transfer Rate up to 150 Mbps
-Dual Antennas Use 2.4 GHz Frequency Band (2T2R)
-Supports 64-Bit and 128-Bit Wireless Data Encryption (WPA/WPA2/WEP)
-Supports Multiple SSID
-Supports Hidden SSID
-WDS Supported with WEP, TKIP, AES Encryption
-Supports NAT / IP sharing
-Supports DHCP, Static, PPPoE, and PPTP WAN Connections
-Supports MDI/MDI-X Auto Switching
-Provides DHCP Server
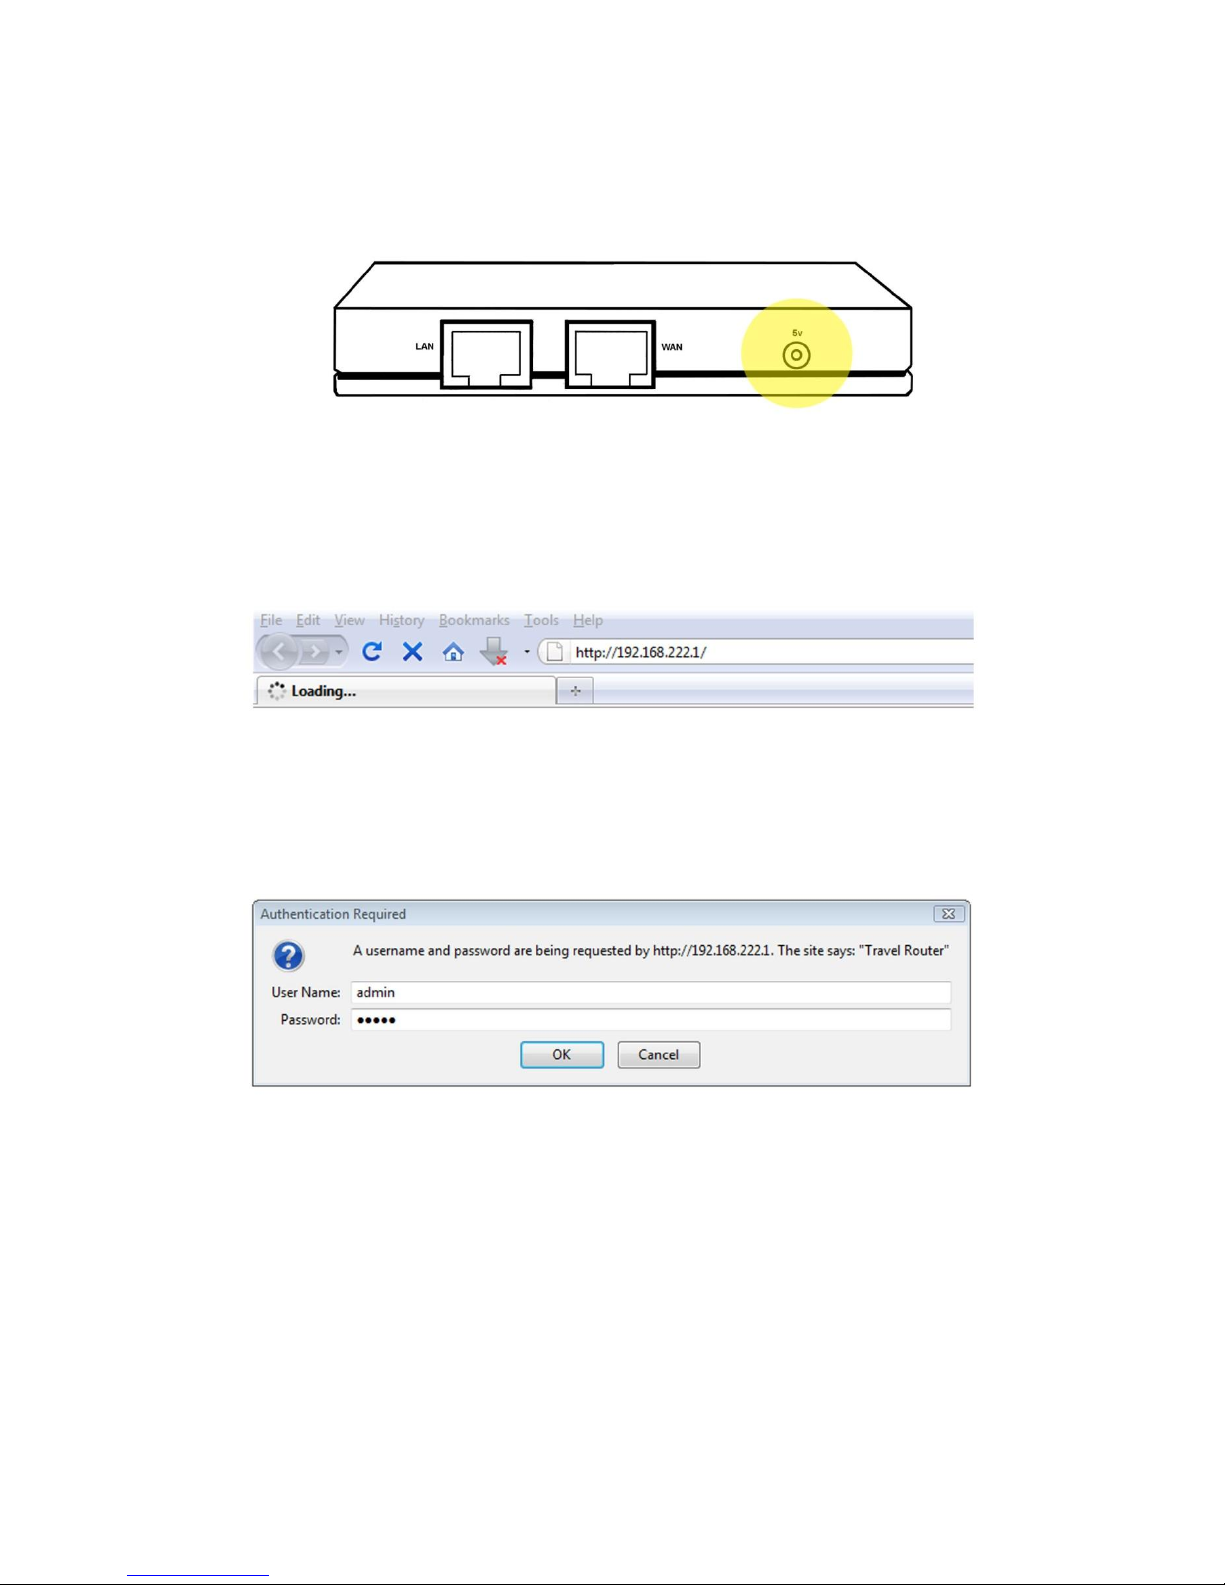
-Firmware Upgradeable via Web Interface
-System Log Function
-Lightweight, Travel Friendly Design

Page | 5
Setup Instructions
WIRELESS SETUP (ROUTER MODE)
ABOUT ROUTER MODE
For this mode the ZuniDigital Travel Connect uses a wired Broadband connection as the WAN (Internet)
connection, to create a new sub-network that can then be shared via Wi-Fi and the LAN port on the travel
router.
Follow these instructions to setup the ZuniDigital Travel Connect for use in ROUTER Mode.For the best results
do not place the ZuniDigital Travel Connect near any large metal objects or magnets (like those found in
speakers). Also note that elevating the travel router from the floor will increase wireless broadcast signal
performance and range.
THE SWITCH ON THE TRAVEL ROUTER IS SET TO ROUTER
Step 1 - Attach LAN (Ethernet) Cable
Attach one side of an RJ-45 Ethernet cable into the LAN (Ethernet) port of the Travel Router, and then connect
the other end to the Ethernet port on your computer.

Page | 6
Step 2 - Attach Power Cable
Plug the AC adapter into a wall socket and plug the power tip into the Travel Router’s 5v power port. Please
wait 30 seconds for the router to fully boot up before continuing to the next step.
Step 3 - Access Web Configuration
From your computer, open a Web browser (Internet Explorer, Firefox, Safari, etc.) then type 192.168.222.1 into
the address bar and press the “ENTER" key.
Step 4 - Setup Login
In the login window key in the default User Name (admin) / Password (admin) and click the OK button.

Page | 7
Step 5 –Enter the Setup Wizard
Click the “Run Setup Wizard” button on the travel router’s main page, or from the navigation menu on the left
side of the web interface.
Step 6 - Begin the Setup Wizard
To begin the Setup Wizard click the “Next” button. If you wish to exit the Setup Wizard click the “Cancel”
button.
Step 7 - Configure LAN (Ethernet) Parameters
The pre-entered default values should work for most networks, but if they need to be modified you can do so
now. Unless you are an advanced user we recommend that you use these default settings when creating your
Local Area Network (LAN), because changing the default values listed may interfere with the router's operation.
Once the values are correctly entered, press the “Next” button.

Page | 8
Step 8 - Configure WAN (Internet) Parameters
This step lets you configure the router to utilize the broadband signal provided by the Internet provider. The
majority of providers use DHCP which is the default setting of the ZuniDigital Travel Connect. This setting should
work in most locations, but if you have any questions on which settings to use, please contact the Internet
Service Provider or the local network administrator.
Step 9 - Configure Basic Wi-Fi Settings
Use this page to personalize the name of the wireless network (SSID) to be broadcast by the ZuniDigital Travel
Connect. If desired, changes can be made to these settings, but it is recommended that only experienced users
do so. Otherwise it is recommended that you do not make any changes to default values that are listed.

Page | 9
Step 10 - Apply Wi-Fi Network Security Settings
By default, the ZuniDigital Travel Connect broadcasts as an OPEN network with no data encryption. If you wish
to enable network encryption to help secure your network, please select the encryption type you want to use,
establish a password that you can remember, and then click the “Finished” button. This will finalize the settings
for your Travel Router and you may begin using it as a wireless access point.
Step 11 - Using the Travel Router
Attach the Ethernet cable that provides the Internet connection into the WAN (Internet) port, then power the
travel router ON and wait for it to fully boot. The router will broadcast the SSID setup in step 9 which you can
connect wireless devices to.
RESTORE FACTORY DEFAULT SETTINGS
Should you at any time with to restore the factory default settings press and hold the “Reset” button on the
bottom of the Travel Router for 10 seconds, then release. The travel router will re-boot and all of the original
factory settings will be restored.

Page | 10
WIRELESS SETUP (WISP MODE)
ABOUT WISP MODE
This mode allows the ZuniDigital Travel Connect to use an existing wireless network signal as the WAN (Internet)
connection instead of relying on a wired Broadband signal. This mode is used for providing access to users in
locations where no wired Broadband Internet connection is available, but where a wireless signal exists.
Follow these instructions to setup the ZuniDigital Travel Connect for use in Wireless ISP (WISP) Mode. For the
best results do not place the ZuniDigital Travel Connect near any large metal objects or magnets (like those
found in speakers). Also note that elevating the travel router from the floor will increase wireless broadcast
signal performance and range.
THE SWITCH ON THE TRAVEL ROUTER IS TO SET TO WISP
Step 1 - Attach LAN (Ethernet) Cable
Attach one side of an RJ-45 Ethernet cable into the LAN (Ethernet) port of the Travel Router, and then connect
the other end to the Ethernet port on your computer.

Page | 11
Step 2 - Attach Power Cable
Plug the AC adapter into a wall socket and plug the power tip into the Travel Router’s 5v power port. Please
wait 30 seconds for the router to fully boot up before continuing to the next step.
Step 3 - Access Web Configuration
From your computer, open a Web browser (Internet Explorer, Firefox, Safari, etc.) then type 192.168.222.1 into
the address bar and press the ENTER key.
Step 4 - Setup Login
In the login window key in the default User Name (admin) / Password (admin) and click the OK button.

Page | 12
Step 5 - Enter Setup Wizard
Click “Run Setup Wizard” from the navigation plane on the left side of the screen.
Step 6 - Select Wi-Fi Network to Connect With
Select the wireless network from the table that you want to connect the Travel Router with and click the “Next”
button. If the desired network is not listed click the “Refresh” button.
Step 7 –Enter Password & Connect
If prompted, type the password used to access the wireless network and then click the “Next” button.

Page | 13
Step 8 - Connection Results
If the password was accepted by the wireless network, you will get a “connection successful” message. If this is
the case, continue to the next step. If you get a “connection un-successful” message, click the “Back” button to
restart the Setup Wizard and verify the password you are using is correct.
Step 9 - Configure LAN (Ethernet) Parameters
The pre-entered default values should work for most networks, but if they need to be modified you can do so
now. Unless you are an advanced user we recommend that you use these default settings when creating your
Local Area Network (LAN), because changing the default values listed may interfere with the router's operation.
Once the values are correctly entered, press the “Next” button.

Page | 14
Step 10 –Configure WAN (Internet) Parameters
This step lets you configure the router to utilize the broadband signal provided by the Internet provider. The
majority of providers use DHCP which is the default setting of the ZuniDigital Travel Connect. This setting should
work in most locations, but if you have any questions on which setting to use, please contact the Internet
Service Provider or the local network administrator.
Step 11 - Configure Basic Wi-Fi Settings
Use this page to personalize the name of the wireless network (SSID) to be broadcast by the ZuniDigital Travel
Connect. If desired, changes can be made to these settings, but it is recommended that only experienced users
do so. Otherwise it is recommended that you do not make any changes to default values that are listed.

Page | 15
Step 12 - Apply Wi-Fi Network Security Settings
By default, the ZuniDigital Travel Connect broadcasts as an OPEN network with no data encryption. If you wish
to enable network encryption to help secure your network, please select the encryption type you want to use,
establish a password that you can remember, and then click the “Finished” button. This will finalize the settings
for your Travel Router and you may begin using it as a wireless access point.
Step 13 –Using the Travel Router
Power the travel router ON and wait for it to fully boot and connect to the selected wireless network. It will
broadcast the SSID setup in step 9 which you can connect wireless devices to. Also, be aware that each time you
relocate the travel router you will need to re-configure it to connect with the wireless network at the new
location.
RESTORE FACTORY DEFAULT SETTINGS
Should you at any time with to restore the factory default settings press and hold the “Reset” button on the
bottom of the Travel Router for 8 seconds, then release. The travel router will re-boot and all of the original
factory settings will be restored.

Page | 16
DEVICE CHARGING
Follow these instructions to charge peripherals. The USB charging ports provide simultaneous recharging of two
portable electronic devices.
The Smart USB Charging Station is capable of charging a wide range of electronics that includes most cell
phones, smart phones, tablet computers, e-readers, MP3 players, digital cameras, and portable gaming
devices.
Step 1
Power the USB charging station ON by connecting the power tip to the 5V port on the ZuniConnect Travel™and
by plugging the AC adapter into a wall socket.
Step 2
For standard charging devices such as smart phones and MP3 players, connect one end of the USB charging
cable into either of the two USB charging ports, and then plug the other end into the device in need of charging.
Many devices have unique charging tips, so be sure to carry a cord that will work to charge all of your devices.

Page | 17
Step 3
For QuickCharging devices such as tablet computers and e-readers, connect one end of the USB charging cable
into the USB charging port labeled “Turbo”, and then plug the other end into the device in need of charge.
Step 4
When the charging process is completed, unplug the device(s) from the USB Charging Station.

Page | 18
Frequently Asked Questions
General Questions
What is the ZuniDigital Travel Connect?
ZuniConnect™ Travel is a lightweight portable router with a built-in smart USB charging station. This travel-
friendly device lets you create a secure wireless network whenever a wired internet connection is available, and
also provides a convenient charging station for portable electronic devices such as smart phones, cell phones,
tablet computers, MP3 players, digital cameras, and portable gaming systems.
Small, lightweight, and powerful, ZuniConnect™ keeps your devices charged and connected at the same time.
What are the benefits of using the Travel Router with USB Charging Station?
Using the wireless travel router lets you do two convenient things: One, it lets you create your own personal
wireless access that can be used to connect multiple wireless devices to the Internet. As an example, check into
a Hotel with a wired Broadband internet connection, then simply plug in the ZuniConnect™ Travel and establish
your own secure wireless network. Secondly, you now have (2) USB charging ports that recharge personal
electronic devices, such as cell phones, tablet pcs, and e-readers, using only the USB portion of the cable that
came with your device. This lets you leave the bulky and heavy wall chargers at home.
Who is the target market for the Travel Router with USB Charging Station?
Designed for people on the go, the travel router allows you to leave bulky & heavy wall transformers at home,
and enjoy the convenience of their own personal wireless network when they travel. Utilizing the two USB
charging ports, travelers only need to carry the USB charging cable for their smart phone, tablet PC, e-reader,
portable gaming device, or MP3 player. These cables take up very little space and weigh next to nothing. In
addition, this travel router also lets users create a personal “Hot-Spot” from an existing broadband connection,
providing a safe, reliable, and secure connection for multiple users.
What are the differences between the Premium and Standard versions?
Both the premium and standard versions of the Travel Router with USB Charging Station allow you to share a
wired Broadband connection and charge a wide range of personal electronics devices. However, the premium
version offers a “QuickCharge” USB charging port that allows for faster peripheral charging, and it also offers
Wireless ISP mode which allows you to create your own personal Wi-Fi network from an existing wireless
network.
Wireless Travel Router Specific Questions
How does the Travel Router work?
The travel router works by taking an existing broadband connection and converting the signal into a personal
high-speed wireless network that is secure, reliable, and convenient. This is especially convenient for hotel
rooms and trade shows.
Where can the Wireless Travel Router best be utilized?
The Wireless Travel Router can be used almost anywhere a wired broadband connection is available. Simply
plug the broadband cable into the Internet (WAN) port on the travel router and out Intelli+IP autosensing
technology will help your create a secure Wi-Fi network that allows multiple users to share the original
Broadband connection. This is especially convenient for use in hotel rooms, and trade shows. Our line of

Page | 19
premium travel routers features Wireless IN / Wireless OUT technology that allows you to create a personal Wi-
Fi network from an existing wireless Broadband connection.
Does the travel router have any LAN ports that can be used to provide a network connection?
The Travel Router includes (1) LAN port that can be used for devices you wish to connect to the network via a
wired cable instead of using the Wi-Fi signal.
What is the maximum wireless data transfer rate supported?
The 802.11N equipped travel router supports wireless data transfer rates up to 300 Mbps.
What security features are available?
The wireless travel router supports WEP, WPA, and WPA2 data encryption to protect clients from wireless
attacks, and it also offers dual-active Firewalls to protect users from attack originating from the Internet.
What wireless standards are supported?
The travel router supports the 802.11N (draft 2.0), 802.11G, and 802.11B wireless standards.
USB Charging Station Specific Questions
How does the USB Charging Station work?
The USB charging station provides (2) USB ports that can be used to recharge a wide range of personal electronic
devices (cell phones, tablet computers, e-readers, etc.). Instead of using the wall transformer plug that came
with your device, simply plug one end of the USB cable into the charging station, and the other into the device.
Recharging times will vary on the type of device being charged, how low the battery currently is, and if the
QuickCharge port (only available on the premium version of the travel router) is used.
How many devices can be charge simultaneously?
There are (2) USB charging ports available to recharge peripheral devices with. On the premium version, one of
the USB charging ports is a QuickCharge port that provides a higher output and thus provides a quicker
recharging time. This is especially convenient for tablet computers and e-readers.
What devices are compatible with the USB charging station?
The USB charging station will recharge a wide range of personal electronic devices that run off a rechargeable
battery. Some of the most common types are: Smart Phones, Cell Phones, Tablet Computers, E-Readers,
Personal Gaming Devices, MP3 Players, and Digital Cameras. You will need to carry a USB charging cord that fits
the charging port on your electronic device. These differ by device.

Page | 20
Troubleshooting Information
If you need further assistance you can reach our product support team by phone toll-free at 1(888)213-8529, or
via emailing support@zunidigital.com
ROUTER MODE
PROBLEM
POSSIBLE SOLUTIONS
I cannot connect to the Internet wirelessly using the
travel router, and the ZuniConnect SSID is not available
Verify the travel router is powered ON and a working
Broadband Internet cable is plugged into the Internet
(WAN) port on the travel router.
If you are far away from the travel router try moving
closer to it.
Connect one end of an Ethernet cable to the LAN port
on the travel router and the other end to the Ethernet
port on your laptop or netbook. Log into the Web
configuration utility and verify the travel router is
setup correctly and the SSID is broadcasting.
The setup computer cannot access the Web based
configuration screen.
Make sure any wireless network adapters on the setup
computer have been powered OFF or disabled.
Make sure the wired Ethernet adapter on the setup
computer is set to receive an IP address automatically.
Reboot the setup computer with the RJ-45 Ethernet
cable from the ZuniConnect Bridge attached.
Be sure you are typing the correct IP address into your
Web browser (192.168.222.1)
There is no RJ-45 Ethernet port on my setup device to
access the travel router with.
If the device you are using to configure the travel
router does not have an Ethernet port available (for
example when using a tablet PC) you will have to use
the default factory settings, or download an
application for your device that allows you to
configure the travel router.
Wireless network performance is slow.
Since wi-fi networking is radio based, performance will
be affected by the distance between the wireless
client and the travel router itself. To improve
performance move closer to the travel router or try
changing the SSID broadcast channel. To change the
broadcast channel use the Web based configuration
utility --- LAN section.
Some devices cannot connect to the wireless network
Make sure that all of the clients attempting to connect
to the travel router’s wireless signal are using the
correct password.
This manual suits for next models
1
Table of contents
Other ZuniDigital Wireless Router manuals