1 BY ONE OUK00-0860 User manual
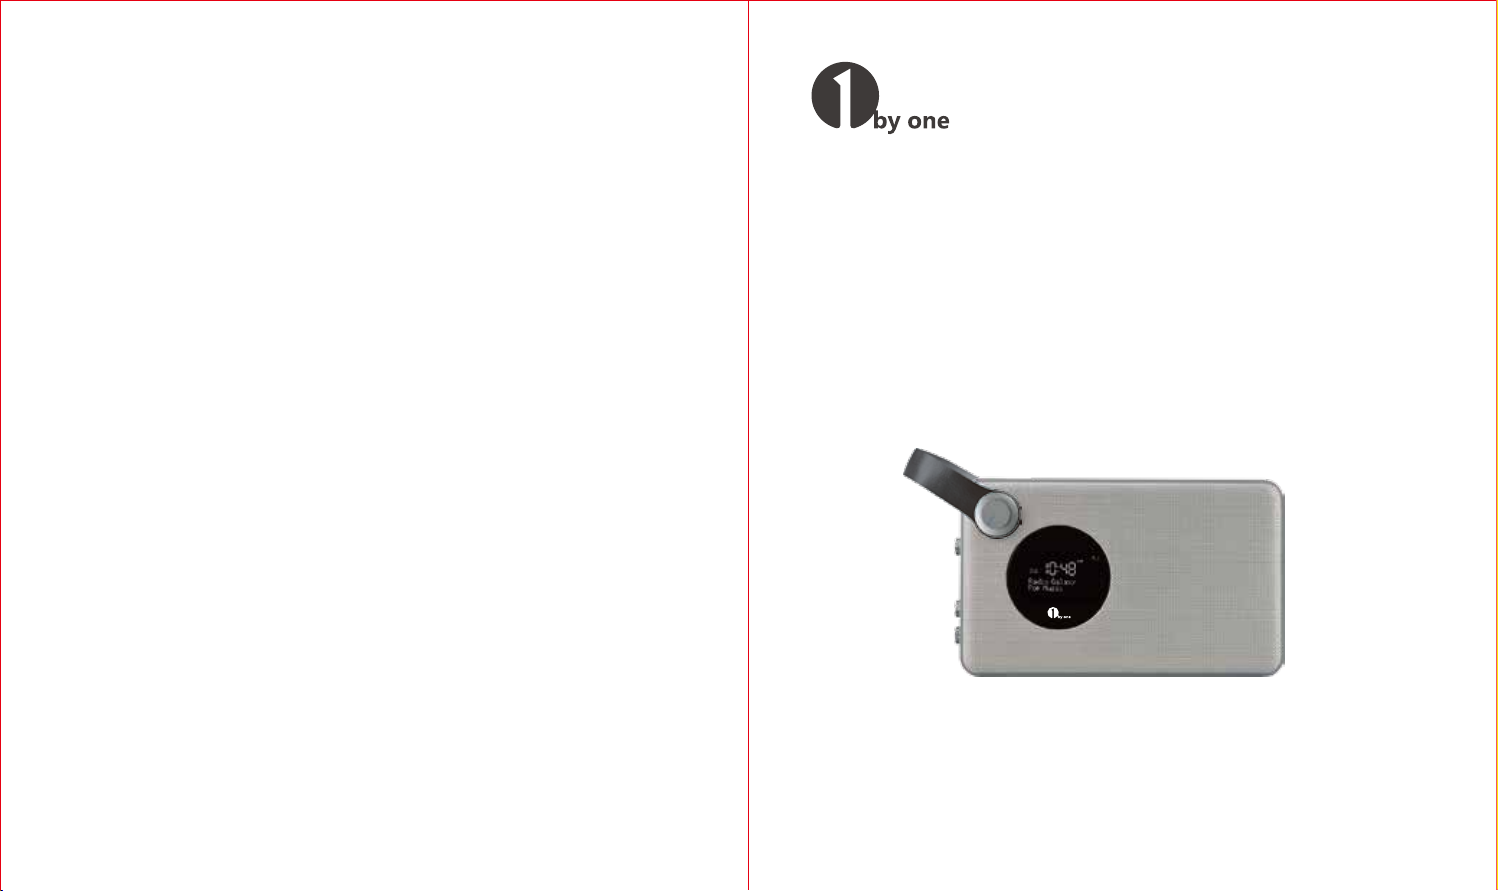
Portable Digital Radio
DAB / FM / Alarm Clock / Rechargeable Battery
1byone Products Inc.
2313 E Philadelphia Street, Unit M, Ontario, CA 91761
www.1byone.com
Instruction Manual/ Bedienungsanleitung
Manuel d'instructions/ Manual de instrucciones
LOCATION OF CONTROLS
CONTENTS
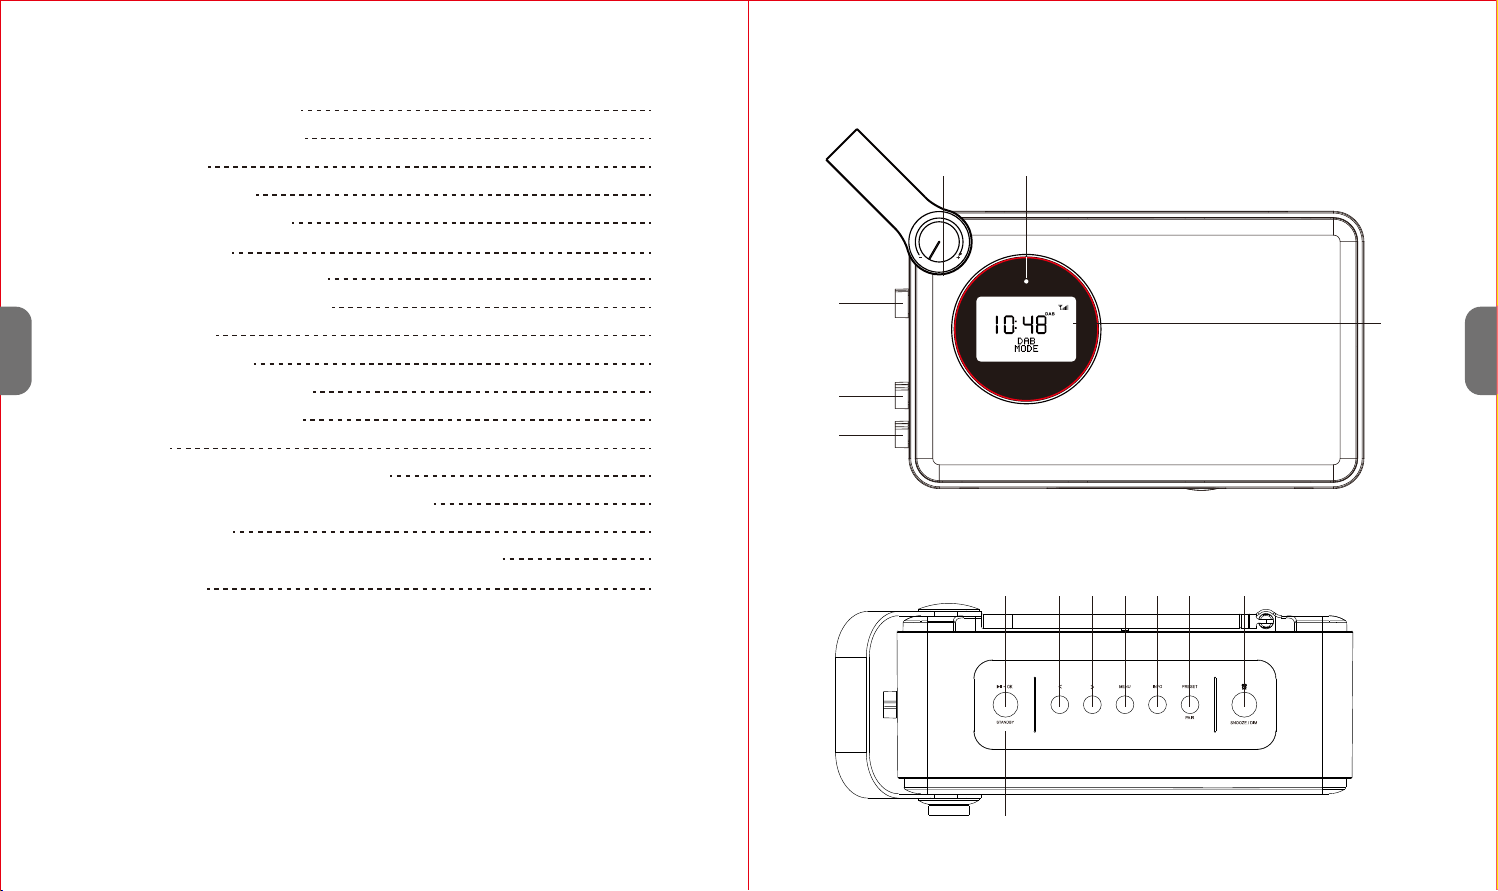
TOP VIEW
FRONT VIEW
LOCATION OF CONTROLS
BATTERY INSTALLATION
Power supply
Charging the installed battery
GENERAL OPERATION
Setting the language
Setting the clock time and date
Sleep timer setup
Setting the alarms
Snooze function
DAB MODE OPERATION
FM MODE OPERATION
AUX-IN MODE OPERATION
BLUETOOTH OPERATION
FACTORY RESET
SOFTWARE VERSION
TROULBSHOOTING AND ERROR MESSAGES
SPECIFICATIONS
2
5
6
6
7
7
8
8
9
10
11
15
16
17
19
20
20
24 7 8 9 10 11 12 13
14
4 5
1
2
3
6
EN
EN
1 2
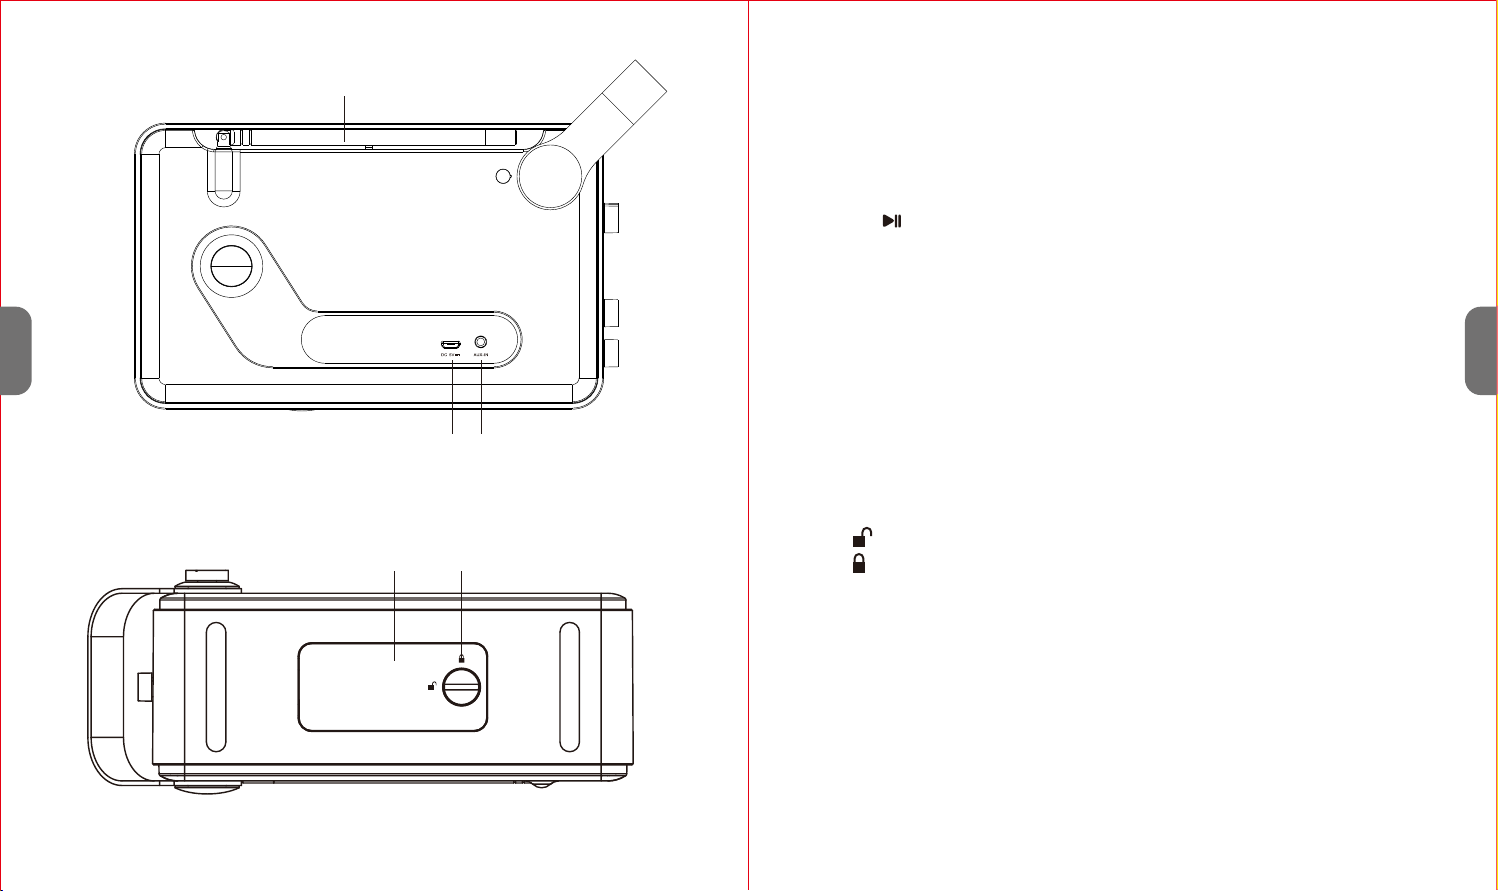
BACK VIEW 15
16 17
BOTTOM VIEW
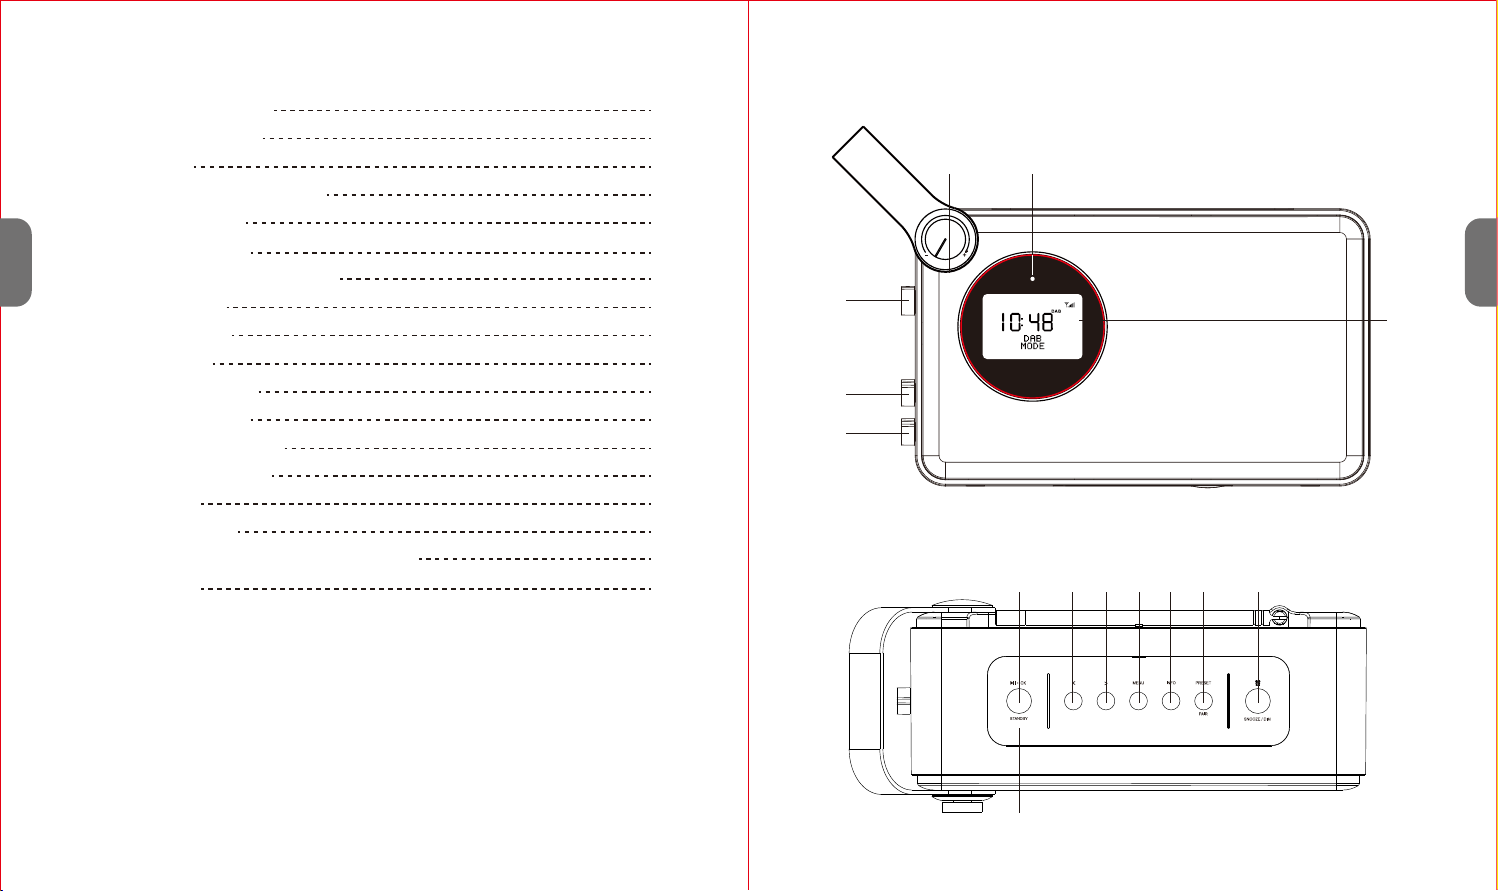
1. POWER ON/OFF Switch
2. BACK-LIGHT ON/OFF Switch
3. FUNCTION Selector (DAB/FM/AUX/BT)
4. VOLUME Knob
5. Battery Charging Indicator
6. LCD Display
7. /OK/STANDBY Button
8. < Button
9. > Button
10. MENU Button
11. INFO Button
12. PRESET/PAIR Button
13. ALARM/SNOOZE/DIM Button
14. Built-in Microphone
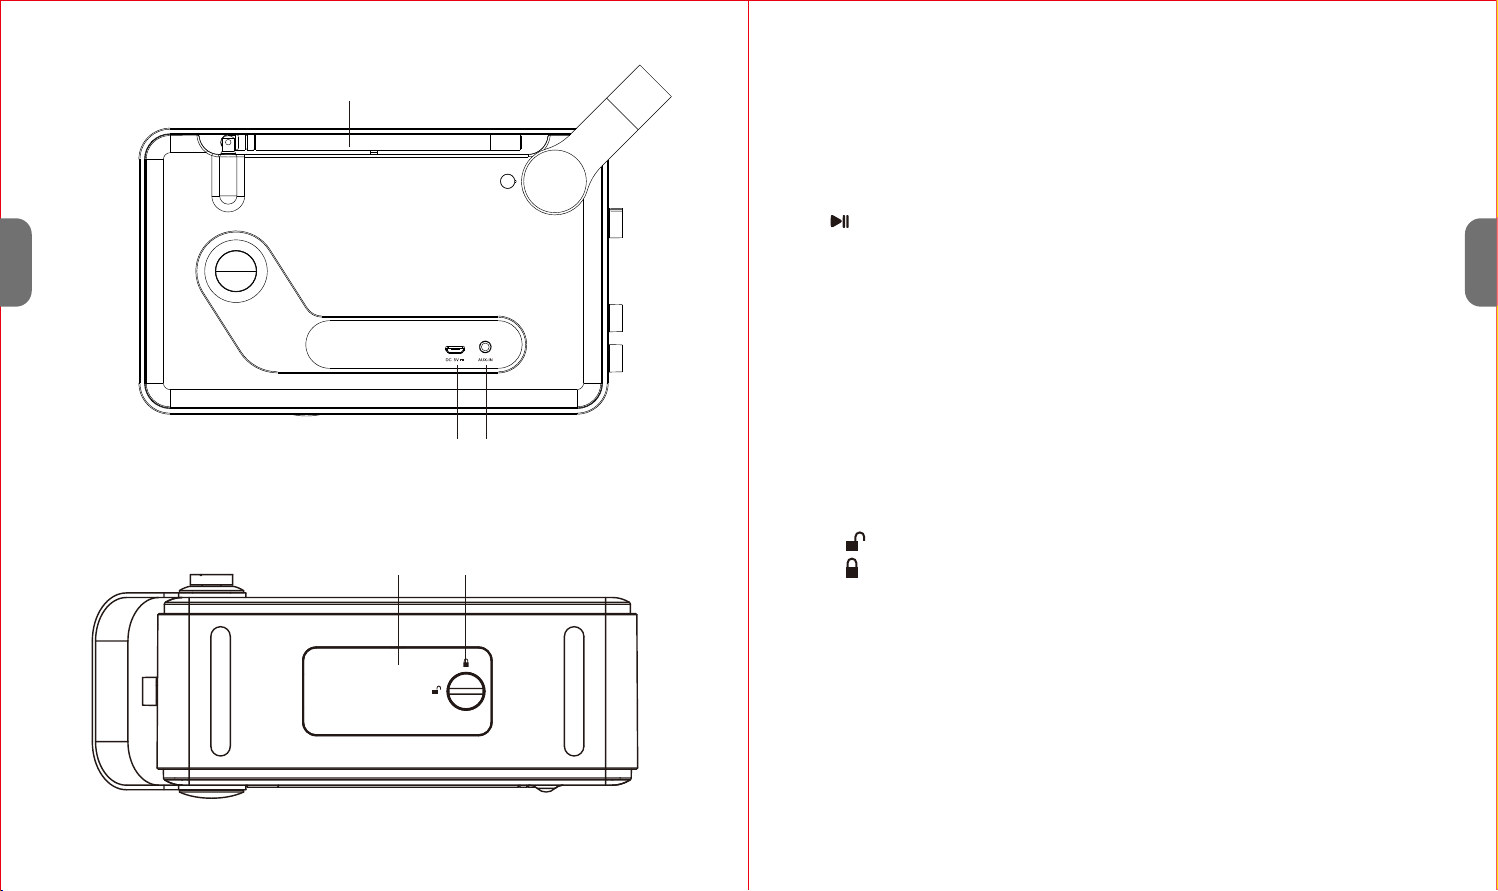
15. Telescopic Antenna
16. DC 5V Jack
17. 3.5mm AUX-IN Jack
18. Battery Cover
19. Battery Locking Screw
=Unlocked
=Locked
18 19
EN
EN
3 4

1. Use a coin to rotate the battery locking screw 90 degrees to unlock the
battery cover.
2. Remove the battery cover with your fingers.
BATTERY INSTALLATION
Warning
3. Follow the polarity to install the accompanying 3.7V lithium ion battery.
4. Reinsert the battery cover and rotate the locking screw.
1. Be sure that the battery is installed correctly.
2. Only batteries of the same or equivalent type as recommend are to be used.
3. If the unit will not be used for an extended period of time, remove the
battery to prevent damage or injury from possible battery leakage.
4. Batteries should not be exposed to excessive heat such as sunshine or fire.
Power supply
1. Connect the supplied AC-DC adapter to the DC 5V jack on the back of the
unit through the attached USB cable and insert the grid plug into a
properly installed AC socket.
2. Make sure the grid voltage corresponds to the figures on the rating plate.
Warning
1. Only use the supplied power adaptor for this unit.
2. Do not use for other devices.
3. Only use the original AC adapter. This adapter has been specially designed
for the accompanying battery in order to gradually charge the battery. Any
other adapter may shorten the battery life or can damage it or the unit.
4. Disconnect from main power supply during longer periods of non-use.
Charging the installed battery
The installed battery can be charged by plugging the accompanying AC-DC
adapter into a wall socket and the other end into the unit's DC 5V jack. The
battery charging indicator will light up yellow when charging and green
when fully charged.
Play/OK/
Standby
< Button
Enter the Menu/
Switch Off & On
Scroll through
DAB station list &
Control through
Menu
Enter the Menu/
Switch Off & On
Manually search FM
range, press for 2
seconds to
automatically
search FM range
Return to the beginning of
played track or skip to previous
track
> Button Scroll through
DAB Staton List &
Control through
Menu
Manually search FM
range, press for 2
seconds to
automatically
search FM range
Skip to the next track
Menu/
Sleep
Button
Press to enter
DAB Mode menu,
press again to go
back
Press to enter Mode
menu, press again
to go back
Press to enter Mode menu, press
again to go back
Preset/
Pair Button Press and hold to
save a station,
press shortly to
enter radio station
memory
Press and hold to
save a station,
press shortly to
enter radio station
memory
Hold the button for 3 seconds to
break the current connection
and activate pairing mode
INFO
Button Cycle through
information
screens
Cycle through
information screens
Pause & play current playback,
answer & end a phone call
In DAB Mode In FM Mode In Bluetooth Mode
EN
EN
5 6
GENERAL OPERATION
Note:
Notes:
Setting the language
The default language is English. To change the language, please follow the
steps below:
1. Press "Menu" button.
2. Press “<” or “>” button to select “System”.
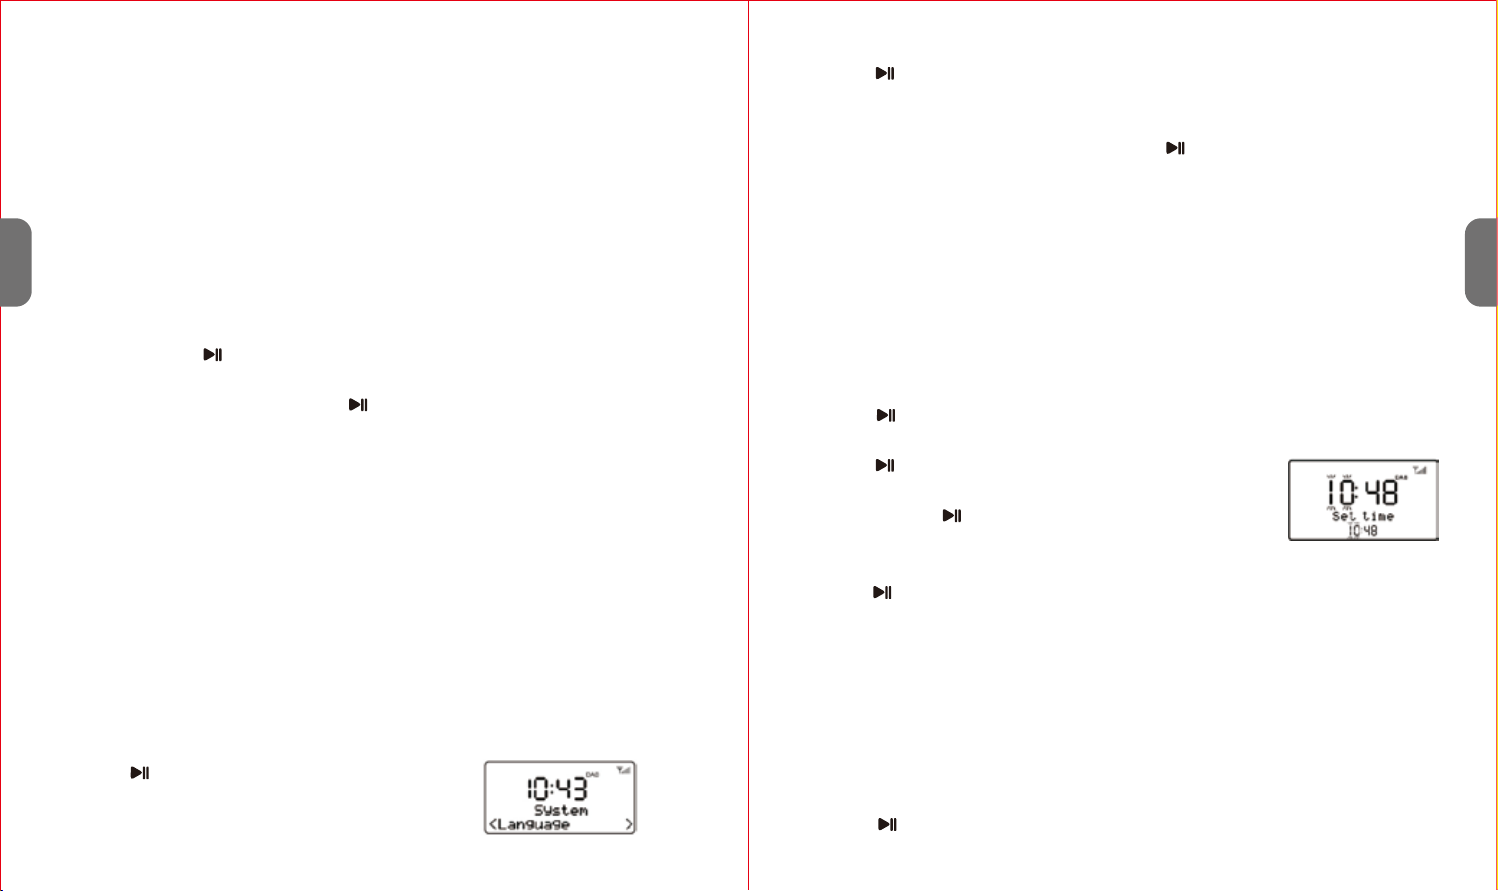
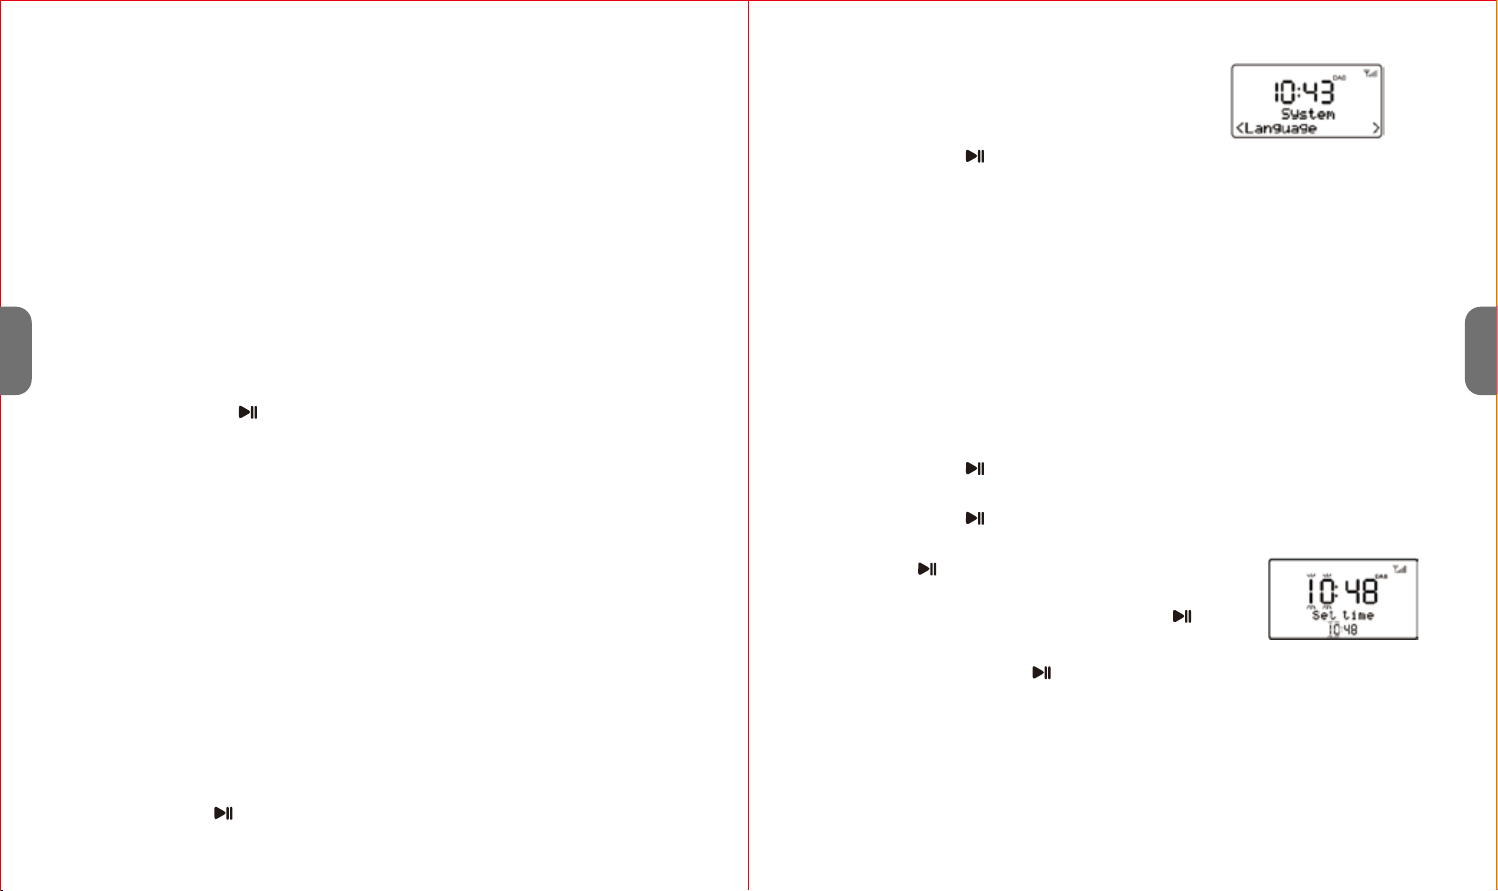
3. Press /OK button to enter the "System"
subdirectory.
4. Press "<" or ">" button to select "Language".
5. Press /OK button to enter the "Language" subdirectory.
6. The language used for display messages can be selected from:
English/Francais/Deutsch/Italiano/Español
7. Press "<" or ">" button to select and press /OK button to confirm the
language.
1. Rotate the Power ON/OFF Switch to “ON” position to turn on the unit. The
display will light up and display the time digits and the current operating
mode.
2. Rotate the Function Selector to select different operating modes: DAB, FM,
AUX-IN, or Bluetooth.
3. Press and hold /OK/STANDBY button for 3 seconds to enter into Standby
mode.
4. In Standby mode, press and hold /OK/STANDBY button for 3 seconds to
switch the unit on.
5. To completely switch off the unit, rotate the Power ON/OFF switch to OFF
position.
1. The duration of the charging process depends on the state of charge of the
battery.
2. Remember to take out the battery during longer periods of non-use.
Setting the clock time and date
The time and date can be updated automatically. With auto-update, the time
and date are automatically synchronized with national time signals broadcast
over DAB and FM (when available).
The clock time can also be set manually. Please follow the steps below:
1. Press "Menu" button.
2. Press "<" or ">" button to select “System”.
3. Press /OK button to enter the "System" subdirectory.
4. Press "<" or ">" button to select “Time”.
5. Press /OK button to enter the "Time" settings
subdirectory. "Set Time/Date" will be shown on the
display. Press /OK button again to confirm and enter
into clock time settings.
Sleep timer setup
Sleep timer will turn the unit to standby mode automatically after the sleep
time you set.
1. Press "Menu" button.
2. Press "<" or ">" button to select “System”.
3. Press /OK button to enter the subdirectory of “System”.
6. Select a value for each parameter by using "<" or ">" button and then
press /OK button to confirm and move on to the next parameter.
7. "Time Saved" will be shown on the display once the date has been set.
The unit will automatically switch to Standby mode if none of the main
functions of any operating modes have been actively used for 60 minutes
(except for FM mode).
EN
EN
7 8
Setting the alarms
There are two wake-up alarms with snooze function. Each alarm can use a
buzzer, DAB or FM for the alarm sound. An active alarm is indicated by bell
icons “ ” and " " in the left of the LCD display.
Note: the alarm parameters can only be set after the clock time on the unit
has been set.
Notes:
1. To ensure the alarm function works properly, make sure the volume is set to
a proper level.
2. Please do not switch off the unit's power by the ON/OFF selector after
setting an alarm, or else the alarm will not sound.
Snooze function
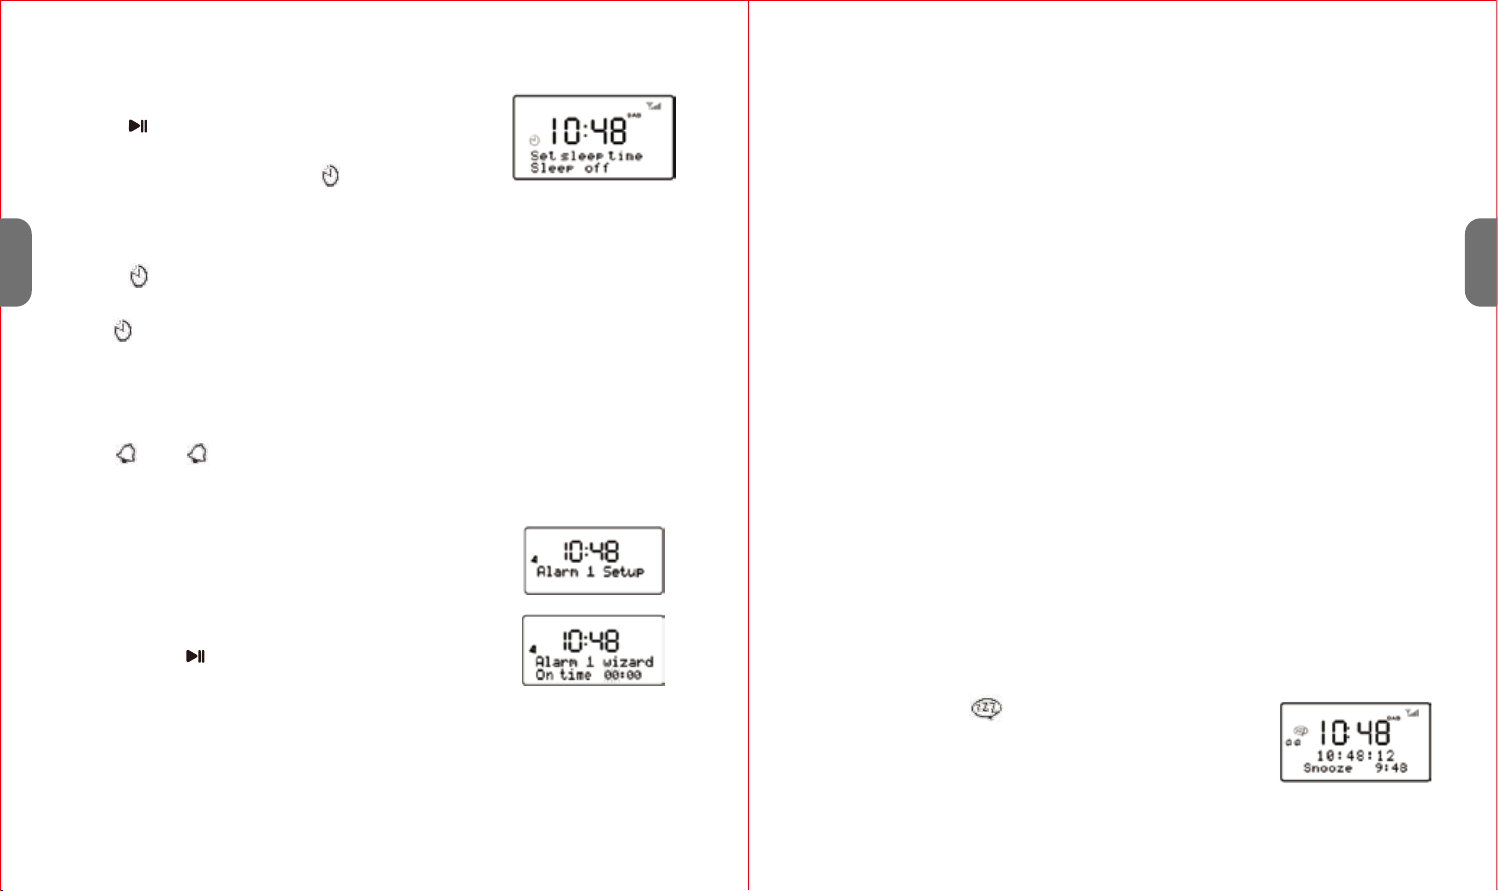
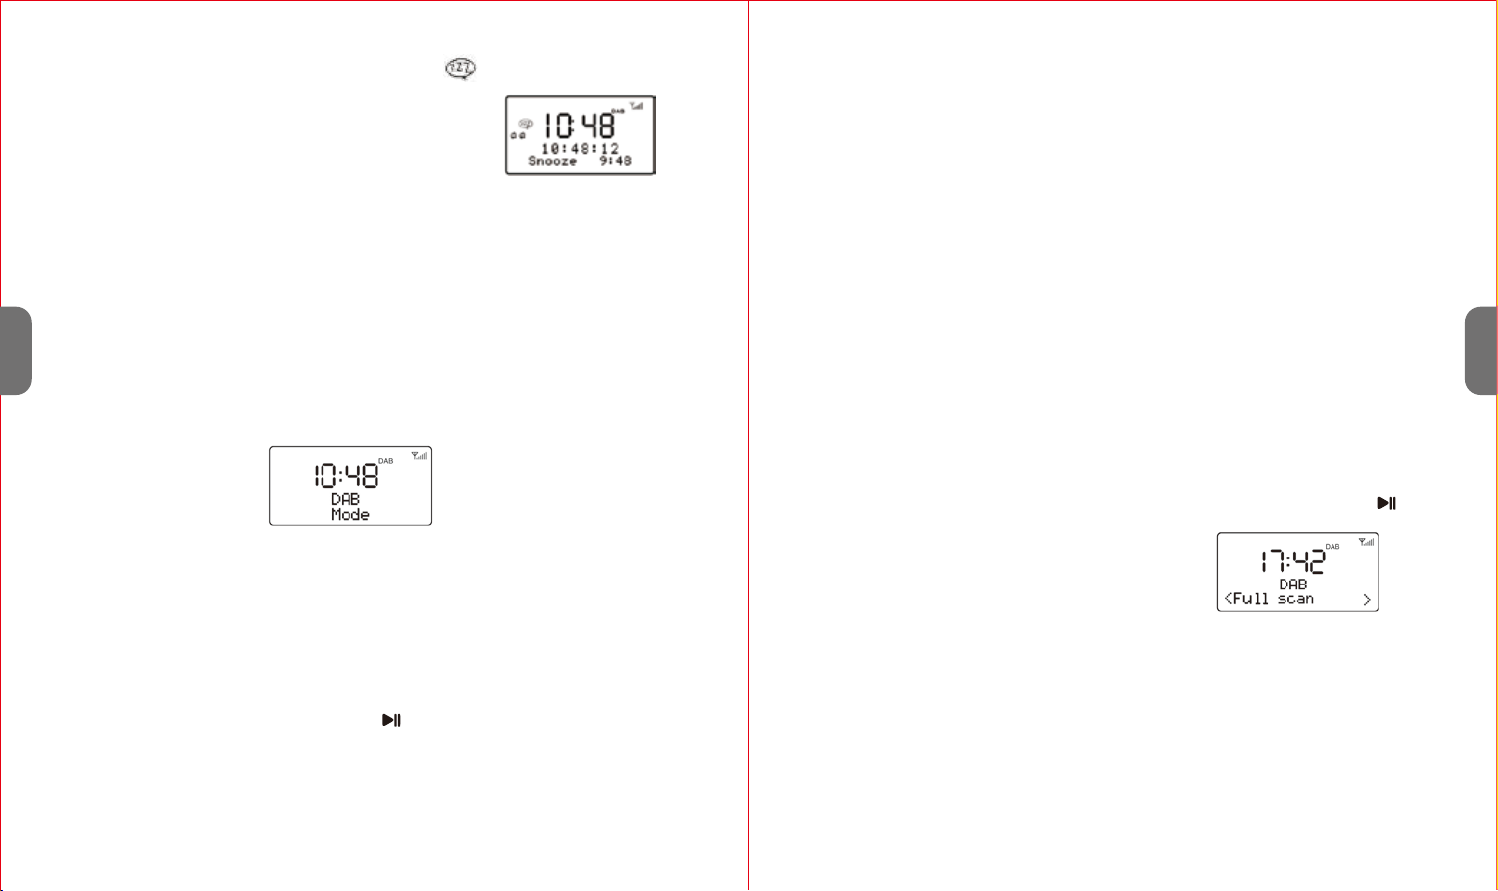
1. When the alarm is going off (sounding), short pressing
the ALARM/SNOOZE button will stop the alarm one time.
The Snooze icon “ ” will then show on the display.
2. The alarm will sound again after 10 minutes (the default
snooze time).
3. To turn off the alarm completely, press and hold
ALARM/SNOOZE button for 3 seconds
3. At the set time, the alarm will sound, quietly at first, then gradually building
up to the set volume. When an alarm sounds, the bell icon in the display will
flash.
4. Press and hold ALARM/SNOOZE button for 3 seconds to cancel the Alarm
when it is going off.
1. During any operating mode, press and hold the
"ALARM/SNOOZE/DIM" button and "Alarm 1 Setup"
will be shown on the display.
2. Short press "<" or ">" button to select between
"Alarm1" and "Alarm2".
3. Short press /OK button to confirm the Alarm you
selected. The hour digits will flash on the display.
6. Short press "<" or ">" button to select the alarm duration of
"15/30/45/60/90" mins, then press OK button to confirm the duration.
7. Short press "<" or ">" button to select the Alarm Source "Buzzer/DAB/FM",
then press OK button to confirm. If DAB or FM is chosen as the audio source,
you will then be prompted to select either the last listened station or one of
the preset stations (if set).
8. Short press "<" or ">" button to select the Alarm Period "Daily/Once/Week-
ends/Weekdays", then press OK button to confirm.
9. Short press "<" or ">" button to select the Alarm "On/Off", then press OK
button to confirm.
10. "Alarm Saved" will be shown once the setting is finished.
4. Short press "<" or ">" button to adjust the hour, then press OK button to
confirm the hour. The hour digit will stop flashing and the minute digit will
start flashing.
5. Short press "<" or ">" button to adjust the minutes, then press OK button to
confirm.
4. Press "<" or ">" button to select “Sleep” option in the
system library submenu.
5. Press /OK button to enter into sleep timer
settings. "Set sleep time" will be shown on the
display along with a flashing " " icon.
6. Press "<" or ">" button to adjust the sleep delay time using the following
options (in minutes): Sleep off/15/30/45/60/90.
7. The chosen setting will confirm automatically after 10 seconds and the sleep
icon " " will stop flashing.
Note: To cancel sleep mode, select “Sleep off”. The sleep icon
“ ” will disappear once sleep mode is disabled.
21
EN
EN
9 10

Notes:
How to re-do a full scan
Manual tune
1. Just like Digital TV there are some areas where it may be difficult to get a
good DAB signal. Broadcasters are constantly improving DAB coverage, so
you should check coverage for your area.
2. You may also need to start a scan manually to update the list of stations for
one of the following reasons:
- New stations may become available from time to time.
- Stations close or can no longer be received (In the station list, invalid
stations are indicated with a question mark “?” in front of their name).
- If reception was not good for the original scan (for example the antenna was
not up), this may result in an empty or incomplete list of available stations.
- If you have poor reception of some stations causing the audio to break up,
you may wish to list only stations with good signal strength.
2. Press “<” or “>” to display a particular channel/frequency and press OK button
to tune to that channel/frequency. The display shows a live indication of the
received signal strength on the selected frequency.
Adjustments to your antenna will be manifested in
the received signal strength displayed.
To re-do a full scan, short press the MENU button to show the menu and then
press “<” or “>” button to select ' Full Scan'.
Press /OK button to confirm.
As well as the normal method of scanning, you can also manually tune to a
particular channel/frequency. This can be useful for adjusting your antenna to
achieve the best possible reception and scanning a particular channel to
update the station list.
1. Press MENU button and then press “>” to show the Manual tune submenu,
then press the OK button to enter.
DAB MODE OPERATION
Auto scan
DAB radio mode receives DAB/DAB+ digital radio and displays information
about the station.
1. Fully extend the telescopic antenna.
2. Switch the unit on by rotating the Power ON/OFF switch to ON position to
turn on the unit.
3. Rotate the Function Selector to DAB position to enter DAB mode.
For first time use or if the station list is empty, the unit automatically
performs a full scan to see what stations are available. The display will show
the scan progress and the total number of channels during scanning.
4. When the scan is complete, the unit will set the time and start playing the
first station on the station list.
5. To change the station, press “<” or “>” button to scroll through the list of
stations and press /OK button to tune to the displayed station. The
playing screen will be displayed with the new station's details.
6. If no stations are detected during the scan the display will show “Service not
available”.
EN
EN
11 12
To recall a station
Dynamic range compression (DRC)
Now playing information
To view further information
Note:
DL Plus presents additional information that can be broadcast by stations
and stored temporarily on the unit.
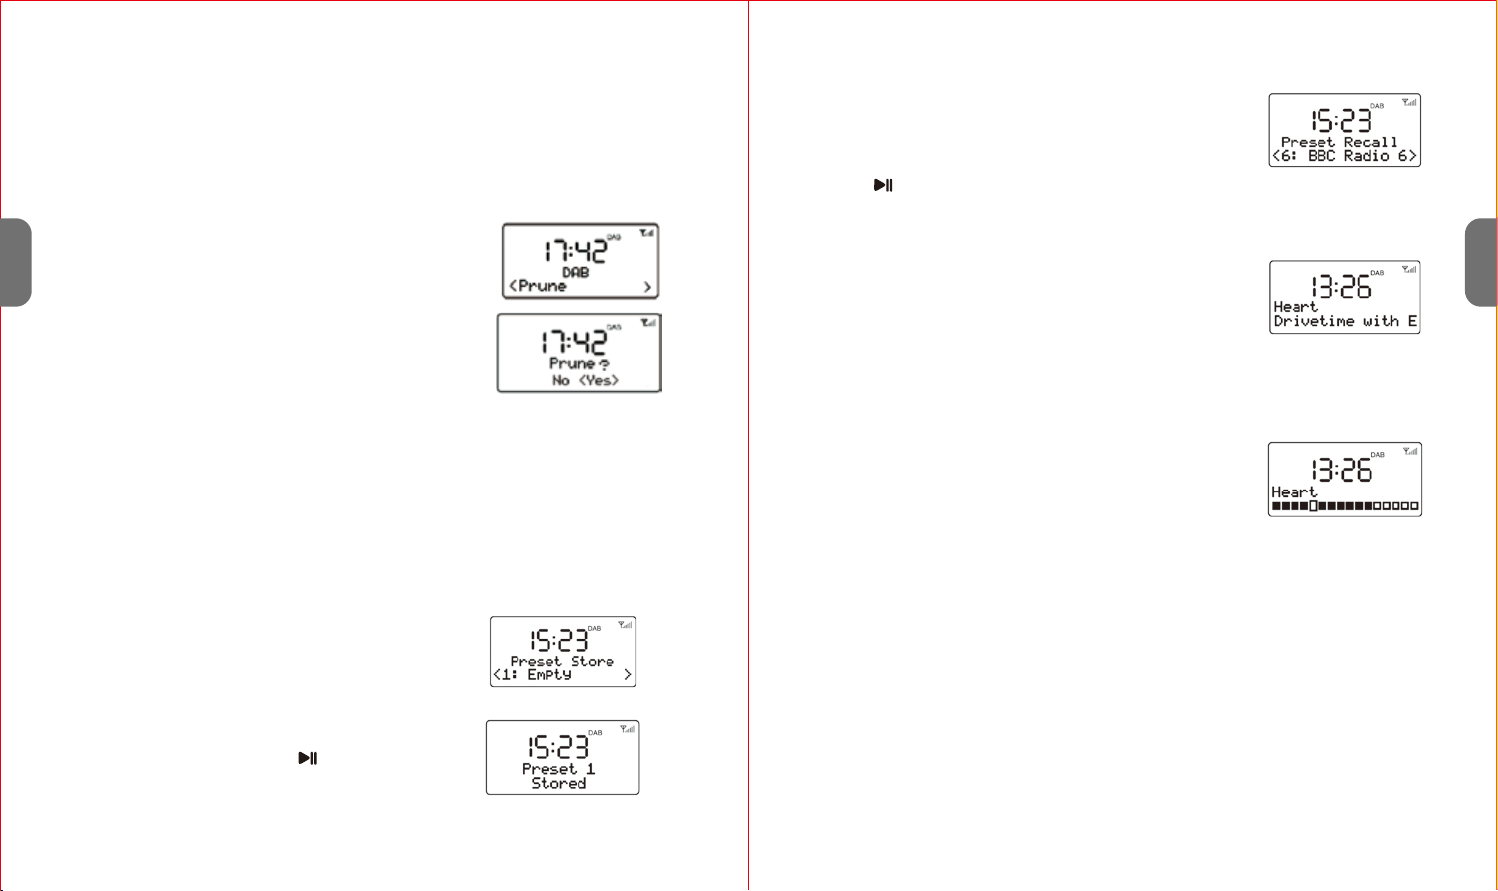
2. Press "<" or ">" button to choose the preset
memory position. Press the /OK button to
confirm the settings.
1. Short press the PRESET button during DAB mode
to enter the preset memory selecting mode.
2. Press "<" or ">" button to select the preset station.
3. Press /OK button to choose and play the displayed station.
This function reduces the difference between the loudest and quietest audio
being broadcast. Effectively, this makes quiet sounds comparatively louder,
and loud sounds comparatively quieter.
While a station is playing, the screen shows its name
and DLS (Dynamic Label Segment) information broad-
cast by the station such as programme name, track title
and contact details. Long DLS info, over 16 characters
will scroll across the display.
Each time you press INFO button, the next set of
information is displayed, cycling through: DLS text, DL
Plus information (this is only displayed if broadcast by
the station), signal strength, programme type, ensemble
name, channel number/frequency, signal error rate, bit
rate, codec/DAB variant, time and date.
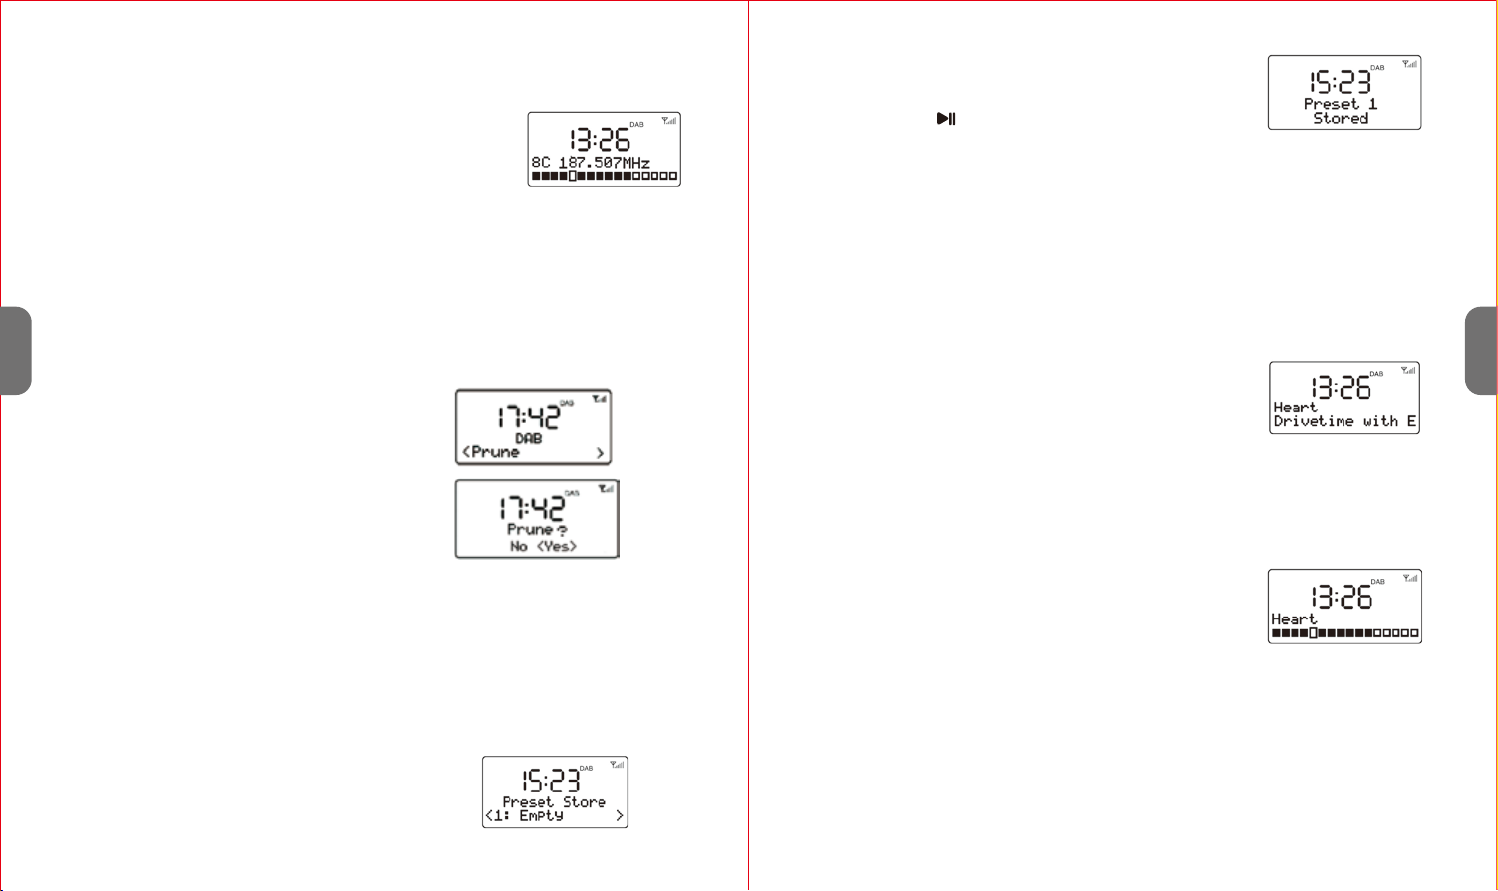
To remove stations that are listed but unavailable
Station presets
To save a station
Note:
The slightly larger rectangle indicates the audio quality threshold – if the signal
strength, as indicated by the solid rectangles, falls below this threshold the
audio quality will deteriorate.
Note:
This removes all invalid stations indicated in the station list with a ‘?’ in front of
the station name.
1. Press MENU button and then press "<" or ">" to
show the Prune submenu. Press OK button to
enter the Prune option.
2. Press “>” to select “Yes” and then press OK
button to confirm the removal.
1. If you have found the desired station, press
and hold the PRESET button until the
display shows Preset Store.
The unit allows you to store up to 20 DAB stations for easy recall at any time.
EN
EN
13 14

Note:
If reception is too weak and there is noise on the received station, try to
improve the reception by changing the position of the telescopic antenna.
Station presets
Now playing information
To view further information about the broadcast
AUX-IN MODE OPERATION
4. Short press “<” or “>” button to tune the radio down or up in 50KHz steps
for fine tuning.
The unit allows you to store up to 20 FM stations which work in the same way
as described in DAB mode.
While FM radio is playing, the screen shows its frequency,
or any further ‘RadioText’ information.
If no information is available, just the frequency and a No
Radio Text message is shown.
Each time you press INFO button, the next set of
information is displayed, cycling through: RDS
RadioText, programme type, frequency, time and date.
AUX-IN mode plays audio from an external source such as an MP3 player.
1. Plug one end of the 3.5mm audio cable (included) into the headphone or
line out jack on your player. Plug the other end of cable into the unit
AUX-IN jack on the back of the unit.
2. Rotate the FUNCTION Selector to AUX position to enter AUX mode.
3. Turn on the external audio source and play your device.
4. Control the volume level and operate all other functions on the external
device as usual.
Notes:
1. If your external device is connected to the line out jack, then you only
need to adjust the volume control of this unit. If your external device is
connected to the headphone jack, then you may need to adjust both the
volume control of your external device and the volume control of this unit
to find the most desirable volume setting.
Note:
DRC only works if it is enabled by the broadcaster for a specific station.
To change the DRC setting
FM MODE OPERATION
Select Menu > DRC, then press ENTER button
to enter the DRC submenu.
Press "<" or ">" to select the available options:
DRC off, high, low.
DRC off: DRC is switched off.
DRC high: DRC is switched on; the default setting recommended for noisy
environments.
DRC low: DRC is set to half level.
FM radio mode receives analogue radio from the FM band (87.5-108MHz)
and display RDS (Radio Data System) information about the station.
1. Fully extend the telescopic antenna.
2. Rotate the FUNCTION Selector to FM position to
enter FM mode.
3. Press and hold the "<" or ">" button to search the
station. It will then stop automatically at the first
station it finds.
EN
EN
15 16

Pairing the unit and external device
Notes:
If your device asks for a passkey (depending on the device manufacturers,
model, and software version), enter digits “0000” (four zeros) and press OK.
If pairing has been carried out successfully, “Connected” will be shown on
the display and the voice prompt “Connecting” will be heard.
3. After successfully connecting, you can listen to music wirelessly
through Bluetooth and select music on the Bluetooth device.
4. Some mobile phone brands have an energy-saving mode. Deactivate the
energy-saving mode as it can otherwise result in problems during the data
transfer through Bluetooth.
5. Short press /OK button to pause or resume playback.
6. Press “>” button to skip to next track, or press “<” button to return to
beginning of current track or skip to previous track.
7. Press and hold the /OK button to turn into standby mode or switch the
unit off by rotating the Power ON/OFF switch on the left of the unit to OFF
position .
1. Depending on the device manufacturer, you may need to preform the
pairing again during future use to connect the device.
2. Bluetooth compatibility cannot be ensured for future devices (e.g. yet to be
released mobile phones).
3. To be able to transfer audio data, Bluetooth needs to stay activated in your
player. Please refer to the operation manual of your player.
4. If a mobile phone on which you are playing music receives a call, the
music will be interrupted. After you have ended the call, the devices will
connect to each other again and playback will continue.
5. If there is an existing connection, press and hold the PRESET/PAIR button
for 3 seconds to break the current connection and initiate pairing mode.
6. The player will disconnect when your unit is moved beyond the opera-
tional range. To reconnect, move back within the operational range.
1. Activate Bluetooth on the compatible device, and set it to search for
compatible devices.
2. Select the name “1byone
BS002
” from the list of found devices.
Tips: The unit can only be connected to one external device at a time. If the
unit is already connected to a playback device, the unit will not appear in
other device's BT selection lists.
BLUETOOTH OPERATION
This unit offers you the possibility to connect with a Bluetooth enabled
device. The functional radius is limited to approx. 10 metres depending on
the surroundings and the device used.
Due to the different device manufacturers, models, and software versions,
full functionality cannot be guaranteed.
Preparing the unit for pairing
Before using the unit with a compatible external device (such as a mobile
phone) for the first time, you must pair and connect it to the device.
1. Switch the unit on by rotating the Power ON/OFF switch to “ON” position.
2. Ensure that the Bluetooth function is activated on your player (e.g. mobile
phone). For this, refer to the operation manual of your player.
3. Rotate the FUNCTION selector to BT position to enter Bluetooth mode.
“Bluetooth Disconnected” will flash on the display. It shows that this unit is
available to pair with other devices.
2. Press and hold the /OK button to switch the unit to Standby mode or
switch the unit off by rotating the Power ON/OFF switch to the off position
when you finish listening.
3. Don't forget to switch off the power of your external device as well.
EN
EN
17 18

1. Press "Menu" button.
2. Press "<" or ">" button to select “System”.
3. Press /OK button to enter the "System"
subdirectory.
4. Press "<" or ">" button to select “Factory Reset”
option in the system library submenu.
5. Press /OK button to enter the Factory Reset
subdirectory.
6. Press "<" or ">" button to select “Yes” or "No".
7. Press /OK button to confirm.
A factory reset clears all user defined settings, replacing them with the
original default values. Time/date, DAB/FM station list and preset stations
data will all be erased.
FACTORY RESET
Using the unit as a hands-free bluetooth speakerphone
When it is back within range, please check if the unit is still connected to
the player.
7. If the connection is lost, follow the instructions above to pair your unit to
the player again.
1. Link your cell phone to the unit via Bluetooth as described above.
2. When receiving an incoming call on your cell phone, short tap the /OK
button on the unit to switch the incoming call from the cell phone to the
unit's speaker. Complete your call using the built-in microphone and speaker.
3. Adjust the volume control of your cell phone to obtain the desired sound
level.
4. To end the call, just tap the /OK button again, and the call will end.
1. Error messages
SOFTWARE VERSION
TROUBLESHOOTING AND ERROR MESSAGES
FM mode
No Radio Text No RDS text information is available on this
station
No PTY No RDS programme type information is
available
No Name No RDS stationname is being broadcast
Message Description
DAB mode
No DAB Station No DAB reception
No DAB stations are available – check aerial
Not available The listed stationcannot be found
Signal error The DAB signal has been interrupted
(No name) The current station does not broadcast an
identityname
? List invalid
Signal error The DAB signal has been interrupted
To check the software version, follow the steps below:
1. Press "Menu" button.
2. Press "<" or ">" button to select “System”.
3. Press /OK button to enter the "System"
subdirectory.
4. Press "<" or ">" button to select “SW version".
5. Press /OK button to display the current software version.
EN
EN
19 20
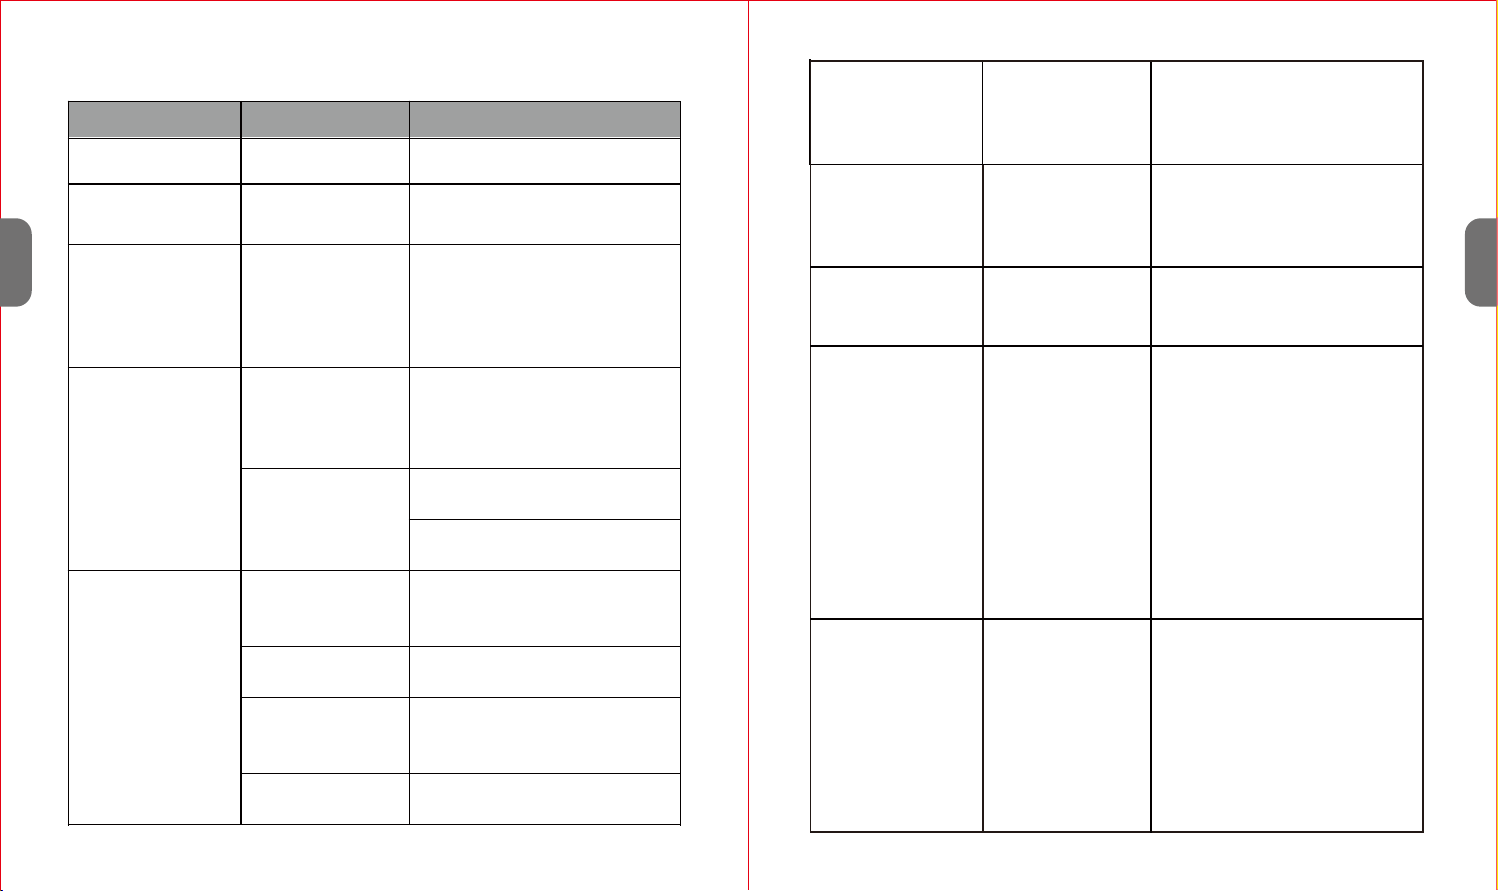
Bluetooth cannot
be connected
Pairing does not
work
Check whether the audio
source supports the A2DP
protocol
Audio source
is switched off Switch on the audio source
Bluetooth is
switched off at the
audio source
Switch on the Bluetooth
function on the audio source
Bluetooth version
is not supported Use a different playback unit
Poor sound
quality from a
Bluetooth® device
Bluetooth device
is almost out of
range of the
1byone BS002
Move your Bluetooth device
closer to the 1byone BS002
The unit does not
power on
Main switch is on
“OFF”
The unit is in
standby mode
Change the switch on the left
side of the unit to “ON”
Press the “Standby” Button for
3 Seconds
The battery does
not charge The battery has no
contact
Check the charging cable.
It may be loose. Is the battery
properly installed?
The touch buttons
don't work
The touch buttons
don't react if you
press them the first
time
The touch buttons
don't react fast
enough
Some buttons
don't work
in every mode
The buttons start reacting after
the 2nd push. The first push will
only activate the whole panel
The buttons have a reaction
time of about 0.4 seconds.
This might cause confusion
In Bluetooth and AUX mode,
you cannot access the Menu.
If you did not set and save the
time on the unit, the Sleep
function cannot be activated
The unit doesn’t
react in DAB+ to
any input Or
No connection to
DAB
The unit software
crashed due to an
uncertain key
combination
The antenna is not
fully extended
Please switch off the unit
and switch it on again
Please “RESET” the unit in
the Settings Menu
Make sure the antenna is
completely extended and
restart the unit
2.Troubleshooting
Problem Cause Solutions
No sound Volume is too low Increase the volume
Poor sound quality
in Radio mode
Radio signal too
weak
Try to adjust the antenna
position
FM: Hiss
DAB: intermittent
cut-out or "No
stations available"
message
Low signal
strength
Check/move antenna
Move unit
Rescan local
No audio signal
via the Bluetooth
connection
No audio signal
via the Bluetooth
connection
Check whether a connection
exists. If necessary, pair the
speaker again to the audio
source
Volume too low
Increase the volume on the
speaker
Increase the volume on the
audio source
EN
EN
21 22

The right to make technical and design modifications in the course of
continuous product development remains reserved.
This device has been tested according to all relevant current CE guide-
lines, such as electromagnetic compatibility and low voltage directives,
and has been constructed in accordance with the latest safety regulations.
SPECIFICATIONS
Power adaptor (included) Input AC 100-240V ~ 50/60Hz
Output DC 5V 1.5A
Battery capacity (included) 1,050 mAh
Max play time (with battery) 3.5 Hours
Power consumption 7.5 W
Standby power consumption <1 W
DAB frequency 174.928-239.2 MHz
FM frequency 87.5-108 MHz
Bluetooth support V2.1 + EDR
Bluetooth operation range up to 10 metres
Transmission frequency 2.4 GHz
Protocols A2DP 1.2
Working temperature 0℃~ +35℃
Working humidity 20%~80%
The time setting
doesn’t save
The time setting
has not been
confirmed
After you have set up the
unit's internal time, please press
“OK” to confirm
The unit
suddenly
switches off
Sleep function is
active
The battery is not
installed
The unit switches to sleep
mode after a certain time.
Please reset the sleep function
completely
Without a battery the unit will
not work properly. Please be
sure to install a battery even if
you use the power cord
SPECIFICATIONS
Disposal of the appliance
Under no circumstances should you dispose of the appliance in
normal domestic waste. This product is subject to the provisions of
European Directive 2012/19/EU.
The appliance’s packaging is made from environmentally friendly
material and can be disposed of at your local recycling plant.
Dispose of the appliance via an approved disposal company or your municipal waste
facility. Please observe currently applicable regulations. Please contact your waste
disposal center if you need any further information.
DISPOSAL
Disposal of batteries
Used batteries may not be disposed of in household waste.
All consumers are statutorily required to dispose of batteries at a collection point
provided by their local municipality or retail store.
The purpose of this obligation is to ensure batteries are disposed of in a non-polluting
manner. Only dispose of batteries when they are fully discharged.
EN
EN
23 24
Ansicht von Oben
LAGE DER BEDIENELEMENTE
Vorderansicht
7 8 9 10 11 12 13
14
4 5
1
2
3
6
DE
DE
25 26
INHALT
LAGE DER BEDIENELEMENTE
INSTALLATION DER BATTERIE
Stromanschluss
Die Batterie aufladen
BEDIENUNGS DES GERÄTES
Sprache einstellen
Uhrzeit und Datum einstellen
Schlummerfunktion einstellen
Alarm einstellen
Die Snooze-Funktion
BEDIENUNG DES DAB MODUS
BEDIENUNG DES FM MODUS
AUX-MODUS
BLUETOOTH VERBINDUNG HERSTELLEN
WERKSEINSTELLUNGEN WIEDERHERSTELLEN
SOFTWARE VERSION
HÄUFIG GESTELLTE FRAGEN UND LÖSUNGSANSÄTZE
SPEZIFIKATIONEN
26
29
30
30
31
31
32
32
33
34
35
39
40
41
44
45
46
49
27 28
Rückansicht 15
16 17
DE
DE
8. Taste <
9. Taste>
10. Taste MENU
Ansicht von Unten
1. Ein-/Ausschalter
2. Helligkeit Ein-Ausschalter
3. Funktionsauswahl(DAB/FM/AUX/BT)
4. Lautstärkeregler
5. Batterieladeanzeige
6. LCD Display
7. Taste /OK/Standby
18 19
11. Taste INFO
12. Taste PRESET/PAIR
13. Taste ALARM/ SNOOZE/ DIM
14. Eingebautes Mikrofon
15. Teleskopantenne
16. DC 5 V Buchse
17. 3.5mm Aux- IN- Klinkenbuchse
18. Batteriefachdeckel
19. Sicherungsschraube des Batteriefachdeckels
= Gesperrt
= Aufgesperrt
29 30
DE
DE
Warnung:
1. Achten Sie drauf, dass die Batterie ordnungsgemäß eingesetzt wurde.
2. Wir empfehlen, nur Batterien des empfohlenen Typs zu verwenden.
3. Entfernen Sie bei längerer Nichtbenutzung die Batterie, um Schäden oder
Verletzungen durch mögliches Auslaufen der Batterie zu vermeiden.
4. Die Batterie des Geätes sollte keiner starken Wärme, Sonneneinstahlung
oder Feuer augesetzt sein.
Stromanschluss
1. Schließen Sie den mitgelieferten Netzadapter mit dem beigefügten
USB-Kabel an die 5 V Buchse auf der Rückseite des Geräts und den Netzs-
tecker an eine vorschriftsmäßig installierte Steckdose an.
2. Vergewissern Sie sich, dass die Netzspannung mit der Spannung auf
Typenschild übereinstimmt.
Vorsicht
1. Verwenden Sie mit diesem Gerät nur den im Lieferumfang enthaltenen
Netzadapter. Nicht für andere Geräte verwenden.
2. Verwenden Sie nur den mitgelieferten Netzadapter. Dieser Adapter wurde
speziell zum schrittweisen Aufladen der integrierten Batterie entworfen.
Alle anderen Adapter können die Lebensdauer der Batterie verkürzen oder
die Batterie und das Gerät beschädigen.
Batterie aufladen
Die installierte Batterie kann auch mit dem beigefügten Netzadapter geladen
werden. Schließen Sie den Netzadapter an einer Steckdose und das anderen
1. Drehen Sie die Sicherungschraube des Batteriefachdeckels mit einer Münze
um 90 Grad, um den Batteriefachdeckel zu entriegeln.
2. Entfernen Sie den Batteriefachdeckel mit den Fingern.
3. Legen Sie die mitgelieferte 3.7 V Lithium-ionen-Batterie entsprechend der
Polarität ein.
4. Schließen Sie den Batteriefachdeckel und drehen Sie die Sicherungsschraube
zu
INSTALLATION DER BATTERIE
Ende an der DC 5 V Buchse an. Die Batterieladenanzeige leuchtet gelb auf.
Sobald die Batterie vollständig aufgeladen ist, leuchtet die Anzeige grün.
Play/OK/
Standby
< Button
Das Menü
aufrufen / Ein und
Ausschalten
Durchlaufen der
DAB Stationen,
Durchlaufen des
Menüs
Das Menü
aufrufen / Ein und
Ausschalten
Manuelle suche
nach FM Stationen,
für 2 Sekunden
drücken für
automatische Suche
Zurück zum anfang des Liedes
oder vorheriger Song
> Button Durchlaufen der
DAB Stationen,
Durchlaufen des
Menüs
Manuelle suche
nach FM Stationen,
für 2 Sekunden
drücken für
automatische
Suche
Nächstes Lied
Menu/
Sleep
Button
DAB Modus
Menü, drücken
zum Aktivieren /
Verlassen
Einfaches drücken öffnet
das Menü. Falls es schön
geöffnet ist, schließt ein
weiterer Tastendruck das
Menü wieder
Einfaches drücken öffnet das
Menü. Falls es schön geöffnet ist,
schließt ein weiterer Tastendruck
das Menü wieder
Pre-Set /
Pair Button
Drücken Sie die Taste
ein paar Sekunden um
einen Sender zu
speichern, Drücken sie
die Taste kurz, um den
Stationsspeicher
abzurufen
Drücken Sie die Taste
ein paar Sekunden um
einen Sender zu
speichern, Drücken sie
die Taste kurz, um den
Stationsspeicher
abzurufen
Halten Sie den Knopf für 3
Sekunden gedrückt um die
momentane Verbindung zu
unterbrechen und in den
Paarungsmodus zu wechseln
INFO
Button Durchlaufen der
Informationsan-
zeigen
Durchlaufen der
Informationsanzei-
gen
Pause und Play für das ausgewählte
Musikstück, annehmen und
auflegen eines Gespräches
In DAB Mode In FM Mode In Bluetooth Mode
31 32
DE
DE
BEDIENUNGS DES GERÄTES
Anmerkungen:
Spracheinstellungen
Anmerkung:
Gerät ein- oder ausschalten
1. Schalten Sie das Gerät ein, indem Sie Ein-/Ausschalter auf der linken Seite
des Geräts in die Stellung „ ON“ drehen. Das Display des Geräts leuchtet auf
und zeigt“00:00“ an. Anschließend wird der ausgewählte Modus
aufgerufen.
2. Drehen Sie die Funktionsauswahl, um die verschiedenen Betriebsmodus
auszuwählen: DAB, FM, AUS-IN oder Bluetooth.
3. Halten Sie die Taste /OK/STANDBY gedrückt für 3 Sekunden, um den
Standby-Modus aufzurufen.
4. Drücken und halten Sie die Taste für 3 Sekunde im Standby- Modus, um
das Gerät zu einschalten.
5. Drehen Sie zum Ausschalten des Geräts den ON/OFF in die Stellung OFF.
Das Radio wird sich automatisch abschalten, wenn 60 Minuten lang keine
Eingabe erfolgt ist (Außnahme: FM Modus)
Die Werkseinstellung des Gerätes ist Englisch. Um dies zu ändern, befolgen
Sie diese Schritte:
1. Die Dauer des Ladevorgangs hängt vom Ladezustand der Batterie ab.
2. Vergessen Sie nicht, bei längerer Nichtbenutzung die Batterie zu entneh-
men, um ein Auslaufen zu vermeiden.
Uhrzeit und Datumseinstellungen
Schlummer-Timer einstellen
Die Uhrzeit kann sich automatisch einstellen. Dies funktioniert über den DAB
und FM Modus, der sich mit den lokalen Zeitangaben der Radiostationen in
Ihrer Umgebung abgleicht (wenn möglich).
Die Uhrzeit kann auch manuell eingestell werden. Befolgen Sie dafür folgen-
de Schritte:
Der Schlummer-Timer bezeichnet die automatische Abschaltung des Gerätes
nach einer angegebenen Zeitspanne.
7. Drücken Sie noch einmal /OK um die Uhrzeit des Radios zu bestätigen.
1. Drücken Sie den Menü-Knopf
2. Drücken Sie “<” oder “>” bis Sie zur Auswahl “System” kommen.
3. Drücken Sie den /OK Knopf um in das Menü des Systems zu gelangen.
4. Drücken Sie “<” oder “>” bis Sie bei “Language”
angekommen sind.
5. Drücken Sie den /OK Knopf um in das Menü des Sprache zu gelangen.
6. Drücken Sie “<” oder “>” bis Sie bei “Deutsch/Italienisch/Spanisch/Englis-
ch/Französisch” angekommen sind.
1. Drücken Sie den “Menu” Knopf.
2. Drücken Sie “<” oder “>” bis Sie zur Auswahl “System” kommen.
3. Drücken Sie den /OK Knopf um in das Menü des Systems zu gelangen.
4. Drücken Sie “<” oder “>” bis Sie zur Auswahl “Time/Zeit” kommen.
5. Drücken Sie den /OK Knopf um in das Menü der Zeiteinstellung zu
gelangen. “Set Time / Date” wird auf dem Display aufleuchten. Drücken Sie
wiederholt /OK um die Zeiteinstellung zu beginnen.
6. Wählen Sie eine Stunde und Minute aus, indem Sie
mit “<” oder “>” die Zahlen ändern und mit /OK
bestätigen.
1. Drücken Sie den “Menu” Knopf.
2. Drücken Sie “<” oder “>” bis Sie zur Auswahl “System” kommen.

Den Alarm einstellen
Das Radio hat 2 Wecker die unabhängig voneinander Eingestellt werden
können. Jeder der beiden Wecker kann Sie mit einem Buzzer oder DAB / FM
Sender wecken. Welcher Wecker aktiv ist, sehen sie an den Icons “ ” und “ ” Notes:
1. Stellen Sie sicher, dass die Lautstärke des Radios laut genug gestellt ist um
Sie zu wecken.
2. Schalten Sie das Radio nicht an dem „On/Off“ Schalter an der Seite aus, da
sonst der Alarm nicht funktioniert.
3. Sobald die eingestellte Zeit gekommen ist, wird der Wecker erst leise, und
dann immer lauter werdend klingeln.
4. Drücken Sie den Alarm/Snooze Knopf für 3 Sekunden um den Alarm
auszustellen, sobald er ertönt.
Snooze-Funktion
1. Wenn der Alarm ertönt, können Sie den „Alarm/Snooze“ Knopf drücken um
Achtung: Der Wecker kann erst nach der Uhrzeitseinstellung korrekt eingestellt
werden.
1. Während der normalen Nutzung des Radios können
Sie den “Alarm/Snooze/Dim” Knopf drücken und es
wird direkt das „Alarm 1 Setup“ angezeigt.
2. Drücken Sie “<” oder “>” um zwischen Alarm 1 oder
Alarm 2 zu wählen und bestätigen Sie es mit /OK.
Die Zeitanzeige auf dem Radio wird anfangen zu
blinken.
3. Drücken Sie “<” oder “>” um die Stunde des Alarms festzulegen. Drücken
Sie OK um diese Eingabe zu bestätigen und wiederholen Sie dies für die
Minutenanzeige. Drücken Sie OK um die komplette Eingabe danach zu
bestätigen.
4. Drücken Sie “<” oder “>” um die länge des Alarms einzustellen. Sie können
zwischen 15/30/45/60/90 Sekunden einstellen. Drücken Sie „OK“ um dies zu
bestätigen.
5. Drücken Sie “<” oder “>” um den Alarmtyp auszuwählen. Sie können
hierbei zwischen Buzzer/DAB/FM wählen. Drücken Sie OK um die eingabe
zu bestätigen. Wenn sie DAB oder FM ausgewählt haben, werden Sie
aufgefordert, eine der zuletzt gehörten Radiostationen auszuwählen.
Bestätigen Sie mit OK.
6. Drücken Sie “<” oder “>” um den Alarmzeitraum einzustellen. Sie können
hierbei zwischen Täglich/Einmalig/Wochenende/Wochentags wählen.
Bedenken Sie, dass Sie die Datumseinstellungen hierfür korrekt eingegeben
haben sollten.
7. Drücken Sie “<” oder “>” um den Alarm auf „On/Off“ zu stellen und bestäti-
gen Sie mit OK. „Alarm saved“ wird auf dem Display zur Bestätigung
aufblinken.
3. Drücken Sie den /OK Knopf um in das Menü des Systems zu gelangen.
4. Drücken Sie “<” oder “>” bis Sie zur Auswahl “Sleep” kommen.
5. Drücken Sie den /OK Knopf um in das Menü des Schlummer-Timers zu
gelangen. “Set Sleep Time” wird zusammen mit einem blinkenden
Symbol auf dem Display angezeigt.
6. Drücken Sie “<” oder “>” um den Schlummer-Timer auf 15/30/45/60 oder
90 Minuten einzustellen.
7. Die ausgewählte Zeit wird nach 10 Sekunden automatisch bestätigt und
das Zeichen wird aufhören zu blinken.
Beachten Sie: Um den Schlummer-Timer abzustellen, wählen Sie “Sleep off”.
Das Zeichen wird von dem Display verschwinden und der Schlum-
mer-Modus wird abgeschaltet.
33 34
DE
DE
2
1
den Alarm kurzzeitig auszustellen. Das Symbol wird
auf dem Bildschirm erscheinen.
2. Der Wecker wird nach 10 Minuten erneut klingeln.
3. Um den Wecker zu deaktivieren, drücken Sie den
Alarm/Snooze Knopf für 3 Sekunden.
BEDIENUNG DES DAB MODUS
Suchlauf
Der DAB- Radiomodus emfängt DAB/DAB+ Digital Radio und zeigt Informa-
tionen über den Sender an.
1.Ziehen Sie die Teleskopantenne voll aus.
2.Schalten Sie das Geräts ein, indem Sie den ON/OFF auf der linken Seite des
Geräts in die Stellung ON drehen.
3.Drehen Sie die Funktionsauswahl in die Stellung DAB, um den DAB- Modus
aufzurufen.
Beim ersten Gebrauch oder wenn die Senderliste leer ist, führt das Radio
automatisch einen vollständigen Sendersuchlauf durch. Das Display zeigt
den Suchfortschritt und die vollständige Kanalnummer während des
Suchvorgangs an.
4.Wenn der Suchlauf abgeschlossen ist, wird die Uhrzeit eingestellt und mit der
Wiedergabe des ersten gefundenen Senders in der Senderliste begonnen.
5.Scrollen Sie zum Ändern des Senders mit der Taste „<” oder „>” durch die
Senderliste und drücken Sie die Taste /OK um den angezeigten Sender
einzustellen. Auf dem Wiedergabebildschirm warden die Einzelheiten des
neuen Senders angezeigt.
6.Wenn während des Suchlaufs kein Sender gefunden wurde, zeigt das Display
„ Dienst nicht verfügbar“ an.
35 36
Anmerkungen:
Erneutes Ausführen eines vollständigen Suchlaufs
Manuelle Sendersuche
1. Wie beim Digital- TV gibt es einige Gebiete, in denen es möglicherweise
schwierig ist, ein gutes DAB-Signal zu empfangen. Die Rundfundanbieter
verbessern ständig die DAB-Abdeckung. Sie können die Abdeckung für Ihre
Gebiet überprüfen.
2. Möglicherweise müssen Sie einen Suchlauf auch manuell starten, um die
Senderliste aus einem der folgenden Gründe zu aktualisieren:
- Von Zeit zu Zeit sind neue Sender verfügbar.
- Sender wurden geschlossen oder können nicht mehr empfangen werden
(In der Senderliste werden ungültige Sender mit einem Fragezeichen „?“ vor
dem Namen gekennzeichnet).
- Wenn beim ersten Suchlauf der Empfang nicht gut war(Z.B. die Antenne war
nicht ganz ausgezogen), kann dies zu einer leeren oder unvollständigen
Liste der verfügbaren Sender führen.
Drücken Sie zum erneuten Ausführen eines vollständigen Suchlaufs kurz die
Taste Menü, um das Menü anzuzeigen und drücken Sie dann die Taste /
Enter, um „ Vollständiger Suchlauf“ auszuwählen.
Ebenso wie auch bei der normalen Suchmethode können Sie auch einen
bestimmten Kanal/ eine bestimmte Frequenz manuell einstellen. Dies kann
zum Anpassen der Antenne für den bestmöglichen Empfang und zum
Suchen eines bestimmten Kanals zum Aktualisieren der Senderliste nützlich
sein.
1. Drücken Sie die Taste Menü und dann „>”, um das Untermenü aufzurufen:
Manual einstellen. Und dann drücken Sie zum Aufrufen die Taste Ok.
DE
DE
2. Drücken Sie zum Anzeigen eines bestimmten Kanals/ Frequenz die Taste
“<” oder “>” und drücken Sie die Taste OK, um diesen Kanal oder diese
Löschen von Sendern, die zwar aufgelistet werden, jedoch
nicht verfügbar sind
Senderspeicher
Speichern eines Senders
Anmerkung:
Das etwas größere Rechteck zeigt den Schwellenwert der Audioqualität an.
Wenn die Signalstärke unter den Schwellenwert fällt, wird dies durch das
Rechteck angezeigt und die Audioqualität verschlechtert sich.
Anmerkung:
Dies entfernt alle ungültigen Sender aus der Senderliste, die mit einem „?“
vor dem Namen des Sender gekennzeichnet sind.
1. Drücken Sie die Taste MENU und zeigen Sie
dann mit “<” oder “>” das Untermenü an:
Leeren. Rufen Sie mit der Taste OK die
Bereinigungsoption auf.
2. Wählen Sie mit “<” die Option „Ja“ und
bestätigen Sie dann das Bereinigen mit OK.
1. Wenn Sie den gewünschten Sender gefunden
haben, halten Sie die Taste PRESET gedrückt,
bis das Display „ Progr. speichern“ anzeigt.
Das Gerät kann jederzeit bis zu 20 DAB-Sender für schnelles Abrufen speichern.
Frequenz einzustellen. Das Display zeigt die Echtzeit-An-
zeige der empfangenen Signalstärke der gewählten
Frequenz an. Anpassungen der Antenne wirken sich auf
die angezeigte Empfangs-Signalstärke aus.
37 38
DE
DE
Abrufen eines Senders
Informationen zur „Aktuellen Wiedergaben“
Weitere Informationen anzeigen
Anmerkung:
DL Plus enthält zusätzliche Informationen, die von den Sendern übermittelt
und vorübergehend in Ihrem Radio gespeichert werden können.
2. Wählen Sie mit der Taste“<” oder “>” die Sender-
speicherposition und bestätigen die Einstellung
mit der Taste /OK.
1. Drücken Sie im DAB-Modus kurz die Taste PRESET, um den Senderspeicher-
Auswahlmodus aufzurufen.
2. Wählen Sie mit der Taste “<” oder “>” den vorbelegten Sender.
3. Wählen Sie ihn mit der Taste OK aus und starten Sie die Wiedergabe des
angezeigten Senders.
Während der Wiedergabe eines Senders zeigt der
Bildschirm seinen Namen und DLS (Dynamic Label
Segment) Informationen an, die vom Sender übertra-
gen werden, wie Programmname, Titel und Kontaktdat-
en. Eine lange DLS Information mit mehr als 16 Zeichen
scrollt über das Display.
Jedes Mal, wenn Sie die Taste INFO drücken, wird die
nächste Informationsgruppe zyklisch angezeigt:
DLS-Text, DL Plus- Informationen (diese wenden nur
angezeigt, wenn sie vom Sender übertragen warden),
Signalstärke, Programmtyp, Ensemblename, Kanalnum-
mer/Frequenz, Signal-Fehlerrate, Bitrate,
Codec/DAB-Variante, Zeit und Datum.
Table of contents
Languages:


