1 BY ONE 436NA-0006 User manual

Instruction Manual/ Bedienungsanleitung
Manuel d’utilisation / Manual de instrucciones / Manuale di istruzioni
1byone Products Inc.
1230 E Belmont Street, Ontario, CA 91761
Customer Service: +1 909-391-3888
www.1byone.com
Wireless Soundbar Speaker

EN
DE
FR
ES
IT
1
Introduction
Thank you for purchasing 1byone Wireless soundbar Speaker.This instruction manual contains important information about safety, usage,and
disposal. Use the product as described and keep this manual for future reference. If you sell this speaker or pass it on, also give this manual to the
new owner.
IMPORTANT SAFETY INSTRUCTIONS
• Please thoroughly read this manual before connecting and operating this speaker.
• Do not open the cover of this speaker.There are no user-serviceable parts inside. Refer servicing to qualified personnel only.
• Switch off the speaker when it is not in use. Switch off and disconnect the speaker from AC power when it will not be used for a long period of time.
• Do not install the speaker in a place exposed to heating sources or direct sunshine.
• Do not install the speaker in a place exposed to moisture or rain.
• The speaker should not be exposed to dripping or splashing water. Do not place any objects filled with liquids, such as vases, on the speaker.
• Install the speaker on a horizontal,flat,sturdy surface with good ventilation.Never block the speaker’s vents which will cause malfunction resulting
from overheating.
• Use a soft, clean cloth to clean the outside of the speaker. Never clean it with chemicals or detergent.
• This manual is a guide for general user operation only and not a complete guide for configuration.
• Only use attachments/accessories specified by the manufacturer.
The lightning flash is intended to alert the user to the presence of dangerous voltage within the product's enclosure, and touching
the internal components may result in a risk of electric shock to persons.
The exclamatory mark is intended to alert the user to the presence of important operating instructions.
RISK OF ELECTRIC SHOCK
DO NOT OPEN
CAUTION To reduce the risk of electric shock or fire,do not open the cover. Refer servicing to qualified service personnel.

EN
DE
FR
ES
IT
EN
DE
FR
ES
IT
23
Product Description
Front View
12
1. Display Screen
2. Remote Sensor
Rear View
3 41 2
1. HDMI ARC Input (Connects to the HDMI output port of ARC-compliant TVs only)
2. AUX Input - RCA ports (Connects to the Analogue output of the external device)
3. Optical Digital Audio Input (Connects to the optical output of TVs, DVD players, set top boxes, and game consoles)
4. Power Cord Inlet
Side View
12 43 5 6
1. Standby (Turns the soundbar on and off)
2. Source (Switches between Line In,Aux In,BT, USB,ARC, and Optical input mode.The selected
mode will appear on the front panel)
3. USB Port (Connects to USB devices such as MP3 player or thumb drive for music playback)
4.Volume - (Turns down the volume.The volume level will appear on the front panel)
5.Volume + (Turn up the volume, the volume level will appear on the front panel)
6. Line In 3.5mm port (Connects to the analog output of external device)
Included Items
1 x Wireless Sound Bar Speaker 2 x Wall Plug 1 x RCA-to-RCA Cable
1 x Remote Control 2 x Screw 1 x Instruction Manual
4 x Bracket Screw 2 x Bracket
Before using the Wireless Soundbar Speaker for the first time, check the package contents to ensure all parts are free of visible damage.

EN
DE
FR
ES
IT
EN
DE
FR
ES
IT
45
Installation Guide
Mounting the Soundbar Speaker to a Wall
To prevent injuries,fasten the speaker securely to the wall in accordance with the below instructions.
1. Drill two holes (about 6mm/0.24in diameter) into the wall,keeping the distance between the two drill holes at 500mm (19.7in). (Fig.1)
2. Insert the two plugs into the two drilled holes.Next,insert two screws into the two holes and tighten.(Fig.2)
3. Leave 4mm (0.16”) of space between each screw head and the wall.(Fig.3)
500mm
4mm
Fig.1 Fig.2 Fig.3
4. Slide the wall-mounting brackets onto the speaker. (Fig.4)
5. Screw the wall-mounting brackets onto the speaker. (Fig.5)
6. Hang the assembled speaker and brackets onto the wall screws.(Fig.6)
Fig.4 Fig.5 Fig.6

EN
DE
FR
ES
IT
EN
DE
FR
ES
IT
67
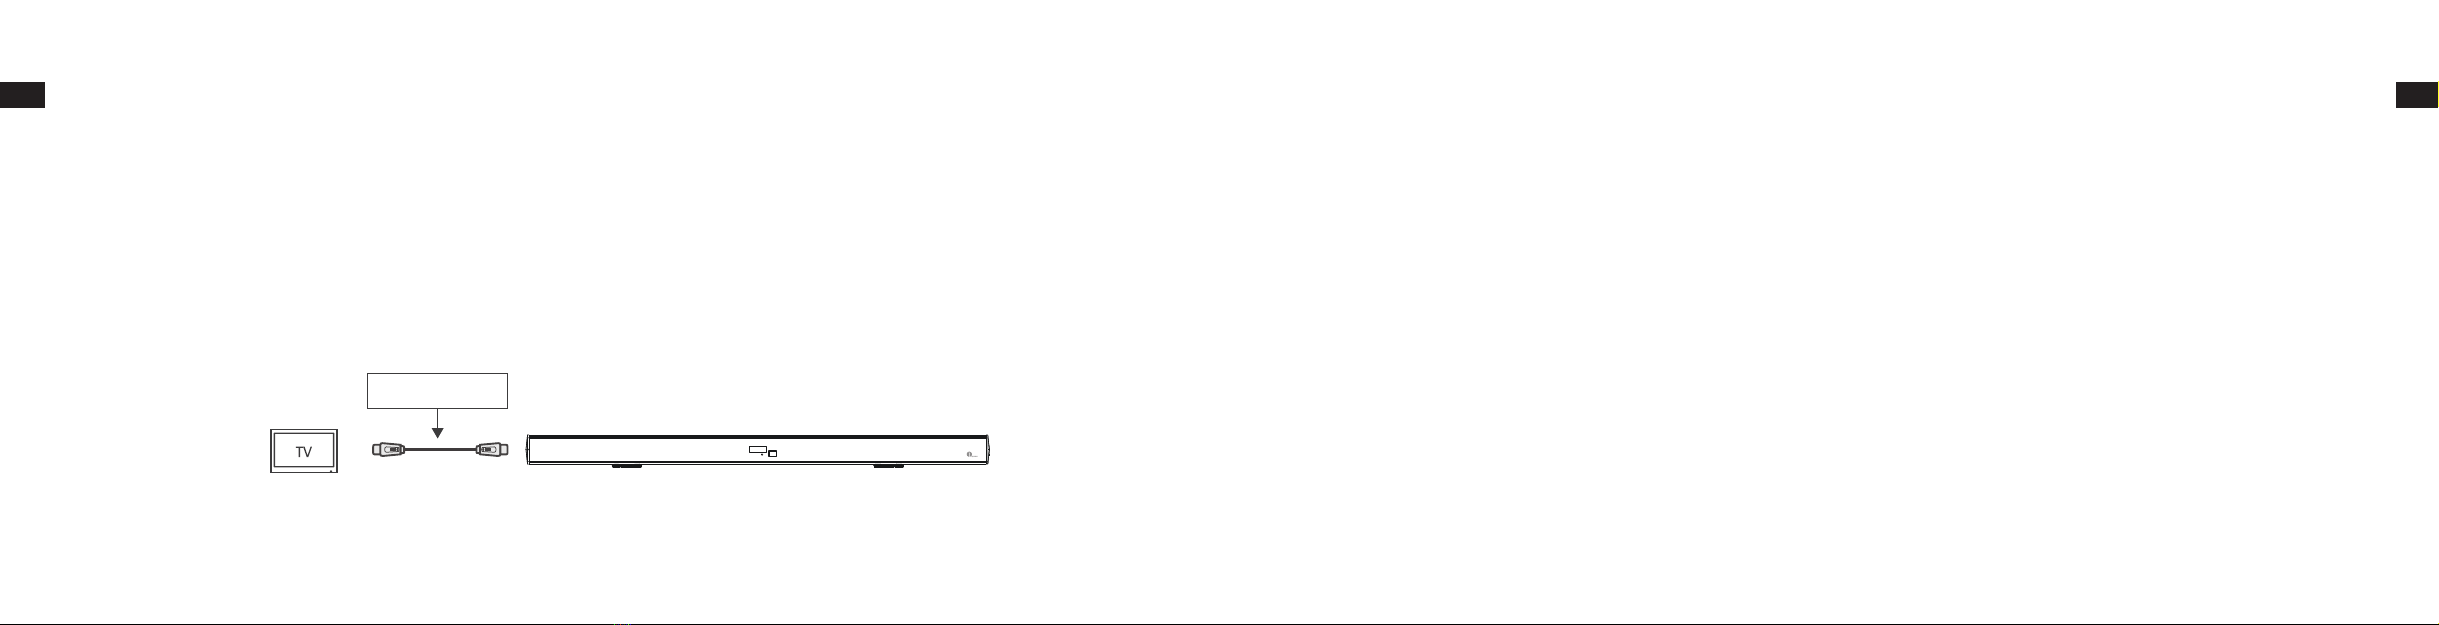
Connections
This soundbar speaker has Aux (RCA), Line (3.5mm) and Optical (SC) inputs. Press the LINE/AUX/OPT button on remote control to select a
correspondent signal source input.
Connections
-8-
LINE IN/AUX IN
This sound base have two extra groups of
audio input terminals. You can input the
analogue stereo audio signals from extra
devices such as VCD, CD, VCR, DVD
player, etc.
Use the audio cable to connect the stereo
audio output terminals of a VCD, CD,
VCR,DVD player to the stereo input
terminals LINE IN/AUX IN of this sound
base.
Its corresponding signal source is LINE
IN/AUX IN which can be available by
pressing [LINE/AUX] on the remote
control.
Use the optical cable to connect the optical
input of this sound base to the optical
output of VCD, CD, VCR, DVD player.
Optical Input
OPTICAL
Optical Input
Optical Output
LINE Output (3.5mm)
AUX Input
R
L
Connections
LINE IN/AUX IN
This sound base have two extra groups of
audio input terminals. You can input the
analogue stereo audio signals from extra
devices such as VCD, CD, VCR, DVD
player, etc.
Use the audio cable to connect the stereo
audio output terminals of a VCD, CD,
VCR,DVD player to the stereo input
terminals LINE IN/AUX IN of this sound
base.
Its corresponding signal source is LINE
IN/AUX IN which can be available by
pressing [LINE/AUX] on the remote
control.
Use the optical cable to connect the optical
input of this sound base to the optical
output of VCD, CD, VCR, DVD player.
Optical Input
OPTICAL
Optical Input
Optical Output
LINE Output (3.5mm)
AUX Input
R
L
L
R
L
AUX Input
AUX Output(RCA) LINE Output(3.5mm)
TV/Laptop/Smartphone
Not included
Not included Not included
BD/VCD/CD/DVD
Player/ VCR
Line Input
Line In
Optical Input
Optical Output
BD/VCD/CD/DVD
Player/VCR/TV/Game
Console
Optical
R
L R
Aux In
Use the included RCA-to-RCA cable to connect the stereo audio output terminals of a VCD, CD,VCR, or DVD player to the soundbar’s Aux input. An
RCA-to-3.5mm cable can also be used to connect 3.5mm devices,such as TVs, smartphones, and laptops, to the soundbar’s Aux input.
Line In
Use a 3.5mm-to-3.5mm audio cable to connect the 3.5mm audio output of TVs,smartphones and laptops to the Line input on the soundbar’s side
panel.
Optical Input
Connect the optical input of this speaker to the optical output of a TV, DVD player, set top box, or game console using an optical cable.
ARC (Audio Return Channel)
HDMI Cable
ARC compliant TV
Not included
ARC is used in digital audio output of liquid-crystal display televisions for optimal synchronous sound quality.This function is only available when
connecting to an ARC-compliant TV.
Connect an ARC-compliant TV to the soundbar using a HDMI cable. Turn on the TV and the soundbar. Press the Source button on the soundbar side
panel or ARC button on the remote control to select ARC mode.You may need to turn off the TV’s built-in speaker and choose“External speakers”in
the Audio/Sound settings menu of your TV. Audio will then be directed to the output port. Please refer to the owner’s manual supplied with your TV.

EN
DE
FR
ES
IT
EN
DE
FR
ES
IT
89
Notes about connectivity options:
While a television may have multiple HDMI ports, only one may have ARC functionality. Please confirm you have connected the HDMI cable to the
TV’s HDMI port labeled with “ARC”, or else this function will not be enabled.
Your TV may need to be configured to use“external speakers”in order to activate the digital optical output of the television.The optical output of
some TVs are always active, but other TVs may need to be configured to convert all audio to the optical output.
If a HDMI ARC port or RCA output is not available on your television, keep in mind that you can accomplish the same basic setup using other audio
outputs such as optical output, 3.5mm output, or via a Bluetooth wireless connection.
Pairing the Soundbar Speaker with a Mobile Device
1. Press the Standby button to power on the speaker. Press the Source button on the speaker to switch
to Bluetooth mode.“BT”will flash on the display screen,indicating the speaker is in pairing mode.
2.Turn on your phone’s (device’s) Bluetooth and search for other active Bluetooth devices.
3. Select “1byone BS015”from the list of found devices on your smartphone and input“0000”if the
password is required.
4.The BT indicator will stop flashing and become solid if pairing is successful.
5.You can now play music from your smartphone or other Bluetooth device through the soundbar
speaker.
6. Disconnect your phone’s Bluetooth to switch off the Bluetooth connection.
Note: Bluetooth connection range is within 10m (32.8ft).
Bluetooth
Model:1byone BS015
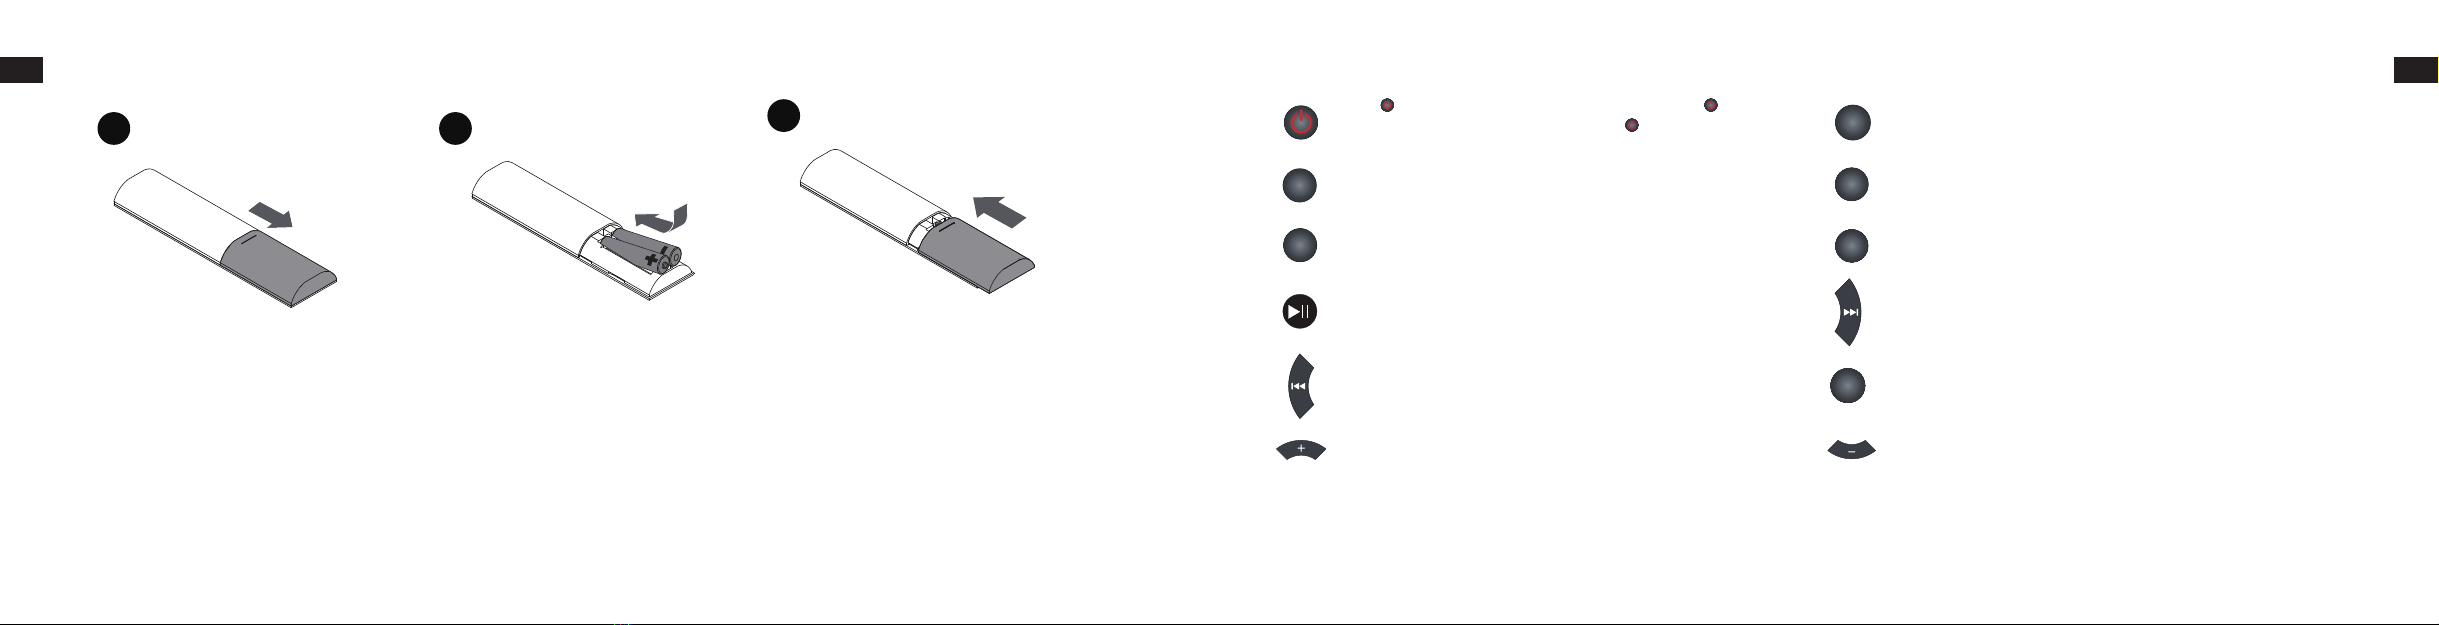
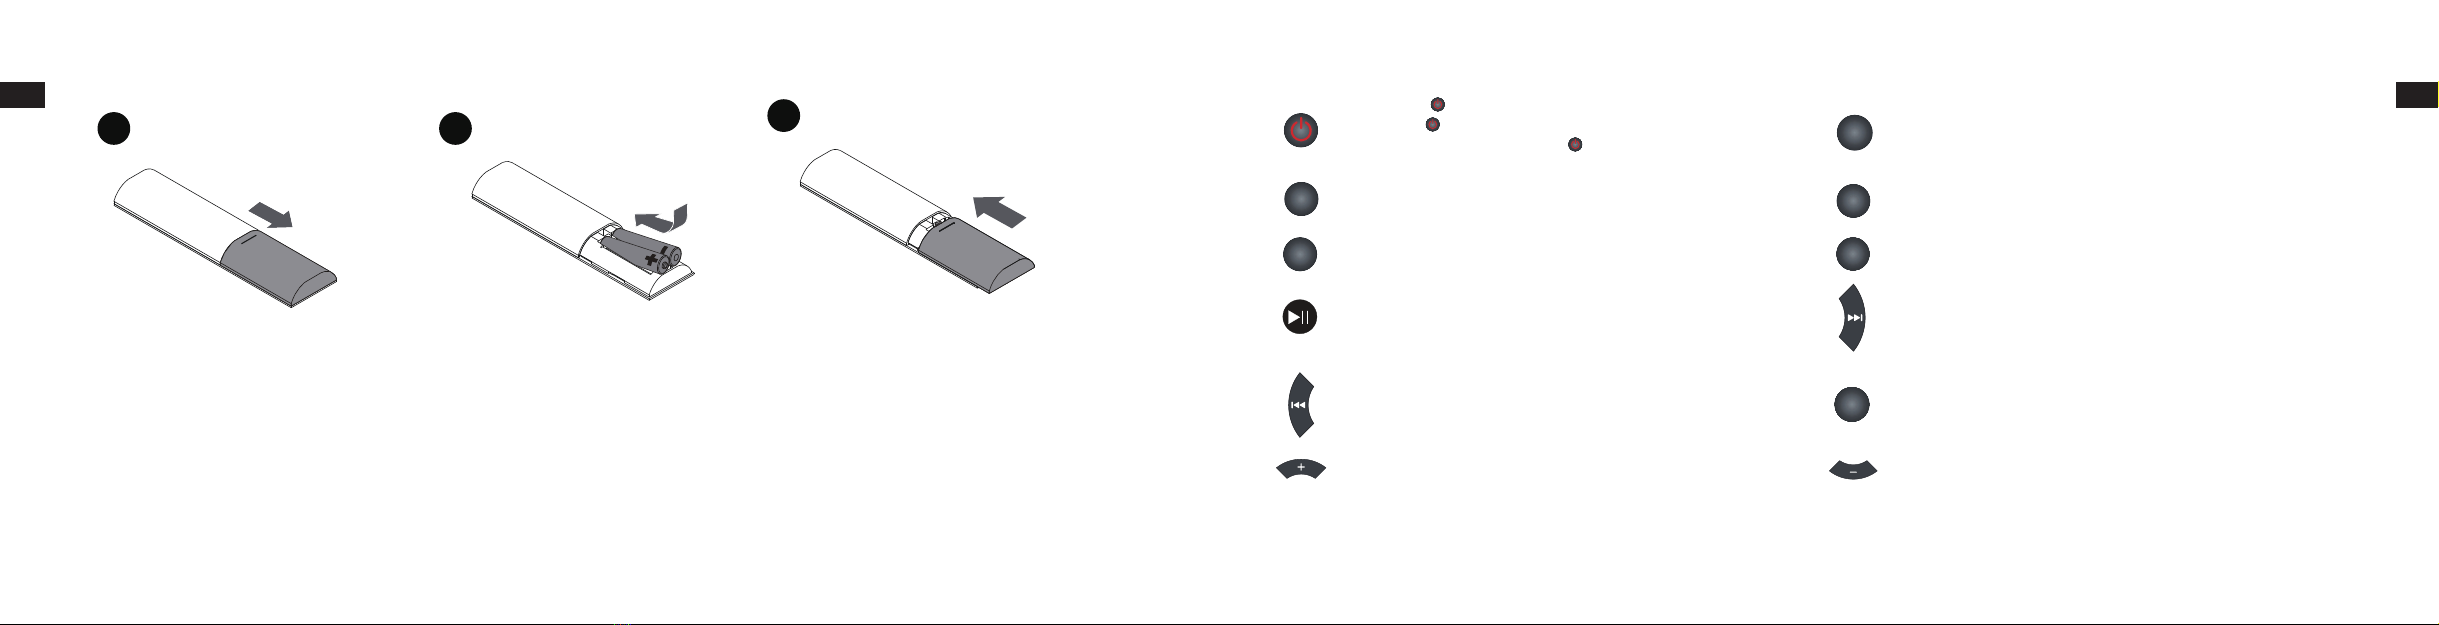
Operating the Remote Control
2
7
6
1
3
4
5
8
9
11
10
12
1. Standby
2.Volume +
3. Previous Track
4. Play/Pause
5.Volume -
6. Line/Aux
7. Bluetooth
8. ARC
9. Mute
10. Next Track
11. USB
12. Optical
EN
DE
FR
ES
IT
EN
DE
FR
ES
IT
10 11
Inserting Batteries
1 2 3
1. Remove the battery compartment cover on
the back of the remote control.
2. Insert two AAA batteries (not included) into
the battery compartment, paying attention to
the correct polarity.
3. Reinsert the battery cover.
Notes:
• The remote control works within a distance of about 8 meters and with a sensor angle of about 30 degrees from left to right.
• Remove the battery if you do not intend to use the remote control for a long period of time.
• Weak batteries can leak and severely damage the remote control.
• Batteries must not be exposed to excessive heat sources, such as sunshine or fire.
• Please be environmentally friendly and dispose of batteries according to local government regulations.
Operating Instructions
• Press to switch on the soundbar speaker. Press again to
put the speaker in standby mode.Press again to turn off the
speaker.
USB• Enter USB mode
BT • Enter BT (Bluetooth) mode OPT • Enter Optical In mode
ARC • Enter ARC mode LINE
AUX • Switch between Line In and Aux In mode
• Pause/Resume a playback
• Hold down for 3 seconds to disconnect Bluetooth
(only available for Bluetooth or USB mode)
• Skip to the next track
(only available for Bluetooth or USB mode)
• Return to the previous track
(only available for Bluetooth or USB mode)
MUTE • Temporarily switch off the sound. Press again to switch the sound
back on
• Turn up the volume • Turn down the volume

EN
DE
FR
ES
IT
EN
DE
FR
ES
IT
12 13
Troubleshooting
Problem Cause(s) Solution(s)
No power. The AC power cable is not connected to the
power supply or the connection is not secure.
The AC power cable is not connected to the power
supply or the connection is not secure.
There is no sound or the sound is distorted.
The audio cables aren’t securely connected. Connect the audio cables securely.
The volume is set to the minimum level. Turn up the volume.
The sound is switched off. Press the Mute button on the remote control to switch
on the sound.
The buttons on the speaker don't work. The speaker is receiving static electricity
interference.
Switch off and unplug the speaker from power. Plug
back in and switch the speaker on.
The remote control does not function.
There are no batteries in the remote control. Install two AAA batteries.
The batteries are out of charge. Replace with two new batteries.
The remote control isn’t pointed to the remote
sensor.
Make sure that the remote control is pointed to the
remote control sensor.
The remote control is out of its operating area. Make sure the remote control is within the operating
area.
The speaker is not turned on. Switch off the speaker and unplug it from power. Plug
it back in and turn on the speaker.
Specifications
Power Supply: AC 100-240V, 50/60Hz
Power Output (Max): 20W x 2
Frequency Response: ±3dB (20Hz~20kHz)
Working Temperature: 14ºF~95ºF (-10ºC~35ºC)
Relative Humidity: 5%~90%
Disposal
Disposal of this Appliance
Under no circumstances should you dispose of the appliance in normal domestic waste.This product is subject to the provisions of
European Directive 2012/19/EU.
Dispose of the appliance via an approved disposal company or your municipal waste facility. Please observe currently applicable regulations.Please
contact your waste disposal center if you need any further information.
The appliance’s packaging is made from environmentally friendly material and can be disposed of at your local recycling plant.

EN
DE
FR
ES
IT
EN
DE
FR
ES
IT
14 15
Einleitung
Vielen Dank für den Kauf unseres 1byone Wireless Soundbar-Lautsprecher. Diese Bedienungsanleitung enthält wichtige Informationen über
Sicherheit, Nutzung und Entsorgung.Verwenden Sie das Produkt nur wie beschrieben und bewahren Sie diese Anleitung zum späteren
Nachschlagen auf.
WICHTIGE SICHERHEITSANWEISUNGEN
• Bitte lesen Sie dieses Handbuch gründlich durch, bevor Sie diesen Lautsprecher anschließen und bedienen.
• Öffnen Sie nicht die Abdeckung dieses Lautsprechers. Es gibt keine vom Benutzer zu wartenden Teile im Inneren.
• Schalten Sie den Lautsprecher aus, wenn er nicht benutzt wird. Schalten Sie den Lautsprecher aus und trennen Sie ihn von der
Netzstromversorgung,wenn er längere Zeit nicht benutzt wird.
• Installieren Sie den Lautsprecher nicht an Orten, an denen Wärmequellen sind oder das Gerät direkter Sonneneinstrahlung ausgesetzt ist.
• Installieren Sie den Lautsprecher nicht an einem Ort, der Feuchtigkeit oder Regen ausgesetzt ist.
• Der Lautsprecher sollte keinem Tropf- oder Spritzwasser ausgesetzt werden. Stellen Sie keine mit Flüssigkeiten gefüllten Gegenstände wie Vasen
auf den Lautsprecher.
• Installieren Sie den Lautsprecher auf einer horizontalen, flachen und stabilen Oberfläche mit guter Belüftung.Blockieren Sie niemals die
Lüftungsschlitze des Lautsprechers,da dies zu Fehlfunktionen aufgrund von Überhitzung führen kann.
• Reinigen Sie die Außenseite des Lautsprechers mit einem weichen,sauberen Tuch.Reinigen Sie es niemals mit Chemikalien oder Reinigungsmitteln.
• Dieses Handbuch ist nur eine Anleitung für den allgemeinen Benutzerbetrieb und keine vollständige Anleitung zur Konfiguration.
• Verwenden Sie nur vom Hersteller angegebene Zubehörteile.
Der Blitz soll den Benutzer auf das Vorhandensein von gefährlichen Spannungen im Gehäuse des Produkts aufmerksam machen und Die
internen Komponenten können die Gefahr eines elektrischen Schlags für Personen zur Folge haben.
Das Ausrufezeichen soll den Benutzer auf das Vorhandensein wichtiger Betriebsanweisungen aufmerksam machen.
VORSICHT
RISIKO DES STROMSCHLAGS
NICHT ÖFFNEN
Um das Risiko eines Stromschlags oder Feuer zu verringern, öffnen Sie die Abdeckung nicht.Wenden Sie sich an qualifiziertes Servicepersonal.
Produktbeschreibung
Vorderansicht
12
1. Bildschirm
2. Fernbedienungssensor
Rückansicht
3 41 2
1. HDMI ARC-Eingang (Anschluss nur für den HDMI-Ausgang von ARC-kompatiblen Fernsehgeräten)
2. AUX-Eingang - Cinch-Anschlüsse (Anschluss an den Analogausgang des externen Geräts)
3. Optischer digitaler Audioeingang (Anschluss für den optischen Ausgang von Fernsehgeräten,DVD-Playern, Set-Top-Boxen und Spielekonsolen)
4. Netzkabeleingang

EN
DE
FR
ES
IT
EN
DE
FR
ES
IT
16 17
Seitenansicht
12 43 5 6
1. Standby (Schaltet die Soundbar ein und aus)
2. Quelle (Schaltet zwischen den Eingangsmodi Line In, Aux In, BT, USB, ARC und Optical um. Der
gewählte Modus wird auf der Vorderseite angezeigt)
3. USB-Anschluss (Anschluss für USB-Geräte,z. B.zur Musikwiedergabe von MP3-Playern)
4. Lautstärke - (Verringert die Lautstärke. Die Lautstärke wird auf der Vorderseite angezeigt)
5. Lautstärke + (Erhöht die Lautstärke, die Lautstärke wird auf der Vorderseite angezeigt)
6. Line In 3,5 mm Port (Anschluss an den Analogausgang des externen Geräts)
Included Items
1 x Wireless Soundbar-Lautsprecher 2 x Dübel 1 x Cinch-zu-Cinch-Kabel
1 x Fernbedienung 2 x Schraube 1 x Bedienungsanleitung
4 x Halteschraube 2 x Halterung
Bevor Sie den Wireless Soundbar-Lautsprecher zum ersten Mal verwenden, überprüfen Sie den Inhalt des Pakets, um sicherzustellen, dass alle Teile
frei von sichtbaren Beschädigungen sind.
Installationsanleitung
Montage des Soundbar-Lautsprechers an einer Wand
Um Verletzungen zu vermeiden, befestigen Sie den Lautsprecher gemäß den folgenden Anweisungen an der Wand.
1. Bohren Sie zwei Löcher mit einem Durchmesser von ca.6 mm in die Wand und halten Sie den Abstand zwischen den beiden Bohrlöchern bei 50
cm. (Fig.1)
2. Stecken Sie die beiden Dübel in die beiden Bohrungen. Setzen Sie als nächstes zwei Schrauben in die beiden Löcher ein und ziehen Sie sie fest.
(Fig.2)
3. Zwischen den einzelnen Schraubenköpfen und der Wand einen Abstand von 4 mm einhalten. (Fig. 3)
500mm
4mm
Fig.1 Fig.2 Fig.3

EN
DE
FR
ES
IT
EN
DE
FR
ES
IT
18 19
4. Schieben Sie die Wandhalterungen auf den Lautsprecher. (Fig.4)
5. Schrauben Sie die Wandhalterungen am Lautsprecher fest.(Fig.5)
6. Hängen Sie den montierten Lautsprecher und die Halterungen an den Schrauben an. (Fig.6)
Fig.4 Fig.5 Fig.6
Anschlüsse
Dieser Soundbar-Lautsprecher verfügt über Aux (Cinch), Line (3,5 mm) und Optical (SC) Eingänge. Drücken Sie die Taste LINE / AUX / OPT, um eine
entsprechende Signalquelle auszuwählen.
Connections
-8-
LINE IN/AUX IN
This sound base have two extra groups of
audio input terminals. You can input the
analogue stereo audio signals from extra
devices such as VCD, CD, VCR, DVD
player, etc.
Use the audio cable to connect the stereo
audio output terminals of a VCD, CD,
VCR,DVD player to the stereo input
terminals LINE IN/AUX IN of this sound
base.
Its corresponding signal source is LINE
IN/AUX IN which can be available by
pressing [LINE/AUX] on the remote
control.
Use the optical cable to connect the optical
input of this sound base to the optical
output of VCD, CD, VCR, DVD player.
Optical Input
OPTIC AL
Optical Input
Optical Output
LINE Output (3.5mm)
AUX Input
R
L
Connections
LINE IN/AUX IN
This sound base have two extra groups of
audio input terminals. You can input the
analogue stereo audio signals from extra
devices such as VCD, CD, VCR, DVD
player, etc.
Use the audio cable to connect the stereo
audio output terminals of a VCD, CD,
VCR,DVD player to the stereo input
terminals LINE IN/AUX IN of this sound
base.
Its corresponding signal source is LINE
IN/AUX IN which can be available by
pressing [LINE/AUX] on the remote
control.
Use the optical cable to connect the optical
input of this sound base to the optical
output of VCD, CD, VCR, DVD player.
Optical Input
OPTIC AL
Optical Input
Optical Output
LINE Output (3.5mm)
AUX Input
R
L
L
R
L
AUX-Eingang
AUX-Ausgang (Cinch) LINE-Ausgang (3,5 mm)
TV / Laptop / Smartphone
Nicht enthalten Nicht enthalten
Nicht enthalten
BD / VCD / CD
DVD Spieler / VCR
Leitungseingang
Line In
Optischer Eingang
Optischer Ausgang
BD / VCD / CD
DVD-Spieler
Spielkonsole
Optical
R
L R
EN
DE
FR
ES
IT
EN
DE
FR
ES
IT
20 21
Aux In
Verbinden Sie die Audioausgänge eines CD,VCR oder DVD-Players mit dem mitgelieferten RCA-zu-Cinch-Kabel mit dem Aux-Eingang der Soundbar.
Ein
RCA-zu-3,5-mm-Kabel können auch verwendet werden,um 3,5-mm-Geräte wie Fernseher, Smartphones und Laptops an den Aux-Eingang der
Soundbar anzuschließen.
Line In
Verwenden Sie ein 3,5-zu3,5mm Audiokabel, um den 3,5-mm-Audioausgang von Fernsehern, Smartphones und Laptops mit dem Line-Eingang an
der Seitenleiste der Soundbar zu verbinden.
Optischer Eingang
Verbinden Sie den optischen Eingang dieses Lautsprechers über ein optisches Kabel mit dem optischen Ausgang eines Fernsehers, DVD-Players,
einer Set-Top-Box oder einer Spielkonsole.
ARC (Audio Return Channel)
HDMI Kabel
ARC-konformes Fernsehgerät
Nicht enthalten
ARC wird bei der digitalen Audioausgabe von LCD-Fernsehgeräten für eine optimale synchrone Klangqualität verwendet. Diese Funktion ist nur
verfügbar, wenn ein ARC-kompatibles Fernsehgerät angeschlossen ist.
Schließen Sie ein ARC-kompatibles Fernsehgerät über ein HDMI-Kabel an die Soundbar an. Schalten Sie den Fernseher und die Soundbar ein.
Drücken Sie die Source-Taste auf der Seitenleiste der Soundbar oder die ARC-Taste auf der Fernbedienung,um den ARC-Modus auszuwählen.
Möglicherweise müssen Sie den eingebauten Lautsprecher des Fernsehers ausschalten und im Menü Audio- / Toneinstellungen Ihres Fernsehgeräts
"Externe Lautsprecher" auswählen. Sound wird dann an den Ausgabeanschluss geleitet.Bitte lesen Sie die Bedienungsanleitung Ihres
Fernsehgerätes.
Hinweise zu Verbindungen:
Während ein Fernsehgerät mehrere HDMI-Anschlüsse haben kann, kann es sein, dass nur einr ARC-Kompatibel ist. Bitte überprüfen Sie, dass Sie das
HDMI-Kabel an den mit "ARC" bezeichneten HDMI-Anschluss des Fernsehgeräts angeschlossen haben.
Ihr Fernsehgerät muss möglicherweise so konfiguriert werden,dass "externe Lautsprecher" verwendet werden, um den digitalen optischen Ausgang
des Fernsehers zu aktivieren. Die optischen Ausgänge einiger Fernsehgeräte sind immer aktiv, aber andere Fernsehgeräte müssen möglicherweise
konfiguriert werden,um alle Audiosignale in den optischen Ausgang umzuwandeln.
Wenn ein HDMI-ARC-Anschluss oder ein Cinch-Ausgang an Ihrem Fernseher nicht verfügbar ist, beachten Sie,dass Sie die gleichen
Grundeinstellungen auch mit anderen Audioausgängen wie z.B. optischer Ausgang,3,5 mm-Ausgang oder über eine drahtlose Bluetooth-
Verbindung durchführen können.

EN
DE
FR
ES
IT
EN
DE
FR
ES
IT
22 23
Pairing des Soundbar-Lautsprechers mit einem mobilen Gerät
1. Drücken Sie die Standby-Taste, um den Lautsprecher einzuschalten.Drücken Sie die Source-Taste am
Lautsprecher, um in den Bluetooth-Modus zu wechseln. "BT" blinkt auf dem Bildschirm und zeigt an,
dass sich der Lautsprecher im Kopplungsmodus befindet.
2. Schalten Sie das Bluetooth-Gerät Ihres Telefons ein und suchen Sie nach anderen aktiven Bluetooth-
Geräten.
3.Wählen Sie "1byone BS015" aus der Liste der gefundenen Geräte auf Ihrem Smartphone und geben
Sie "0000" ein, wenn ein Passwort benötigt wird .
4. Die BT-Anzeige hört auf zu blinken, wenn die Kopplung erfolgreich ist.
5. Sie können jetzt Musik über Ihr Smartphone oder ein anderes Bluetooth-Gerät über den Soundbar-
Lautsprecher wiedergeben.
6.Trennen Sie die Bluetooth-Verbindung des Telefons, um die Bluetooth-Verbindung auszuschalten.
Bluetooth
Model:1byone BS015
Bedienung der Fernbedienung
2
7
6
1
3
4
5
8
9
11
10
12
1. Standby
2.Volumen +
3.Vorheriger Track
4. Spielen / Pause
5.Volumen -
6. Line / Aux
7. Bluetooth
8. ARC
9. Stumm
10. Nächster Track
11. USB
12. Optisch
EN
DE
FR
ES
IT
EN
DE
FR
ES
IT
24 25
Batterien einlegen
1 2 3
1. Entfernen Sie die Batteriefachabdeckung auf
die Rückseite der Fernbedienung.
2. Legen Sie zwei AAA-Batterien (nicht im
Lieferumfang enthalten) in das Batteriefach,
achten Sie auf die richtige Polarität.
3. Setzen Sie die Batterieabdeckung wieder ein.
Notizen:
• Die Fernbedienung arbeitet in einer Entfernung von ca. 8 Metern und mit einem Sensorwinkel von ca. 30 Grad von links nach rechts.
• Entfernen Sie die Batterien,wenn Sie die Fernbedienung längere Zeit nicht benutzen möchten.
• Schwache Batterien können auslaufen und die Fernbedienung schwer beschädigen.
• Batterien dürfen nicht übermäßigen Wärmequellen wie Sonne oder Feuer ausgesetzt werden.
• Bitte seien Sie umweltfreundlich und entsorgen Sie die Batterien gemäß den örtlichen Vorschriften.
Bedienungsanleitung
• Drücken Sie um den Soundbar-Lautsprecher einzuschalten.
Drücken Sie erneut, um den Lautsprecher in den Standby-
Modus zu bringen. Drücken Sie erneut, um den Lautsprecher
auszuschalten.
USB• USB-Modus
BT • BT-Modus (Bluetooth) OPT • Optischen Eingangsmodus
ARC • ARC-Modus LINE
AUX • Umschalten zwischen Line In und Aux In
• Pause / Wiedergabe fortsetzen
• Halten Sie 3 Sekunden lang gedrückt, um Bluetooth zu trennen
(nur für Bluetooth- oder USB-Modus verfügbar)
• Zum nächsten Titel springen
(nur für Bluetooth- oder USB-Modus verfügbar)
Zurück zum vorherigen Track (nur für Bluetooth- oder USB-Modus
verfügbar)
MUTE • Schalten Sie den Ton vorübergehend aus. Drücken Sie erneut, um
den Ton wieder einzuschalten
• Lautstärke hoch • Lautstärke runter

EN
DE
FR
ES
IT
EN
DE
FR
ES
IT
26 27
Fehlerbehebung
Problem Ursache Lösung
Kein Strom Das Netzkabel ist nicht an die Stromversorgung angeschlossen
oder die Verbindung ist nicht sicher.
Das Netzkabel ist nicht an die Stromversorgung angeschlossen oder
die Verbindung ist nicht sicher.
Es gibt keinen Ton oder der
Ton ist verzerrt.
Die Audiokabel sind nicht fest angeschlossen. Schließen Sie die Audiokabel sicher an.
Die Lautstärke ist auf den minimalen Pegel eingestellt. Drehen Sie die Lautstärke hoch.
Der Ton ist ausgeschaltet. Drücken Sie die Taste“Mute”auf der Fernbedienung.
Die Tasten am Lautsprecher
funktionieren nicht. Der Lautsprecher empfängt statische Interferenz.
Schalten Sie den Lautsprecher aus und ziehen Sie ihn aus der
Steckdose.Stecken Sie ihn wieder hinein und schalten Sie den
Lautsprecher ein.
Die Fernbedienung
funktioniert nicht.
Es befinden sich keine Batterien in der Fernbedienung. Installieren Sie zwei AAA-Batterien.
Die Batterien sind leer. Ersetzen Sie durch zwei neue Batterien
Die Fernbedienung ist nicht auf den Fernbedienungssensor
gerichtet. Stellen Sie sicher, dass die Fernbedienung auf den Sensor zeigt.
Die Fernbedienung befindet sich außerhalb ihres
Betriebsbereichs. Vergewissern Sie sich, dass sich die Fernbedienung nah genug dran ist.
Der Lautsprecher ist nicht eingeschaltet. Schalten Sie den Lautsprecher aus und ziehen Sie den Netzstecker.
Schalten Sie den Lautsprecher aus und ziehen Sie ihn aus der
Steckdose.Stecken Sie ihn wieder hinein und schalten Sie den
Lautsprecher ein.
Spezifikationen
Stromversorgung: AC 100-240V, 50 / 60Hz
Ausgangsleistung (max.): 20W x 2
Frequenzgang: ± 3dB (20Hz ~ 20kHz)
Arbeitstemperatur: -10ºC ~ 35ºC
Relative Luftfeuchtigkeit: 5% ~ 90%
Entsorgung
Gerät Entsorgen
Werfen Sie das Gerät keinesfalls in den normalen Hausmüll. Dieses Produkt unterliegt der europäischen Richtlinie 2012/19/EU.
Entsorgen Sie das Gerät über einen zugelassenen Entsorgungsbetrieb oder über Ihre kommunale Entsorgungseinrichtung. Beachten Sie die aktuell
geltenden Vorschriften. Setzen Sie sich im Zweifelsfall mit Ihrer Entsorgungseinrichtung in Verbindung.
Die Verpackung besteht aus umweltfreundlichen Materialien, die Sie über die örtlichen Recyclingstellen entsorgen können.

EN
DE
FR
ES
IT
EN
DE
FR
ES
IT
28 29
Introduction
Merci pour l’achat de cette barre de son / haut parleur sans fil 1byone. Ce manuel d’instruction contient d’importantes informations concernant la
sécurité, l’utilisation et le recyclage de ce produit. Utiliser le produit comme décrit dans ce manuel. Si vous vendez ou donnez ce produit, veuillez
également transmettre ce manuel d’instruction.
INSTRUCTIONS IMPORTANTES
• Veuillez lire ce manuel avec attention avant de brancher et d’utiliser l’appareil.
• Ne pas ouvrir la barre de son.Il n’y a pas de composants utile pour l’utilisateur dans l’appareil.
• Veuillez laisser le personnel qualifié effectuer les réparations nécessaires.
• Veuillez éteindre l’appareil lorsqu’il n’est pas utilisé.
• Déconnecter et débrancher l’appareil de la prise secteur si cet appareil ne va pas être utilisé pendant une longue période.
• Ne pas installer l’appareil dans un endroit où il est exposé à des sources de chaleur et de rayons du soleil.
• Ne pas installer l’appareil dans un endroit exposé à de la pluie ou de la moisissure.
• L’appareil ne doit pas être exposé à des éclaboussures.
• Ne pas placer des objets remplis avec des liquides,tels que des vases, sur l’appareil.
• Installer l’appareil sur une surface horizontale,plate, solide et avec une bonne ventilation. Ne jamais bloquer la ventilation de l’appareil car cela pourrait conduire à la
surchauffe du produit.
• Utiliser un chiffon doux et propre pour nettoyer l’extérieur de l’appareil. Ne jamais le laver avec des produits chimiques ou du détergent.
• Ce manuel est un guide pour l’utilisation générale de l’appareil et non pas un guide complet concernant sa configuration.
• N’utiliser que les accessoires recommandés par le fabricant.
Cette lumière clignotante a pour but d’alerter l’utilisateur concernant la présence de tension dangeureuse dans le produit.Toucher les composants internes
représentent un risque de choc électrique pour les personnes.
Les points d’exclamations sont censés alerter l’utilisateur de la présence d’informations d’opérations importantes.
ATTENTION
RISQUE DE CHOC ELECTRIQUE
NE PAS OUVRIR Pour réduire le risque de choc électrique ou d’incendie,ne pas ouvrir le couvercle.Veuillez contacter le personnel qualifié en cas de problème.
Description du Produit
Vue Frontale
12
1. Ecran
2. Capteur Distant
Vue Arrière
3 41 2
1. Entrée HDMI (connecte le port de sortie HDMI des télévisions écran ARC).
2. Entrée AUX - Ports RCA (connecte la sortie analogue de l’appareil externe)
3. Entrée Audio Optiques Numériques (Se branche à la sortie de optique de la télévision, lecteur DVD,boîtes d’installation / set up box, et consoles
vidéos de salon).
4. Entrée Alimentation

EN
DE
FR
ES
IT
EN
DE
FR
ES
IT
30 31
Vue Latérale
12 43 5 6
1.Veille / Standy ( éteint l’appareil)
2. Source (changer entre ligne In,Aux,BT, USB, ARC et fibre optique simple.Le mode sélectionné
apparaîtra sur le panneau frontal).
3. Port USB (connecte l’appareil USB tel que le playback provenant de MP3).
4.Volume - (Diminuer le niveau du volume. Le niveau du volume apparaîtra sur le panneau frontal).
5.Volume + (Augmenter le niveau du volume.Le niveau du volume apparaîtra sur le panneau
frontal).
6. Port entrée de ligne ( Connecte la sortie analogique de l’appareil externe)
Contenu de l’Emballage
1 x Barre de Son 2 x Prise Murale 1 x Câble RCA-RCA
1 x Télécommande 2 x Vis 1 x Manuel d’Instruction
4 x Vis de Support 2 x Support
Avant d’utiliser la Barre de Son pour la première fois, vérifier le contenu de l’emballage pour s’assurer que toutes les parties du produit sont
présentes et en bon état.
Guide d’Installation
Monter la Barre de Son sur un Mur
Pour éviter les blessures, attacher la barre de son fermement sur le mur en respectant les instructions ci-dessous.
1. Percer 2 trous (environ 6 mm de diamètre) dans le mur, garder de la distance entre les deux trous d’environ 500 mm (cf image 1).
2. Insérer les deux fiches dans les deux trous.Insérer ensuite les deux vis dans les trous puis serrer. ( cf image 2).
3. Laisser 4 mm d’espace entre chaque tête de vis et le mur (cf image 3).
500mm
4mm
Fig.1 Fig.2 Fig.3

EN
DE
FR
ES
IT
EN
DE
FR
ES
IT
32 33
4. Faire glisser les montages mureaux de la barre de son ( cf image 4).
5.Visser les têtes de vis sur la barre de son (cf image 5).
6. Placer la barre de son et les têtes de vis sur les vis du mur (cf image 6).
Fig.4 Fig.5 Fig.6
Connections
La barre de son dispose d’une ligne Aux (RCA) de 3.5 mm et d’une entrée optique (SC). Presser sur le bouton LINE / AUX / PORT pour sélectionner le
signal correspondant à la source du signal d’entrée correspondant.
Connections
-8-
LINE IN/AUX IN
This sound base have two extra groups of
audio input terminals. You can input the
analogue stereo audio signals from extra
devices such as VCD, CD, VCR, DVD
player, etc.
Use the audio cable to connect the stereo
audio output terminals of a VCD, CD,
VCR,DVD player to the stereo input
terminals LINE IN/AUX IN of this sound
base.
Its corresponding signal source is LINE
IN/AUX IN which can be available by
pressing [LINE/AUX] on the remote
control.
Use the optical cable to connect the optical
input of this sound base to the optical
output of VCD, CD, VCR, DVD player.
Optical Input
OPTIC AL
Optical Input
Optical Output
LINE Output (3.5mm)
AUX Input
R
L
Connections
LINE IN/AUX IN
This sound base have two extra groups of
audio input terminals. You can input the
analogue stereo audio signals from extra
devices such as VCD, CD, VCR, DVD
player, etc.
Use the audio cable to connect the stereo
audio output terminals of a VCD, CD,
VCR,DVD player to the stereo input
terminals LINE IN/AUX IN of this sound
base.
Its corresponding signal source is LINE
IN/AUX IN which can be available by
pressing [LINE/AUX] on the remote
control.
Use the optical cable to connect the optical
input of this sound base to the optical
output of VCD, CD, VCR, DVD player.
Optical Input
OPTIC AL
Optical Input
Optical Output
LINE Output (3.5mm)
AUX Input
R
L
L
R
L
Entrée AUX
Sortie AUX (RCA) LIGNE de Sortie (3.5 mm)
TV/ Ordinateur Portable
Smartphone
Pas inclu
Pas inclu Pas inclu
Lecteur CBD/VCD
DVD/VCR
Ligne d’Entrée
Line In
Entrée Optique
Sortie Optique
Lecteur BDC / VCD
DVD/ VRC
Console de Jeux
Optical
R
L R

EN
DE
FR
ES
IT
EN
DE
FR
ES
IT
34 35
Aux In
Utiliser le câble inclu RCA-RCA pour connecter les terminaux stéréo des VCD, CD,VCR ou de lecteurs DVD de la barre de son sur l’entrée Aux. Un câble
RCA de 3.5 mm peut également être utilisé pour connecter des appareils 3.5 mm ,tels que des télévisions,smartphones, ordinateurs portables à la
barre de son.
Line In
Utiliser une câble audio 3.5 mm - 3.5 mm pour connecter la sortie audio de la télévision, smartphones et ordinateurs portables pour l’entrée de ligne
sur le panneau latéral de la barre de son.
Entrée Optique
Connecter l’entrée optique de cette barre de son à la sortie optique de votre télévision,;lecteur DVD, ou console de jeux en utilisant un câble
optique.
Technologie ARC (Audio Return Channel)
Câble HDMI
TV conforme ARC
Non inclue
La technologie ARC est utilisée dans la production audio digitale de télévision avec écran LCD pour obtenir un son d’une qualité optimale. Cette
fonction est uniquement disponible en connectant une télévision conforme ARC.
Brancher la télévision conforme ARC avec la barre de son en utilisant un câble HDMI. Allumer la TV et la barre de son. Presser sur le bouton Source
de la barre de son (sur la panneau latâral) sur la télécommande pour sélectionner le mode ARC.Vous devez éteindre la télévision et choisir“External
Speakers / Hauts Parleurs Externes”dans le menu Audio de votre télévision.L’audio sera ensuite connecté directement sur le port de sortie.Veuillez
consulter le manuel d’utilisation de votre TV pour plus d’informations.
Remarques concernant les options de connectivité
Une télévision dispose de plusieurs ports HDMI, mais uniquement un seul de ces ports peut disposer de la fonctionnalité ARC.Veuillez confirmer que
vous avez connecté le câble HDMI au port HDMI de la télévision étiqueté avec“ARC”, ou bien cette fonction ne sera pas activée.
Votre télévision a besoin d’être configurée pour utiliser les écouteurs extérieurs pour activer la sortie optique numérique de la télévision. La sortie
optique numérique de certaines télévisions sont toujours actives, mais d’autres télévision ont besoin d’être configurées pour convertir l’audio en
sortie optique.
Si le ARC HDMI ou les sorties RCA n’est pas disponible sur votre télévision, garder à l’esprit que vous pouvez accomplir le même type d’installation
en utilisant d’autres configuration telles que la sortie option, la sortie 3.5 mm, ou via une connection sans fil Bluethooth.

EN
DE
FR
ES
IT
EN
DE
FR
ES
IT
36 37
Synchroniser la Barre de Son avec un Smartphone
1. Presser sur le bouton Standby pour allumer l’appareil.
Presser sur le bouton Source l'appareil pour basculer en mode Bluetooth. Le message“BT”clignotera sur
l’écran, indiquant que l’appareil est en mode synchronisation.
2. Allumer le Bluetooth votre smartphone et chercher un autre appareil actif Bluetooth.
3. Sélectionner “1byone BS015”depuis la liste d’appareils trouvés et écrire“0000”si le mot de passe est
requis.
4. L’indicateur BT ne clignote plus et devient stable lorsque la synchronisation est finie.
5.Vous pouvez maintenant jouer la musique depuis votre smartphone ou tout autre appareil Bluetooh
avec la barre de son.
6. Déconnecter le Bluetooth du téléphone pour éteindre la connection Bluetooth.
Remarque : La portée de la connection Bluetooth est de 10 mètres.
Bluetooth
Model:1byone BS015
Modèle : 1byone BS015
Utilisation de la Télécommande
2
7
6
1
3
4
5
8
9
11
10
12
1. Standby / Veille
2.Volume +
3. Piste Précédente
4. Lecture/ Pause
5.Volume -
6. Line / Aux
7. Bluetooth
8. ARC
9. Muet
10. Piste Suivante
11. USB
12. Optique
Other manuals for 436NA-0006
1
Table of contents
Languages:
Other 1 BY ONE Speakers System manuals


