12trace GeoChaser Control User manual

Page 1 of 8
English V1.0 laatste wijziging: 07-8-2018
User Manual GeoChaser Control
1.Introductie
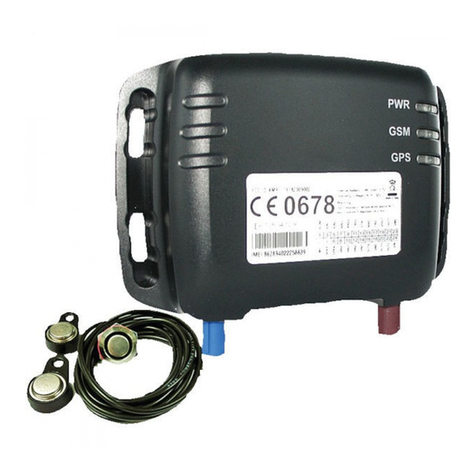
The GeoChaser Control is a powerful GPS tracking system designed for tracking of vehicles
and reading out driver identification. The device has superior reception sensitivity, fast
positioning and supports four-band GSM frequencies 850/900/1800/1900, the location can
be viewed real-time on your personal 12Trace page or in the mobile App. The GeoChaser
has multiple in/outputs that can be used for monitoring or control of external devices. The
GeoChasers communicate with the GPRS/GSM network and can alert you when crossing a
virtual fencing (Geofence), low back-up battery or low communication credits.
Your GeoChaser uses the Global Positioning System (GPS). The GPS system is
maintained by the U.S. Government. Changes in availability and accuracy of the system
can adversely affect the operation of the GeoChaser. 12Trace cannot take any
responsibility for the reliability, availability and accuracy of the GPS system, as a result of
third parties. In the disclaimer of 12Trace you will find more information.
Tall buildings and metal structures can affect the determination of the position by
GeoChaser.
2. Interface Definitions:
There are 8 wires in the cable of the GeoChaser including the connection for the contact input, digital
input, analog input etc.
8) +12/24 Volt
7) GND
6) I-Button (red wire)
5) I-Button (white wire)
4) Release immobilizer,
green led
3) I-Button , red led
2) Ignition
1) unused
3. GeoChaser activation
To activate the GeoChaser he needs to be
registered.

Page 2 of 8
English V1.0 laatste wijziging: 07-8-2018
3.1 New user
New users must first create an account on www.12trace.nl. Go to the site, click on the ' login '
button and then click ' create account '. You will be prompted to fill in some data.
You need the product key. The product key can be found at the bottom of the GeoChaser. To
activate your account you will receive an e-mail message from support@12trace.nl on your
specified email address, follow the instructions in this e-mail message. Your account and
GeoChaser are activated now. Note: the GeoChaser is equipped with a SIM card, DO NOT
CHANGE THE PIN CODE of the SIM card. It is not possible to use a different SIM card.
3.2 Existing user
If you already have a 12Trace account, you can add the GeoChaser to your account. Log in
to your account with the ' log in ' button and then click ' Add ', GeoChaser and fill in the
required information. Your GeoChaser is now activated en ready for use.
4. Voltage and contact detection
The red wire is plus 12/24V and the black wire is the ground. The white wire is for the contact
detection. This detection is necessary to activate a ride and allows for lower power
consumption once the vehicle is turned off. Connect the white wire to a tension on the
contact or connection that has only once the ignition of the vehicle is on.

Page 3 of 8
English V1.0 laatste wijziging: 07-8-2018
5. Installation of the GeoChaser
For optimal operation of your GPS tracking system, it is important that the GeoChaser not be
completely enclosed by metal or metal-containing glass. This will may seriously disturb the
functioning of the system. In General, plastic and normal glass has no negative for receiving a
GPS signal. The Gps antenna is built in the GeoChaser at the top under status led lights. The
GeoChaser at the top of the box has two recesses that help fixed your system at the vehicle.
LED status
LED
led status
Device status
GSM
Fast flashing
Search network
slow flashing
connected
GPS
off
GPS off
slow flashing
no data
Fast flashing
Search GPS
on
Found positions
PWR
off
No external power supply
slow flashing
Battery low
Fast flashing
Battery carge
On
Battery is full
6.Additional connections
6.1 Digitale Input
There is a general digital input, blue wire. This entry is "active" if it is switched to the mass/
ground. For example you can use this entry for a panic button or a float alarm.

Page 4 of 8
English V1.0 laatste wijziging: 07-8-2018
6.2 Analog input
The green wire is the analog input. This can be a DC voltage from 0 to 30V. The overview
shows the connections.
6.3 Digitale output
The brown wire is the digital output. . For example you can use this entry for a siren or horn to
send control with a maximum flow of 750mA. If the output is switched on the voltage equal to the
input voltage of the vehicle. Is the system connected to 12V is the exit to the siren or horn also
12V. .

Page 5 of 8
English V1.0 laatste wijziging: 07-8-2018
6.4 Relay output
The GeoChaser has a built-in potential-free relay contact between the 2 yellow wires. This is a
normally open contact relay with a maximum switching voltage of 16VDC and a maximum
continuous current of 5A.
7. Set up the GeoChaser
After signing in to the website account you will get an overview of your GeoLockers and
GeoChasers in your account. After selecting the device to get to the main screen of your
device. From here, you can change settings, check what the current position is and what
routes are possible, the current location and your amount of credits

Page 6 of 8
English V1.0 laatste wijziging: 07-8-2018
Depending on the settings, different buttons are hidden or expanded this depending on whether
the button is relevant or not.
Click on Settings
At the (Basic) institutions we distinguish 4 settings, namely:
•Timetrace: This is the time interval between 2 locations
•Geo Motion Live Tracking: This is the interval of locating. Also it possible to also
respond to a change of course. You switch the km-administration option are the other
settings here for defined.
•Geo Fence: The setting disables a virtual fence in. With the button next to it you can
set where this fencing should stand and how big it should be.
•Alarm: Here you can switch on/off different alarms. There are a few alarms that
default turned on.
Click on advanced settings
In addition to the basic settings, there are also advanced settings. This allows you to optimize
the functioning of your GeoChaser. You can find the following settings:
•Automatic control: Specifies that the GeoChaser monitor 12Trace on missed
communications, these alerts you will receive via email.
•External connections: Your GeoChaser offers possibilities to communicate with
peripherals. There are different settings here.
•Change personal data: Specifies, by name, and the attribute of your GeoChaser
change.
•Product information: it shows product information and you are able to remove de data
history.
Please note: If you change a setting and click ' save ' there will be a pink clock appear behind the
changed setting. This means that the setting has not yet been sent to the GeoChaser. The next
time this will happen if the GeoChaser connect to the 12Trace website (for example, at a location
update). Using the [current location retrieval] changed settings will be immediately active.
8. Km-administration
For using the option kilometres administration it is important the km administration setting in the
basic settings Geo Motion Live Tracking is checked. These settings are essential to accurately
keep track of the mileage. When this option is checked the button changes to "Navi list overview"
on the main screen to "km-administration". After clicking this button appears the km
administration screen.
At this screen you can find the locations one by one. Note: this may take several minutes
because the locations from google maps. By default, rides and business classified with a driver
from the last ride. In the private column could you share private kilometers of the business trip. It
is also possible to have a note for the ride and the driver. You must then save the data with the

Page 7 of 8
English V1.0 laatste wijziging: 07-8-2018
button at the top of "Save data". The stored data can be exported to Excel (csv) for processing or
as an attachment to your tax return.
Click the button "Enter correction " you can adjust the mileage to the counter in your vehicle.

Page 8 of 8
English V1.0 laatste wijziging: 07-8-2018
The automated administration justifying what rides by 12Trace remains private, or
business with private-part for the user. Also the detours and the reason for that is up
to the user and can be noted in the comments column. The tax office will ask for the
control locations and proof for the identified as a business address. de
12Trace is gebonden aan de Wet Bescherming Persoonsgegevens. Zij onderschrijft de
Gedragscode Verwerking Persoonsgegevens. Bij de verwerking van uw persoonsgegevens gaat
12Trace zorgvuldig te werk. 12Trace gebruikt alleen die gegevens die nodig zijn voor een
optimale dienstverlening. Voor zover dat niet voortvloeit uit de wet of uit v erplichtingen die
12Trace jegens u is aangegaan, worden zonder uw toestemming geen persoonsgegevens aan
derden verstrekt.
www.12Trace.nl
Other manuals for GeoChaser Control
2
Other 12trace GPS manuals
