12trace GeoChaser Control User manual

Pagina 1 van 9
manuel/ Anleitung/ guide manuel
Introduction
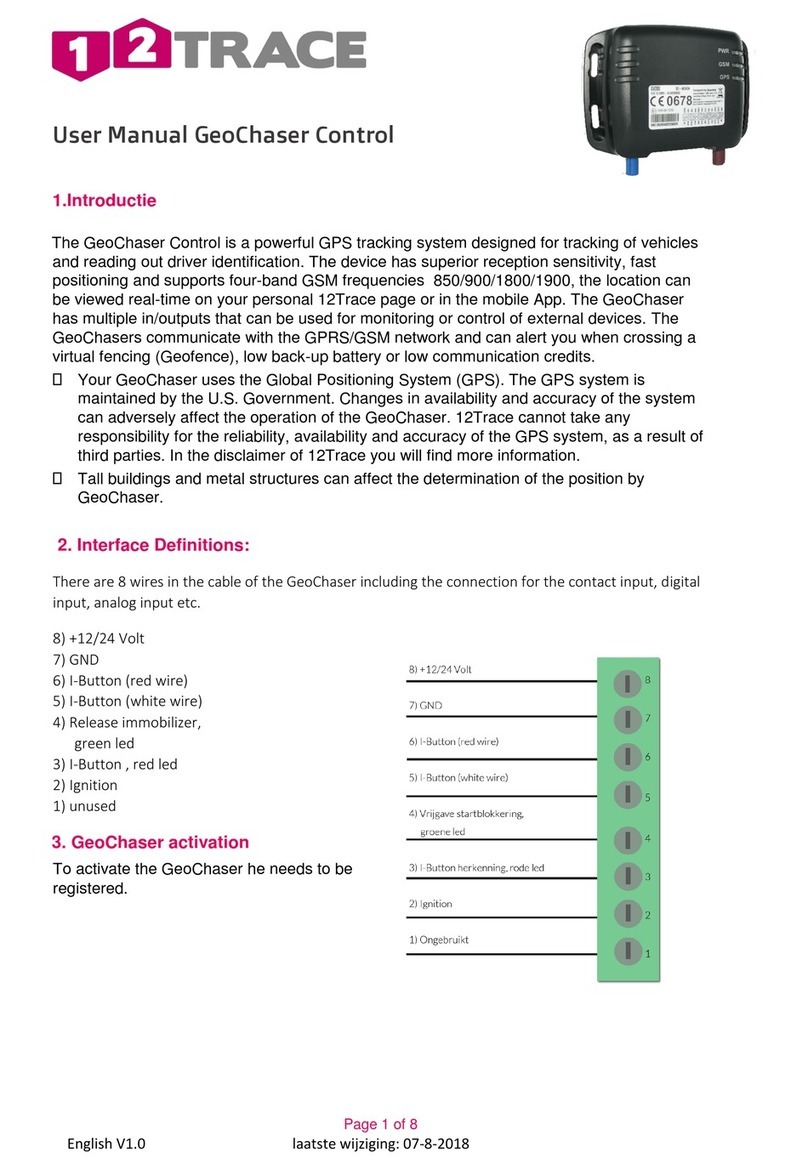
The GeoChaser is a powerful IP67 Waterproof GPS- tracking device, designed for any type of
vehicle. It has superior sensitive receivers and a very fast TTFF (time to first fix). It supports
quad-band GSM frequencies 850/900/1800/1900. Its location can be monitored in real-time or
be tracked periodically on your personal 12trace webpage. The GeoChaser has multiple
input/output interfaces that can be used for monitoring or controlling external devices.*
GeoChaser uses GPRS/GSM to communicated and will alarm you when it leaves a virtual fence
area, or its back-up battery is low.
-Your GeoChaser uses the Global Positioning System (GPS) The GPS system is maintained by de
US government. 12trace cannot take any responsibility for the availability and accuracy of the
GPS and GSM signal, and the influence that has on the function of the device. In our
Disclaimer your find more information.
- High buildings and metal structures can have a negative influence on the accuracy of your
GeoChaser tracking device.
Einführung
Der GeoChaser ist ein leistungsstarkes IP67 wasserdichtes GPS-Überwachungssystem, entworfen für die
Verfolgung von Fahrzeugen. Das Gerät hat eine hervorragende Empfangsempfindlichkeit, schnelles TTFF
(Zeit bis erstes Fix) und unterstützt vier-Band GSM Frequenzen 850/900/1800/1900, der Standort kann
in Echtzeit auf ihrer persönlichen 12Trace Seite angeschaut werden. Der GeoChaser hat mehrere Ein-
/Ausgänge, für die Benutzung von Kontrollvorgängen oder Steuerung von externen Geräten.* Die
GeoChaser kommunizieren über das GPRS/GSM-Netzwerk und können Sie alarmieren bei
Überschreitung der Geofence*, einer niedrigen Back-up Batteriespannung, oder bei zu wenig
Kommunikationsguthaben.
- Ihr GeoChaser macht Gebrauch von dem Globalen Positionierungssystem (GPS). Das GPS System wird
von der Amerikanischen Behörde unterhalten. Änderungen der Verfügbarkeit und der Präzision des
Systems können die Leistung des GeoChasers nachteilig beeinflussen. 12Trace kann keine Haftung
übernehmen für die Zuverlässigkeit, Verfügbarkeit und Präzision des GPS Systems infolge Dritter. In
dem Disclaimer von 12Trace finden Sie weitere Informationen.
- Hochhäuser und Metallkonstruktionen können sich nachteilig auf die Positionsbestimmung durch den
GeoChaser auswirken.
*= niet op alle modellen/not for all models/Nicht für all modelle/Pas
pour tous les modèles

Pagina 2 van 9
Introduction
Le GeoChaser est système de repérage très puissant et étanché IP67, il est conçu pour tracer les
véhicules. L'appareil offre une meilleure sensibilité de réception, TTFF rapide (Temps jusqu’au premier
fixé) et soutient les fréquences de la bande 4 GSM 850/900/1800/1900, la localisation peut être
regardée en temps réel sur votre page personnelle de 12Trace. Le GeoChaser a plusieurs entrées /
sorties qui peuvent être utilisés pour la surveillance ou le contrôle des dispositifs externes *. Les
GeoChasers communiquent via le réseau GPRS / GSM et peut vous alerter lorsque vous dépassez le
Geofence*,Lorsque la batterie de secours est faible ou bien lorsque vous avez moins de crédit pour la
communications.
- Votre GeoChaser utilise le Global Positioning System (GPS). Le système GPS est géré par le
gouvernement américain. Les Changements dans la disponibilité et la précision du système, peuvent
affecter le fonctionnement de GeoChaser. 12Trace ne peut pas prendre la responsabilité de la fiabilité,
la disponibilité et la précision du système GPS, en tant que résultat d'un tiers. Dans le désistement de
12Trace vous trouverez plus d’informations.
- bâtiments élevés et les structures métalliques peuvent négativement déterminer la position du
GeoChaser.
Interface Definitions: There are 8 colored wires in the cable on the GeoChaser for power,
Ignition input, digital input, analog input, digital output, cut relay output. The color definition is
shown in the following table:
Definitionen der Schnittstelle
Im Kabel des GeoChasers befinden sich 8 Drähte, worunter Anschluss Versorgungsspannung,
Zündungseingang, digitaler Eingang, analoger Eingang, Sirene Ausgang, usw. Die
Kabeldefinitionen finden Sie in der folgenden Tabelle aufgelistet:
Farbe
Umschreibung
Anmerkung
Rot
Stromspannung
Externe Stromspannung 8-32V
Schwarz
Masse
direkt auf den Fahrzeugrahmen anschließen, oder auf den negativen Batterie-Pol
Wei ß
Kontakteingang
anschließen auf Klemme 30.
Blau
Digitaler Input*
Digitaler Eingang, negative Schaltung
Grün
Analoger Input*
Analoger Eingang, 0-32V
Braun
Sirene Output *
Sirene Ausgang, High End
Gelb
Relais Output1 *
Internes Relais Output1
Gelb
Relais Output2 *
Internes Relais Output2
Colour
Definition
Comment
Red
Power
Externe DC power input, 8-32V
Black
Ground
System Ground
White
Ingnition
Ingnition input, positieve trigger
Blue
Digital input *
Digital input, negatieve trigger
Green
Analog input *
Analog input, 0-32V
Brown
Siren output *
Siren output, high end
Yellow
Relay ouput1 *
Internal relay output1.
Yellow
Relay ouput2*
Internal relay output2

Pagina 3 van 9
Définitions de l'interface
Il ya 8 fils dans le câble GeoGhaser y compris la prise d'alimentation, entrée de contact, entrée
numérique, entrée analogique, sortie sirène etc. La définition du câble est indiquée de
nouveau dans le tableau ci-dessous.
Couleur
Description
Remarque
Rouge
tension
d’Alimentation
Externe tension d’Alimentation 8-32V
Noire
Masse
Direct connecter au cadre du véhicule ou la borne négative de batterie
Blanche
L’entrée de
Connexion
la connecter par le contact commuté de tension d’alimentation
Bleu
Numérique de
contribution*
entrée Numérique, commutation négative
Vert
d'entrée Analogique
entrée Analogique, 0-32V
Sortie
Sirène Marron *
sortie Sirène , haute fin
Jaune
Relais sortie1*
Relais interne sortie1.
Jaune
Relais sortie2*
Relais interne sortie2
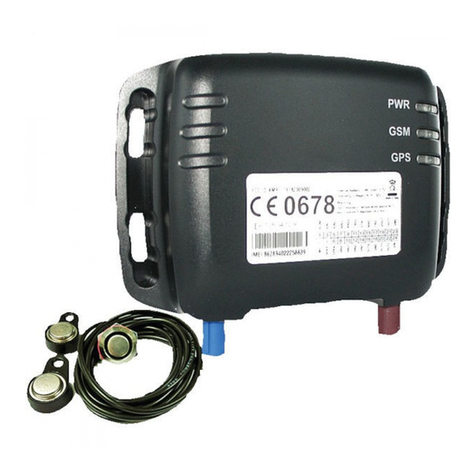
Placement of your GeoChaser: For best performance of your GPS tracking system it do
not place the device in a full metal surrounding or by metal stained glass. The performance of
the device will be limited or nonexistent in these conditions. In general synthetic material or
clear glass is not a limitation to receive a gps signal. The GeoChaser has two special slots in the
cover of the system for easy tie wraps installation into your vehicle.
Anbringen des GeoChasers: Für die optimale Leistung Ihres GPS Überwachungssystems ist es vor
allem wichtig, dass der GeoChaser NICHT vollständig von Metall oder metallhaltigem Glas
eingeschlossen ist. Dies könnte die Leistung des Systems ernsthaft stören, oder gar verhindern. Im
Allgemeinen stellen Kunststoffe und nicht getöntes Glas kein Hindernis für den Empfang eines GPS
Signals dar. Der GeoChaser hat an der Oberseite des Gehäuses zwei Aussparungen, womit Sie das
System mithilfe von Kabelbindern an das Fahrzeug festmachen können.
Placement de votre GeoChaser: Pour un fonctionnement optimal de votre système de
repérage par GPS, il est important que le GeoChaser NE soit PAS complètement entouré de
métal ou de verre métallique. Cela permettra de perturber gravement le fonctionnement du
système ou bien même empêcher le fonctionnement. En général, le plastique et le verre non
teinté ne sont pas un obstacle pour la réception d'un signal GPS. Le GeoChaser possède en
haut de sa petite boite deux emplacements pour adapter le système qui, au moyen d’attaches
autobloquantes, peut fixer le système sur le véhicule.

Pagina 4 van 9
LED status
LED
led status
Device status
GSM
fast flashing
Searching network
Slow Flasing
connected
GPS
off
GPS off
slow Flasing
no data
fast flashing
searching gps
on
GPS fix
PWR
off
no external power
slow Flasing
battery low
Fast flashing
charging battery
on
battery charched
LED Status
LED
led status
Apparat Status
GSM
schnelles Blinken
Netzwerksuche
langsames Blinken
Verbindung steht
GPS
aus
GPS aus
langsames Blinken
keine datei
schnelles Blinken
GPS suchen
an
GPS fix
PWR
aus
kein externer Strom
langsames Blinken
Batteriestrom ist niedrig
schnelles Blinken
Batterie laden
an
Batterie voll
LEDS d'état
LED
led l'état
état de l'appareil
GSM
clignote
recherche le réseau
clignotement lent
lent connecté
GPS
désactivé
GPS est désactivé
clignotement lent
pas de données
clignotement rapide
trouver GPS
Au
fixé au GPS
PWR
désactivé
absence d'alimentation externe
clignotement lent
tension de la batterie est faible
clignotement rapide
charger la batterie
Au
Batterie est pleine

Pagina 5 van 9
Ignition detection:
The white wire is used for ignition detection. It is strongly recommended to connect the
white wire to a non permanent power source that is only available when the vehicle is
running. For example the power source for the FM radio.
Stromspannung und Erfassen eines Kontakts
Der weiße Draht ist zum Erfassen eines Kontaktes. Die Erfassungsfunktion ist notwendig
bei einer Fahrt und sorgt auch für einen geringeren Stromverbrauch, sobald das Fahrzeug
ausgeschaltet ist. Schließen Sie den weißen Draht an den Kontakt, oder einen Anschluss,
der nur Spannung hat, sobald das Fahrzeugzündschloss eingeschaltet ist.
Tension d'alimentation et détection de contact :
Le fil blanc est pour la détection de contact. Cette détection est nécessaire pour
l'activation d'une tournée et permet une faible consommation d'énergie une fois le
véhicule est arrêté. Connecter le fil blanc à la borne de contact ou à un terminale qui a
seulement une puissance lorsque le commutateur d'allumage du véhicule est en marche.
Digital Input *
There is a general purpose digital input which is
the blue wire on the GeoChaser User Cable, and it
is a negative trigger. The digital input is
recommended to support panic button function.
Digitaler Eingang *
Dies ist ein allgemeiner Eingang, mit blauem
Draht. Der Eingang ist “aktiv” wenn diese zur Masse geschaltet wird. Der Eingang lässt
sich zum Beispiel für eine Panik-Taste oder einen Schalter verwenden.
Entrée numérique *
Il ya une entrée numérique général, ce fil est bleu. Cette entrée est "actif" quand elle est
mise à la masse commutée . Vous pouvez utiliser cette entrée par exemple pour un
bouton de panique ou un flotteur.

Pagina 6 van 9
Analog Input *
There is an analog input which is the green wire on The GeoChaser User Cable, and the
analog input voltage range is from 0 to 32V. The following diagram shows the
recommended connection.
Analoger Eingang *
Der grüne Draht ist der analoge Eingang. Dieser kann einen Gleichstrom von 0 und 32V
messen. Das nachfolgende Diagramm gibt den Anschluss wieder.
Entrée analogique*
Le fil vert est l'entrée analogique. Il peut mesurer une tension continue de 0 à 32V. Le
schéma suivant illustre de nouveau la connexion.
Digital Output *
There is an output which is the brown wire on the GeoChaser User Cable. This output is
used to drive a siren and the maximum drive current is 750mA. When the siren output is
enabled, the voltage on the siren output is determined by the system power level, if the
system power is 12V, then the siren output voltage is 12V.
Digitaler Ausgang *
Der digitale Ausgang ist der braune Draht. Dieser Ausgang kann zum Beispiel eine Sirene,
oder eine Hupe betätigen mit einem Antriebsstrom von 750mA. Wenn der Ausgang
eingeschaltet ist, ist die Stromspannung mit dem Eingangsstrom des Fahrzeugs
identisch. Ist das System auf 12V angeschlossen, ist der Ausgang zur Sirene, oder Hupe,
ebenfalls 12V.
Sortie numérique*
La sortie numérique est le fil marron. Cette sortie peut contrôler, par exemple, une sirène
ou un klaxon avec un courant de commande maximum de 750mA. Si la sortie est sous
tension, la tension est égale à la tension d'entrée du véhicule. Le système est relié à la
sortie 12V c’est la sirène ou le klaxon aussi 12V.

Pagina 7 van 9
Analog Input *
There is an analog input which is the green wire on The GeoChaser User Cable, and the
analog input voltage range is from 0 to 32V. The following diagram shows the
recommended connection.
Analoger Eingang *
Der grüne Draht ist der analoge Eingang. Dieser kann einen Gleichstrom von 0 und 32V
messen. Das nachfolgende Diagramm gibt den Anschluss wieder.
Entrée analogique*
Le fil vert est l'entrée analogique. Il peut mesurer une tension continue de 0 à 32V. Le
schéma suivant illustre de nouveau la connexion.
Digital Output *
There is an output which is the brown wire on the GeoChaser User Cable. This output is
used to drive a siren and the maximum drive current is 750mA. When the siren output is
enabled, the voltage on the siren output is determined by the system power level, if the
system power is 12V, then the siren output voltage is 12V.
Digitaler Ausgang *
Der digitale Ausgang ist der braune Draht. Dieser Ausgang kann zum Beispiel eine Sirene,
oder eine Hupe betätigen mit einem Antriebsstrom von 750mA. Wenn der Ausgang
eingeschaltet ist, ist die Stromspannung mit dem Eingangsstrom des Fahrzeugs
identisch. Ist das System auf 12V angeschlossen, ist der Ausgang zur Sirene, oder Hupe,
ebenfalls 12V.
Sortie numérique*
La sortie numérique est le fil marron. Cette courant de commande maximum de 750mA.
Si la sortie est sous tension, la tension est égale à la tension d'entrée du véhicule. Le
système est relié à la sortie 12V c’est la sirène ou le klaxon aussi 12V.

Pagina 8 van 9
Cut Relay Output*
There is a built-in cut relay on the GeoChaser between the 2 yellow wires.
It is a Normally Open type relay which maximum switching voltage is 16VDC and
maximum continuous current is 5A.
Relais Ausgang *
Die GeoChaser hat einen eingebauten potentialfreien Relais-Kontakt zwischen den beiden
gelben Kabel.
Dies ist ein Kontaktrelais mit einem maximalen Wechselstrom von 16VDC (Gleichstrom)
und einem maximalen Dauerstrom von 5A.
Sortie relais*
Il s'agit ici d'un relais normalement ouvert avec une tension maximale de 16 VDC et une
commutation de courant permanent maximum de 5A.

Pagina 9 van 9
Setting up your account: To use your GeoChaser you need to set-up an account on
www.12trace.nl. Select ‘login’ and then select ‘set-up account’. Here you will be asked to
submit some personal details and register your device by entering the product code. You
find the product code on the device and on the sticker that is inside the box of the device.
You can keep the sticker on this Manuel for later use. If you already have an 12trace
account you can add this device to it. Just log in and select ‘ad device’ and register your
product code.
Konto erstellen: Um den Geochaser benutzen zu können, müssen Sie zuerst ein
Konto auf www.12trace.nl anmelden. Klicken Sie zuerst auf den ‘Login’ Button und
anschließend auf ‘Account anmelden’. Hier tragen Sie dann bitte Ihre Daten ein. Den
Produktcode brauchen Sie ebenfalls. Sie finden ihn auf dem Sticker in der Verpackung.
Hier können Sie ihren Sticker auch aufheben. Wenn Sie bereits ein 12Trace Account
besitzen, brauchen Sie den GeoChaser nur dem Account hinzuzufügen. Loggen Sie sich
über den Login Button auf Ihr Konto ein, und klicken Sie dann anschließend auf ‘Gerät
hinzufügen’, und tragen Sie dann die erforderlichen Daten ein.
Créer un compte : Afin de pouvoir utiliser Geochaser, vous devez d'abord créer un
compte sur www.12trace.nl. Choisissez ici le bouton ''Identifiant' puis 'créer un Compte'.
Ici, on vous demande de remplir quelques détails. Ici vous avez besoin du code de
produit. Vous trouvez le code du produit sur l'autocollant dans l'emballage. Vous pouvez
garder votre autocollant.
Si vous avez déjà un compte sur 12Trace, vous pouvez ajouter GeoChaser à votre compte.
Connectez-vous à votre compte en utilisant le bouton 'Connexion' puis cliquez sur
'Ajouter un appareil' et remplissez les informations demandées.
Other manuals for GeoChaser Control
2
Other 12trace GPS manuals
