360 FLY 4K PRO User manual

360fly 4K PRO User’s Guide
Miss Nothing.
Congratulations on your
new 360fly 4K PRO.
Powering up:
Camera care and storage:
This powerful camera is optimized to continuously
shoot and stream immersive 360° video without
interruption via dedicated USB and HDMI connectors
or wirelessly.
With the latest upgrade to the 360fly mobile app you
can now instantly live stream your 360-degree video
to Facebook. Let your friends and family join the fun
and experience all the action as you live without
boundaries. Click here to download the Android App.
Getting started.
Charging the battery:
For best results, charge your camera while it’s powered off.
While your camera is charging, its LED indicator will flash
green. When fully charged, the camera LED will remain
solid green. It is recommended you charge your camera for
at least 30 minutes prior to its first use.
When your camera battery is low, the LED will display a
light purple color. Be sure to charge your camera before
using it when the LED is light purple.
To charge your camera, insert a male to male USB
cable into a USB outlet adapter rated at 1.5A to 2.1A
(most tablet charger adapters) and plug it into the
360fly 4K PRO’S USB cable.
Turn on the camera by holding the OnePush button
down for 4 seconds. The triangular OnePush button is
surrounded by the LED indicator and located on the
side of the camera. Camera will also power on when
connected to a power source
When powering up, the camera will vibrate three times
and the LED will flash blue. After completing the
power-up sequence, the LED will display a solid blue
color, indicating that your camera is on and ready to fly.
You can also use the OnePush button to power down
your camera by holding the button down for 4 seconds.
The camera will vibrate four times to indicate that it is
powering down.
A clean lens means cleaner footage. The 360fly 4K PRO
lens can be cleaned using a clean, soft cloth. Lens
cleaning solution, water, or isopropyl alcohol can be
added for additional cleaning.
On My Phone:
Select the icon to access all of your videos, photos,
and bursts stored on your smartphone. Review, edit, and
playback your content anytime/anywhere without the
need to connect to the internet or your 360fly camera.
Explore:
Select the icon to browse public content
uploaded by other 360fly users. Select and view
featured videos, along with hosted content spanning
a variety of interesting topics and categories.
Be sure to check back regularly to view the latest
exciting uploads from other 360flyusers.
Camera:
Select the icon to connect to your 360fly camera.
Once connected, you will have full control of all of
your camera’s features and functions through your
smartphone. You can also view and download all of
your video files and image captures stored on your
camera’s memory.
360fly app main menu:
The 360fly app homepage is the hub of the 360°
video world.
At the bottom of the homepage screen, you can
select from four options:
Profile:
Select the icon to view all of the video content
uploaded to your 360fly account. You can access and
playback any videos you’ve uploaded from anywhere
you have an internet connection—with or without
connecting to your 360fly camera. From your account,
you can also choose to make any of your videos public
and share your experiences with friends and other
360fly users. To make changes or edits to your account,
just tap the edit profile option at the top of the screen.
Note: An active internet connection is required to
access and view content.
www.360fly.com/solutions
Modified: June 11, 2018
The app powering it all.
Download the 360fly app:
The 360fly app is key to capturing your entire world
in 360° 4K video on your Android™Smartphone. Just
search “360fly” in the Google Play™Store and download
the free 360fly application to your mobile device.
Remember, the app allows your mobile device to serve
as your camera’s remote control and viewfinder, giving
you the power to capture, edit, and share clips on the fly.
Note: Your camera may require a firmware update prior
to initial use. If a firmware update is available, your
application will automatically walk you through the
steps to download and transfer the most up-to-date
software load to your camera.
You are now ready to set up your 360fly PRO camera.
The process is simple, just follow the application’s
set up menu to completion.
You will need to manually connect the camera’s Wi-Fi
to your smartphone. This can be done in the camera’s
Settings Menu. The default password is eight zeros
(00000000)

The default video output format (for both streaming and
recording) from the 360fly 4K PRO camera is equirectan-
gular. Meaning, 360-degree, hemispherical video laid flat
into a panoramic format. Equirectangular is also the
optimal format for social media sites such as Facebook
and YouTube.
The EQR format is the default output for the following
features:
WiFi Mode at 1920x960 resolution
Video Record at 3840x1920 resolution
Live stream via HDMI Cable up to 4K resolution
To exit EQR mode, press revolver icon at the bottom
of the screen and select the standard 360 video icon .
Note: The equirectangular video format will not stream
through the USB cable. Images are not available while in
Equirectangular mode.
To switch from standard Photo mode to Camera Burst
mode, press the revolver wheel located at the
bottom of the screen. Tap the Camera Burst icon .
The application will display that it’s set in Camera
Burst mode at the top of the live view display
on your screen.
To switch your camera to Photo mode, tap the
icon at the bottom of the camera home screen.
The icon will switch to the Video camera and
the application will indicate that it is in Photo mode
at the top of the viewfinder screen.
Recording video:
Recording a standard 360° video with the 360fly
app is quick and easy. Simply tap the white Record
button to start capturing. The center of the
capture button will turn red and your camera will
simultaneously vibrate while its LED turns from
blue to red.
As video records, you’ll notice a second button
appears to the top right of the Record button.
This button represents your camera shutter
button, allowing you to capture a still 360° photo
with your camera during video capture.
Note: Your still photo captures will be stored in your
camera’s internal memory as a separate .jpeg image file.
To stop recording, tap the Record button . Your
camera will vibrate twice and the LED will switch from
solid red to blue, indicating your recording has ended.
First-Person POV mode:
The First-Person POV option gives you the power to
record standard (non-360°) videos in a 16:9 aspect
ratio, turning your 360fly into a traditional
point-and-shoot action camera. With this mode
activated, simply orient or mount your camera in a
horizontal position with the lens facing forward and
the OnePush button centered-facing up.
To enter First-Person POV mode, press the revolver
wheel located at the bottom of the screen and
select the POV icon . Your application will display
that it is set in POV mode above the live-view display
on your screen and the live-view area will display a
preview in a 16:9 aspect ratio.
Note: The camera’s OnePush button represents the
top/center of your camera’s viewing angle. When
filming in POV mode, use the OnePush button to
align your shot and achieve the ideal camera angle.
To begin a recording in First-Person POV mode, tap
the white Record button to start capturing. The
center of the capture button will turn red and your
camera will simultaneously vibrate while its LED turns
from blue to red. As your video records, you’ll notice a
second button displaying a camera icon appears to
the top right of the Record button. This button
represents your camera shutter button, allowing you
to capture a still 16:9 POV photo with your camera
while recording your video.
Note: When your camera is set into First-Person POV
mode, you can also start and stop recordings using
the on-camera OnePush button. POV operation via the
OnePush button will remain intact until the record
setting is changed back to a 360° video mode using
the app or the camera is power-cycled. The camera
will also remain in POV mode when Settings Lock
is enabled.
Time-Lapse mode:
Turn hours of activity into dynamic minutes using the
360fly’s Time-Lapse mode. To enter Time-Lapse mode,
press the revolver wheel located in the bottom bar
of the camera home screen and select the Time-Lapse
icon . The recording mode you’re in will display
at the top of the Live View display on your screen.
Change the interval between frame captures by
adjusting the scroll bar to your desired setting. Your
360fly 4K PRO offers settings for 0.5, 1, 2, 5, 10, 30,
or 60 seconds between frames when in Time-
Lapse mode.
To begin a time-lapse recording, tap the white record
button to start capturing. The center of the
capture button will turn red and your camera will
simultaneously vibrate while its LED turns from
blue to red. As video records, you’ll notice a second
button appears to the top right of the Record button.
This button represents your camera shutter
button, allowing you to capture a still 360° photo
with your camera during video capture.
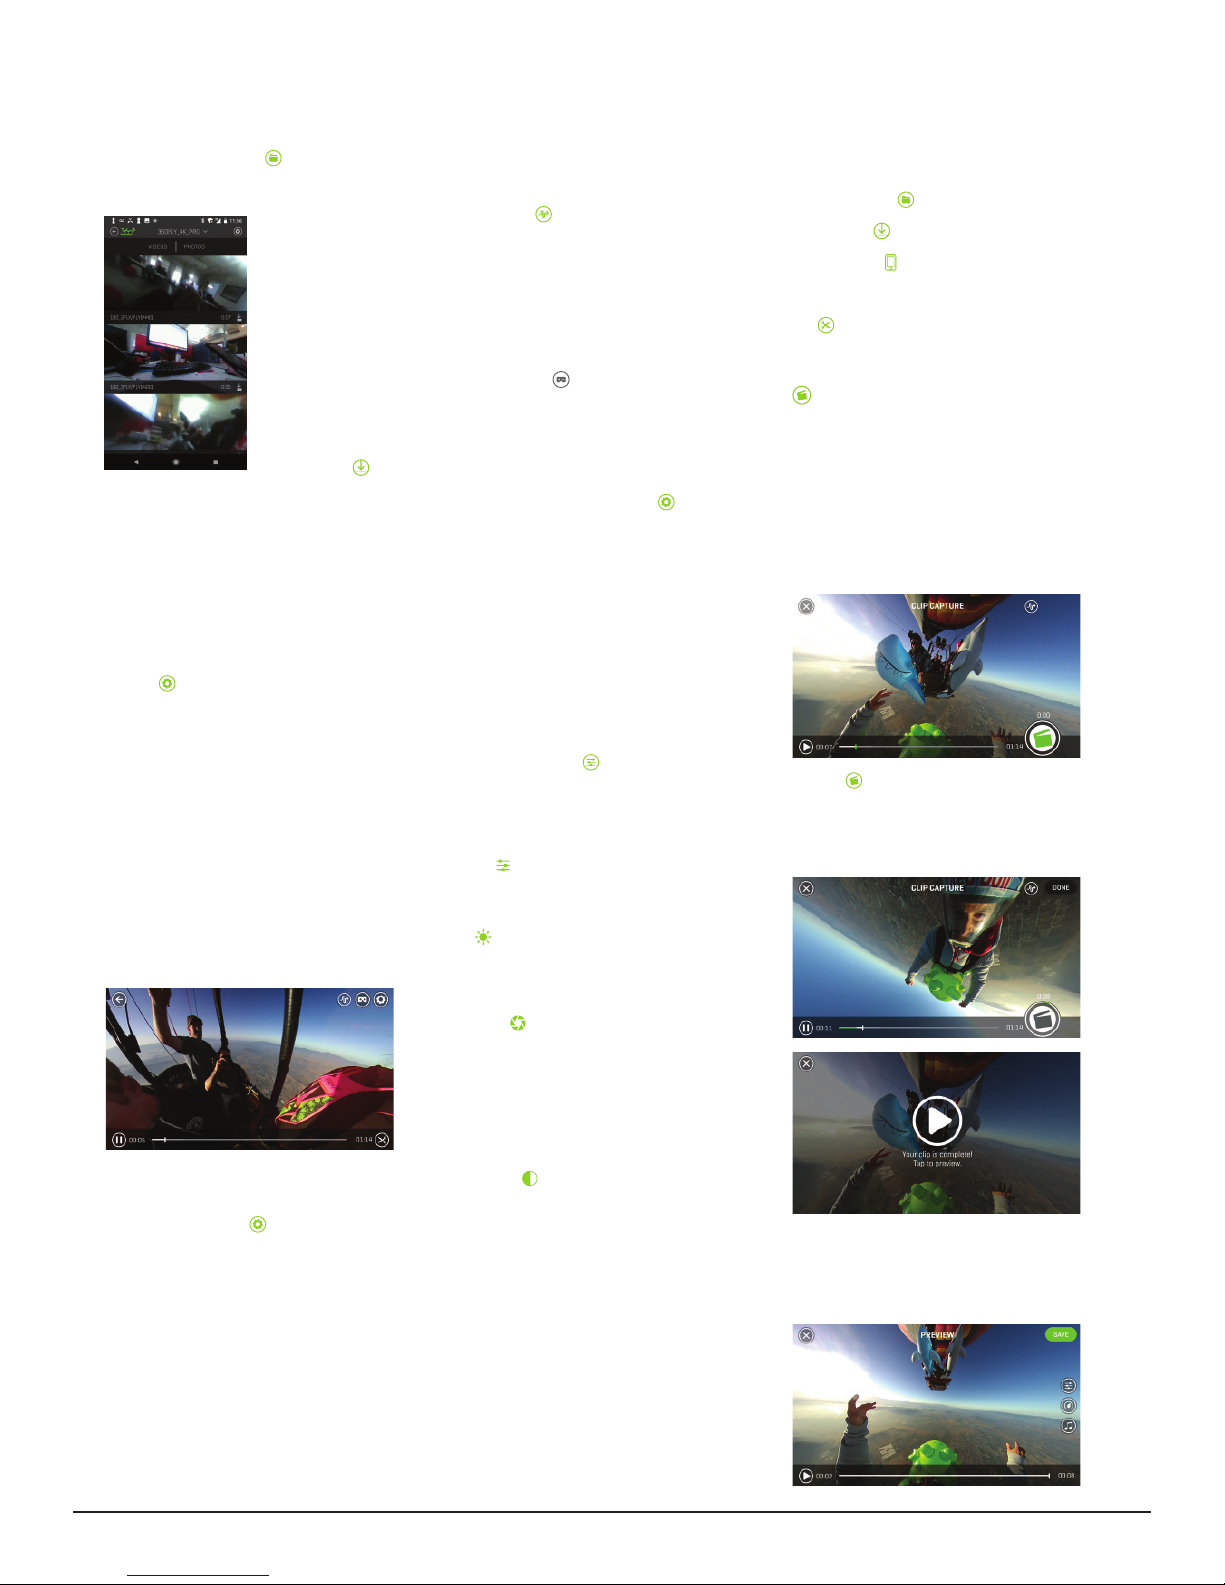
Note: The 360fly 4K PRO‘S AutoPilot feature sets your
application to automatically pan your image to the
area of footage that has the highest degree of motion.
To use this feature within your camera’s live-view, just
tap the AutoPilot icon . Use the slider located on
the left of your display to adjust the sensitivity level.
When the camera’s built-in GPS sensor is toggled on,
the GPS indicator icon will appear on the home
screen. Once activated, the GPS indicator will remain
gray as the sensor calibrates an initial fix for the
camera’s location. Once an active fix is secured, the
icon will display a green color, indicating that the
GPS feature is ready for use. The GPS feature can
take up to 2 minutes to generate an initial fix.
For best results, use the GPS feature outdoors
with a direct line to the sky free of interference
from trees or tall buildings.
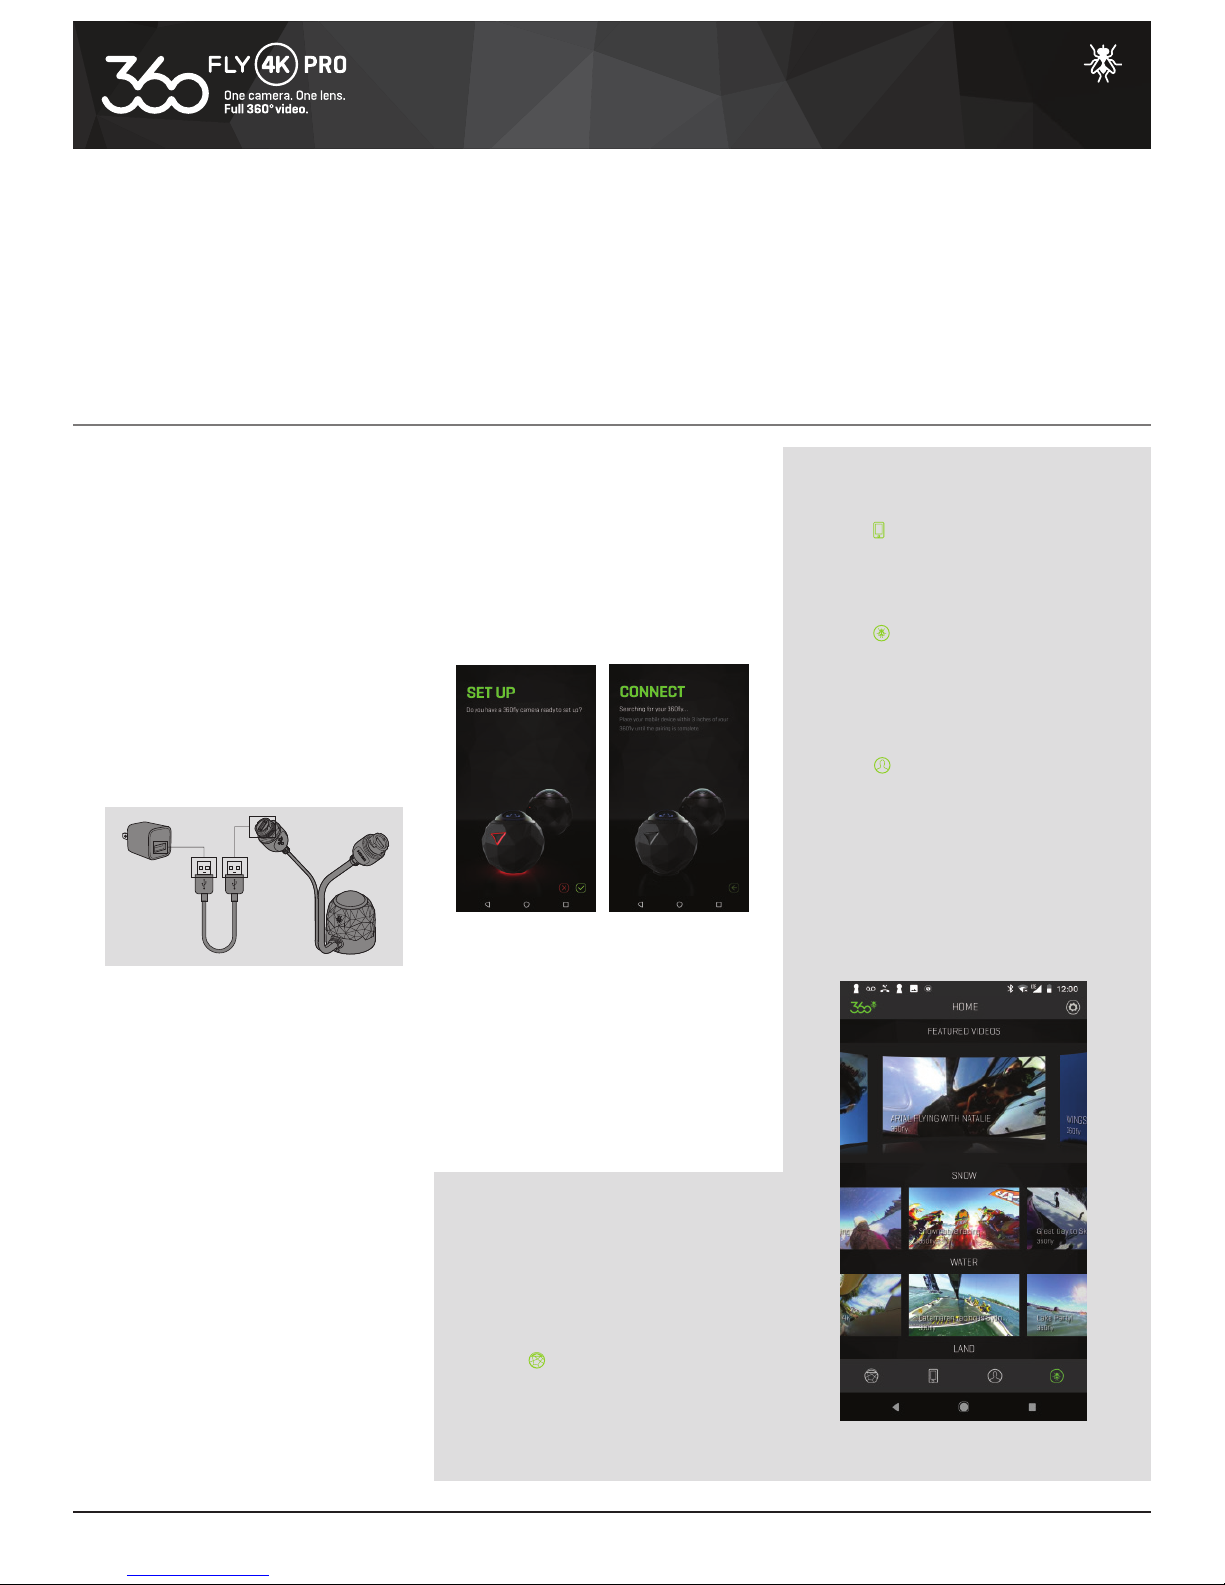
Camera home screen:
Once your smartphone is connected to the camera,
the app’s home screen gives you full access to all
camera controls, modes, and settings options.
1
4
38
9
5
6
2
7
1
3
5
7
2
4
6
8
BACK BUTTON - TOGGLE
TO PREVIOUS SCREEN
VIDEO/PHOTO MODE
TOGGLE SWITCH
CAMERA SETTINGS MENU
GPS FIX INDICATOR CAMERA MODE
OPTION WHEEL
SHUTTER BUTTON - START/STOP
RECORDINGS, CAPTURE PHOTOS
ON MY CAMERA LIBRARY
AUTO PILOT PREVIEW MODE
9IMAGE TUNING OPTIONS
Recording without the app:
If you don’t have access to the 360fly app on your
mobile device, you can record videos directly on your
camera. Simply press the OnePush button on your
camera to launch a 360° recording. Your camera will
vibrate and the LED will turn from blue to solid red,
indicating that your camera is now recording. To stop
recording, press the OnePush button again.
Note: Note: The default recording mode for 360fly 4K
PRO videos is pre-set to Equirectangular format. In
this setting, the live viewfinder is disabled during
active recording. To enable live-view while recording,
you must change the camera’s settings (by taking the
camera out of equirectangular mode), to 2880x2880
pixels at 24 frames per second (FPS). Also, when
equirectangular mode is on the camera’s frame rate
and resolution are fixed at 3840x1920.
60 FPS mode:
Your 360fly 4K PRO allows you to record videos at 60
frames per second with a resolution of 1728x1728
pixels. Perfect for extreme action sequences, this
recording option is ideal for creating slow-motion
effects when editing your videos and creating action clips.
To launch 60 FPS mode, press the revolver wheel
located at the bottom of the screen and select the
Video camera icon . Your application will display an
option to select from each of the 360° recording modes
available on the 360fly 4K PRO camera. Select the
1728x1728 @ 60 FPS option to change your record setting.
To begin a 60 FPS recording, tap the white record
button to start capturing. The center of the capture
button will turn red and your camera will simultaneously
vibrate while its LED turns from blue to red. As the video
records, you’ll notice a second button displaying a
camera icon appears to the top right of the Record
button . This button represents your camera shutter
button, allowing you to capture a still 360° photo with
your camera while recording your video.
Still Image Capture:
Your 360fly 4K PRO doubles as a still image action
camera, allowing you to capture .jpeg photos at an
effective resolution of 3456x3456 pixels. Your 360°
images can be viewed within the mobile application
or via the Desktop Director app on PC or Mac.
First-Person POV photo mode:
The 360fly 4k PRO can be set to capture standard
photos from the First-Person POV perspective.
To switch from standard Photo mode to POV mode,
tap the revolver wheel located at the bottom of
home screen. Tap the POV icon . The application
will indicate that it is in POV mode at the top of the
viewfinder screen.
Once your shot’s lined up, tap the white shutter
button to take a photo. When a photo is captured,
the camera LED will flash red once and return back
to solid blue, indicating that it is in ready mode.
All of your photo files will be stored on your camera’s
memory in a .jpeg format.
Camera Burst mode:
The 360fly 4K PRO’s Camera Burst mode feature allows
you to capture several photographs in quick succession
with a single push of the shutter button. Ideal for sports
or action photography, Camera Burst mode lets you
select the best image from a group of photos or
arrange them in a sequence.
Pre-set your frame capture intervals by adjusting
the scroll bar to your desired setting. The 360fly 4K PRO
offers settings for 3, 5, or 8 captures per second within
burst mode.
To capture burst photos, tap the white shutter
button . As your photos are captured, the
camera LED will flash red once and return
back to solid blue, indicating that it is in ready
mode. All of your photo files will be stored on
your camera’s memory in a .jpeg format.
To capture photos, tap the white shutter button .
When a photo is captured, the camera LED will
flash red once and return back to solid blue,
indicating that it is in ready mode. Your photo
files will be stored on your camera’s memory in
a .jpeg format.
Note: To exit Photo mode, tap the video icon at the
bottom of the screen and your camera will return to
video record mode.
Note: Images are not available while equirectangular
mode is turned on.
Equirectangular Mode (EQR):
www.360fly.com/solutions
Modified: June 11, 2018

Once your video completes processing, you can click
to preview. In the Preview menu, you’ll have the ability
to add a range of color filters, plus apply slow and fast
motion to the video to create an awesome, fully
immersive 360° clip. See below for more details on
adding Filters and Playback Speed Adjustment.
Press the icon again to stop your clip. You can start
and stop multiple times to create one continuous
clip with multiple segments.
Once you have captured your video, press the “Done”
button in the top-right corner and allow a few seconds
Clip Capture:
Edit and share your clips in their native 360° format.
Select this tool to trim your video by picking the parts
of your 360° 4K footage that you want to edit,
store, and share.
After launching the Clip Capture feature, select the
“Play” icon to start playing the video. At the location
that you would like to begin your clip, press the
icon to start capturing. You will notice a green
status ring around the icon indicating the time
you have left in your capture session. You can
record up to two minutes in one session.
for your video to process.
Accessing your camera’s
stored files:
While connected to your camera’s home screen,
select the On My Camera icon to view your
camera’s storage library. This selection will display
all of the video files and still images stored within
your camera’s internal memory.
To view a video, simply tap
on the thumbnail image of
your desired file, and the
application will
automatically launch your
file within its video player.
To view your camera’s still
image photo captures, tap
the “Photos” tab at the top
of the screen to switch
your library view to display
stored photos.
To download a video or
image directly to your
smartphone, simply tap
the download icon .
This will copy your file directly into your 360fly app.
Note: storing your video files onto your 360fly app
will allow you to playback content without the need to
connect your device to your 360fly camera. Additionally,
the application’s video editing tools are (only) available
for content stored in your phone’s gallery.
To delete a file, perform a left swipe on the thumbnail.
The application will request confirmation that you would
like to delete the file before it is permanently removed
from the camera’s memory storage.
If you want to fill the blindspot area of a video or image,
press the in the top right corner and turn “Blindspot
Visibility” on. This will fill the darkened area with a
blurred reflection of the video or image. You can also
choose a stored image from your mobile device to fill
the blind-spot. If the camera’s GPS feature has been
turned on you will see Google Maps options as well.
Exposure:
Adjust the slider to adjust your camera image
sensor’s sensitivity to light. For brighter environments
(i.e. direct sunlight), use a lower exposure setting. Apply
an increased exposure setting for darker environments.
The slider also allows you to lock in a specific setting
and override the camera from automatically adjusting to
varying light conditions. The lock remains in place until
you manually turn it off.
Contrast:
Increase the setting to achieve a more vivid
picture or lower the setting to deliver a slightly
flatter appearance.
Virtual reality headset playback:
Your 360fly 4K PRO’s footage is designed to work
seamlessly with most Google Cardboard (type) VR
viewers with just the touch of a button.
To watch your footage using a VR viewer, just tap
the VR viewer icon located top-right while you’re
in the video player screen. Next, simply place your
smartphone into your VR headset and immerse yourself
inside the incredible world of 360fly 4K PRO content.
General camera settings:
Adjust your camera controls and general system
settings by pressing the Settings icon located at
the top-right of your display screen. Under this menu
you can check your camera’s battery life, memory
capacity, and make changes to your it’s name and
Image tuning:
Your 360fly 4K PRO camera’s default settings are
optimized to deliver the highest quality output
within a wide range of environments and lighting
conditions. To get the most out of your videos and
images, the 360fly 4K PRO offers advanced options
that allow you to fine-tune your device’s settings.
To access your camera’s fine-tuning options, tap
the Camera Tuning icon located at the bottom
right of your display screen. A set of sliders will
appear on screen, giving you the options to make
adjustments to the following tuning options:
Saturation:
Use the slider to adjust the intensity of the colors
captured within your footage.
Brightness:
The slider fine-tunes the brightness of the subjects
within your image without affecting your camera’s
exposure compensation.
Editing and sharing content:
If you haven’t already, you’ll need to download your
desired file from your camera library into your smart
device’s memory in order to access 360fly’s editing
and sharing features.
You can access your camera’s library by selecting the
On My Camera icon to view your camera’s storage
library. After locating your selected video, tap the
download icon to begin the file transfer process.
From the app’s main menu screen, select the
On My Phone tab to view your stored content
within your phone’s memory.
Select the video that you would like to edit to launch
the file. As the video begins to play, tap the scissor
icon to enter into the Edit mode. There are three
tools that enable you to edit and share your 360°
footage: Clip Capture, Watch Me and Still Capture.
AutoPilot playback mode:
The 360fly 4K PRO’s AutoPilot feature sets your
application to automatically track the area within
your 360° footage that has the highest degree of
activity, allowing you to simply sit back and enjoy all
of the action without the need to interact with your device.
To watch your footage using AutoPilot mode, just tap
the viewer icon located at the top-right of your
screen. Use the slider located on the left of your display
to adjust the sensitivity level of the panning feature.
Video playback:
Tapping a video thumbnail image within your camera’s
library will automatically launch the 360fly player.
Once the video uploads, you can pan the angle of
view by swiping across the screen. You can also
pan using your device’s built-in gyroscope function
by turning your phone in the desired orientation.
To zoom in during playback, simply pinch two
fingers together on your device’s display until
you reach the desired zoom level. To zoom out,
expand two fingers across the display and release
when you have reached the ideal zoom level.
Use the play bar at the bottom of your screen
to pause/restart a video or fast-forward/rewind
to a desired point within your video file.
You can adjust your video player’s settings by
selecting the Settings icon located at the top-
right of your display. Under this menu you have the
option to toggle your phone’s gyroscopic panning
feature on/off or remove the app’s graphics/overlays
from view during playback. The Settings menu also
features the option to invert your video file, giving
you the ability to switch videos that were recorded
upside-down to the correct viewing orientation.
Note: Equlretangular videos do not support blindspot
fill and inverting video.
password. This section is also where you will find
Advanced Camera Operations such as Webcam
Mode and Settings Lock
www.360fly.com/solutions
Modified: June 11, 2018

Playback Speed adjustments:
Tap the icon to have the ability to speed up or
slow down a section of your clip. Select just a portion
of your edit using the sliders on the playback bar, or
select the full clip. You can slide the green bar back
and forth to select the section of your video that you
wish to adjust. Next, use the speed control bar to
increase or decrease the playback speed faster or
slower for that selection. As you adjust, you’ll see a
preview of the playback speed adjustment applied to
your footage. Once you’re happy with your selection,
hit “Apply” to add your speed adjustment to your clip
or select the back arrow to return to the original file.
Still Capture:
Export photos from your captured video moments.
You’re the photographer—select an area within
your video, capture and then save still images to
your phone’s image gallery.
After launching the Photo Capture tool, you’ll be
prompted to select your desired image ratio. Your
app will allow you to select from 360° view, square,
16:9, or panoramic output for your photo capture.
After you’ve selected your image size, press the “Play”
icon to begin playing the video. Pause the video player
at the location that you would like to capture your
photo and align your image to the desired orientation.
You can also pinch to zoom in or out for a closer view
within your image prior to capturing your photo.
Tap the button to capture your shot. You will see
a flash and hear a shutter click. Next, select from an
array of filters and color enhancements for your new
photo. Select and preview your desired filter and tap
“Apply” to confirm it or click “None” if you do not wish
to apply a filter. You can share your photo to any of
your connected social media sites.
Video Chaptering
Realizing that the download time for longer videos can
become very long, this file storage option allows for
easier file transfer and management for longer-duration
video recordings. With chaptering activated, longer
recordings are stored in fixed four-minute segments
within the camera’s memory.
To activate video chaptering, tap the settings icon
located at the top-right of your display. Scroll down and
locate the “4 Minute Video Chaptering” option. Move the
slider to the right to toggle the feature on.
Note: The 360fly Desktop Director software provides
advanced editing tools allowing you the to merge video
files or create clips from multiple files into a single
video output.
Settings Lock
You have the option to store the last-known settings
adjustments to the camera’s memory so that the
camera maintains this configuration after a power-cycle.
Adding filters:
Tap the icon to select from an array of filters
and color enhancements for your video clip. After
selection, you’ll see a preview of the filter applied
to your footage. When you’ve decided on the
perfect filter hit “Apply” to add it, or select the back
arrow to return to the original, unfiltered file.
Watch Me:
Create a standard 16:9 ratio export from your
original 360° footage. Use the Watch Me tool to
record your movements as you pan left and right
within the video. Wherever you swipe, shift and
zoom while capturing in this mode will be cropped
and saved as a shareable 16:9 video clip; capturing
your unique point of view, ready to share with
the world.
After launching the Watch Me tool, select the
“Play” icon to start reviewing your video. At the
location that you would like to begin your clip, press
the icon to start capturing. You will notice a
green status ring around the icon indicating the
time you have left in your capture session. You
can record up to two minutes in one session.
As your video is recording, move the point of view by
panning right, left, up, and down with your finger or by
physically moving your device to pan via the gyroscope.
Your resulting video clip will capture your point of view
by following all of your movements.
You can also use the AutoPilot feature to automatically
adjust the point of view within your clip by selecting
the icon in the top right corner of the screen. The
AutoPilot feature will pan the point of view within your
clip by automatically selecting the area within the
video that contains the highest degree of activity.
When done recording, click the icon to stop
recording. You can start and stop multiple times
in various locations throughout your video to create
a single clip.
When complete, click on the “Done” button and allow
a few seconds for your video to process. You can now
add some special effects slow/fast motion, or change
the image filter to apply a unique color scheme to your
clip. See below for more details on Filters and Playback
Speed Adjustment.
Adding soundtracks:
Note: The app will remain in Preview mode after
making adjustments to your clip until you select the
“Save” button in the top-right corner of your display.
Once you have clicked the “Save” button, you’ll be
prompted to name your masterpiece and add
a description. After saving you can share your
creation to your favorite social sites.
Note: Your device will need an internet connection
to upload the video and post to your desired social
networking sites. On some phones, if you are connected
to the 360fly app, you’ll need to disconnect and
re-establish your internet service prior to posting.
Bluetooth Audio Device Connectivity
Perfect for indoor recording environments or for
real-time narration of action sports videos from the
creator’s point of view - this feature allows the use of a
Bluetooth microphone or headset in place of the
camera’s built-in microphones.
To connect your camera to a Bluetooth microphone
device, begin by placing your Bluetooth device into
pairing mode. Once your Bluetooth device is ready to
pair, tap the settings icon located at the top-right of
your display. Scroll down and select the “Pair Bluetooth
Microphone” option.
Once selected, your app will automatically complete a
scan of all of the Bluetooth devices available within range
(for best results, place your camera and Bluetooth device
3-5 inches apart during the scan). When the scan is
complete, locate and select your Bluetooth device from
the list of available devices. When pairing is completed,
your app will show that your Bluetooth device is
connected within the list of paired devices. Your
Bluetooth device will now record the audio for your
recordings in place of the camera’s microphones.
To un-pair your Bluetooth device from your camera,
locate your device within the list of paired devices and
select the settings icon adjacent to it . Select the
“forget” option to release the Bluetooth connection
between the camera and your device.
Advanced Camera Operations:
To Access the Advanced Camera Operations Menu. Go to
the camera home screen (while the camera is connected
to your smartphone) and press the settings icon .
Use the option to add a soundtrack to your clip
by selecting from an array of music options. Simply
select the perfect track from our large library of
tracks. You can then choose between a 50/50 mix
of music and your video's ambient sound or 100%
music. Toggle between the two to see which option
you like best.
www.360fly.com/solutions
Modified: June 11, 2018

Triggered Recording:
The 360fly 4K PRO camera features an array of
automatic “triggered” recording options. Using this
feature, your camera can be set to automatically record
when it senses audio, video motion, or movement of the
camera via the built-in accelerometer.
To activate the 360fly 4K PRO’S triggered recording
feature, tap the settings icon located at the top-right
of your display. Scroll down and locate the triggered
recording options within the list of menu items and
select your desired triggered recording function by
moving the slider to the right.
Audio-Based Triggered Recording – With this
feature enabled, the camera will automatically launch
a recording session when the camera senses an
audible sound.
Video Motion-Based Triggered Recording – Within this
setting, the camera’s image sensor will react to changes
in pixel geography to detect movement. If a moving
person or object is detected within the camera’s field of
view, a recording session will automatically launch.
Accelerometer-Based Triggered Recording – Using the
camera’s built-in accelerometer, any physical movement
of the device from a still position to a pre-determined
g-force level will automatically launch a recording
session. Recordings captured within this mode also
include a built-in 10-second pre-record option. When
the accelerometer is activated, the camera will gather
the last 10 seconds of video content recorded while the
camera was in idle mode and automatically append it to
the beginning of the recorded video.
For each triggered recording option, you have the ability
to set your desired recording period for each event to 30
seconds, 1, 3, 5, 10, 15, 30, 60, or 90 minutes in duration.
You also have the option to set the delay/time-out
duration for 5, 10, 30, or 60-second intervals
between recordings.
©2016 360fly, Inc. All rights reserved.
360FLY, the 360FLY Logo, and the Fly Logo are trademarks of 360fly, Inc.
For a complete list of patents, please visit www.360fly.com/patents.
USB Connectivity:
Transferring Content To Your PC
Your 360fly 4K PRO camera doubles as a USB mass
storage device when connected to your PC or Mac.
To access your camera’s stored content, simply
connect your USB cable to your computer. Locate your
360fly camera within your computer’s folder browser
to view and transfer your files to your desktop or a
desired file folder.
Webcam Mode
Use your 360fly 4K PRO as a connected webcam by
placing your camera into Webcam mode within your
app’s settings menu. When enabled and plugged into a
PC’s USB port, the 360fly 4K PRO camera will transmit a
360° live stream that can be broadcast over Skype™,
Facetime®, GoToMeeting®, or any other streaming
webcam service that allows you to select an alternate
camera as it’s video output source.
To enable Webcam mode, tap the settings icon
located at the top-right of your display. Scroll down and
locate the “Webcam” option. Move the slider to the right
to toggle the feature on. Finally, place your camera onto
its power cradle and ensure that the USB cable is
plugged into your computer.
Note: We recommend placing your camera into Webcam
mode (Before) connecting the camera to your PC to
activate the Webcam feature.
Note: Webcam mode is only available through the USB
cable and not the HDMI Cable.
Configure WiFi Network
This setting allows you to switch the 360fly 4K PRO
camera’s Wi-Fi connection from the controlling mobile
device to a local Wi-Fi network. Enabling live streaming,
server connectivity, and the ability for multiple users to
view a camera’s video output without the need for your
smart phone’s LTE/ Internet connectivity
To configure to your WiFi network, tap the settings
icon located at the top-right of your display. Scroll
down and locate the “Configure WiFi Network” option.
Troubleshooting
Resetting your camera:
Tech support & FAQs:
The 360fly team is always here to help. For all of
your support needs or to report a bug, please contact
us at support@360fly.com.
Camera Connection Reset
Use only when you want to reset to the camera’s
default password, which is eight zeros (00000000),
and to reset the camera after using the Configure WiFi
Network feature.
Note: The camera must be situated within three
inches of the smartphone for the reset to take place.
www.360fly.com/solutions
Modified: June 11, 2018
Table of contents
Other 360 FLY Action Camera manuals