3B6 TOP MASTER User manual

Top Master
User Manual
Rev 8 3-29-10
Software WS02_19 &
RL02_20

Table of Contents
Features and functions Page 3
Central Unit Page 4
Displays Page 5
Setting and operating pushbuttons Page 6
Operating the remote control Page 7
Weighing mode Page 8
Setting a new tare Page 9
Disable the weighing system Page 10
Count down Function Page 11
Machine Function Page 12
Infrared Communication Page 13
Multi-Product & Multi-Truck Functions Page 14-15
Correction of load Page 16
Setting time and date on the printer Page 17
Partial zeroing, partial x 2, total, totals and tare procedure Page 18
Target, Unit of Measurement, Customer code No.,
Material code No., Operator code No. Truck No., Project, Page 19
Total Display for Goods
Target (Maximum Load) Page 20
Unit of Measurement Page 21
Customer Page 22
Material Page 23
Density function (specific gravity) for
Print load in cubic yard/meter Page 24
Operator Page 25
Truck No. Page 25
Max N.W. Page 25
Project Page 25
Total Display for Goods Page 25
Printer function Page 26-29
How to use the handheld keypad Page 30
Memory Capacity/Operating Faults Page 31- 32
Diagnostics Page 33
Top Master User Manual

Features and Functions
The design and production concept underlying all
3B6 products is refined simplicity.
This makes TOP MASTER one of the most user-
friendly, technologically advanced weighing systems.
It has been programmed with all the information
necessary for better management of your machinery.
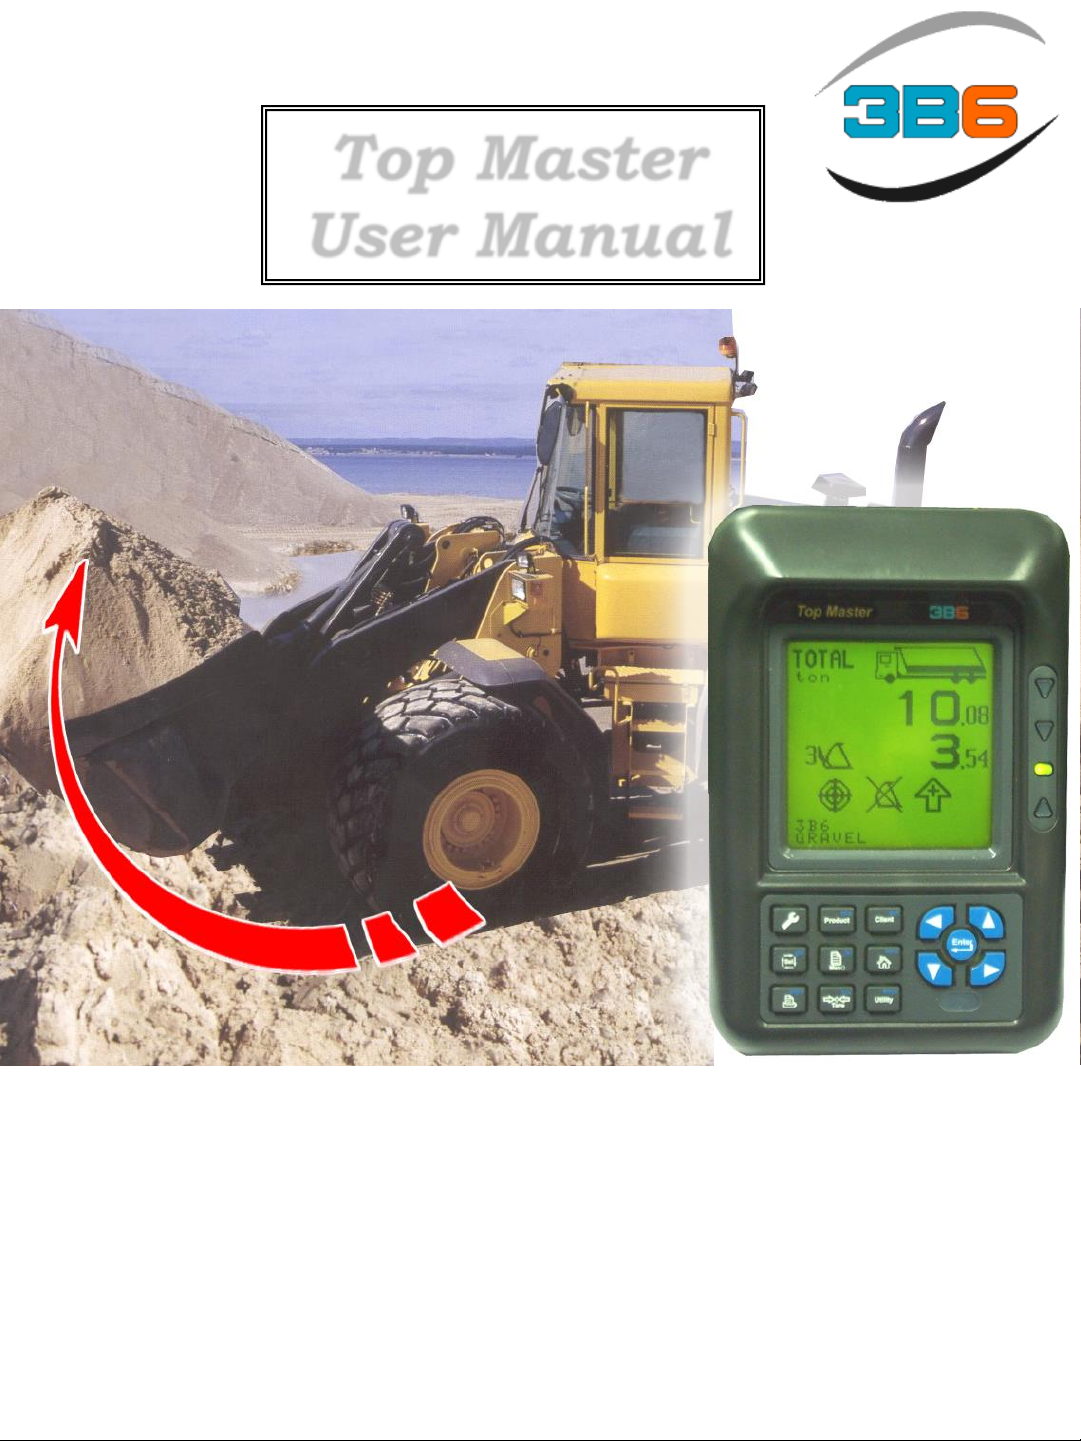
TOP MASTER is a weighing system, which can
measure the load on moving mobile machines,
particularly, wheel loaders and lift trucks.
Its main features are:
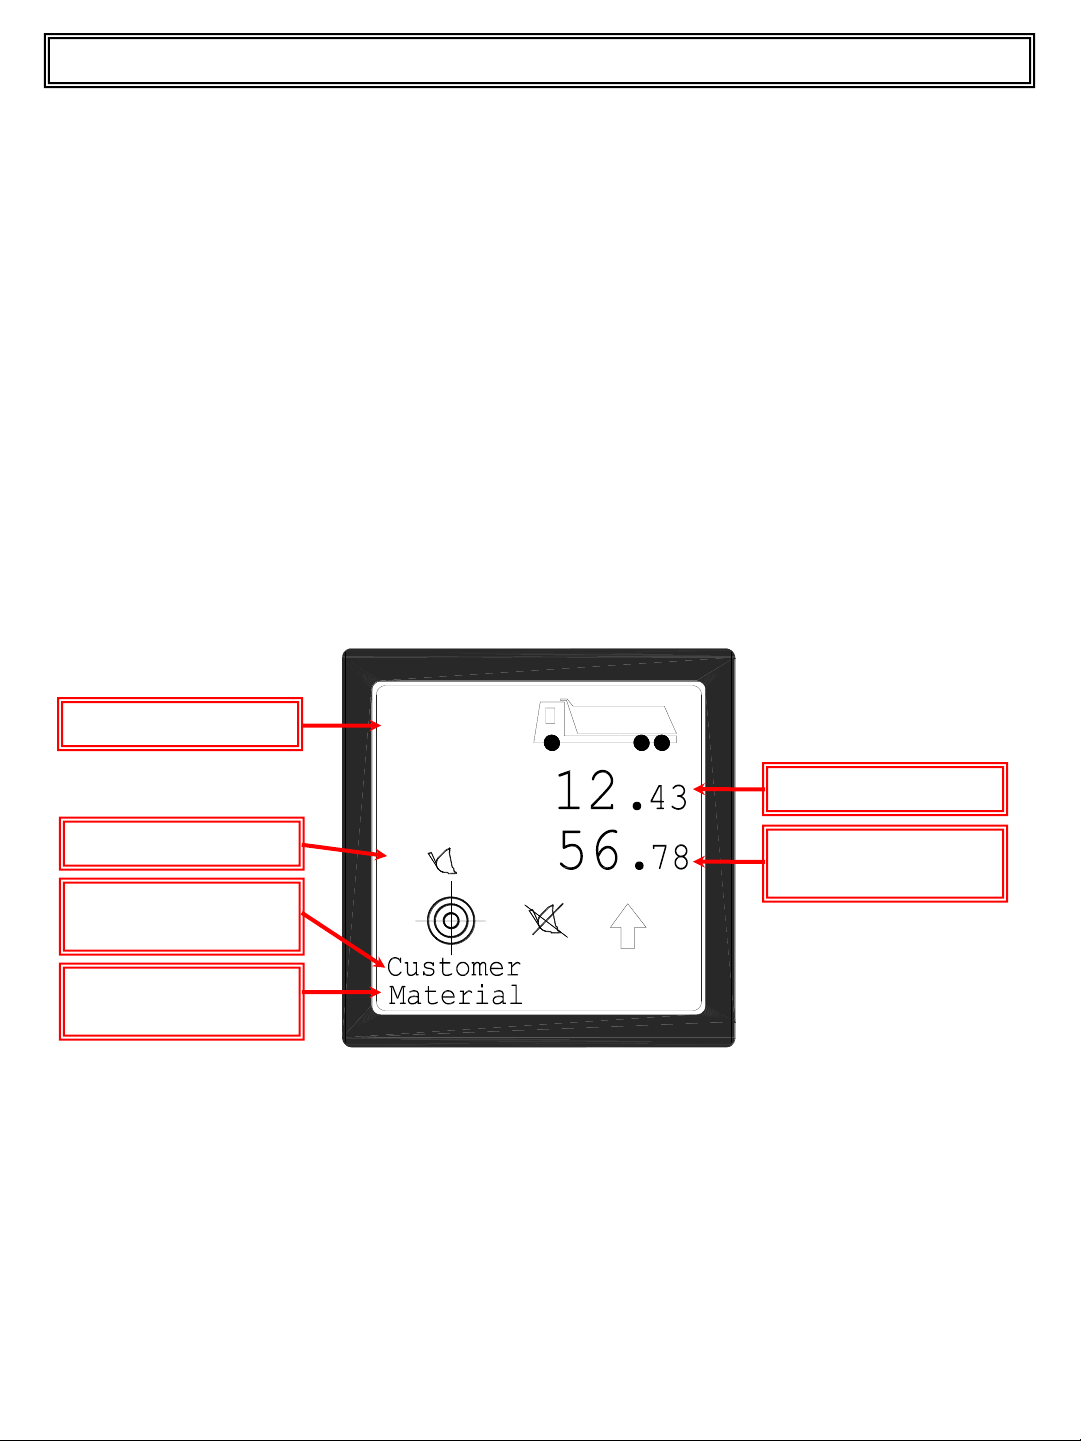
•alphanumerical display
•dynamic weighing (without stopping the lifting arm)
•display of partial weights and relative totals automatically
summed without operator intervention
•possibility of partial zeroing for precise loadings
•setting of 1000 different clients with name, address, etc.
•setting of 200 types of materials with name
•setting 50 different operators
•setting 500 truck Nos.
•setting 100 projects
•sum of the truck loads
•subtraction of the partial loads starting from the target
•display of totals for materials
•4 different calibrations
•set the maximum load
also if the system has a printer:
•print tickets for each weighing
•print total tiucket at the end of each load
•end of day (week, month or year) summary grouped together by type of material loaded.
•date and time
•Load up to 10 different materials on the same truck
•Load up to 10 different trucks in the same time.
TOP MASTER systems have RS-232/C serial communication for connections with other
intelligent external units: infrared port, modem, radio etc. and to enter further code No. from
the optional alphanumerical keypad.
3
Top Master User Manual

Main Unit
4
Ref.
0
Depth
Radius
Enter
Selghi
Sel jkl
abc
Product
pqrs tuv
Tare
wxyz
Utility
Enter
Menù
mno
ghi
Sel jkl
abc
Product def
Client
pqrs tuv
Tare
wxyz
Utility
Enter
Menù
Displays
Setting and
operation keys
Signal lamps indicate
that the maximum
load set has been
reached
26-contact connector
for connection to the
junction box
ON/OFF
switch
4-contact connector
for connection roll
printer and P.C.
4-contact connector
for connection card
printer and keypad
I/R port
Top Master User Manual

Displays
TOTAL
XXX
XXX
ton
10
+
1
2
6
7
1 Display of truck loading with respect to the maximum load set.
The tank fills in percentage with respect to the maximum load set.
2 Display of the total weight
3 Display of the partial weight
4
Display of the type of weighing
Indicates that it is weighing adding
Indicates that it is weighing subtracting
5 Indicates weighing disabled
6
Displays the number of weighing (buckets).
The bucket icon moves dynamically until weighing is complete.
Wait for Weighing Start Weighing End Weighing
7 Indicates that a maximum load has been set
8 Displays the customer name or code No.
9 Displays the material name or code No.
10
Signal lamps
Indicates that the maximum weight set has been reached.
Green lamp on and red lamps off: “Continue to weigh”
Red lamps on and green lamp off: “Maximum load reached or exceeded” 5
3
4
8
9 5
+
-
10
Top Master User Manual

Setting and Operating Pushbuttons
6
mno
ghi
Sel jkl
abc
Product def
Client
pqrs tuv
Tare
wxyz
Utility
Enter
Menù
1 Used to access Diagnostic and Calibration
2 Used to access Target, Maximum Load
3 Used to execute Printer functions
4 Used for direct access of Material setting
5 Used for delete Partial, Total, Tare procedure access
6 Press to set Tare or Reset (Press more than 5 sec.)
7 Used for direct access to Customer setting
8 Used to go back from selected menus to working page
9 Used to access tare enabling and exclusion of weighing system
10 Used to confirm selections and data
11 Used to move UP and DOWN on page and menus and set values
(+ and -)
2
3
10
1 11
11
11
11
4 7
6 9
5 8
ghi
Sel
pqrs
abc
Product
jkl
Menù
tuv
Tare
wxyz
Utility
Enter
mno
def
Client
Top Master User Manual

Operating the Remote Control
7
1 Printer command switch (to request the ticket or end of the day
ticket, end of the day ticket press and hold for 10 seconds.)
2 Total Zeroing switch (before a new loading)
3 Partial Zeroing Switch (of the last bucket load)
4 Audible alarm of operation (active in the measurement phase)
5 Connecting Cable
4
2
1
3
5
Top Master User Manual

TOTAL
XXX
XXX
ton
10
+
Dynamic Weighing Mode
The system is based on the measurement of the lift cylinder piston pressure (by means
of the pressure transducer) and the calculation of the raise speed (with proximity
switches or inclinometer).
To perform the weighing completely close the bucket, raise the arm keeping the engine
Rpm’s constant and the the lift lever full open and wait for the unit to give the audible
signal, which signals when the system is performing the weighing.
It is important during this audible signal not to alter the conditions of machine: the
upward movement must remain constant and the Rpm’s. The machine must work level
and should be subjected to as few movements as possible.
When the audible signal is finished the central unit display will read:
For correct weighing the following must be respected.
•The bucket must be completely closed
•During the audible signal keep the Rpm’s at and raise lever fully open.
•During the weighing the machine must be as level as possible.
Note: Unit of measurement
•mTon = Metric ton (2204 lbs or 1000 kg)
•LBS = pounds (0.45359 kg)
•iTon = Imperial/Long ton (2240 lbs or 1016 kg)
•sTon = Short ton (2000 lbs or 907.18 kg)
•KG = kilogram (2.204 lbs)
Total weight
Weight of the
single Load
Unit of measurement
Number of weighing
Customer Code No.
or name
Material Code No.
or name
8
Top Master User Manual

TARE ZEROING PROCEDURE
Perform an empty weighing maintaining a constant raise speed. After the audible
weighing signal (weighing performed correctly) is given proceed as follows.
Press and release the TARE pushbutton, the displayed load will indicate zero and
press and release the ENTER pushbutton to save the new tare value. If you press the
tare function by mistake press and release the HOME pushbutton to restore the old
value.
Pressing and holding the TARE pushbutton for more than 5 seconds will zero the tare
value. Press and release the UTILITY pushbutton to change the display :
The tare value is displayed on the right side of the label. The Tare value is displayed
across from the Tare line.
Setting a New Tare
A new tare should be set when the bucket is changed or the oil changed in the
hydraulic system, or when residual material is built up in bucket. When setting a new
tare, the weight of the quantity deposited can be zeroed and only the material which
is effectively loaded into the truck is weighed.
Before beginning the loading operations the state of the tare should be checked by
performing an empty weighing; if it is not zero or close to zero. Repeat the operation
two or three times a day to compensate for the variation of temperature of the
hydraulic oil.
Tare
Disable
Count Down
Machine
Use IR
MultiProduct
Correction 100
Time Setting
Using the Remote Control and press and holding the
Total Zero switch will tare the value. To perform an
empty weighing press and hold the Tot Zero switch and
raise the boom at a constant Rpm, with the raise lever
fully open. The audible alarm will sound and then stop.
The new tare value is saved automatically.
9
Top Master User Manual

10
During the loading process, the machine may be used for other reasons and you
want to keep the value of the load performed so far, the weighing can be suspended
temporarily and then resumed to finish loading the truck.
Proceed as follows:
Press and release the UTILITY pushbutton, the display appears as below:
Disable the Weighing Feature
Press and release the the UP or DOWN pushbutton to scroll to the Disable line
and press and release the ENTER pushbutton to disable the weighing. The
asterisk to the left of “Disable” confirms that the weighing system is excluded.
To enable the weighing, follow the procedure above, the asterisk will disappear.
Tare
Disable
Count Down
Machine
Use IR
MultiProduct
Correction 100
Time Setting
Tare
* Disable
Count Down
Machine
Use IR
MultiProduct
Correction 100
Time Setting
Top Master User Manual

Tare
Disable
Count Down
Machine
Use IR
MultiProduct
Correction 100
Time Setting
To activate or deactivate the Count Down function proceed as follows:
Press and release the UTILITY pushbutton, the display appears as below:
Count Down Function
When using this feature you must enter a Target load in order for it to count down the
weight, see page 19-20. Once activating the COUNT DOWN function the maximum
load value is shown on the display. Each partial is subtracted from the maximum load
and when the maximum load is exceeded, the audible alarm will sound when the load
is below zero. 11
Tare
Disable
*Count Down
Machine
Use IR
MultiProduct
Correction 100
Time Setting
Press and release the UP or DOWN pushbutton to scroll to the Count Down
line and press and release the ENTER pushbutton to enable the function. The
asterisk to the left of “Count Down” confirms that the weighing is Counting Down
now.
Top Master User Manual
To disable the function, follow the procedure above, the asterisk will disappear.

The Top Master display can be moved between 4 different machines and store 4
separate calibrations.The machine function can select the machine in use and thus its
specific calibration at any time.
To set the machine in use proceed as follows: Press and release the UTILITY
pushbutton. The display looks as below.
Machine Function
Machine 1 = 1st calibration
Machine 2 = 2nd calibration
Machine 3 = 3rd calibration
Machine 4 = 4th calibration
12
Tare
Disable
Count DW
Machine x
Use IR
MultiProduct
Correction 100
Time Setting
X=1 or 2 or 3 or 4
Press and release the UP or DOWN pushbutton to scroll to the Machine line.
Then use the LEFT (-) or RIGHT (+) pushbutton to select the proper machine
number.
Press and hold the HOME pushbutton to return to the main weighing display
Top Master User Manual
NOTE!
Correction setting is used when adjusting the load when you have an error due to
cold or hot conditions.
It has no effect on the calibration and should be set back to 100% if adjusting it in
these conditions.

13
Top Master User Manual
Infrared Communication
Optional
Tare
Disable
Count DW
Machine
Use IR
MultiProduct
Correction 100
Time Setting
To use this function you must have the Dispenser option to proceed as follows: Press and
release the UTILITY pushbutton. The display looks as below
Press and release the UP or DOWN pushbutton to scroll to the Use IR line.
Enable the infrared transmission for a time limited period (about 3 minutes). In this
time you can use the Dispenser tool (optional). Roll printer is disabled.
See Dispenser user manual for further information.

The Multi-Product function enables the possibility to load up to 10 different products on
the same truck.
By default; this function is disabled to keep the software 100% compatible with the
previous version; so the operator can continue to work as usual:
The system memorizes all the material loaded at the end of the truck load: when
“delete total” is pressed actual total weight is stored in the total of the product
selected in this moment. Nothing happens if the operator changes the product
selected in the middle of the truck load.
Enabling the Multi-Product function:
The operator can load on the same truck different materials. See this example:
1) Select as usual the first material to load (GRAVEL) and start to fill the truck
2) After one or more buckets the operator is free to select another material (MIXED)
and start to load this material.
3) When the quantity of the second material is enough the operator can select a third
material to load or return to the first (GRAVEL in this example) continuing from the
previous value of load reached.
If you have used the Multi-Product function during the load of a truck you can see in
the printer ticket the total truck load as usual and the single load of each material.
The system memorizes these data at the end of the truck load as usual (“delete
total”) keeping the correct load for every material.
14
Top Master User Manual
Tare
Disable
Count DW
Machine
Use IR
MultiProduct
Correction 100
Time Setting
Multi-Product/Multi-Truck function
To use this function you must have the Dispenser option to proceed as follows: Press and
release the UTILITY pushbutton. The display looks as below
Press and release the UP or DOWN pushbutton to scroll to the MultiProduct line.

During a Multi-Product load you can see two icons on the display:
: Last bucket load is displayed.
: Total for the selected material is displayed.
Switch between these visualizations by press and releasing the RIGHT (+) pushbutton.
TOTAL
ton
10
XXX
XXX
+L
T
TOTAL
ton
10
XXX
XXX
+
T
L
The Multi-Truck function is always enabled and is completely transparent by the operator.
Changing the truck selected during a load (Total Load > 0) system freezes in memory
actual load and it starts again to load from 0. Then you can finish the second truck
(usually with print total and delete total) and load again previous truck selecting it’s code
(previous values are restored on the display!).
NOTE: using Multi-Product and Multi-Truck all the partial values are lost when cycling the
power during a load !
15
Top Master User Manual
Multi-Product/Multi-Truck function

Press and release the UTILITY pushbutton, the display appears as below.
Example : If the TOP MASTER works with 5% less than the real weight the value of
correction must be increased of 5 points percentage. (105%)
If the TOP MASTER works with 5% more than the real weight the value of
correction must be decreased of 5 point percentage. (95%)
Once the situation changes due to temperature the correction should be returned to
100%
16
Top Master User Manual
Correction Function
Tare
Disable
Count DW
Machine
Use IR
MultiProduct
Correction 100
Time Setting
Press and release the UP or DOWN pushbutton to scroll to the Correction 100 line.
This function is used to correct and constant error in the weighing accuracy without effecting
the calibration of the system when a variation is seen by the operator.
Press and release the LEFT (-) or RIGHT (+) pushbutton to increase or decrease the
correction

17
Tare
Disable
Count DW
Machine
Use IR
MultiProduct
Correction 100
Time Setting
Setting Date and Time
Press and release the UTILITY pushbutton. The display looks as below.
Press and release the UP or DOWN pushbutton to scroll to the value you want to
change and then press and release the LEFT (-) or RIGHT (+) pushbutton to
change the value. Once you have changed all values use the DOWN pushbutton to
scroll to the Confirm line and press and release the ENTER pushbutton to
confirm. After 5 seconds the system returns to normal operation display.
Note:
if a roll printer is used, the new date will be printed on the ticket.
Press and release the UP or DOWN pushbutton to scroll to the Time Setting line.
Press and release the ENTER pushbutton to confirm.The display looks as below.
TIME SETTING
hh: xx
mm: xx
ss: xx
DD: xx
MM: xx
YY: xx
Confirm
hh = Hour
mm = Minutes
ss = Seconds
DD = Day
MM = Month
YY = Year
Top Master User Manual

18
Partial Zeroing, Partial x 2, Total, Totals and Tare Procedure
Press and release the MENU pushbutton. The display looks as below.
Delete
Partial
Partial x 2
Total
Product Totals
Tare
to cancel the tare.
to cancel the last weighing .
Partial x 2 LAST WEIGHT CALIBRATION FUNCTION: When the last bucket load
did not empty completely, to find out the effective total quantity
unloaded weigh the material which has remained in the bucket and use
the PARTIAL X 2 CANCEL function; this function will remove twice the
last value weighed from the total so that you can find out the total value
of material which has really been put into the truck.
Total to cancel the total load
Product
Totals
to cancel the totals in the memory (end of the day, end of the week, etc.).
This operation takes about 30 seconds.
Tare
Partial
Press and hold the HOME pushbutton to return to the main display.
Top Master User Manual
Press and release the DOWN pushbutton to scroll to the proper line and press and
Release the ENTER pushbutton to confirm.

19
Target, Unit of Measurement, Customer Code, Material,
Operator, Truck, Project, and Project
Press and release the SEL pushbutton. The display looks as below.
Press and release the UP or DOWN pushbutton to scroll to the line you want to
changes. Use the LEFT (-) or RIGHT (+) pushbutton to change the value for the
Customer/Material/Operator code/Truck No or Project No.
Proceed as follows to enter a particular name to the code No.
To enter a new name, product, operator, truck no., etc. go to page 22.
Target
Unit Meas.
Customer
Product
Operator
Truck N.
Max N.W.
Project
Top Master User Manual

Target (Maximum Load)
20
Target
Unit Meas.
Customer
Product
Operator
Truck N.
Max N.W.
Project
Press and release the DOWN pushbutton to scroll to the TARGET line..
Use the LEFT (-) or RIGHT (+) pushbutton to change the value required and confirm by
pressing and releasing the ENTER pushbutton.
When the limit is reached the system sound an intermittent audible alarm.
Note: the Target or Maximum Load is displayed on the basis of the Unit of measurement
chosen.
In any case the minimum increase/decrease step is 100 kg/lbs. or 0.1 ton.
If the Count Down function is activated the operative Target will be the initial Count
Down value.
Top Master User Manual
Table of contents