3TEMP Hipster WALL User manual

Rev.300305-02
Made in Sweden
WALL 300305-2
User manual
Hipster WALL

2
Rev.300305-02
Hipster WALL

3
Hipster WALL
Rev.300305-02
Arvika, Sweden; the home of where the Hipster brewer was created and innovated.
It is in this small industrial town in the middle of Sweden, where hard working men and
women reap their harvest of diligent work; a work of tradition and dedicated skilled
craftsmanship. Arvika is sincerely famous for it’s warmth during the summer, for it’s
environment of magnicent forests and foremost for the surroundings of 365 smaller
lakes, that enhance mysticism and stories from the past to the present.
The home of the Hipster brewer.
The Hipster is classied by baristas and coee people all over the world as one of
the best amongst lter coee machines. Hipster is a unique brewer. Unlike any other
brewer in the market it let’s you control blooming, temperatures in 3 phases and water
distribution for each recipe. It is designed and developed in Sweden by a team with vast
experience from the coee industry.
The Hipster is a game changer as it brings lter coee to a new level. Precision of ow
rate, temperature and extraction time are critical factors to reach the best possible
extraction. In order to preserve the coee’s origin in avour and fragrance, makes the
demands high on these 3 parameters precision in order to recreate the same taste
experience time and again.
The fresh water system and the recipe parameters makes a huge impact on the taste
and a tiny impact on the environment as it consumes barely 7 watts when not brewing.
We hope that you will enjoy your new Hipster brewer.
With best wishes
Copyright 2021 All rights reserved
3TEMP/PLAE2TECH
The Story
1. Preface

4
Rev.300305-02
Hipster WALL

Rev.300305-02
Table of contents
1. Preface .........................................................................................3
2. Safety information ................................................................6
2.1 Introduction..........................................................................................6
2.2 This user manual...............................................................................6
2.3 Intended use .......................................................................................6
2.4 Capacity of the machine...............................................................7
2.5 General safety instructions .........................................................7
2.6 Disposal..................................................................................................9
3. Before rst use ........................................................................9
4. Product description Hipster KOBRA......................... 10
4.1 Description......................................................................................... 10
4.2 The cycle of The Hipster taste-proling ............................ 11
5. Technical data........................................................................12
5.1 Technical data...................................................................................12
5.2 Wiring diagram HeatCase..........................................................13
6. Unpacking................................................................................14
7. Installation instructions ....................................................15
7.1 Description..........................................................................................15
7.2 Installation ..........................................................................................15
7.3 Installation button controller....................................................17
7.4 Installation HeatCase....................................................................19
7.5 Machine status ................................................................................20
7.6 Connect the water lter system..............................................21
7.7 Connect the network ....................................................................21
8. User instructions................................................................. 22
8.1 Prepare a brew ................................................................................ 22
8.2 Select recipe ................................................................................... 23
8.3 Thermos detachable serving base...................................... 25
9. Recipe settings with button controller. .................. 26
10. Care and maintenance after use.............................. 29
10.1 Cleaning instructions................................................................. 29
10.2 Cleaning Thermos....................................................................... 30
10.3 Cleaning water strainer............................................................ 33
11. Spare parts ........................................................................... 34
12. Extra additions ................................................................... 35
13. Declaration of conformity ............................................ 36
14. Warranty ................................................................................ 37
15. Notes ....................................................................................... 38

6
Rev.300305-02
Hipster WALL
This appliance is intended to be used in applications such as:
- Oces and other commercial working environments.
- Hotels, motels.
- Bed and breakfast environments.
Switch o the appliance when NOT in use.
Do not use this appliance for anything other than intended use. Any maintenance other
than cleaning should be performed by authorised person.
Do not install the machine in environments in which the temperature is 0 C or less.
Do not use outdoors.
2. Safety information
2.1 Introduction
2.2 This user manual
Information for the user:
Note!
safety instructions
This user manual is an integral part of the appliance and must be kept in an accessible
place under the working life of the appliance.
2.3 Intended use
Warning!
Electric shock hazard!
ALL ELECTRICAL
WORK MUST BE
PERFORMED
BY AN AUTHORIZED
ELECTRICIAN
Save these instructions for future reference.
Caution!
Burn hazard!
Protect your eyes.

7
Hipster WALL
Rev.300305-02
Read all the user instructions before using the machine.This guide contains important
instructions for proper and safe use of the Hipster brewer. Always keep this manual close
at hand for future reference. We reserve the right for any errors in text or images and any
necessary changes made to technical data. In the event of technical problems or any
questions. Please contact our [email protected]
The appliance is only to be installed in locations where it can be overseen by trained
personnel.
The English language is used for the original instructions.
This appliance is not intended for use by persons (including children) with reduced physical,
sensory or mental capabilities, or lack of experience and knowledge, unless they have been
given supervision or instruction concerning use of the appliance in a safe way and if they
understand the hazards involved by a person responsible for their safety.
Children should be supervised to ensure that they do not play with the appliance.
This appliance can be used by children aged from 8 years and above and persons with
reduced physical, sensory or mental capabilities or lack of experience and knowledge if
they have been given supervision or instruction concerning use of the appliance in a safe
way and understand the hazards involved.
Cleaning and user maintenance shall not be made by children without supervision.
Access to the service area should only be permitted to persons having knowledge
and practical experience of the appliance, in particular as far as safety and hygiene are
concerned.
The appliance is intended for indoor use and max altitude 2000m.
Warning! In case of improper use the responsibility is on the user.
2.5 General safety instructions
For the optimal performance of the WALL these parameters shall not be exceeded:
Maximum permissible inlet water pressure : 800KPa (8Bar)
Minimum permissible inlet water pressure: 200KPa (2Bar)
Maximum working temperature: 40C
Minimum working temperature: 10 C
2.4 Capacity of the machine.

8
Rev.300305-02
Hipster WALL
Avoid getting the coee machine wet and do not spray liquids onto it. In the event of contact
with liquid immediately switch o the power at the socket or main breaker and dry the
appliance thoroughly.
Never immerse the machine, plug or mains cable in water because there is a danger of
electric shock.
Never try to put out a re or ames with water. Turn of the appliance and remove the plug
from the socket, and smother the ames with a re blanket or other appropriate cover.
Do not operate any electrical appliance with a damaged cord or after the appliance has been
damaged in any manner. If the mains cable is damaged it must be replaced by the customer
service to avoid a hazard. Only use the attached power cord.
Do not install the machine in environments in which the temperature is 0° C or less.
Do not move the Hipster brewer whilst in operation.
Do not use the Hipster brewer on a sink drain board.
Do not place the Hipster brewer on or near a hot gas or electric burner, or where it could
touch a heated oven.
Keep the appliance and accessories clean. Follow the cleaning instructions provided in this
manual.
Only use original spare parts. The use of spare parts not approved by the
manufacturer could lead to res, electric shocks or personal injury.
Do not place on top of any other appliance.
Appliance must not be cleaned by a water jet.
Electric shock hazard!
This appliance dispense hot water from the brewing hat and may cause injury if not
used correctly. The brew basket must be in place before a recipe is started.
Do not move the brew basket while the coee is being brewed.
Do not touch hot surfaces with your hands; use the handles and buttons.
Burn hazard!
9
Hipster WALL
Rev.300305-02
2.6 Disposal
Do not dispose of the device in household waste! Recycle devices, accessories and
packaging. Observe applicable national regulations.
EU only: In accordance with European Directive on waste electrical and electronic
equipment and implementation in national law, used electric power tools must be
collected separately and handed in for environmentally friendly recycling. By collecting and
recycling waste, you help save natural resources, and make sure the product is disposed in
an environmental friendly and healthy way.
Remove all packaging materials attached to your Hipster WALL. Ensure that you have
removed all parts and accessories before discarding the packaging.
Clean parts and accessories, lter, basket and thermos. Use warm water and a gentle dish
washing liquid and rinse well. Wipe the outer housing and drip tray with a soft damp cloth and
dry thoroughly.
3. Before rst use
Danger! Do not immerse power cord, power plug for appliance in water or any
other liquid. Do not clean any of the parts or accessories in the dishwasher.
Accept dish try. Important to clean the product propertly.
Important! Ensure that you have removed all parts and accessories before
discarding the packaging.
Note! We recommend that you save the packaging for a possible return
of goods.

10
Rev.300305-02
Hipster WALL
4. Product description Hipster WALL
4.1 Description
Brewer hat
Brew basket
Button controller
Thermos 2,5 l
Thermos 3,8 l(option)
Level tube
Coee tap
Wall Bracket
11
Hipster WALL
Rev.300305-02
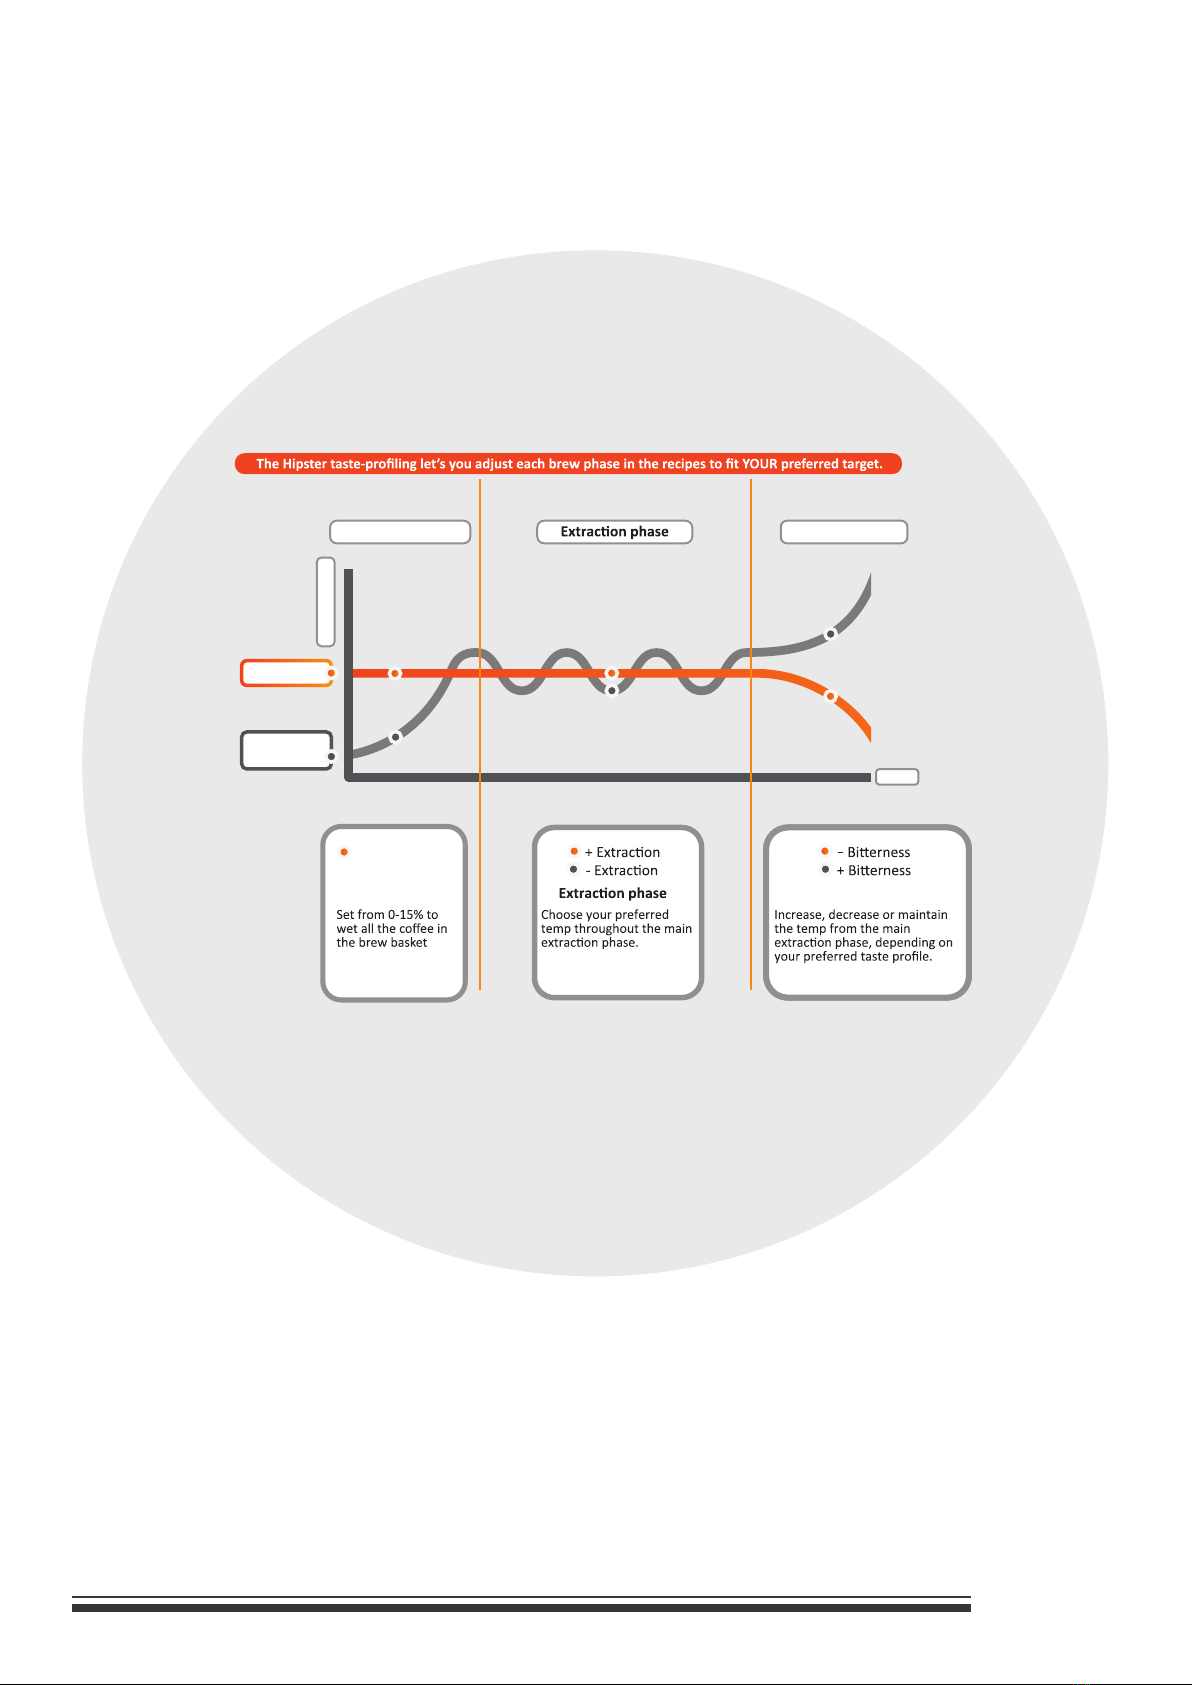
4.2 The cycle of The Hipster taste-proling
”Regular”
brewer
Target
Pre-brew phase End phase
End phase
Time
Temperature
End phase
+ Blooming
Pre-brew phase

12
Rev.300305-02
Hipster WALL
5. Technical data
Including button controller, router.
The machine is placed on the wall. The HeatCase below counter or behind the wall.
Capacity: 1x3,8 lit 200 cups/h.
Dimensions main unit: W275mm/D387mm/H Max 830mm.
Dimensions HeatCase W181,5/D395,5/H262
Weight total : 5 + 9 kg. (HeatCase)
Max power hot: 230V 1x2400W.
Max power cold: 1x38W.
Max power idle: 4 W.
5.1 Technical data
272 181
266
Position is free of choice depending on the height of your thermos.
HeatCase Unit placed behind wall.
The Hot water hose and Control cabels
to be routed through the wall.
Power inlet
Water inlet
320
395
Wall
Dimensions
Hipster UC Wall
300305-02
17-06-02
Jarl Nilson
A3
SHEET 2 OF 3
SCALE:1:5.5
PART NO.
TITLE:
DO NOT SCALE DRAWING
MATERIAL:
DATE
SIGNATURE
NAME
Q.A
APPV'D
DRAWN
Latest Rev:
Description:
Date:
19-11-25
New Version
-02
13
Hipster WALL
Rev.300305-02
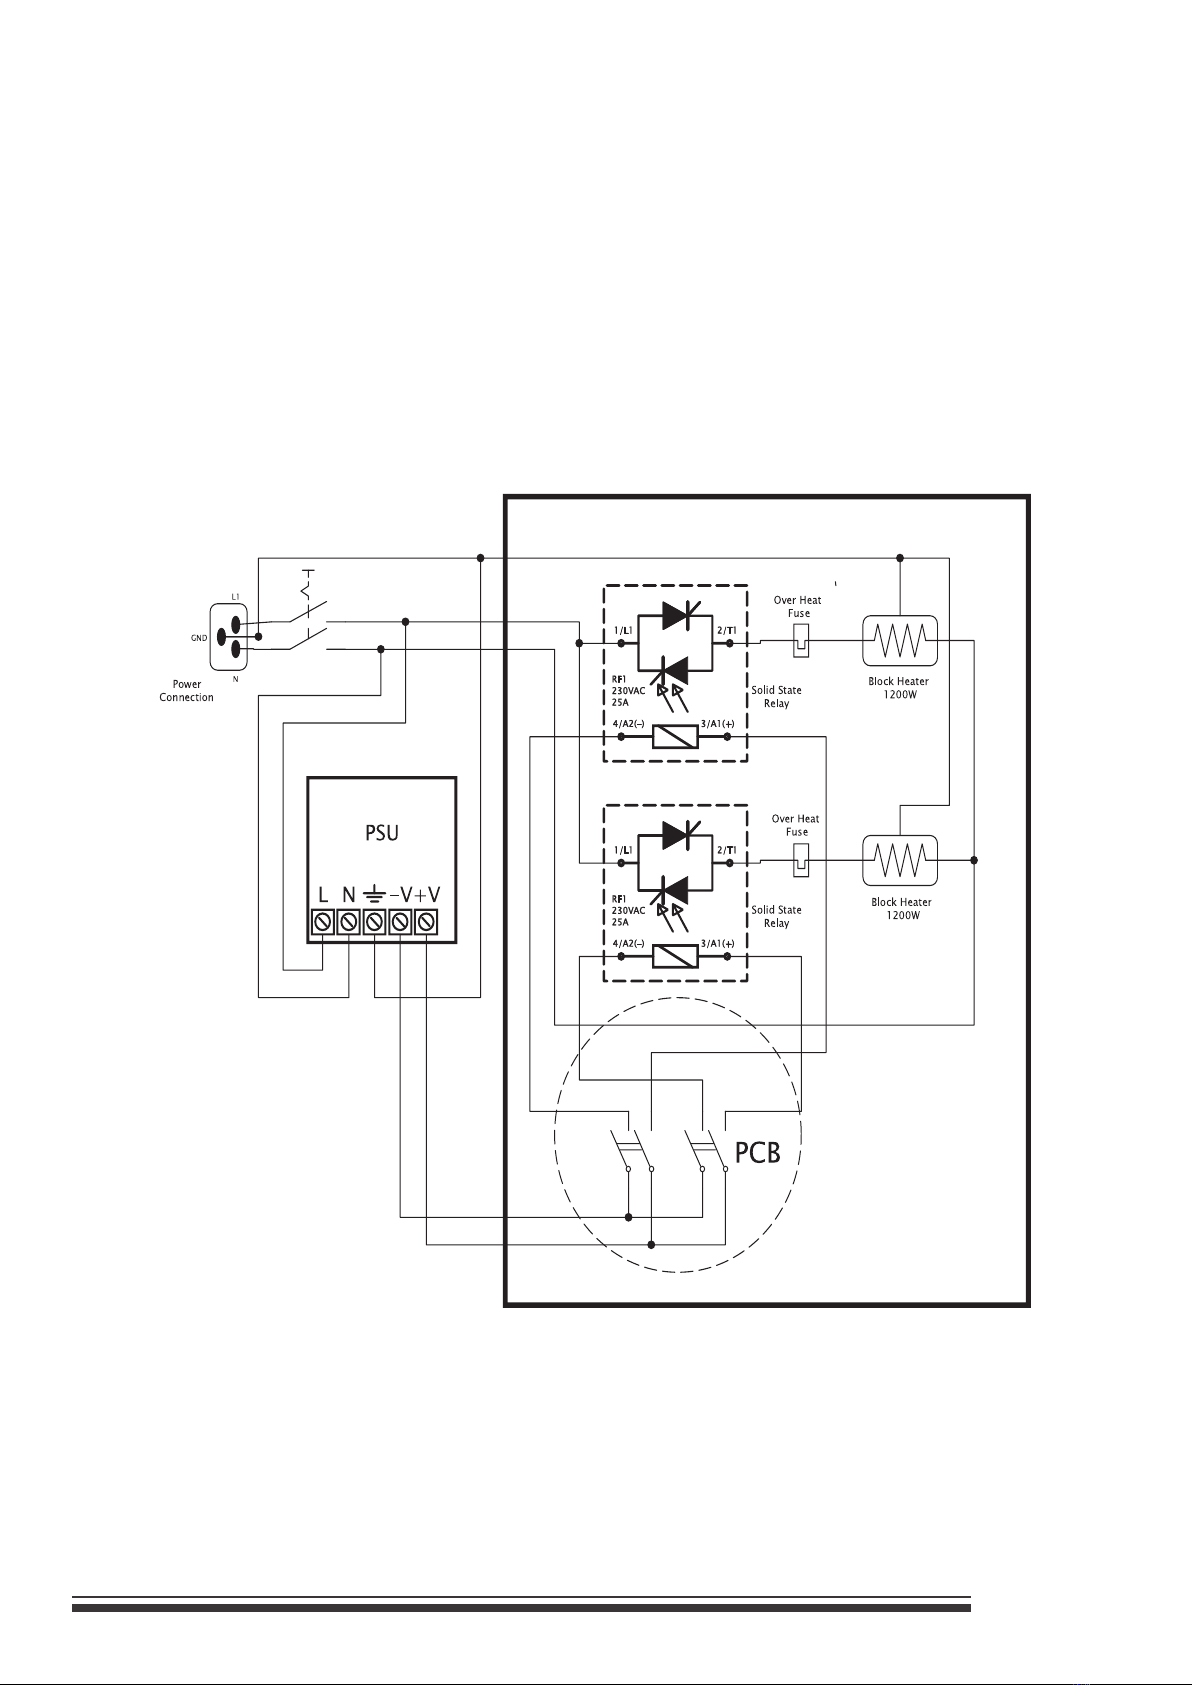
5.2 Wiring diagram HeatCase
220 - 240 VAC 2400W
14
Rev.300305-02
Hipster WALL
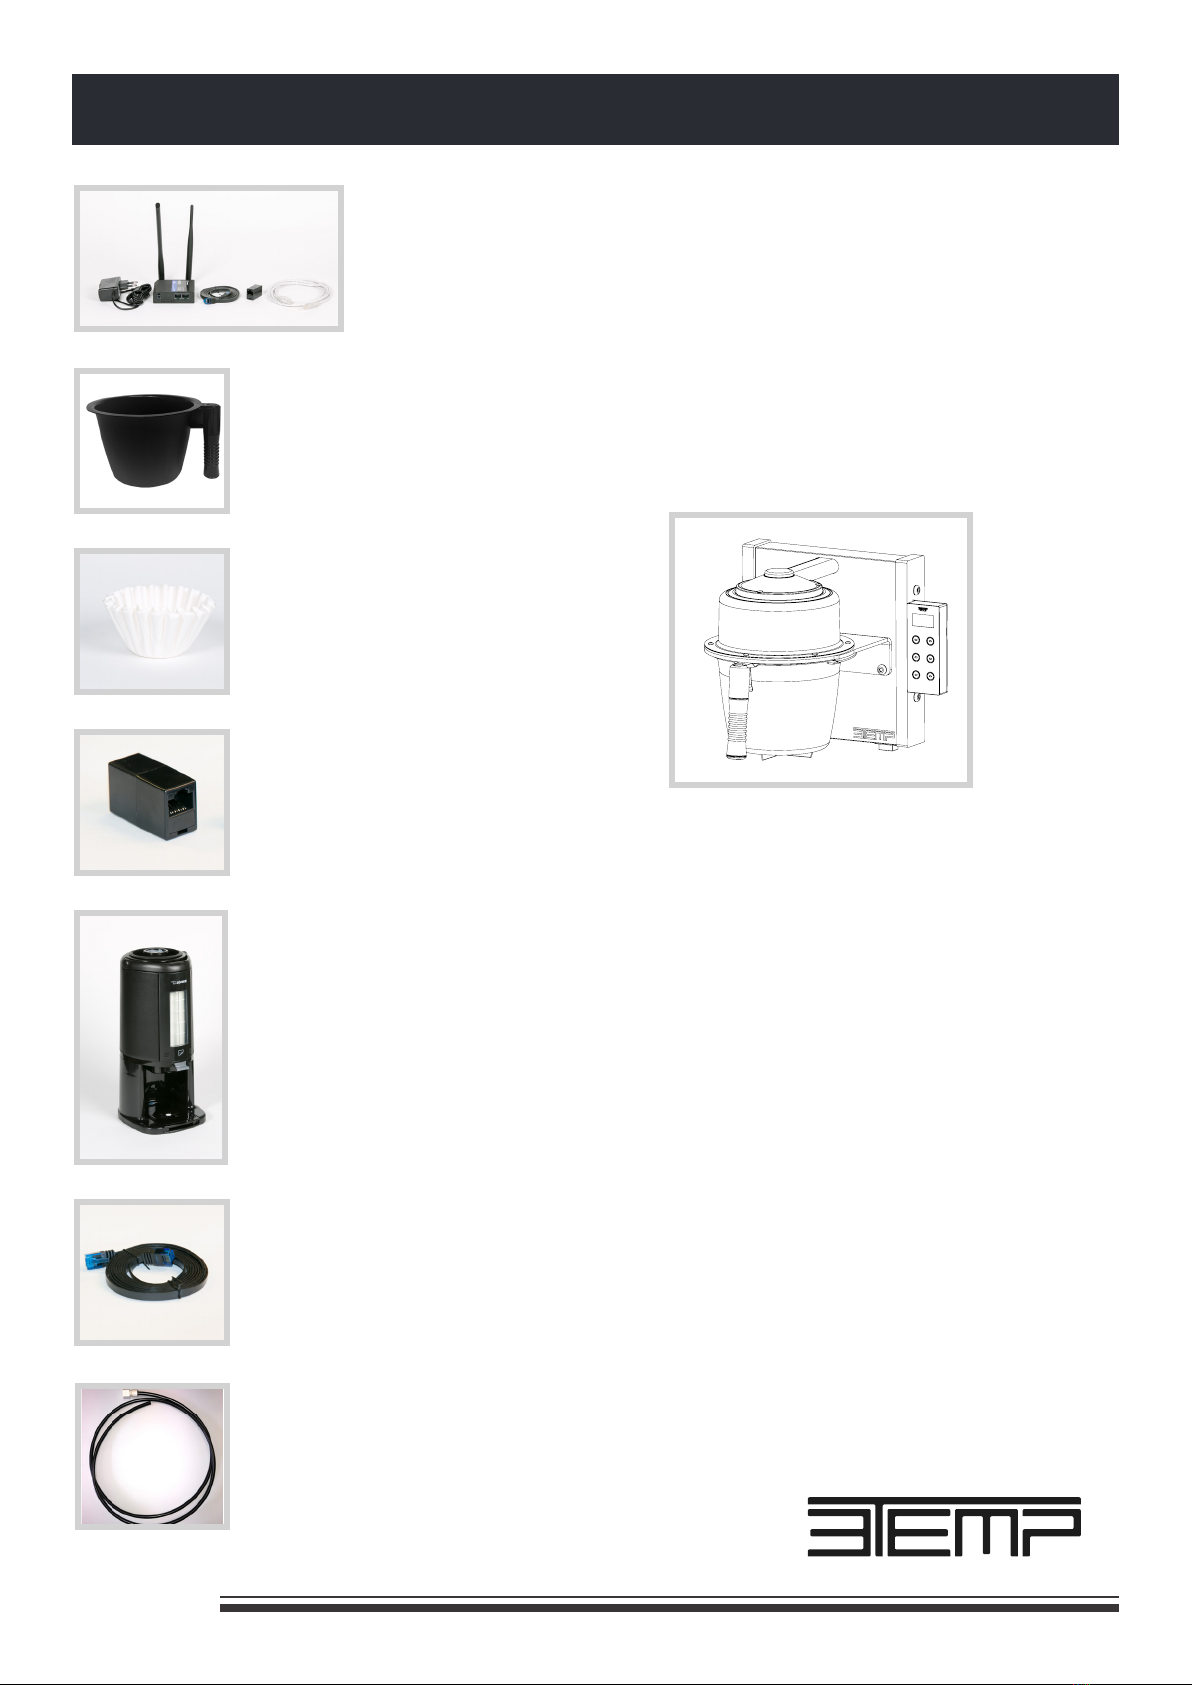
6. Unpacking
Coee lter 1x 25. 110/330
Extension cords router
Thermos 2,5 Litres
RJ hub Extension
adapter
Brew basket plastic
Inlet hose
Router
Main unit
Hipster WALL
15
Hipster WALL
Rev.300305-02
7. Installation instructions
ALL ELECTRICAL
WORK MUST BE
PERFORMED
BY AN AUTHORIZED
ELECTRICIAN
7.1 Description
Spirit-level
Adjustable spanner
Hex key 4 mm
2,5 mm
Drilling machine, Drill
Screwdriver
Marker pen
Hole saw
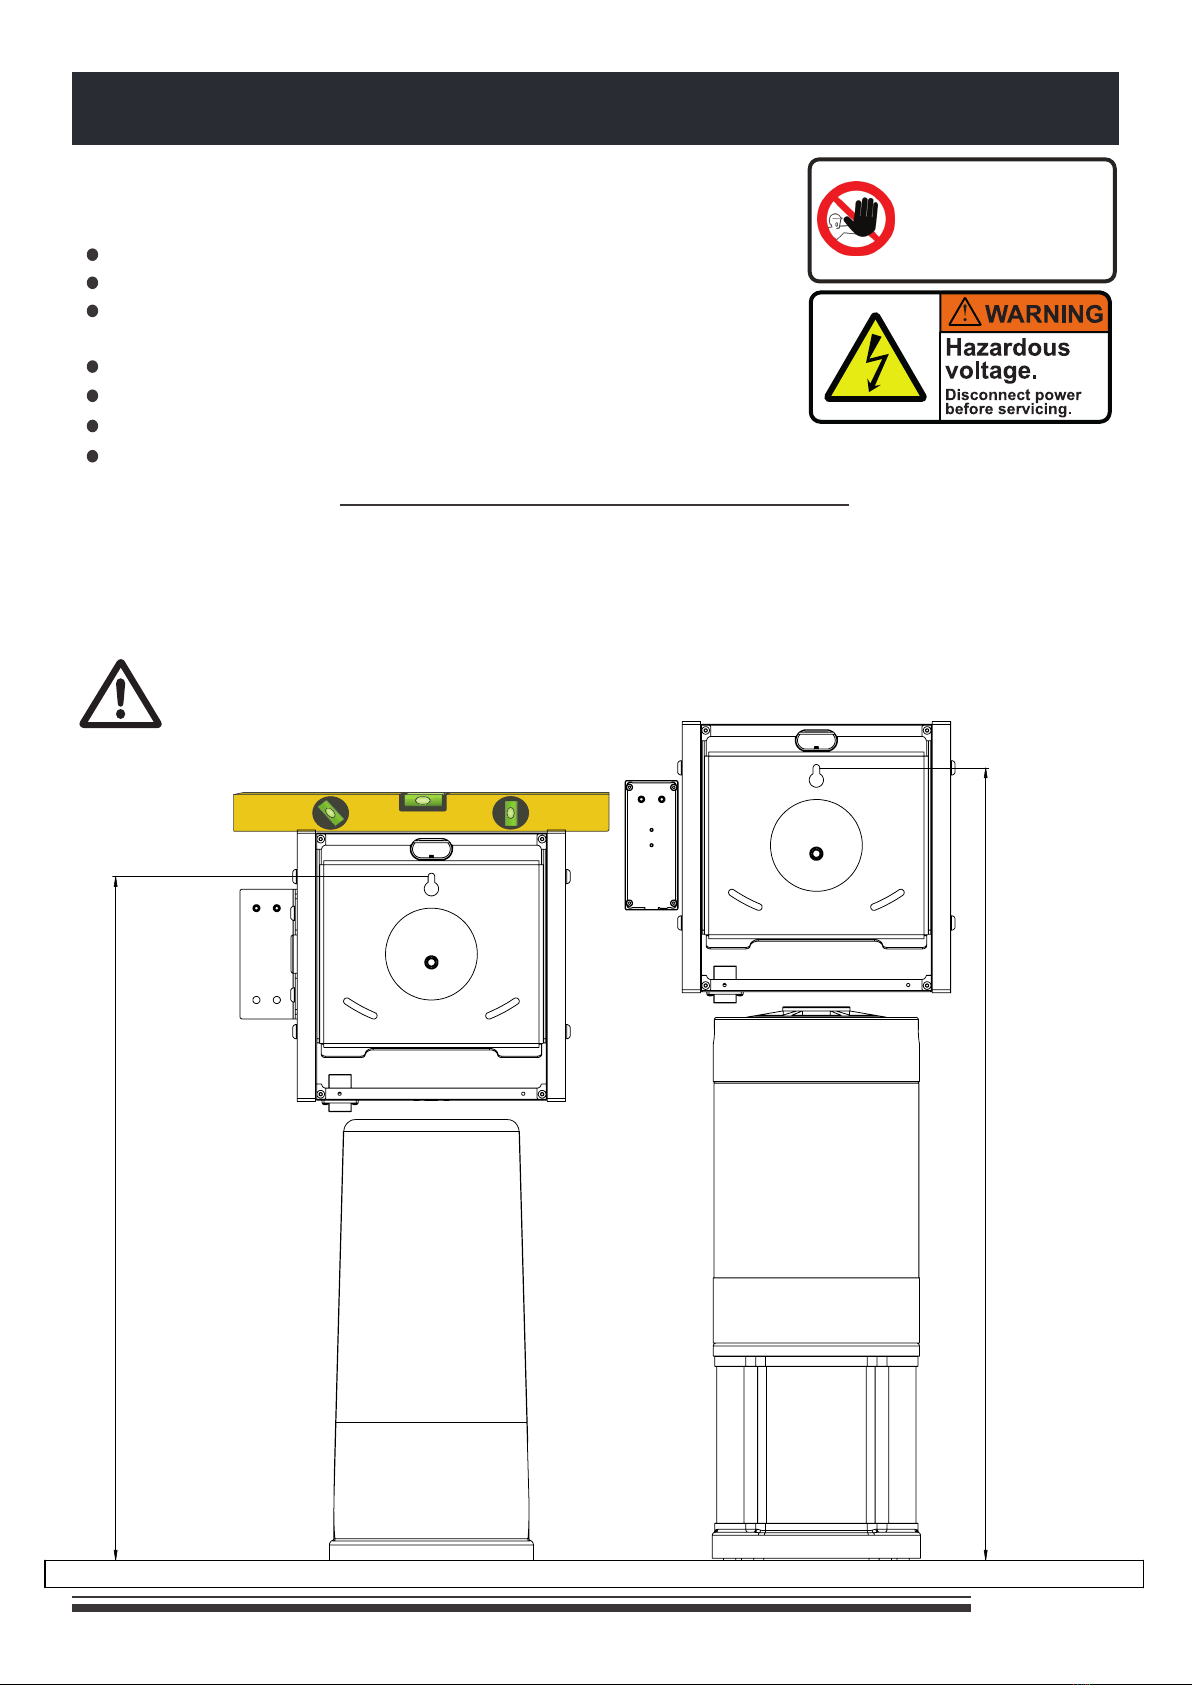
1. Make sure the main wall is vertical.
7.2 Installation
Caution! Make sure the WALL is in
level, or it will not extract evenly in
the lter basket. Use a spirit-level .
Tools needed:
2. Measure the wall bracket. right
in height due to thermos version.
670
777

16
Rev.300305-02
Hipster WALL
3. Dimensions
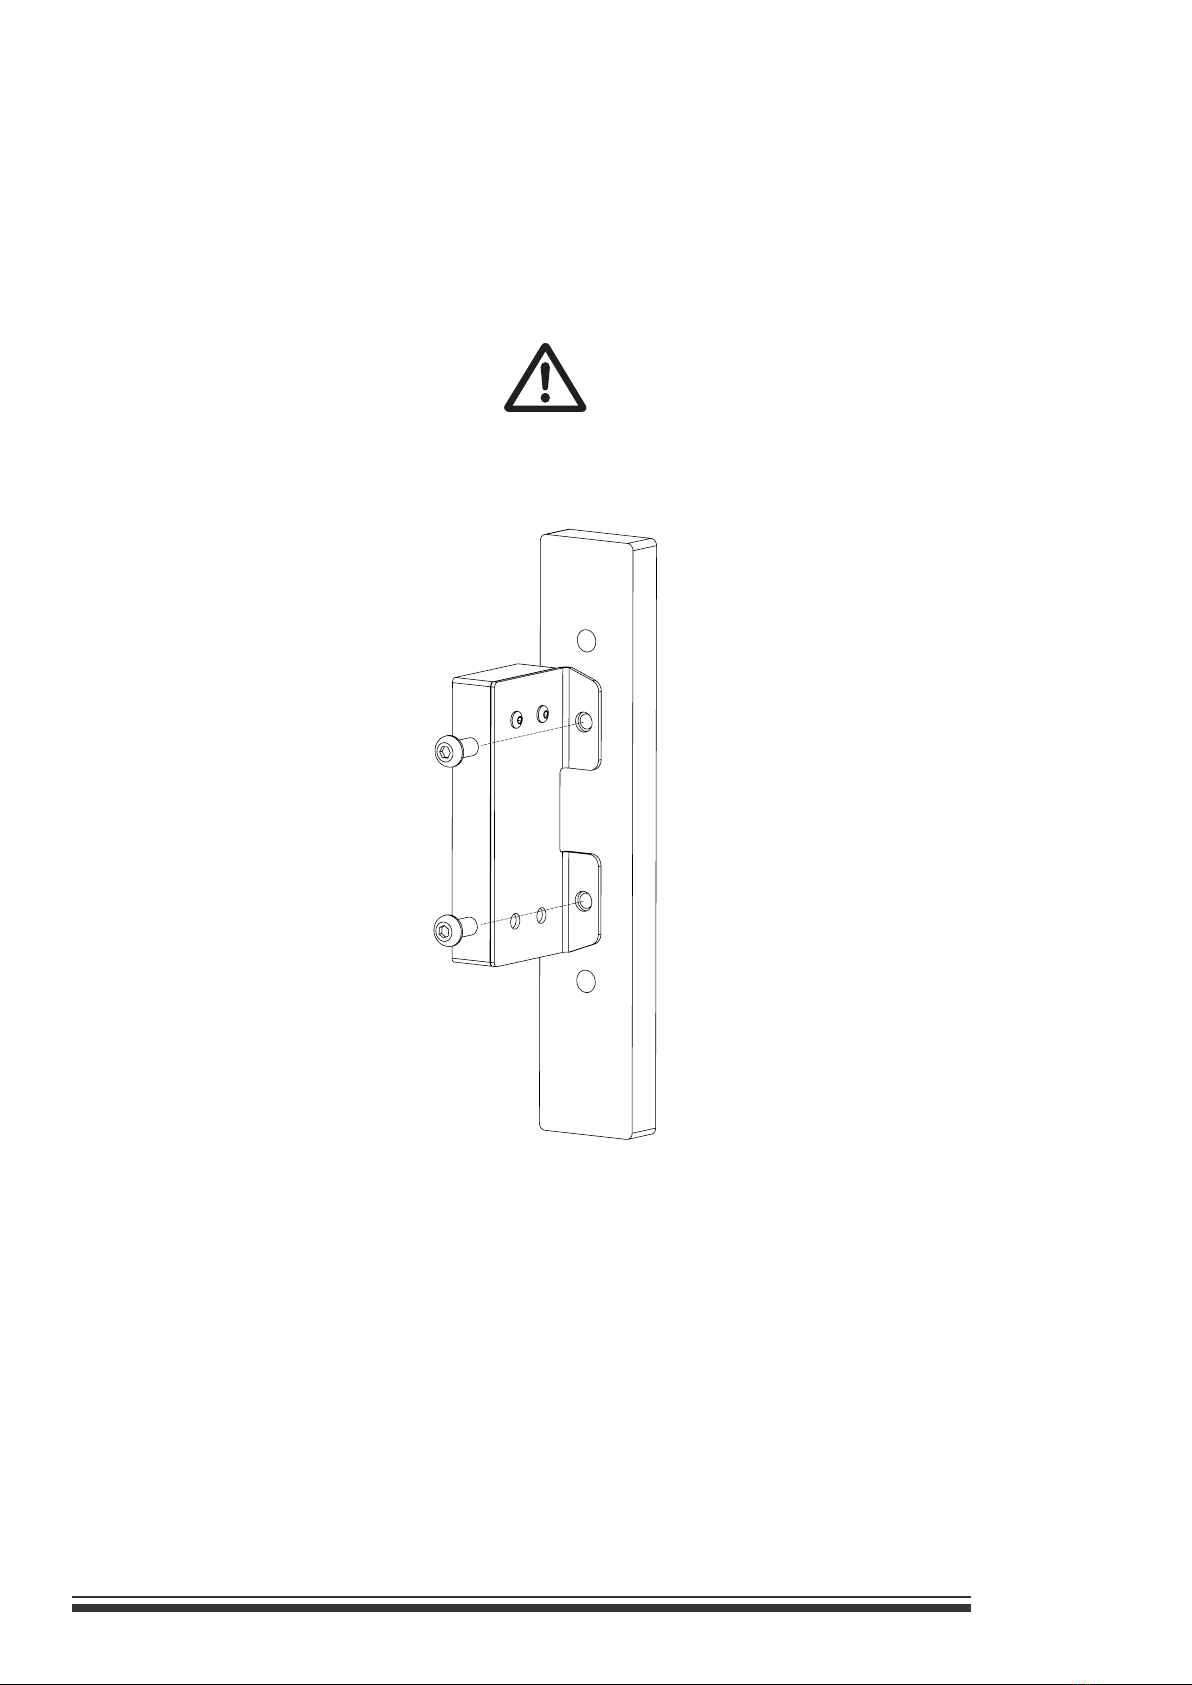
4. Wall bracket plate
17
Hipster WALL
Rev.300305-02
1. Decide where to place the button controller;
either on the left hand side or the right hand
side.
Note! This example is to the right
7.3 Installation button controller

18
Rev.300305-02
Hipster WALL
5. Front
1. Connect the cable between the ports of the
Button controller and the Main unit.

19
Hipster WALL
Rev.300305-02
7.4 Installation HeatCase
Button Controller
Hot water hose
Hat Valve
NTC
1. Fasten the Hot water hose to the Hot water out connector.
Fasten the cords and tighten the inlet hose to the
HeatCase, according to national standard ref. cl. 7.12.1 in
60335-2-75
Inlet water hose

20
Rev.300305-02
Hipster WALL
Drain
Hot water out
On / Off
Cold water in
7.5 Machine status
2. Connect the hoses and the cords in to the HeatCase.
Open the lid.
LAN
Button controller
Power inlet
Fasten the cords from below
Hat Valve,
NTC
Router
Caution!
Warning! Close the lid properly in front of the connections.
Tighten the screw in the middle; if not, the warranty will expire.
recipe
1-8
start/stop
grams of coffee
thermos
1-8
setup
+
HIPSTER
O
Startup
Idle Green
Running Blue
Heater error Red slow blink
Connector error Red fast blink
Watersupply error Red fast blink
State name Light
Table of contents
Other 3TEMP Brewing System manuals

Popular Brewing System manuals by other brands


Ss Brewtech
Ss Brewtech Keg WaSsher manual

Fetco
Fetco Extractor Plus CBS-1241 Users guide and operator instructions

Blichmann Engineering
Blichmann Engineering 2 BBL Hybrid Brewhouse Assembly operation maintenance

Wilbur Curtis Company
Wilbur Curtis Company G4CBHS user guide

PolyKeg
PolyKeg PRO instruction manual

Fetco
Fetco CBS-2152XTS-2G Users guide and operator instructions
