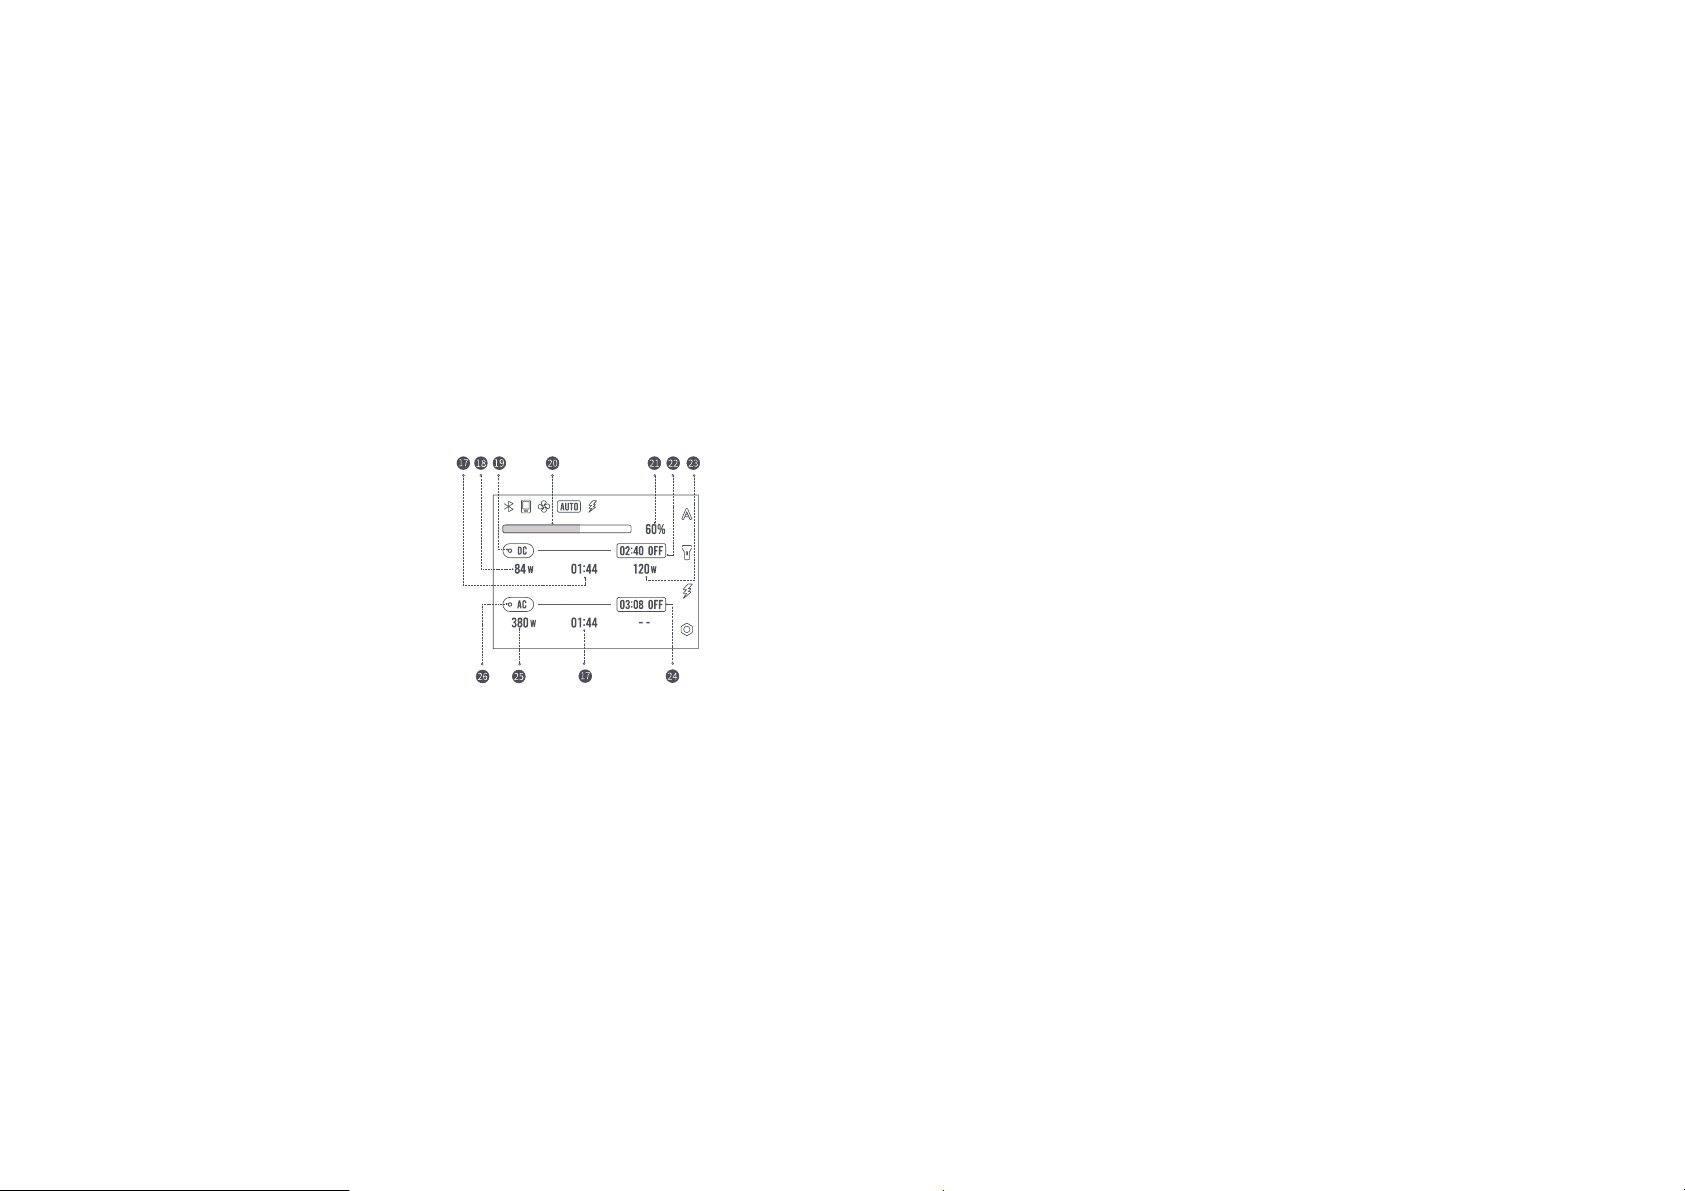
70mai Tera 1000 User manual

70mai Power Station Tera 1000 User Manual

Contents
English ……………………………………………………………………………………………………………………………………………………………………………………………………………………
Español ……………………………………………………………………………………………………………………………………………………………………………………………………………………
Português ………………………………………………………………………………………………………………………………………………………………………………………………………………
Français ……………………………………………………………………………………………………………………………………………………………………………………………………………………
仼儗鏥 ……………………………………………………………………………………………………………………………………………………………………………………………………………………
籖넒⚥俒 ……………………………………………………………………………………………………………………………………………………………………………………………………………………
01
14
25
36
47
58

01
IMPORTANT SAFETY INSTRUCTIONS
WARNING: The following safety precautions should be followed when using this product.
1. Before using this product, please read the manual to ensure correct and safe use.
2. To reduce the risk of injury, close attention is required when using this product near children.
3. Do not put fingers, palms, or any part of the body into the product to avoid personal injury.
4. Do not use unofficial or third-party accessories, otherwise, it may cause product incompatibility, product damage, or even personal injury.
5. To avoid damage to the product, if there is a need to disconnect the power input of the power station, unplug the power cable from the socket first.
6. Do not use modified or damaged batteries as they may cause fire, explosion or other personal injuries.
7. Do not use this product with a damaged power cable, plug or output cable as it will pose a risk of electric shock.
8. Do not disassemble the product by yourself. Otherwise, fire or electric shock may occur. If a fault occurs during use, stop using the product and
contact the service center.
9. If the product fails, unplug the power cable of the product from the socket to reduce the risk of electric shock.
Please read this manual carefully before using the product and keep it in a safe place for future reference.
Safety use
1. Please use the product in a dry and ventilated environment. The product is not waterproof. Do not expose the product to any liquid. Keep the product
dry and do not submerge it in liquid. Do not use the product in a humid environment. Otherwise, it may cause a short circuit, electric shock, fire, or
even explosion.
2. Use the product at an environment temperature of 14°F to 113°F (-10°C to 45°C).
3. Do not use the product in a strong electrostatic or electromagnetic environment. Otherwise, the product may malfunction.
4. Do not disassemble or puncture the product. Otherwise, it may cause battery leakage, fire, or even explosion.
5. If the product suffers a strong impact or is dropped from a high place, do not use it again.
6. If the product falls into the water during use, place it in a safe open area and let it air dry. Do not use the product after drying.
7. Do not place the product in a microwave oven or any pressurized container.
8. Do not put foreign metal objects into the product to avoid short circuiting the battery.
9. Avoid bumping the product against a hard object. Do not place any heavy object on the product.

02
Charging safety
1. Charge the product at an environmental temperature of 32°F to 104°F (0°C to 40°C). Ensure the environment is dry and ventilated. The charging
voltage should not exceed the specified voltage range. Keep away from inflammable materials while charging.
2. Use a standard car charging cable, AC power cable, and other accessories to charge the product. Use of non-standard accessories may result in fire,
electric shock, or other personal injuries.
3. After a long period of use, the product temperature may rise. Do not charge the product immediately and let the product cool to room temperature
before charging.
Air safety
1. Do not carry this product on an airplane.
Maintenance
1. Do not use chemicals or detergents to clean this product. If the surface or port of the product is dirty, wipe it with a piece of dry, soft cloth.
2. To extend the service life of the product, it is recommended to fully charge the product every 3 months.
3. The product and its accessories may contain some small parts. Please keep the product and its accessories out of the reach of children. Children may
inadvertently damage the product and its accessories, or swallow small parts, causing suffocation or other safety hazards.
SAVE THESE INSTRUCTIONS
10. In extreme cases, the product may eject liquid. Avoid direct contact with the ejected liquid. In case of accidental contact with skin, rinse immediately
with plenty of water. If the liquid comes into contact with the eyes, seek medical attention immediately. The liquid ejected from the battery may irritate
or burn the skin.
11. Do not connect the product output to a power grid.
Moving or storage instructions
1. The weight of the product is 12.3KG, beware of falling off and hitting when moving the product.
2. Store the product at an environmental temperature of -4°F to 113°F (-20°C to 45°C). The place where the product is stored should be kept dry and
ventilated. The product should not be exposed to direct sunlight, fire, or a similar heat source.

03
Product overview
Function buttons
Function buttons
Ύ
Ύ
LCD display
LCD display
Ώ
Ώ
Power button
Power button
ΐ
ΐ
LED light
LED light
Α
Α
DC input port
DC input port
Β
Β
Anderson input port
Anderson input port
*We have designed different AC output ports in accordance with the local regulations of different countries and regions.
Note: The illustrations of products, accessories, user interface, etc. in the manual are all schematic diagrams and are for reference only. Due to product
updates and upgrades, the actual product may be slightly different from the diagrams. Please refer to the actual product.
Γ
Γ
AC output ports*
AC output ports*
Δ
Δ
AC output indicator
AC output indicator
Ε
Ε
AC output switch
AC output switch
Ζ
Ζ
Quick charge USB-A output port
Η
Η
Type-C output port (PD 60W)
Θ
Θ
5521 output ports
5521 output ports
Ι
Ι
Car port
Car port
Κ
Κ
DC output indicator
DC output indicator
Λ
Λ
DC output switch
DC output switch
Μ
Μ
Type-C output port (PD 18W)
Ν
Ν
USB-A output port
USB-A output port
Ξ
Ξ
AC input port
AC input port

04
1. Function buttons
On the LCD display, press the corresponding function button to
perform different functions.
2. LCD display
When the power station is turned on, the display automatically
lights up to show the current battery level. It will automatically turn
off if no button is pressed within 30 seconds.
3. Power button
Press and hold the power button for about 3 seconds to turn on/
off the power station.
4. LED light
Press the corresponding function button on the main interface of
the display to turn on/off the LED light.
5. DC input port (8mm)
Connect the car charge or solar charge cable to this port to charge
the power station.
6. Anderson input port
Connect the Anderson connector of the solar charge cable to this
port to charge the power station.
7. AC output port
Supply power to devices with rated power less than 1200W.
8. AC output indicator
When AC output is enabled, the indicator turns on.
9. AC output switch
When the power station is turned on, press this switch to turn on/
off the AC output.
10. Quick charge USB-A output port
Applicable to devices charged through USB-A port, and supports
up to 18W quick charge.
Devices connected to this port that do not support quick charge
are still charged at standard speed.
11. Type-C output port (PD 60W)
Applicable to devices charged through Type-C port, and supports
up to 60W quick charge.
Devices connected to this port that do not support quick charge
are still charged at standard speed.
12. 5521 output port
Applicable to devices charged through 5521 port.
13. Car port
Applicable to general car electrical appliances, with a maximum
output current of 10A.
14. DC output indicator
When DC output is enabled, the indicator turns on.
15. DC output switch
When the power station is turned on, press this switch to turn on/
off the DC output.
16. Type-C output port (PD 18W)
Applicable to devices charged through Type-C port, and supports
up to 18W quick charge.
Non-quick charge enabled devices connected to this port will
charge at normal speed.

05
17. USB-A output port
Applicable to devices charged through the USB-A port, such as
mobile phones and tablets.
18. AC input port
Connect the standard AC power cable to the port, and attach the
other end to the mains to charge the power station.
Turning on/off
1. Turning on
Press and hold the power button for about 3 seconds to turn on
the power station. After powering on, the LCD display turns on and
the main interface displays.
2. Turning off
Press and hold the power button for about 3 seconds to turn off
the power station. After shutting down, the LCD display turns off.
The power station automatically turns off in the following
situations:
ƽAfter the power station is turned on, if no button is pressed
after 10 minutes and the charging, discharging and timing
functions are disabled, the power station will automatically turn
off.
ƽIf the built-in battery power is low, the power station will
automatically turn off.
Downloading 70mai App
How to use
1. Press and hold the power button for about 3 seconds to turn
on the power station.
2. Press the DC or AC output switch. The corresponding output
indicator lights up, and the output port is enabled.
3. Connect the power supply of the electrical equipment to the
output port of the power station to supply power to the device.
4. After using the power station, press the DC or AC output
switch. The corresponding output indicator turns off and the
output port is disabled to save power.
Note: Battery power may be slightly lost during transportation
and storage. Before using the power station for the first time, it is
recommended to fully charge the power station.
1. 70mai Power Station Tera 1000 × 1
2. Car charge cable × 1
3. AC power cable × 1
4. Storage bag × 1
5. User manual × 1
Packing list
This product can be used with 70mai App.
Please search for “70mai” in the App Store
or scan the QR code to download and install
the App.

06
LCD display
Setting
The power station includes the following settings:
1. Timing function: When the power station is turned on, the AC/
DC ON and OFF timer can be set respectively.
ӪAC/DC ON timer: When the AC/DC output of the power
station is off, the AC/DC ON timer can be set. At set time, the
AC/DC output automatically turns on and can supply power to
electrical appliances.
If the AC/DC output is manually turned on before the set time,
the timer will not take effect.
ӪAC/DC OFF timer: When the AC/DC output of the power
station is on, the AC/DC OFF timer can be set. At set time, the
AC/DC output automatically turns off, and the power station
cannot supply power to electrical appliances.
If the AC/DC output is manually turned off before the set time,
the timer will not take effect.
2. Factory reset: Restore the power station to default settings.
3. Output setting: Switch to the appropriate AC voltage and
frequency according to the actual situation of the country and
region.
4. Troubleshooting guide: Scan the QR code on the screen to
obtain the fault manual of the product.
Main interface
1. Bluetooth: Bluetooth is always on by default.
2. Output auto off (no load): Press the corresponding function
button to enable or disable this function. When enabled, the
output ports of the power station will automatically turn off
when the output is idle or at low load*.
3. LED light: Press the corresponding function button to switch
between the three states of LED lights on, SOS, and LED lights
off.
4. AC fast charge: Press the corresponding function button to
enable or disable this function. When enabled, the power
station will be charged with a higher power, and the charging
time will be shortened.
5. Setting: Press the corresponding function button to enter
settings of the power station.
6. Remaining battery power: Displays the current remaining
battery power and percentage of the power station.
* Low load indicates the case when the AC output <10W or DC output
<100mA for 10 hours.

07
Charging/discharging only interface
7. Charging icon: Indicates that the power station is in charging state.
8. Mobile icon: Indicates that the power station is connected to the Bluetooth of the mobile phone.
9. Fan icon: When the ambient temperature of the power station is too high or the load is too large,
the temperature-controlled electric fan inside the power station is turned on and this icon will be
shown.
10. Icon for Output auto off (no load): Indicates that this function is enabled.
11. AC fast charge icon: Indicates that the AC fast charge function is enabled.
12. Current input: Total power of input.
13. Charging time: Time required to fully charge the power station. The value is estimated based on
the current battery level and total input power.
When the power station is charging or discharging only, the display shows the following interface:
Charging state
Discharging state
14. Discharging icon: Indicates that the power station is in discharging state.
15. Current output: Total power of output.
16. Discharge time: The remaining working time of the power station. The value is determined based
on the remaining battery power and total output power.

08
When the AC/DC ON or OFF timer is set, or the power station is in the state of charging and discharging simultaneously, the display shows the
complex operating interface.
Take the following operating condition as an example: DC and AC outputs are both turned on, the AC and DC OFF timers are set, and the
power station is charged via a DC connection. The meaning of the icons and data is as follows:
17. Working time: The working time of power station. The value is estimated based on the
current input and output power and the remaining battery level of the power station.
18. DC output power: Total power of DC output.
19. DC output indicator: Currently the DC output is enabled and the indicator is on.
20-21. Remaining battery power: Current remaining battery power and percentage of the
power station.
22. DC OFF timer: A DC OFF timer is set. Currently the DC output port of the power station
is turned on, and will automatically turn off after 2 hours and 40 minutes.
23. DC input power: The power station is in charging via a DC connection, and the DC
charging power is displayed.
24. AC OFF timer: An AC OFF timer is set. Currently the AC output port of the power station
is turned on, and will automatically turn off after 3 hours and 8 minutes.
25. AC output power: Total power of AC output.
26. AC output indicator: Currently the AC output is enabled and the indicator is on.
Complex operating interface

09
The power station can be charged using an AC power cable, car charging cable, or solar panel.
2. DC charging
ƽCharging with car charger
Connect the plug of the car charging cable to the 8mm DC input port of the power station, and
attach the other end to the cigarette lighter of the car.
Ignite to start the car, and the car’s cigarette lighter port is energized to charge the power
station.
1. AC charging
Connect the 3-pin connector of the AC power cable to the AC charging input port of the power
station, and attach the other end to the mains.
The standard charging time is about 5 hours. If AC fast charge is enabled, the charging time can be
shortened to about 2 hours.
Notes:
ƽPlease turn on the power station before AC charging.
ƽThe AC output is disabled when the power station is in AC charging.
Charging the power station
ƽCharging with solar panel
Connect the solar panel to the power station according to two ways of connector: 8mm port or
Andersen port.
Notes:
ƽThe open-circuit voltage of the solar panel should be between 12 and 27V.
ƽSupports up to 2 70mai portable solar panels in parallel.
ƽThe 8mm and Andersen ports of the power station cannot be connected simultaneously.

10
3. Simultaneous AC and DC charging
When charging via an AC input, the power station can also be charged via a DC
input (solar panel or car cigarette) at the same time.
Note: If the AC fast charge function is enabled, AC and DC charging cannot be
performed simultaneously.
Specifications
General specifications Output
Product: 70mai Power Station Tera 1000 USB-A output (× 1): 5V 2.4 A
Model: PN1010A Car port(× 1): 13.6V 10A Max.
Capacity: 1043.9Wh USB-A QC output (× 1): 5V 3A, 9V 2A, 12V 1.5A(18W Max.)
Weight: 27lbs (12.3kg) Type-C PD output (× 1): 5V 3A, 9V 3A, 12V 3A, 15V 3 A, 20V 3A(60W Max.)
Size: 11.8 × 8.9 × 11.3inch(30 × 22.5 × 28.7cm) Type-C PD output (× 1): 5V 3A, 9V 2A, 12V 1.5A(18W Max.)
Charge temperature: ૢWRૢWR AC output: 1200W(Surge 2400W), 100-120V~, 50/60Hz(Pure Sine Wave)
Discharge temperature: ૢWRૢWR
DC output (5521 × 2): 13.6V 3A Max.
Input
AC input: 800W Max., 100-120V~, 50/60Hz
DC input: 200W Max.,12-27V 10A Max.

11
Troubleshooting
Issue Possible cause Solution
Power station cannot be
charged
1. The connection between the power cable and the AC
input port or mains socket is poor.
ƽCheck if the cable or plug is broken or deformed.
ƽCheck the connection between the cable and the power station or socket.
ƽClean away any dust or dirt on the contact points of the socket.
2. The connection between the car charging cable and
the DC input port or car cigarette lighter is poor.
ƽCheck if the cable or plug is broken or loose.
ƽCheck the connection between the cable and the power station or car
cigarette lighter.
ƽClean away any dust or dirt on the contact points of the car cigarette lighter.
3. The engine has not been turned on, so there is no
power to the car cigarette lighter. ƽStart the engine of the car.
4. The connection between the solar panel and the DC
input port is poor.
ƽCheck if the cable or connector is broken or loose.
ƽEnsure that the connection is tight and secure.
5. For AC charging, the power station was not first
turned on. ƽTurn on the power station first.
6. Other causes ƽContact the service center.
Power station has no
output
1. The power cable of the electrical device is not
connected to the output port of the power station.
ƽCheck if the power cable or the port of the electrical device is broken or
deformed.
ƽEnsure that the connection is tight and secure.
2. The DC/AC output switch is not turned on. ƽTurn on the DC/AC output switch.
3. Other causes ƽContact the service center.
Power station output is
interrupted
1. The auto off (no load) function is triggered because of
very low or intermittent output. ƽDisable auto off (no load).
2. The AC/DC OFF timer is set and the AC/DC output turns
off when the time expires. ƽDisable or adjust the AC/DC OFF timer.
3. Other causes ƽContact the service center.
Note: If an error code is shown, check the online troubleshooting guide to identify the issue and find the corresponding solution.

12
FCC compliance statement
This device complies with Part 15 of the FCC Rules. Operation is subject to the following two conditions: (1) this device may not cause harmful
interference, and (2) this device must accept any interference received, including interference that may cause undesired operation.
changes or modifications not expressly approved by the party responsible for compliance could void the user’s authority to operate the
equipment.
This equipment has been tested and found to comply with the limits for a Class B digital device, pursuant to Part 15 of the FCC Rules. These
limits are designed to provide reasonable protection against harmful interference in a residential installation. This equipment generates, uses
and can radiate radio frequency energy and, if not installed and used in accordance with the instructions, may cause harmful interference to
radio communications. However, there is no guarantee that interference will not occur in a particular installation.
If this equipment does cause harmful interference to radio or television reception, which can be determined by turning the equipment off and
on, the user is encouraged to try to correct the interference by one or more of the following measures:
-- Reorient or relocate the receiving antenna.
-- Increase the separation between the equipment and receiver.
-- Connect the equipment into an outlet on a circuit different from that to which the receiver is connected.
-- Consult the dealer or an experienced radio/TV technician for help.
FCC Radiation Exposure statement
This equipment complies with FCC radiation exposure limits set forth for an uncontrolled environment. This equipment should be installed
and operated with minimum distance 20cm between the radiator and your body. This transmitter must not be co-located or operating in
conjunction with any other antenna or transmitter.
FCC ID: 2AOK9-PN1010A
Risk of Electric Shock. Connect only to properly grounded outlets.
Risque de choc électrique. Connectez uniquement à des prises correctement mises à la terre.
Refer to the SN Coding Rules to obtain the production date of this product.
The SN has 16 digits in total, with the 10th to 12th digits representing the year, the month, and the day.
The rules are as follows:
Year: Take the last digit of the year, for example, 2021 is represented by 1.

13
ISED compliance statement
This device contains licence-exempt transmitter(s)/receiver(s) that comply with Innovation, Science and Economic Development Canada’s
licence-exempt RSS(s). Operation is subject to the following two conditions:
(1) This device may not cause interference.
(2) This device must accept any interference, including interference that may cause undesired operation of the device.
L’émetteur/récepteur exempt de licence contenu dans le présent appareil est conforme aux CNR d’Innovation, Sciences et Développement
économique Canada applicables aux appareils radio exempts de licence. L’exploitation est autorisée aux deux conditions suivantes :
(1) L’appareil ne doit pas produire de brouillage;
(2) L’appareil doit accepter tout brouillage radioélectrique subi, même si le brouillage est susceptible d’en compromettre le fonctionnement.
Month: The digit 1-9 represents the month from January to September. October(A), November(B),December(C).
Day: The digit 1-9 represents the day from 1st-9th. The rest of the days are represented by upper case letters in a alphabetical order(A-Z), but
exclude the letters I, O, U, V.
For example, in the SN “XXXXXXXXX1BWXXXX”, “1BW” means that the product was produced on November 28th, 2021.
Reportez-vous aux règles de codage SN pour obtenir la date de production de ce produit.
Le SN comporte 16 chiffres au total, les 10e et 12e chiffres représentant l’année, le mois et le jour. Les règles sont les suivantes :
Année : Prenez le dernier chiffre de l’année, par exemple, 2021 est représenté par 1.
Mois : Les chiffres 1 à 9 représentent le mois de janvier à septembre. Octobre(A), Novembre(B), Décembre(C).
Jour : Les chiffres 1 à 9 représentent le jour du 1er au 9. Le reste des jours est représenté par des lettres majuscules dans l’ordre alphabétique
(A-Z), à l’exclusion des lettres I, O, U, V.
Par exemple, dans le SN « XXXXXXXXX1BWXXXX », « 1BW » signifie que le produit a été fabriqué le 28 novembre 2021.
ISED Radiation Exposure statement
This equipment complies with IC RSS-102 radiation exposure limits set forth for an uncontrolled environment. This equipment should be
installed and operated with minimum distance 20 cm between the radiator and your body.
Cet équipement est conforme aux limites d’exposition aux radiations IC CNR-102 établies pour un environnement non contrôlé. Cet
équipement doit être installé et utilisé avec une distance minimale de 20 cm entre le radiateur et votre corps.

14
INSTRUCCIONES DE SEGURIDAD IMPORTANTES
ADVERTENCIA: Cuando use este producto debe seguir las siguientes medidas de seguridad.
1. Para asegurarse de hacer un uso correcto y seguro de este producto, lea el manual antes de usarlo.
2. Para reducir el riesgo de lesiones, extreme las precauciones cuando use este producto cerca de niños.
3. Para evitar lesiones personales no introduzca los dedos, las palmas de las manos ni ninguna otra parte del cuerpo en el producto.
4. No utilice accesorios no oficiales o de otros fabricantes, de hacerlo podría causar incompatibilidad del producto, daño del producto o incluso lesiones
personales.
5. Para no dañar el producto, si necesita desconectar la entrada de energía de la central eléctrica, desenchufe en primer lugar el cable de alimentación
de la toma.
6. No utilice baterías adulteradas o dañadas que puedan provocar incendios, explosiones u otras lesiones personales.
7. No utilice este producto con cables de alimentación, enchufes o cables de salida dañados, ya que pueden suponer un riesgo de descarga eléctrica.
8. No desmonte el dispositivo. De hacerlo podría provocar un incendio o sufrir una descarga eléctrica. Si mientras usa el producto se produce un fallo,
deje de usarlo y póngase en contacto con el servicio posventa.
9. Si se produce un fallo del producto, desenchufe el cable de alimentación de la toma para reducir el riesgo de descarga eléctrica.
Lea este manual con atención antes de utilizar el producto y consérvelo en un lugar seguro para futuras referencias.
Uso seguro
1. Utilice el producto en un ambiente seco y ventilado. Este producto no es resistente al agua. No exponga el producto a líquidos. Mantenga el producto
seco y no lo sumerja en líquidos. No utilice el producto en un entorno húmedo. De lo contrario, puede causar cortocircuitos, descargas eléctricas,
incendios o incluso una explosión.
2. Use el producto en un ambiente a entre -10°C y 45°C (de 14°F a 113°F).
3. No utilice el producto en un entorno electrostático o electromagnético fuerte. De lo contrario, es posible que el producto no funcione correctamente.
4. No desmonte ni perfore el producto. De lo contrario, podría causar fugas de la batería, incendios o incluso una explosión.
5. En caso de que el producto sufra un fuerte impacto o caiga de un lugar alto, no vuelva a utilizarlo.
6. Si durante su uso el producto cae al agua, colóquelo en una zona abierta y segura, y déjelo secar al aire. Una vez se haya secado, no use el producto.
7. No coloque el producto en un horno microondas ni en recipientes bajo presión.
8. Para evitar un cortocircuito de la batería, no coloque cuerpos metálicos extraños en el producto.
9. Evite golpear el producto contra objetos duros. No coloque objetos pesados sobre el producto.

15
Carga segura
1. Cargue el producto a una temperatura ambiente a entre 0°C y 40°C (de 32°F a 104°F). Asegúrese de que el ambiente es seco y está entilado. La
tensión de carga no debe exceder el rango de tensión especificado. Durante la carga, mantenga el producto alejado de materiales inflamables.
2. Utilice el cable de carga de carga estándar para automóvil, el cable de alimentación de CA y otros accesorios para cargar el producto. El uso de
accesorios no estándar puede provocar incendios, descargas eléctricas u otras lesiones personales.
3. Después de un largo período de uso, la temperatura del producto puede aumentar. No cargue el producto inmediatamente, antes de cargarlo, déjelo
enfriar hasta que alcance la temperatura ambiente.
Seguridad Aérea
1. No transporte este producto en avión.
Mantenimiento
1. No utilice productos químicos ni detergentes para limpiar este producto. Si la superficie o el puerto del producto está sucio, límpielo con un paño
suave y seco.
2. Para extender la vida útil del producto, se recomienda cargar completamente el producto cada 3 meses.
3. El producto y sus accesorios pueden contener algunas piezas pequeñas. Mantenga el producto y sus accesorios fuera del alcance de los niños.
Los niños pueden, de manera involuntaria, dañar el producto y sus accesorios o tragarse las piezas pequeñas, lo que puede causar asfixia u otros
peligros.
GUARDE ESTAS INSTRUCCIONES
10. En casos extremos, el producto puede expulsar líquido. Evite el contacto directo con el líquido expulsado. En caso de contacto accidental con la piel,
enjuague inmediatamente con abundante agua. Si el líquido entra en contacto con los ojos, busque atención médica de inmediato. El líquido que
expulsa la batería puede irritar o provocar quemaduras en la piel.
11. No conecte la salida del producto a la red eléctrica.
Instrucciones para el desplazamiento o almacenamiento
1. El producto tiene un peso de 12,3KG. Tenga cuidado de no dejarlo caer o golpearlo durante su desplazamiento.
2. Almacene el producto a una temperatura ambiente de entre -20°C y 45°C (de -4°F a 113°F). El lugar en el que se almacena el producto debe
mantenerse seco y ventilado. El producto no debe exponerse a la luz solar directa, al fuego ni a fuentes de calor similares.

16
Descripción general del producto
Botones de función
Botones de función
Ύ
Ύ
Pantalla LCD
Pantalla LCD
Ώ
Ώ
Botón de encendido
Botón de encendido
ΐ
ΐ
Luz LED
Luz LED
Α
Α
Puerto de entrada CC
Β
Β
Puerto de entrada Anderson
*Hemos diseñado diferentes puertos de salida de CA de acuerdo con las regulaciones locales de diferentes países y regiones.
Nota: Las ilustraciones de productos, accesorios, interfaz de usuario, etc. del manual son diagramas esquemáticos y son solo para referencia. Debido a
las actualizaciones y mejoras del producto, el producto real puede diferir ligeramente de los diagramas. Observe el dispositivo real.
Γ
Γ
Puertos de salida de CA*
Δ
Δ
Indicador de salida de CA
Ε
Ε
Interruptor de salida de CA
Ζ
Ζ
Puerto de salida USB-A de carga rápida
Η
Η
Puerto de salida de Tipo-C (PD 60W)
Θ
Θ
Puertos de salida 5521
Ι
Ι
Puerto de carga de coche
Κ
Κ
Indicador de salida de CC
Λ
Λ
Interruptor de salida de CC
Μ
Μ
Puerto de salida de Tipo-C (PD 18W)
Ν
Ν
Puerto de salida USB-A
Ξ
Ξ
Puerto de entrada de CA

17
1. Botones de función
En la pantalla LCD, presione el botón de función correspondiente
para realizar una función diferente.
2. Pantalla LCD
Cuando se enciende la central eléctrica, la pantalla se enciende
automáticamente para mostrar el nivel actual de la batería. Si no se
utiliza ningún botón en 30 segundos se apagará automáticamente.
3. Botón de encendido
Presione y mantenga presionado el botón de encendido durante
unos 3 segundos para encender/apagar la central eléctrica.
4. Luz LED
Presione el botón de función correspondiente en la interfaz
principal de la pantalla para encender/apagar la luz LED.
5. Puerto de entrada CC (8mm)
Para cargar la central eléctrica, conecte el cable de carga del
automóvil o de carga solar a este puerto.
6. Puerto de entrada Anderson
Para cargar la central eléctrica, conecte el conector Anderson del
cable de carga solar a este puerto.
7. Puerto de salida de CA
Suministro de energía a dispositivos con potencia nominal inferior
a 1200W.
8. Indicador de salida de CA
Cuando la salida de CA está habilitada, se enciende el indicador.
9. Interruptor de salida de CA
Cuando la central eléctrica está encendida, presione este
interruptor para encender/apagar la salida de CA.
10. Puerto de salida USB-A de carga rápida
Aplicable a dispositivos cargados a través del puerto USB-A y
admite carga rápida de hasta 18W.
Los dispositivos conectados a este puerto que todavía no admiten
la carga rápida, se cargan a velocidad estándar.
11. Puerto de salida de Tipo-C (PD 60W)
Aplicable a dispositivos cargados a través del puerto de tipo C y
admite carga rápida de hasta 60W.
Los dispositivos conectados a este puerto que todavía no admiten
la carga rápida, se cargan a velocidad estándar.
12. Puerto de salida 5521
Aplicable a dispositivos cargados a través del puerto 5521.
13. Puerto de carga de coche
Aplicable a dispositivos de automóvil en general, con una corriente
de salida máxima de 10A.
14. Indicador de salida de CC
Cuando la salida de CC está habilitada, se enciende el indicador.
15. Interruptor de salida de CC
Cuando la central eléctrica está encendida, presione este
interruptor para encender/apagar la salida de CC.
16. Puerto de salida de Tipo-C (PD 18W)
Aplicable a dispositivos cargados a través del puerto de tipo C y
admite carga rápida de hasta 18W.
Los dispositivos habilitados para carga no rápida conectados a este
puerto se cargarán a velocidad normal.

18
17. Puerto de salida de USB-A
Aplicable a dispositivos que se cargan a través del puerto USB-A,
como teléfonos móviles y tabletas.
18. Puerto de entrada de CA
Conecte el cable de alimentación de CA estándar al puerto y
conecte el otro extremo a la red para cargar la central eléctrica.
Encendido/Apagado
1. Encender
Presione y mantenga presionado el botón de encendido durante
unos 3 segundos para encender la central eléctrica. Una vez
encendido, la pantalla LCD se enciende y muestra la interfaz
principal.
2. Apagar
Presione y mantenga presionado el botón de encendido durante
unos 3 segundos para apagar la central eléctrica. Después del
apagado, la pantalla LCD también se apaga.
La central eléctrica se apaga automáticamente en las siguientes
situaciones:
ƽUna vez encendida la central eléctrica, ésta se apaga
automáticamente si no se utiliza ningún botón en 10 minutos
y las funciones de carga, descarga y temporización están
desactivadas.
ƽSi la energía de la batería incorporada es baja, la central
eléctrica se apaga automáticamente.
Descarga de la aplicación de 70mai
Modo de empleo
1. Presione y mantenga presionado el botón de encendido
durante unos 3 segundos para encender la central eléctrica.
2. Presione el interruptor de salida de CA y CC. El indicador de
salida correspondiente se enciende cuando el puerto de salida
está habilitado.
3. Conecte la fuente de alimentación del equipo eléctrico al puerto
de salida de la central eléctrica para suministrar energía al
dispositivo.
4. Después de utilizar la central eléctrica, presione el interruptor
de salida de CA y CC. El indicador de salida correspondiente se
apaga cuando el puerto de salida se cierra para ahorra energía.
Nota: Una cantidad pequeña de energía de la batería puede perderse
durante el transporte y almacenamiento. Antes de utilizar la central
eléctrica por primera vez, se recomienda cargarla por completo.
1. 70mai Power Station Tera 1000 × 1
2. Cable de carga de coche × 1
3. Cable de alimentación de CA × 1
4. Bolsa de almacenamiento × 1
5. Manual del usuario × 1
Volumen de suministro
Este producto puede usarse con la aplicación
de 70mai. Busque “70mai” en la tienda de
aplicaciones o escanee el código QR para
descargar e instalar la aplicación.
Table of contents