A-Star LTV-37HLS User manual

Dear ASTAR Customer,
Congratulations on your new ASTAR LTV-37HLS High Definition LCD
Television purchase.
Thank you for your support. For maximum benefit of your set, please
read these instructions before making any adjustments, and retain
them for future reference. We hope you will experience years of
enjoyment from your new ASTAR LTV-37HLS High Definition
Television.
For assistance, please call 1
To purchase or inquire about accessories and installation services for
your ASTAR LCD TV, please visit our website at
1
We recommend you register your ASTAR LTV-37HLS HDTV either at
our website
Write down your Serial Number located on the back of your LTV-37HLS.
S/N:
Purchase Date
-877-851-2528.
-877-851-2528.www.astarelectronics.com or call
www.astarelectronics.com or fill in your registration
card and mail it in. For peace of mind and to protect your
investment beyond the standard warranty, ASTAR offers on-site
extended warranty service plans. These plans give you additional
coverage during the standard warranty period. Visit our website
or call us to purchase a plan.
D
D
D
D
www.astarelectronics.com
1

This product isdesigned and manufacturedto operate withindefined design limits,and misuse mayresult
in electric shockor fire. Toprevent the productfrom being damaged,the following rulesshould be
observed for theinstallation, use andmaintenance of theproduct. Read thefollowing safety instructions
before operating thedisplay. Keep these instructionsin a safeplace for futurereference.
* To avoid therisk of electricshock or componentdamage, switch off the power beforeconnecting other components to
the LCD TV.
*Unplug the powercord before cleaning the LCD TV. Adamp cloth is sufficient for cleaningthe LCD TV. Do notuse a
liquid or aspray cleaner for cleaning the product. Do not useabrasive cleaner.
*Always use theaccessories recommended by ASTARto insure compatibility.
*When moving theLCD TV froman area oflow temperature to an area of high temperature, condensationmay form on
the housing. Donot turn on the LCD TVimmediately after this to avoid causing fire, electric shockor component damage.
*Do not placethe LCD TVon an unstablecart, stand, or table. If the LCD TV falls,it can injurea person andcause serious
damage to theappliance.
* Adistance of atleast 3 feetshould be maintained between the LCD TV and anyheat source, i.e. radiator, heater,
oven, amplifier etc.Do not install the product close to smoke. Operatingthe product closeto smoke or moisture may
cause fire orelectric shock.
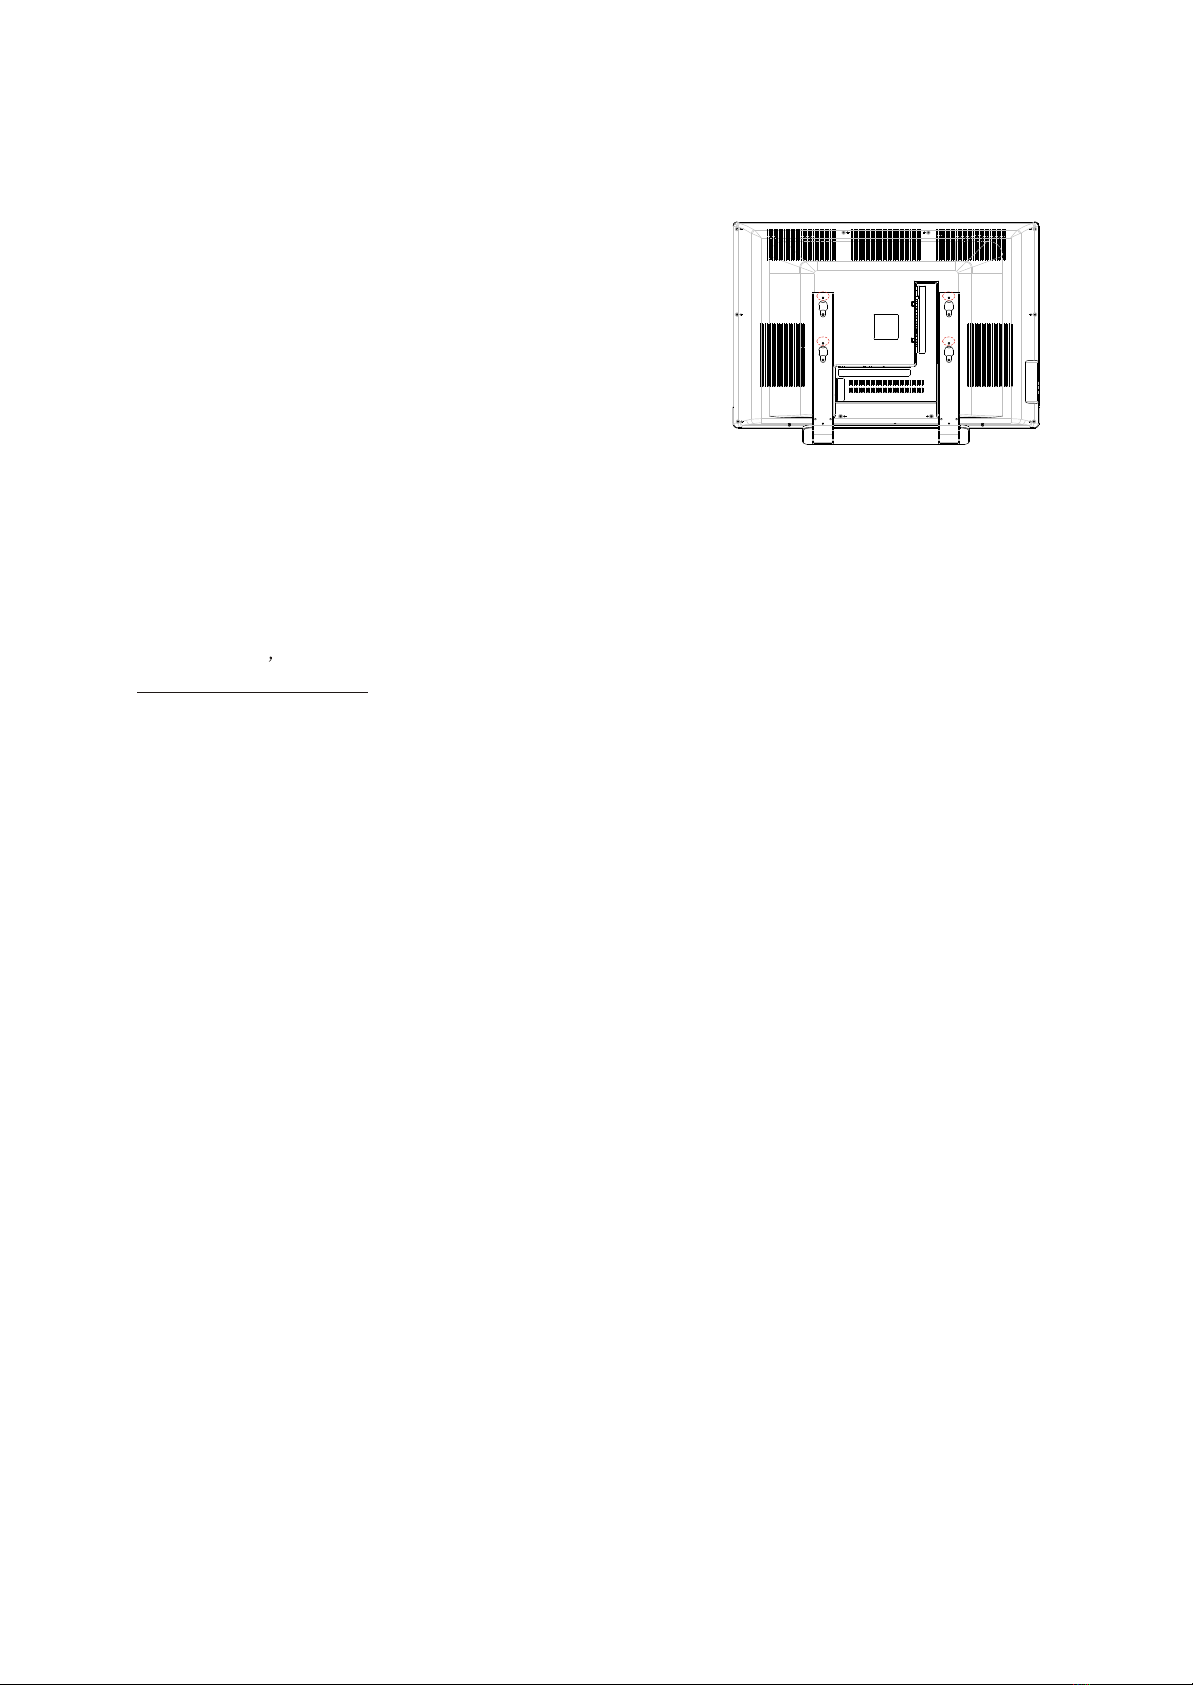
*Slots and openingsin the back and bottom of the cabinet areprovided for ventilation. Toensure reliable operation of the
LCD TV andto protect itfrom overheating, besure the opening are not blocked or covered. Dono place the LCD TV ina
bookcase or cabinetunless proper ventilation is provided.
*Never push anyobject into the slot on the LCD TV cabinet.Do not place any objects onthe top of the product. It could
short circuit partscausing a fire or electric shock. Never spill liquidson the LCDTV.
*The LCD TVshould be operatedonly from thetype of power source indicated on the label. Ifyou are not sure of the type
of power suppliedto your home, consult your local power company.
*The power cablemust be replaced when using differentvoltage from that specified in the User Manual. Formore
information, contact ASTAR.
*The LCD TVis equipped witha three-pronged groundedplug, a plug with a third (grounding) pin. This plug willfit only
into a groundedpower outlet as a safety feature. If your outletdoes not accommodate the three-wire plug, have an
electrician install thecorrect outlet, or use an adapter to ground theappliance safely.Do not defeatthe safety purpose
of the groundedplug.
*Do not overloadpower strips and extension cords. Overloading can result infore or electricshock.
*The wall socketshould be installed near the equipment and should beeasily accessible.
*Do not touchthe power cord during lightning. Toavoid electric shock, avoid handling the power cord duringelectrical
storms.
*Unplug the unitduring a lightening storm or when it will notbe used forlong period of time. This willprotect the LCD TV
from damage dueto power surges.
*Do not attemptto repair or service the product yourself. Opening orremoving the back cover may expose you to high
voltages, the riskof electric shock, and other hazards. If repair isrequired, please contact ASTAR and refer all servicing
to qualified servicepersonnel.
*Keep the productaway from moisture. Do not expose this appliance torain or moisture.If water penetrates into the
product, unplug thepower cord and contact ASTAR. Continuous usein this case may result in fire or electricshock.
*Do not usethe product if any abnormality occurs. IF any smokeor odor becomes apparent, unplug the power cord and
contact ASTAR immediately.Do not tryto repair the product yourself.
*Avoid using droppedor damaged appliances. If the productis dropped and the housing is damaged, the internal
components may functionabnormally. Unplug the power cordimmediately and contact ASTARfor repair. Continued use
of the productmay cause fire or electric shock.
*Do not installthe product in an area with heavy dust orhigh humidity. Operating the productin environments with heavy
dust or highhumidity may cause fire or electric shock.
*Hold the powerconnector when removing the power cable. Pulling the powercable itself maydamage the wires inside
the cable andcause fire or electric shock. When the product willnot be used for an extended period of time,unplug the
power connector.
*Toavoid risk of electric shock, do not touch theconnector with wet hands.
*Insert batteries inaccordance with instructions while using the remote control. Incorrectpolarities may causedamage
and leakage ofthe batteries, operator injury and contamination of the remotecontrol.
*If any ofthe following occurs, please contact ASTAR:
*The power connectorfails or fray.
*Liquid sprays orany object drops into the LCD TV.
*The Display isexposed to rain or other moisture.
*The Display isdropped or damaged in any way.
*The performance ofthe Display changes substantially.
*Operating environment: Temperature:40°F~95°F,Humidity:10% to 90% non-condensing, Altitude:0~10.000ft.
THIS PRODUCT HAS BEEN TESTED AND FOUND TO COMPLY WITH REGULATORY SAFETY CERTIFICATIONS.
www.astarelectronics.com
2

Note: In some countriesor regions, theshape of thepower plug andpower outlet maysometimes differ
from that shown in the explanatory drawings. However, the method of connecting and operating the unit
is the same.
If an outside antenna/satellite or cable system is to be connected to the LCD TV, make sure that the
antenna/satellite or cable system is electrically grounded to provide some protection against voltage
surges and staticcharges.
For added protection of your LCD TV during a lightning storm or when it is left unattended or unused for
long periods of time, unplug the LCD TV from the wall outlet and disconnect the antenna/satellite or cable
system.
Do not locate the antenna near overhead light or power circuits, or where it could fall into such power lines
or circuits.
Television Antenna Connection Protection
Article 810 of the National Electrical Code, ANSI/NFPSA 70, provides information with regard to proper
grounding of themast and supportingstructure, grounding ofthe lead-in wireto an antennadischarge unit,
size of thegrounding conductors, locationof antenna dischargeunit, connection togrounding electrodes,
and requirements of the grounding electrode.
External Television Antenna Grounding
Lightning Protection
Power Lines
GROUND CLAMP
ELECTRIC SERVICE EQUIPMENT
GROUND CLAMPS
ANTENNA LEAD-IN WIRE
ANTENNA DISCHARGE UNIT(NEC SECTION 810-21)
POWER SERVICE GROUNDING
ELECTRODE SYSTEM (NEC ART 250,PARTH)
GROUNDING CONDUCTOR(NEC SECTION 810-21)
www.astarelectronics.com
3

Opening the package
Your ASTAR LTV-37HLS HDTV is packaged in a carton together with other standard accessories. Any
optional accessories would be packed separately in another carton.
The weight ofthe LCD displayis approximately 87lbs. Due tothe size andweight of the product, it is
suggested that itbe handled bya minimum of2 persons.
Since the glass can be easily scratched or broken, please handle the product gently. Never place the unit
on a surface with the glass facing downwards unless it is on protective padding.
When opening the carton, check that the product is in good condition and that all standard accessories
and items are included.
IMPORTANT: Save the original box and all the packing material for future shipping needs.
ASTAR LTV-37HLS HDTV
ASTAR Remote Control byUniversal Electronics
Audio Video Cable (yellow,red and white"RCA" connectors)
Power Cord
User's Guide
Quick Setup Guide
Registration Card
VIP Services Brochure
Note: Optional components sold separately.
Package Contents
www.astarelectronics.com
4

Please read theuser manual carefullybefore performing the installation.
The power consumptionof the display is approximately 220 watts, please use thepower cord designated
for the product.When an extensioncord is required,use one withthe correct powerrating. The cord must
be the groundedand the groundingfeature must not be defeated.
The product should be installed on a flat surface to avoid tipping. Spaceshould be maintainedbetween
the back ofthe product andthe wall forproper ventilation. Ifyou would liketo mount theTV to the
wall, please see"Preparing the LCDfor Wall Mounting" below for additional information.
Please ensure theproduct is installed with the screen in landscape orientation. Any 90° clockwise or
counter clockwise installation may induce poor ventilation and excessive component damage.
ASTAR offers professional installation services. Pleasecontact ASTAR for more information on these
services at
Avoid installing
the product in the kitchen, bathroom or other places with high humidity, dust or smoke, to not shorten the
service life ofthe electronic components.
1-877-851-2528 or www.astarelectronics.com.
Installation Preparation
The ASTAR LTV-37HLS HDTV can either be kept on the stand base or mounted to the wall for viewing.
If you choose to mount the LTV-37HLS to the wall, please follow the instructions below for removing
the stand/base.
Preparing Your LCD TV FOR Wall Mounting
www.astarelectronics.com
5

Removing the stand/base:
1.Unplug all thecables and cordsfrom your LCD TV.
2.Place the LCD TV face down ona soft and flat surface
(blanket,foam, cloth,etc) to prevent any damage
to the display.
3.Remote the 6 screws on the back panel of the TV located near
the bottom so that the base stand can be
removed. (see Figure 3.3a)
4.Gently pull thestand away fromthe display by grasping firmly to
the base.
5.Now the display can fit securely to a mount(sold separately) by
utilizing the mounting holes in the center
or the backpanel of thedisplay (see Figure 3.3b). Please make
sure to read the directions of your specific
wall mount to properly hang the LTV-37HLS HDTV. Make sure the
wall mount israted to support at least
65 Ibs.
Tofind the perfectwall mount for the ASTAR LTV-37HLS HDTV,
browse ASTAR s certified mount selection at
www.astarelectronics.com or call directly at 1-877-851-2528.
www.astarelectronics.com
6

Table of Contents
www.astarelectronics.com
7
Chapter 1- Basic Controls and Connections
Chapter 2- Connecting Equipment
Chapter 3-Setting Up to Watch TV and DTV
Chapter 4-Maintenance and Troubleshooting
Specifications
Glossary-Standard Definitions
1.1-Front Panel Controls..................................................................................................8
1.2-Side Panel Controls...................................................................................................8
1.3-Rear Panel Connections.............................................................................................9
1.4-ASTAR Universal Remote Control...............................................................................10
1.4.1-Insertion of Batteries in the Remote Control....................................................12
1.4.2-Remote Control Range.................................................................................12
1.4.3-Precautions for the ASTAR Universal Remote Control.....................................12
2.1-Which Video Connection Should I Use?.......................................................................13
2.2-Connecting your DVD Player......................................................................................14
2.2.1-Using HDMI(Digital HD)...............................................................................14
2.2.2-Using Component(Analog HD1) Video...........................................................16
2.2.3-Using S-Video..............................................................................................17
2.2.4-Using Composite(AV)Video..........................................................................18
2.3-Connecting Your HDTV Set-Top Box............................................................................19
2.3.1-Using HDMI (Digital HD)...............................................................................19
2.3.2-Using VGA Video..........................................................................................21
2.4-Connecting Your VCR or Video Camera........................................................................22
2.5-Connecting Coaxial(RF)............................................................................................
2.5.1-Using Your Antenna or Cable for DTV.............................................................23
2.5.2-Using Your Antenna or Cable for TV................................................................24
2.5.3-Using the Antenna or Cable through Your VCR...............................................24
2.6-Connecting an Amplifier or Speakers...........................................................................25
2.7-Connecting a Computer..............................................................................................26
3.1-Basic LCD TV Start Up................................................................................................27
3.2-Watching a TV Program..............................................................................................28
3.3-Adjusting Basic LCD TV Settings.................................................................................28
3.4-General....................................................................................................................29
3.4.1-Parental Controls for DTV.............................................................................34
3.4.2-DTV Channel Information..............................................................................36
3.4.3-Program Information.....................................................................................37
3.4.4-Setting a Password......................................................................................38
3.5-Using the On Screen Display(OSD).............................................................................39
3.5.1-OSD Menu Operations..................................................................................39
3.5.2-Video..........................................................................................................40
3.5.3-Setup..........................................................................................................40
3.5.4-V-Chip for TV...............................................................................................41
3.5.5-TV...............................................................................................................41
3.5.6-Audio..........................................................................................................41
3.5.7-Geometric...................................................................................................42
3.5.8-Temperature................................................................................................42
3.5.9-Understanding Viewing Features...................................................................43
3.5.10-Viewing Modes...........................................................................................43
3.5.11-Picture-in-Picture(PIP)/Picture-by-Picture(POP) Mode.......................... .......44
3.5.12-Adjusting Basic PIP/POP Settings................................................................44
3.5.13-Using the V-Chip........................................................................................45
3.5.14-Setting the Sleep Timer...............................................................................46
4.1-Maintenance.............................................................................................................47
4.2-Troubleshooting Guide...............................................................................................47
4.3-Telephone and Technical Support................................................................................49
4.4-Compliance.......................................................................................................... ....50
4.5-FCC Class B Radio Frequency Interference Statement..................................................50
......................................................................................................................51
.......................................................................................52
8
8
9
10
12
12
12
13
14
14
16
17
18
19
19
21
22
23
23
24
24
25
26
27
28
28
29
34
36
37
38
39
39
40
40
41
41
41
42
42
43
43
44
44
45
46
47
47
49
50
51
52
50

1.2 - Side Panel Controls
Composite Video(AV2) - Connect a source for composite devices, such as a VCR or a video game console.
Use the white and red connectors to connect the external audio from the same source.
Chapter 1 -Basic Controls and Connections
1.1 - Front Panel Controls
1.CH(-/+)-These buttons increase or decrease the channels. When the OSD is active, these buttons
are used toselect OSD options.
2.VOL(-/+)- These buttons increase or decrease volume. When the OSD is active, these buttons
adjust the OSDoptions.
3.MENU - This button opens the TV OSD menu.
4.INPUT-This button switches between the available input sources in the sequence: AV1, AV2, S-Video
YPbPr1,YPbPr2,VGA, HDMI, ATV and DTV, Press the button repeatedly to cycle through the available
options.
5.Power Button( )-Switch the LCD TV on by pressing the button once. Press the button again to turn the
LCD TV off.
6.Remote Control Sensor-This is the window that passes all of the remote control signals to the TV.Point
the remote control directly at this window for the best response to the remote signal.
7.Power Indicator Light - If the light is solid red, then your LCD TV is turned off. If the light is solid
green, then your LCD TV is turned on. If the light is not lit, there is no ACpower detected and the power
cord may notbe connected properly. When turning the LCDTV on or off, wait three secondsbefore
pressing the power button again.
www.astarelectronics.com
8

1.3 - Rear Panel Controls
1.SERVICE - This custom communication port is for factory service only.
2.CABLE /AIR IN - Connect to an antenna, or cable service.
3.VIDEO OUT - Connect theVideo and Audio fromthe LCD TV to an extra service, such as PVR, DVR or TV.
The coaxial outis connected tothe amplifier whenthe source isHDMI.
4.HDMI IN - Connect a DVD multimedia player, or set-top box and the audio through this connection.
The white colorband on theback of thedisplay indicates thisconnection. For userswho want toconnect
a DVI enabled device, use an HDMI-DVI cable (available for purchase from
or by calling
.VGA IN - Connect the video and the audio from a computer or set-top box here. The purple color band on
the back of the display indicates this connection.
6.Y-Pb/Cb-Pr/Cr-with Audio L/R - Connect the primary source for component video, suchas a DVD
player or set-topbox here, Fromleft to right,use the greenfor Y, blue forPb(or Cb), redfor Pr(or Cr), white
for left audio and red for right audio inputs. The green color band on the back of the display indicates this
connection.
7.VIDEO IN -Connect the primary source for composite devices, such as a VCR or video game console.Use
the white and red connectors to connect the external audio from the same source. The yellow color band on
the back of the display indicates this connection.
8.S-VIDEO IN - Connect the primary source for S-Video devices, such as a VCR or videogame console. Use
the white and red connectors to connect the external audio from the same source.
9.DIGITALAUDIO OUT- When the DTV input is selected for viewing, the digital audio associated with
Digital programming willbe available onthis output for connection toyour home theatresystem.
www.astarelectronics.com
1-877-851-2528)and use the Analog Audio output of the device connected to the L+R Audio
here.
5
Y-2 Pb/Cb-2 Pr/Cr-2
Y-1 Pb/Cb-1 Pr/Cr-1
L-2 R-2
L-1 R-1
HDMI-IN VGA IN
L
RS-VIDEO IN
VIDEO IN L-3 R-3
L-4 R-4
DIGITAL
AUDIO
OUT
IN
COAXIAL OUT
VIDEO OUT
AUDIO
OUT
L
R
AUDIO
IN
AUDIOAUDIO
AUDIOAUDIO
DIGITAL HD
www.astarelectronics.com
9
SERVICE
AIR IN CABLE IN
12
367
8
9
5
4
AV1

1.4-ASTAR Remote Control Button Description
•POWER- Press this key to turn the TV on from standby
mode. Press it again to return to the standby mode.
•MUTE-This button turns the sound on and off.
•SLEEP-This button allows the user to select the sleep
options by adjusting the timer in15 minute increments up
to120 minutes.
•MTS-This button will select the MTS options in the ATV
mode. Options include: Stereo, SAP or Mono;
Additionally changing the audio language in DTV mode.
•DTV/ATV-This button is used to select the input source DTV
or ATV .
•Number Button Pad-Use these buttons to select a channel
or enter a password.
•INPUT-This button allows the user to cycle through the
input sources.
•EXIT-This button exits the OSD menus.
•MENU-This button is used to turn the OSD on.
•INFO-This button displays the image and system
information display.
•ENTER-This button works to select your chosen option in
On-Screen Display(OSD) menu.
• These buttons navigate the On-Screen
Display(OSD) menu.
•RED/GREEN/YELLOW/BLUE button-These are short-cut
buttons, using them with the hint OSD menu.
•FREEZE-Press this key to "Freeze-Frame" the current
screen, Users may press this key again to continue playing.
Note: normal viewing will resume automatically after one
minute.
•V-CHIP- Press to popup a pin-code dialog box to set
the viewing rating.
•CC-This button will select the Closed Caption menu in
the TV mode.
•VOL(+or-)-These buttons turn volume up or down.
•GUIDE-This button displays program information.
Note: this button is only functional for DTV.
• SYSTEM-Press repeatedly to select tuner mode: Air/Cable.
•CH(+or-)-These buttons change the channels up or down.
123
456
789
0
www.astarelectronics.com
10

•SOUND-Press repeatedly to select sound mode: Normal,
News, Cinema, Concert, User.
•PICTURE-Press repeatedly for different picture modes
select user/cinema/normal/vivid/Hi-bright.
•Return-Press it to return to the previous channel in TV mode.
•Mode- User this button to activate the PIP mode and select
the mode by pressing repeatedly.
•SWAP/SCREEN-Used to swap the inputs from the main
screen and the sub-screen while in the PIP mode, Additionally
press repeatedly to select the viewing
mode:4:3/full/panoramic.
•SIZE/ZOOM-Press this button to select the size of the PIP
screen from one of the following: small, medium or large
in PIP mode. Additionally press is to zoom the image from
max 8 times to 1/8 times.
•POS/FAV.LIST-Press this button to change the PIP window
position in PIP mode. Additionally press it to show the
favourite program list.
•ADD/DEL-Press this button to add/delete current channel
to/from the list of favorite programs.
•SELECT- Press it to select the program directly from the
list of favorite channel you preset.
•AV-Repeated pressing of this button will cycle
through AV1, AV2 and S-Video inputs.
•HD-Repeated pressing of this button will switch between
the YPbPr1/YPbPr2 input and HDMI mode.
•VGA-This button selects a connected VGAinput.
123
456
789
0
www.astarelectronics.com
11

1.4.1-Insertion of Batteries in the Remote Control
Insert two AA batteries into the remote control. Make sure that you match the (+) and (-) symbols on the
batteries with the (+)and (-) symbols inside the battery compartment. Re-attach the battery cover.
Precautionary Tipsfor Inserting theBatteries:
•Only use thespecified AAbatteries.
•Do not mixnew and oldbatteries. This may result in cracking or
leakage that maypose a firerisk or leadto personal injury.
•Inserting the batteries incorrectly may also resultin cracking or
leakage that maypose a firerisk or leadto personal injury.
•Dispose of thebatteries in accordancewith local lawsand
regulations.
•Keep the batteriesaway from childrenand pets.
1.4.2-Remote Control Range
•Point the remote control at the remote control sensor to transmit the commands.
•Do not place any obstacles between the remote control and the receiver window.
•The effective range of the remote control is approximately 32 feet(10 meters) from the front of
the receiver window, 30° to the left and right, 20° up and down.
1.4.3-Precautions for the ASTAR Remote Control
•The remote controlshould be kept dry and away from heat sources. Avoid humidity.
• If thedisplay responds erratically to the remote control or does not respond at all, check thebatteries. If
the batteries arelow or exhausted, replace them with fresh batteries.
• When notusing the remote control for a long period of time, remove the batteries.
• Do nottake apart the batteries, heat them, or throw them intoa fire.
• Do notsubject the remote control to undue physical stress, such as striking or dropping it.
• Do notattempt to clean the remotecontrol with avolatile solvent. Wipe it with a clean, damp cloth.
www.astarelectronics.com
12

Chapter 2 - Connecting Equipment
2.1- Which Video Connection Should I Use?
The ASTAR LTV-37HLS HDTVhas six different ways to connect your video equipment from abasic
connection to themost advanced fordigital displays.
Digital HD(HDMI-High-Definition
Multime-dia Interface)- Itis the first and
only industry-supported, uncompressed,
all-digital audio/video interface.HDMI
provides an interfacebetween any
audio/video source, suchas a set-top
box, DVD player, orA/V receiver and an
audio and/or videomonitor, suchas a
digital television(DTV),over asingle
cable.
DTV RF comesfrom AIRor CABLE. When
used for MPEG2encoded bit streamsfrom
ATSC broadcast programming, thisinput
takes advantage ofthe High Definitioncontent.
Analog VGA(RGB)-This videoinput has
separate red, greenand blue color
components. The signal carries
horizontal and verticalsync information
on the greensignal. This is most
commonly used forPC input.
Analog HD1/HD2(Component)-The
video signal isseparated into three
signals, one containingthe black-and-
white information andthe other two
containing the colorinformation. This
enhancement over S-Video takes
advantage of thesuperior picture
provided by progressivescan DVD
players and HDTVformats.
S-Video-The video signal is separatedinto
two signals onecontaining the black-and-white
information and theother containing thecolor
information. Separating thecolor in thisway
avoid "cross color"effects where closely spaced
black and whitelines are erroneouslydisplayed
in color.It also enablestext to be displayed more
sharply.
AV1/AV2- The complete video signalis
carried through thissingle pin connector.
This is themost commonly usedvideo
connection.
TV Cocoaxial RFcomes fromAIR or CABLE.
This is theconnection for standardNTSC TV
using antenna orcable. If youhave a VCR,
you can connectyour antenna/cable tothe
VCR RF Outputto this connector.
Best
(digital)
Best
(digital)
Left
Better
(analog)
Better
(analog)
Good
(analog)
Good
(analog)
Good
(analog)
Right
Connection
Quality
(type)
Connector
Color
Codes
for
Rear Panet
Description
www.astarelectronics.com
13

2.2 - Connecting Your DVD Player
You have several for connecting your DVD player to yournew LTV-37HLS HDTV-HDMI(Digital HD),
Component (Analog HD), S-Video, and Composite (AV) inputs. Based on your home theater configuration,
you decide which option is the right one for you.
2.2 .1- Using HDMI (Digital HD)
DVD players that have a digital interface such as HDMI (High-Definition Multimedia Interface) should be
connected to theHDMI input ofthe ASTAR LTV-37HLS HDTVfor optimal results.
Note: To maintain the display, use a ASTAR certified HDMI cable available up to 10 meters
or less. See www.astarelectronics.com or call 1-877-851-2528
Connecting DVD Player(Best):
1.Turn off the power to the LCD TV and DVD player.
2.Connect a HDMI cable to the HDMI output of your DVD player and the other end to the HDMI input in
the rear ofyour LCD TV.
3.Turn on the power to the LCD TV and your DVD player.
4.Select HDMI using the INPUT button on the front of the LCD TV or directly by pressing theHD button
on the Remote Control.
Note: Refer to your DVD player user manual for more information about the video output
requirements of the product.
Y-2 Pb/Cb-2 Pr/Cr-2
Y-1 Pb/Cb-1 Pr/Cr-1
L-2 R-2
L-1 R-1
HDMI-IN VGA IN
L
RS-VIDEO IN
VIDEO IN L-3 R-3
L-4 R-4
DIGITAL
AUDIO
OUT
IN
COAXIAL OUT
VIDEO OUT
AUDIO
OUT
L
R
AUDIO
IN
AUDIOAUDIO
AUDIOAUDIO
DIGITAL HD
www.astarelectronics.com
14
AV1

For DVD Players with DVI:
1.Turn off the power to the LCD TV and DVD player.
2.Using a HDMI-DVI cable, connect the DVI end to your DVD Player and the HDMI end to the HDMI input
in the rearof your LCDTV.
3. Using anaudio cable(white andred connectors), connectcable to theaudio output connecters
associated with the DVI output on the rear of your DVD Player, and connect the other end to the audio
connectors associated withthe HDMI inputin the rearof your LCDTV.
4. Turn on the power to the LCD TV and your DVD Player.
5. Select HDMI using the INPUT button on the remote control or the front of the LCD TV, or directly by
pressing the HD button on the remote control.
Y-2 Pb/Cb-2 Pr/Cr-2
Y-1 Pb/Cb-1 Pr/Cr-1
L-2 R-2
L-1 R-1
HDMI-IN VGA IN
L
RS-VIDEO IN
VIDEO IN L-3 R-3
L-4 R-4
DIGITAL
AUDIO
OUT
IN
COAXIAL OUT
VIDEO OUT
AUDIO
OUT
L
R
AUDIO
IN
AUDIOAUDIO
AUDIOAUDIO
DIGITAL HD
www.astarelectronics.com
15
WR
WR
AV1

2.2.2 - Using Component (YPbPr1) Video
Connecting DVD Player(Better):
1.Turn off the power to the LCD TV and DVD player.
2. Connect the Y (green color) connector on the rear of your
DVD player tothe corresponding Y-1 (green color) connector in the rear of your LCD TV.
3.Connect the Pb(bluecolor) connector onthe rear ofyour DVD playerto the corresponding Pb/Cb-1
(blue color) connectorin the rearof your LCDTV.
4.Connect the Pr(redcolor) connector onthe rear ofyour DVD playerto the corresponding Pr/Cr-2
(red color) connectorin rear ofyour LCD TV.
5.Connect the R(redcolor) and L(whitecolor) audio connectorson the rearof your DVDplayer to the R-1
(red color) andL-1(White color) audioinput connectors inthe rear ofyour LCD TV.
6.Turn on the power to the LCD TV and DVD player.
7.Select YPbPr1 using the INPUT button on the remote or front of the LCD TV or directly by
pressing the HD button on the Remote Control.
Note:
a) If you are already using the YPbPr1input for another component, or you do not want to use the
Component AnalogYPbPr1 input for the DVD player, you can connectthe DVD playerto the YPbPr2
connections.
b) Refer to your DVD player user manual for more information about the video output requirements of
the product.
Y-2 Pb/Cb-2 Pr/Cr-2
Y-1 Pb/Cb-1 Pr/Cr-1
L-2 R-2
L-1 R-1
HDMI-IN VGA IN
L
RS-VIDEO IN
VIDEO IN L-3 R-3
L-4 R-4
DIGITAL
AUDIO
OUT
IN
COAXIAL OUT
VIDEO OUT
AUDIO
OUT
L
R
AUDIO
IN
AUDIOAUDIO
AUDIOAUDIO
DIGITAL HD
Y1 Pb1 Pr1 W R
VIDEO EQUIPMENT
with terminal
R
W
Y
W
R
To video
inputs
To audio
inputs
www.astarelectronics.com
16
AV1

Note: Refer to your DVD player user manual for more information about the video output requirements of
the product.
1.Turn off the power to the LCD TV and DVD player.
2.Connect the S-Video jack on the rear of your DVD player to the S-Video jack in the S-Video in the rear of
your LCD TV.
3.Connect the R(red color) and L(white color) audio connectors on the rear of your DVD player to the R4
(red color) andL4(White color) audioinput connectors inthe rear ofyour LCD TV.
4.Turn on the power to the LCD TV and DVD player.
5.Select S-Video using the INPUT button on the remote or front of the LCD TV or directly by pressing the
AV button on the Remote Control.
2.2.3 - Using S-Video
Connecting DVD Player (Good):
Y-2 Pb/Cb-2 Pr/Cr-2
Y-1 Pb/Cb-1 Pr/Cr-1
L-2 R-2
L-1 R-1
HDMI-IN VGA IN
L
RS-VIDEO IN
VIDEO IN L-3 R-3
L-4 R-4
DIGITAL
AUDIO
OUT
IN
COAXIAL OUT
VIDEO OUT
AUDIO
OUT
L
R
AUDIO
IN
AUDIOAUDIO
AUDIOAUDIO
DIGITAL HD
VIDEO EQUIPMENT
with terminal
ToS-VIDEO output
WR
WR
To audio
inputs
www.astarelectronics.com
17
AV1

2.2.4 - Using Composite (AV) Video
Connecting DVD Player (Good):
1.Turn offthe power tothe LCD TV and DVDplayer.
2.Connect the Video(yellow color) connectoron the rear of
your DVD playerto the Video connector in the AV1 (yellow color)in the rear of your LCD TV.
3.Connect the R(redcolor) and L(whitecolor) audio connectorson the rearof your DVDplayer to theR3
(red color) andL3(White color) audioinput connectors inthe rear ofyour LCD TV.
4.Turn on the power to the LCD TV and DVD player.
5.Select AV1using the INPUTbutton on theRemote Control orthe front ofyour LCD TV, or directly by
pressing theAV button on theRemote Control.
Note:
a) If you are already using the AV1for another component, or you do not want to use the AV1 input for
the DVD player, you canconnect the DVDplayer to the AV2 in theside of yourLCD TV.
b) Refer toyour DVD playeruser manual formore information aboutthe video outputrequirements
of the product.
Y-2 Pb/Cb-2 Pr/Cr-2
Y-1 Pb/Cb-1 Pr/Cr-1
L-2 R-2
L-1 R-1
HDMI-IN VGA IN
L
RS-VIDEO IN
VIDEO IN L-3 R-3
L-4 R-4
DIGITAL
AUDIO
OUT
IN
COAXIAL OUT
VIDEO OUT
AUDIO
OUT
L
R
AUDIO
IN
AUDIOAUDIO
AUDIOAUDIO
DIGITAL HD
VIDEO EQUIPMENT
with terminal
ToVIDEO input
WR
WR
To audio
inputs
Y
Y
www.astarelectronics.com
18
AV1

2.3 - Connecting Your HDTV Set-Top Box
1.Turn offthe power tothe LCD TV and HDTVSet -Top Box.
2.Connect a HDMIcable to theHDMI output ofyour HDTV Set-Top Box andthe other endof the HDMIinput
in the rearof your ofyour LCD TV.
3.Turn on the power to the LCD TV and yourHDTV Set-Top Box.
5.Select HDMI usingthe INPUT button on thefront of the LCD TV or directly by pressing the HD
button on theRemote Control.
Note:
a) The HDMI input onyour LCD TV supports High-banwidth Digital ContentProtection(HDCP).
HDCP encrypts the transmission between the video source and the digital display for added
security and protection.
b) Refer to your HDTV Set-Top Box user manual for more information about the video output
requirements of the product or consult your satellite or cable operator.
You have several options for connecting yourHDTV Set-Top Box toyour new LTV-37HLS
HDTV:HDMI(Digital HD) and VGA inputs. Based onyour home theaterconfiguration, you candecide which
option is theright one foryou.
HDTV Set-Top Boxes thathave a digital interface such as HDMI (High-Definition Multimedia Interface)
should be connectedto the HDMIinput of theASTAR LTV-37HLS foroptimal results.
2.3.1 - Using HDMI (Digital HD)
Note: To maintain the display quality, use aASTAR certified HDMI cable that is10meters or less.
See www.astarelectronics.com or call 1-877-851-2528 for details.
Connecting Set-Top Box (Best):
Y-2 Pb/Cb-2 Pr/Cr-2
Y-1 Pb/Cb-1 Pr/Cr-1
L-2 R-2
L-1 R-1
HDMI-IN VGA IN
L
RS-VIDEO IN
VIDEO IN L-3 R-3
L-4 R-4
DIGITAL
AUDIO
OUT
IN
COAXIAL OUT
VIDEO OUT
AUDIO
OUT
L
R
AUDIO
IN
AUDIOAUDIO
AUDIOAUDIO
DIGITAL HD
HDTV Set-Top Box
www.astarelectronics.com
19
AV1

For HDTV Set- Top Boxes with DVI:
1.Turn offthe power tothe LCD TV and HDTVSet -Top Box.
2.Using a HDMI-DVIcable, connect theDVI end toyour HDTV Set-Top Box andthe HDMI endto the HDMI
input in therear of yourLCD TV.
3.Using an audiocable (white andred connectors), connectcable to the audio output connectors
associated with theDVI output onthe rear ofyour HDTV Set-Top Box, andconnect the otherend to the
audio connectors associatedwith the HDMIinput in therear of your LCD TV.
4.Turn on the power to the LCD TV and yourHDTV Set-Top Box.
5.Select HDMI usingthe INPUT button on theRemote or frontof the LCD TV or directly by pressing the HD
button on theRemote Control.
Y-2 Pb/Cb-2 Pr/Cr-2
Y-1 Pb/Cb-1 Pr/Cr-1
L-2 R-2
L-1 R-1
HDMI-IN VGA IN
L
RS-VIDEO IN
VIDEO IN L-3 R-3
L-4 R-4
DIGITAL
AUDIO
OUT
IN
COAXIAL OUT
VIDEO OUT
AUDIO
OUT
L
R
AUDIO
IN
AUDIOAUDIO
AUDIOAUDIO
DIGITAL HD
HDTV Set-Top Box
www.astarelectronics.com
20
WR
WR
AV1
Table of contents
Other A-Star LCD TV manuals

A-Star
A-Star LTV-27HBG User manual

A-Star
A-Star LTV-1501 User manual

A-Star
A-Star LTV-40HBG User manual

A-Star
A-Star LTV-3201 User manual

A-Star
A-Star LTV-2001 User manual

A-Star
A-Star LTV-3001 User manual

A-Star
A-Star LTV-19WS User manual

A-Star
A-Star LTV-2701 User manual

A-Star
A-Star LTV-1701 User manual

A-Star
A-Star ud55yc5500ua User manual