AAton CANTAR X3 User manual

CANTAR X3
User Manual
Software v 1.113

Table of Content
HELP.........................................................................................................................7
HEADPH NE.............................................................................................................8
Current utmap......................................................................................................8
Name...................................................................................................................8
Inputs....................................................................................................................8
ther Main Selector Positions....................................................................................9
LINE UTPUTS.........................................................................................................10
utmaps..............................................................................................................10
utput Level......................................................................................................11
Delay..............................................................................................................11
Play Mute.........................................................................................................11
Beep Mute.......................................................................................................12
Current Configuration.........................................................................................12
Edit utmap.....................................................................................................12
Multiple utmap...............................................................................................13
utput Levels........................................................................................................14
ther Main Selector Positions..................................................................................15
AES UTPUTS..........................................................................................................16
utmaps..............................................................................................................16
DANTE UTPUTS (optional)........................................................................................17
utmaps..............................................................................................................17
Module Configuration............................................................................................17
IN GRID R UTING...................................................................................................18
Current Ingrid........................................................................................................18
Name.................................................................................................................18
Inputs..................................................................................................................18
Inputs to Tracks..................................................................................................18
Pan-Pot to Mixdown...........................................................................................19
Track settings....................................................................................................20
Declare input as Mixdown......................................................................................20
PRE-REC RD (PPR).....................................................................................................22
Pre-Record functionality...........................................................................................22
Pre-Record Buffer................................................................................................22
Metadata Edit...................................................................................................22
Previous take trash..............................................................................................22
Global Screen presentation.....................................................................................22
Media States........................................................................................................23
Metadata.............................................................................................................24
Next Record.....................................................................................................24
Previous Record.................................................................................................24
Completion.......................................................................................................25
Audio Trash..........................................................................................................25
Solo....................................................................................................................26
Mic.................................................................................................................26
Line.................................................................................................................28
Track...............................................................................................................28
Cantar X3
2

AES.................................................................................................................29
AES-42............................................................................................................30
utputs............................................................................................................31
Double Solo & Phase-meter......................................................................................31
Mics................................................................................................................31
Tracks..............................................................................................................32
Phase-meter......................................................................................................32
Levels..................................................................................................................32
Inputs...............................................................................................................32
Tracks..............................................................................................................33
Locking Panels......................................................................................................34
Mixer Panel......................................................................................................34
Potentiometer Panel............................................................................................35
Tone Generator.....................................................................................................35
Talk.....................................................................................................................35
Assignation...........................................................................................................35
Potentiometer....................................................................................................35
Mixer Fader......................................................................................................36
Cantarem.........................................................................................................36
Cantarem II.......................................................................................................36
Timecode.............................................................................................................37
State...............................................................................................................37
Internal Source Timecode Method.........................................................................37
External Source..................................................................................................39
REC RD..................................................................................................................40
Medias State........................................................................................................40
Solo....................................................................................................................40
Metadata.............................................................................................................40
Sync Points...........................................................................................................40
Slate Detection..................................................................................................40
User Marker......................................................................................................41
Levels..................................................................................................................41
Tone Generator.....................................................................................................41
Talk.....................................................................................................................41
Timecode.............................................................................................................41
TEST.......................................................................................................................42
Link Inputs.............................................................................................................42
Inputs Delay..........................................................................................................43
Line utputs Levels.................................................................................................44
Idle backup..........................................................................................................44
ST P......................................................................................................................45
Media Free Space.................................................................................................45
Low Power Mode..................................................................................................45
Power n/ ff......................................................................................................45
Power N.......................................................................................................45
Power FF.......................................................................................................46
Dante..................................................................................................................46
Rescue Mode........................................................................................................46
PLAY.......................................................................................................................47
Cantar X3
3

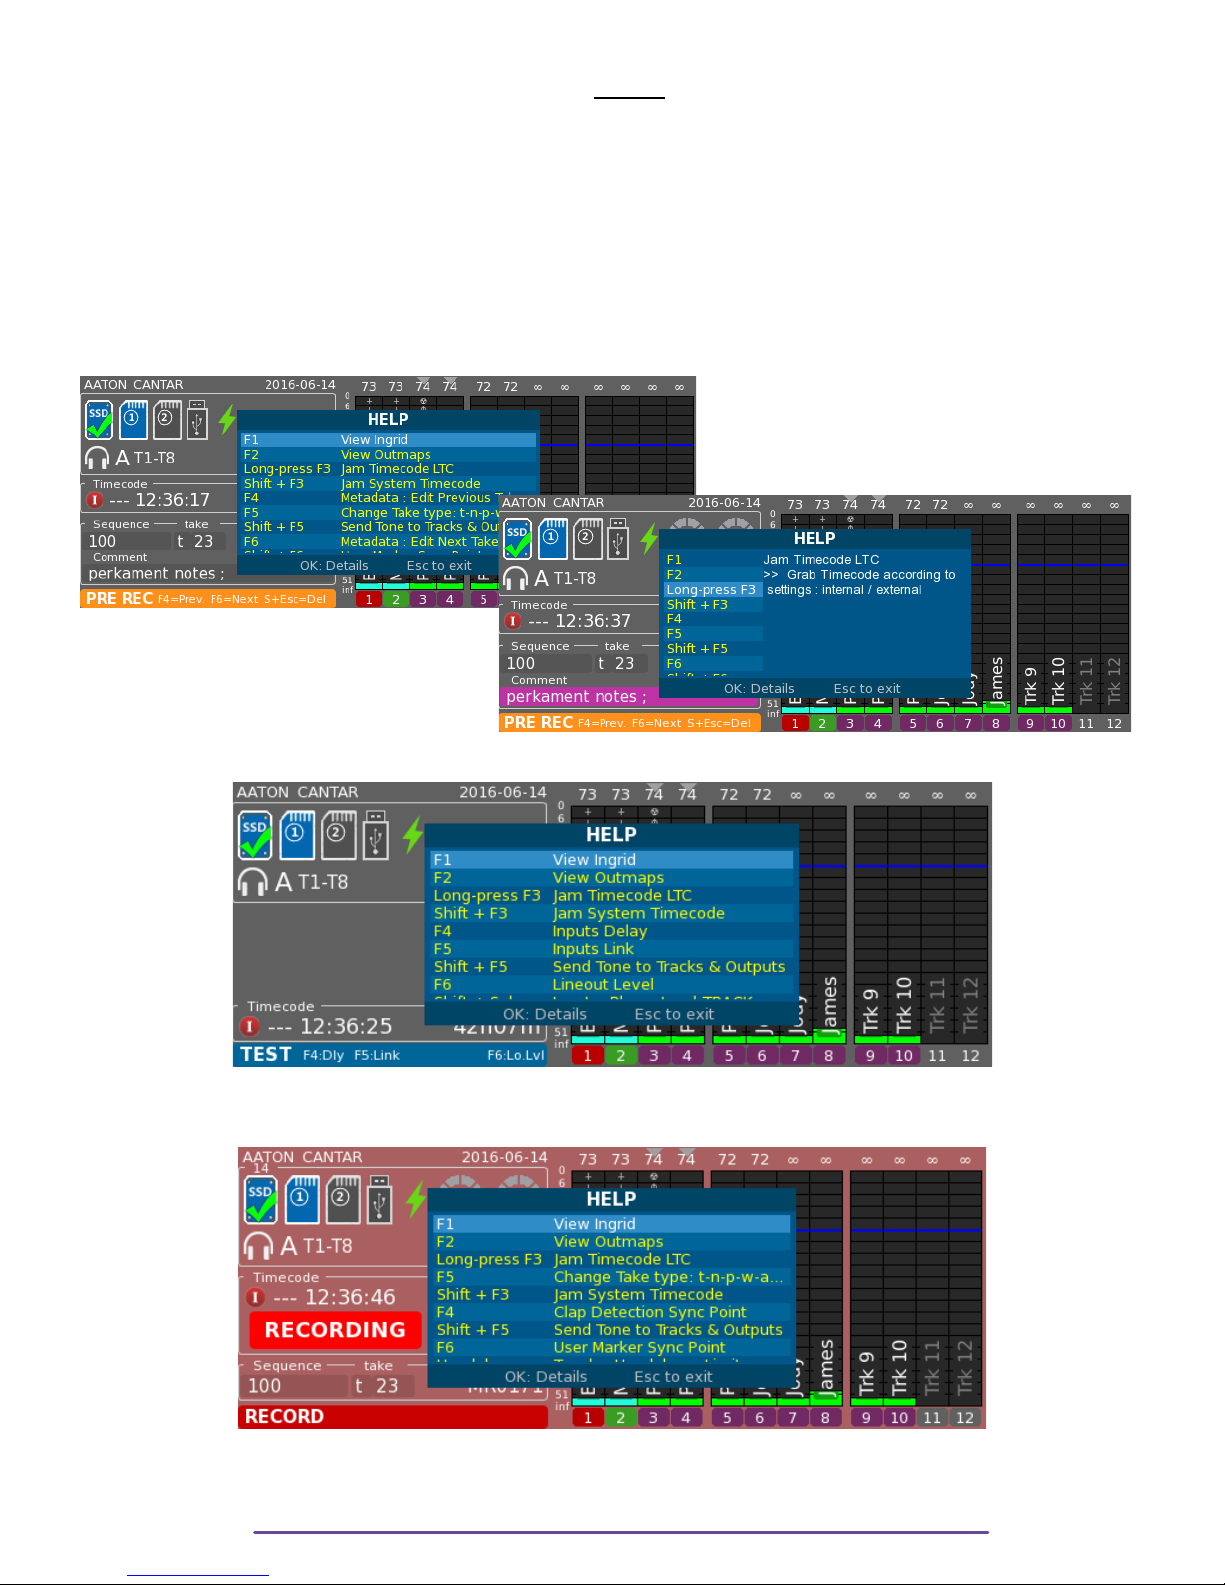
Commands...........................................................................................................47
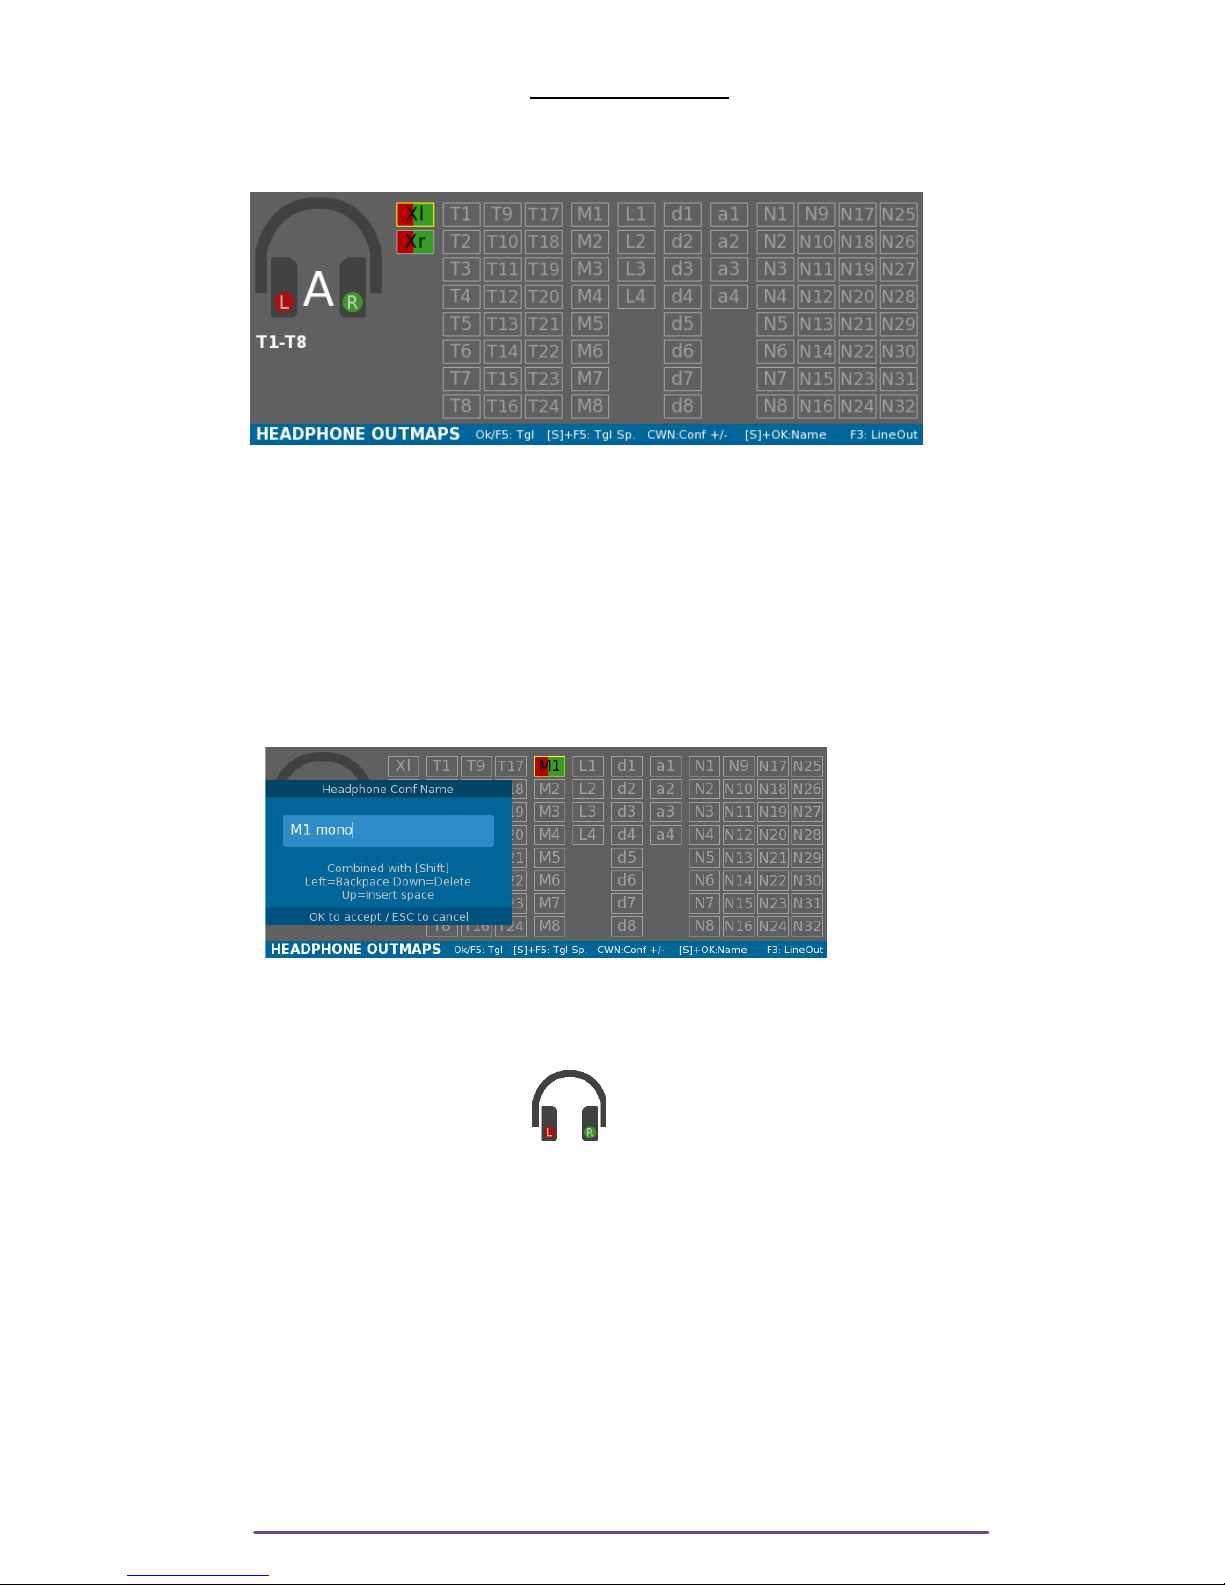
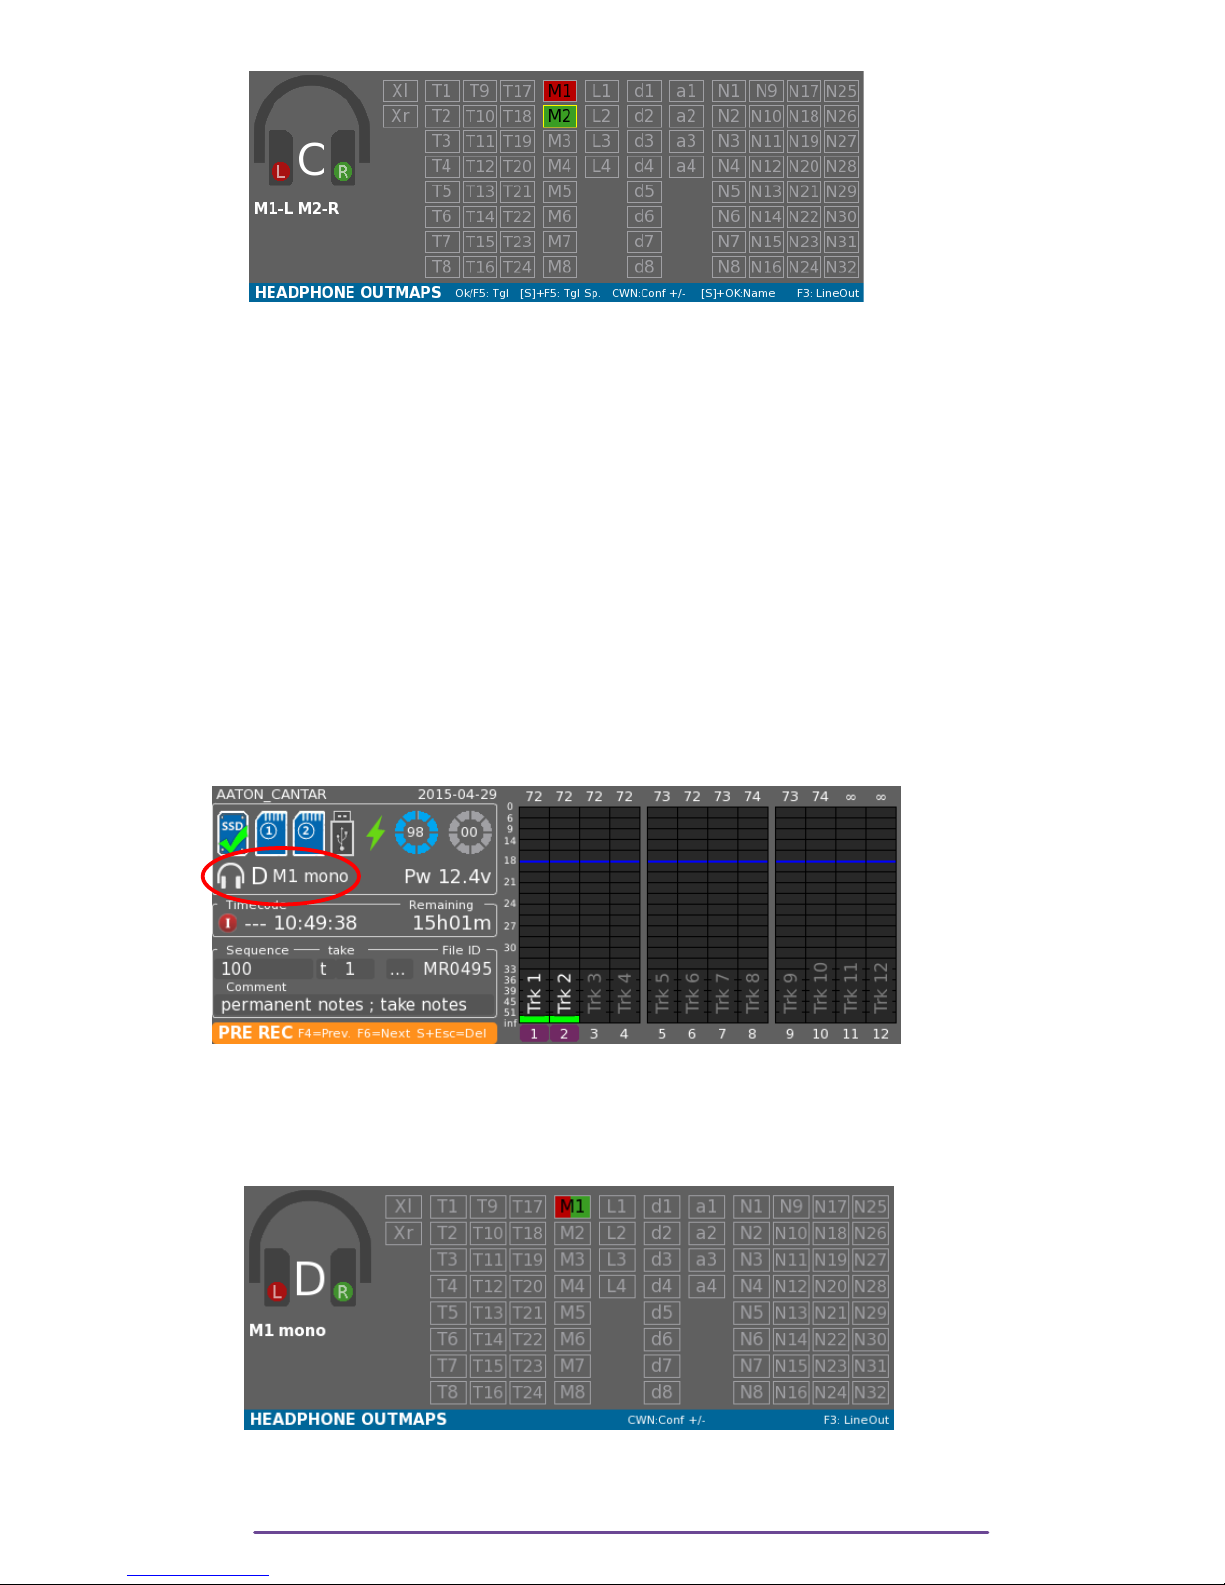
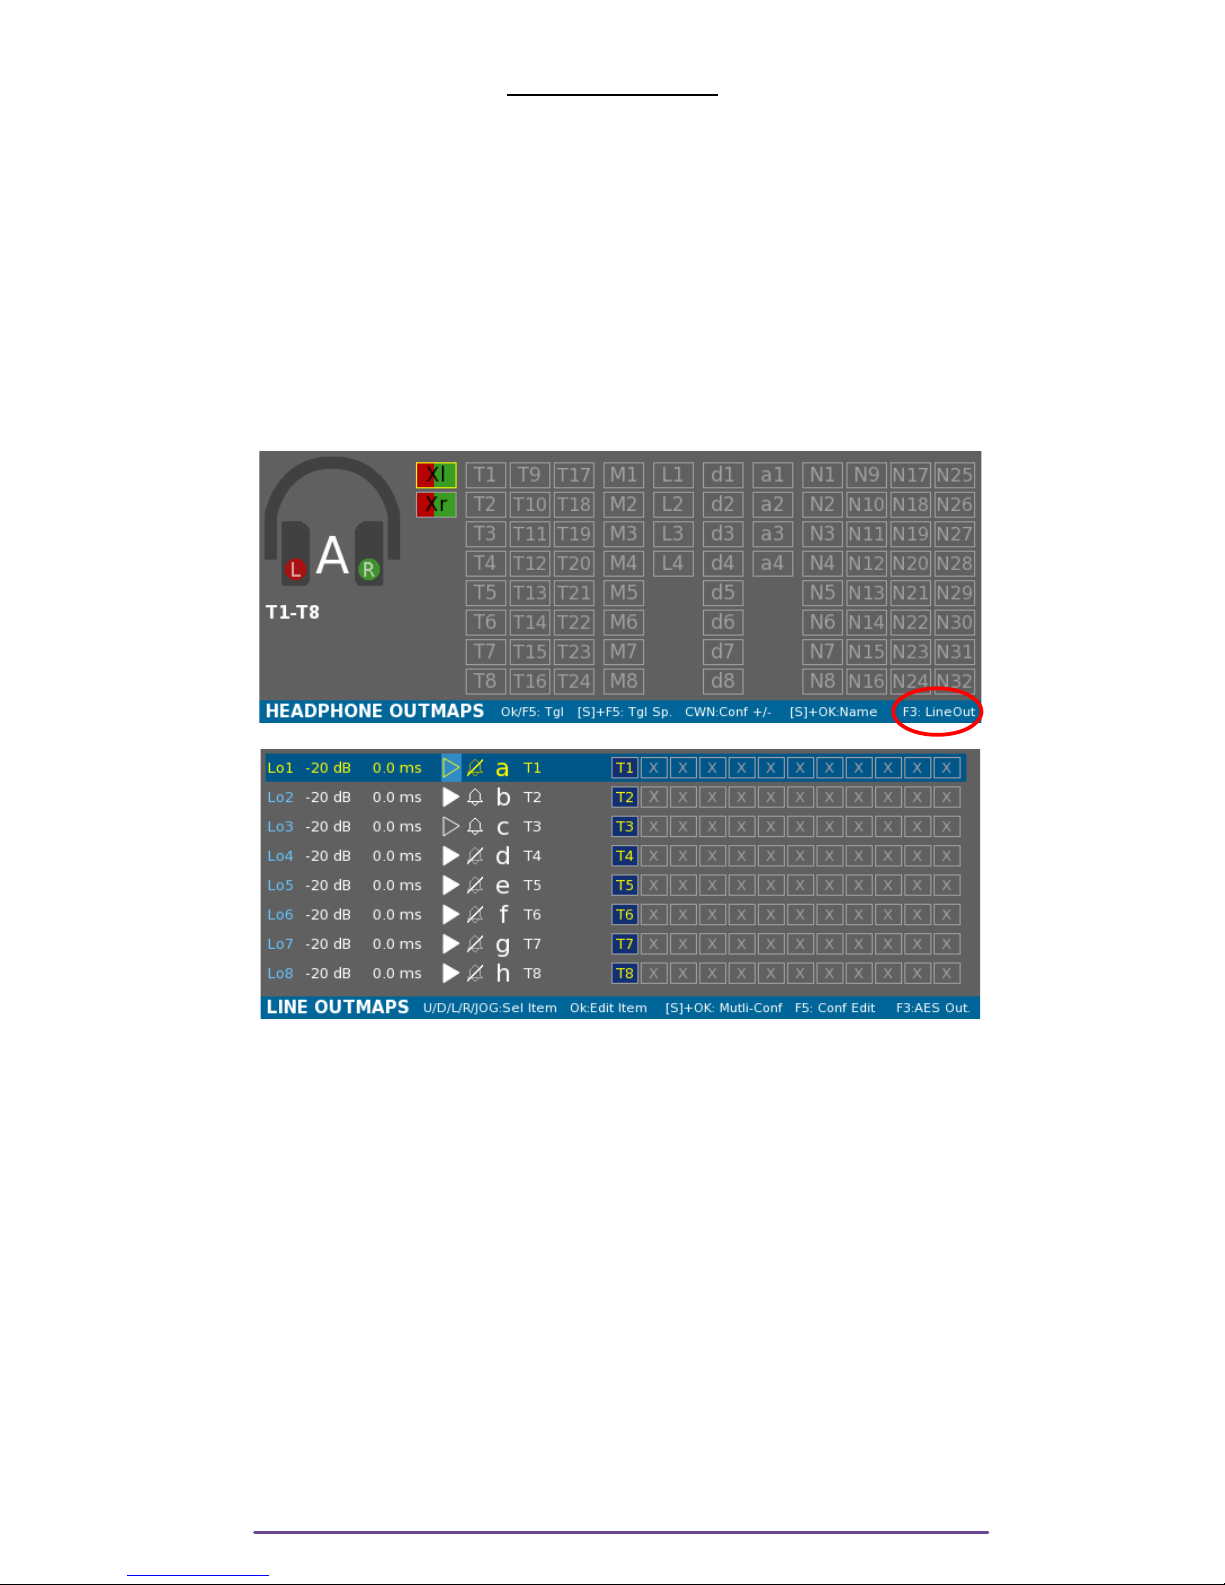
Headphone Modes...............................................................................................47
Recorded Mixdown............................................................................................48
Tracks-Mono.....................................................................................................48
User utmaps...................................................................................................49
Solo................................................................................................................49
Routing................................................................................................................50
Sync Points...........................................................................................................51
AUDI FILE BR WSER..............................................................................................52
Browser...............................................................................................................52
Editing Metadata...................................................................................................52
Single File edit..................................................................................................52
Multiple Takes Edition.........................................................................................53
Trash...............................................................................................................53
Fix Files............................................................................................................54
Snap Report..........................................................................................................54
Simple Snap.....................................................................................................54
Export Snap......................................................................................................55
AUDI & TIMEC DE................................................................................................56
Sample Rate.........................................................................................................56
Bit Depth..............................................................................................................56
Pre-Record Length...................................................................................................56
Timecode Settings..................................................................................................56
LTC ut Generator.............................................................................................56
LTC ut Level....................................................................................................56
LTC Rate..........................................................................................................56
Timecode Source...............................................................................................56
Timecode User-bits.............................................................................................56
Timecode Fudged..............................................................................................57
perator TC.....................................................................................................57
Record-Run TC...................................................................................................57
Clap Detection......................................................................................................57
Mixer Fader Max Level...........................................................................................57
Phantom Mic Gain.................................................................................................57
Tone & Beep........................................................................................................57
Tone Level........................................................................................................57
Beep Level........................................................................................................57
Record Beep.....................................................................................................57
Beep Routing....................................................................................................57
Remote Rec..........................................................................................................58
Slate Mics............................................................................................................58
Internal slate mic................................................................................................58
Jack 3,5 slate mic..............................................................................................58
Jack 3,5 bias pwr..............................................................................................58
Talk full duplex..................................................................................................58
Hdphn safety lvl....................................................................................................58
Balance Lock........................................................................................................58
Audio Power.........................................................................................................58
Digital power....................................................................................................58
Cantar X3
4

Dante power.....................................................................................................58
TECHNICAL.............................................................................................................59
Scene & Take Template..........................................................................................59
File naming..........................................................................................................59
Vumeter Settings....................................................................................................59
Mxdn Shifted....................................................................................................59
Grid................................................................................................................59
Line Level..........................................................................................................59
Gradian...........................................................................................................59
Red Zone.........................................................................................................59
Yellow Zone.....................................................................................................60
Speed.............................................................................................................60
Peek Hold........................................................................................................60
System Clock........................................................................................................60
Date................................................................................................................60
Time................................................................................................................60
Display Levels/Attenuation......................................................................................60
Inputs Levels......................................................................................................60
Tracks attenuation..............................................................................................60
Light....................................................................................................................60
Backlight..........................................................................................................60
LED.................................................................................................................60
Low Power in stop.................................................................................................60
External voltage limit...............................................................................................61
Keyboard layout....................................................................................................61
File Network access...............................................................................................61
Tech support.........................................................................................................61
IP Adress..........................................................................................................61
Diagnostic........................................................................................................61
Save / Load settings..............................................................................................62
Save...............................................................................................................62
Load................................................................................................................62
Load firmware.......................................................................................................63
SESSI N.................................................................................................................64
Record Parameters.................................................................................................64
Project.............................................................................................................64
Media.............................................................................................................65
Media erase.....................................................................................................66
Compressed Proxy.............................................................................................66
Report.................................................................................................................67
Report type.......................................................................................................67
Setup PDF.........................................................................................................67
BACKUP..................................................................................................................69
Backup settings.....................................................................................................69
Source and Target.............................................................................................69
Process............................................................................................................69
Backup processing.................................................................................................70
ANNEXES................................................................................................................72
Connectors...........................................................................................................72
Cantar X3
5

Mini Delta Ribbon..............................................................................................72
Headphone Jack 6.35mm & Slate Mic Jack 3.5mm.................................................72
Cantarem Lemo 8..............................................................................................73
Timecode Lemo 5 (F)..........................................................................................73
Power XLR-4 (M)................................................................................................73
Mic XLR-3(F)......................................................................................................73
Mic XLR-5(F)......................................................................................................73
Line-In XLR-5(F)...................................................................................................74
AES-42 TA-3(F)..................................................................................................74
AES In/ ut Dsub-25..........................................................................................74
Analog utput Dsub-25......................................................................................74
Hi-Rose............................................................................................................74
Cantar Audio Chain...............................................................................................75
Software history.....................................................................................................75
Cantar X3
6

HELP
In order to remind the user of the shortcuts available at any time, a quick help Menu is available
by pressing three times the Shift button.
This help box is available in the Record, Pre-Record, Test, Play, Browse, utmaps, Ingrid Menus.
Each item may be selected by pressing the Up and Down buttons and more details obtained by
pressing the k button.
← Pict. 01
Pict. 02 →
Pict. 03
Pict. 04
Cantar X3
7

HEADPHONE
Headphone utmaps can be modified while the Main Selector is in the 6 o'clock position.
You can configure up to 26 Headphone utmaps (from 'A' to 'Z').
Pict. 05
I. Current Outmap
To go to the next or previous utmap, use the Left Crown.
Nota Bene (NB): Copy and Paste.
By pressing the Shift+F4 buttons, the current outmap is copied to the clipboard.
Paste it over any utmap by pressing the Shift + F6 buttons.
II. Name
Each utmap can be named (max: 12 characters). Press the Shift+ K buttons to modify it.
Pict. 06
III. Inputs
Each input can be sent to the Left and/or Right Ear.
The Left Ear is represented in RED.
The Right Ear is represented in GREEN.
You can navigate through the input grid with the direction buttons (Left-Right-Up-Down) or using
the Jog wheels.
Enable or disable Left mapping by pressing the F4 button.
Enable or disable Right mapping by pressing the F6 button.
Toggle between Left-Center-Right-Nothing by pressing the F5 button.
An input sent to Left Ear will be colored in RED.
An input sent to Right Ear will be colored in GREEN.
An input sent to both Left and Right Ear will be colored in both colors.
Example:
- In Pict 01, utmap 'A' : Mixdown Left and Right are sent to both ears.
- In Pict 03, utmap 'C' : Mic 1 is sent to the Left Ear and Mic 2 to the Right Ear.
Cantar X3
8

Pict. 07
NB: • A digital gain can be applied on Digital inputs: from -¥ to +12dB on AES inputs and
from -¥ to +36 dB for AES 42.
Both version of inputs (before or after gain) can be routed in an utmap. These versions
are symbolised by the letter representing the input type being capital or not: for example,
for an AES input, 'd' is for the input before gain and 'D' is for the input after gain.
By default with the K and F5 buttons, the version before gain is changed, in order to
cycle throught the Left, Right and Center mapping, press the Shift + F5 buttons.
• A track may be mapped Post-fade in an utmap, to cycle throught the Left, Right and
Center mapping, press the Shift + F5 buttons.
IV.Other Main elector Positions
When the Main Selector is in the Test (10 o'clock), Pre Record (11 o'clock), or Record (12
o'clock) positions, the current Headphone utmap is indicated bellow the media icons.
Symbolised by a headphone icon, it displays the utmap's letter and name.
Pict. 08
You can change the current Headphone utmap and go to previous or next one using the Left
Crown. The letter and name will be updated.
By pressing the F2 button, you will see the utmap grid, as for the 6 o'clock position, it can be
edited.
Pict. 09
In that view it is also possible to go to the previous or next utmap using the Left Crown.
Cantar X3
9

LINE OUTPUT
Cantar X3 has 8 Line outputs.
I. Outmaps
You can configure up to 26 utmaps (from 'a' to 'z') each applicable to one or several outputs.
NB: Line and AES utmaps are shared. (Line utmap 'a' is the same as AES utmap 'a').
utmaps can be modified while the Main Selector is in the 6 o'clock position.
In that position, Headphone utmaps are displayed but by pressing the F3 button, you will
access the Line utmaps panel (pressing the F3 button again will display the AES utmap
panel).
Pict. 06
Pict. 10
Pict. 11
Each row represents a Line utput. n a row, five parameters may be setup:
• the Attenuation Level.
• the Delay applied to the utput.
• the Play-Mute option.
• the Beep Mute option.
• the current outmap configuration of the utput.
In Pict 07: Line ut 1 has the utmap 'a' which is named « T1 ».
Track 1 is sent to Line ut 1.
You can select a row by using the Up and Down buttons. Using the Left and Right buttons or the
Jog wheel enables to select among the 5 parameters.
nce a row is selected, the corresponding utmap is applied on the Headphone ouput.
Cantar X3
10

1. Output Level
Using the Left and Right buttons or the Jog wheel, move the light blue selection box to the first
item of the wanted row and press the K button to modify the value.
Pict. 12
NB: • If the output is assigned to a fader (Mixer or Cantarem) it is impossible to modify it using
the Attenuation window. The current attenuation is grayed.
• Quick edit the current value by holding the Shift button pressed while rotating the Jog
wheel.
2. Delay
All the analog and digital outputs can be delayed within a range of 0 to 43690 samples (which
represents nearly 910 ms with a 48kHz sample-rate).
Using the Left and Right buttons or the Jog wheel, move the light blue selection box to the second
item of the wanted row and press the K button to modify the value.
Pict. 13
NB: • Quick edit the current value by holding the Shift button pressed while rotating the Jog
wheel.
3. Play Mute
When the Cantar is in the Play position, the output may be Muted using the Play Mute option.
Using the Left and Right buttons or the Jog wheel, move the light blue selection box to the third
item of the wanted row and press the K button to modify the value.
If the Play symbol is de-activated (emptied triangle) the output is muted in Play.
In Pict 07, Line outputs 1 & 3 will be muted in Play.
Cantar X3
11

4. Beep Mute
Beeps (record beeps, warning beeps) may be muted on each output.
Using the Left and Right buttons or the Jog wheel, move the light blue selection box to the fourth
item of the wanted row and press the K button to modify the value.
If the Beep symbol is crossed, beeps won't be routed to the output
In Pict 07, Beeps are enabled for outputs 2 & 3 only.
5. Current Configuration
You can change the utmap applied to an utput by selecting its row and then turning the Left
Crown. Letter, name and utmap settings are updated.
A special utmap is placed before the 'a' outmap: the Muted outmap where no input is routed.
It is also possible to select an utmap using the Left and Right buttons or the Jog wheel, in order
to move the light blue selection box to the fifth item of the wanted row and press the K button
to display the utmap selection window.
Pict. 14
Using the Up and Down buttons, select the wanted utmap and apply it by pressing the k
button. It is also possible to edit the currently selected utmap by pressing the F5 button.
6. Edit Outmap
Press the F5 button to open the Configuration Edit window.
Pict. 15
WARNING: Keep in mind that the configuration you are modifying can be applied to multiple
outputs. Even more, as the utmaps are shared between AES and Line utputs it can also
modify an AES utput.
In Pict 08, utmap 'a' is applied to Lineout 1 but also to AES- ut 1 to 8 as stated
by the warning text at the left of the window.
Cantar X3
12

You can change to the previous or next utmap by turning the Left Crown.
i. Name
Each utmaps can be named (max: 12 characters).
Press the Shift+ K buttons to modify it.
ii. Inputs
Any Input can be sent to Line utput. Scroll through the grid with the direction
buttons or the Jog wheel and press the K button to enable or disable an input.
iii. Talk
Compared to Headphone utmap, you can choose Tlk1 and Tlk2.
It corresponds to the Talk buttons.
Pressing those buttons, enables the Slate Mic and the 3,5mm jack Mic and will
send the stream to the Headphones and to any utmap (Line, AES, Dante) where
the corresponding Talk function is routed.
Example: if Talk1 is routed to Line ut 3 and Talk2 to Line ut 4.
Pressing Talk 1 will send the Slate Mic to Line ut 3 but not to Line ut 4.
Pressing Talk 2 will send the Slate Mic to Line ut 4 but not to Line ut 3.
NB: Pressing the Shift + Talk buttons, routes the audio to the utputs and to
the Tracks.
NB: Quick Modification > Each parameter once selected may be quickly modified by rotating
the Jog wheel while holding the Shift button pressed.
7. Multiple Outmap
It is possible to apply a different utmap according to the Main Selector position.
Press the Shift + K buttons to display the Multiple utmap window.
Pict. 16
A Main Selector is represented with an utmap letter on each position, except the Stop position
where nothing is routed to the outputs.
Using the Left and Right buttons, loop throught the eleven available Main Selector position.
Using the Up and Down buttons, scroll through the 26 available utmaps (plus the Muted
special outmap).
Save the modifications by pressing the k button or Cancel by pressing the Escape button.
Cantar X3
13

nce a Multiple utmap is applied to an output, its outmap description is replaced by the letters
corresponding to the twelve utmaps applied in regard of the twelve Main Selector positions
(the first letter being the Record position).
Pict. 17
NB: • Using the Left Crown to select the utmap placed before the Muted utmap calls
II. Output Levels
utputs levels can be modified while the Main Selector is in the 10 o'clock position (TEST).
Pict. 18
Press the F6 button to open the Line ut Level panel.
Pict. 19
Using the direction buttons you can select the Line uput. Press the K button to modify the
Value.
Pict. 20
Cantar X3
14

III. Other Main elector Positions
When the Main Selector is in the Test (10 o'clock), Pre Record (11 o'clock), or Record (12
o'clock) positions, it is also possible to modify the Line utmaps by pressing the F2 key and then
the F3 key.
Cantar X3
15

AE OUTPUT
Cantar X3 has 8 AES outputs.
I. Outmaps
You can configure up to 26 utmaps (from 'a' to 'z') each applicable to one or several outputs.
NB: Line and AES utmaps are shared. ( AES utmap 'a' is the same as Line utmap 'a').
utmaps can be modified while the Main Selector is in the 6 o'clock position.
In that position, Headphone utmaps are displayed but by pressing F3 button twice, you will
access the AES utmaps panel (another press on the F3 button will display the Headphone
utmap panel).
Please refer to the Line utmap section.
Cantar X3
16

DANTE OUTPUT (optional)
Cantar X3 optionnaly has 32 Dante outputs.
I. Outmaps
n the first 24 outputs (Dante ut 1 to Dante ut 24), are routed the Tracks (Track 1 to Track
24).
n the last 8 outputs (Dante 25 to Dante 32), the 8 AES utmaps are copied (Do 1 to Do 8).
II. Module Configuration
Dante module can be configured using Audinate's Dante controller application. It is available for
Windows and Mac s X (please visit Audinate's web site to download it).
NB: While setting up your Dante network, please verify a few things:
• In the Dante Controller, tab “Clock Status”, the Cantar should be checked as “Prefered
Master” and “Enable Sync to External” should also be checked.
Pict. 21
• In the tab “Device Info”, by double clicking on the Cantar X3 (if the name was changed, refer
to Product Type which should be “Cantar X3”, access the Device View where Sample Rate and
Device Latency can be set up.
Pict. 22
Cantar X3
17

IN GRID ROUTING
In Grid routing can be modified while the Main Selector is in the 5 o'clock position.
You can configure up to 20 InGrid (from 1 to 20).
Pict. 23
I. Current Ingrid
The InGrid used is changed by turning the Left Crown. Name and Tracks settings are updated.
NB: Copy and Paste.
By pressing the Shift+F4 buttons, the current InGrid is copied to the clipboard. You can paste it
over any InGrid by pressing the Shift + F6 buttons.
II. Name
Each InGrid can be named (max: 12 characters). Press the Shift+ K buttons to modify it.
III. Inputs
The InGrid represents the 24 Tracks with 24 columns. In each column, 8 inputs can be routed
represented by 8 rows.
In each row can be routed the corresponding input number i.e. on row 3 > Mic-3, Ms-M-3 Line-
3, Digi-3, AES 42-3, Dante-3 (optional), PostFade 3.
The last (9th) row displays the Pan-Pot to Mixdown.
1. Inputs to Tracks
Any input can be routed to any Track (including Mixdown).
i. Add input
Use the direction buttons to move the yellow selection box and select the appropriate Track and
the input number. Press the K button to display the Input choice panel.
Pict. 24
Use Up or Down buttons to select the appropriate input in the list and press the K button.
Cantar X3
18

NB: • Quick way: Press the appropriate Solo-Track button to select the Track, then press the
appropriate Input-Solo button to toggle its state (hold the Shift button for MS Mic Input).
• Mix Left can only be accessed through Row 1
• Mix Right can only be accessed through Row 2
• MS mics should be routed on adjacent Tracks: M side on an uneven Track number and
S side on the following Track.
• When routing or removing an MS mic, the other side (M or S) is automatically
routed/removed.
• A digital gain can be applied on Digital inputs: from -¥ to +12dB on AES inputs and
from -¥ to +36 dB for AES 42.
Both version of inputs (before or after gain) can be routed in an InGrid. These versions are
symbolised by the letter representing the input type being capital or not: for example, for
an AES input, 'd' is for the digital input before gain and 'D' is for the digital input after
gain.
To toggle between the two versions: select the item and press the Right or Left button.
• For input number superior to 8: Dante (optional), PostFade an arrow is displayed, select
the item and press Right/Left button to adjust the input number.
• PostFade N is the output of the track N through the attenuation applied to this track. Be
careful, the PostFade has a delay of 1 sample.
• Refer to Annex to see the Cantar Audio Chain.
ii. Remove input
Use the direction buttons to move the yellow selection box and select the appropriate Track and
the input number.
• Press the K button to display the Input choice panel and choose “Remove”.
r • Double press the ESC button.
r • Press the Solo button of the appropriate input.
NB: All inputs routed to a Track can be removed by holding the ESC button.
2. Pan-Pot to Mixdown
Each Track can contribute to the Mixdown through the PanPot.
Pan-pot is represented on the last row and indicates each Track contribution to the Mixdown Left
and Right.
•L means the Track is sent to Mix-Left.
•R means the Track is sent to Mix-Right.
•C means the Track is sent to both Mix-Left and Mix-Right.
•X means the Track is not sent to the Mixdown.
Example: on Pict.12: • Track 3 is sent to Midown-Left.
• Tracks 4 to 10 are sent to Mixdown-Right.
• other Tracks are not sent to Mixdown (Track 1 and 2 cannot for obvious
reason by sent to Mixdown).
The F4 button toggles the Left contribution.
The F6 button toggles the Right contribution.
The F5 button cycles through the L, R, C, X options.
Cantar X3
19

NB: • If a stereo pair (MS mic) is routed and each side is sent to Mixdown respectively Left
and Right or both sides to Center, then MS will be decoded into the Mixdown.
It is also possible to have more precision: Fine Pan.
The Pan-Pot letter is replaced by a percentage representing how the Track is sent to Mixdown Left
and Right.
Access the Fine Pan setting Window by pressing the Shift + F5 buttons.
Pict. 25
Balance is set using the Left or Right buttons. Each Track's contribution will be displayed in
percentage and dB.
It is not possible to send Mixdown Tracks or Postfade Tracks to Mixdown for obvious reasons.
i. MS decoding into Mix:
For MS pair, only 4 PanPot positions are available:
• M is sent to the Left and S is not sent to Mixdown.
• M is sent to the Right and S is not sent to Mixdown.
• M & S are not sent to Mixdown.
• M & S to the Center: the MS pair is decoded, post-fader, by changing the S-track level, the
width of the decoded stereo signal is changed.
3. Track settings
i. Arm/Disarm
Pressing the Shift+F3 button arms or dis-arms the currently selected Track.
ii. Track level
For tracks with no actuator assigned, it is possible to modify the Track level directly from the
Ingrid by turning the Jog wheel while holding the Shift button pressed.
IV. Declare input as Mixdown
In order to have an external source declared as Mixdown track, it is possible to add an input to
a track with a Mix-Left or a Mix-Right already routed.
Cantar X3
20
Table of contents
Other AAton Recording Equipment manuals