ABBA STA05 User manual

STA05
www.ABBALightingUSA.com
INSTALLATION GUIDE

IMPORTANT SAFETY INSTRUCTIONS
LIGHTEN LAMP IS HOT!
WARNING: TO REDUCE THE RISK OF FIRE OR INJURY TO PERSONS:
Please exercise caution when using the lamp, as it tends to HEAT up rapidly.
We recommend taking necessary safety measures to ensure optimal usage.
For your safety, please refrain from touching the HOT lens, guard, or enclosure.
We recommend waiting for the product to cool down before handling it.
To prevent any fire hazards, please ensure that the lamp is kept away from
materials that may easily catch fire. We appreciate your cooperation in
maintaining a safe and secure environment.
RATED VOLTAGE 12V AC/DC
Congratulations on your purchase of this high-quality product! We want to ensure that you
have the best possible experience with it, so we kindly ask that you take a moment to carefully
read and follow all instructions before assembly, installation, and use. By doing so, you'll not
only guarantee correct function and safety, but also optimize the full potential of this
exceptional product. Thank you for choosing us as your trusted provider of top-notch
products - we truly appreciate your business!
WARRANTY
We stand behind the quality of our product and offer a 2-year warranty from the date of purchase.
Please note that the warranty is valid from the date of purchase, not from the date of installation.
Kindly ensure that you keep the proof of purchase as it will be required for any warranty claims.
Warranty will be void if there is any damage due to improper usage or
modification to the fixture.
Failure to comply with the instruction in this manual may increase the risk of
damage or injury and will void warranty.
For safety reasons, we recommend that only a qualified professional install
this electrical product.
Before attempting to install this unit, ensure all power connections are off for
your own safety.
www.ABBALightingUSA.com

Do not instal within 10 feet of a pool, spa or fountain
CAUTION:
fixture(s) must be installed in accordance with all local codes and ordinances.
INSTALLATION INSTRUCTION
www.ABBALightingUSA.com
To ensure optimal performance and safety,
it is important to use our fixtures ONLY with
a low voltage landscape transformer. This
transformer reduces the voltage from 120V
to 12V, making it safe and suitable for
outdoor use.
When installing the fixture(s), please follow
these instructions carefully:
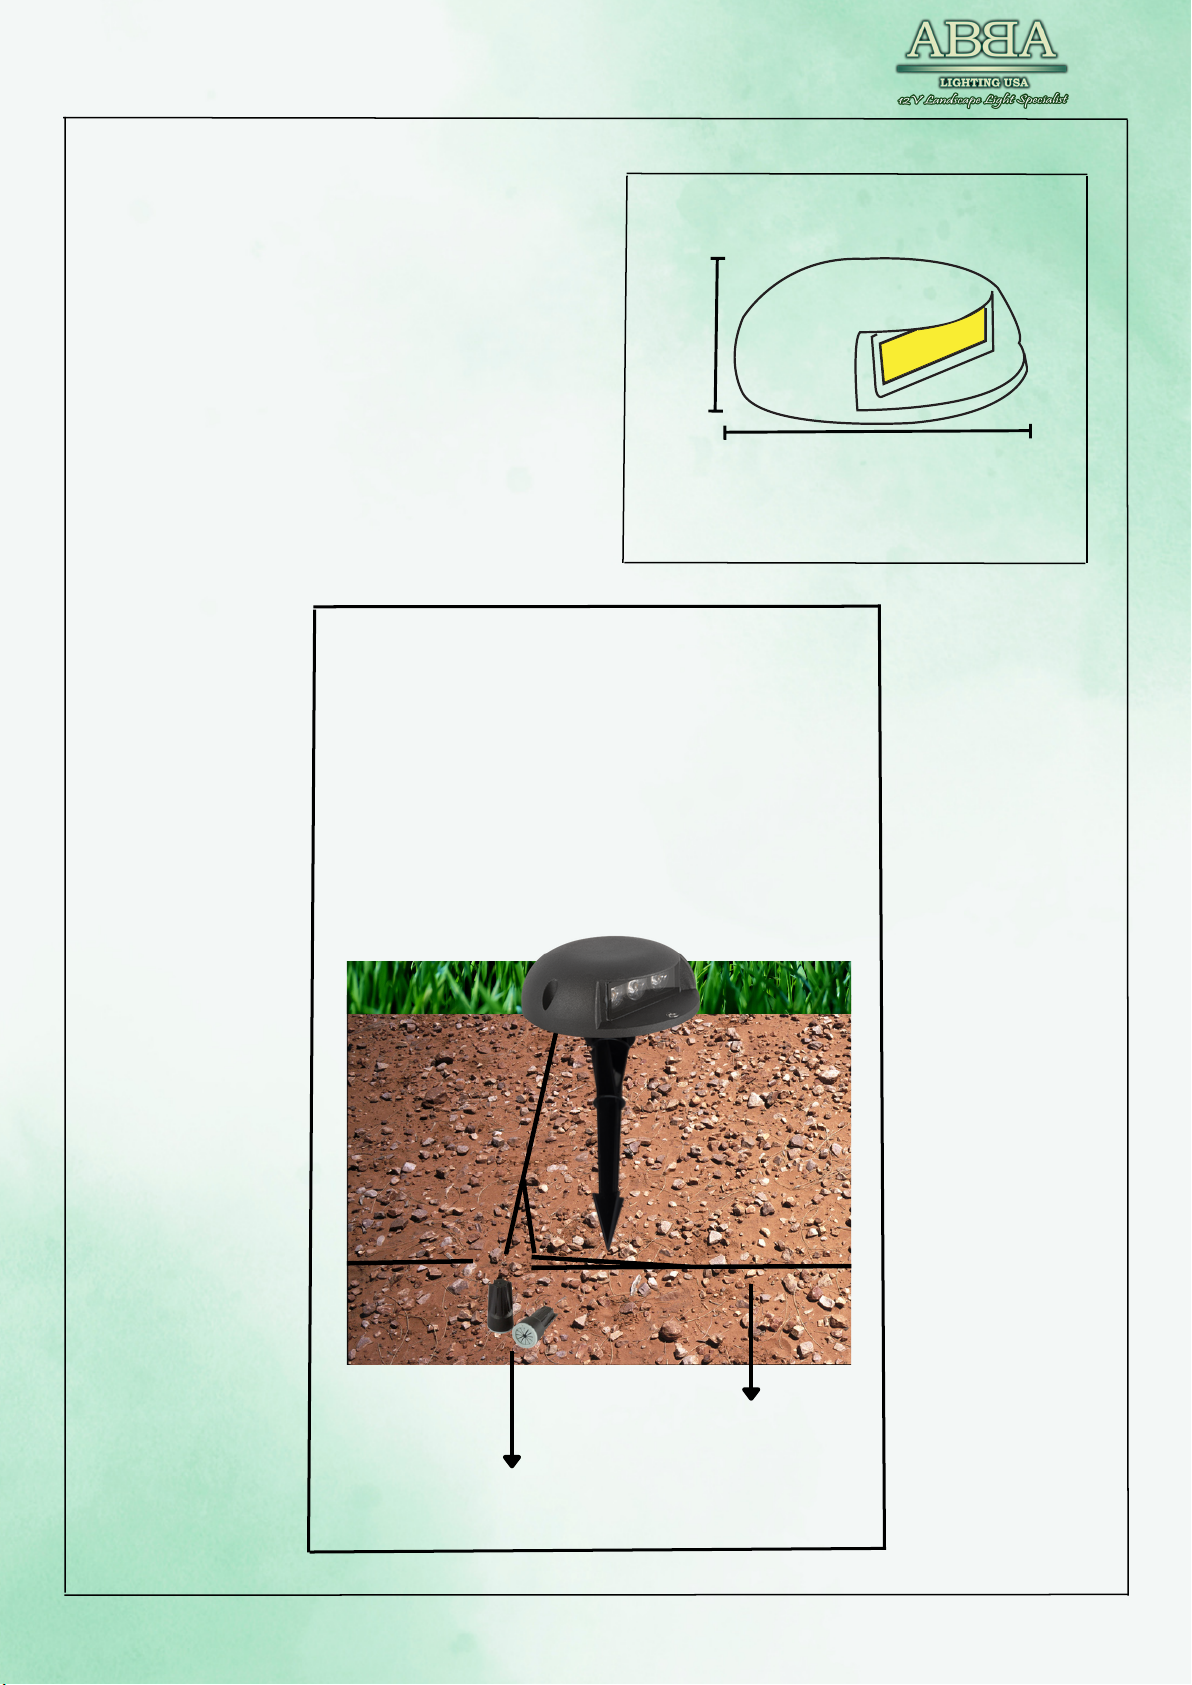
INSTALLING IN WOOD & CONCRETE
1.Before installation, please ensure that
the power is turned off for your safety.
2.To unlock or open the fixture, loosen the
screws using a screw driver.
3.Using a pencil or marker, carefully mark
the screw hole locations on the wall
through the holes in the metal plate.
4.Select an appropriately sized drill bit for
the pilot holes, which should match the
diameter of the screws you are using. It is
recommended to use a bit slightly smaller
than the screws to provide a secure grip.
5.Position the drill bit on each marked spot
and gently drill pilot holes into the wall at
the marked locations. Take care not to drill
too deep, ensuring the depth matches the
length of the screws.
6.To ensure a proper installation of the
fixture, it is necessary to diligently create a
hole on the wall that corresponds to the
size of the wire.
This will allow you to route the wires towards
the main line connection. To do this, use a drill
bit or hole saw that is the same diameter as
the wires. Make sure to measure and mark the
hole accurately beforehand. Once the hole
are made, you can proceed to install.
7.For concrete installation, To begin,
construct conduit raceways inside the
concrete formwork by using one-inch dowels
and PVC pipe before pouring the concrete.
After the concrete has cured, remove the
dowels and proceed to finish the outer
surface of each riser if you are installing it in
stairs.
8. Attach the wires from the fixture(s) to the
main cable, For best results, we recommend
using WN12 waterproof wire nuts (which are
sold separately) to ensure optimal
connectivity and protection against dust,
moisture and water damage.
9.Strip the insulation: Carefully strip
approximately 3/4 inch (1.9 cm) of insulation
from the ends of the two wires you wish to
connect. Ensure that the bare metal ends are
clean and free from any frayed strands.
10. Align the wires: Hold the stripped ends of
the two wires together, aligning them neatly
and ensuring that no stray strands are
crossing over.
11. Insert the aligned ends of the wires into
the wire nut, ensuring that they go all the way
in. The bare ends should be completely
covered by the wire nut.

Do not instal within 10 feet of a pool, spa or fountain
CAUTION:
fixture(s) must be installed in accordance with all local codes and ordinances.
www.ABBALightingUSA.com
17.Once the fixture(s) have been installed
securely, secure the fixture by tightening
the screws. it's time to turn on the power
and enjoy the enhanced lighting experience!
Locate the power switch or breaker that
controls the fixture(s) and turn it on.
Take a moment to observe the lighting effect
Remember to regularly maintain and clean
the fixture(s) to ensure optimal performance
and longevity. Refer to the manufacturer's
instructions for specific details on how to
care for your particular fixture.
16. Remember to test the fixture after
making any adjustments to ensure it is
functioning correctly and that the lighting is
set to your preferences.
Twist the wire nut: Firmly twist the wire nut
clockwise onto the wires, ensuring a secure
connection. Continue twisting until the wire
nut is tight and snug. For added safety, it is
recommended to apply electrical tape
around the wire nuts and wires as an extra
layer of protection.
Confirm that the FIXTURE is firmly and
evenly attached to the wall, without any
wobbling or misalignment.
Use a level to verify that the metal plate is
horizontally or vertically aligned, as
desired.
12.Test the connection: Gently tug on each
wire to ensure they are securely held by the
wire nut.
13. Place the FIXTURE against the wall,
aligning the screw holes with the pilot holes
you created.
14.Take the screws and insert them through
the holes in the FIXTURE, one at a time.
15.Using a screwdriver, tighten the screws
gradually and evenly, ensuring a secure
attachment of the FIXTURE to the wall. Be
cautious not to overtighten and damage the
wall surface.
MAIN LINE
WN12
Attach the wires
from the
fixture(s) to the
main cable, For
best results, we
recommend
using WN12
waterproof wire
nuts (which are
sold separately)

Do not instal within 10 feet of a pool, spa or fountain
CAUTION:
fixture(s) must be installed in accordance with all local codes and ordinances.
INSTALLATION INSTRUCTION
www.ABBALightingUSA.com
INSTALLATION WITH GROUND SPIKE
When installing the fixture(s), please follow
these instructions carefully:
1.Before installation, please ensure that
the power is turned off for your safety.
2.To unlock or open the fixture, loosen the
screws. Take the replacement metal plate
included in the package. Ensure it has a
hole for the ground spike, allowing for
proper grounding.
3.Attach the metal plate to the ground
spike by aligning the hole and tightening
the screw. Continue tightening the screw
until the metal plate is securely fastened to
the ground spike.
4.Attach the metal plate with the ground
spike to the fixture using screw. Tighten the
screw firmly to ensure a secure connection
between the metal plate and the fixture.
5.Attach the wires from the fixture(s) to the
main cable, For best results, we
recommend using WN12 waterproof wire
nuts (which are sold separately) to ensure
optimal connectivity and protection
against dust, moisture and water damage.
Simply thread the wires through the wire
nut and twist it until it is securely in place.
6.Strip the insulation: Carefully strip
approximately 3/4 inch (1.9 cm) of
insulation from the ends of the two wires
you wish to connect.
7.Ensure that the bare metal ends are clean
and free from any frayed strands.
8. Align the wires: Hold the stripped ends of
the two wires together, aligning them neatly
and ensuring that no stray strands are
crossing over.
9. Insert the aligned ends of the wires into
the wire nut, ensuring that they go all the
way in. The bare ends should be completely
covered by the wire nut.
10.Twist the wire nut: Firmly twist the wire
nut clockwise onto the wires, ensuring a
secure connection. Continue twisting until
the wire nut is tight and snug. For added
safety, it is recommended to apply electrical
tape around the wire nuts and wires as an
extra layer of protection.
11.Test the connection: Gently tug on each
wire to ensure they are securely held by the
wire nut.
12.Insert the spike into the ground, ensuring
it is vertical and firm., apply enough force to
ensure it is firmly anchored.
13. Remember to test the fixture after
making any adjustments to ensure it is
functioning correctly and that the lighting is
set to your preferences.

www.ABBALightingUSA.com
8.8”
DIAMETER:
1.6”
it's time to turn on the power and enjoy the
enhanced lighting experience! Locate the
power switch or breaker that controls the
fixture(s) and turn it on.
Take a moment to observe the lighting effect
Remember to regularly maintain and clean
the fixture(s) to ensure optimal performance
and longevity. Refer to the manufacturer's
instructions for specific details on how to
care for your particular fixture.
WN12 (Sold separately)
Main Line
Connect the wires using
Table of contents
Other ABBA Outdoor Light manuals