Abbot & Ashby ATBG280/6 User manual

Operating Manual
6”Industrial Bench Grinder
ATBG280/6
804531
Protect yourself and others by observing all safety information, warnings and
cautions. Failure to comply with instructions could result in personal injury
and/or damage to product or property
Please retain instructions for future reference!
“The reputable name in bench grinders for 40 years”
40 Year
Australian
Heritage

SPECIFICATIONS
PART No. ATBG280/6
ITEM CODE 804531
RPM no load speed 2880
WHEEL SIZE 150 x 25 x 12mm
AMPS 1.8
INPUT/OUTPUT 420W/280W
WEIGHT 10.3kg
WHEEL GRITS 36 Coarse / 60 Medium
Eye Shield
Mounting holes
On/Off Switch
Mounting holes
Adjustable tool rest

ATBG280/6 Operating Manual
Protect yourself and others by observing all safety information, warnings,
and cautions. Failure to comply with instructions could result in personal
injury and/or damage to product or property.
Please retain instructions for future reference.
Introduction.
Dear Customer,
Thank you for purchasing this product which has passed through our extensive quality
assurance process. Every care has been taken to ensure that it reaches you in perfect
condition.
General Safety Rules
WARNING! Read all instructions Failure to follow all instructions listed below may result in
electric shock, re and/or serious injury. The term “power tool” in all of the warnings listed
below refers to your mains-operated (corded) power tool.
SAVE THESE INSTRUCTIONS

1) Work area
a) Keep work area clean and well lit. Cluttered and dark areas invite accidents.
b) Do not operate power tools in explosive atmospheres, such as in the presence of
ammable liquids, gases or dust. Power tools create sparks which may ignite the dust
or fumes.
c) Keep children and bystanders away while operating a power tool. Distractions can
cause you to lose control
2) Electrical safety
a) Power tool plugs must match the outlet. Never modify the plug in any way. Do not
use any adapter plugs with earthed (grounded) power tools. Unmodied plugs and
matching outlets will reduce risk of electric shock
b) Avoid body contact with earthed or grounded surfaces such as pipes, radiators,
ranges and refrigerators. There is an increased risk of electric shock if your body is
earthed or grounded.
c) Do not expose power tools to rain or wet conditions. Water entering a power tool will
increase the risk of electric shock.
d) Do not abuse the cord. Never use the cord for carrying, pulling or unplugging the
power tool. Keep cord away from heat, oil, sharp edges or moving parts. Damaged
or entangled cords increase the risk of electric shock.
e) When operating a power tool outdoors, use an extension cord suitable for outdoor
use. Use of a cord suitable for outdoor use reduces the risk of electric shock.
3) Personal safety
a) Stay alert, watch what you are doing and use common sense when operating a
power tool. Do not use a power tool while you are tired or under the inuence of
drugs, alcohol or medication. A moment of inattention while operating power tools may
result in serious personal injury.
b) Use safety equipment. Always wear eye protection. Safety equipment such as dust
mask, non-skid safety shoes, hard hat, or hearing protection used for appropriate
conditions will reduce personal injuries.
c) Avoid accidental starting. Ensure the switch is in the off-position before plugging in.
Carrying power tools with your nger on the switch or plugging in power tools that have
the switch on invites accidents.
d) Remove any adjusting key or wrench before turning the power tool on. A wrench or
a key left attached to a rotating part of the power tool may result in personal injury.

ATBG280/6 Operating Manual
e) Do not overreach. Keep proper footing and balance at all times. This enables better
control of the power tool in unexpected situations.
f) Dress properly. Do not wear loose clothing or jewellery. Keep your hair, clothing and
gloves away from moving parts. Loose clothes, jewellery or long hair can be caught in
moving parts.
g) If devices are provided for the connection of dust extraction and collection facilities,
ensure these are connected and properly used. Use of these devices can reduce dust-
related hazards.
4) Power tool use and care
a) Do not force the power tool. Use the correct power tool for your application. The
correct power tool will do the job better and safer at the rate for which it was designed.
b) Do not use the power tool if the switch does not turn it on and off. Any power tool
that cannot be controlled with the switch is dangerous and must be repaired.
c) Disconnect the plug from the power source before making any adjustments,
changing accessories, or storing power tools. Such preventive safety measures reduce
the risk of starting the power tool accidentally.
d) Store idle power tools out of the reach of children and do not allow persons
unfamiliar with the power tool or these instructions to operate the power tool. Power
tools are dangerous in the hands of untrained users.
e) Maintain power tools. Check for misalignment or binding of moving parts, breakage
of parts and any other condition that may affect the power tools operation. If
damaged, have the power tool repaired before use. Many accidents are caused by
poorly maintained power tools.
f) Keep cutting tools sharp and clean. Properly maintained cutting tools with sharp cutting
edges are less likely to bind and are easier to control.
g) Use the power tool, accessories and tool bits etc., in accordance with these
instructions and in the manner intended for the particular type of power tool, taking
into account the working conditions and the work to be performed. Use of the power
tool for operations different from intended could result in a hazardous situation.
5) Service
a) Have your power tool serviced by a qualied repair person using only identical
replacement parts. This will ensure that the safety of the power tool is maintained.

ADDITIONAL SAFETY RULES FOR BENCH GRINDERS
• Ensure that power tools are disconnected from the mains supply when not in use, before
servicing, lubricating or making adjustments and when changing accessories such as
grinding wheels.
• Always use the correct type of grinding wheel for the type of operation to be carried
out and the material being machined. Do not use a grinding wheel as a cutting disc.
• Only use grinding wheels that are in good condition. This will improve grinding and
reduce the load on the machine ensuring a longer life of the grinding wheel and the
machine.
• Never use damaged grinding wheels. Grinding wheels that are cracked, chipped or
worn could shatter causing injury to the operator and bystanders and damage to the
machine.
• Do not use grinding wheels that are larger than specied, only use grinding wheels that
are rated for the machine. The rotational speed shown on the grinding wheel should
always be HIGHER than the rotational speed of the machine.
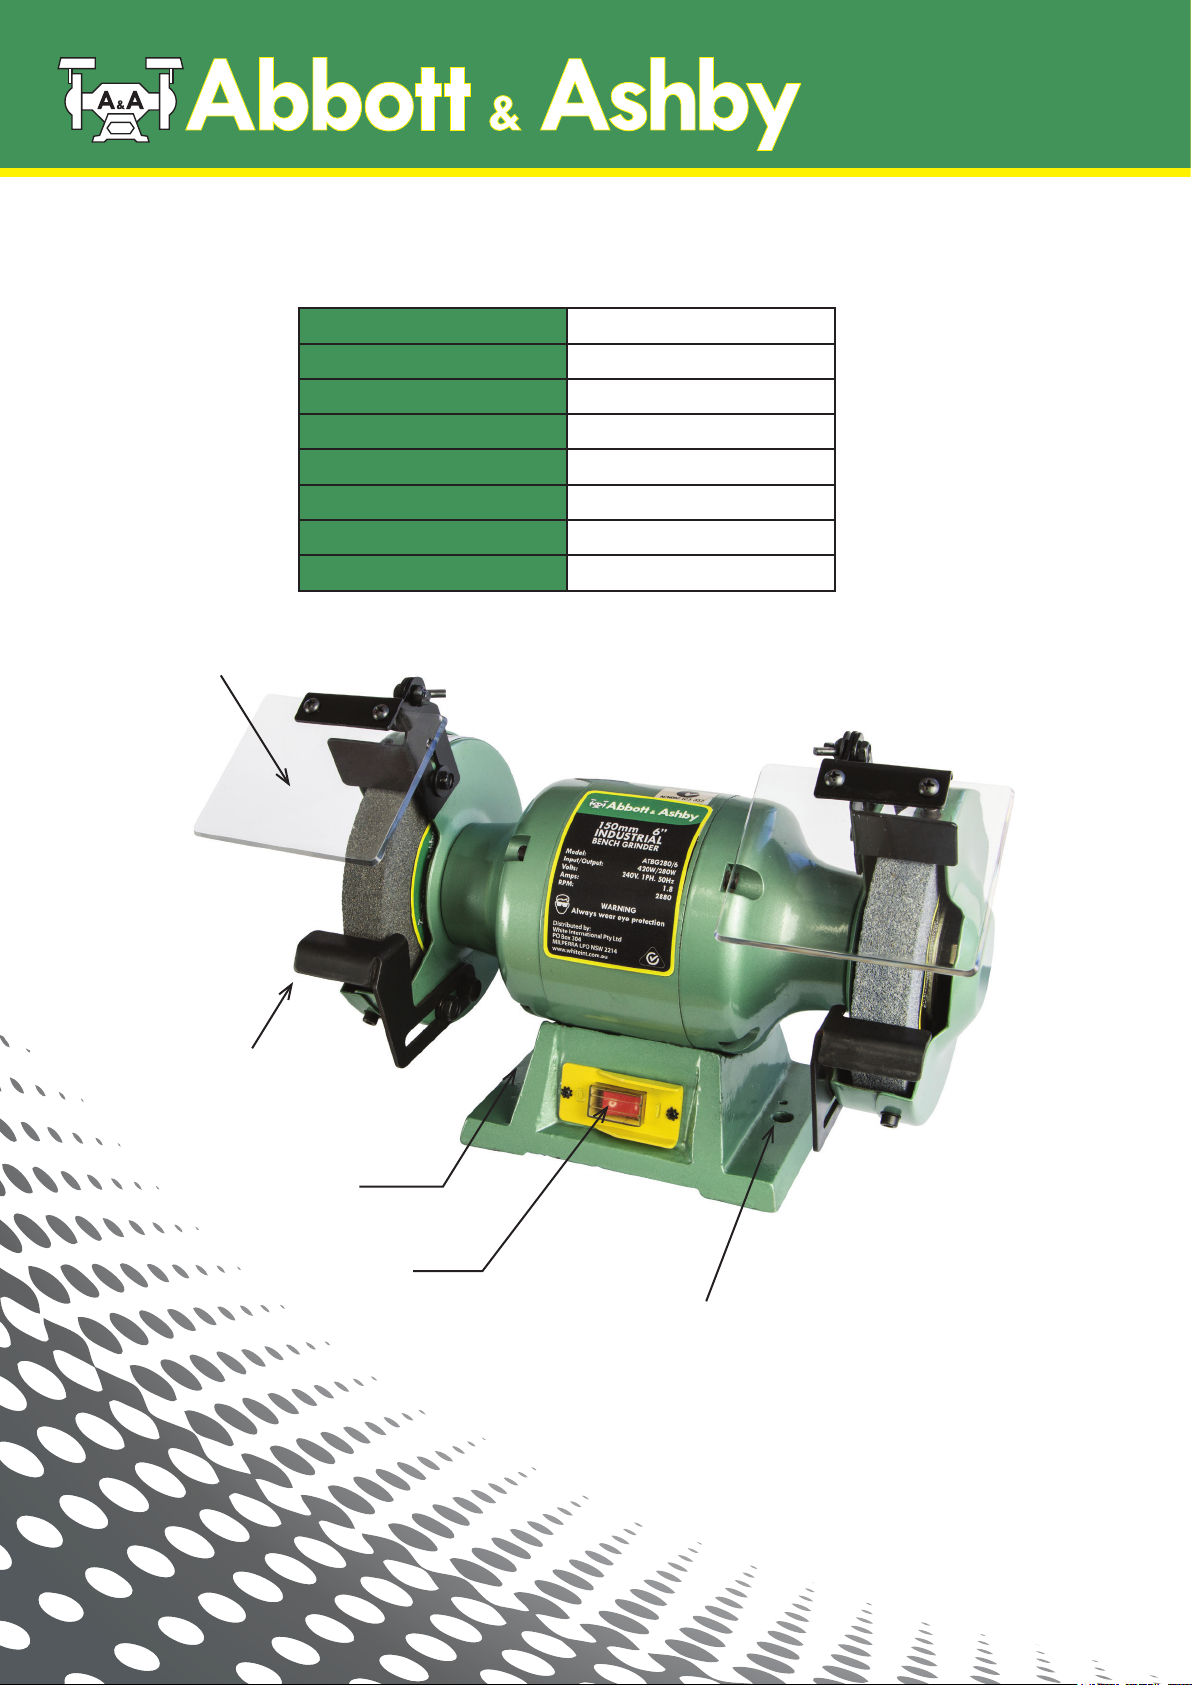
• Always t the blotter or paper washers on either side of the grinding wheel if not
already tted to the grinding wheel.
• When tting a new wheel ensure blotters are in place, t concave side of ashers to face
the wheel and tighten the lock nut rmly.
• Do not over tighten (over tightening can crack a grinding wheel).
• Do not attempt to modify the machine or its accessories in any way.
• Do not use excessive force on the grinding wheel. Only use gradual pressure as this will
reduce the wear on the bench grinder and grinding wheels and increase its efciency
and operating life.
• Use approved safety glasses or goggles, face mask and if being used for an extended
period wear ear defenders.
• Do not start the machine with the work piece in contact with the grinding wheel or
before checking the position of the tool rest.
• Never apply the work piece to the side of the grinding wheel, this could cause the
grinding wheel to shatter.
• Keep guards in place and in good working order. With the machine disconnected from
the mains supply check that the guards are secure and tted correctly.
• Always keep the tool rest as close to the grinding wheel as possible. The gap between
the tool rest and the grinding wheel should be no more than 2mm.
• Do not attempt to grind objects that are too small to hold safely.
• Do not use the work piece to slow down the grinding wheel once the machine has been
switched off.

ATBG280/6 Operating Manual
WARNING!
Do not use bench grinders in areas where there is a risk of explosion or re from
combustible materials, ammable liquids, paint, varnish, petrol etc. ammable gases and
dust of an explosive nature. As a precaution it is recommended that you consult an expert
on a suitable re extinguisher and its use.The metal particles (sparks) which are produced
during grinding are hot and could ignite any combustible material in the vicinity of the
operation.
GETTING STARTED
ACCESSORIES
The bench grinder is supplied with the following accessories:
2 eye shields with mounting brackets and 2 tool rests
CAUTION. Always ensure that the bench grinder is switched off and plug is removed from
the power point before making any adjustments.
To t the eye shields locate the nut, screw and washers provided through the slot in the eye
shield and hole on the grinding wheel guard and nger tighten. Position the eye shield so it
does not come in to contact with the grinding wheel. Tighten the nut and screw to secure the
eye shield in place.
Attach the tool rests using the bolts and securing knobs provided and adjust to the correct
position. The gap between the tool rest and grinding wheel should be set to 2mm.
BENCH MOUNTING
The Grinder can be secured with screws or nuts and bolts. Locate the mounting holes. The
length of the bolts or screws will depend on the thickness of the bench. Where a steel
bench is used it is best to mount the grinder on to a board, then attach the board to the
bench, this will also minimise vibration.
SWITCHING ON AND OFF
Before connecting to the power supply rotate the wheel by hand to ensure that it is running
free from obstruction. Connect to the mains supply and press the rocker switch to the ON
position (l). To stop the machine simply press the rocker switch to the OFF position (o).
GENERAL INSPECTION
Regularly check that all the xing screws are tight. They may vibrate loose over time.

WARRANTY
Our goods come with guarantees that cannot be excluded under the Australian Consumer Law. You are
entitled to a replacement or refund for a major failure and for compensation for any other reasonably
foreseeable loss or damage. You are also entitled to have the goods repaired or replaced if the goods
fail to be of acceptable quality and the failure does not amount to a major failure.
This product is covered by a 3 year warranty.
This warranty will not apply:
(i) where this product has been subjected to misuse, abuse, accident or want of care;
(ii) where this product has been used for a purpose for which it was not designed or is not suited;
(iii) where the service of this product has been undertaken by a non-authorised person or company or if
nonapproved parts have been used;
(iv) where this product has been used for industrial purposes.
Should service become necessary during the warranty period, the purchaser should contact an Authorised
Service Centre or White International. In order to obtain warranty service, the purchaser must present the
store receipt showing the name of the retailer and the date of purchase.
The period of the warranty begins from the original date of purchase, notwithstanding any subsequent
repair or parts replacement.
Purchaser shall be responsible for all transport charges to and from the Authorised Service Centre.
Damage in transit is not covered by this warranty. The purchaser should remove from the product any
liquids (if applicable) before sending the tool for service or repair. The tool should be packed securely to
prevent damage.
WARRANTY EXCLUSIONS
Wear parts or service related parts required when performing normal and regular maintenance of this
product are not covered by warranty unless it is found to be defective by an Authorised Service Centre.
These include, but are not limited to: Wheels
Distributed in Australia by White International.
PO Box 304 Milperra LPO, NSW Australia, 2214
Ph:1300 780 876
The White International Policy is one of continuous improvement and the company reserves the right to
alter designs, colours and specications without notice.
For information on all Abbott & Ashby products
please visit: www.whiteint.com.au
The Abbott & Ashby logo is a registered trademark of White International Pty Ltd.
This manual suits for next models
1
Table of contents
Other Abbot & Ashby Grinder manuals
Popular Grinder manuals by other brands

Husqvarna
Husqvarna PG 400 Operator's manual

Hornbach
Hornbach J.C. Schwarz JWS1400XE manual

Bosch
Bosch GWS Professional 10-125 Original instructions

Stanley
Stanley FATMAX FMEG232 Original instructions

EINHELL
EINHELL BT-AG 850 Original operating instructions

Hitachi
Hitachi G 23UBY Technical data and service manual