ABRIVO VB-44240A User manual

VB-44240A
900 MHz Cordless Telephone
Installation and Users Guide
December, 2004

The contents of this manual are subject to change without notice and do not constitute a commitment on
the part of Abrivo Communications. Every effort has been made to ensure the accuracy of this document.
However, due to ongoing product improvements and revisions, Abrivo cannot guarantee the accuracy of printed
material after the date of publication nor can it accept responsibility for errors or omissions. Abrivo will
update and revise this document as needed. The software and hardware described in this document may be
used or copied only in accordance with the terms of the license pertaining to said software or hardware.
Reproduction, publication, or duplication of this manual, or any part thereof, in any manner, mechanically,
electronically, or photographically, is prohibited without permission of the Abrivo Communications.

Table of Contents
Precautions ...............................................................................................1
Checking your Package ...........................................................................2
Understanding Your Telephone ..............................................................3
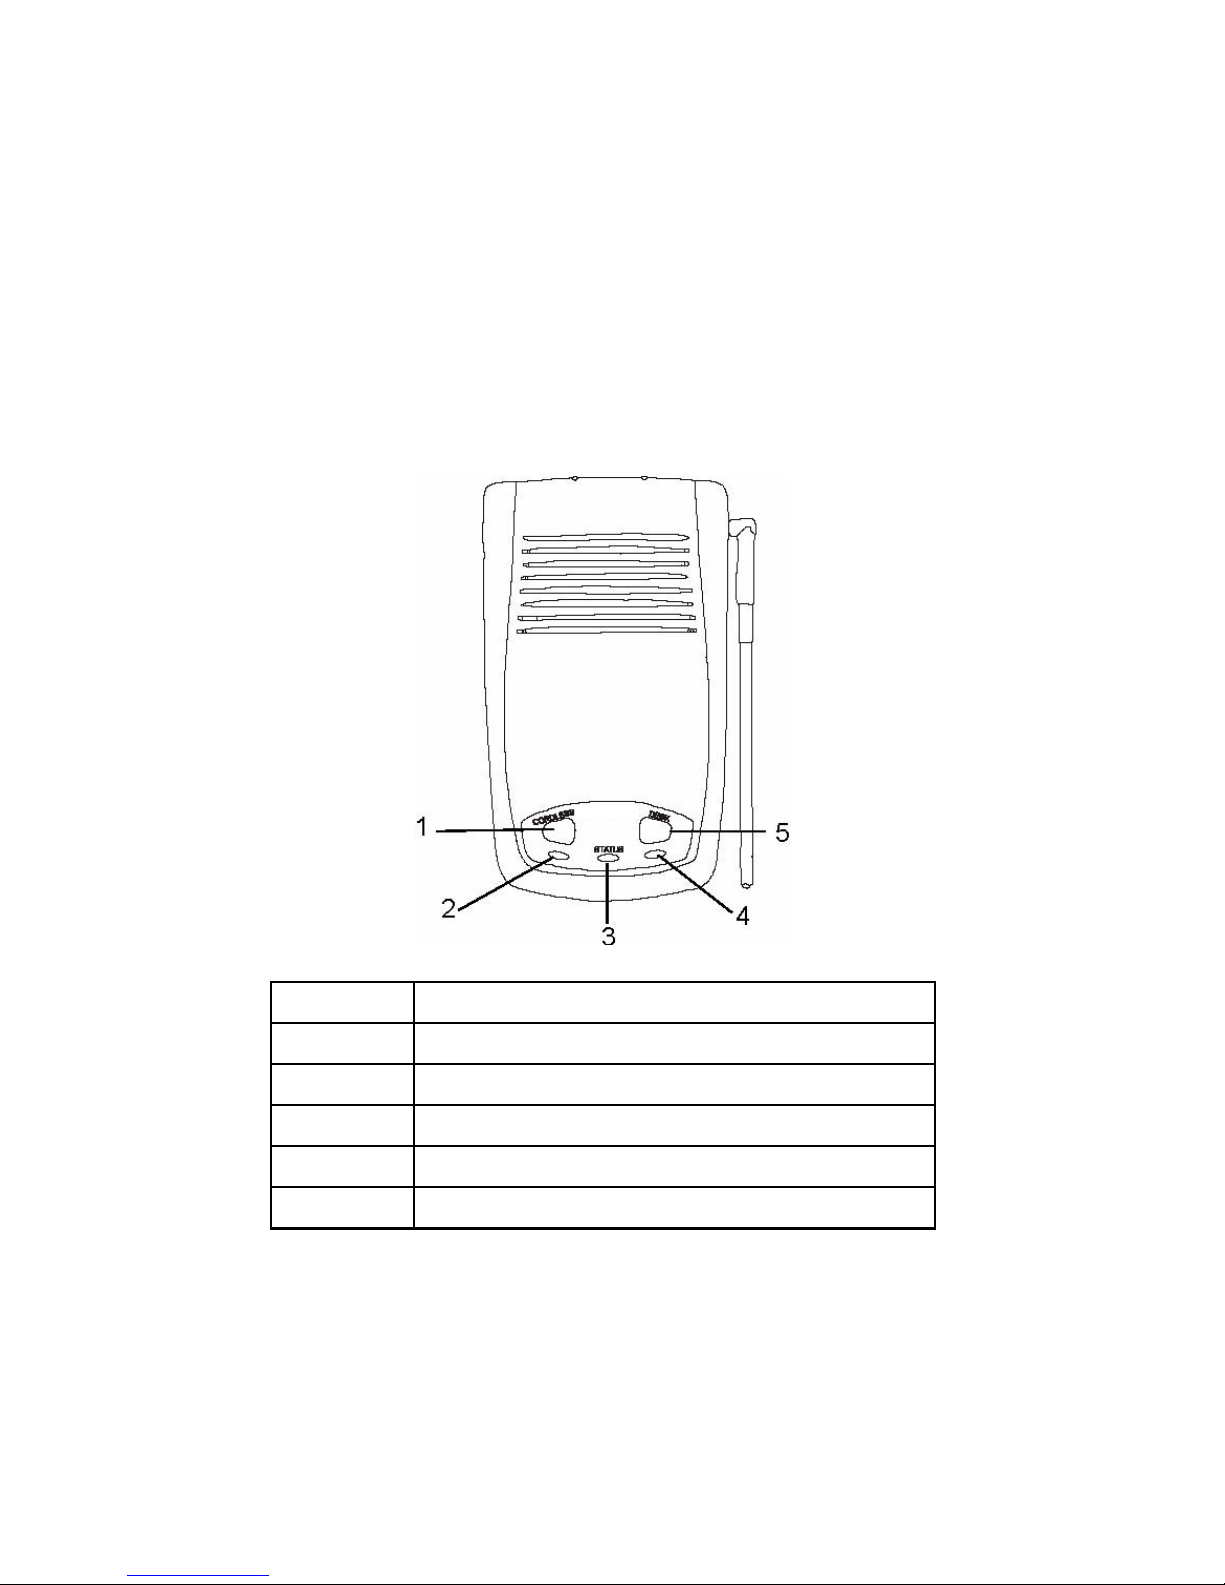
Handset Overview.......................................................................................4
Base Station Features ................................................................................5
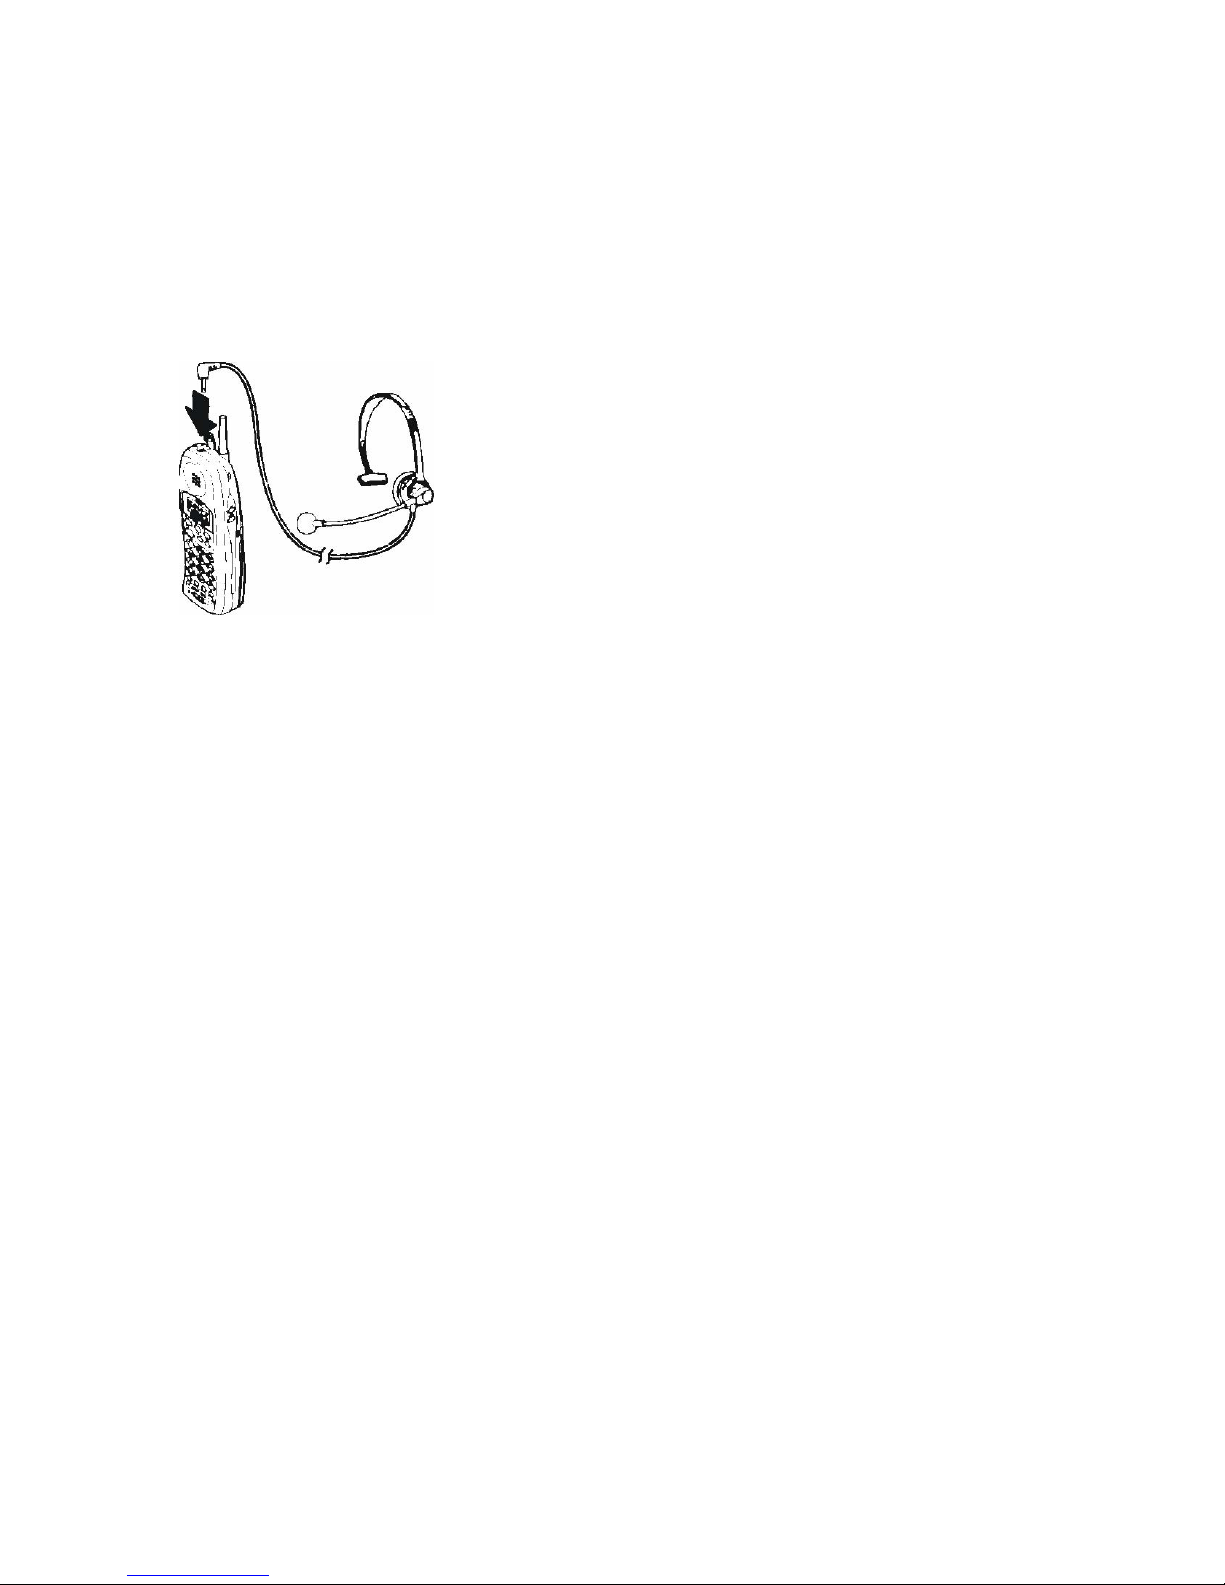
Optional Headset (VB-44249HS)................................................................6
Charging Unit (EXP9785) ...........................................................................6
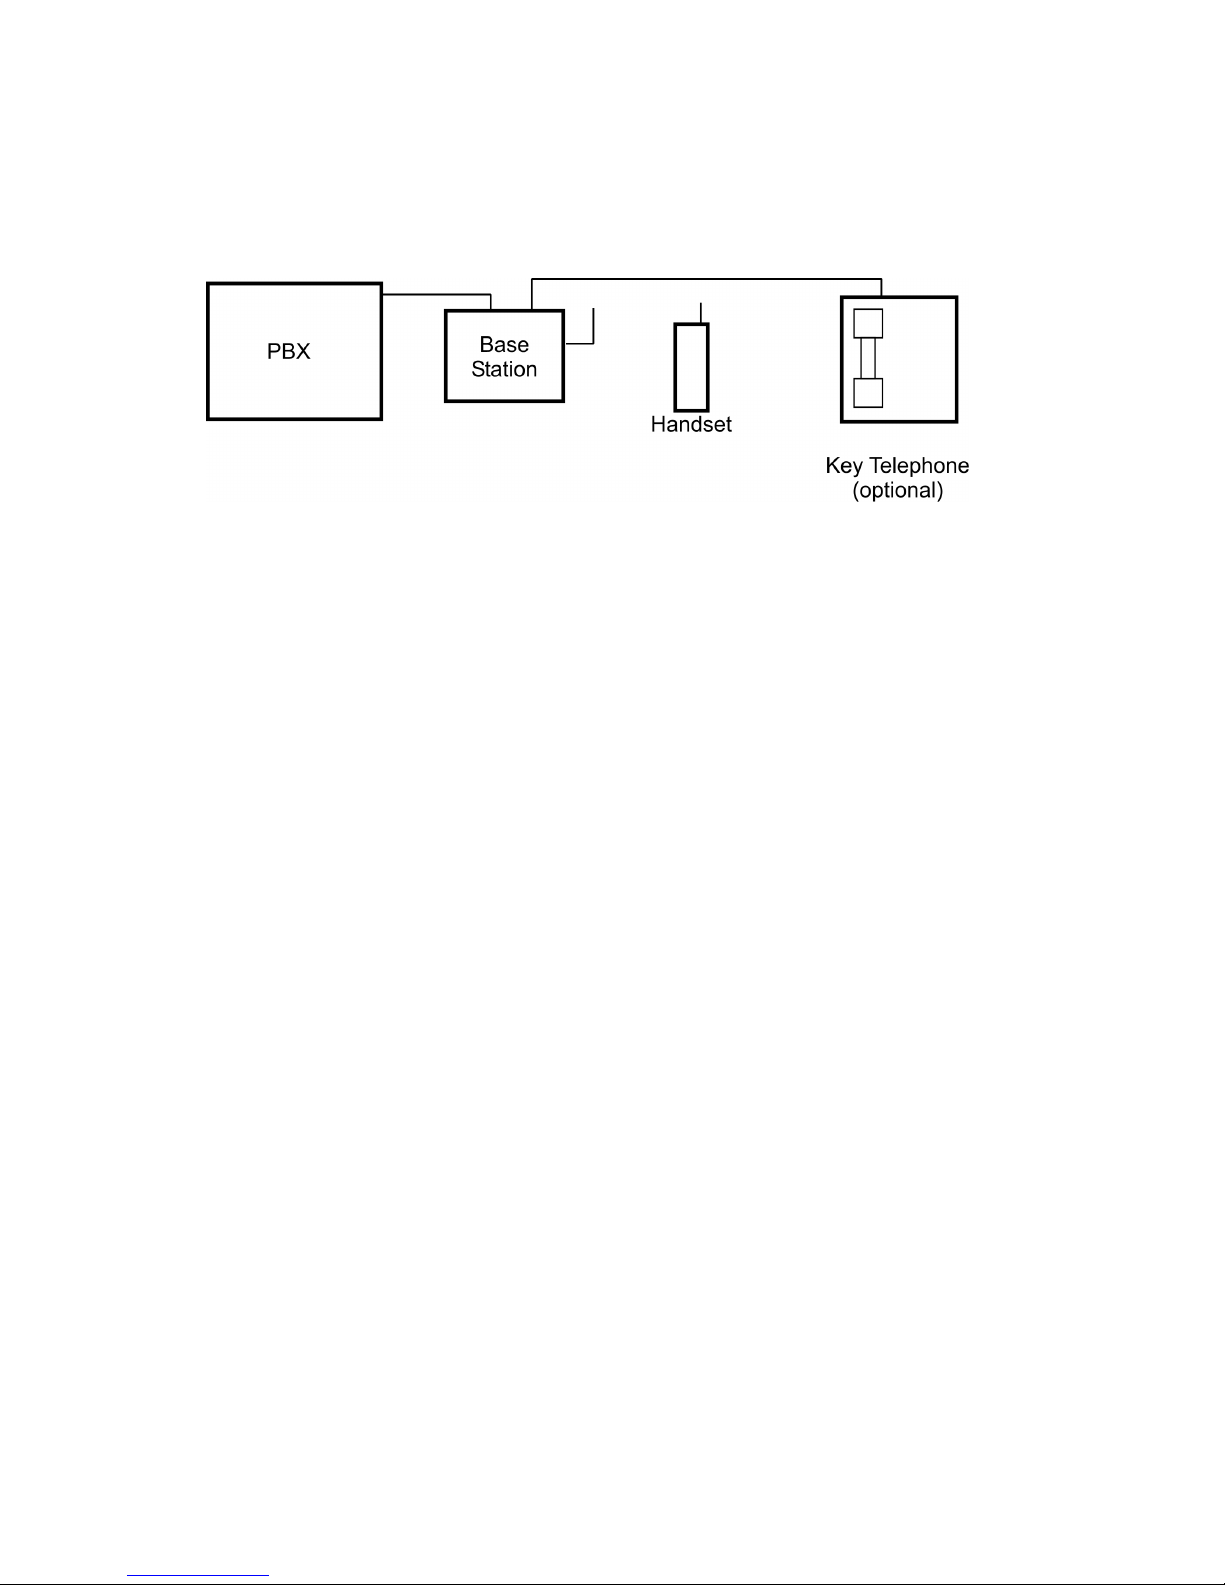
Installing the 900 MHz Cordless Telephone...........................................7
1. Selecting the Installation Location.........................................................7
2. Connecting the Telephone Cords..........................................................7
3. Applying Power......................................................................................8
4. Installing the Handset Battery ...............................................................9
5. Charging the Handset Battery (First Time)............................................9
6. Attaching Belt Clip to Handset.............................................................10
Wall-Mounting the Base Station (Optional Procedure) .............................10
Wall-Mounting the Charging Unit (Optional Procedure) ...........................12
Using Your 900 MHz Cordless Telephone............................................14
Before You Begin......................................................................................14
Placing a Call............................................................................................14
Answering a Call.......................................................................................14
Adjusting the Headset/Microphone Volume..............................................14
Muting the Handset Microphone...............................................................15
Adjusting the Ringer Volume ....................................................................15
Switching Calls Between Telephones.......................................................15
Selecting Channels...................................................................................16
Low Battery Indicator ................................................................................16
Recharging the Handset Battery...............................................................17
Cleaning Handset & Charging Unit Contacts............................................17
Charging a Spare Battery .........................................................................17
Programming Your Handset ..................................................................18
Troubleshooting......................................................................................20
Service Parts and Accessories .............................................................21

Precautions
Warning: Products powered by electricity should be serviced only by experienced
professional technicians. Any attempt by others to service the products dealt with in
this manual could result in serious injury or death. Warning: The 900 MHz cordless
telephone and associated equipment described in this manual are not waterproof.
To reduce the risk of fire, electrical shock, or damage to equipment, DO NOT
expose the equipment to rain or moisture.
Caution: This equipment contains a Rechargeable Nickel-Cadmium Battery. •
Do not short-circuit the battery. • Do not charge the battery in any charger other than
the one specified in this Guide. Using another charger may damage the battery, or
cause the battery to explode. • Do not remove or damage the battery casing. •
Never throw the battery into a fire, disassemble it, or heat it. • To reduce risk of fire
use only BT-2499A battery.
The nickel cadmium battery you have purchased is recyclable. At the end
of its useful life, under various state and local laws, it is illegal to dispose
of this battery into your municipal waste stream.
FCC Warning
This equipment generates, uses, and can radiate radio frequency energy, and, if not
installed and used properly, that is, in strict accordance with the instruction manual,
may cause interference to radio and television reception. This equipment has been
tested and found to comply with the limits for a Class A computing device in Subject
J of Part 15 of FCC Rules, which are designed to provide reasonable protection
against such interference in a residential installation. However, there is no
guarantee that interference will not occur in a particular installation. If this equipment
does cause interference, take one or more of the following actions:
1. Place each base station at least five feet apart.
2. Raise the base station antenna to the vertical position.
3. Place the base station on top of a desk or on higher shelves.
4. Avoid locations surrounded by metal surfaces.

2
Checking Your Package
Before reading the User Guide and using the Abrivo 900 MHz Cordless Telephone,
take a few minutes to check the contents of your package. You should have the
following:
Handset
Base Station with
AC Adapter
Charging Unit with
AC Adapter
Telephone
Cable
800 mAH DC 3.6V
Rechargeable Battery
Belt Clip
Wall Mount
Adapter

3
Understanding Your Telephone
The Abrivo 900 MHz VB-44240A Business Phone is a digital cordless telephone
that allows you to stay connected to your Panasonic PBX - even when you are away
from the desk. This phone includes:
• Digital Spread Spectrum
• Cordless Communication (range varies greatly with environment)
• 2-line LCD display with 16 digits per line
• Vibrator alert
• 10 channels, selectable with the handset
• 6 Function keys (F1 - F4 backlighted)
• 5 Hours of talk time/4 days standby time on one battery charge
(Standby battery time is reduced when features such as the Message icon or
LED lights for programmable function keys are in use.)
• Headset Jack (2.5 mm)
Number Feature Number Feature
1 Ringer ON/OFF Switch 9 Headset Jack
2 Message Display 10 FF-5 (Programmable) Default : Auto
Key
3 FF-6 (Programmable) Default: Program
Key
11 Hold Key
4 Talk Key 12 Redial Key
5 Numeric Keypad 13 Channel Key
6 FF-2 (Programmable) 14 FF-3 (Programmable)
7 FF-1 (Programmable) 15 FF-4 (Programmable)
8 Microphone 16 Volume (R/VOL) Key

4
HANDSET OVERVIEW
The 900 MHz handset has a two-line LCD display. Each line displays up to 16
alphanumeric characters.The display can also show up to four icons:
(Talk, Ringer Off,
Battery Low, and
Message)
Handset Modes
Your handset operates primarily in these modes: Standby, Talk, or Programming.
When you place a call, receive a call, or when you are in a converstation, the
handset is in Talk mode and the Talk icon is displayed. The Talk icon blinks
when Muting is turned on or during channel changes.
When you place a call, the handset LCD display shows the number you are dialing.
When receiving an incoming call, the display shows information about the calling
party such as phone number and name (if incoming line is equipped with Caller ID).
When you are not receiving a call or dialing, the handset goes into Standby mode.
The display is blank, unless the 900 Mhz handset or the key telephone has a call
holding. If either of these conditions occurs, the second line of the handset display
shows the identity of the party on hold. If the holding call is diconnected, the LCD
goes blank.
For information about programming mode, see "Programming Your Handset" on
page 41.
Ringer Off Indication
The Ringer Off icon appears if the ringer is turned off with the R/VOL switch.
Low Battery Warnings
• Standby mode: Battery Low icon appears. A battery low alert tonesounds
once every 15 seconds for three minutes.
• Talk mode: The Battery Low icon appears, and the battery low alert tone
soundsonce every three seconds until the conversation ends. At that time the
handset goes to standbymode.

5
Message Waiting Indication
The Message icon is displayed when a message is waiting. The handset can show
up to 32 characters in the LCD display. If the message is longer than 32 characters,
the message is displayed on two "pages". The display switches between pages at
1.5 second intervals.
Base Station Features
Number Feature
1 Cordless Button
2 Cordless LED
3 Status LED
4 Desk LED
5 Desk Button

6
OPTIONAL HEADSET (VB-44249HS)
The optional Headset provides a “Hands-Free” Option for the 900 MHz phone. With
the Headset installed, you can use the Belt Clip to carry the handset, and conduct a
conversation using the Head Set.To install the optional Headset, open the cover
over the Headset Jack and plug the Headset in.
No other settings are needed. Operation of the 900 MHz
phone using the Headset is exactly the same as using the
handset. However, you will hear through the Headset
earphone, and talk through the Headset microphone. The
handset earphone and microphone (mouthpiece) are
disconnected when the headset is plugged in.
CHARGING UNIT (EXP9785)
The unique design of your 900 MHz phone allows you to place the handset in the
charging unit with or without the Belt Clip attached. The Battery Packs can be
recharged either in or out of the handset.

7
Installing the 900 MHz Cordless Telephone
The Abrivo 900 MHz Cordless phone is installed with your existing key telephone
and DBS series PBX as shown in the following illustration:
1. SELECTING THE INSTALLATION LOCATION
The base station can be placed on a desk or tabletop near a standard 120V AC
outlet and telephone line jack. The base station can also be mounted on a standard
AT&T or GTE wall plate, or directly on a wall, using the Wall Mount Adapter.
Avoid locations surrounded by metal surfaces. Keep the base station and handset
away from excessive heat and humidity, and from sources of electrical noise
(motors, transformers, fluorescent lighting, or computers).
Mount the base station and your key telephone at least three to four feet apart to
avoid noise from the key telephone speaker. If you are installing multiple base units,
place them at least five feet apart.
2. CONNECTING THE TELEPHONE CORDS
The base station for your 900 MHz phone must be connected to the Panasonic
PBX. You can also connect a Panasonic key phone to the base station.
Caution:
Never install telephone wiring during a lightning storm.
Never touch uninsulated telephone wires or terminals unless the telephone line has
been disconnected at the network interface.

8
Connecting the Base Station to the PBX and Key Telephone
3. APPLYING POWER
IMPORTANT! Route the power cord where it will not create a trip hazard, or where it
could become chafed and create a fire or other electrical hazards.
3.1 Applying Power to the Base Station
Use only the supplied AC Adapter (EXP9704).
3.2 Applying Power to the Charging Unit
Use only the supplied AC Adapter (AD970).

9
4. INSTALLING THE HANDSET BATTERY
1. Remove the battery cover
by pressing the latch and
sliding the cover down
and off of thehandset.
2. Slide the battery down
into the handset.
3. Place the cover and
slide thecover up until
it latches intothe handset.
5. CHARGING THE HANDSET BATTERY (FIRST TIME)
The Rechargeable Nickel-Cadmium Battery must be fully charged before using your
900 MHz phone for the first time. Caution: To reduce the risk of fire use only
BT-2499A battery.
1. Place the handset in the front
slot of the charging unit.
2. Make sure the CHARGE
indicator lights. If the CHARGE
light doesn’t light, check to see
that the AC Adapter is plugged
in, and that the handset is
making good contact with the
charging unit charging contacts.
3. Charge the battery without
interruption for 15-20 hours.

10
6. ATTACHING BELT CLIP TO HANDSET
You can use the belt clip to attach the handset to your belt or pocket for convenient
portability.
1. Locate the belt clip notches on the sides of the
handset, near the top.
2. Slide the belt clip tabs
into the notches.
3. Press firmly until the
belt clip snaps into
place.
4. To remove, simply lift
one side of the belt
clip to pull the tabs
out of the handset
notches.
WALL-MOUNTING THE BASE STATION
(OPTIONAL PROCEDURE)
Standard Wall Plate Mounting
You can use this mounting option if you have a standard AT&T or GTE wall plate
connection to the Panasonic PBX.
1. Slide the Wall Mount
Adapter into the
notches at the top of
the base station.
Rotate the Wall
Mount Adapter down
and snap it into place.
2. Plug the AC Adapter
(EXP9704) into the
base station.

11
3. Place the AC Adapter
cord inside the molded channel of the WallMount Adapter.
4. Plug a short telephone cord into the LINE IN jack
on the base station. Connect a telephone cord
from a Panasonic key telephone to the LINE
OUT jack. Then place the telephone cord(s)
inside the molded channel(s) on the bottom of
the Wall Mount Adapter.
5. Plug the other end of the short telephone cord (from the LINE
IN jack) into the modular wall jack.
6. Place the base station on the posts of the wall plate and push down until it is
firmly seated.
7. Plug the AC Adapter into a standard 120V AC wall outlet.
Note: You can plug the base station into an AC outlet controlled by a wall switch.
This is especially convenient for base stations that are not easily accessible. To
avoid accidentally turning off the base station, do not use a wall switch that controls
lights or other equipment.
Direct Wall Mounting
If you do not have a standard wall plate, you can mount the 900 MHz Cordless
Telephone base station directly on a wall. Before doing so, consider the following:
• Select a location away from electrical cables, pipes, or other items behind the
mounting location that could cause a hazard when screws are inserted into the
wall
• Ensure that the wall material is capable of supporting the weight of the base
station.
• Use #10 screws with anchoring devices suitable for the wall material at the
mounting point.

12
1. Insert two mounting screws in thewall, 3-15/16 inches apart. Allow
about 3/16 of an inch between thewall and screw heads for
mountingthe base station.
2. Perform steps 1 to 3 of "StandardWall Plate Mounting"
on page 25.
3. Plug a telephone cord into theLINE IN jack on the base
station.Connect the other end to the wall jack leading to the
Panasonic PBX.
4. Plug a telephone cord from a Panasonic key telephone into the
LINE OUTjack on the base station.
5. Place the telephone cord(s) inside the molded channel(s) on the
bottom of the Wall MountAdapter.
6. Place the base station on the posts of the wall screws and push
down until firmly seated.
7. Plug the AC Adapter into a standard 120V AC
wall outlet.
WALL-MOUNTING THE CHARGING UNIT
(OPTIONAL PROCEDURE)
The charging unit is also designed to be wallmounted. Before mounting your
charging unit,consider the following:
• Select a location away from electrical cables,pipes, or other items behind the
mounting location that could cause a hazard when inserting screws into the wall.
• Make sure the wall material is capable of supporting the weight of the charging
unit.
• Use #10 screws with anchoring devices suitable for the wall material at the
mounting point.
1. Insert two mounting screws 1-9/10 inches
apart. Allow about 3/16 of an inch
between the wall andscrew heads for
mounting the phone.

13
2. Plug the AC Adapter into the charging unit. Wrap
the AC Adapter cord around the strain relief.
3. Place the charging unit on the posts of the wall
screws and push down until firmly seated.
4. Plug the AC Adapter into a standard 120V AC
wall outlet.

14
Using Your 900 MHz Cordless Telephone
BEFORE YOU BEGIN
• Ensure that your 900 MHz phone has been
installed as described in "Installing the 900 MHz
Cordless Telephone" on page 19.
• Remove the handset from the charging unit
before using the handset.
• Raise the base station antenna to the vertical
position.
• Ensure that the "CORDLESS" LED on the base stationis lit.
Note: When you pick up thehandset and press TALK, you may see the message
“Acquiring Link” momentarily: This message disappears when the base station
obtains an open line from the PBX.
PLACING A CALL
1. Press TALK. You will hear a dial tone.
2. Enter the number you are calling.
3. To end the call, press TALK.
ANSWERING A CALL
If the handset is out of the charging unit:
• Press TALK or any key on the numeric keypad.If the handset is in the
charging unit:
1. Remove the handset from the charging unit. (The AutoTalk feature allows you to
answer the call immediately.)
2. When you finish the call, place the handset back in the charging
unit. (The AutoStandby feature automatically ends the call.)
ADJUSTING THE HEADSET/MICROPHONE VOLUME
When in Talk mode (during acoversation):
Press the R/VOL key on right side of handset to select
maximum, high, medium, orlow earpiece volume level.

15
MUTING THE HANDSET MICROPHONE
When in Talk mode (during acoversation):
Press the MUTE key on right side of the handset. The called
party can no longer hear your voice or any other sounds
near the handset. The Talk icon blinks.
To turn off mute, press the MUTE key again. Mute is
also cancelled when you press the TALK button to
end the conversation.
ADJUSTING THE RINGER VOLUME
When in Standby mode:
Rapidly press the R/VOL key on right side of handset to select one of the following
ringer volume settings:
SWITCHING CALLS BETWEEN TELEPHONES
The 900 MHz cordless telephone base station allows you to switch calls between
the 900 MHz handset and the key telephone.
Caution: Do not press the buttons labeled "Desk" or "Cordless" on the
base station when receiving a call. Doing so maydisconnect the call.
Switching a call from 900 MHz handset to key telephone
To switch during an active call:
1. Press HOLD on the 900 MHz handset.
2. Press TALK on the 900 MHz handset.
3. Press the DESK button on the base station.
4. Pick up the receiver on the key telephone.
Ringer Volume Screen Display Ringer Volume Screen Display
Ring Type A
(High)
Ring Type A High Ring Type C
(High)
Ring Type C High
Ring Type A (Low) Ring Type A Low Ring Type (Low) Ring Type C Low
Ring Type B
(High)
Ring Type B High Ring Off (Vibrate) Ring Off
Ring Type B (Low) Ring Type B Low

16
Note:
•
When the base station is operating with the key telephone, and you press the 900 MHz
handset TALK button, there is no handset tone. The handset displays LINE IN USE for
5 seconds.
•
If the PBX is powered off and on while the base station is in use, it may be necessary to
reset the base station. You can do so by powering the base station off and on.
Switching a call from key telephone to 900 MHz handset
To switch a call from the key telephone to the 900 MHz handset during an active
call:
1. Press HOLD on the key telephone.
2. Press the CORDLESS button on the basestation.
3. Press TALK on the 900 MHz handset.
Note:
• If you are on an active call on the key telephone and you press the CORDLESS
button on the base station without first pressing the HOLD button on the key
telephone, your call will be disconnected.
• If you are on an active call on the 900 MHz handset and you press the desk
button on the base station without first pressing the HOLD button on the key
telephone, the transfer between phones is delayed until the call is completed.
(Avoid this practice.)
• If the TALK button on the handset is pressed while the base station is switching
from Desk mode to Cordless mode, the base station switches back to Desk
mode.
SELECTING CHANNELS
To change the active channel, press the CHANNEL button on the handset.
LOW BATTERY INDICATOR
When the battery in the handset is low and needs to be charged, you will see a
message on the display.
Return the handset to the charging unit for chargingor replace the handset battery
with another charged battery.
On Call In Standby Mode On Call In Standby Mode
All keys and functions
are available
None of the buttons Op-
erate
Handset beeps once
every 3 seconds until
conversation ends
Handset beeps once
every 15 seconds for 3
minutes, then stops
Complete your call as
quickly as possible
Cannot make call and
receive call
Replace batter within 20
seconds to continue call
Replace battery before
making a call

17
RECHARGING THE HANDSET BATTERY
1. Place the handset in the front slot of the charging unit.
2. Make sure the CHARGE indicator lights. If the CHARGE light
doesn’t light, check to see that the AC Adapter is plugged in, and
that the handset is making good contact with the charging unit
charging contacts.
3. Charge the battery without interruption for 5 hours.
CLEANING HANDSET & CHARGING UNIT CONTACTS
To maintain a good charge, it is important to clean all
charging contacts on the handset and charging unit about once a
month. Use a pencil eraser or other contact cleaner. Do not use
any liquids or solvents.
CHARGING A SPARE BATTERY
The Charger Unit of your 900 MHz phone is equipped to charge a spare battery with
or without the handset in the front slot.
1. Slide the (optional) spare battery into the second slot in the charging unit until the
retaining clip snaps over the top of the battery.
2. Make sure the BATT CHARGE indicator lights. If the BATT
CHARGE indicator doesn’t light, check to see that the AC Adapter
is plugged in, and that the battery is making good contact with the
charging unit charging contacts.
Note: When charging a battery for the first time, charge it without
interruption for 15-20 hours. When recharging a battery, charge it
without interruption for 5 hours.
3. When charging is complete, press back on the latch and remove the battery for
use. Or, if you don’t need the battery immediately, leave it in the charging
compartment; it will not overcharge.
Other manuals for VB-44240A
1
Table of contents
Other ABRIVO Cordless Telephone manuals