ABSTRACTA Agile Operating and maintenance manual

Agile
Bruksanvisning / Use Instructions ver 1.0
Care instructions
To maintain the color and apparance, the product
should be vacuum cleaned regularly with a soft nozzle.
Stain removal:dab or wipe gently with a damp cloth.
A
Including components
Page 1 of 6
Abstracta technical support,
tel.+46472269600.
12
4
3
5
6
7
Screenwall
Assembly
(1 pcs)
Foot
assembly
(2 pcs)
Screw M8
(4 pcs)
Spring washer
(4 pcs)
Cap nut (4 pcs)
Pin screw
(4 pcs)
Washer 4 (pcs)
Alternative for mounting
Abstracta´s recommended
display screen.
Keep this manual together with the product for future use.
Store it inside, behind the acoustic front panel.
9
8
Cable tie (2 pcs)
Splitted tube
(1 pcs)

Agile
Bruksanvisning / Use Instructions ver 1.0
A
Page 2 of 6
Side Table
To access the
table, pull out all
the way and
then turn
counter
clockwise. To
reverse, turn it
back and push
onto table front.
Mounting the feet and lifting
If possible leave the screen wall on it's pallet
while mounting the feet. If not possible, lift it to
a table or elevated supportive surface. Be at
least 3 persons to perform the heavy lifts
during this assembly! In some cases 4 persons
is good.
Step 1. Mount the feet using a 5 mm allen key
to fasten Screw M8 (3) with Spring washer (4)
in between. Tighten the screws so the washers
becomes compressed and then another 1/8
turn.
Step 2. Carefully lift the screen wall onto some
books or a carpet or similar on the floor.
Step 3. lock one lower wheel and raise the wall
to it´s wheels. It is good to have persons that
can keep this heavy product in balance during
the lift and raise.
x 3
Lock this wheel
before raise!
x 3
Retractable
USB-C cable
Step 1
Step 2
Step 3
3
4
2
1

Agile
Bruksanvisning / Use Instructions ver 1.0
A
Page 3 of 6
Abstracta technical support,
tel.+46472269600.
USB-C Connector to
conference equipment etc.
Alternative for high position.
Retracting USB-C
connector - To Computer
This will allow about 45 cm cable length.
All cables shall
be attached
away from the
retractable cable
and table
mechanism!
See that no
cables interfere!
Access the inside
Have clean hands!
Grab behind panel
top and front panel
with two hands, pull
hard near one upper
corner at a time, to
loosen the magnetic
connections and lift
off the panel.
Attention! See that all cables and excess of cables are
not interfering with the cable retraction or table
mechanism. Use cable ties or similar to make sure they
don't fall into such positions in the future. You can also
squeeze in cables between the boards and the acoustic
filling to keep them into position.
USB-C Connector. Alternative
for low position of conference
equipment etc. Use the lower
extra cable clip that is unused!
Preparing retractable USB-C cable
This cable is already prepared for having a high position, but can be reorganized low, for the cable to come out underneath the display screen. Use the cable
clips on the inside of the board to rearrange the cable for your needs and make sure that it don´t interfere with the movable parts inside. Use the
USB-C-connector inside Agile to connect to your permanent installed electronic equipment. If you are installing Abstracta´s recommended conference
equipment that demands another kind of USB-C cable, please go through the chapter below.
Exchanging USB-C cable
Step 1. First notice and note how the cable is placed before removing the old one. Make a sketch of how it is placed.
Step 2. Remove the plastic seat were the USB-C comes out, by pulling the cable slightly harder until the seat loosen and take it of the cable. If it is hard to get
it loose, try to push it with a finger from the inside at the same time as pulling the cable.
Step 3. Let the cable retract. From inside, take the cable off the plastic link attached to the retractor by unwinding the locking wire. Notice that the cable have a
tape at the right length (maximum 49 cm of cable, excluding connector). Notice also that the cable might have to be connected in a specific direction. Usually
the computer-side is marked with "Source".
Step 4. Remove the cable totally from the cable clips. Mark the new cable with tape at the same length and make sure that the computer-side will be on the
outside.
Step 5. Put the new cable in the same way with tape mark in the same position at the link and lock with the locking wire. Make sure that the cable have the
slack needed to go out all the way, but not more than needed to avoid getting stuck with other parts.
Step 6. Run the USB-connector through the hole. From the outside, put on the plastic seat on the cable, turn the slot of the seat downwards "12 o´clock" and
pull the seat into the hole. (For Bose VB1, use the special plastic seat attached with that kit.) Try out that the retractor functions satisfying.
Remove cable!
Place here!

Agile with recommended conference equipment
Bruksanvisning / Use Instructions ver 1.0
A
Page 4 of 6
5
6
7
Cap nut (4 pcs)
Pin screw (4
pcs)
Washer 4 (pcs)
Place Bose
VB1 Power
Supply onto
double-
sided tape.
Use middle
holes for
Bose VB1 above
display screen.
Bose VB1. (See Bose's
manual for mounting instruction.)
Place on soft material
to protect the screen!
NEC Display screen
Preparing cables and power supply
Exchange the USB-C cable to the one coming with Bose VB1 (See page 3). Install all the cables and fasten the Bose VB1 Power
Supply to the double sided tape with the DC output cable upwards. Arrange cable excesses with the plastic covered wires, so they
won´t interfere with movable parts inside. This preparation can be arranged for alternative solutions. One is shown in the pictures
on this page. When all equipment is in place: Secure the main power cable with the plastic tube (9) and strap it tight to a
loop around the board with a cable tie (8) so it won´t become damaged at sharp edges! (See picture below)
Mounting Bose VB1 (Sound Bar)
Step 1. Decide if you want the sound bar above or underneath the display screen (See the two alternatives on page 5). Mount the
sound bar (Bose VB1) according to the Bose VB1 manual, but use the four shortest screws that comes in a separate package
or bag. Before drilling and screwing, measure out a good gap between top of the sound bar and the inside of the frame above if
sound bar above screen. A good gap is 10 mm. If placed underneath a 10 mm gap between panel metal top and the bottom of the
sound bar is good. Also measure out that it is centered. Tips! Add on a bright tape strip to make the drill marks on. Drill and mount
the wall bracket included with the VB1-package when you have the position correct. Use a 3 mm drill.
Step 2. Hold the sound bar and connect DC power, USB-C and HDMI connector to it, and place it onto the wall bracket. Fixate the
sound bar with two of the shortest screws. Arrange cables so they won´t interfere with the movable parts inside.
Mounting NEC Display Screen
Step 1. Remove the handles on the backside of the display screen. First mount pin screws (6) and cap nuts (5) together and
screw them all the way till it stops. Then mount them into the threaded holes on the backside of the display screen together with
the washers (7).
Step 2. Be two or three persons while hanging up the display screen. Hold the screen near to the cables and connect them. Hook
on the display screen to four of the keyholes on the board. Use the middle holes for VB1 on top and the upper holes for VB1
underneath screen. Make sure all four hanging points are in place by slightly pulling each corner of the screen. See that it hangs
straight.
Alternative ways for Power cable.
5
6
Not recommended
for cables!
7
Parts included with Agile
Split and put plastic tube
around power cable to
protect from damage at
metal edges.
Strap cable and plastic tube
to a loop around the board, tight
with a cable tie. Use a location
that fits your needs and will lock
the cable and tube.
DC power to VB1.
Power to
display
screen.
HDMI to display
screen.
HDMI to VB1
9
Splitted plastic
tube (1 pcs)
8Cable tie
(1 pcs)
USB-C to VB1
Attention! For mounting Bose VB1, use the four shortest
screws in separate package! Make sure that the screws
and the drilling don´t damage cables on the backside!
Secure main power cable!
Power cable
to VB1 driver.
Wieland
T-connector
Main power
cable

5-10mm
8-10mm
Bose VB1
Bose VB1
Sound bar above display screen Sound bar underneath display screen
Page 5 of 6
Mounting Bose VB1 and recommended distances
Measure out, drill (drillbit = 2,5 mm to 3,0 mm) and mount the wall bracket included with
Bose VB1. Attention! Use the short screws in the separate package coming with the
conference kit.
Connect computer with an
internet connection and
follow Bose Manual!
Get started!
•Connect a computer with internet
connection and follow the
instructions included with Bose VB1.
Or browse to:
pro.Bose.com/VB1LatestSW
•If needed: Follow the NEC display
screen´s manual, to get the video
signal via the connected HDMI on
the screen.
8-10mm
5-10mm

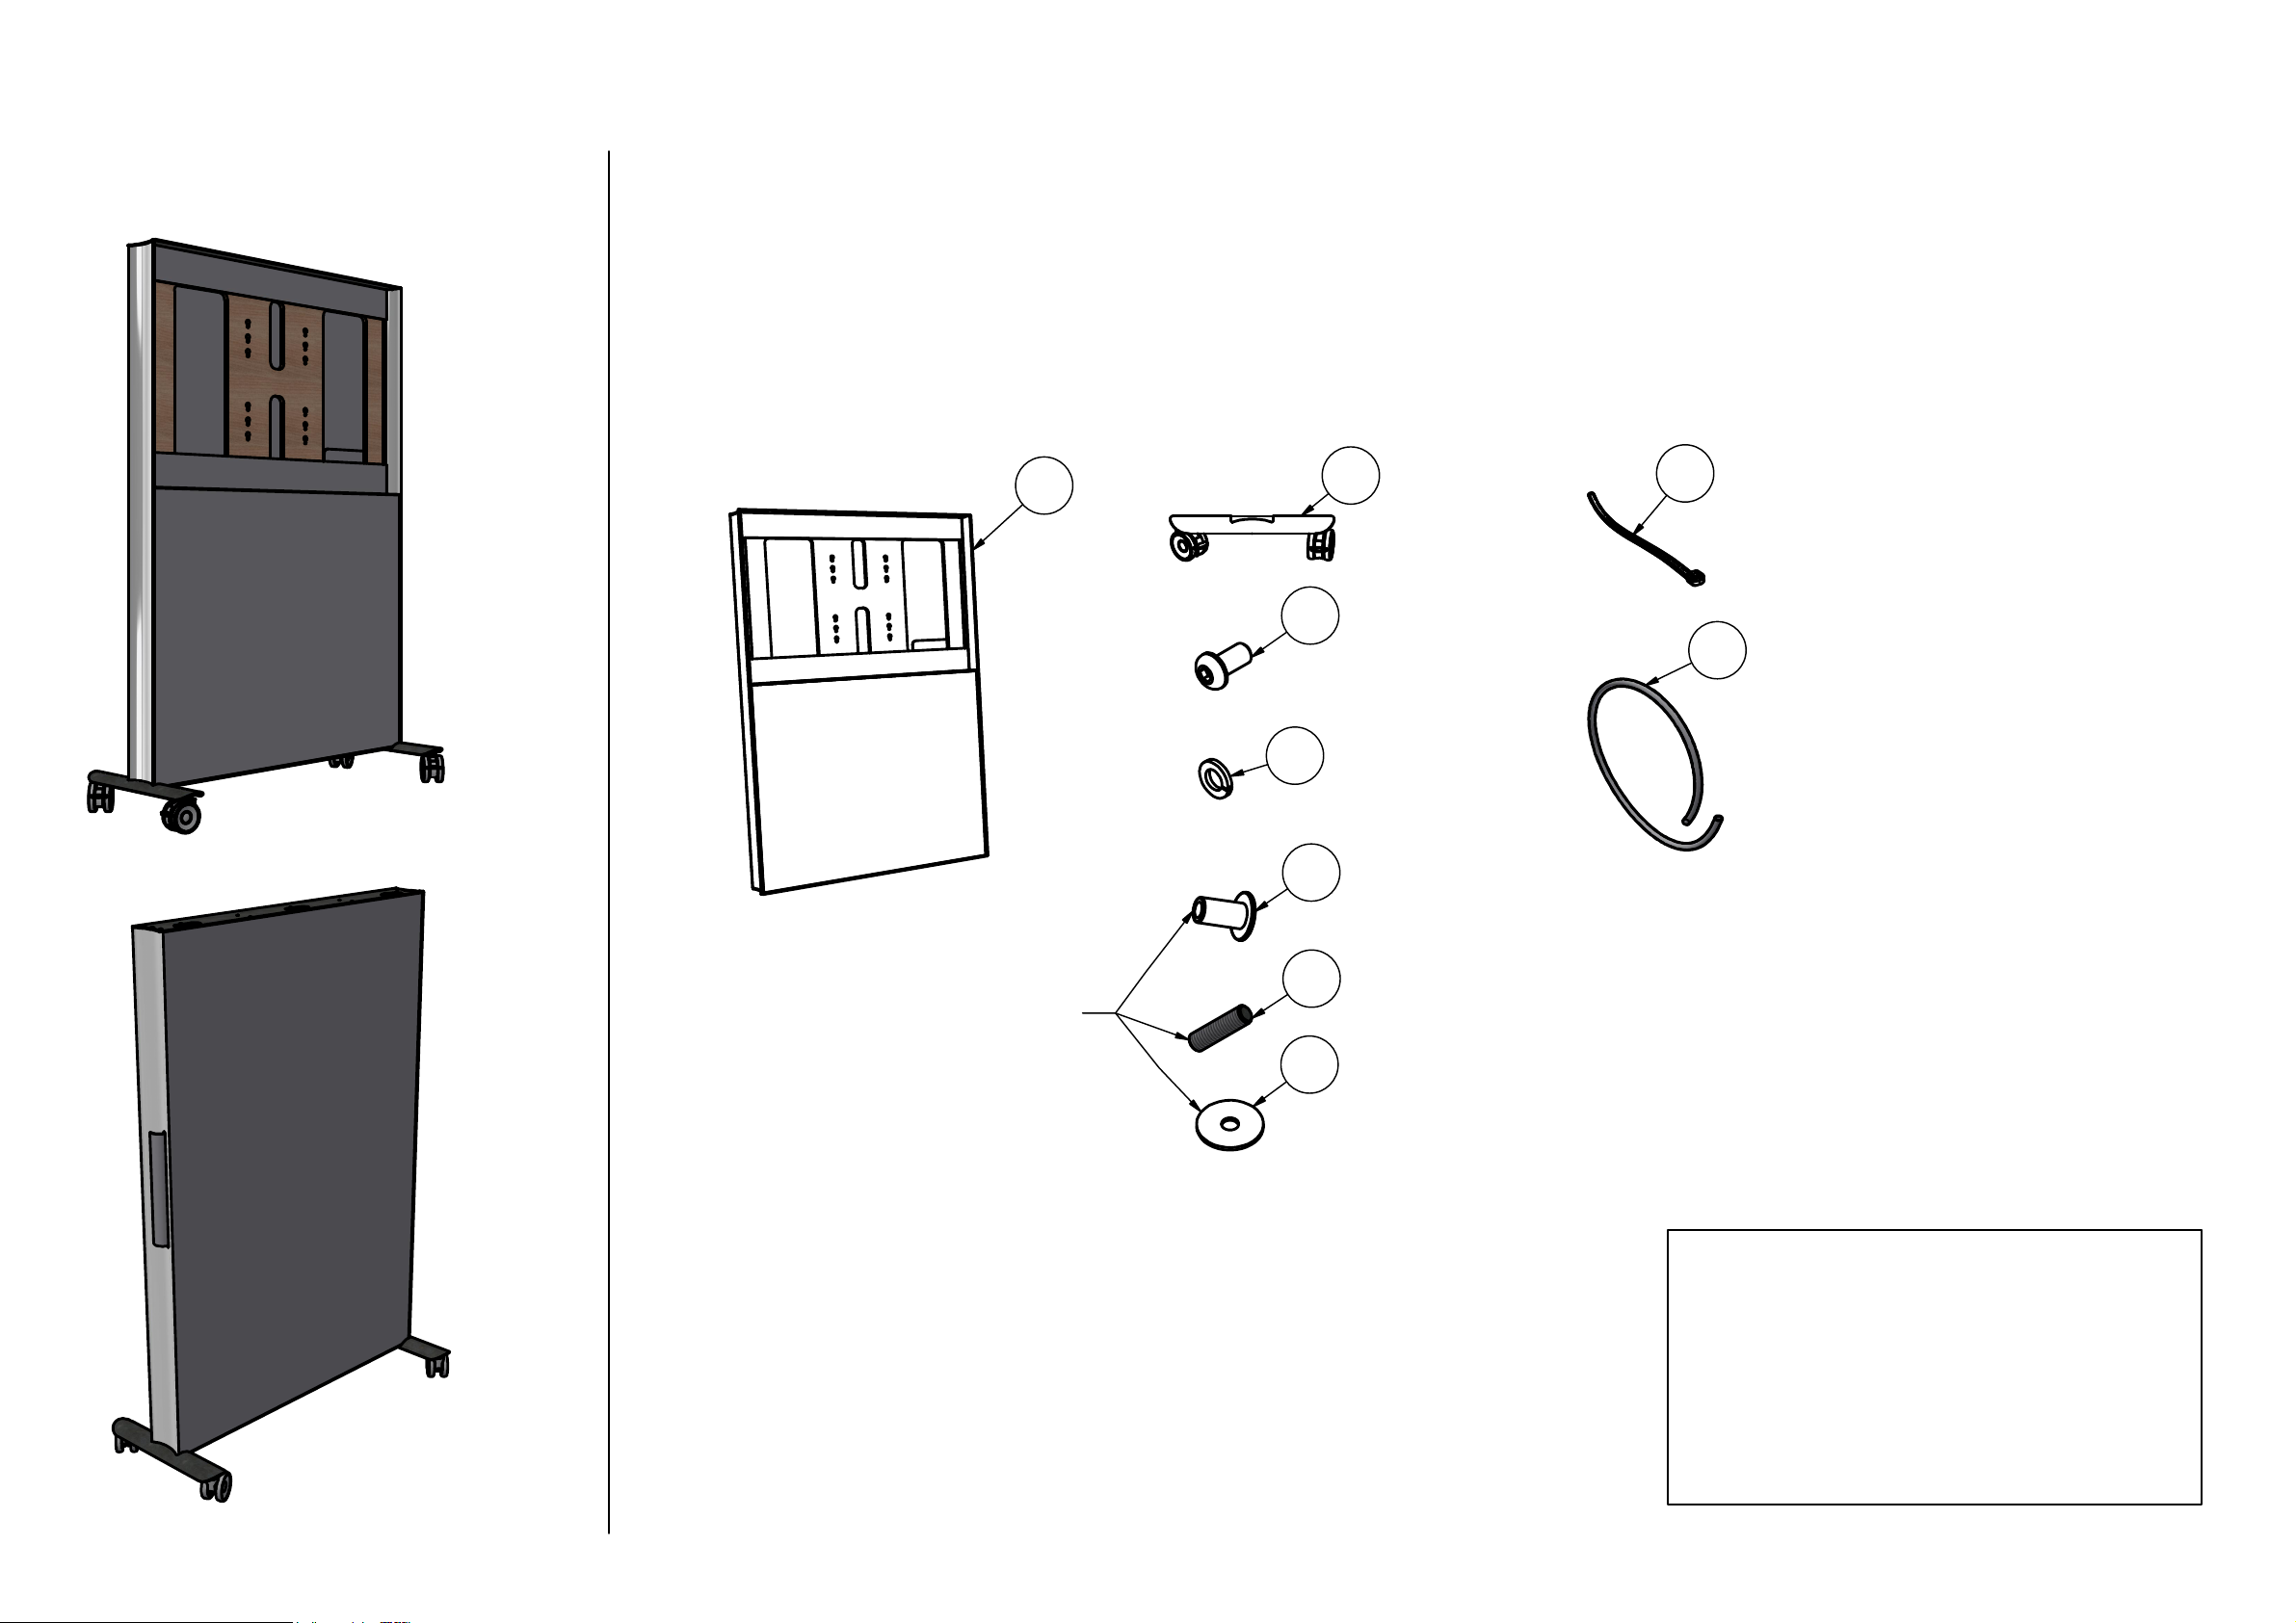
Wereserveallrightsinthisdocumentandintheinformationtherein.
Reproduction,useordisclosuretothirdpartieswithoutexpress
authorityisstrictlyforbidden.CopyrightAbstractaAB
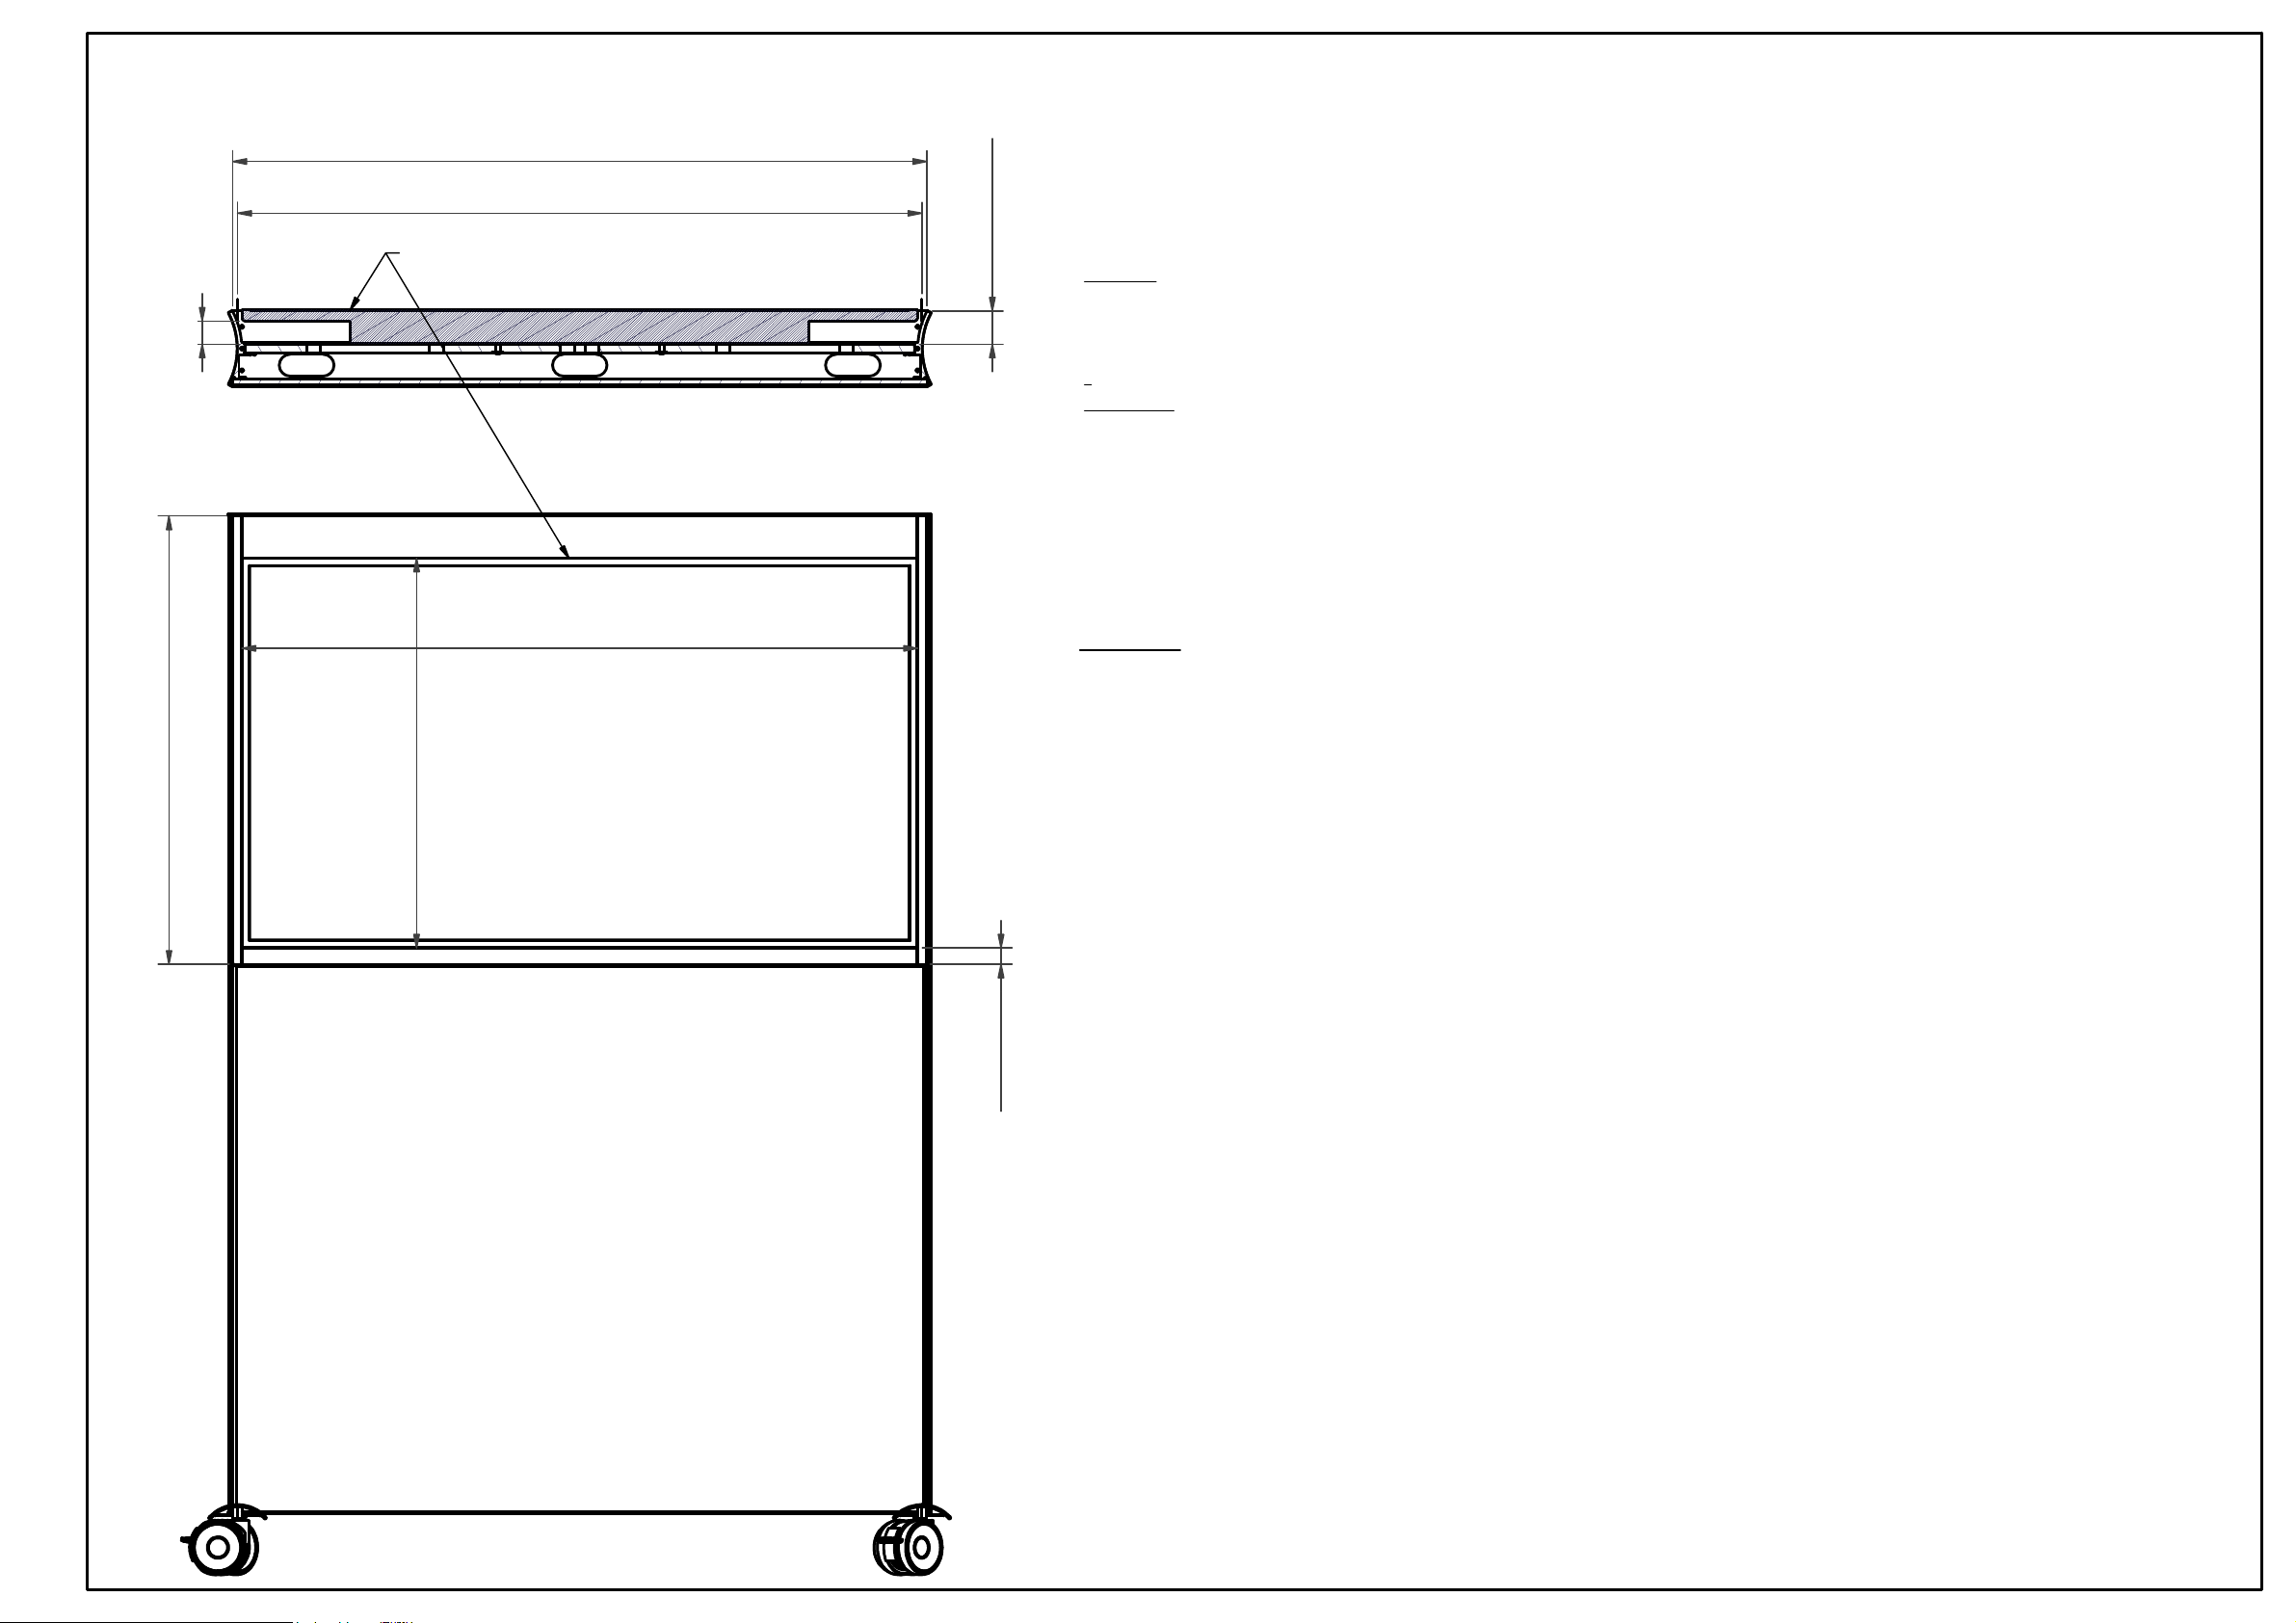
821
F.mm
1270E. mm (Not recommended!)
1237A. mm
714
B.mm
Measures
A. 1237 mm = width (approx.) of Abstracta's recommended screen. Less or equal than this width will always fit
Agile.
B. 714 mm = height (approx.)of Abstracta's recommended screen.
C. 1253 mm = Max. recommended screen width. (Screen backside minimum 42 mm from Agile's mounting
board.
D. 42 mm = Distance for our recommended screen (backside of display screen to mounting board).
Increasing this measure allows 0,9 mm wider display screen, for every 1 mm added. Calculation example. D =
50 mm gives: (50-42) x 0,9 + 1253 = 1260 mm width.
In any case you shall not use screens wider than 1270 mm.
If instead going closer to the mounting board see first that
the screen will fit. This may happen if using a thinner screen. See that the bracket and screen together, can
bring the depth needed.
E. 1270 mm = Max. inside width of frame. Abstracta don't recommend to use display screens wider than the
inside of the frame, due to decreased balance and looks.
F. 821 mm = Max. height of mounting area.
Attention! If using e.g. added soundbar or camera, make sure there is space enough above for e.g. lifting onto
hooking brackets.
G. 30 mm = Recommended gap between display screen and panel top. Absolute min. gap is 18 mm. If closer
gap you can hurt or lock your fingers while putting the screen onto the bracket, or be difficult to remove the
screen later.
H. 61 mm = Depth of Agile's framing. A screen assembly may be 10 -15 mm thicker than this without
decreasing the looks. A very thin display geometry may not look good, if the backside of the display is visible
outside the framing.
1253C. mm
30
G.mm
42
D.mm
60,6
H.mm
Abstracta's recommended display screen.
Guidelines for display screens for Agile.
If not using Abstracta's recommended display screen that we supply, please go through these guidelines
before choosing and mounting the display screen to assure a good design. The premade mounting holes may
not be usable. Measure out and mount onto the board. Make sure if drilling, that inside equipment will not be
damaged. Do not use too long screws, they shall not go through the 16 mm mounting board!
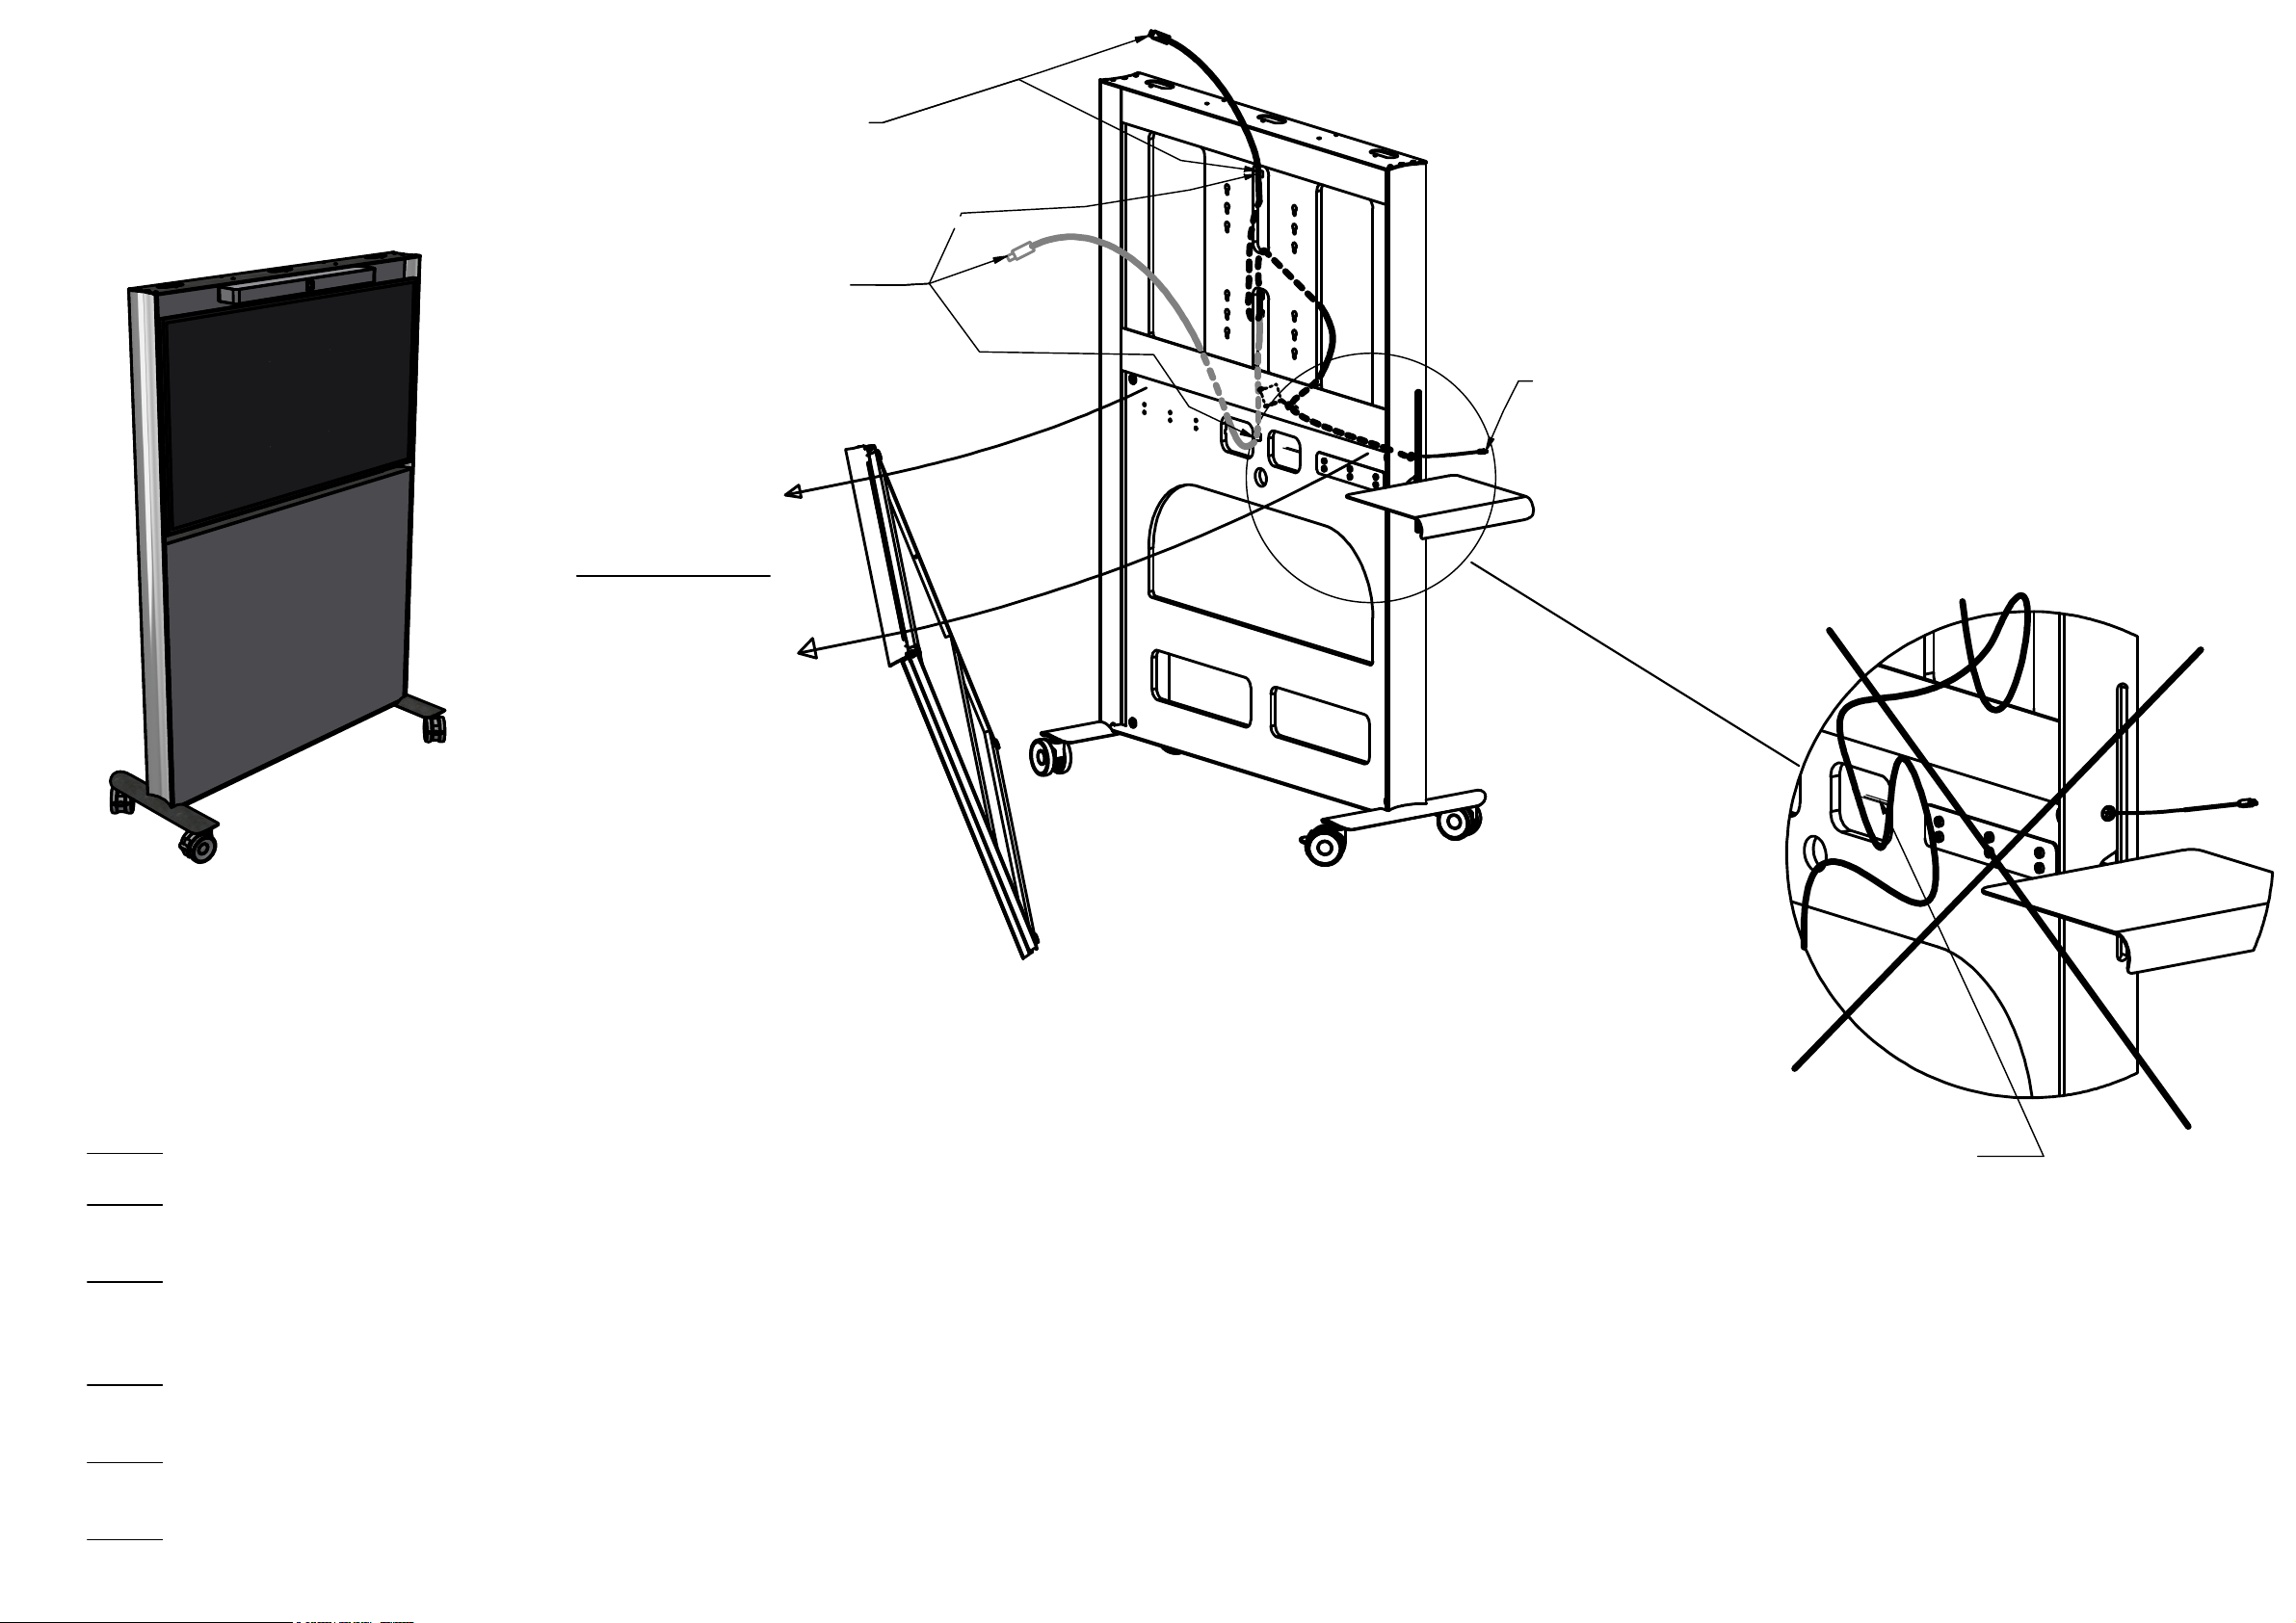
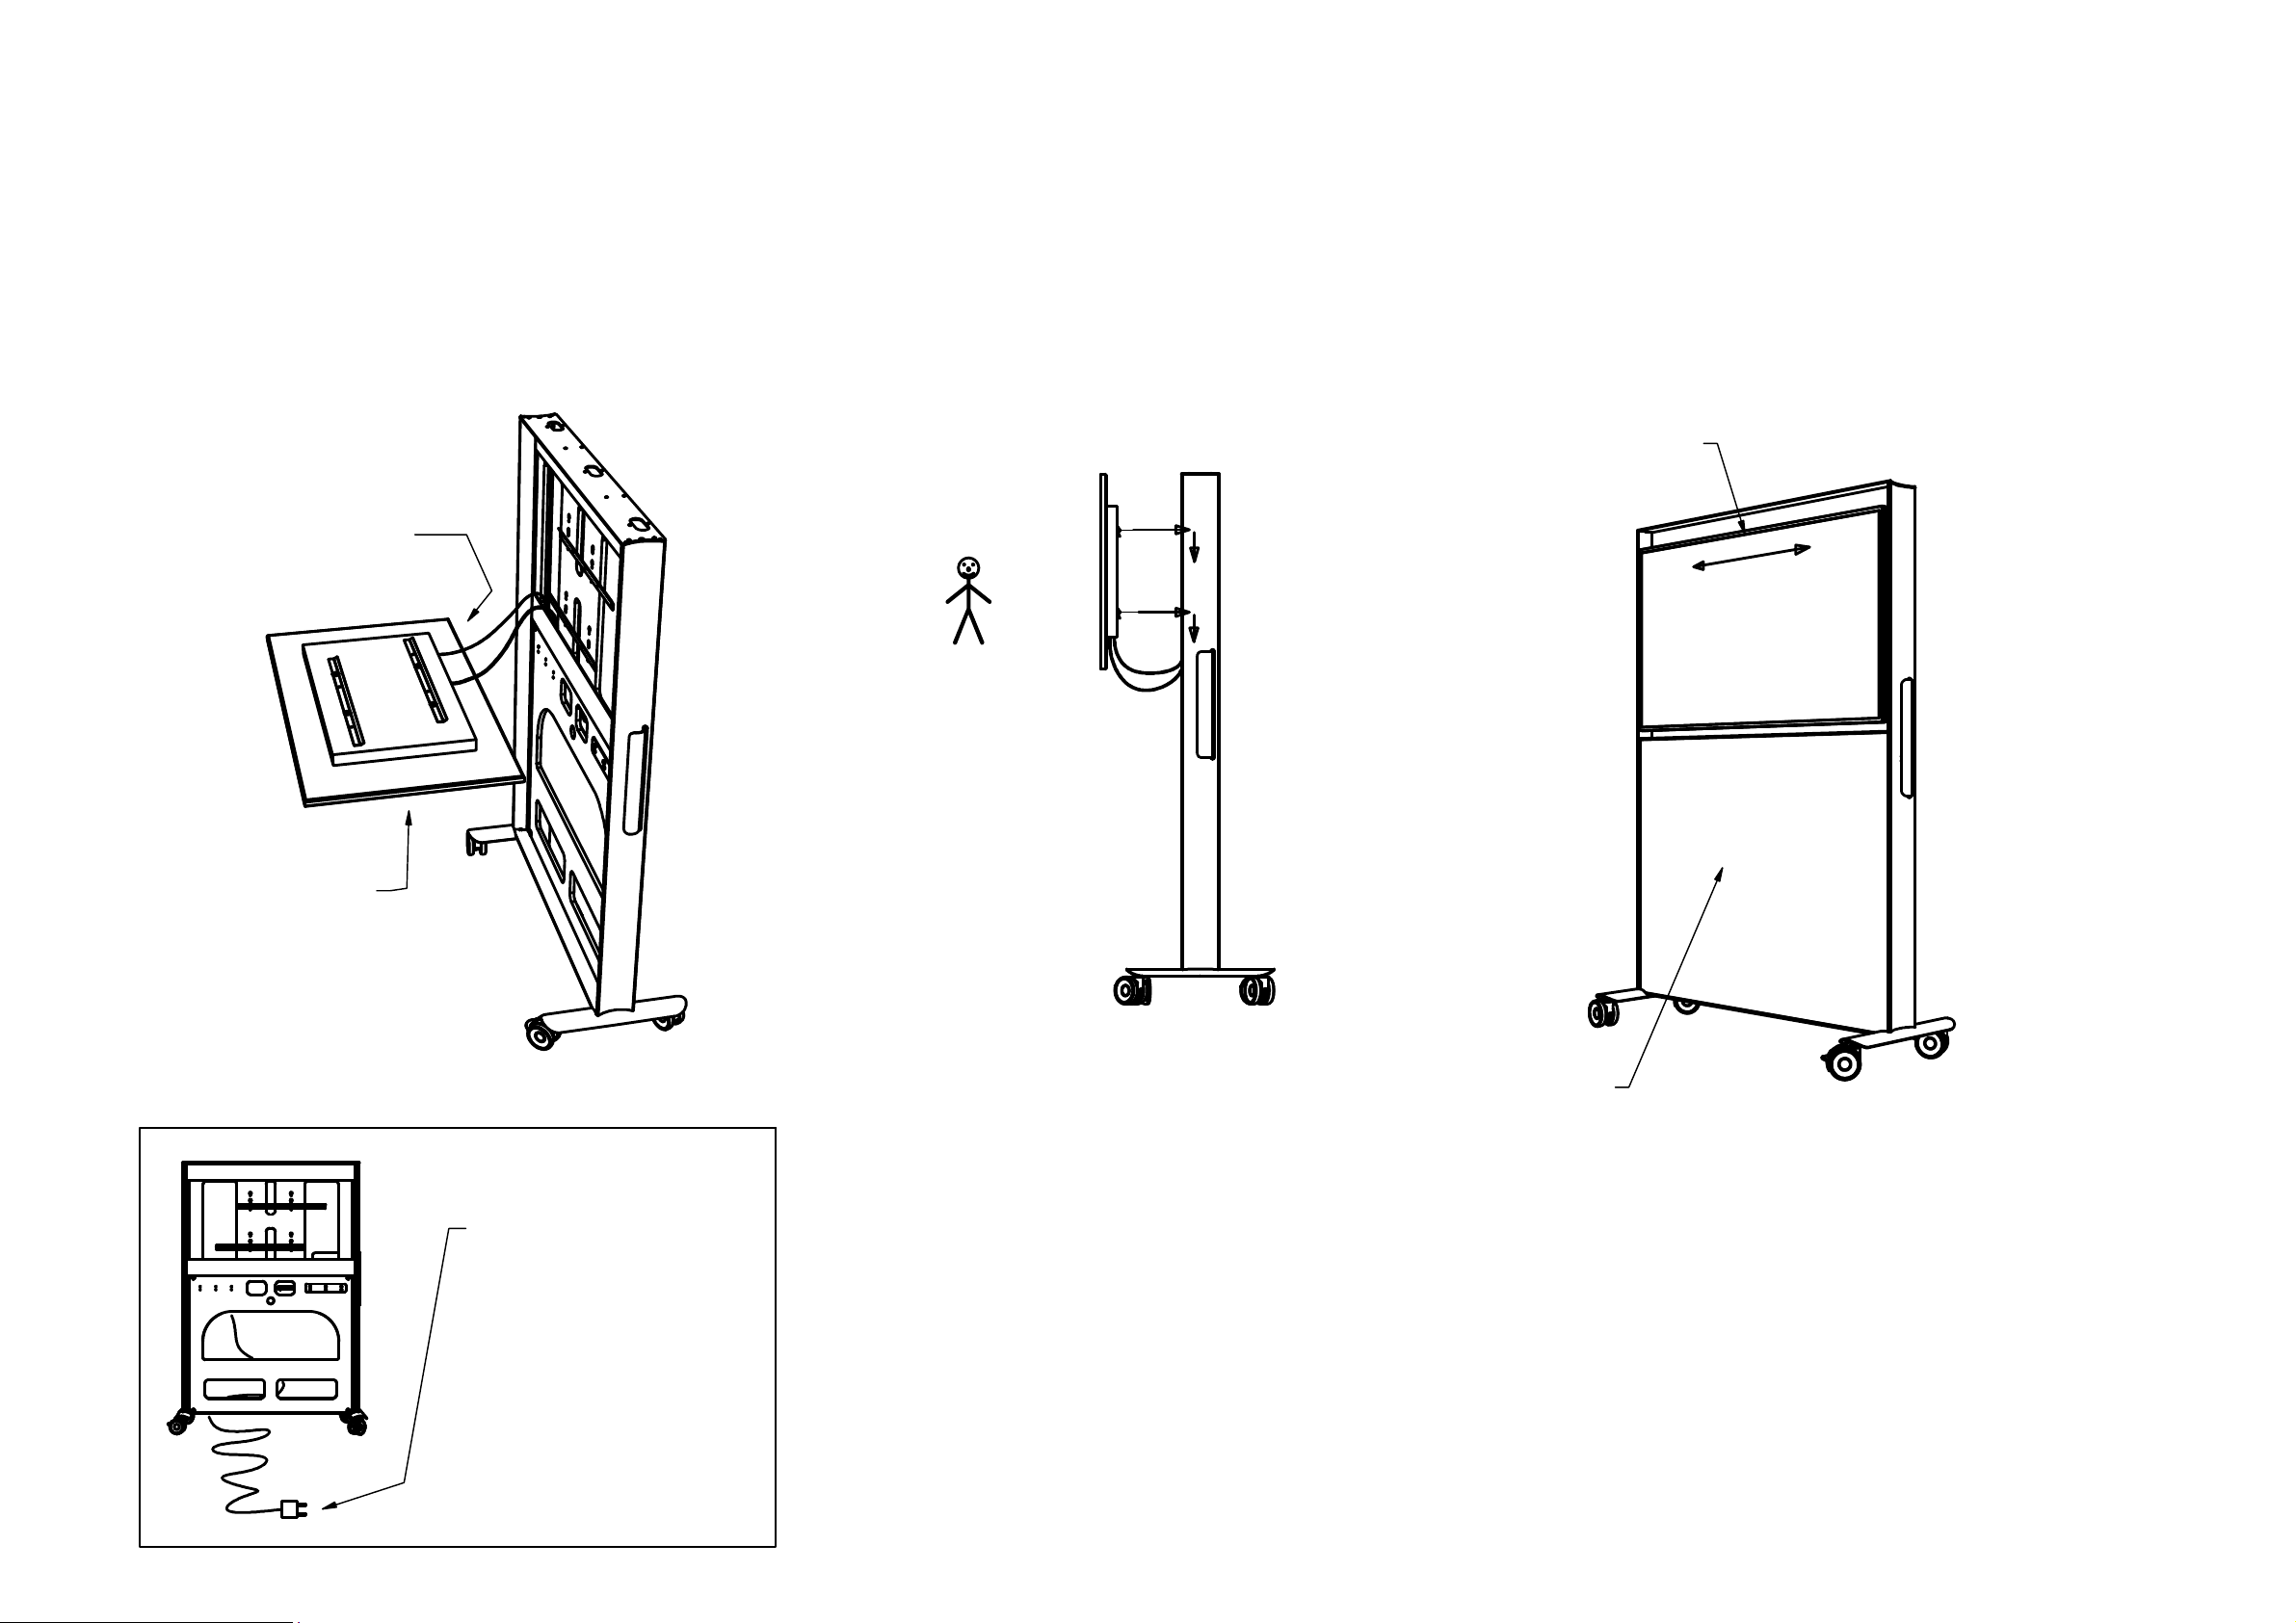
USB-C
You will need a screen with a USB-C 3.1 or 2.0 connector to use the included retracting cable connection.
Some USB-C don´t access charging! USB-C 2.0 works, but doesn't allow charging the connected device. In
some cases an adapter to USB-C can be used. Ask the display screen supplier!
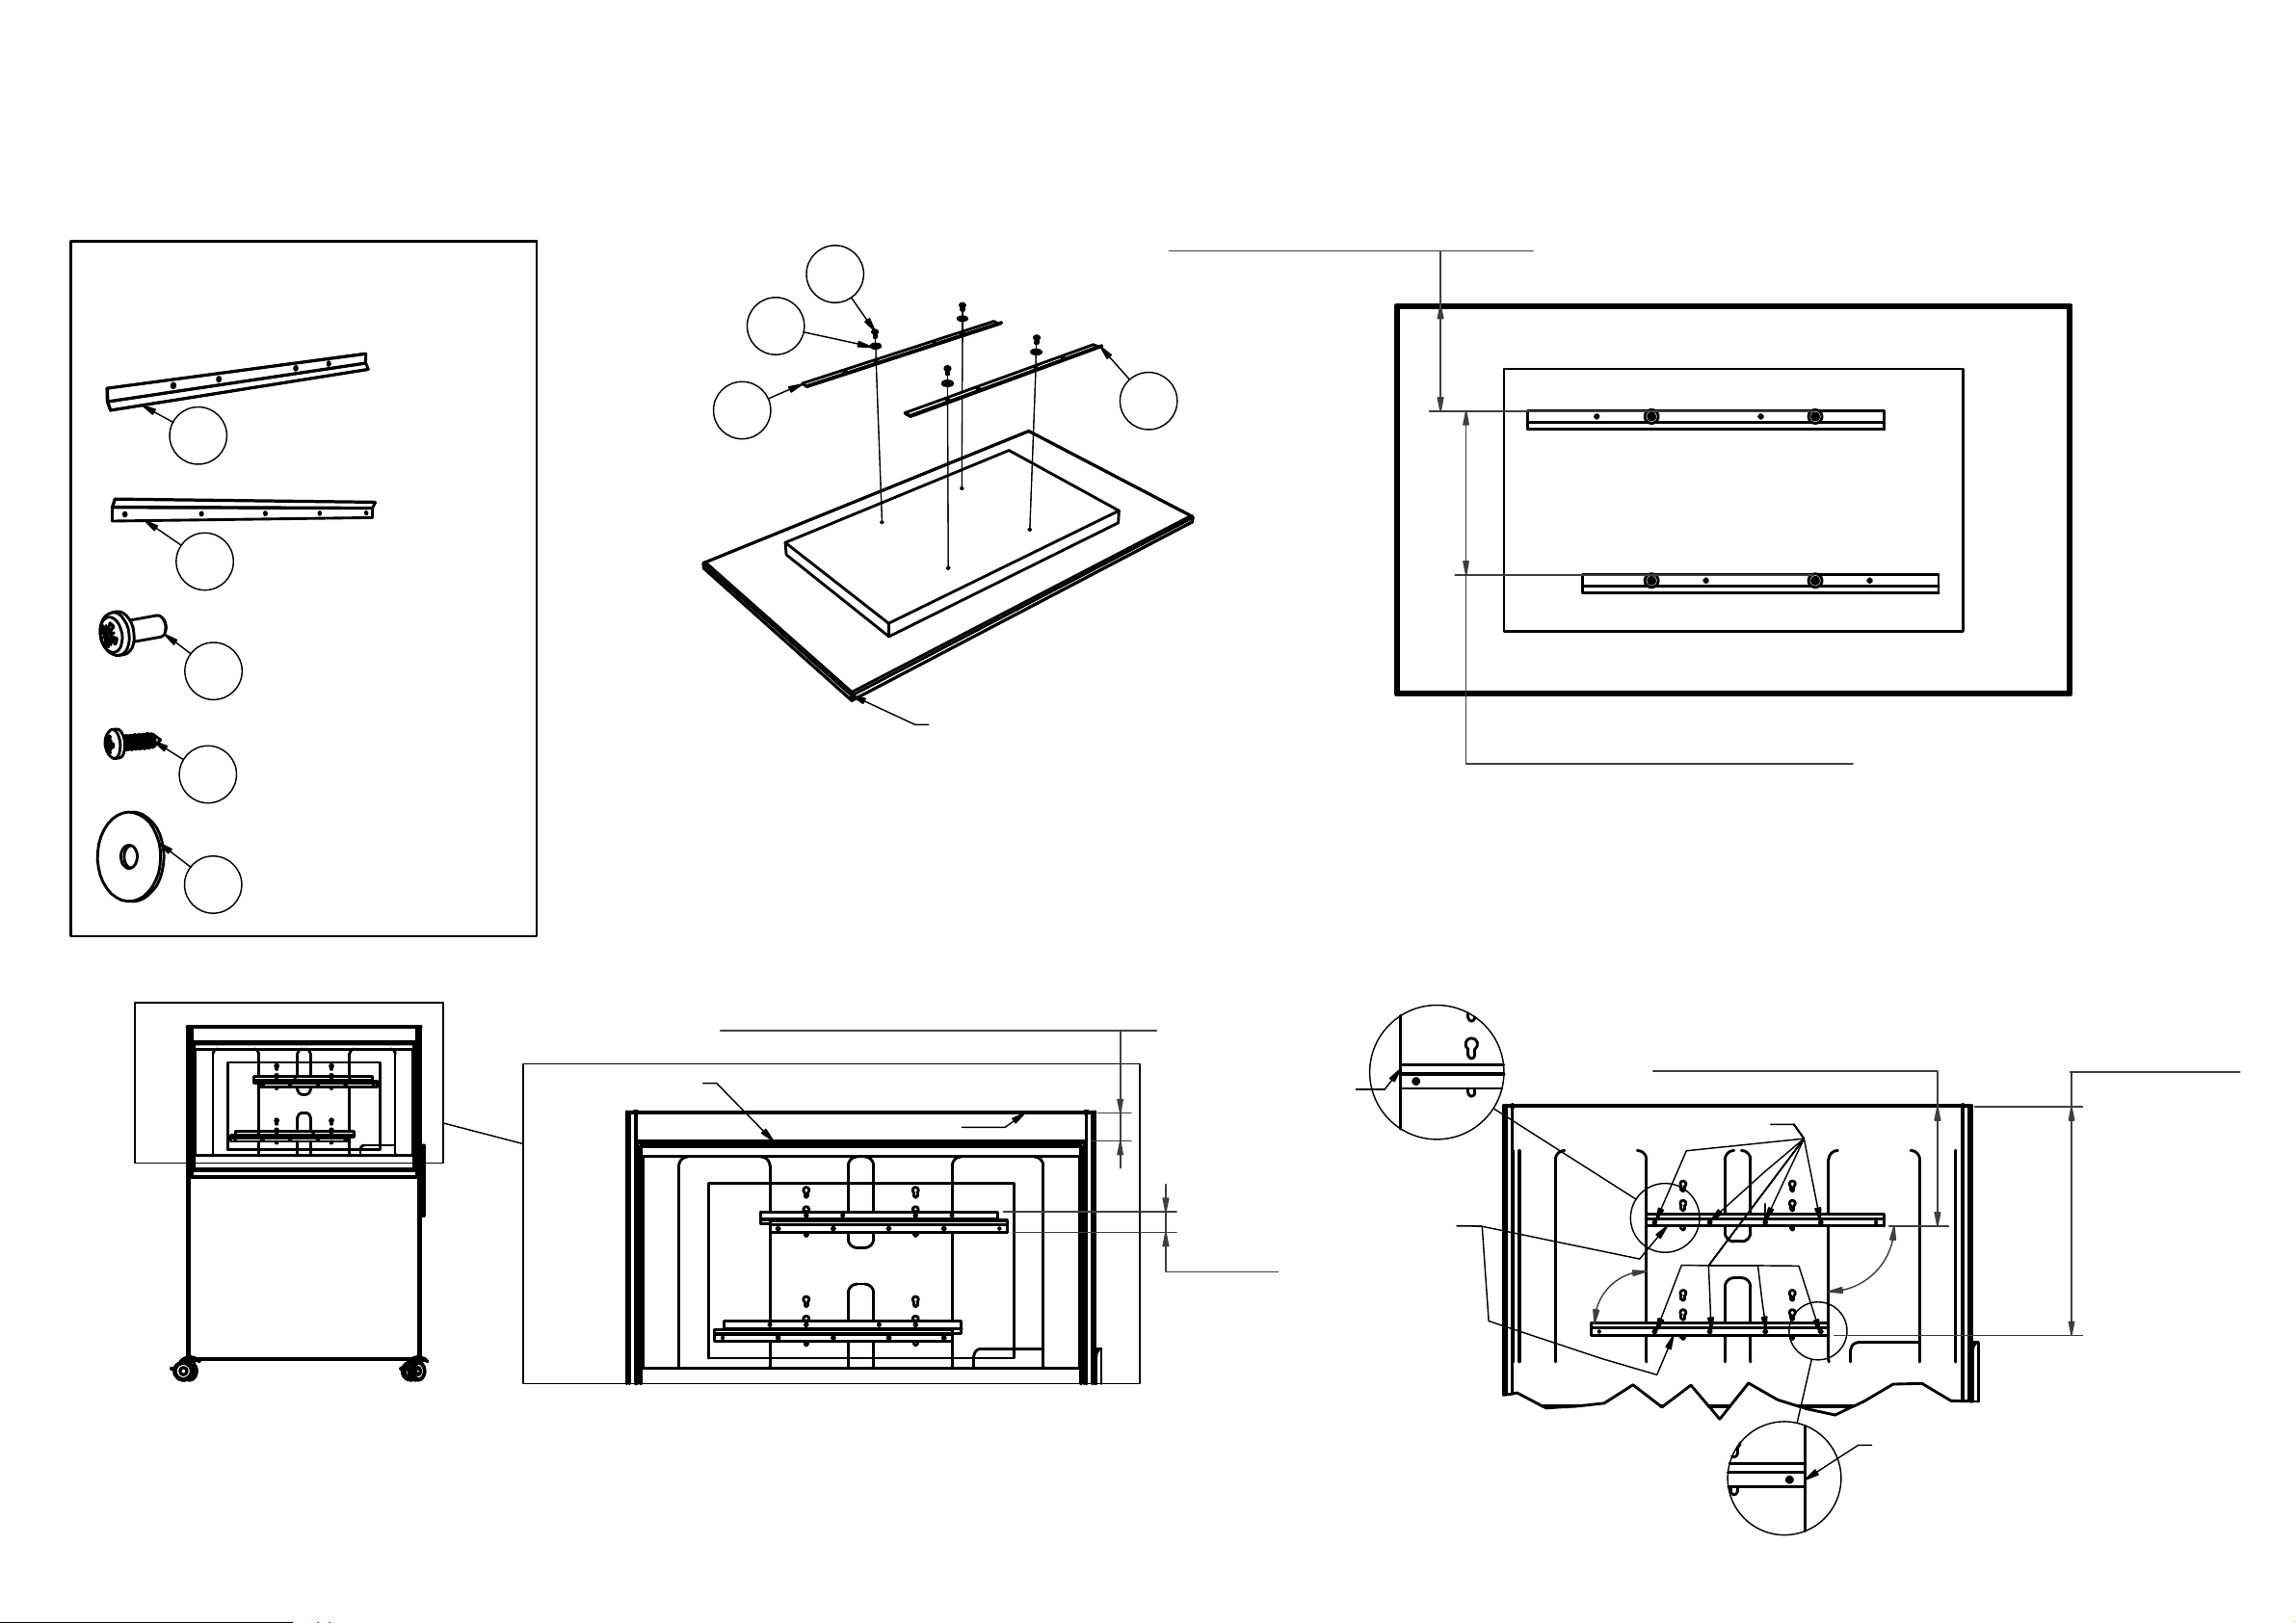
Brackets
If using an alternative standard screen bracket, Abstracta recommend as thin as possible (about 10-20 mm
thickness). Screen and bracket together should not exceed a thickness of 75 mm, for good design. Best design
is no more than 65 mm.
Max. recommended screen
weight 30 kg.
Page 6 of 6

(Abstracta Agile with
brackets and monitor/TV
mounted)
Abstracta Agile Monitor Bracket
Bruksanvisning / User Instructions ver 1.0
A
Including components
Page 1 of 3
Abstracta technical support,
tel.+46472269600.
X= your measured distance!
Y= 200, 300, 400 mm.....?
Z= Your wanted gap! (Min. 12 mm)
(56 mm)
H1 = X + Z + 56 mm
3. Decide your gap "Z" (between
your monitor/TV top and inside of
the top frame of Abstracta Agile).
H2 = H1 + Y
Mount centered or more to the left side!
Mount centered or more
to the right side!
Align edges!
Align
edges!
4. Calculate "H1" and mark out this with a straight, perpendicular line. Place
the top Monitor Bracket to your line, like the picture shows (don´t screw).
Mark out four of the bracket holes to the mounting board with a pencil.
Calculate "H2" and mark out in the same way for the bottom bracket. Use a
sharp tipped tool to punch deeper center marks for easier screwing!
Backside of your monitor/TV
1. Mount the Monitor Brackets.
(Positions in next step)
4
5
Monitor Bracket (2 pcs)
Wall Bracket (2 pcs)
Screw M6 (4 pcs)
Screw (8 pcs)
Washer (4 pcs)
3
11
3
5
2. Measure and note "X" and "Y" for your monitor/TV.
Monitor/TV top
Inside of frame
Your Monitor/TV
1
2
Draw the
lines here!
Mark center of holes here!
90°
90°

!
Pull
here!
Pull
here!
Abstracta Agile Monitor Bracket
Bruksanvisning / Use Instructions ver 1.0
A
Page 2 of 3
Abstracta technical support,
tel.+46472269600.
42
2
5. Mount the wallbrackets with the screws into your marks.
•Remove the panel by grabbing behind panel top and
pulling quick and hard. (Magnetic)
Panel top
Panel
4. Place your cables needed for the
monitor/TV or other eqipment.
•Keep cables fixed and away from the
movable parts inside!
Keep cables from
falling into movable
parts in this area!

Abstracta Agile Monitor Bracket
Bruksanvisning / Use Instructions ver 1.0
A
Page 3 of 3
Abstracta technical support,
tel.+46472269600.
5. Put your monitor/TV onto a soft surface on a table.
•Connect your cables.
•See "Abstracta Agile" user instructions for further cable
instructions!
x 2
Connect cables!
Soft surface on a table!
Slide to center monitor!
For installation of
power supply cable,
see separate user
instructions, included
with Abstracta Agile.
Put back the panel!
6. Hang the Monitor/TV onto the
brackets and make sure it is
straight and hanging on both
brackets. Be two persons!
7. Center the Monitor/TV, hide
visible excess of cables behind the
monitor and in the lower space. Put
back the panel and panel top.
Other ABSTRACTA Indoor Furnishing manuals
Popular Indoor Furnishing manuals by other brands

topstar
topstar OPEN ART Assembly instructions

Moveis Estrela
Moveis Estrela COMODA CHERRY instruction manual

Universal Forest Products
Universal Forest Products BALAU Assembly instructions

VECELO
VECELO KHD-XF-WR02-BLK Assembly instructions

Oasis Berco
Oasis Berco Oasissoft HUB Solo Small manual

Jysk
Jysk GREENVILLE quick start guide