AC Infinity AC-PHM3 User manual

USER MANUAL
pH METER
HYDROPONIC TESTER


3
WELCOME
Thank you for choosing AC Infinity. We are committed to product quality and friendly
customer service. If you have any questions or suggestions, please don’t hesitate to
contact us. Visit www.acinfinity.com and click contact for our contact information.
EMAIL
support@acinfinity.com
WEB
www.acinfinity.com
LOCATION
Los Angeles, CA

4
MANUAL CODE PHM2304X1
PRODUCT
pH Meter
pH Meter PRO
Hydroponic Meter PRO
MODEL
AC-PHM3
AC-PHM5
AC-PHM7
UPC-A
819137024205
819137023987
819137024212
NOTE
Water droplets are added during the production of this product to maintain the
probe's moisture. This is normal practice and is not indicative of a used product.
Do NOT use this product under freezing cold conditions. Wait until your space
warms to room temperature before using this product.
This testing device is equipped with a sensor shield that protects the glass bulb
from accidental collisions (see image below).You may remove this shield to
clean the sensor and put it back when you are finished.

5
MANUAL INDEX
Manual Index .................................................................................
Product Warning ............................................................................
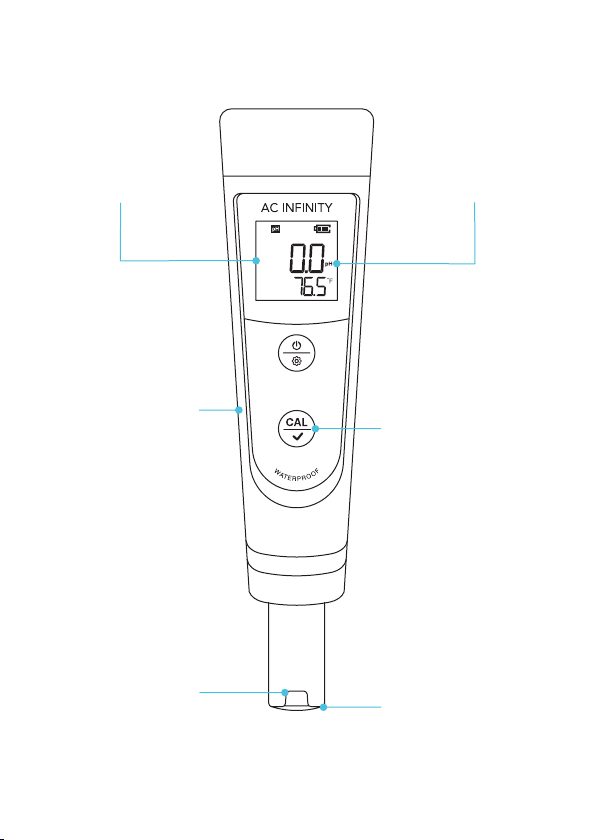
Key Features .................................................................................
Product Contents ...........................................................................
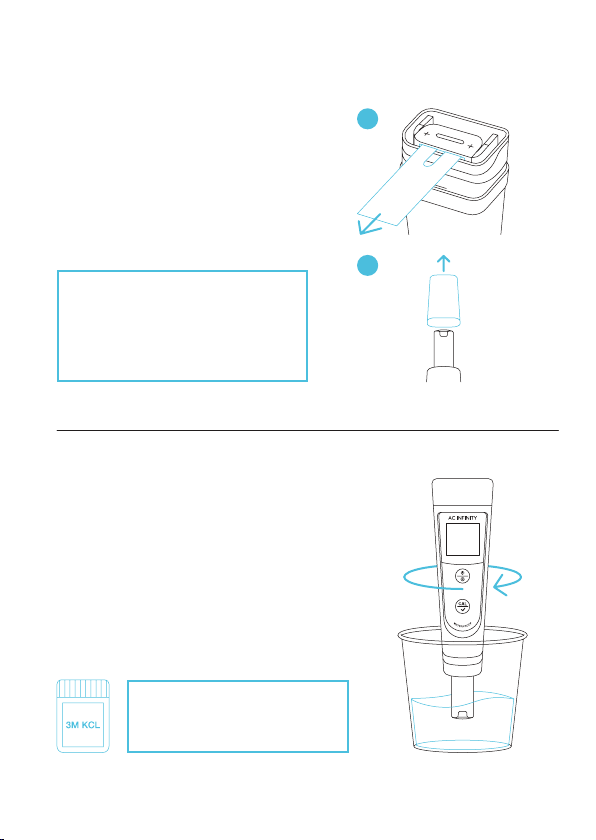
Powering and Setup ......................................................................
Programming .................................................................................
Other Settings ...............................................................................
Calibration Notes ...........................................................................
Calibration .....................................................................................
Measurement .................................................................................
Maintenance ..................................................................................
Troubleshooting Guide ...................................................................
FAQ................................................................................................
Other AC Infinity Products .............................................................
Warranty ........................................................................................
Page 5
Page 6
Page 7
Page 8
Page 9
Page 12
Page 13
Page 15
Page 16
Page 19
Page 21
Page 24
Page 25
Page 26
Page 27

6
Read all instructions before using this product.
Do not fully submerge this product underwater.
Do not operate this product if it malfunctions, has been dropped, or is
damaged in any manner.
Wash hands thoroughly after handling calibration solutions.
Do not consume the calibration solutions. Seek medical attention and rinse
mouth in case of consumption. Keep solutions out of reach from children
and animals.
1.
2.
3.
4.
5.
PRODUCT WARNING
TO REDUCE THE RISK OF FIRE, ELECTRIC SHOCK, OR INJURY TO PERSONS,
OBSERVE THE FOLLOWING:

7
KEY FEATURES
SECURE BUILD
Detachable sensor
shield protects glass
electrode probe to
handle heavy usage.
HIGHLY ACCURATE
Lithium glass membrane
sensor quickly delivers
precise pH readings with
±0.1 accuracy.
DURABLE DESIGN
IP67 protection
rating ensures high
resistance against
heat, liquids, and dust.
PREMIUM DISPLAY
Vivid LCD screen with
locking capabilities
provides a sharp layout for
convenient observation.
LONGER LIFESPAN
pH 4.00 solution extends
the pH meter’s longevity
by supplying ideal storage
conditions in between use.
WELL-REGULATED
Calibration solutions
balance the probe to
ensure consistently
accurate readings.

8
PRODUCT CONTENTS
pH 4.00 CALIBRATION
BUFFER SOLUTION
(x1)
pH 7.00 CALIBRATION
BUFFER SOLUTION
(x1)
TRAVEL
LANYARD
(x1)
pH
METER
(x1)

9
STEP 1
Pull off the battery insulation paper and
remove the probe cap.
POWERING AND SETUP
FIRST TIME USE
Your pH meter will come shipped
with 3M KCL droplets in the probe
cap.You may see this substance as
white sediment, which can be rinsed
off and will not affect its usability.
A
STEP 2
Fill a cup with 8-16 oz. of distilled or deionized
water for probe rinsing. Shake off excess water.
If unused for a month or longer,
soak in 3M KCL (not included)
for 30 minutes before use.
B

10
STEP 3
Insert the batteries as shown. The
positive end (+) of each battery must
face upwards.
POWERING AND SETUP
BATTERY REPLACEMENT
STEP 1
Remove the cap.
AB
STEP 2
Pull the battery tab open.
CAUTION: Incorrectly inserted
batteries may damage your pH
meter and cause potential hazards.

11
POWERING AND SETUP
BATTERY REPLACEMENT
STEP 5
Press the power/setting button
to power it on.
STEP 4
Push the battery tab down and
forward to lock it. Place the cap
back on.
A B
PRESS

12
PROGRAMMING
1
2
3
4
1. SMILE ICON
Indicates a stabilized reading
that lasts 2 seconds or longer.
3. POWER/SETTING BUTTON
Powers your pH meter ON/OFF
or adjusts settings. Cancels
calibration in CALIBRATION
Mode. Enters Settings while
your pH meter is OFF.
4. CALIBRATION BUTTON
Enters CALIBRATION Mode,
initiates the calibration, and
confirms changes.
2. CALIBRATION ICONS
= pH 4.00
= pH 7.00
= pH 10.01
7. PROBE TEMPERATURE
Displays the current temperature
that the probe is detecting.
6. PROBE pH
Displays the current pH level that
the probe is detecting.
5. MEASUREMENT MODE
Displays the parameter indication.
5
7
6

13
OTHER SETTINGS
START CALIBRATION
Press the calibration button. PRESS +
CONFIRM CHANGES
In SETTINGS and CALIBRATION mode, press the calibration
button to confirm changes.
PRESS +
ACCESS CALIBRATION MODE
In MEASUREMENT mode, hold to enter CALIBRATION mode. HOLD +
CANCEL CALIBRATION
In CALIBRATION mode, press the power/settings button. PRESS +
CHANGE PARAMETER
In SETTINGS, press the power/settings button. PRESS +
POWER ON
Press the power/settings button. PRESS +
ACCESS SETTINGS
While off, hold the power/settings button to enter SETTINGS. HOLD +
POWER OFF
Hold the power/settings button. HOLD +
GENERAL SETTINGS

14
OTHER SETTINGS
Settings Adjustment
Selects pH Buffer Series
Restores Factory Settings
Selects Temperature Scale
Category
P1
P3
P2
Settings
USA / NIST
No / Yes
°F / °C
Factory Settings
USA
No
°F
ENTER SETTINGS
Holding the power/settings button will enter settings
while your pH meter is off.
HOLD +
1.
CYCLE THROUGH SETTINGS
Pressing the power/settings button switches between
P1-P2-P3.
PRESS +
2.
UNLOCK SETTINGS
Pressing the calibration button will enable you to
adjust your current setting which will flash.
PRESS +
3.
ADJUST SETTINGS
Pressing the power/settings button adjusts settings.
Pressing the calibration button confirms the settings change. PRESS +
PRESS +
4.
JUMP TO MEASUREMENT MODE
Holding the power/settings button returns you to the
MEASUREMENT mode.
HOLD +
5.
PARAMETER SETTINGS

15
The 1st point calibration must be 7.00 pH. Perform the 2nd and 3rd point
calibrations (4.00 and 10.01 respectively) after the 1st point calibration
is complete.
A.
"Er2" will appear when the calibration button is pressed while the calibration
process is incomplete (smile icon does not appear on the screen).
B.
This testing kit comes included with pH 4.00 and pH 7.00 buffer solutions
only. You may purchase a pH 10.01 buffer solution separately if your target
pH level is > 8.0 pH.
C.
The included pH buffer solutions can be used for up to 10 calibrations. After
use, tightly close the bottle and store it at room temperature. Replace the
solutions after their 10 uses to help keep your pH measurements reliable.
D.
This pH meter will automatically recognize the pH buffer solution it is in. You
may select the following calibration points:
E.
CALIBRATION NOTES
Calibration Icon
7.00 pH, 4.00 pH,
and 10.01 pH
7.00 pH and 10.01 pH
7.00 pH and 4.00 pH
7.00 pH
Calibration Solution
Wide measuring range
Target pH level > 8.0 pH
Target pH level < 8.0 pH
Required Accuracy
≥0.3 pH
Application
2-Point
3-Point
1-Point
Calibration

16
CALIBRATION
STEP 1
Rinse the probe in distilled water and
shake off excess moisture.
STEP 2
Hold the calibration button to enter
CALIBRATION Mode.
HOLD
You may cancel the calibration and return to
MEASUREMENT Mode by pressing the power/setting button.

17
STEP 3
Quickly stir the probe in the 7.00 pH
buffer solution, then hold it still.
Wait for the smile icon to appear, then
press the calibration button to finish the
1st point calibration.
STEP 4
Your pH meter will return to
MEASUREMENT mode once the
calibration process is complete.
"M" will display on the lower left
corner, indicating a successful 1st
point calibration (the middle point).
CALIBRATION
Once the calibration is confirmed,
the next solution will be indicated
at the bottom right of the screen.
To continue calibration, DO NOT turn off your
pH meter after you finish each calibration.
PRESS

18
CALIBRATION
STEP 5
Repeat steps 1-3 to calibrate the
2nd point, using the 4.00 pH buffer
solution instead.
"L" will display next to "M," indicating
a successful 2nd point calibration.
STEP 6
You may optionally repeat steps 1-3 to
calibrate the 3rd point (target pH > 8.0),
using a standard 10.01 pH buffer solution
(not included).
"H" will show up next to "L" and "M,"
indicating a successful 3-point calibration.

19
STEP 1
Press the power/settings button
to power on your pH meter, then
remove the probe cap.
STEP 2
Rinse the probe in distilled water and
shake off excess moisture.
MEASUREMENT
PRESS

20
MEASUREMENT
STEP 3
Submerge the probe at least 1 in.
deep into your sample solution, then
hold it still.
Record the readings after the reading
is stabilized, indicated by the smile
icon on the screen.
PURE WATER MEASUREMENT
Readings will take longer to fully
stabilize (~1-5 min.) when testing pure
water like, drinking water, RO water, and
distilled water.
If your readings are not stabilizing, add
a 1:1000 ratio of 3M KCL solution to
your pure water (e.g. 1 ml KCL to 1000
ml water) to accelerate the stabilization
while minimizing pH change.
1 ml
1000 ml
1 in.
Other manuals for AC-PHM3
1
This manual suits for next models
5
Table of contents
Other AC Infinity Measuring Instrument manuals
Popular Measuring Instrument manuals by other brands

Sony
Sony TC-366-4 Owner's instruction manual

Zenner
Zenner zelsius C5-ISF Installation and operating instructions

Honeywell
Honeywell MicroMAX Pro User & maintenance manual

Stanley
Stanley FATMAX FMHT82565-0 instruction manual

Elitech
Elitech EASYLOG Temperature Label Series user manual

Tektronix
Tektronix 634 instruction manual