AC Schnitzer AC S II User manual

-Fitting Instructions-
Hand Lever Type AC S II

2
General Notes!
AC Schnitzer Hand Lever AC S II
Important Notes!
Important Notes!
These Fitting Instructions must be read carefully before starting work, and do not claim to be complete in relation to
every work step. Technical, editorial and content changes are reserved!! AC Schnitzer bears no liability for damage
caused by incorrect installation!
Check goods for completeness and absence of damage before starting work.
Later complaints cannot be accepted.
These Fitting Instructions are intended solely for use by authorised AC Schnitzer or BMW dealers. These Fitting
Instructions are in all cases directed at professionals trained in BMW vehicles who have the corresponding
specialist knowledge and tools. Knowledge concerning material properties and standards is assumed! Work on
hydraulic systems, brake systems and the electrical system should only be carried out by trained personnel.
Before installation:
For installation, protect the vehicle adequately against rolling away or falling over.
We recommend the use of the normal main stand or an original BMW assembly stand! Keep children and animals
away from the working area!
There is a risk of accident from tripping or electrical short-circuit! Therefore remove all jewellery (chains, watches,
rings etc.) before starting work.
After installation:
After completion of the work, carry out a test ride. After the test ride, check all bolt connections for tightness and
ensure that all moving parts have adequate clearance.
Fitting time (1 unit = 5 minutes )
The fitting time is around 5-8 units , which may vary depending on vehicle type.
(This value is a recommendation only and is not binding!)
Tools Required
- Standard automotive Torx driver
- Standard automotive Allen keys
- Screw locking paint
- Medium-strength thread lock
- Hot air gun
Fitting Instructions Hand Lever Type AC S 2 / Issue: 01 / 2017 RVo_REV_1
AC Schnitzer - Neuenhofstraße 160 - D - 52078 Aachen - Tel. 0241/5688 -300 Fax -135 / www.ac-schnitzer.de

3
Contents
AC Schnitzer Hand Lever AC S II
Chapter Page
1. Components supplied 4
2. Fitting the AC Schnitzer hand lever to BMW K1200/1300R/S models 5
3. Fitting the AC Schnitzer hand lever to BMW F800R/GS/S models 11
4. Fitting the AC Schnitzer hand lever to BMW S 1000 R / RR models 18
5. Fitting the AC Schnitzer hand lever to BMW R 1200 models 23
6. Fitting the AC Schnitzer hand lever to BMW S 1000 XR models 32
7. Fitting the AC Schnitzer hand lever to BMW Scrambler models 40
Fitting Instructions Hand Lever Type AC S 2 / Issue: 01 / 2017 RVo_REV_1
AC Schnitzer - Neuenhofstraße 160 - D - 52078 Aachen - Tel. 0241/5688 -300 Fax -135 / www.ac-schnitzer.de

4
Components Supplied
AC Schnitzer Hand Lever AC S II
A AC Schnitzer hand lever (vehicle-specific)
1. Brake control lever
2. Clutch control lever
3. 1 long and 1 short extension (per lever)
4. 6 fixing bolts (per lever)
5. 1 Torx angle driver (only when a set is ordered)
Fitting Instructions Hand Lever Type AC S 2 / Issue: 04/2016 RVo_REV_1-2016-04-11
AC Schnitzer - Neuenhofstraße 160 - D - 52078 Aachen - Tel. 0241/5688 -300 Fax -135 / www.ac-schnitzer.de

5
-Fitting Instructions-
Hand Lever Type AC S II
on BMW K 1200 / 1300 S/R

6
Fitting Instructions
AC Schnitzer Hand Lever AC S II - General Notes -
2. - General Notes -
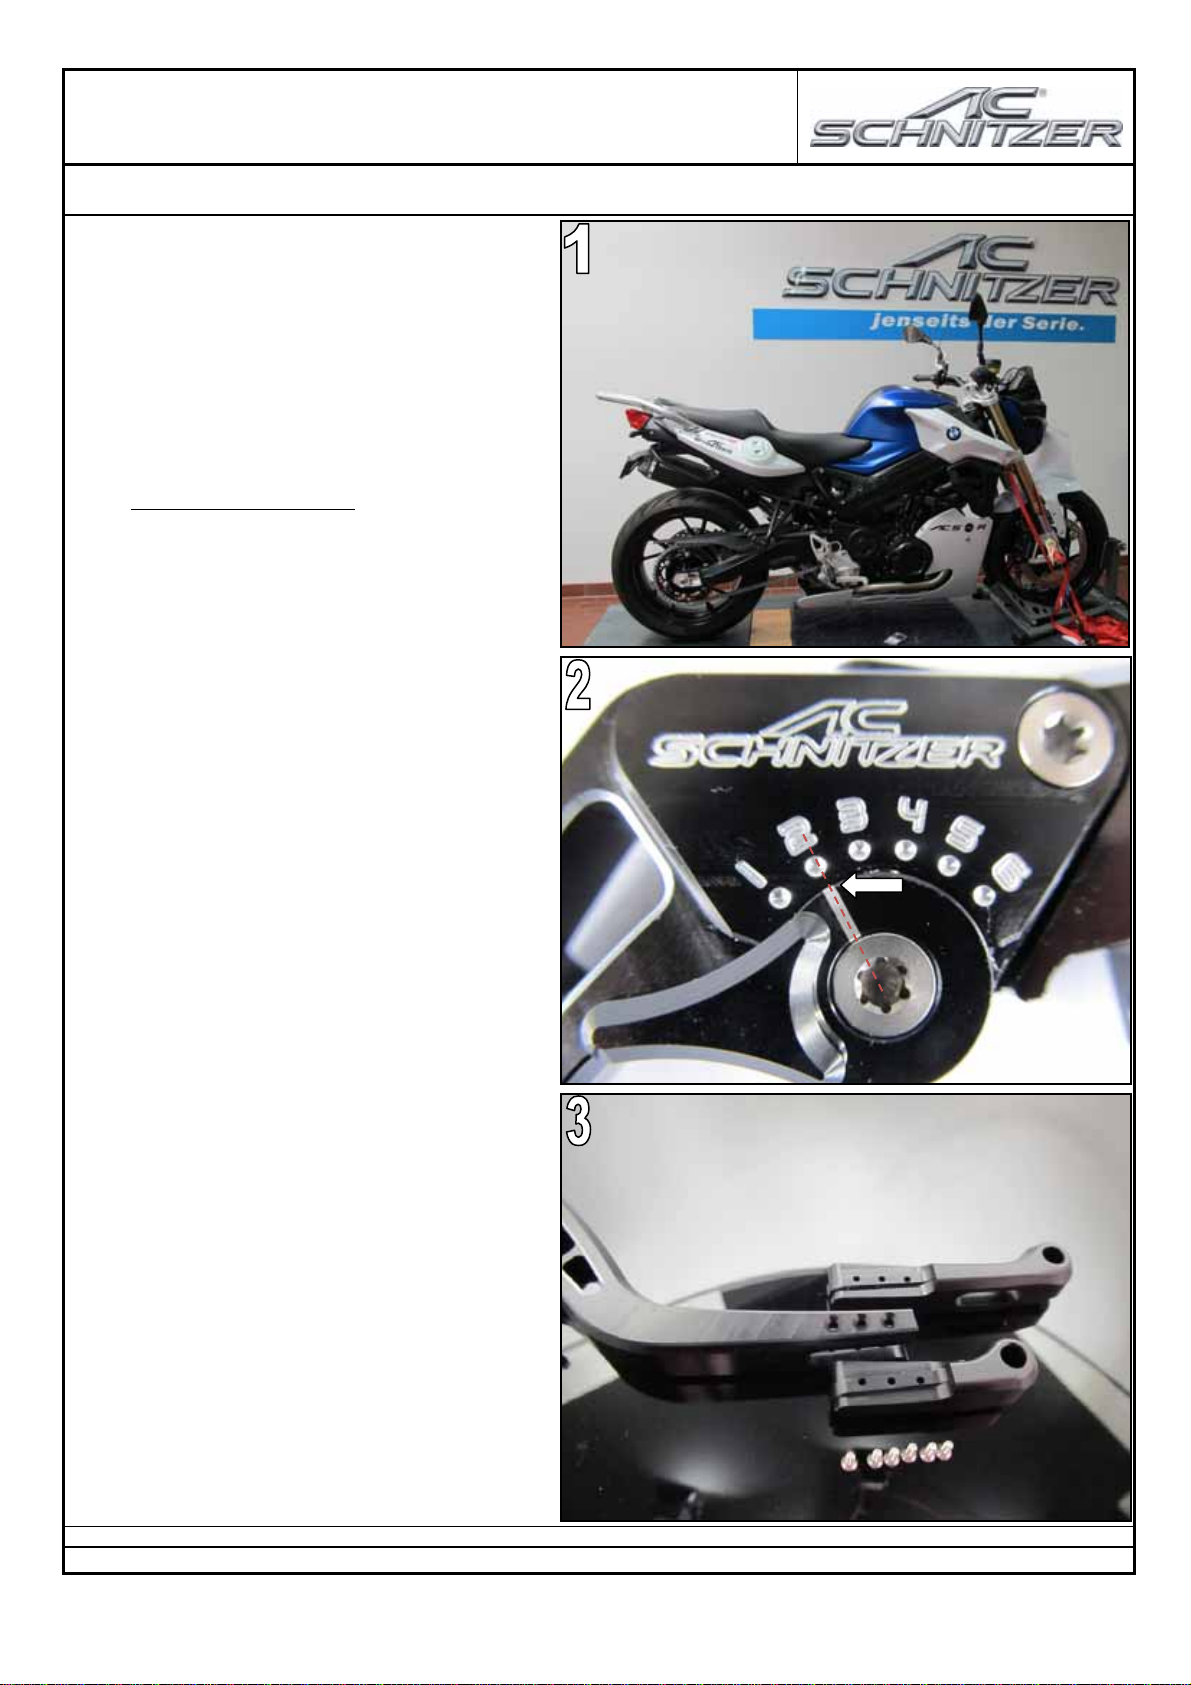
- Before starting work, park the vehicle safely
and secure against falling or rolling away.
- After completing the work, carry out a test ride
and check that the hand levers and electrical
system (clutch switch / brake light switch / GRA
switch and lighting system) function properly.
- A general operating licence is supplied with the
AC Schnitzer hand lever type ACS2. This must be
given to the customer with the information that
these documents must be carried on every ride!
- The AC Schnitzer hand levers have 6 settings.
The current position can be seen from the line
marking. (Fig. 1) To adjust, press the hand lever
slightly forward (in direction of travel), and turn the
adjustment lever clockwise/counter-clockwise as
required. AC Schnitzer recommends that
adjustments are only performed when parked. In
all cases, ensure there is sufficient remaining
travel on operation. AC Schnitzer bears no
liability for damage resulting from incorrect
installation and lack of remaining travel!
- Before mounting on the vehicle, install the long
or short extension (1 long & 1 short supplied per
lever) using the fixing bolts supplied. For this, from
the outside insert the desired extension flush into
the guide of the lever concerned, and secure with
6 bolts per lever.
- Warning: Do not overtighten bolts!
Fitting Instructions Hand Lever Type AC S 2 / Issue: 01 / 2017 RVo_REV_1
AC Schnitzer - Neuenhofstraße 160 - D - 52078 Aachen - Tel. 0241/5688 -300 Fax -135 / www.ac-schnitzer.de
?

7
Fitting Instructions
AC Schnitzer Hand Lever AC S II
2. Fitting
On brake side:
- Release and remove fixing bolt by releasing the
fixing nut on the underside.
- Remove brake lever to the outside, being careful
of the rubber sleeve. (Fig. 4)
- Using a suitable tool, e.g. Torx driver, press the
plain bush out of the brake lever.
- Remove individual parts from brake lever.
- Warning: Parts are spring-loaded (Fig. 5)
- Clean components, inspect and grease lightly.
On vehicles BEFORE / UP TO MY 2011, remove
standard rotary adjuster by twisting off the
threaded piece.
On vehicles AFTER MY 2011, use the threaded
insert 420-47812-41 ordered separately.
Fitting Instructions Hand Lever Type AC S 2 / Issue: 01 / 2017 RVo_REV_1
AC Schnitzer - Neuenhofstraße 160 - D - 52078 Aachen - Tel. 0241/5688 -300 Fax -135 / www.ac-schnitzer.de

8
Fitting Instructions
AC Schnitzer Hand Lever AC S II
2. Fitting
- Clean standard rotary adjuster, grease lightly
and screw into the AC Schnitzer brake lever.
Vehicles before / up to 2011 (Fig. 7)
- On vehicles after 2011, lightly grease the
separately ordered pressure piece and screw into
the AC Schnitzer brake lever supplied as shown
(Fig. 8).
- Refit the remaining components (push-rod and
compression spring) to the AC Schnitzer brake
lever in the reverse order from removal as shown,
and fix using the standard bush.
Lightly grease ball on push-rod (Fig. 9)
Fitting Instructions Hand Lever Type AC S 2 / Issue: 01 / 2017 RVo_REV_1
AC Schnitzer - Neuenhofstraße 160 - D - 52078 Aachen - Tel. 0241/5688 -300 Fax -135 / www.ac-schnitzer.de

9
Fitting Instructions
AC Schnitzer Hand Lever AC S II
2. Fitting
- Place prepared AC Schnitzer brake lever on the
vehicle.
- Ensure that the ball of the push-rod perceptibly
clicks into the cup provided in the brake fitting.
- Guide bolt through bush, and secure with new
self-locking nut (7Nm)
- Make basic adjustment by screwing the pressure
piece in (1.5 turns).
(Fig. 10)
- Remove fixing bolt by releasing and removing
the fixing nut below the fitting. Remove fixing bolt
towards the top. (Fig. 11)
- Press out bush using a suitable tool
(Torx driver etc.) as shown.
- Warning: Parts are spring-loaded.
- Remove rotary adjuster by twisting off threaded
piece. (Fig. 12)
Fitting Instructions Hand Lever Type AC S 2 / Issue: 01 / 2017 RVo_REV_1
AC Schnitzer - Neuenhofstraße 160 - D - 52078 Aachen - Tel. 0241/5688 -300 Fax -135 / www.ac-schnitzer.de

10
Fitting Instructions
AC Schnitzer Hand Lever AC S II
2. Fitting
- Clean and lightly grease components
- Screw threaded piece into AC Schnitzer clutch
lever supplied, clip rotary adjuster back on.
- Assemble cleaned and greased components as
shown, and fix with standard bush.
- Lightly grease ball on push-rod. (Fig. 13)
- Place prepared lever on clutch fitting, ensuring
that the ball of the push-rod perceptibly engages
in the cup of the piston seat. (Fig. 14)
- Guide bolt through bush, and secure with new
self-locking nut (7Nm)
- Make basic adjustment by screwing the pressure
piece in (1 turn).
- Ensure correct fitting!
- The general operating licence must be given to
the customer.
Fitting Instructions Hand Lever Type AC S 2 / Issue: 01 / 2017 RVo_REV_1
AC Schnitzer - Neuenhofstraße 160 - D - 52078 Aachen - Tel. 0241/5688 -300 Fax -135 / www.ac-schnitzer.de

11
-Fitting Instructions-
Hand Lever Type AC S 2
on BMW F 800 R/S/GS/GT
12
Fitting Instructions
AC Schnitzer Hand Lever AC S II
2.Fitting
General Notes -
- Before starting work, park the vehicle safely
and secure against falling or rolling away. (Fig. 1)
- After completing the work, carry out a test ride
and check that the hand levers and electrical
system (clutch switch / brake light switch / GRA
switch and lighting system) function properly.
- A general operating licence is supplied with the
AC Schnitzer hand lever type ACS II. This must
be given to the customer with the information that
these documents must be carried on every ride!
- The AC Schnitzer hand levers have 6 settings.
The current position can be seen from the line
marking. (Fig. 2) To adjust, press the hand lever
slightly forward (in direction of travel), and turn the
adjustment lever clockwise/counter-clockwise as
required. AC Schnitzer recommends that
adjustments are only performed when parked. In
all cases, ensure there is sufficient remaining
travel on operation. AC Schnitzer bears no
liability for damage resulting from incorrect
installation and lack of remaining travel!
- Before mounting on the vehicle, install the long
or short extension (1 long & 1 short supplied per
lever) using the fixing bolts supplied. For this, from
the outside insert the desired extension flush into
the guide of the lever concerned, and secure with
6 bolts per lever.
- Warning: Do not overtighten bolts!
(Fig. 3)
Fitting Instructions Hand Lever Type AC S 2 / Issue: 01 / 2017 RVo_REV_1
AC Schnitzer - Neuenhofstraße 160 - D - 52078 Aachen - Tel. 0241/5688 -300 Fax -135 / www.ac-schnitzer.de

13
Fitting Instructions
AC Schnitzer Hand Lever AC S II
2. Fitting
- On brake side:
- Release and remove the fixing nut on the
underside. (Fig. 4)
- Remove fixing bolt upward from hand fitting.
- Remove brake lever towards the outside, being
careful of the rubber sleeve. (Fig. 5)
- Using a suitable tool, e.g. Torx driver, press the
plain bush out of the brake lever.
- Remove individual parts from brake lever.
- Warning: Parts are spring-loaded (Fig. 6)
Fitting Instructions Hand Lever Type AC S 2 / Issue: 01 / 2017 RVo_REV_1
AC Schnitzer - Neuenhofstraße 160 - D - 52078 Aachen - Tel. 0241/5688 -300 Fax -135 / www.ac-schnitzer.de

14
Fitting Instructions
AC Schnitzer Hand Lever AC S II
2. Fitting
-- Clean, inspect and lightly grease components.
On vehicles BEFORE / UP TO MY 2011, remove
standard rotary adjuster by twisting off the
threaded piece.
(Fig. 7)
On vehicles AFTER MY 2011, use the threaded
insert 420-47812-41 ordered separately.
- Clean standard threaded piece, grease lightly
and screw into the AC Schnitzer brake lever. Clip
plastic rotary adjuster back onto threaded piece,
as per standard.
(Vehicles up to 2011)
- On vehicles after 2011, lightly grease the
separately ordered pressure piece and screw fully
into the AC Schnitzer brake lever supplied as
shown. (Fig. 8)
- Refit the remaining components (push rod and
compression spring) to the AC Schnitzer brake
lever in the reverse order from removal, as
shown, and fix using the standard bush. Lightly
grease ball on push-rod. (Fig. 9)
Fitting Instructions Hand Lever Type AC S 2 / Issue: 01 / 2017 RVo_REV_1
AC Schnitzer - Neuenhofstraße 160 - D - 52078 Aachen - Tel. 0241/5688 -300 Fax -135 / www.ac-schnitzer.de

15
Fitting Instructions
AC Schnitzer Hand Lever AC S II
2. Fitting
- Place prepared AC Schnitzer brake lever on the
vehicle.
- Ensure that the ball of the push-rod perceptibly
clicks into the cup provided in the brake fitting.
- Guide bolt through bush, and secure with new
self-locking nut (7Nm)
- Make basic adjustment by screwing the pressure
piece in (1.5 turns).
(Fig. 10)
- On clutch side:
- Push the rubber sleeve of the cable adjustment
away from the adjustment unit. (Fig. 11)
- Release plastic locknut fully by turning counter-
clockwise.
- Screw in adjustment screw fully clockwise.
- Unthread clutch cable from clutch fitting. (Fig.12)
Fitting Instructions Hand Lever Type AC S 2 / Issue: 01 / 2017 RVo_REV_1
AC Schnitzer - Neuenhofstraße 160 - D - 52078 Aachen - Tel. 0241/5688 -300 Fax -135 / www.ac-schnitzer.de
16
Fitting Instructions
AC Schnitzer Hand Lever AC S II
2. Fitting
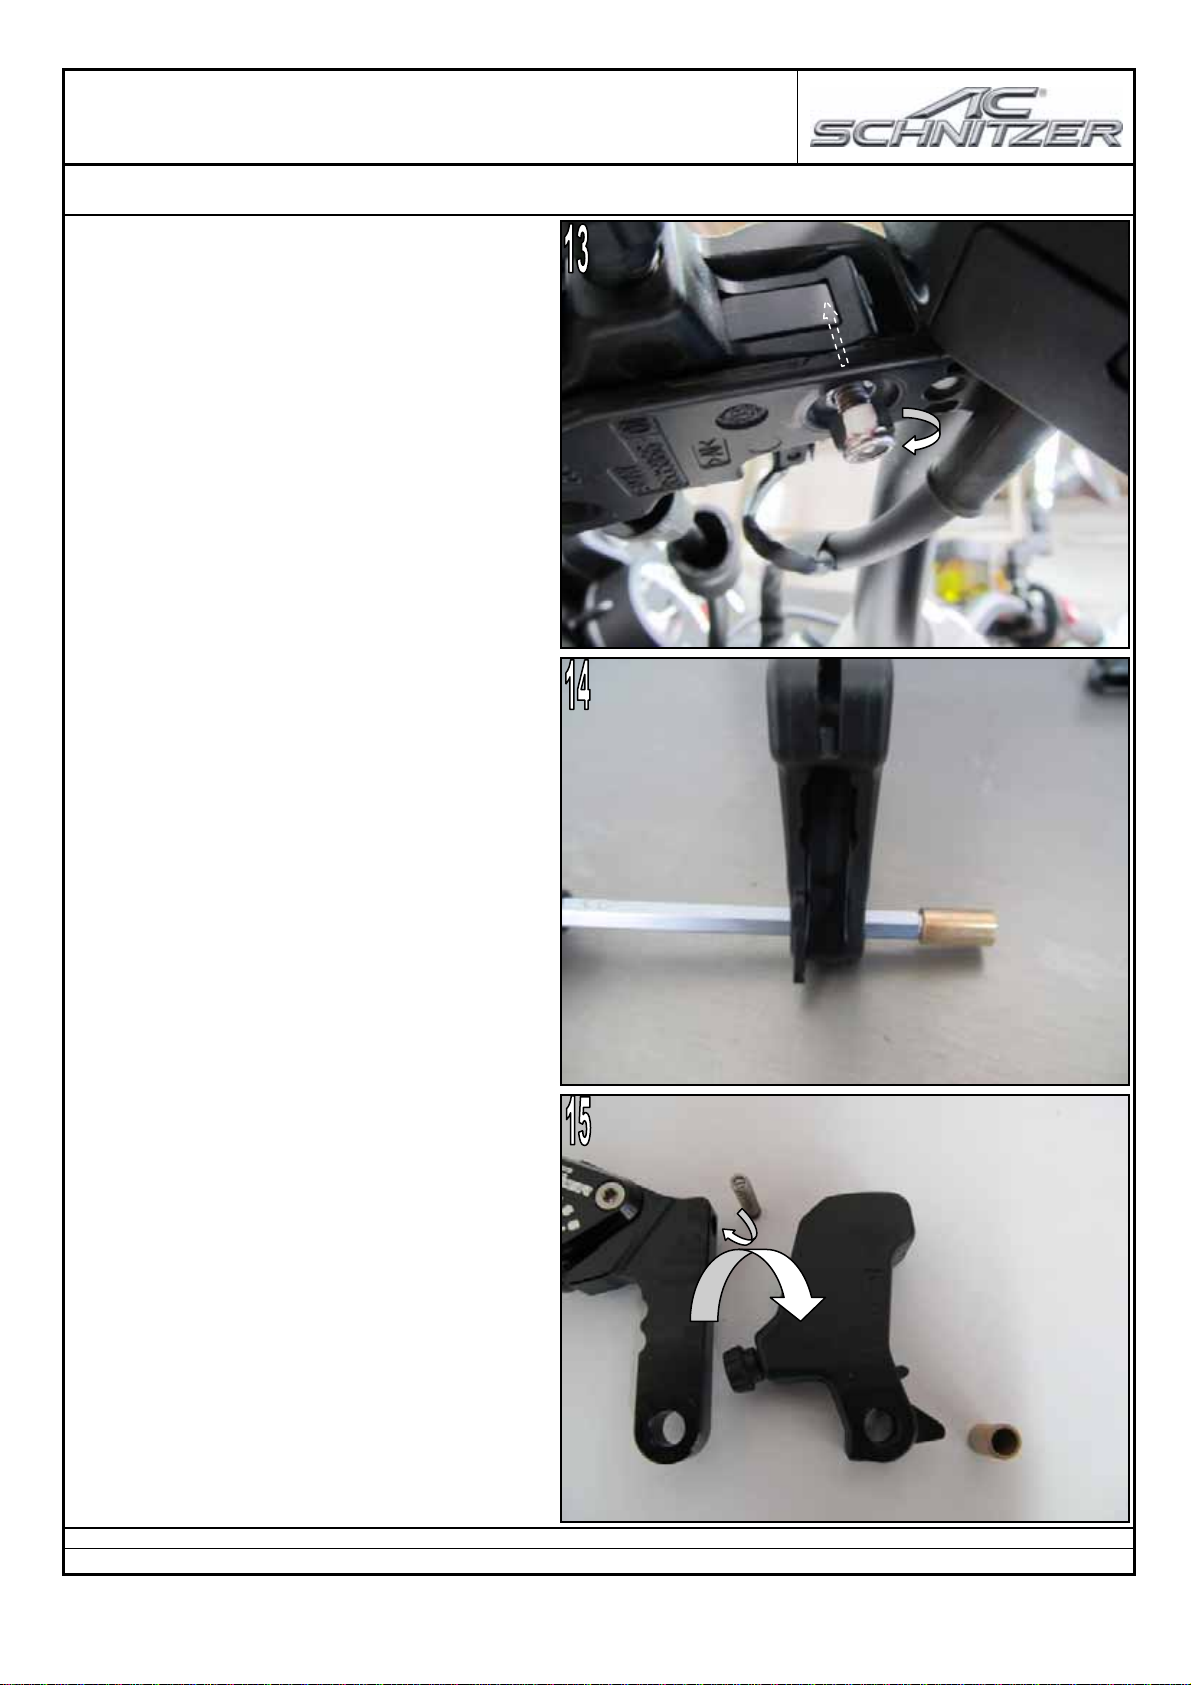
- Release and remove the fixing nut on the clutch
fitting. Remove fixing bolt toward the top. (Fig.13)
- Remove hand lever from vehicle.
- Press out bush with a suitable tool (e.g. Torx
driver).
- Warning: Parts are spring-loaded.
- Clean and lightly grease components, and
prepare for assembly as shown.
- Slide spring into the bore provided (Fig. 15).
Fitting Instructions Hand Lever Type AC S 2 / Issue: 01 / 2017 RVo_REV_1
AC Schnitzer - Neuenhofstraße 160 - D - 52078 Aachen - Tel. 0241/5688 -300 Fax -135 / www.ac-schnitzer.de
17
Fitting Instructions
AC Schnitzer Hand Lever AC S II
2. Fitting
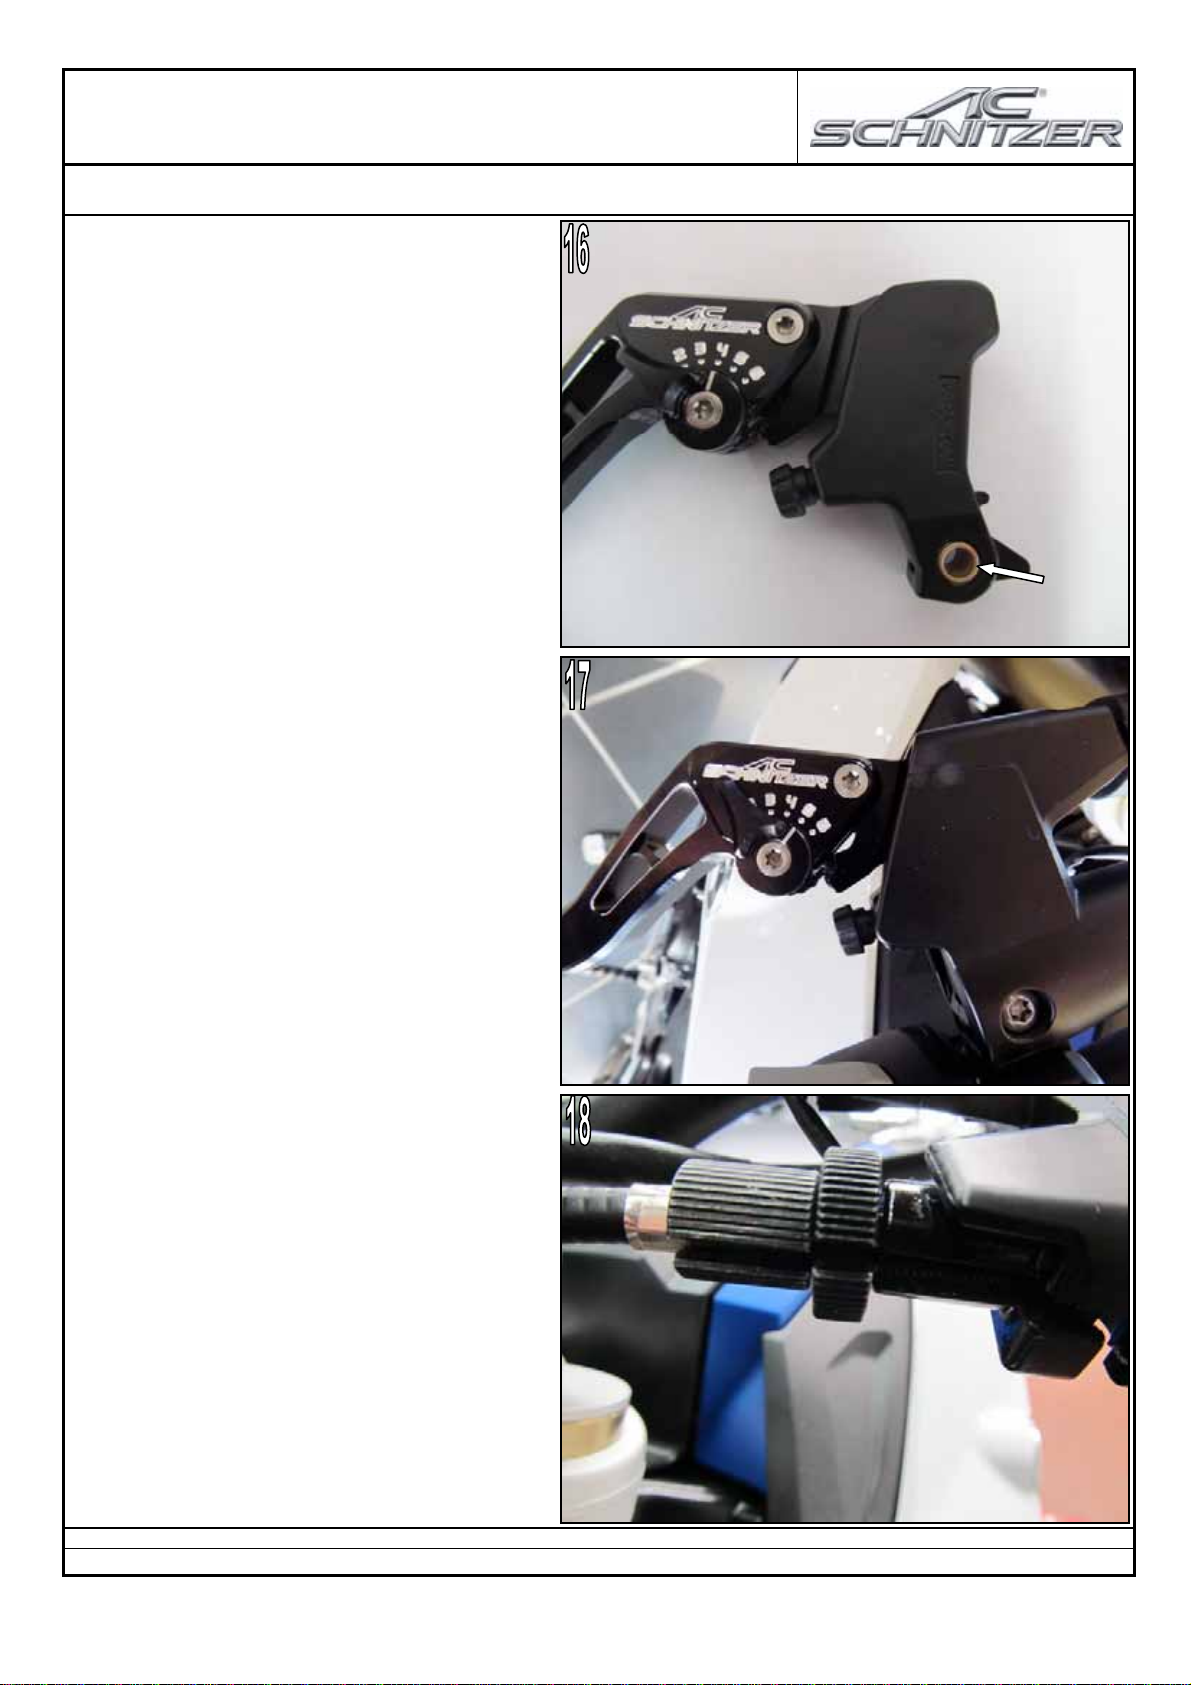
- Assemble the joined clutch lever with the
standard, lightly greased bush. (Fig. 16)
- Place prepared lever on standard clutch fitting,
and secure using the standard bolt and a new
fixing washer (7 Nm) (Fig.17).
- Rethread clutch cable and set clutch pull/play on
left lock to 3mm play according to BMW
specification.
(Fig. 18)
- Ensure that the unit is correctly fitted!
- The general operating licence must be given to
the customer.
Fitting Instructions Hand Lever Type AC S 2 / Issue: 01 / 2017 RVo_REV_1
AC Schnitzer - Neuenhofstraße 160 - D - 52078 Aachen - Tel. 0241/5688 -300 Fax -135 / www.ac-schnitzer.de

18
-Fitting Instructions-
Hand Lever Type AC S 2
on BMW S 1000 R / RR

19
Fitting Instructions
AC Schnitzer Hand Lever AC S II
2. Fitting
- General Notes -
- Before starting work, park the vehicle safely
and secure against falling or rolling away. (Fig. 1)
- After completing the work, carry out a test ride
and check that the hand levers and electrical
system (clutch switch / brake light switch / GRA
switch and lighting system) function properly.
- A general operating licence is supplied with the
AC Schnitzer hand lever type ACS2. This must be
given to the customer with the information that
these documents must be carried on every ride!
- The AC Schnitzer hand levers have 6 settings.
The current position can be seen from the line
marking. (Fig. 2) To adjust, press the hand lever
slightly forward (in direction of travel), and turn the
adjustment lever clockwise/counter-clockwise as
required. AC Schnitzer recommends that
adjustments are only performed when parked. In
all cases, ensure there is sufficient remaining
travel on operation. AC Schnitzer bears no
liability for damage resulting from incorrect
installation and lack of remaining travel!
- Before mounting on the vehicle, install the long
or short extension (1 long & 1 short supplied per
lever) using the fixing bolts supplied. For this, from
the outside insert the desired extension flush into
the guide of the lever concerned, and secure with
6 bolts per lever.
- Warning: Do not overtighten bolts!
(Fig. 3)
Fitting Instructions Hand Lever Type AC S 2 / Issue: 01 / 2017 RVo_REV_1
AC Schnitzer - Neuenhofstraße 160 - D - 52078 Aachen - Tel. 0241/5688 -300 Fax -135 / www.ac-schnitzer.de

20
Fitting Instructions
AC Schnitzer Hand Lever AC S II
2. Fitting the brake lever
- On the brake lever side: From below, release
and remove lock nut (SW 10) on the fixing bolt.
Unscrew and remove fixing bolt. Remove
standard brake lever forward from the hand pump.
(Fig. 4)
- Lightly grease the bore of the prepared AC
Schnitzer brake lever and the bore for the push
bolt. (Fig. 5)
- Place AC Schnitzer lever on the vehicle,
ensuring that the push bolt of the pump slides in
the lever deflection. Screw in fixing bolt again and
secure (1Nm). The attach (new) fixing nut onto
fixing bolt (6Nm), counter-holding the fixing bolt.
(Fig. 6)
Fitting Instructions Hand Lever Type AC S 2 / Issue: 01 / 2017 RVo_REV_1
AC Schnitzer - Neuenhofstraße 160 - D - 52078 Aachen - Tel. 0241/5688 -300 Fax -135 / www.ac-schnitzer.de
This manual suits for next models
9
Table of contents
Popular Motorcycle Accessories manuals by other brands

Titanium
Titanium TI-TCWH9 Owner's manual & safety instructions

hepco & becker
hepco & becker KTM 1190 Adventure quick start guide

R&G
R&G YTI0011 Fitting instructions

LSL
LSL 120H125 FITTING INSTRUCTION

hepco & becker
hepco & becker Sportrack 6709524 00 01 quick start guide

SUOMY
SUOMY SFERA Instructions for user

SW-Motech
SW-Motech SBL.22.995.10000/B Mounting instructions

Honeywell
Honeywell HW100 Important Instructions & Warnings

hepco & becker
hepco & becker 6307581 00 01 quick start guide

Kirby Morgan
Kirby Morgan 47 Operation and maintenance manual

hepco & becker
hepco & becker 502937 00 01 quick start guide

BMW
BMW MOTORRAD K 1200 LT owner's manual


