Acard ARS-2018 User manual

ARS-2018/2018E
SCSI to SATA Mirror Smart
User’s Manual
Copyright ©2006 ACARD Technology Corp.
Release: April 2006
Version: 1.0

Copyright and Trademarks
The information in this manual is subject to change without prior notice and does
not represent a commitment on the part of the vendor, who assumes no liability or
responsibility for any errors that may appear in this manual.
ACARD is the trademarks of ACARD Technology Corp. Microsoft and the Windows
Logo are the registered trademarks, and Windows is the trademark of Microsoft
Corporation. All brands and trademarks are the properties of their respective own-
ers.
This manual contains materials protected under International Copyright Conven-
tions. All rights reserved. No part of this manual may be reproduced in any form or
by any means, electronic or mechanical, including photocopying, without the writ-
tenpermissionofthemanufacturer and theauthor. All inquiriesshould be addressed
to ACARD Technology Corp.

Table of Contents
Chapter 1 Introduction....................................... 4
1.1 Overview ................................................................4
1.2 Features................................................................4
1.3 Specifications.......................................................4
1.4 Package ................................................................5
1.5 Quick Start............................................................5
1.6 HDD Compatibility................................................7
Chapter 2 Installation......................................... 8
2.1 Install HDD into ARS-2018................................. 10
2.2 Install HDD into ARS-2018E ..............................11
2.3 DIP Switch Setting ............................................. 13
2.3.1 ARS-2018 ....................................................................... 13
2.3.2 ARS-2018E..................................................................... 14
2.4 Connect ARS-2018 to PC.................................. 15
2.5 Connect ARS-2018E to PC ................................ 16
Chapter 3 The Control Panel........................... 19
3.1 LCD Panel ........................................................... 19
3.2 LCD Operation....................................................19
3.3 The LEDs ............................................................25
Chapter 4 Troubleshooting ............................. 26
Appendix 1 Migrate Existing HDD to Mirror .. 32
Appendix 2 Mirror Smart Utility ...................... 34
Appendix 3 About RAID................................... 50
Appendix 4 SCSI Adapter Compatibility........ 53
Technical Support Form................................... 54

4
ARS-2018/2018E Manual
1.2 Features
Chapter 1 Introduction
1.1 Overview
ARS-2018/2018E is an internal/external SCSI to SATA RAID subsystem using cost-
effective SATA hard drives to achieve SCSI efficiency. Both 2018 and 2018E adopt
ACARD’s ROC (RAID-On-Chip) technology, which is essential for drive mirroring,
data rebuilding and protection. The two types are all operated through LCD panel
and utility. They also support SATA hot swap, and make system setting more
convenient.
1.3 Specifications
nHost interface:
w Ultra 160 LVD SCSI features with data transfer rate up to 160MB/s
nSupports RAID 1, JBOD and Normal
nSupports SATA hard drives
nSupports real time rebuilding (up to 3.0GB per minute)
nSupports drive hot swap
nSupports multitasking
nSupports ROC SCSIDE engine
nMinimized CPU utilization
nLCD panel for setting and monitoring the status of system
nLED indicators for showing the status of hard drives
nWarning signal for system failure
nE-mail notification for system failure
nKey lock for data security
nOn-board Flash ROM for quick firmware update
nAutomatic fan speed adjustment to keep a stable environment
nSupports Windows 98/ME/2000/XP/Server 2003, Linux, Mac OS, Sun
Solaris, etc.

5
ARS-2018/2018E Manual
1.4 Package
nARS-2018/2018E ×1
nSupport CD ×1
nUser’s manual ×1
nPower cord (ARS-2018E only) ×1
nPack of screws ×2
nKey ×2
nExternal SCSI cable (ARS-2018E only) ×1
nTerminator (optional)
w SCSI daisy chain up to 15 sets
w Selectable SCSI ID from 0 to 15
nDrive interface: SATA
nRemote management: GUI utility software
nError notification: via built-in buzzer, LED or E-mail
nDimension:
w ARS-2018 : 215 (L) × 148 (W) × 85 (H) mm
w ARS-2018E : 280 (L) × 172 (W) × 152 (H) mm
nPower supply: 100V~240V, 50~60Hz auto-switching power supply
nTemperature:
w Operation : 5°C~40°C (not condensed)
w Non-operation : –5°C~50°C
nHumidity : 10%~75%
1.5 Quick Start
Install ARS-2018:
Step 1: Prepare 2 SATA hard drives of the same model.
Step 2: Unlock the 2 trays and take them out of ARS-2018.
Step 3: Put a hard drive into each tray and aim its end to the tray’s connector.
Fasten the hard drive with screws.
Step 4: Put the 2 trays back to ARS-2018 and lock them.
6
ARS-2018/2018E Manual
Install ARS-2018E:
Step 1: Prepare 2 SATA hard drives of the same model.
Step 2: Unlock the 2 trays and take them out of ARS-2018E.
Step 3: Put a hard drive into each tray and aim its end to the tray’s connector.
Fasten the hard drive with screws.
Step 4: Put the 2 trays back to ARS-2018E and lock them.
Step 5: Set a proper and unique SCSI ID for ARS-2018E (see page 2.3.2).
Step 6: Connect ARS-2018E to the SCSI card with an external SCSI cable. Be sure
to add a terminator to the end (see 2.5 ).
Step 7: Connect ARS-2018E with a power cord.
Step 8: Power on ARS-2018E first and then the PC.
Step 9: After powering on, the system will detect a hard drive named Mirror Smart
2018. Before using it, do HDD partition and format if necessary.
Step 5: Set a proper and unique SCSI ID for ARS-2018 (see 2.3.1).
Step 6: Fasten ARS-2018 to the interior of PC with screws.
Step 7: Connect ARS-2018 to the SCSI card with an internal SCSI cable. Be sure to
add a terminator to the end (see 2.4 ).
Step 8: Connect ARS-2018 with 2 power cords to let Mirror Smart work well.
Step 9: After powering on, the system will detect a hard drive named Mirror Smart
2018. Before using it, do HDD partition and format if necessary.
NOTICE:
(1) Be sure to unlock the tray before removing it.
(2) The provided trays are designed for ACARD ARS-2018/2018E/
2019. Do not use any substitutes without ACARD’s authorization.
ACARD will not maintain or provide any after service/warranty if
the problem is due to using a substitute.

7
ARS-2018/2018E Manual
1.6 HDD Compatibility
ARS-2018/2018E is particularly designed for SATA hard drives.Visit http://
www.acard.com to get the newest support list of hard drives. ARS-2018/2018E is
also compatible with various kinds of SCSI cards, and can operate well in Mac OS
and Linux.
If your hard drive is not approved by ACARD, contact us or local distributor for
assistance.

8
ARS-2018/2018E Manual
Chapter 2 Installation
Power
connectors
SCSI ID & function switch, see 2.3.1
Four buttons on the LCD
panel, see 3.1
LEDs on the front
panel, see 3.3
ARS-2018
Key locks
SE/LVD SCSI connector
The front
The back

9
ARS-2018/2018E Manual
ARS-2018E
The front
The back
SE/LVD SCSI connectors
Four buttons on the
LCD panel, see 3.1
LEDs on the front
panel, see 3.3
Key locks
SCSI ID switch, see 2.3.2
Function switch,
see 2.3.2
RS-232 (for test only)
Power switch
Power connector
10
ARS-2018/2018E Manual
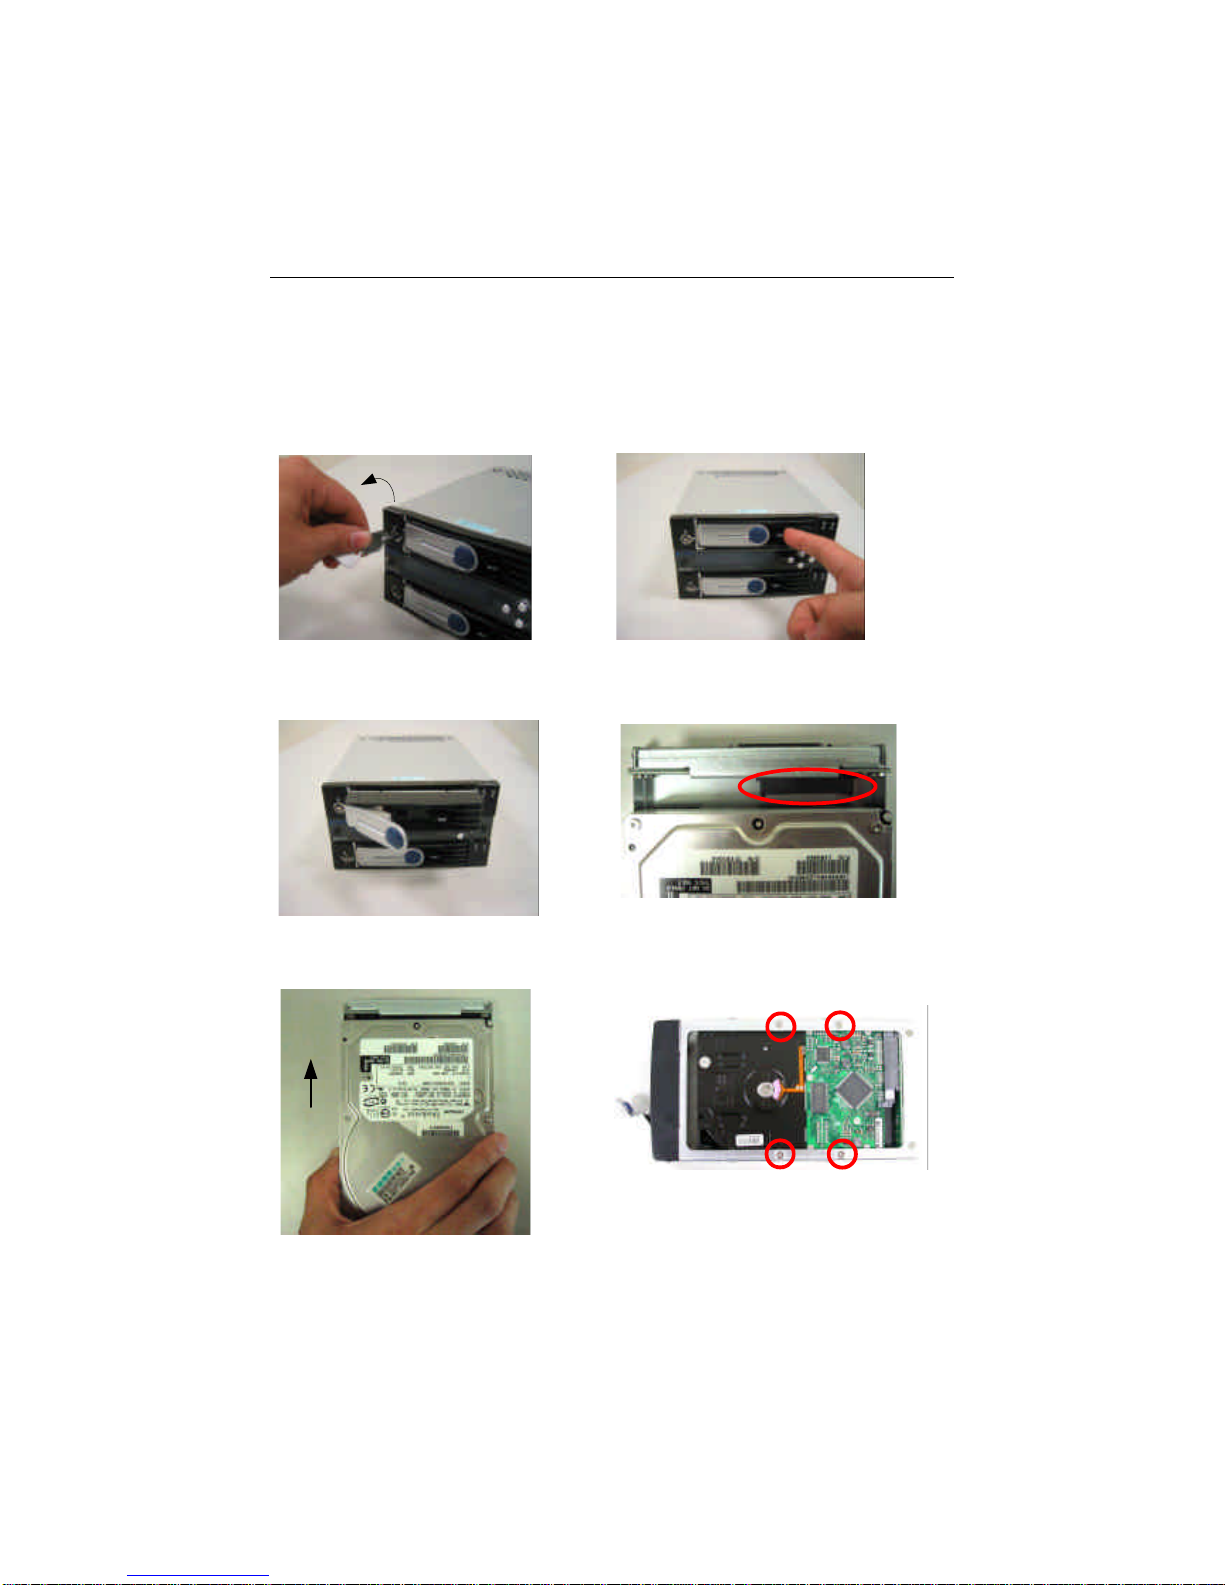
2.1 Install HDD into ARS-2018
Follow the steps below to install the hard drives into the trays of ARS-2018.
(1). Unlock. (2). Open the tray by pushing the fastener
to the left.
(3). Pull the handle to slide the (4). Put a hard drive into the tray, and aim
tray out. its end to the connector of the tray.
(5). Push the hard drive till it attaches (6). Turn the tray carefully and fasten with
the connector. 4 screws.
This manual suits for next models
1
Table of contents
Other Acard Storage manuals


