manuals.online logo
Brands
  1. Home
  2. •
  3. Brands
  4. •
  5. Access Dinghy Sailing
  6. •
  7. Boat
  8. •
  9. Access Dinghy Sailing 303 Single Seater Use and care manual

Access Dinghy Sailing 303 Single Seater Use and care manual

Access Dinghy Sailing Systems Pty Ltd
2/7 Bungaleen Court
Dandenong South Victoria 3175
Australia
Phone: 61 3 9768 3101
Fax: 61 3 9768 3103
Email: [email protected]
www.accessdinghy.org
USA Fax: 520 563 8203
Important Note:
Whilst Access Dinghies have inherent design features ensuring maximum
stability thereby reducing the chance of capsize, it should be remembered
that these are small sailing dinghies and under certain weather, water and
sailing conditions sensible precautions should be taken :
•Always reef the sails according to the weather conditions.
•Always have a manned safety boat in the sailing area.
•Always cancel sailing activities if inclement weather conditions dictate.
The safety of the sailors should come first under all circumstances.
303 Single Specifications
Length 3.03 metres
Beam 1.35 metres
Draft 1 metre
Boat Weight 71 kg
Centreboard Weight 35 kg
Sail Plan Main & Jib
Sail Area 5.8 sq. m
Mast 4.85 metre
Access Dinghies
OPERATIONS &
SAFETY MANUAL
Access 303 Single Seater
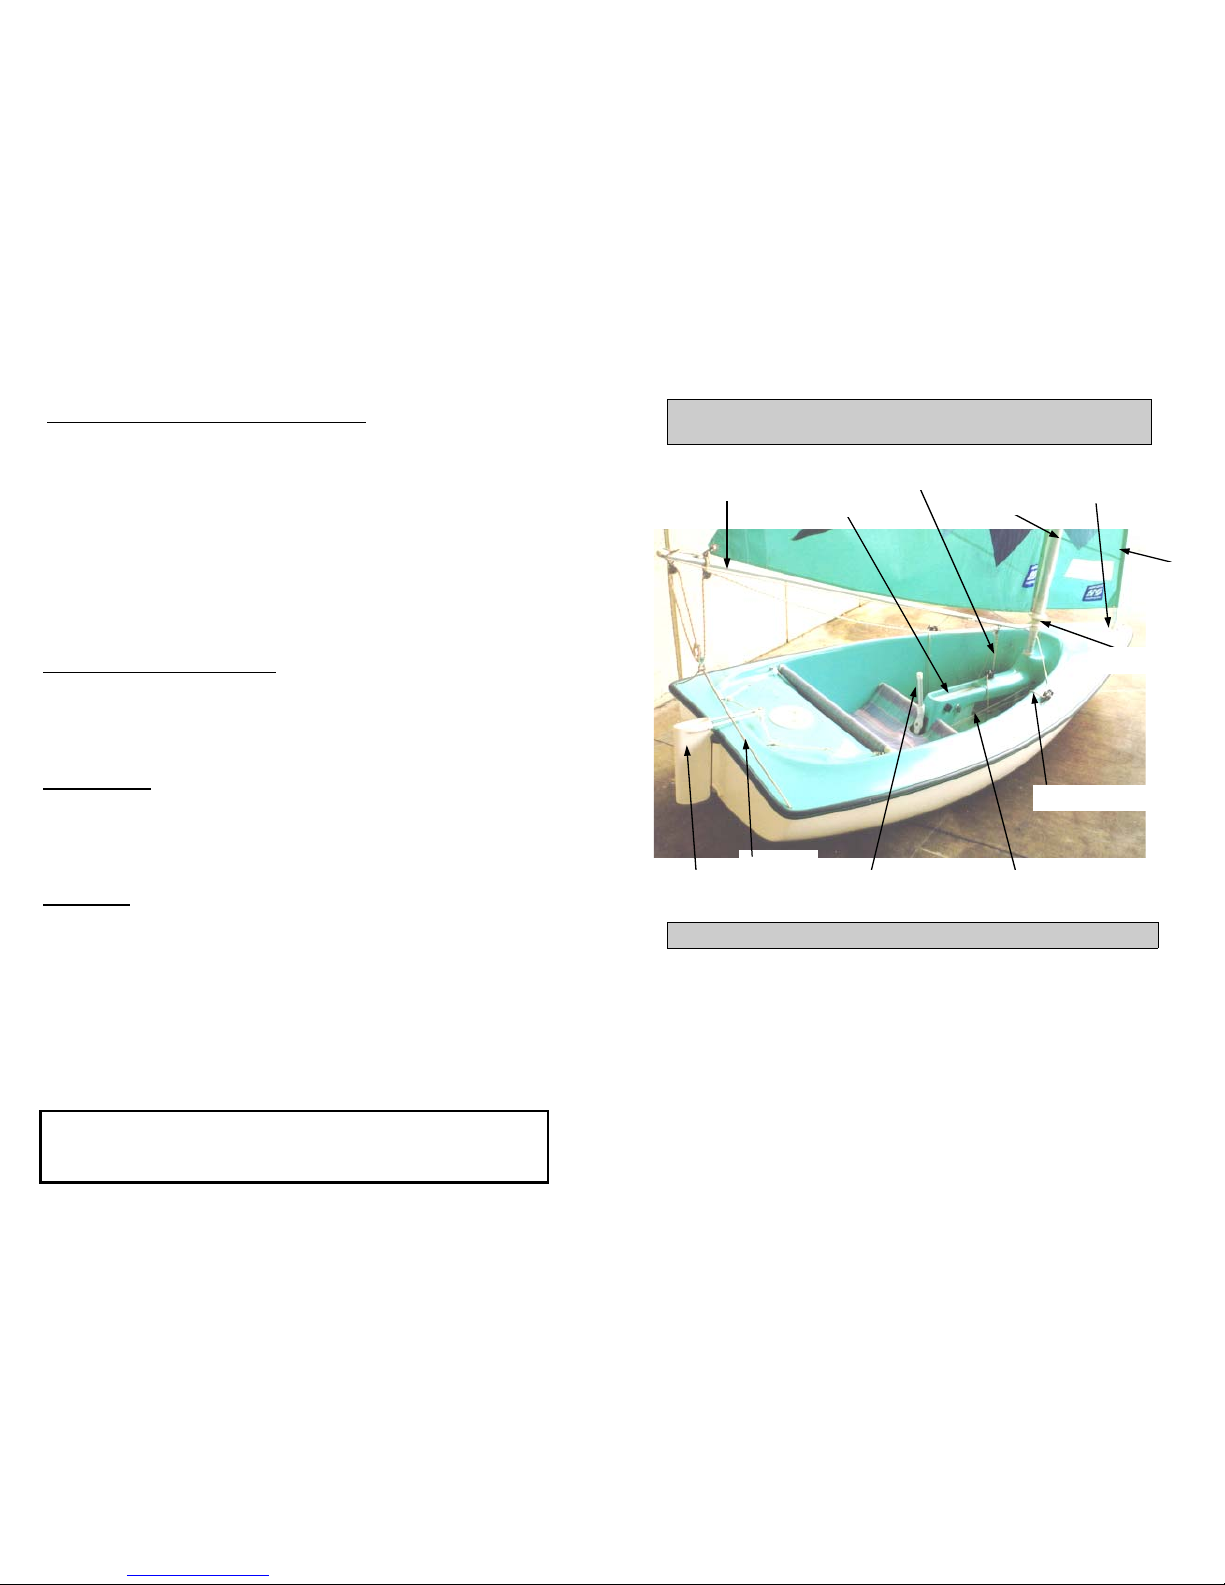
Items included with your Access 303S Sailing Dinghy.
1. Sailing Dinghy 11. Mainsail
2. Mast 12. Foresail (Jib)
3. Fors’l Mast 13. Bobbin
4. Boom 14. Mainsheet
5. Centreboard 15. Main Outhaul
6. Rudder Blade 16. Jib sheet
7. Rubber Box 17. Jib Claw
8. Rudder Box Pin 18. Jib Strut
9. Traveller 19. Jib Downhaul
10. Painter.. 20. Installed reefing system,
both masts.
General Safety Sailing Precautions
GENERAL
•Take into account the actual and forecast weather conditions.
•Personal Flotation Devices (PFD) must be worn by all persons when afloat.
•The sailing area should be clearly defined and known to all afloat. The safety
boat should be able to view the entire sailing area at all times.
•There should be a simple signal for all boats to return to shore, which is
known by all afloat.
•The safety of sailors and volunteers must be considered at all time. If
weather conditions alter, sails are to be reefed accordingly, or if necessary
activities cancelled should conditions prove unsafe.
SAFETY BOAT
•When Access Dinghies are sailed a safety boat should be on the water at all
times, with at least two crew on board. Generally a safety boat should pro-
vide cover for no more than eight dinghies, but prevailing conditions must be
taken into account.
•Safety boats should carry a first aid kit and should be equipped with radio
communication to the shore.
•In all planing powerboats, a kill cord should be fitted and used.
•All persons in the safety boat must wear an approved buoyancy aid.
•All safety boat personnel should be instructed on how to reef sails.
•If an Access Dinghy needs to be towed, it is safer and easier to tie the
dinghy close alongside and remove the rudder blade so that the dinghy
cannot be “steered” in the wrong direction.
Design Features of Access Dinghies
Access Dinghies are designed with a hull form and other features which
combine to give considerable stability. There needs to be a set of rules
which we must follow to continue our excellent safety record and prevent
any accidents. The stability of Access 2.3 and 303 Dinghies is reliant upon
the following factors.
•SEATING - Because the placement of sailor’s weight affects stability it is
important that people remain seated low in the boat. We therefore, have
to look at using quick release velcro straps to hold them in place, pro-
vided the keel is locked fully down.
•CENTREBOARDS - It is most important that the keel be fully down
when sailing. The hole 1/3 down the keel is there purely to facilitate
sailing off a beach, and under no circumstances should people with
disabilities be allowed to sail around with the keel held in this posi-
tion. There is provision to lock the keel fully down so as even in a
“knock down” it remains in place. It is imperative that the locking pin be
inserted whenever the boat is used. Invariably people sailing the electric
boat need to be strapped into it. Never strap someone into a boat
unless the centreboard locking pin is inserted through the c/b handle.
Locking the keel— Insert the long aluminium pin
through the c/b handle and into the drilled hole in the
console. Push the pin right in so that only the knot at
the end of the rope is visible.
•REEFING - Being a displacement type hull extra sail area in strong
winds does not mean more speed, all it does is bury the boat in the wa-
ter and make it more difficult to handle. In a breeze it is always better to
reef to suit the stronger gusts.
If an Access Dinghy needs to be towed, it is safer and easier to tie the din-
ghy close alongside and remove the rudder blade so that the dinghy cannot
be “steered” in the wrong direction.
A pontoon system which will take care of the off the beach keel handling
and transferring problems is available from Access Dinghies.
People with disabilities need the keel down and because many are unable
to raise and lower the keel to improve sailing performance and also unable
to adjust the size of the sail by reefing it is discriminatory to allow abler bods
to make these adjustments during a race.
REEFING THE MAINSAIL: shortening sail area
1. Pull on the port reefing line to reduce sail area
2. Pull the Starboard line to increase sail area.
3. Never pull on both at once.
4. Use the white “clamcleats” on the left (port) side of the console to cleat the
reefing line or the sail will unroll.
5. You can put one complete turn of sail around the mast without adjusting the
outhaul.
6. To reef further the outhaul needs to be released to allow the sail to travel for-
ward along the boom.
7. Conversely, when unreefing, you need to pull on the outhaul.
8. Always recleat the outhaul after adjusting.
9. The idea is not to flatten the sail along the boom as it should have enough
slack to form a gentle curve.
REEFING AND FURLING THE JIB.
1. Uncleat the jib sheet and downhaul before attempting to reef.
2. Use the port reefing line to reef, the starboard to unreef.
3. Remember to cleat the reefing line (use the “clamcleat on the console port
side) or the sail will unroll.
4. Adjust the downhaul to suit.
THE STEERING
1. Make sure the steering lines pass under the joystick correctly.
2. Fit the rudders making sure the rope traveller is above the tillers.
3. Remove the spring clips and pass the clevis pins up through the holes at the
end of the tillers. Re-insert the clips.
4. Fit the alloy joystick extension.
LAUNCHING
1. Pass the bow line (called a painter) through the guide ring at the bow and fas-
ten it to one of the fittings at the end of the traveller using a bowline (a knot
which is always easy to untie)
2. Use the short alloy tube to pin the centreboard up when moving the boat
around onshore.
3. Pin the centreboard in the half way position if you need to move the boat
around in shallow water.
4. DO NOT ALLOW ANYONE TO SAIL WITHOUT THE CENTREBOARD
FULLY DOWN OR THEY MAY CAPSIZE.
5. Use the long alloy pin to lock the centreboard down.
6. NEVER USE SEAT BELTS OR HARNESSES UNLESS THE CENTRE-
Maximum Weight for Access 303 Single
Sailor = 120KG / 264Lbs
Luggage = 20Kg / 44Lbs
General info on Personal Floatation Devices
There are many types and variety of buoyancy aids available, manufactured to different
sets of standards. The PFD is a personal item of safety equipment, designed specifically
to assist in preserving a person’s life when in the water.
Some PFD’s provides buoyancy to help you float with your head above the water. All sail-
ors and volunteers should wear a PFD at all times whilst on, or near water. PFD’s are
subject to normal wear and tear. Each one should be checked regularly and if in doubt
about its serviceability it should be replaced. If they become wet from salt water they
should be hosed down with fresh water and allowed to dry.
PFDs and Children
A properly designed PFD of the correct size will keep a child’s mouth and nose clear of the
water. A child should be taught how to put on a device and should be allowed to try it out
in the water. It is important that the child feels comfortable and knows what the PFD is for
and how it functions.
Parts of an Access 303 Dinghy
Traveller
Foremast
Reefing Drum
Mast
Foremast
Bobbin
Headsail Sheets
Reefing LineJoystickRudder
Mainsheet
Boom
Centreboard
How to Rig an Access 303 Single
¾SPECIAL FEATURES
•The 303S has 2 rudders which give directional control at extreme angles of
heel.
•It has the option of fitting a boom with a 3 part manual mainsheet, rigged as
per the 303W, or a 2 part double ended mainsheet, one end going to a servo
assist sheet winch and the other through a conventional swivel/deadeye/
camcleat for manual operation. Both these pass through a double block at-
tached to the boom about 300mm back from the mast.
•The main outhaul cleats at a camcleat on the console and passes through a
block under the plastic rowlock close to the mast.
•The jib is self tacking with a diagonal strut between the clew and a claw at
the mast which prevents twisting as the sheet is eased.
•The jib sheet is 2 part which gives the option of one end going to a servo as-
sist winch and the other down to a camcleat on the console for manual op-
eration.
•The following description is for the 2 part mainsheet with servo assist
mainsheet winch fitted.
¾STEPPING THE MAIN MAST & FITTING THE BOOM
With the sail rolled and tied up, carefully step the mainmast making sure the
foot is firmly in the step.
1. Take the boom, free its outhaul and sheet and push the rowlock at the front
end of the boom onto the bobbin.
2. Pull the outhaul shackle as far forward as it will go, untie the sail, unroll 5 or
6 turns and shackle on the outhaul, then pull the sail out tight with the out-
haul.
3. Run the outhaul through the block on the console at the base of the mast,
then through the camcleat on the port side of the console,and cleat it.
4. Rotate the mast to fully unroll the sail, haul in on the outhaul and cleat it, pull
the starboard reefing line till its knot is as far as it will go on the port side,
then tighten the reefing drum clamp.
5. Unravel the mainsheet which comes up through the console from the sheet
winch then:
a) pass its end through the right side of the double block on the boom,
b) then through the plastic guide ring half way along the boom,
c) then through the first of the blocks towards the end of the boom,
d) then down and through the block on the traveller,
e) then back up and through the block at the end of the boom,
f) then again through the plastic guide ring, and then through the right
side of the double block,
g) and then down through the fairlead and cam cleat on the centre of
the console.
h) Tie a stopper knot in its end. If there was not enough rope for this
operation set up the servo assist electrics and feed out sufficient
rope.
¾STEPPING THE FOREMAST.
1. Unroll the sail, fit the claw and strut (fig 1), then and attach the strut to the
claw with the plastic hook as per fig 2.
2. At the bow, pull the port side jib reefing line till its knot is at its stop hard up on
the port side.
3. Unhook the jib reefing line tension shock cord hook and set up the reefing line
in a loop to complete a full turn around the foremast reefing drum.
4. Step the mast, fit the reefing line and re-tension the shockcord.
5. Shackle on the jib sheet block, and pass the downhaul around the port side of
the mast and attach it to the lug on the front of the claw.
6. Pull in on the downhaul (located on the left side of the console) and cleat it on
the black clamcleat.
7. Check the manual operation of the jib sheet located at the cam cleat on the
right side of the console.
Fig. 1
Fig. 2

Other manuals for 303 Single Seater

1

Other Access Dinghy Sailing Boat manuals

Access Dinghy Sailing 303 Single Seater User manual

Access Dinghy Sailing

Access Dinghy Sailing 303 Single Seater User manual

Popular Boat manuals by other brands

Pelican Sentinel 100XR manual

Pelican

Pelican Sentinel 100XR manual

Hobie Getaway Assembly manual

Hobie

Hobie Getaway Assembly manual

Sea Eagle HB96 Instruction & owner's manual

Sea Eagle

Sea Eagle HB96 Instruction & owner's manual

Monterey Sport Cruiser 260SCR owner's manual

Monterey

Monterey Sport Cruiser 260SCR owner's manual

Highfield Reef Series owner's manual

Highfield

Highfield Reef Series owner's manual

Sea Dragon ALUBAT CIGALE 16 Operation guide

Sea Dragon

Sea Dragon ALUBAT CIGALE 16 Operation guide

Scout Boats 145 owner's manual

Scout Boats

Scout Boats 145 owner's manual

Topper TOPAZ TRES owner's manual

Topper

Topper TOPAZ TRES owner's manual

Speed Sails Merlin Rocket Guide

Speed Sails

Speed Sails Merlin Rocket Guide

Yamaha 190 FSH Sport 2017 Owner's/operator's manual

Yamaha

Yamaha 190 FSH Sport 2017 Owner's/operator's manual

Anderson Model Pro 600 Assembly instructions

Anderson Model

Anderson Model Pro 600 Assembly instructions

CORRECT CRAFT ski nautique 200og owner's manual

CORRECT CRAFT

CORRECT CRAFT ski nautique 200og owner's manual

On Point Products Inflatable Sport Boats Yacht Dock owner's manual

On Point Products

On Point Products Inflatable Sport Boats Yacht Dock owner's manual

Carver 56 Voyager SE owner's guide

Carver

Carver 56 Voyager SE owner's guide

Sea Sport 2200 Series owner's manual

Sea Sport

Sea Sport 2200 Series owner's manual

RedShark Bikes ADVENTURE Assembly instructions

RedShark Bikes

RedShark Bikes ADVENTURE Assembly instructions

Sea-doo 2001 GTI 5552 Operator's guide

Sea-doo

Sea-doo 2001 GTI 5552 Operator's guide

Sea-doo XP 5859 Shop Manual

Sea-doo

Sea-doo XP 5859 Shop Manual

manuals.online logo
manuals.online logoBrands
  • About & Mission
  • Contact us
  • Privacy Policy
  • Terms and Conditions

Copyright 2025 Manuals.Online. All Rights Reserved.