Plastimo 66111 User manual

OWNER’S MANUAL ref. 66111
Dear customer,
Congratulations on your purchase of a Plastimo inflatable product. We take pride in bringing you a quality product which will
offer you years of pleasure. Your new item is an investment which deserves your care and attention. This manual has been
compiled to help you to operate your product with safety and pleasure. It contains details of the product, its equipment, and
information on its operation and maintenance. Read it carefully and familiarize yourself with the inflatable before using it in
order to ensure the safe use and prevent tragic accidents.
The warnings below are advisories relative to various types of situations. Please observe them.
CAUTION ! Denotes an imminent hazard which will result in severe injury if you do not comply with the instructions
WARNING ! Reminds you of safety measures which must be observed. Denotes also unsafe practices which could result in
injury or product or property damage if you do not comply with the instructions.
CAUTION !
It is the owner’s responsibility to make sure that all users will carefully read and follow the manual and instructions
for the safe operation of this product. Observe all local and national laws. Always wear a lifejacket. Please observe
carefully the information on the capacity plate which is printed on the item.
Your canoe/kayak fulfils the requirements of EN ISO 6185-1 standard, TYPE III.

TECHNICAL SPECIFICATIONS
Model
Length inflated
approx.
Width inflated
approx.
Weight
kg
Persons
capacity
Max load capacity
66111
240
88
7
1
115 kg
SRE240 EQUIPEMENT
`
ASSEMBLY INSTRUCTIONS / INFLATION
CAUTION !
Do not use a sharp tool !
For the first inflation and in order to get acquainted with your new product, inflate indoors at room temperature where the PVC
will be soft and assembly process made easier.
Any use of an air compressor will damage your product and automatically void all warranties.
If it was stored at a temperature below 0°C / 32°F, leave it at 20°C / 68°F for 12 hours before unfolding. Inflate it with an inflator
from any inflator designed for inflatable boats, rafts, pool floats, air beds, camping mattresses, and other low pressure
inflatables. These types of inflators will have a hose and adapters to fit the valves on this product.
Choose a smooth and clean surface to unfold your product.
1)Before you begin inflation, attach the footrest to the nylon cover by sliding the black PVC pipe through the three
fittings at the front and at the same time through the 2 soft EVA pads, which should be positioned between the fittings.
Lock the footrest from both sides by the ropes through the hole at each end of the pipe.
2
)
Attach the fin on the underside by folding the hull. Insert the extremities of the fin in the loops and stretch the hull as
much as possible to hold it in position. Once the kayak is inflated, this operation becomes impossible. The curvature of
the fin must be oriented towards the back end of the kayak.
3)Your product is equipped with one type of valve:
(Jumob) Push-in valve(s): Open the Velcro flap/cover, pull the valve out slightly and remove the plug from the valve;
inflate the chamber by using the adapter of the inflator which fits the valve. Close the valve and press it into the air
chamber. Close the Velcro flap/cover.
4)Inflate the product in the order of inflation as shown on the capacity plate printed on the product.
Handles
Bow window
Side chamber with
Push-in valve
Handles
Footrests
Bungee cords
Floor chamber with
Push-in valve
Removable
seats
Side chamber with
Push-in valve
Handles
Paddle holders

5)Max. air pressure: The correct pressure for this item is: 0,1 bar (= 100 mBar). Do not exceed it. Add air until
the product is free of wrinkles and feels firm to the touch. Please check the pressure with the supplied pressure
gauge. Overpressure: deflate until you reach the recommended pressure. Drop of pressure: inflate again slightly.
WARNING !
If you leave your product exposed to the hot sun check the pressure and deflate it slightly, otherwise the material
might be overstretched.
The ambient temperature affects the tube’s internal pressure: a variation of 1°C causes a variation of the pressure in the tube
of +/- 4 mBar.
OPERATING INSTRUCTIONS
WARNING !
BEWARE OF OFFSHORE WINDS AND CURRENTS!
Get informed on local regulations and hazards related to this sport or water activities.
Learn about your canoeing area. Ask locals about tides and currents.
Before using the product, please check it carefully.
Be careful that you do not over estimate your strength, your endurance or your skill.
Be careful never to under estimate the forces of nature.
Do not exceed the authorized number of persons or weight.
Avoid all contact between the buoyancy tubes and sharp objects or aggressive liquids (such as acid).
This product is delivered with a carry bag. Keep it away from children. Danger of suffocation!
MAINTENANCE: DEFLATING – FOLDING THE ITEM – CLEANING – WINTERING STORAGE
1. Remove oars/paddles and other accessories.
2. To deflate, unscrew the valves’ insert and open the valve cap of the push-in valve.
3. Clean and check the item as well as all the accessories after each use. Rinse it thoroughly making sure to remove any
residues of salt if used in saltwater. Use a mild soapy solution, do not use detergents or any type of siliconebased products.
Make sure the product is completely dry before putting it away.
4. Fold the 2 sides into the middle, then roll it up from the opposite end of the valves (so remaining air can escape from the
valves); start again if you feel there is still some air in the tubes.
5. When storing your inflatable, keep it in a clean and dry place that is not affected from major variations in temperature and
other damaging factors. You may store it deflated and rolled up in a bag or assembled and lightly inflated (make sure you do
not subject it to deformations). Store it away from rodents.
HOW TO REPAIR SMALL PUNCTURES
You can repair small punctures with the included repair kit. Please note that in order for the repair to be successful, the
humidity level should be less than 60%, temperature between 65° F/77° F or 18°C/25° C. Avoid carrying out repairs in the rain
or in direct sunlight.
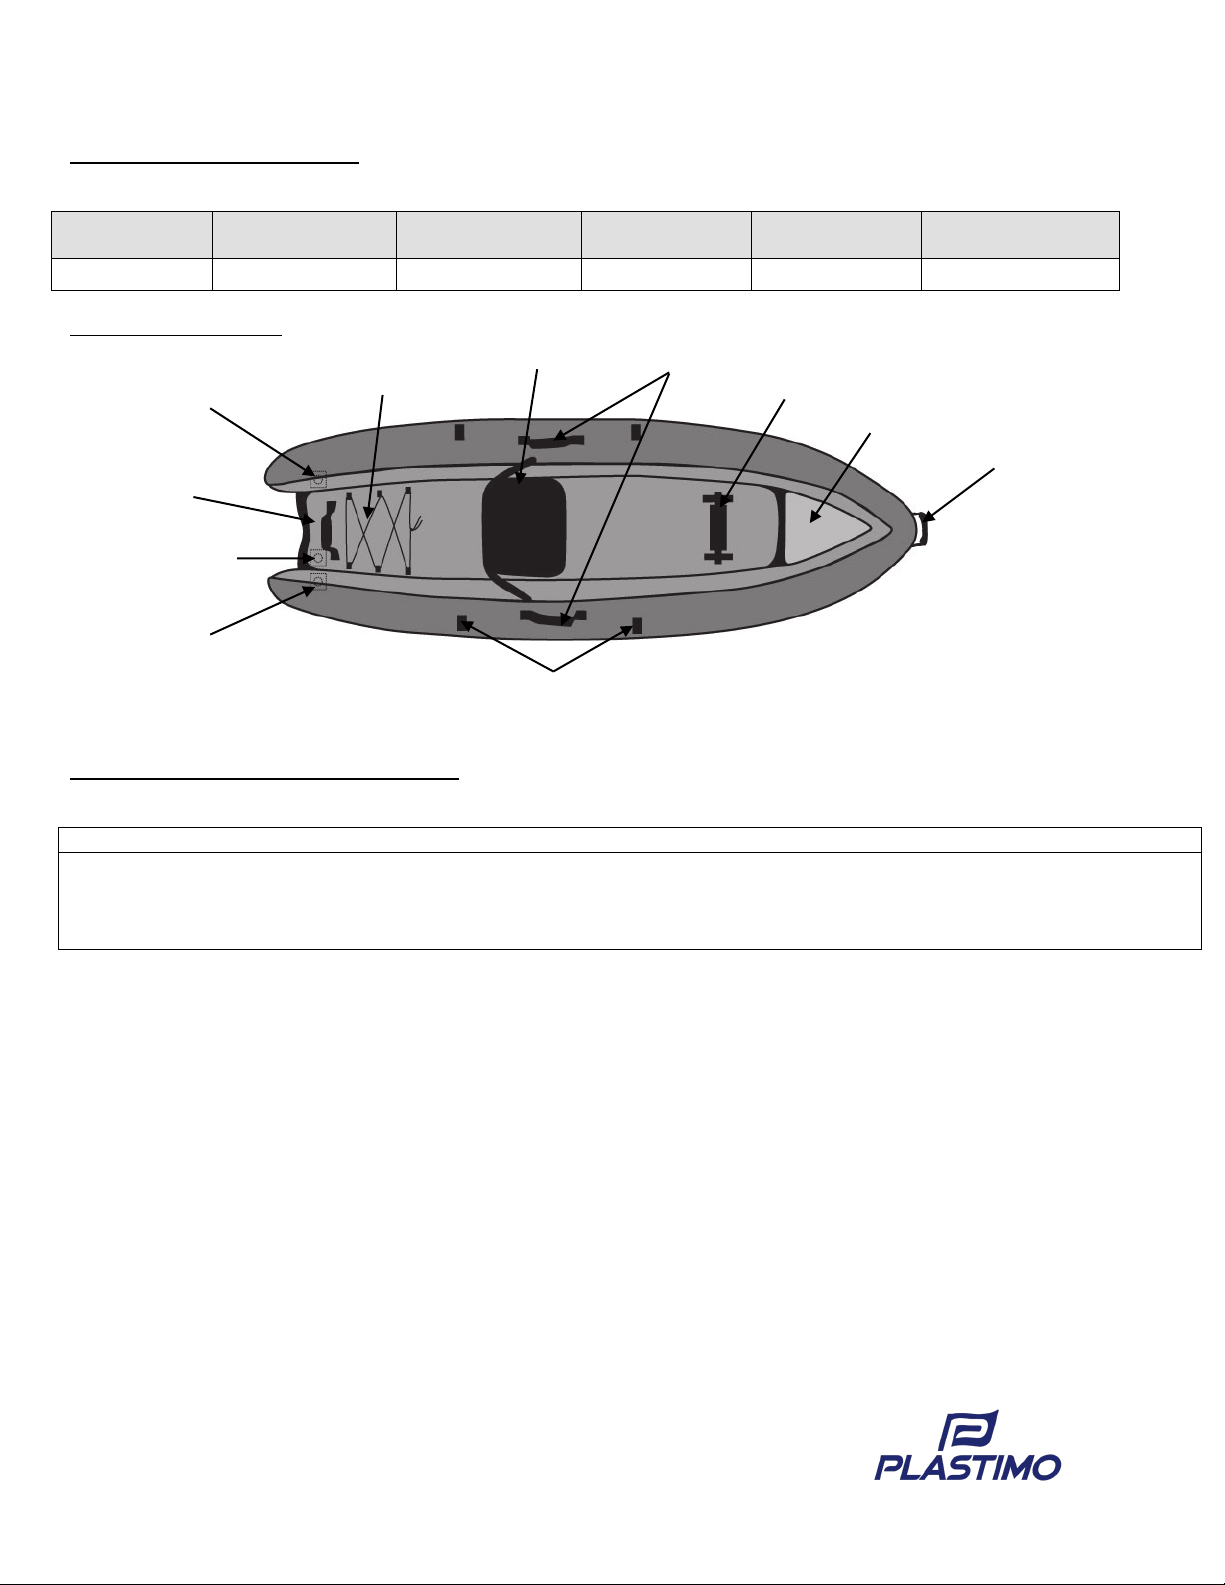
To remove the inside bladder(s) please open the zippers on the inside of the canoe/kayak cover; each air chamber features a
zipper at the bow and a zipper at the stern of the canoe/kayak for quick and easy access. Check that the tube is fully deflated
and lies flat.
1. Draw the shape of the patch exactly where it will be applied, cut a round patch at least 2” / 5 cm larger than the
cut/damaged area.
2. Clean the damaged area and the corresponding side of the patch with a grease remover of the alcohol type and allow for it
to dry for 5 minutes.

3. Apply 3 thin layers of glue on both the patch and the damaged area, allow for it to dry for 5 minutes between layers until the
glue feels tacky.
4. When the third layer of glue is dry, apply the patch without pressing and adjust the positioning if required, press the air
bubbles which may have formed under the patch by smoothing the patch with a round object such as a spoon, do this
procedure by starting in the center of the patch towards the outside, clean the excess glue with a solvent. Drying: 12 hours.
AVERTISSEMENT !
Perform all of your repairs in a well-ventilated area
Avoid i
nhaling glue vapors or swallowing.
Avoid contact with the skin or the eyes
Keep all repair materials (glue, solvents, etc.) away from children’s
reach
N.B. the repairs on the weldings must not be glued. Only the manufacturer of the Canoe/Kayak can perform the repairs on the
weldings.
WARRANTY
Plastimo warrants (legal warranty) to the original purchaser only, and from date of purchase, when any product is used for
normal recreational purposes, that the product is free from defects (weldings). The warranty does not cover any puncture, cut
or abrasion sustained in normal use or damage from unreasonable uses or improper storage. If any product is found to be
defective, the owner may return it to the store it was purchased from with the original sales receipt.
After inspection of any product found defective, Plastimo shall either repair or replace the defective part or item as deemed
necessary by Plastimo. Plastimo shall not be held liable for incidental and consequential damages. There are no warranties
which extend beyond the description of the face hereof. This warranty is inclusive in lieu of all other warranties.
This warranty gives you specific legal rights and you may also have other rights, which may vary, from country to country.
The main limitations to the application of the warranty are the following:
The product must not be modified and/or fitted with a motor in excess of that allowable by the manufacturer or used in
any activities outside normal recreational use (such as races, rental, professional usage).
Use in excess of the manufacturers recommended maximum load capacity.
Pressure recommendations, assembly / disassembly and handling procedures must be strictly observed.
The maintenance and the storage procedures must not be neglected.
This warranty does not cover parts and accessories not supplied or recommended by the manufacturer or defects
resulting from the installation of such equipment on their products.
NOTICE : all repairs covered by warranty must be performed by Plastimo.
WARNING !
Your product is designed in accordance with the standards for a specific use. Any modifications, transformations or
use of a motor horse power higher than indicated by the manufacturer could result in serious risks for the user and
will void the warranty.
Table of contents
Other Plastimo Boat manuals
Popular Boat manuals by other brands

intrepid
intrepid 350 WALKAROUND owner's manual

Yamaha
Yamaha 2009 Wave Runner VX Deluxe Operator's manual

Maverick
Maverick 17 HPX-V 2014 owner's manual

Kayak Innovations
Kayak Innovations NATSEQ Packer quick start guide

Yamaha
Yamaha 210FSH SPORT 2020 Operator's manual

Maxxon
Maxxon Express II Kayak 2011 owner's manual