ACCO Brands NOBO X20M User manual

User Manual
X20M DLP Projector
User Manual
ACCO Europe
www.accoeurope.com
Made in Taiwan

2

3
TABLE OF CONTENTS
Usage Notice
•Precautions . . . . . . . . . . . . . . . . . . . . . . . . . . . . . . . . . . . . . . . . . . . . . . . . . . . . . . . . . . . . . . . . . . . . . . . . . . . . . . . . . 4
Introduction
•Product Features. . . . . . . . . . . . . . . . . . . . . . . . . . . . . . . . . . . . . . . . . . . . . . . . . . . . . . . . . . . . . . . . . . . . . . . . . . . 5
•Package Overview . . . . . . . . . . . . . . . . . . . . . . . . . . . . . . . . . . . . . . . . . . . . . . . . . . . . . . . . . . . . . . . . . . . . . . . . . 6
•Product Overview. . . . . . . . . . . . . . . . . . . . . . . . . . . . . . . . . . . . . . . . . . . . . . . . . . . . . . . . . . . . . . . . . . . . . . . . . . 7
•Main Unit . . . . . . . . . . . . . . . . . . . . . . . . . . . . . . . . . . . . . . . . . . . . . . . . . . . . . . . . . . . . . . . . . . . . . . . . . . . . . . . . 7
•Panel Control. . . . . . . . . . . . . . . . . . . . . . . . . . . . . . . . . . . . . . . . . . . . . . . . . . . . . . . . . . . . . . . . . . . . . . . . . . . . 8
•Connection Ports. . . . . . . . . . . . . . . . . . . . . . . . . . . . . . . . . . . . . . . . . . . . . . . . . . . . . . . . . . . . . . . . . . . . . . . . 8
•Remote Control with Mouse Function and Laser Pointer . . . . . . . . . . . . . . . . . . . . . . . . . 9
•Laser Pointer Caution . . . . . . . . . . . . . . . . . . . . . . . . . . . . . . . . . . . . . . . . . . . . . . . . . . . . . . . . . . . . . . . . . . 9
Installation
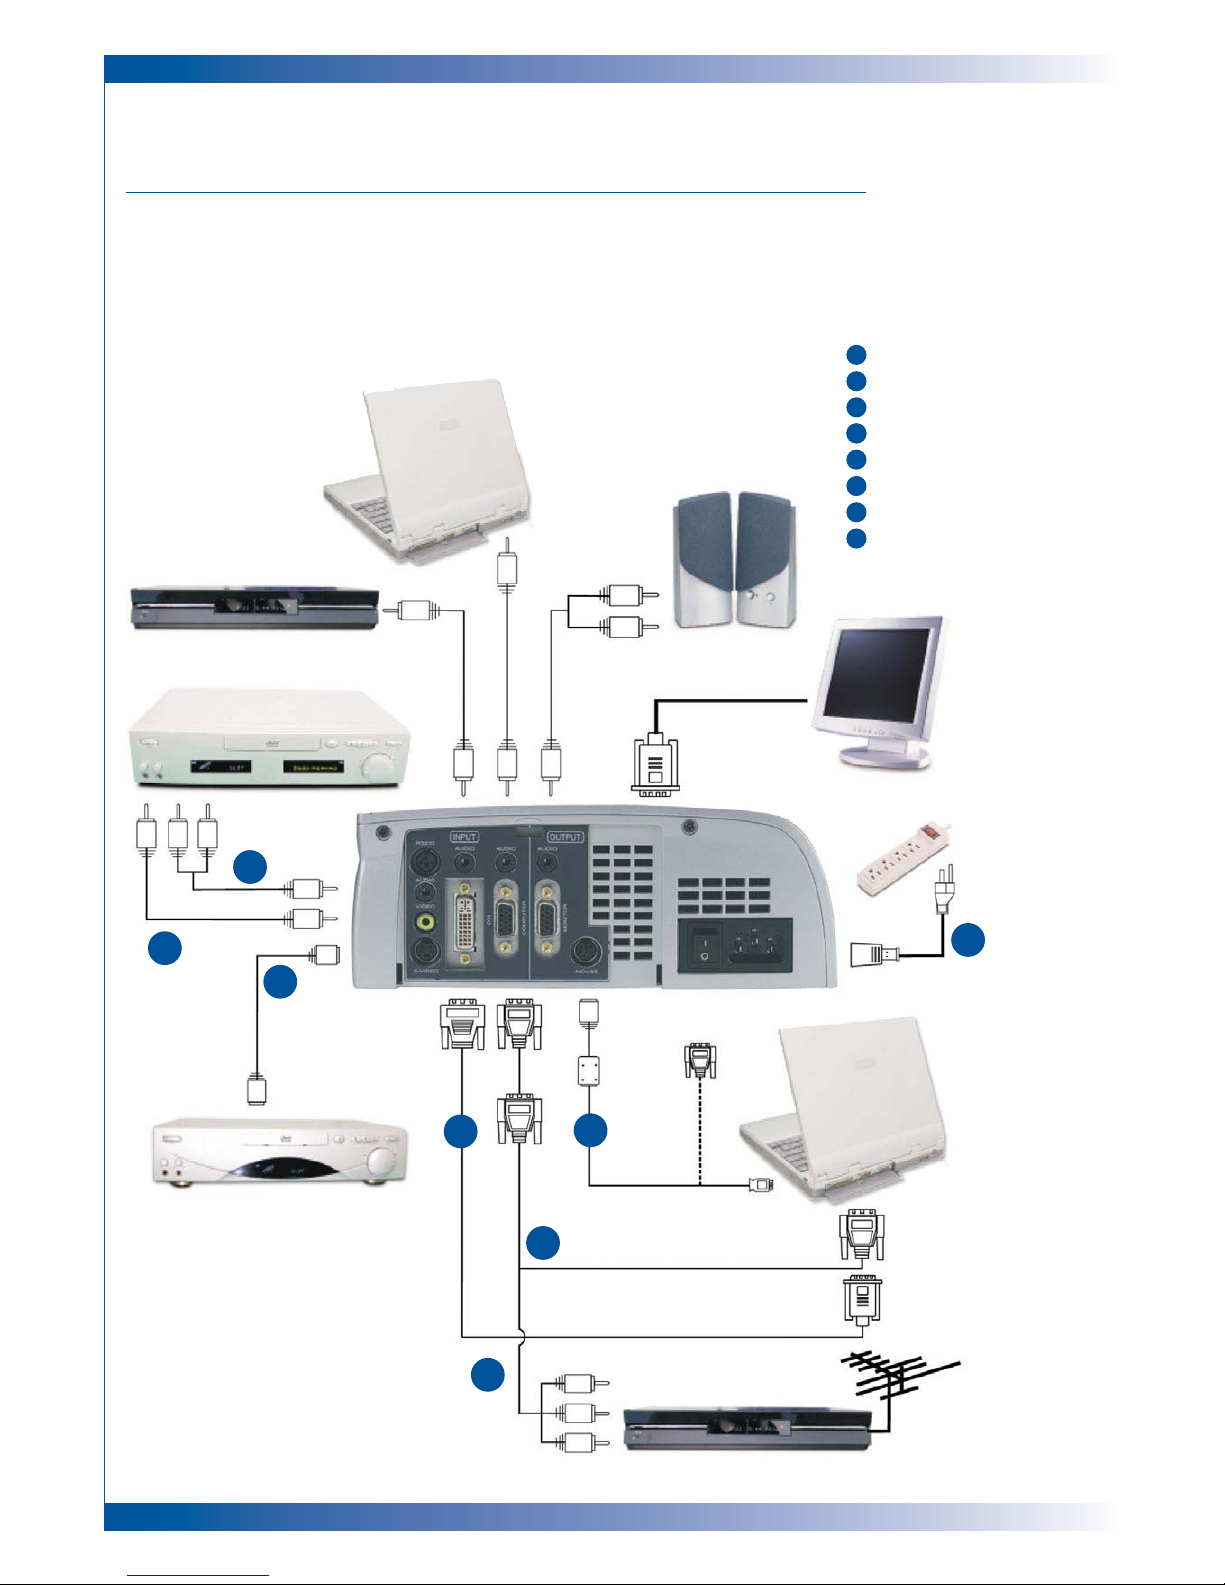
•Connecting the Projector . . . . . . . . . . . . . . . . . . . . . . . . . . . . . . . . . . . . . . . . . . . . . . . . . . . . . . . . . . . . . . . 10
•Powering On/Off the Projector. . . . . . . . . . . . . . . . . . . . . . . . . . . . . . . . . . . . . . . . . . . . . . . . . . . . . . . . . 11
•Power On the Projector . . . . . . . . . . . . . . . . . . . . . . . . . . . . . . . . . . . . . . . . . . . . . . . . . . . . . . . . . . . . . . 11
•Power Off the Projector . . . . . . . . . . . . . . . . . . . . . . . . . . . . . . . . . . . . . . . . . . . . . . . . . . . . . . . . . . . . . . 12
•Adjusting the Projected Image . . . . . . . . . . . . . . . . . . . . . . . . . . . . . . . . . . . . . . . . . . . . . . . . . . . . . . . . . 13
•Adjusting the Projector Height. . . . . . . . . . . . . . . . . . . . . . . . . . . . . . . . . . . . . . . . . . . . . . . . . . . . . . 13
•Adjusting the Projector Zoom/Focus. . . . . . . . . . . . . . . . . . . . . . . . . . . . . . . . . . . . . . . . . . . . . . . . 14
•Adjusting Projection Image Size . . . . . . . . . . . . . . . . . . . . . . . . . . . . . . . . . . . . . . . . . . . . . . . . . . . . 14
User Controls
•Panel Control and Remote Control . . . . . . . . . . . . . . . . . . . . . . . . . . . . . . . . . . . . . . . . . . . . . . . . . . . 15
•On-Screen Display Menus . . . . . . . . . . . . . . . . . . . . . . . . . . . . . . . . . . . . . . . . . . . . . . . . . . . . . . . . . . . . . . . 16
•How to Operate . . . . . . . . . . . . . . . . . . . . . . . . . . . . . . . . . . . . . . . . . . . . . . . . . . . . . . . . . . . . . . . . . . . . . . . 17
•Image-I (Computer Mode) . . . . . . . . . . . . . . . . . . . . . . . . . . . . . . . . . . . . . . . . . . . . . . . . . . . . . . . . . . . 18
•Image-I (Video Mode) . . . . . . . . . . . . . . . . . . . . . . . . . . . . . . . . . . . . . . . . . . . . . . . . . . . . . . . . . . . . . . . . 19
•Image-II (Computer Mode). . . . . . . . . . . . . . . . . . . . . . . . . . . . . . . . . . . . . . . . . . . . . . . . . . . . . . . . . . . 20
•Image-II (Video Mode). . . . . . . . . . . . . . . . . . . . . . . . . . . . . . . . . . . . . . . . . . . . . . . . . . . . . . . . . . . . . . . . 21
•Audio . . . . . . . . . . . . . . . . . . . . . . . . . . . . . . . . . . . . . . . . . . . . . . . . . . . . . . . . . . . . . . . . . . . . . . . . . . . . . . . . . . . 22
•Language. . . . . . . . . . . . . . . . . . . . . . . . . . . . . . . . . . . . . . . . . . . . . . . . . . . . . . . . . . . . . . . . . . . . . . . . . . . . . . . 22
•Management. . . . . . . . . . . . . . . . . . . . . . . . . . . . . . . . . . . . . . . . . . . . . . . . . . . . . . . . . . . . . . . . . . . . . . . . . . . 22
Appendices
•Troubleshooting . . . . . . . . . . . . . . . . . . . . . . . . . . . . . . . . . . . . . . . . . . . . . . . . . . . . . . . . . . . . . . . . . . . . . . . . . . 24
•Changing the Lamp . . . . . . . . . . . . . . . . . . . . . . . . . . . . . . . . . . . . . . . . . . . . . . . . . . . . . . . . . . . . . . . . . . . . . . 26
•Specifications . . . . . . . . . . . . . . . . . . . . . . . . . . . . . . . . . . . . . . . . . . . . . . . . . . . . . . . . . . . . . . . . . . . . . . . . . . . . . 27
•Compatibility Modes. . . . . . . . . . . . . . . . . . . . . . . . . . . . . . . . . . . . . . . . . . . . . . . . . . . . . . . . . . . . . . . . . . . . . 28
FCC Notice
This equipment has been tested and found to comply with the limits for a Class B
digital device, pursuant to Part 15 of FCC Rules. These Limits are designed to provide
reasonable protection against harmful interference in a residential installation.
Trademarks
Trademark are the rights of their respective owners.

4
USAGE NOTICE
PRECAUTIONS
Follow all warnings, precautions and maintenance as recommended in this
User’s Guide to maximise the life of your unit.
DO
■Turn off the product before cleaning
■Use a soft cloth moistened with mild detergent to clean the display housing
■Disconnect the power plug from AC outlet if the product is not being used
for a long period of time
DON’T
■Block the slots and opening on the unit provided for ventilation
■Use abrasive cleaners, waxes or solvents to clean the unit
■Use under the following conditions:
■Extremely hot, cold or humid conditions
■In areas susceptible to excessive dust and dirt
■Near any appliance generating a strong magnetic field
■Place in direct sunlight
Do not look into the lens. The bright light may hurt your eyes.
To reduce the risk of fire or electric shock, do not expose the product to rain or moisture.
Please do not open or disassemble the product as this may cause electric shock.
When changing the lamp, please allow unit to cool down, and follow all changing instructions.
This product will detect the life of the lamp itself. Please be sure to change the lamp when it
shows the warning messages.
After changing a new lamp. please reset the lamp life from OSD menu.
Before switching off the product, please keep the cooling fan running for a few minutes.
When connecting the projector to computer, please turn on the projector first.
To reduce the risk of injury to the eyes, do not look directly into the laser light on the
remote control and do not point the laser light into anyone’s eyes. This remote control is
equipped with a Class II laser that emits radiation.
When the lamp reaches the end of its life, it will burn out and may make a loud popping
sound. If this happens, the projector will not turn back on until the lamp module has been
replaced. To replace the lamp, follow the procedures listed under Changing the lamp on
page 26.
WARNING
WARNING
WARNING
WARNING
WARNING
WARNING
WARNING
WARNING
WARNING
WARNING
Ì
Ì
Ì
Ì
Ì
Ì
Ì
Ì
Ì
Ì
!
!
!
!
!
!
!
!
!
!

5
INTRODUCTION
PRODUCT FEATURES
This product is an XGA single chip 0.7” DLP™ projector.
It’s outstanding features are:
■True XGA, 1024 x 768 addressable pixels
■2.9 kg (6.4 lbs) compact design
■Single chip DLP™ technology
■SXGA compression and VGA, SVGA re-sizing
■200 Watts user replaceable UHP lamp
■Mac compatible
■NTSC / NTSC4.43 / PAL / PAL-M / PAL-N / SECAM and HDTV compatible
■Full function remote with mouse control and laser pointer
■High-tech DVI Connection for digital and analog video connectivity
■High definition TV compatibility
■User-friendly multilingual on-screen display menu
■Advanced electronic keystone correction
■User-friendly control panel
■Luxurious carrying case included

6
INTRODUCTION
PACKAGE OVERVIEW
This projector comes with all the items shown below. Please ensure your unit
is complete. Contact your dealer immediately if anything is missing.
Projector with lens cap VGA Cord
S-Video Cord
DVI to D-Sub Cable
Remote Mouse Y Cable
User’s Guide
Carry Case Batteries x 2Quick Start Sheet
Remote Control with
Mouse Function and
Laser Pointer
Audio Cable Jack / RCA
Composite Video Cable
Power Cord
X20M DLP Projector
Quick Start Guide
1
Power Cord
2
VGA Cable
3
S-Video Cable
4
Audio Cable Jack/RCA
5
Composite Video Cable
6
DVI to D-Sub Cable
7
Remote Mouse Y Cable
8
D-Sub to RCA Cable for
HDTV/Component (optional)
4
5
3
67
2
8
1
panel control. The startup screen will
display for 20 seconds and the
Power/Standby indicator will light
solid amber.The “LAMP” LED
indicator will light solid green
5
Turn on your source (computer,
notebook, or video player,etc.).
The projector will detect your source
automatically
Powering On the Projector
Connecting the Projector
1
Make sure the projector and your
computer are turned off
2
Unplug the mouse from the
computer
3
Connect one end of the projector
signal cable to the projector; connect
the other end to the RGB or Digital
port on the computer and tighten
the screws
4
Connect the remote mouse y cable to
the computer
5
Connect the projector to other video
sources
6
Connect one end of the power cord
into the side of projector; connect
the other end to an electrical outlet
7
Turn on the projector first and then
the computer
1
Remove the lens cap
2
Ensure the power cord and signal
cable are securely connected
3
Turn on the main power switch on
the side of the projector and allow
the projector to warm up for 1-2
minutes
4
Turn on the lamp by pressing
“Power/Standby” button on the
Digital TunerOutput
Video Output
S-Video Output
RS232
USB RGB
Antenna
Digital TunerOutput
1901265
Warranty Card

7
INTRODUCTION
PRODUCT OVERVIEW
MAIN UNIT
Speaker
Panel Control
Power Connector
Power Switch
Zoom Ring
Connections PortsFocus Ring
Zoom Lens
Elevator Foot
Elevator Button
Remote Control Receiver

8
INTRODUCTION
PANEL CONTROL
CONNECTION PORTS
Lamp Warning LED
Temperature Warning LED
Enter
Four Directional Select Keys
Audio Input for Video Audio Input for Computer
Audio Output Connector
Power Connector
Power SwitchDVI Input Connector
S-Video Input Connector
Monitor Loop-through ConnectorPC Analog Signal / HDTV / Component Video Connector
Remote Mouse
Input Connector
Composite Video
Input Connector
Audio Input for Video
RS232 Input Connector*
* RS232 is for after service purpose only

9
INTRODUCTION
REMOTE CONTROL
WITH MOUSE FUNCTION & LASER POINTER
Freeze
Mute
LED
Power / Stand By
Laser Pointer
Volume +
Volume –
Page Down
Multi-
Directional
Selector
Re-Sync
Source
Page Up
Zoom In
Keystone
Correction
Zoom Out
Menu
Cover
Close the cover of the
remote control when
you want to use the
remote mouse
LASER POINTER
CAUTION
To reduce the risk of injury to the eyes, do
not look directly into the laser light on
the remote control and do not point the
laser light into anyone’s eyes. This remote
control is equipped with a Class II laser
that emits radiation
Enter Key
WARNING
Ì
!

10
INSTALLATION
CONNECTING THE PROJECTOR
To ensure the projector works well with your computer, please configure
the display mode of your graphic card to make it less than or equal to
1024 x 768 resolution. Make sure timing of the display mode is compatible
with the projector. Refer to the Compatibility Modes Section on page 28.
Power Cord
VGA Cable
S-Video Cable
Audio Cable Jack/RCA
Composite Video Cable
DVI to D-Sub Cable
Remote Mouse Y Cable
D-Sub to RCA Cable for
HDTV/Component (optional)
1
2
3
4
5
6
7
8
4
5
3
67
2
8
1
Digital Tuner Output
Video Output
S-Video Output
RS232
USB RGB
Antenna
Digital Tuner Output

11
INSTALLATION
POWERING ON THE PROJECTOR
Remove the lens cap.
Ensure that the power cord and signal cables are
securely connected.
Turn on the main power switch on the side of the
projector and allow the projector to warm up for 1-2
minutes.
Turn on the lamp by pressing “Power / Standby” button
on the control panel.
The start-up screen will display and count down for 20
seconds and the “Power / Standby” indicator will light
solid amber.
The “LAMP” LED indicator will light solid green.
Turn on your source (computer, notebook, or video
player, etc.). The projector will detect your source
automatically.
Lens Cap
Power Switch
1
1
2
3
2
Power / Standby
3
Turn on the projector
first and then the
computer.
If the screen displays
“No Signal”, please
ensure the signal
cables are securely
connected.
If you connect
multiple sources at
the same time, use
the “Source” button
on the Remote
Control or Panel
Control to switch.

12
INSTALLATION
POWERING OFF THE PROJECTOR
Press the “Power / Standby” button to turn off the projector lamp.
You will see a message “Power off the lamp?” on the on-screen display.
Press the “Power / Standby” button again to confirm.
Otherwise the message will disappear after 5 seconds.
“Power / Standby” LED indicator will light solid amber for about 30 seconds.
After the “Power / Standby” indicator starts flashing, you can turn off the
main power switch on the side of the projector.
If you want to turn on the projector again, you must press the “Power /
Standby” button within 90 seconds of the indicator flashing.
Do not turn on the projector immediately following this Power Off
procedure.
1
2
3
4
When the “TEMP” indicator lights solid
orange, it indicates the projector has been
overheated. You will see a message “Over
Temperature” on the on-screen display. The
projector will automatically shut
itself down. Under normal conditions, the
projector can be switched on again for your presentation.
If the problem persists, you should contact your local dealer or
our service centre.
When the “LAMP” indicator flashes green
for about 10 seconds, you will see a message
“Fan Fail” on the on-screen display.
Please contact your local dealer or our
service centre.

The projector is equipped with an elevator foot for adjusting the projector
height.
To raise the projector
To lower the projector
13
INSTALLATION
ADJUSTING THE PROJECTOR HEIGHT
Press the Elevator Button.
Raise the projector to the desired display angle, then release the button
to lock the elevator foot into position.
Use the Height Adjuster Button to fine-tune height adjustment.
1
Press the Elevator Button.
Lower the projector, then release the button to lock the elevator foot into
position.
Use the Height Adjuster Button to fine-tune height adjustment.
1
2
3
2
3
Elevator Foot
Height Adjuster Button
Elevator Button

14
INSTALLATION
You may adjust Zoom Ring to zoom in or out. Rotate the Zoom Ring counter-
clockwise to zoom in and clockwise to zoom out. To focus the image, rotate
the focus ring until the image is clear. The projector will focus at distances
from 1.1m to 12.4m (3.7 feet to 40.7 feet).
ADJUSTING THE PROJECTOR ZOOM / FOCUS
ADJUSTING THE PROJECTOR IMAGE SIZE
Zoom Ring
Focus Ring
Screen Max. 28” 98” 123” 197” 246” 305”
(Diagonal) Min. 22” 78” 98” 157” 197” 244”
Screen Max (W x H)
22.4 x 16.8” 78.4 x 58.8” 98.4 x 73.8” 157.6 x 118.2” 196.8 x 147.6” 244.0 x 183.0”
Size Min. (W x H)
17.8 x 13.2” 62.4 x 26.8” 78.4 x 58.8” 125.6 x 94.2” 157.6 x 118.2” 195.2 x 146.4”
Distance 3.7’ 13.1’ 16.4’ 26.2’ 32.8’ 40.7’
This graph is for
User’s reference only

15
USER CONTROLS
There are two ways for you to control the functions:
Remote Control or Panel Control.
PANEL CONTROL & REMOTE CONTROL
Remote Control
Panel Control
Power / Standby
■Refer to the Power On / Off the Projector section on page 11.
Source
■Press “Source” to choose RGB, DVI-Digital, DVI-Analog, S-Video, Composite,
Component and HDTV sources.
Zoom
Use the Panel Control
■When you press “Zoom” button, the Zoom icon appears in the screen. Press the
Up or Down buttons to zoom in or zoom out of the image.
Re-Sync
Use the Remote Control
■Automatically synchronises the projector to the input source, when you press this
button while the remote control cover is open.
■If the remote control cover is closed, the Mouse / Re-Sync button functions like
the right mouse button.
Use the Panel Control
■Automatically synchronises the projector to the input source.

16
USER CONTROLS
Four Directional Select Keys
■When you close the cover of remote control, this key can be used as a mouse to
control direction.
■When the cover of remote control is opened, this key can be used for the up,
down, left and right operation for OSD display.
Page Up (Computer mode only)
■Use this button to page up.
Page Down (Computer mode only)
■Use this button to page down.
Laser Pointer
■Aim the remote at the viewing screen, press and hold button to activate the laser
pointer.
Menu
■Press “Menu” to open the on-screen display (OSD) menus and press left and right
keys to select menu items. To exit OSD, press “menu” button again. The projector
will save any changes you made automatically.
Freeze
■Press the “Freeze” button to still the screen image.
Mute
■Use to mute sound.
Volume + / -
■Increases or decreases speaker volume.
Keystone + / -
■Adjust image distortion caused by tilting the projector (±16 degrees).
Zoom In / Out (Computer mode only)
■Magnifies an image up to a factor of 32 times on the projection screen.
■Diminishes the zoom-in image.
Enter
Use the Remote Control
■Confirm your selection of items, when you open the front cover of remote control.
■If the remote control is closed, the “Enter” button functions like the left mouse
button.
Use the Panel Control
■Confirm your selection of items.
The above function is only enabled with the
connection between computer and projector
by remote mouse Y cable.
Page Up / Page Down
Under remote mouse
connected status only

17
USER CONTROLS
ON-SCREEN DISPLAY MENUS
How to Operate
■The projector has multi-lingual On-Screen Display (OSD) menus that allow you to
make image adjustments and change a variety of settings. In computer source, the
OSD will be the “Computer OSD”. In video source, the OSD will be the “Video
OSD”. The projector will detect the source automatically.
■To open the OSD menu, press the “menu” button on the remote control or the
panel control.
■When OSD is displayed, press keys to select menu items.
E.g.: Image-I >Image-II >Audio >Language >Management >Image-I...
While making selection on a particular page, press “Enter” key to go into sub-menu.
■Press keys to select the required item and use the keys to adjust the
settings. When a specified item is selected, the colour of the item will change from
yellowish brown to blue.
E.g.: Brightness >Contrast >Colour Temp. >Zoom >Keystone >Brightness...
■While using keys to adjust the parameter or required function in the items
of the sub-menu, confirm all the functions of the main menu by pushing “Enter”
button after all / part of the items have been modified. Press the ”Enter” button
to confirm, and the screen will be back to the main menu at once. Only
keys are enabled now.
■To exit the OSD, press the “Menu” button again.

18
USER CONTROLS
Computer Mode
Language Management
Image-I Image-II Audio
Brightness
Contrast Keystone
Colour Temp.
Zoom
IMAGE-I
(COMPUTER MODE)
Brightness
Adjusting the brightness of the image.
■Press the key to darken the image.
■Press the key to lighten the image.
Contrast
The contrast controls the degree of difference between the lightest and
darkest parts of the picture. Adjusting the contrast changes the amount of
black and white in the image.
■Press the key to decrease the contrast.
■Press the key to increase the contrast.
Colour Temperature
Adjust the colour temperature. the range is from 6000K to 9000K. The factory
default setting is 7500K. With a higher temperature the screen looks colder,
with a lower temperature the screen looks warmer.
Zoom
■
Press the to magnify an image up to a factor of 32 times on the projection screen.
■Press the to Diminish the zoom-in image.
Keystone (Keystone Correction)
Adjust the image distortion caused by tilting projection (±16 degrees).

19
USER CONTROLS
Video Mode
Language Management
Image-I Image-II Audio
Brightness
Contrast Sharpness
Colour
Tint
IMAGE-I
(VIDEO MODE)
Brightness
Adjusting the brightness of the image.
■Press the key to darken the image.
■Press the key to lighten the image.
Contrast
The contrast controls the degree of difference between the lightest and
darkest parts of the picture. Adjusting the contrast changes the amount of
black and white in the image.
■Press the key to decrease the contrast.
■Press the key to increase the contrast.
Colour
The colour setting adjusts a video image from black and white to fully
saturated colour.
■Press the key to decrease the amount of colour in an image.
■Press the key to increase the amount of colour in an image.
Tint
The tint adjusts the colour balance of red and green.
■Press the key to increase the amount of green in the image.
■Press the key to increase the amount of red in the image.
Sharpness
Adjusting the sharpness of the image.
■Press the key to decrease the sharpness.
■Press the key to increase the sharpness.

20
USER CONTROLS
Computer Mode
Language Management
Image-I Image-II Audio
Frequency
Tracking V. Position
16:9 / 4:3 Reset
Yes No
H. Position
IMAGE-II
(COMPUTER MODE)
Frequency
“Frequency” is for changing the display data frequency to match the
frequency of your computer’s graphic card. When you experience a vertical
flickering bar, use this function to make an adjustment.
Tracking
Choose “Tracking” item to synchronise the signal timing of the display with
that of the graphic card. When you experience an unstable or flickering
image, use this function to correct it.
16 : 9 / 4 : 3
You can use this function to fit your desired aspect ratio type.
Horizontal Position
■Press the to move the image left.
■Press the to move the image right.
Vertical Position
■Press the to move the image up.
■Press the to move the image down.
Reset
Choose “Yes” to return the display parameters back to the factory default. Reset:
Reset select includes
both Image-I and
Image-II settings
Other manuals for NOBO X20M
1
Table of contents
Other ACCO Brands Projector manuals

ACCO Brands
ACCO Brands NOBO WX28 Operation and maintenance manual

ACCO Brands
ACCO Brands NOBO X23M User manual

ACCO Brands
ACCO Brands X25C User manual

ACCO Brands
ACCO Brands NOBO S15E User manual

ACCO Brands
ACCO Brands NOBO X20P User manual

ACCO Brands
ACCO Brands NOBO DLP TM Projector User manual

ACCO Brands
ACCO Brands DLP Projector User manual

ACCO Brands
ACCO Brands NOBO X20M User manual

ACCO Brands
ACCO Brands NOBO User manual

ACCO Brands
ACCO Brands NOBO S17E User manual