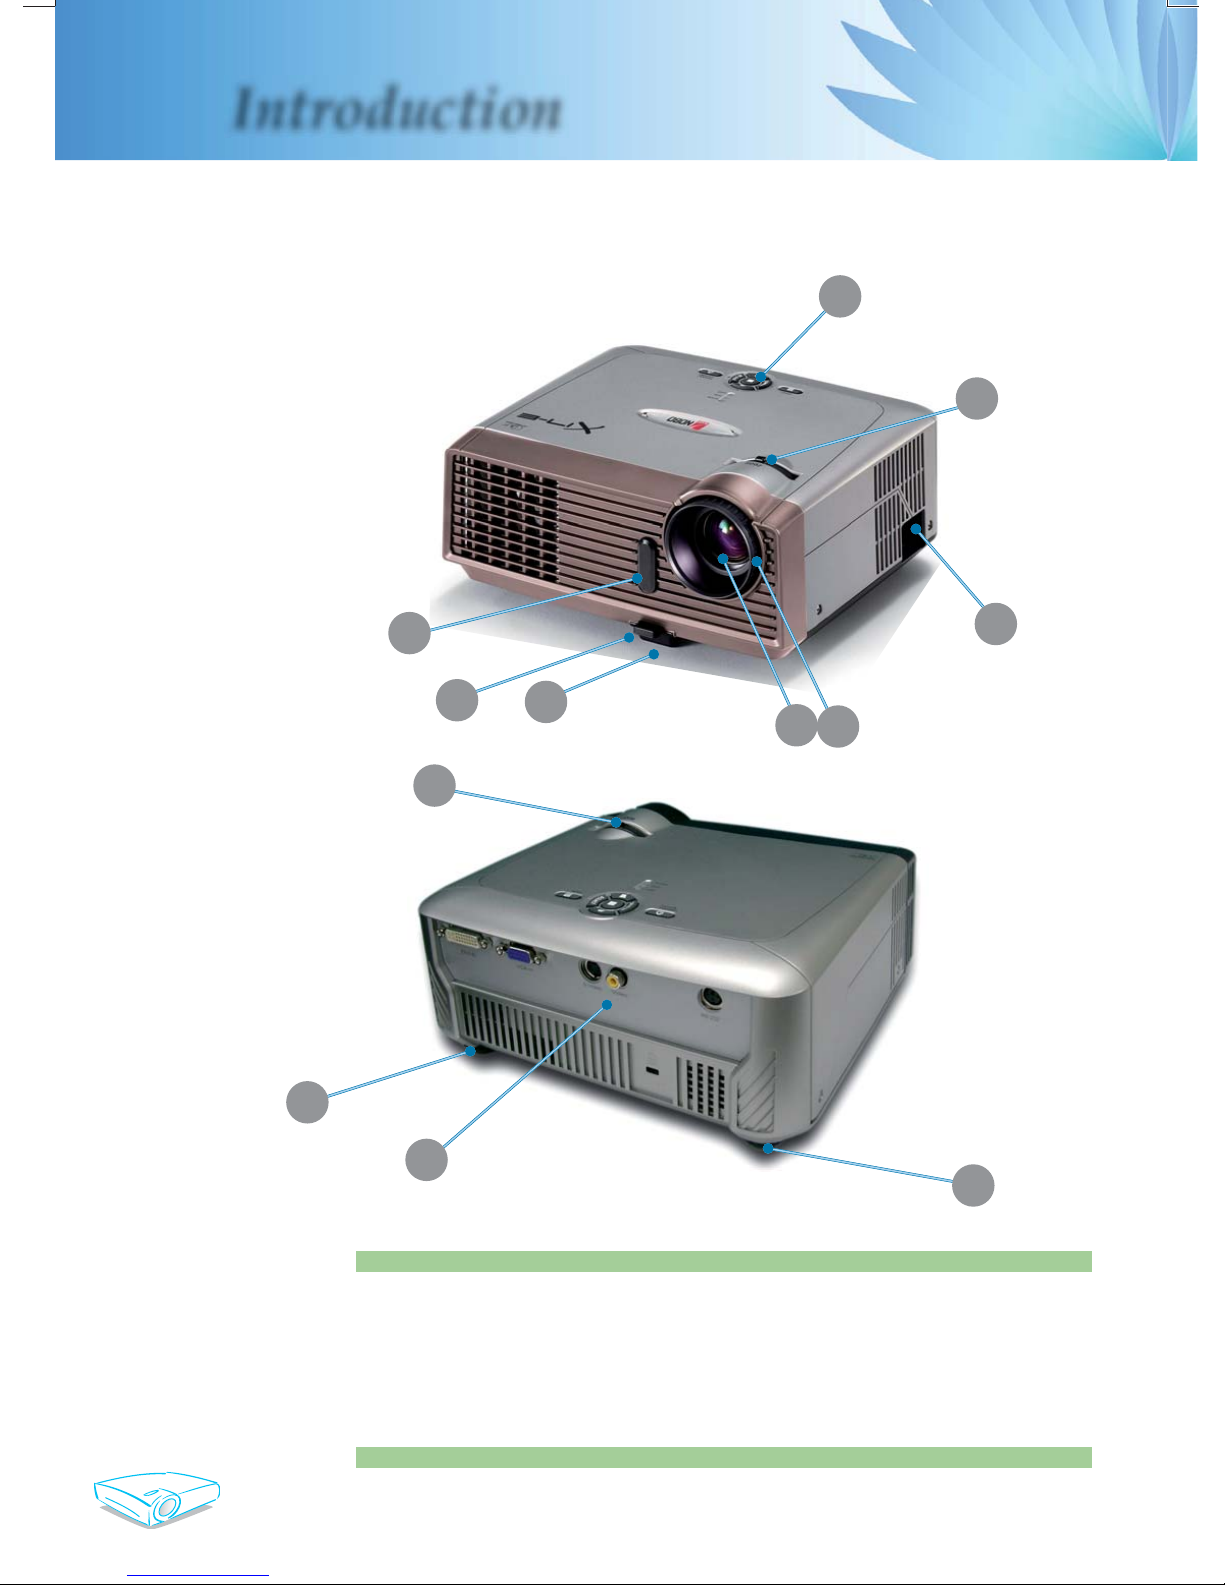
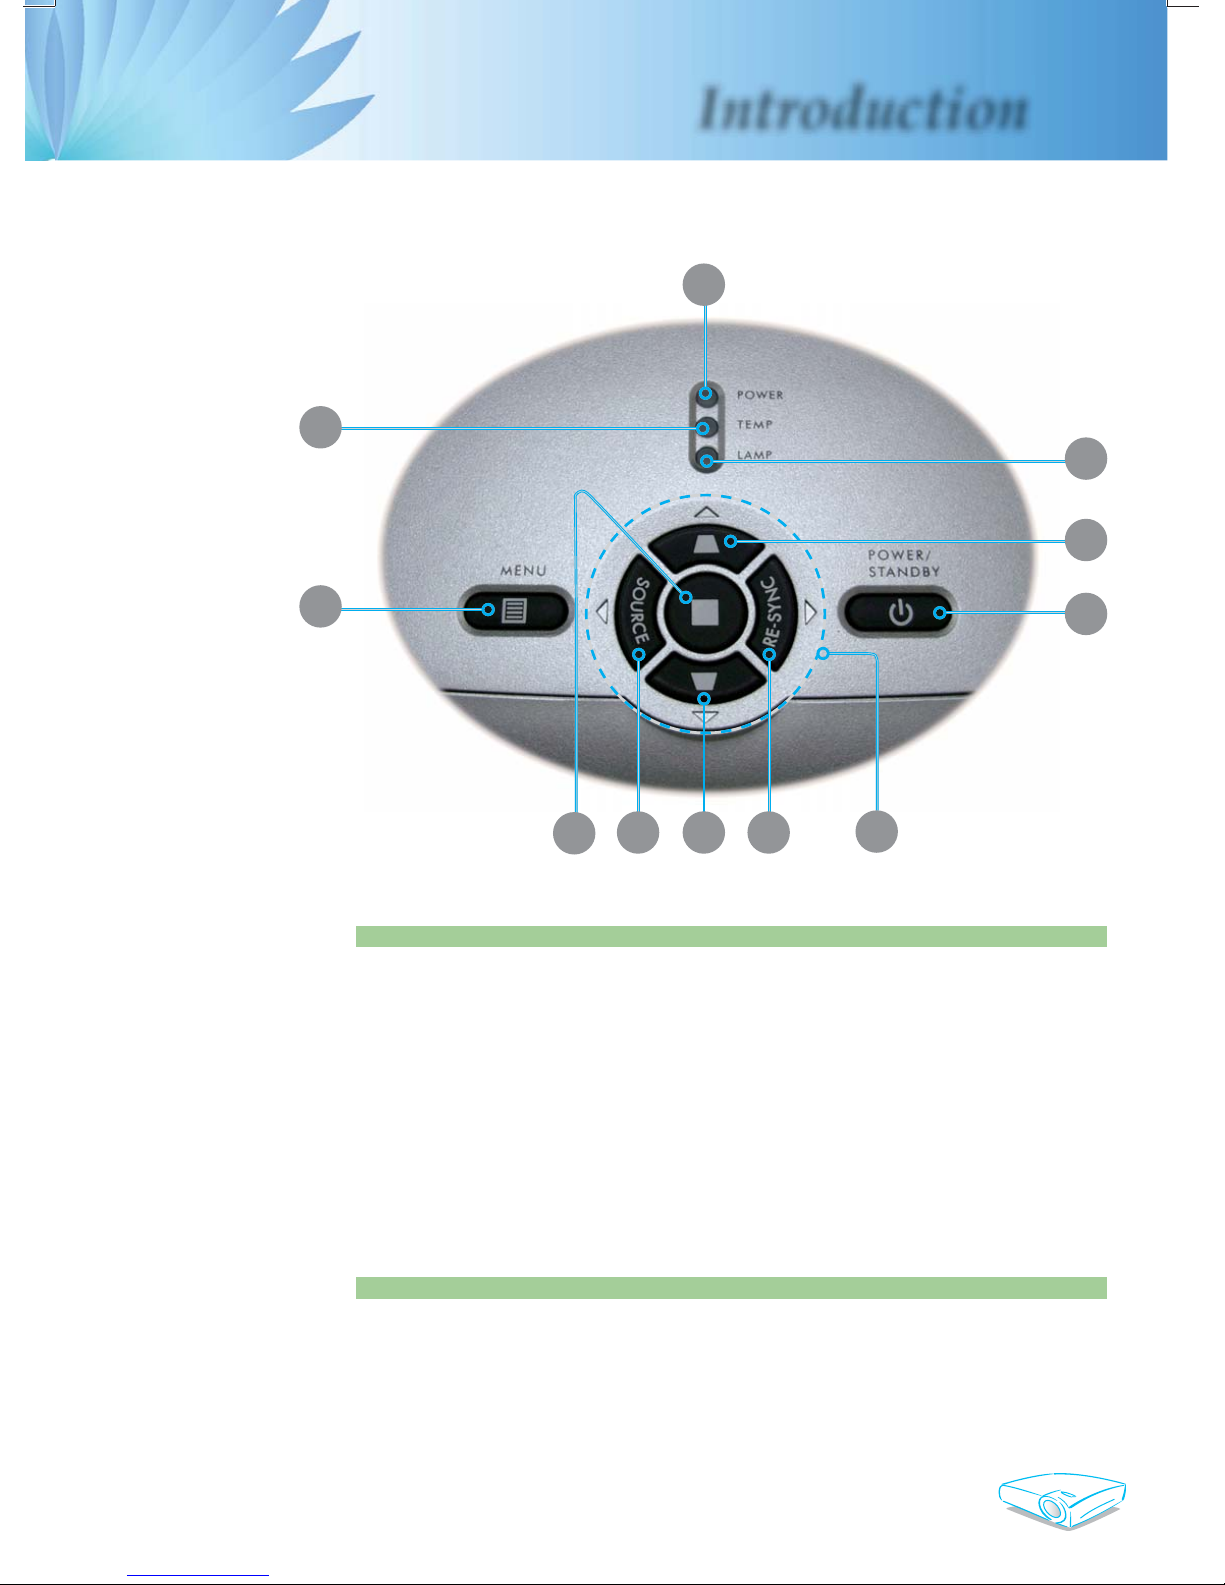
ACCO Brands X17E DLP User manual

English
1
Table of Contents
Table of Contents ......................................................................................... 1
Usage Notice................................................................................................ 2
Safety Information ................................................................................................2
Precautions...........................................................................................................3
Eye Safety Warnings............................................................................................5
Introduction................................................................................................... 6
Product Features..................................................................................................6
Package Overview................................................................................................7
Product Overview .................................................................................................8
Main Unit........................................................................................................................8
Control Panel .................................................................................................................9
Connection Ports .........................................................................................................10
Wireless Remote Control ............................................................................................. 11
Installation .................................................................................................. 12
Connecting the Projector....................................................................................12
Powering On/Off the Projector............................................................................13
Powering On the Projector...........................................................................................13
Powering Off the projector ...........................................................................................14
Warning Indicator.........................................................................................................14
Adjusting the Projected Image............................................................................15
Adjusting the Projector Image Height ..........................................................................15
Adjusting the Projector Zoom / Focus..........................................................................16
Adjusting Projected Image Size ...................................................................................16
User Controls ............................................................................................. 17
Control Panel & Remote Control ........................................................................17
On-Screen Display Menus..................................................................................20
How to operate ............................................................................................................20
Menu Tree....................................................................................................................21
Language .....................................................................................................................22
Management I .............................................................................................................23
Management II ............................................................................................................25
Image-I ........................................................................................................................26
Image-II (Computer Mode / Video Mode) ....................................................................28
Colour Setting .............................................................................................................30
Appendices................................................................................................. 31
Troubleshooting ..................................................................................................31
Replacing the lamp.............................................................................................35
Compatibility Modes ...........................................................................................36
RS232 Commands .............................................................................................37
Ceiling Mount Installation ...................................................................................38

English 2
Usage Notice
Safety Information
The lightning flash with arrowheard within an equilateral triangle is
intended to alert the user to the presence of uninsulated “dangerous volt-
age” within the product’s enclosure that may be of sufficient magnitude to
constitute a risk of electric shock to persons.
The exclamation point within an equilateral triangle is intended to alert
the user to the presence of import operating and maintenance (servicing)
instructions in the literature accompanying the appliance.
WARNING: TO REDUCE THE RISK OF FIRE OR ELECTRIC SHOCK, DO NOT
EXPOSE THIS APPLIANCE TO RAIN OR MOISTURE. DANGEROUS HIGH
VOLTAGES ARE PRESENT INSIDE THE ENCLOSURE. DO NOT OPEN THE
CABINET. REFER SERVICING TO QUALIFIED PERSONNEL ONLY.
Class B emissions limits
This Class B digital apparatus meets all requirements of the Canadian
Interference-Causing Equipment Regulations.
Important Safety Instructions
1. Read these instructions –before using this projector.
2. Keep these instructions –for future reference.
3. Follow all instructions.
4. Install in accordance with the manufacturer’s instructions
A. Do not block any ventilation openings
To ensure reliable operation of the projector and to protect it from over-
heating, put the projector in a position and location that will not inter-
fere with its proper ventilation. For example, do not place the projector
on a bed, sofa, carpet, or similar surface that may block the ventilation
openings. Do not put it in an enclosure, such as a bookcase or a cabinet
that may keep air from flowing through its ventilation openings.
B. Do not use this projector near water or moisture. To reduce the
risk of fire or electric shock, do not expose the projector to rain or mois-
ture.
C. Do not install near any heat sources, such as radiators, heaters,
stoves or other apparatus (including amplifiers) that produce heat.
5. Clean only with a dry cloth.
6. Only use attachments/accessories specified by the manufacturer.
7. Refer all servicing to qualified service personnel. Servicing is required
when the projector has been damaged in any way, such as:
▀■Power supply cord or plug is damaged.
▀■Liquids have spilled or objects have fallen into the apparatus.
▀■The projector has been exposed to rain or moisture, does not oper-
ate normally, or has been dropped.
Do not attempt to service this projector yourself. Opening or removing
covers may expose you to dangerous voltages or other hazards. Please
call Optoma to be referred to an authorized service center near you.
8. Do not let objects or liquids enter the projector –as they may touch
dangerous voltage points or short-out parts that could result in a fire or
electric shock.
9. See projector enclosure for safety related markings.
10. The projector should not be adjusted or repaired by anyone except
properly qualified service personnel.

English
3
Usage Notice
Precautions
Follow all warnings, precautions and maintenance as recom-
mended in this user’s guide to maximize the life of your unit.
Warning - Do not look into the projector’s lens when the
lamp is on. The bright light may hurt your eyes.
Warning - To reduce the risk of fire or electric shock, do not
expose this product to rain or moisture.
Warning - Please do not open or disassemble the product
as this may cause electric shock.
Warning - When changing the lamp, please allow unit to
cool down, and follow all changing instructions.
Warning - This product will detect the life of the lamp
itself. Please be sure to change the lamp when it
shows warning messages (refer to page 34).
Warning - Reset the “Reset Lamp Hours” function from the
On Screen Display “Management II” menu after
replacing the lamp module (refer to page 25).
Warning - When switching the projector off, please ensure
the projector completes its cooling cycle before
disconnecting power.
Warning - Turn on the projector first and then the signal
sources.
Warning - Do not use lens cap when projector is in opera-
tion.
Warning - When the lamp reaches the end of its life, it will
burn out and may make a loud popping sound.
If this happens, the projector will not turn back
on until the lamp module has been replaced. To
replace the lamp, follow the procedures listed
under “Replacing the Lamp”. (see page 35)

English 4
Usage Notice
Do:
Turn off the product before cleaning.
Use a soft cloth moistened with mild detergent to clean the
display housing.
Disconnect the power plug from AC outlet if the product is
not being used for a long period of time.
Don’t:
Block the slots and openings on the unit provided for ventila-
tion.
Use abrasive cleaners, waxes or solvents to clean the unit.
Use under the following conditions:
- In extremely hot, cold or humid environments.
- In areas susceptible to excessive dust and dirt.
- Near any appliance that generates a strong magnetic field.
- Place in direct sunlight.

English
5
Usage Notice
Eye Safety Warnings
▀■Avoid staring directly into the projector beam at all times.
▀■Minimize standing facing into the beam. Keep your back to
the beam as much as possible.
▀■A stick or laser pointer is recommended to avoid the need for
the user to enter the beam.
▀■Ensure that projectors are located out of the line of sight from
the screen to the audience; this ensures that, when presenters
look at the audience, they do not also have to stare at the pro-
jector lamp. The best way to achieve this is by ceiling-mount-
ing rather than floor or table-mounting the projector.
▀■When projector is used in a classroom, adequately supervise
students when they are asked to point out something on the
screen.
▀■In order to minimize the lamp power needed, use room blinds
to reduce ambient light levels.

English 6
Introduction
Product Features
This product is an XGA single chip 0.55” DLP ®projector.
Outstanding features include:
True XGA, 1024 x 768 addressable pixels
Single chip Dark Chip2TM DLP®technology
NTSC/NTSC4.43/PAL/PAL-M/PAL-N/SECAM and
HDTV compatible (480i/p, 576i/p, 720p, 1080i)
Multi-Auto functions: Auto detection, Auto image and
Auto saving the adjustments
Full function remote control
User friendly multilingual on screen display menu
Advanced digital keystone correction and high quality
full screen image re-scaling
User friendly control panel
SXGA compression and VGA, SVGA re-sizing
Mac compatible

English
7
Introduction
Power Cord 1.8m VGA Cable 1.8m
Remote Controller
Projector with lens cap
Package Overview
This projector comes with all the items shown below. Check to
make sure your unit is complete. Contact your dealer immedi-
ately if anything is missing.
Documents :
User’s Guide
Quick Start Card
Warranty Card
Quick Troubleshooting Guide.
WEEE card (European only)
2 x AAA Batteries
Due to the difference
in applications for
each country, some
regions may have
different accessories.
Carrying Case

English 8
Introduction
1. Control Panel
2. Zoom Lever
3. Focus Ring
4. Power Socket
5. Zoom Lens
Main Unit
Product Overview
9
10
10
6. Elevator Foot
7. Elevator Button
8. IR Receivers
9. Connection Ports
10. Tilt Adjusting Feet
1
2
4
3
8
6
7
5
2

English
9
Introduction
Control Panel
1. Power Indicator LED
2. Temp Indicator LED
3. Lamp Indicator LED
4. Keystone Correction
5. Menu (On/Off)
6. Power/Standby
7. Four Directional Select Keys
8. Re-Sync
9. Source
10. Enter
4
5
9
6
7
2
3
1
10 8
4

English 10
Introduction
Connection Ports
1. DVI-D Input Connector (with HDCP)
2. VGA-In SCART Connector (PC Analog signal/HD/Compo-
nent Video Input)
3. S-Video Input Connector
4. Composite Video Input Connector
5. RS232 Connector
6. KensingtonTM Lock Port
123 4 5
6

English
11
Introduction
21
1
4
5
6
9
2
7
8
3
15
13
12
16
14
17
18
19
20
10
11
Wireless Remote Control
1. IR LED
2. Power/Standby
3. Re-Sync
4. Display Mode
5. Keystone Correction
6. Number Buttons
(for password input)
7. Clear
(for password input)
8. DVI
9. Video Source
10. S-Video Source
11. Source Lock
12. VGA Source
13. Color Setting
14. Menu
15. Enter
16. Four Directional
Select Keys
17. Brightness
18. Zoom
19. Display Format
20. Hide
21. Freeze

English 12
Installation
To ensure the projector works well with your computer,
please set the display mode of your graphic card less than or
equal to 1280 X 1024 resolution. Make sure the timing of the
display mode is compatible with the projector. Refer to the
“Compatibility Modes” section on page 36.
S-Video Output
Video Output
DVD Player, Settop Box,
HDTV receiver 5
1
6
RGB
1...............................................................................................................Power Cord
2................................................................................................................VGA Cable
3...............................................................DVI to DVI Cable(Optional Accessory)
4.....................................................Composite Video Cable(Optional Accessory)
5.....................................................................S-Video Cable (Optional Accessory)
6..................................... D-15 to RCA Adapter for YPbPr (Optional Accessory)
7........................................................................RS232 Cable (Optional Accessory)
4
23
Connecting the Projector
Due to the differ-
ence in applications
for each country,
some regions may
have different ac-
cessories.
7

English
13
Installation
Powering On the Projector
1. Remove the lens cap.
2. Ensure that the power cord and signal cable are securely
connected. The Power LED will Flash Green.
3. Turn on the lamp by pressing “Power/Standby” button on
the control panel.And the Power LED will turn Green.
The first time you use the projector, you can select your
preferred language from quick menu after the startup screen
display.
4. Turn on your source (computer, notebook, video player,etc.).
The projector will detect your source automatically.
If you connect multiple sources at the same time, use the
“Source” button on the control panel or remote control to
switch.
Powering On/Off the Projector
Turn on the projector
first and then the signal
sources.
Power/Standby
2
Lens Cap 1

English 14
Installation
Powering Off the Projector
1. Press the “Power/Standby” button to turn off the projector
lamp, you will see a message “
” displayed on the projector’s screen. Press the “Power/
Standby” button again to confirm, otherwise the message
will disappear after 5 seconds.
Please note that if the key is pressed instead, the projec-
tor will enter the “Picture Mute” mode and no image will
be displayed. To exit the “Picture Mute” mode, press the
“Power/Standby” button again.
2. The cooling fans continue to operate for about 10 seconds
for cooling cycle and the Power LED will turn green. When
the Power LED begins flashing, the projector has entered
standby mode.
If you wish to turn the projector back on, you must wait
until the projector has completed the cooling cycle and has
entered standby mode. Once in standby mode, simply press
“Power/Standby” button to restart the projector.
3. Disconnect the power cord from the electrical outlet and the
projector.
4. Do not turn on the projector immediately following a power
off procedure.
Warning Indicator
When the “LAMP” indicator lights solid red, the projector
will automatically shut itself down. Please contact your local
reseller or service center. .
When the “TEMP” indicator lights solid red, it indicates the
projector has been overheated. The projector will automati-
cally shut itself down.
Under normal conditions, the projector can be switched on
again after it has cooled down. If the problem persists, you
should contact your local dealer or our service center.
When the “LAMP” indicator flashes red, it indicates the fan
failed. Please contact your local dealer or our service center.

English
15
Installation
Adjusting the Projected Image
Adjusting the Projector Image Height
Tilt Adjusting
Feet
Elevator Foot
23
Elevator Button
The projector is equipped with an elevator foot for adjusting the
image height.
To raise the image:
1. Press the elevator button .
2. Raise the image to the desired height angle , then release
the button to lock the elevator foot into position.
3. Use
to fine-tune the display angle.
To lower the image:
1. Press the elevator button.
2. Lower the image, then release the button to lock the eleva-
tor foot into position.
3. Use
to fine-tune the display angle.
3
1

English 16
Installation
69.3"
(176.1cm)
115.6"
(293.5cm)
161.8"
(410.9cm)
184.9"
(469.6cm)
277.3"
(704.4cm)
38.1"
(96.8cm)
76.2"
(193.6cm)
127.1"
(322.7cm)
177.9"
(451.8cm)
203.3"
(516.3cm)
304.9"
(774.5cm)
4.9'
39.4'
26.3'
23.0'
16.4'
9.8'
(1.5m)
(12.0m)
(8.0m)
(7.0m)
(5.0m)
(3.0m)
34.7"
(88.1cm)
Width
Height
Diagonal
Max. 38.1"(96.8cm) 76.2"(193.6cm) 127.1"(322.7cm) 177.9"(451.8cm) 203.3"(516.3cm) 304.9"(774.5cm)
Min. 34.7"(88.1cm) 69.3"(176.1cm) 115.6"(293.5cm) 161.8"(410.9cm) 184.9"(469.6cm) 277.3"(704.4cm)
Max.(WxH) 30.5" x 22.9"
(77.4 x 58.1cm)
61.0" x 45.7"
(154.9 x 116.2cm)
101.7" x 76.3"
(258.2 x 193.6cm)
142.3" x 106.7"
(361.4 x 271.1cm)
162.6" x 122.0"
(413.0 x 309.8cm)
243.9" x 182.9"
(619.6 x 464.7cm)
Min.(WxH) 27.8" x 20.8"
(70.5 x 52.9cm)
55.4" x 41.6"
(140.9 x 105.7cm)
92.5" x 69.4"
(234.8 x 176.1cm)
129.4" x 97.1"
(328.7 x 246.5cm)
147.9" x 110.9"
(375.7 x 281.8cm)
221.8" x 166.4"
(563.5 x 422.6cm)
4.9'(1.5m) 9.8'(3.0m) 16.4'(5.0m) 23.0'(7.0m) 26.3'(8.0m) 39.4'(12.0m)
Screen
(Diagonal)
Screen
Size
Distance
Diagonal
Focus Ring
Zoom Lever
Adjusting the Projector Zoom / Focus
You may turn the zoom lever to zoom in or out. To focus the im-
age, rotate the focus ring until the image is clear. The projector
will focus at distances from 4.9 to 39.4 feet (1.5 to 12.0 meters)
with mechanical travel.
Adjusting Projection Image Size
This graph is for user’s reference only.

English
17
User Controls
Control Panel
Control Panel & Remote Control
There are two ways for you to control the functions: Remote
Control and Control Panel.
Using the Control Panel
Power/Standby
4Refer to the “Power On/Off the Projector” section on pages 13-
14.
Source
4Press “Source” to choose DVI, RGB, Component-p, Component-
i, S-Video, Composite Video and HD sources.
Menu
4Press “Menu” to launch the on screen display (OSD) menu. To
exit OSD, press “Menu” again.
Keystone /
4Adjusts image distortion caused by tilting the projector (±16
degrees).
Four Directional Select Keys
4Use to select items or make adjustments to your
selection.
Enter
4Confirm your selection of items.
Re-Sync
4Automatically synchronizes the projector to the input source
(for PC signal only).

English 18
User Controls
Using the Remote Control
Power/Standby
4Refer to the “Power On/Off the Projector” section on pages
13-14.
Re-Sync (for PC signal only)
4Automatically synchronizes the projector to the input source.
Hide
4Press “Hide” to hide image, press again to restore display of the
image.
Display Format
4Display the “Display Format” section of the on screen display
menu to select the desired aspect ratio.
Freeze
4Press “Freeze” to pause the screen image.
Display Mode
4Select the Presentation, Bright, Movie, sRGB and User.
Keystone
/
4Adjusts image distortion caused by tilting the projector (±16
degrees).
Brightness
4Adjust the brightness of the image.
Zoom
4Press “+ / -” button to zoom in/out of an image.
Four Directional Select Keys
4Use to select items or make adjustments to your
selection.
Enter
4Confirm your selection of items.
Menu
4Press “Menu” to launch the on screen display menu. To exit
OSD, press “Menu” again.
Remote Control

English
19
User Controls
Clear
4Clear your input of password.
Color Setting
4Adjust the Red, Green, Blue, Yellow, Cyan and Magenta colors
for advanced adjustment of the individual colors.
Source Lock
4Select auto detection all connector ports or lock current connector
port.
DVI
4Press “DVI” to choose DVI source.
VGA
4Press “VGA” to choose VGA connector.
S-Video
4Press “S-Video” to choose S-Video source.
Video
4Press “Video” to choose composite video source.

English 20
User Controls
The Projector has multilingual On Screen Display menus that
allow you to make image adjustments and change a variety of
settings. The projector will automatically detect the source.
How to operate
1. To open the OSD menu, press “Menu ” on the Remote Control
or Control Panel.
2. When OSD is displayed, use keys to select any item in the
main menu. While making a selection on a particular page, press
or “Enter” key to enter sub menu.
3. Use keys to select the desired item and adjust the settings
by key.
4. Select the next item to be adjusted in the sub menu and adjust as
described above.
5. Press “Menu ” to confirm, and the screen will return to the main
menu.
6. To exit, press “Menu ”again. The OSD menu will close and the
projector will automatically save the new settings.
On Screen Display Menus
Main Menu
Sub Menu Setting
This manual suits for next models
1
Table of contents
Other ACCO Brands Projector manuals

ACCO Brands
ACCO Brands NOBO X20M User manual

ACCO Brands
ACCO Brands NOBO S15E User manual

ACCO Brands
ACCO Brands NOBO User manual

ACCO Brands
ACCO Brands NOBO User manual

ACCO Brands
ACCO Brands NOBO WX28 Operation and maintenance manual

ACCO Brands
ACCO Brands DLP Projector User manual

ACCO Brands
ACCO Brands NOBO S18E User manual

ACCO Brands
ACCO Brands NOBO S11E User manual

ACCO Brands
ACCO Brands NOBO X23M User manual

ACCO Brands
ACCO Brands NOBO DLP TM Projector User manual