Accordions International Concerto DA100 User manual

..........
.
.
.
.
.
.
.
.
.
.
Accordions International
Concerto
DA Series 100-255
Digital Accordion
User Manual
The ultimate accordion
capable of producing an
entire World of sounds
with variety and contrast!
Accordions International
1760 South 450 West
Salt Lake City, UT 84115
www.AccordionInfo.com
Phone 801-485-5840

Page - 2
Concerto Grill Layout

Page - 3
Concerto Grill – Split, Range, Volume Control & Display
Concerto Grill – Sounds & Registers
Concerto Grill
Effects, Exit & Next
1 13 17
2 14 18
3 15 19
4 16 20
5 6 7 8 9 10 11
21
22 23
24 25
26
12 59
22 31 35 39 43 47 51 55
23 32 36 40 44 48 52 56
24 33 37 41 45 49 53 57
25 34 38 42 46 50 54 58
59 60 61 62 63 64 65 66 67
F.
Bass CH 1 CH2
Solo OR1 OR2
68 69
70 71 72
73 74 75
Concerto Small Display

Page - 4
.
.
.
.
.
.
.
.
.
.
Getting the most out of
your Concerto DA-250
Thanks for selecting Concerto.
We are here to serve you!
Best Wishes
We at Accordions International wish to thank you for choosing the
incomparable Concerto D/A Digital Acoustic Accordion. Concerto
combines high levels of technology, rich CD quality sound, and an
easy to use format. We are confident you will find it to be the most
advanced and easiest to use accordion of its kind.
We urge you to read and study this manual carefully so you may
obtain the maximum benefits and receive many years of satisfaction
from your new Concerto accordion. After reading this manual should
you need further help then please feel free to contact us for technical
support. Below are several ways to choose from.
You may contact us via the World Wide Web at
http://www.AccordionInfo.com. Where you may find updated
information. Or email us directly at
Concerto@AccordionInfo.com
Or
You may phone Toll Free for an Appointment with our Tech
Support; 1-800-935-0013
Please identify yourself, include your phone number and best
time to call.
Please take the time to review this manual and then if you feel you still
are unclear or need help then please contact us for support.

Page - 5
Overview
Concerto is a simple to use, yet powerful system providing complete
control at the touch of a button. Simply touching a register button
recalls an entire, global setup, which includes sounds, volumes,
octaves, effects, effect levels, velocities, and many other parameters.
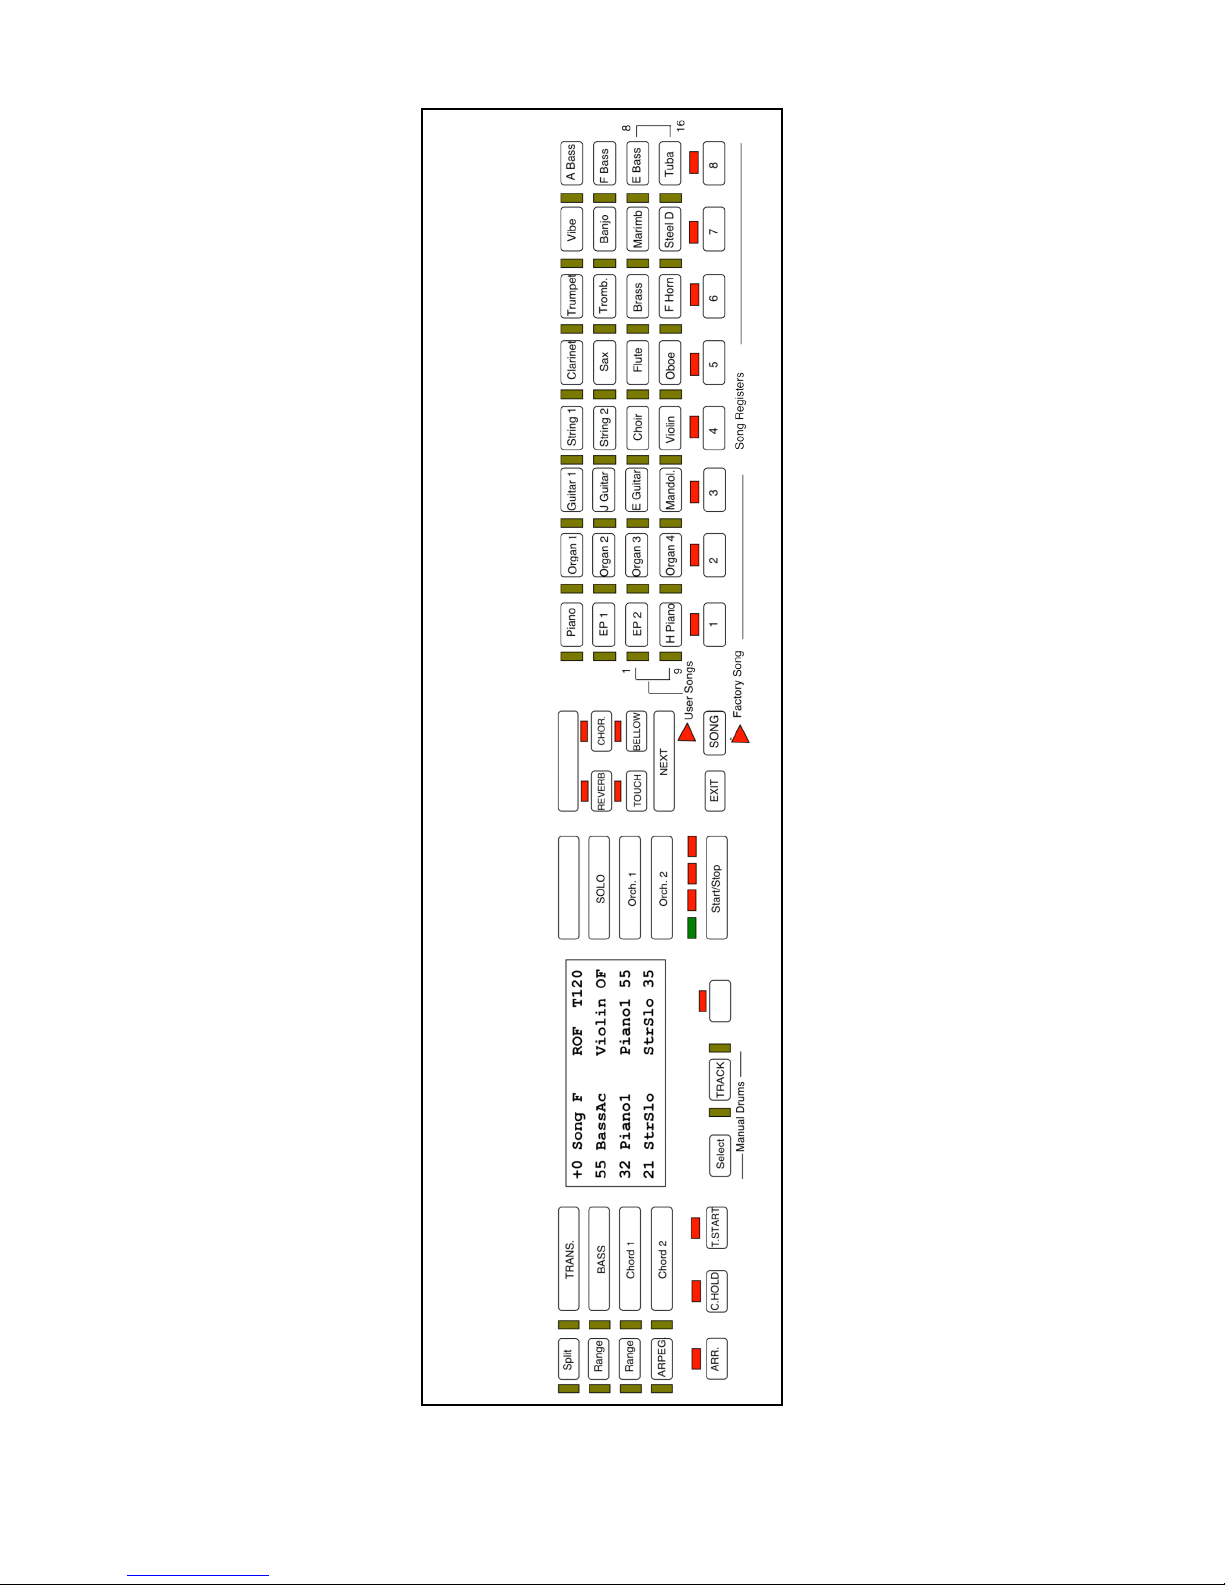
Concerto features eight factory registers for instant playing pleasure,
and the ability to set 128 of your own favorite registers.
Registers are stored in groups of eight, called a song, and may be
stored on optional RAM memory cards, Registers may be sequenced
from the expression pedal allowing for hands-free sequencing.
Concerto's eight factory registers let yon play any style of music
without studying the manual. Simply turn the power on and select one
of the eight register buttons. As you learn to make you own registers
you may store them in one of 128 user registers.
By touching one of the 32 sound select buttons, you may quickly
change sound settings in real time, allowing you to perform without
programming the registers. The six LED's located on the top side of the
grill will indicate which section is assigned to the 32 tone select
buttons. If you wish to change a bass sound simply press the bass
button to light up the bass led and make your selection from the 32
tone buttons.
Concerto has eight families of voices (piano, organ, guitar, etc.). Each
family has four sounds that can be recalled at the touch of a button.
Over 300 additional sounds are available in the sound library.
Concerto features six sections, three for the left hand (bass, chord 1,
and chord 2) and three for the right hand (solo, orchestra 1, and
orchestra 2). A separate sound may be selected for each section
providing for a rich layering of sounds which may be fine tuned with
volume, velocity, octave range, reverb type and level, chorus type and

Page - 6
level, repeat and other effects, tempo settings for external drum, and
sequencer devices.
We urge you to study this manual carefully and to keep it as a handy
reference to your Concerto.
This manual has been written for the Concerto DA-250 but is also
valuable for the DA-100 and DA-200 models. Please not that both the
DA-200 and DA-250 have the same hardware except for the Sound
Engine. The DA-250 has more sounds and more memory to provide
even more accurate sound than the previous models.
For those who are reading this manual that own a DA-100 the major
functional difference is in how you back-up or archive the registers
saved in your accordion. With the DA-100 they are saved on battery
backed memory cards. Please see Appendix C at the end of this
manual for specific instructions on how to use the Concerto RAM 64
Memory Cards.
Those with the DA-200 and DA-250 have the latest technology in
FLASH memory that requires no batteries and is non-volatile.
Instructions for how you back-up or archive the registers saved in your
accordion are included in Chapter 5 of this manual.

Page - 7
Chapter One
Concerto Setup
Inventorying Your Equipment
After unpacking your new Concerto carefully place all of the items in
front of you. Check that you have all of the following:
1 Concerto accordion
1 Concerto generator
1 Concerto power supply
I Volume pedal (expression pedal)
1 Four-way foot switch
1 Foot-switch cable (with a five pin connector on one end and a
nine pin connector on the other)
1 Firing cable (eight pin DIN plug on both ends)
2 Audio cables for Generator Left and Right
1 Stereo Y Cable for amplified accordion.
You will also need an amplifier or a stereo PA system capable of
handling Concerto's full spectrum of sound. Your local dealer should
be able to assist you in choosing the correct amplification for your
specific needs.

Page - 8
Connecting Your Concerto
The following steps will assist you in correctly connecting your
Concerto.
A. Connect the firing cable to the bottom of the Concerto and to the
generator connector labeled "accordion"
B. Connect the volume pedal to the generator jack labeled "pedal 1"
C. Connect the four way foot pedal to the generator jack labeled
"pedal 2"
D. Connect the power supply to an electrical outlet and then to the
generator jack labeled “power"
E. Connect the audio cables to the stereo left and right outputs of
the generator, then to two channels on the amplifier. It is
important that both channels used on the amplifier have the
same settings.
F. Power up the Concerto
G. Turn on the amplifier (to prevent popping in the speakers turn
the amplifier off before turning off the rest of the equipment)
H. Adjusting the volume: With the expression pedal in the
maximum position (all the way down) and the Concerto's
volume at the 3 O'clock position gradually raise the volume on
the amplifier until you are at the loudest forte you desire. The
expression pedal will now provide a full range of volume
from zero to full volume.

Page - 9
Chapter Two
Factory Set Registers
Exploring the Eight Factory-set Registers
Each time Concerto is turned on an automatic systems check will be
performed. At the same time the large display identifies the software
version currently being used. After about four seconds the display will
go immediately to factory-set song register 1.
Factory-set Registers
(Please note -The numbers in parenthesis -example (60) -refer to the drawing on page 3.)
!Register 1 (60): Features acoustic piano and slow strings on the right
hand, and acoustic bass, acoustic piano, and slow strings on the left
hand.
!Phantom*: Violin
!Register 2 (61): Features great theater organ combination on both
right and left hands.
!Phantom*: Trumpet
!Register 3 (62): Features acoustic nylon guitar with slow strings on
the right hand, and acoustic bass, nylon guitar and slow strings on the
left hand.
!Phantom*: Flute
!Register 4 (63): Features orchestra strings on both hands.
!Phantom*: Violin

Page - 10
!Register 5 (64): Features solo clarinet with soft brass on the right hand,
and acoustic bass and soft brass on the left hand.
!Phantom*: Clarinet
!Register 6 (65): Features solo trumpet with brass on the right hand,
and acoustic bass and brass on the left hand.
!Phantom*: Trumpet
!Register 7 (66): Features vibes with slow strings on the right hand, and
acoustic bass and organ on the left hand.
!Phantom*: Clarinet
!Register 8 (67): Features mandolin with strings on the right hand, and
acoustic bass with clarinet (arpeggio) on the left hand.
!Phantom*: Tremolo strings
Touch the Register 1 button. You should hear piano with slow strings.
Notice the touch-sensitivity. The piano really comes alive with the
touch feature! Turn off this feature by touching the button labeled
touch. The red LED above the button will go off. Play the Concerto
with the touch feature on and off and compare the difference. Touch
sensitivity adds extra realism to many sounds.
Now touch the Register 2 button and try the great organ sound.
Notice the touch button is off. For more realistic ORGAN sounds we
recommend turning off this feature and using the using the expression
pedal.
Try all of the factory settings and you will find they match most styles
of music. Pay particular attention to Registers 5 and 6 as they feature
solo sounds. Solo means there is an automatic split which plays the
solo sound only on the highest note and other orchestra sounds are
played on all other notes.
We suggest that after becoming familiar with the factory-set registers
you learn how to select and create your own registers. Refer to Chapter
3, "Making and Recording Your Very Own Registers"
* Phantom is a feature that brings a new (phantom) sound to the
treble keyboard. This feature is presented in the next chapter.

Page - 11
Chapter Three
Fixed Footswitches
& Panel Buttons
In this chapter you will learn the functions of the two side switches on the
expression pedal, the phantom pedal on the four-way pedal, and the buttons on
the front of the Concerto.
Fixed Foot Switches
Expression Pedal
The expression pedal is equipped with two side switches. The left
switch turns on and off the internal drum unit clock on the Concerto.
Notice the LED above the start/stop button on the accordion flashes at
the current tempo setting when the clock is off and remains steady
when the clock is on. No drums will play unless your Concerto is
connected to an external Midi drum unit.
The right switch on the expression pedal is a very powerful tool, which
allows you the hands-free ability to sequence up to the next register.
Set your Concerto at Resister 1 and touch the right switch on the
expression pedal. Notice the LED above the registers advances to the
next register.
It is important to mention that Concerto has been painstakingly
studied to provide you with the most natural musical effects. One of
our achievements in producing natural effects is that the sound of any
note held during a register change is not affected until the note is
released and a new note played. This provides for a smooth and
natural transition between register changes. Notice, there is a special

Page - 12
screen saver function that allows register changes to occur as fast as
possible. When notes are played during a register change, the screen is
not fully displayed which saves time and allows the register change to
be immediate. If you wish to view the entire screen, simply touch the
exit button and the full screen will be displayed.
Phantom
Phantom is a feature you will find invaluable no matter what your
music ability. Phantom is an imaginary keyboard, or second sound,
that allows you to carry on a dialogue between two separate
instruments. Phantom also provides the ability to play a solo passage
on notes other than those with high note priority, with phantom, notes
up and down the scale may be played by the solo instrument.
To see how this feature works select factory-set Register 2. You now
have a theater organ sound. Touch the "phantom" foot pedal (the first,
or far left pedal on the four-way pedal) and the sound will change to a
trumpet. Touch the "phantom" pedal again and you will return to the
organ sound. The LED above the solo button will flash when phantom
is on.
Now, with the phantom off touch any note on the keyboard. While
holding that note (organ sound) touch the "phantom" foot switch and
play a passage of notes above and below the original note. Note that
these have a trumpet sound while the original note remains the organ.
Now release all the notes and play a new passage. All of these notes
will have a trumpet sound. Touch the "phantom" pedal (turning the
phantom feature off) and any new notes return to the organ sound.
Four-way Foot Pedal
Foot pedal A (second pedal from the left) is set as a sustain pedal while
in the factory songs. Foot pedal B (third pedal from the left) is
sostenuto. To use the sostenuto effect you must first play a note(s),
then before releasing it hold down the sostenuto pedal. The sostenuto
pedal will sustain the notes for you allowing you to play non-
sustained passages with only the pre-selected notes being sustained.
Foot pedal C (far right pedal) is the soft damper pedal. This allows you
to soften a passage on the right hand. The use of these pedals will be
described later in this manual.

Page - 13
Panel Buttons
The buttons on the Concerto panel, or grill, are described below. See
attachment A for a picture of Concerto with accompanying reference
numbers. (Panel buttons will be italicized throughout these manuals).
Important: We have placed settings in your Concerto that should
suffice for your immediate needs. We do not recommend you
experiment with these settings until you read about them specifically
in this manual.
#1. Split
There are four split settings, which are indicated by the following LED
patterns:
a. No split (no LED): All active sections play (solo plays
only high notes).
b. Split one (left LED on): High note is played only by solo
section.
c. Split two (right LED on): Same as split one, but three
notes must be played before orchestra section sounds.
This split allows solo legato passages to be played
without the interference of the orchestra sections
popping in between legato notes.
d. Split three (both LED's on): This is first note priority for
the solo section. Similar to phantom in that this is not
high note priority. Different from phantom in which the
solo sound is really struck after the first note; this is first
note priority.
#2.Bass Range
There are two bass ranges to select from:
a. Bass range one (left LED on): Lowest bass note is C
ranging up to B.
b. Bass range two (right LED on): Lowest bass note is F#
below C with the highest note being F above C.
#3. Chord Range
There are three selections:

Page - 14
a. Chord range one (left LED on): Chords are formed in the
octave F# to F
b. Chord range two (right LED on): Chords are formed in
the octave C to B
c. Chord range three (both LED's on): Chords are formed in
the 1.5 octave range of F# to B3 forming open harmony.
#4. Arpeggio
There are four positions:
a. Arpeggio off (no LED's): Chords are fixed.
b. Arpeggio one (left LED on): Chords are automatically
inverted upward in harmony with each strike. Striking a
bass note starts the chord position at the beginning.
c. Arpeggio two (right LED on): Chords are automatically
inverted up once and repeated down once with each
strike. Again striking a bass note starts the pattern from
the beginning.
d. Arpeggio three (both LED's on): Chords are automatically
played in a pattern of invert up, up, up then down, down,
down which when combined with a bass note forms a
classical six step pattern. Try with 3/4 or 6/8 time
signatures.
#5. Arr.
Reserved for future use.
#6. C. Hold
LEFT HAND REGISITER FREEZE
The C.HOLD button turns on and off this feature. When the C.HOLD
button is on the left hand remains frozen to the current Song Register
and as new Song Registers are recalled they are applied only to the
right hand. While the Concerto is in this mode you can still make
changes manually to the left hand and record new registers while the
C.HOLD feature is on.
Example you may recall Factory Setting #2 (ORGAN) and then select
C.HOLD and then Recall Factory Setting #1. You will then have the
ORGAN on the left hand and the Piano & Strings on the Right hand
(this could then be saved as a new register). Now release the C.HOLD
function and press Factory Setting #1 again and you will have
Acoustic Bass & Piano again in the left hand and the Song Registers
will now apply to both Left and Right sides of the Concerto.

Page - 15
#7. T.Start
Reserved for future use.
#8. Select
Used to select screens, sub-menu screens, second functions such as
manual drums, and record a register. Each function is discussed in
detail under the appropriate sections later in this manual.
#9. Track
Used to access Manual Drum Sounds with pressed together with
SELECT. Other functions reserved for future updates.
#10. Intro/End
Reserved for future use.
#11. Start/Stop
Start/stop internal Midi clock
#12. Exit
Exit performs several functions. First it exits any sub-menu and brings
back the main screen. It also writes the screen, which may not be
visible when recalled while playing. Exit is also used in conjunction
with select to bring up the record menu to record a register.
#13. Trans
You may transpose the electronics of Concerto (and all attached midi
gear) up or down half steps with the up or down arrow buttons. This is
easily done in real time during performance. Note you must return the
transpose to +O to play the acoustic accordion together with the
electronics so that they are both in the same key.
#14. Bass
Volume for bass section
#15. Chord l
Volume for chord I. section
#16. Chord 2
Volume for chord 2 section

Page - 16
#17. Rhythm
Sends Program Change numbers 1 to 64 on Channel 10
#18. Solo
Volume for solo section
#19. Orch. I
Volume for orchestra 1
#20. Orch. 2
Volume for orchestra 2
Additional Information about volume keys:
Volume Range
There are 64 increments of volume ranging from 0 (volume off) to 64
(maximum volume). The volumes settings for all sections being played
are indicated in the large display while the top display shows the
volume setting momentarily while you are adjusting an individual
instrument.
The Volume or “value” buttons are an important part of your
Concerto. You will later learn that with different menu’s you can
change the “value” or many different things such as changing the
octave range of the section or selecting a new sound from the
alphabetized “Library” of sounds.
You may want to spend some time practicing using the volume
buttons. They have two speeds. If you touch the button momentarily
the numbers will roll by slowly one at a time. If you hold the key
down after about 2 seconds the numbers go into high gear and roll by
very rapidly. The high-speed feature is to get you to the general range
and the slow speed (touching the button and releasing) is for accuracy.
Section on/off:
When both up/down volumes of a section are depressed then the
section is turned off. To turn on a section, simply touch either up or
down for the desired section. Example; pressing both bass volume up
and down together turns off the bass section, pressing either bass
volume up or down turns the bass section back on again.

Page - 17
Other Functions
Important: Buttons 14 - 20 are also used as value keys for other menus.
The only time they perform the descriptions above is during the main
screen. Each button controls the information present in the screen.
There are four rows of information in the screen and four rows of
volume/value keys on each side of the screen. Each button controls
the corresponding line of information in the display screen.
#21. Tempo
Adjusts the tempo of the internal Midi clock
#22. Reverb
Turns on and off the reverb effect on the entire instrument
#23. Chorus
Turns on and off the chorus effect for the entire instrument
#24. Touch
Turns on and off the keyboard touch sensitivity
Additional Information about Effects Buttons
Note: Other functions
The effects sections (buttons 22 - 24) also have sub-menus that are
important to their function. To select these sub-menus simply hold
select and then touch the effect you wish to select. For example,
selecting reverb will bring up a reverb menu that will allow you to
select the type and level of reverb for each section. Again exit brings
you out of this menu. We will explore these features in further detail
later.
#25. Bellows
Turns on and off the bellow expression. When bellows expression is
engaged the expression is controlled by the bellows rather than by the
expression pedal.
#26. Next
From/to (arrows left/right) turns the pages of the screen. There are
three types of menus:
a. Main menu: Includes volume (normal screen), octave, library,
and velocity.

Page - 18
b. Effect menu: Includes repeat, reverb, chorus, bellow, pedal 2,
foot pedal A, foot pedal B, and foot pedal C.
c. Global screens: These are used to set master tune, master reverb,
chorus amounts, and constant bass. To select a global screen
press select + next (again remember exit gets you out).
#22 -#58. Tone Bank
These are individual tone buttons grouped in eight families
#59. Song
There are three song positions
a. Factory song (lower arrow): Eight factory-set registers
b. User song (upper arrow): Buttons 43 - 50 are used to select user
songs 1 - 8, and buttons 51 - 58 used to select user songs 9 - 16.
Only buttons 27 - 43 can be used to change sound settings while
in this mode.
c. Tone select (no arrows): This position allows all the tone bank
buttons to be used while in the user song mode. When in this
mode the user songs cannot be changed.
#60-67. Song registers
Resister buttons 1 -8
(8-9) Manual Drums
Manual drums; a feature selected from the front panel by touching
select (8) and track (9) together. To try this feature we suggest you
begin with user register 1 and then recall the manual drums. You will
then have a 41 (46 chromatic) note drum kit on the treble keyboard of
the accordion that is TOUCH SENSITIVE. To exit touch the exit button
to return to the normal playing mode.

Page - 19
Additional Information about Small Display
(68 and 69) Small Display
The small display is your navigation guide – it tells you (68) what song
bank you are on – and therefore you will know what bank of 8
registers you are playing (buttons 60 – 67) whether they are FACTORY
or USER registers.
The display will show F for Factory (which is the normal position
when you power up your Concerto).
When you select the USER song banks – (done with the SONG [59]
button – turning on the top triangular LED indicating USER SONGS).
The SONG BANKS are then selected with the row of buttons starting
with 24, 33, 37, 41, 45, 49, 53, & 58. This row will select the USER
SONGS 1 thru 8 and the small display will display the number of the
BANK.
The second set of 8 USER Songs selected with the buttons just below
the previous row – 25, 34, 38, 42, 46, 50, 54, & 58. This row selects
banks 9 thru 16 but is displayed as 1. thru 8. (please pay attention to
the dot (.) after the number this is indicating the second set of Bank
Numbers.
F.
Bass CH 1 CH2
Solo OR1 OR2
68 69
70 71 72
73 74 75
Concerto Small Display
22 31 35 39 43 47 51 55
23 32 36 40 44 48 52 56
24 33 37 41 45 49 53 57
25 34 38 42 46 50 54 58
59 60 61 62 63 64 65 66 67

Page - 20
Chapter 4
Making and Recording
Your Own Registers
In this chapter you will learn to record your own user registers. The
ability to select sounds and record registers assists you in making your
Concerto a very unique and personal instrument.
The following examples will lead you through the steps necessary to
record user registers. Each example results in a different type or style
of sound.
Example l: Jazz Guitar with Strings
Step 1 Begin by selecting a factory song register, which is close to
your desired style. A register that has many of the traits you already
desire. This means you have far less work in creating the new register
if much of the register is similar to what you desire.
After you have recorded your own user song registers, you may
choose either one of these or a factory song register as the basis of a
new register.
a. In this example choose factory song register l.
b. Touch the orchestra 1 volume button
c. Select jazz guitar - now assigned to orchestra I
d. Activate chord l and select jazz guitar again
This manual suits for next models
3
Table of contents
Other Accordions International Musical Instrument manuals
Popular Musical Instrument manuals by other brands

Kawai
Kawai Concert Performer Series Digital Piano CP117 owner's manual

Allen Organ Company LLC
Allen Organ Company LLC MDS-70-S owner's manual

Best Choice Products
Best Choice Products SKY5584 instruction manual

Allen Organ Company LLC
Allen Organ Company LLC MDS-26 owner's manual

Allen Organ Company LLC
Allen Organ Company LLC 3 Manual Series owner's manual

Allen Organ Company LLC
Allen Organ Company LLC MDS-1 owner's manual