aci GRIFFIN User manual

OWNERS MANUAL & REFERENCE GUIDE
AIR CONCEPTS INDUSTRIES
U. S. Patent No. 5,063,905
Serial Number:
Date Purchased:
Dealer:

CONTENTS
SPECIFICATIONS.................................................................3
OPERATION
Cocking...........................................................................4
Air Source Installation....................................................4
Seating of Air Source......................................................4
Loading...........................................................................5
Trigger Safety .................................................................5
Firing...............................................................................5
Uncocking.......................................................................5
Air Source Removal .......................................................5
TUNING YOUR GUN
Ball Retaining Spring Adjustment..................................6
Velocity Adjustment Procedures.....................................6
FIELD MAINTENANCE
Field Stripping................................................................7
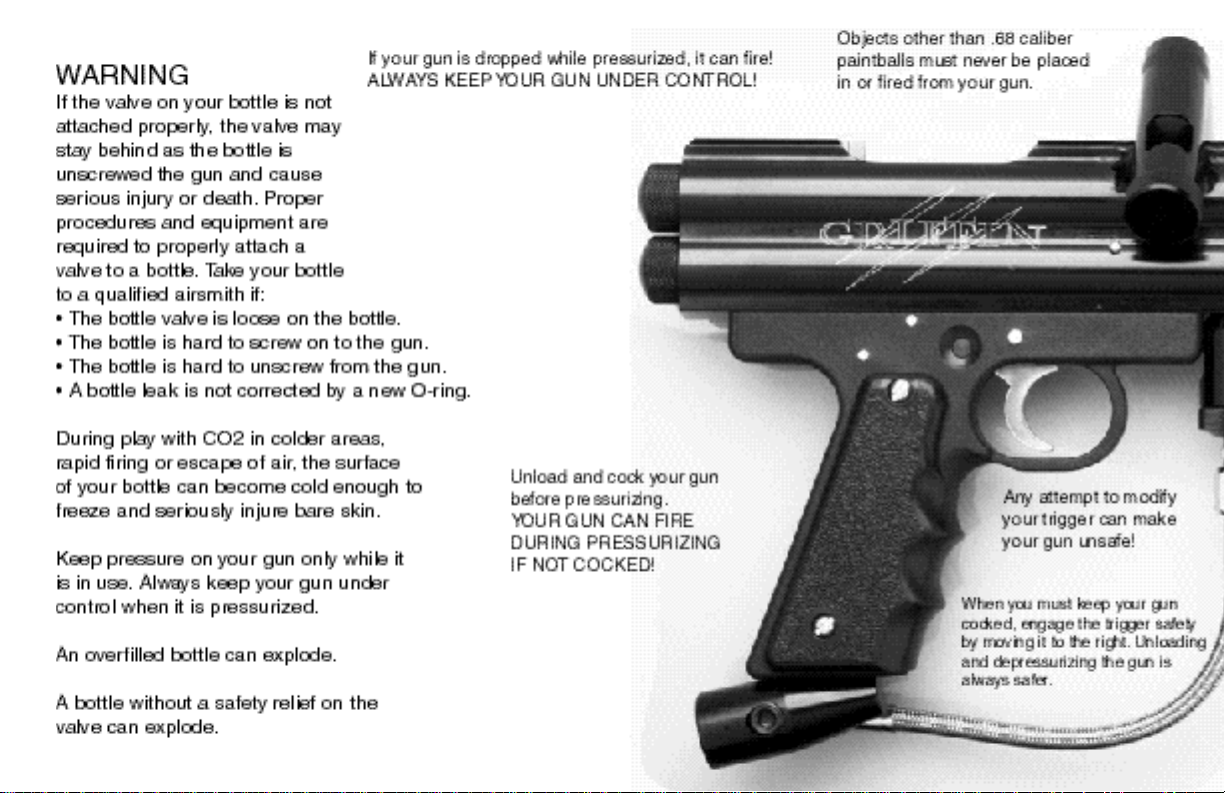
ACCIDENT CAUSES YOU CAN CONTROL....................8
MAINTENANCE
Barrel...............................................................................10
Upper Chamber...............................................................10
Lower Chamber..............................................................10
CLEANING SCHEDULE
Lubrication......................................................................11
SERVICE HINTS....................................................................11
TROUBLE SHOOTING HINTS...........................................12
PARTS BREAKDOWN..........................................................14
WARRANTY INFORMATION.............................................16
CAUTION
• Read the entire manual before using the Griffin.
• The Griffin is not a toy. It can cause serious injury or death.
• Wear approved eye and head protection, even when test firing.
• The compressed air source used with the Griffin can cause serious injury or death.
• Sale or use of the Griffin is not intended for individuals under the age of 18.
• The Griffin is to be used only as described in this manual.
• Fire only 0.68 caliber paintballs from the Griffin.
• Check the velocity of your Griffin before each use. Not to exceed 300 fps.
• The Griffin can fire when dropped.
• Keep the Griffin unloaded and unpressurized when not in use.
• Install a barrel plug in the barrel when not in use. (One is included.)
• Replacement barrel plugs are available from your ACI dealer.
• Handle the Griffin as if it is always ready to fire. It recocks during firing.
• The Griffin can be dangerous up to 200 yards (180 meters).
• Don’t shoot at opponents closer than 20 feet.
• Never shoot toward individuals not wearing approved eye and head protection.
• Never disassemble the Griffin while it is pressurized.
• Do not touch a chilled CO2 container with bare skin; frostbite can occur.
• Do not use theGriffin while under the influence of drugs or alcohol.
• Never shoot at the property of others.
• Learn and follow the rules of the field where you are playing.
• Always maintain control of the Griffin while it is pressurized.
• Never store the Griffin while it is pressurized.
• Two very dangerous defects require immediate attention by your dealer or quali-
fied airsmith:
1. The air source bottle valve unscrews from the bottle.
2. The gun double fires (other than when you are running out of air).
• Do not modify your gun, especially your trigger assembly.
2

CALIBER
• 0.68 Paintballs Only
BLOWBACK SEMI-AUTOMATIC POWERED BY
• Compressed CO2
• Regulated Compressed Air
• Regulated Nitrogen
WEIGHT
• 2.3 lbs. (not including loader or air source)
ALUMINUM MAIN BODY
• Integrated Industry Standard Sight Rail
•Aluminum Ball Retaining Side Plate
• Laser Engraved Graphics
BALL FEED
• Powerfeed Design To Increase Feed Rate
• 7/8 inch O.D; accepts standard feed loader adapters
MUZZLE VELOCITY
• Under 160 to over 300 fps
• Adjustable - External
• Self-Locking
VALVE PATENT #5,063,905
• Patented Sub Zero Antifreeze Technology
• High Performance
BARREL
• Aircraft Quality Aluminum
• Microhoned and Polished
• Muzzle Break
45 GRIP ONE-PIECE TRIGGER FRAME
• Ergonomic “Point And Shoot” Design
•Accepts Standard 45 Grip Pads
• Complies With Industry Standard 2 Hole Bottomline
• Reflex Trigger Action With 2.4 lb. Pull
• Laser Cut Tool Steel Trigger & Sear
• Push Button Positive Lock Safety
VERTICAL ADAPTER
• Accepts Standard Aftermarket Accessories
• Easily Converts To Vertical Style
OPTIONAL ACCESSORIES (If Equipped)
• Zero-Gravity Barrel
• Sub Zero Expansion Chamber
• Gas Through Grip
• High Volume Cell
• Rear Cocking Venturi Bolt
• Velocity Adjuster
• Trigger Shoe
SPECIFICATIONS
3

Air Source Installation
Once the Griffin is properly cocked with the safety on you can
pressurize it with C02, regulated compressed air or nitrogen. Only
after you understand how to handle it safely should you attempt to
pressurize your Griffin.
Proper Seating of Air Source
The bottle O-ring provides the seal, so just tighten the bottle until
it is snug. You should hear a brief hiss as the bottle valve opens
during the last 1/2 turn. Over tightening can damage the Griffin.
If a leak persists, replace the bottle O-ring.
CAUTION
Depressurize the Griffin (remove the bottle) unless you
are about to use it. Do not unscrew the bottle from the
bottle valve; you may turn the bottle into a rocket!
OPERATION
Before pressurizing, check that the Griffin is cocked but not
loaded. If not cocked, air may leak until the cup seal seats.
Also, if not cocked the Griffin can fire as it is being pressur-
ized.
Cocking
To cock the Griffin, pull the cocking pin rearward until it latches.
Be careful, if you let go before it latches, the Griffin can fire. DO
NOT DRY FIRE THE GRIFFIN (To pull the trigger, the safety
must be disengaged.)
4

Loading
Install a 7/8 elbow with loader on the ball feed tube. Following
the directions of the manufacturer, fill the loader with .68 caliber
paintballs.
Trigger Safety
The Griffin has a trigger safety to help prevent accidental firing.
With the Griffin pointing away from you, engage the safety by
pushing it to the right. When the safety is toward the left the
Griffin can then be fired. The safety may not engage unless the
Griffin is cocked. Remember, the only time the Griffin is truly
safe is when it is unloaded and depressurized
Firing
To fire the Griffin, point it in a safe direction, away from yourself,
and pull the trigger. The trigger safety must be off; that is to the
left. Fire the Griffin as often as you like with air, with or without
paintballs in it. This helps break it in and makes it operate
smoother.
Uncocking
Before uncocking, unload. Rotate your gun to the side so paint-
balls in the chamber and elbow roll back into the loader. Take a
couple of shots in a safe direction to insure that the barrel is
empty. If you uncock with a ball in the chamber, it will be forced
forward into the barrel. Later when you recock, a second ball will
enter the chamber. If two balls are fired at once, they may break.
To finish uncocking, unscrew the air source, pull back the cocking
pin, pull the trigger and let the assembly move forward slowly.
DO NOT DRY FIRE THE GRIFFIN. (To pull the trigger, the
safety must be disengaged.)
Air Source Removal
Once the Griffin is properly uncocked with the safety on you can
depressurize it. To depressurize the Griffin, slowly unscrew the
air source paying special attention to the bottle valve. DO NOT
UNSCREW THE BOTTLE VALVEFROM THE BOTTLE.
UNSCREWING THE VALVECOULD CAUSE SERIOUS
INJURY OR DEATH.
WARNING
Avoid dry firing (without air) — damage to the
valve body, stop pin, and cup seal can occur.
5

TUNING YOUR GUN
Regular tuning is essential. But don’t waste time trying to tune a
gun which is:
• Dirty or poorly lubed
• Has a damaged striker O-ring
• Low on air
• Has the wrong O-rings installed
Check velocity to ensure it is not too high. It was set to 260 fps
at the factory, but it will change over time, and with temperature. Velocity Adjustment Procedures
Before adjusting velocity make sure the striker plug is screwed in
all the way. Your gun must be properly lubricated and free of all
dirt and debris.
Insert 1/4 hex wrench (provided) into the velocity adjustment
screw located in the striker plug as shown in the diagram below.
Turn clockwise to increase velocity. Turn counter clockwise to
decrease velocity. Check your velocity on a reliable chronograph
every quarter turn until desired velocity is reached.
CAUTION
Do not adjust velocity with the striker plug
partially unscrewed. If it is later screwed back
in, the velocity may be dangerously high.
PLAY SAFE!
6

FIELD MAINTENANCE
Before each use, your gun must be cleaned, lubed, and tuned.
Field Stripping
To field strip your gun (refer to illustrations):
1. Depressurize gun (remove air source)
2. Unload gun.
3. Uncock gun.
4. Unscrew barrel.
5. Unscrew bolt plug.
6. Pull cocking pin straight out from gun.
7. Remove bolt from front or rear of gun.
8. Swab bolt chamber back to front.
Reverse order for reassembly.
❶ ❷ ❼ ❽
❺ ❻
❸ ❹
7
8

9

MAINTENANCE
AIR SOURCE MUST BE REMOVED BEFORE
ANY MAINTENANCE CAN BE PERFORMED
Barrel
To clean the barrel, unscrew it from the main body and swab back
to front. When paintball gelatin residue builds up, clean with
warm soapy water or rubbing alcohol. Residue build up hurts
accuracy.
Upper Chamber
Field strip as described on page 7 and use warm soapy water or
rubbing alcohol where needed to clean the rest of your Griffin.
Remove the bolt O-rings to remove paint and dirt build up from
the O-ring grooves.
Keep the bottle valve and adapter clean. Dirt entering here can
destroy the cup seal or valve body in one shot.
Lower Chamber
To clean the lower chamber perform steps 1-8 on page 7, then
remove striker plug assembly, striker spring and buffer.
Remove front and rear trigger housing screws and washers and
remove trigger housing. (Notice front screw is longer with a pilot
on it to secure the valve body.)
Slide striker out the rear of the gun. If needed, insert a small
object into the bottom slot of the main body, to assist in sliding
the striker out the rear of the gun.
Clean all major components of the gun.
Inspect all O-rings and replace as needed.
Apply AIRLUBE upon assembly of all moving parts.
Reassemble parts in reverse order, making sure to include trigger
housing washers. Be very careful not to force parts back together,
or permanent damage may occur.
The following parts should not be removed for
routine maintenance:
Cup Seal And Valve Body
Easily damaged when removed. In clean conditions these have
lasted for more than 250,000 shots. If exposed to dirt, the cup seal
will wear rapidly.
Reservoir Plug O-rings
Usually damaged only during removal
10

CLEANING SCHEDULE
Every 500-1000 shots • Lubricate with AIRLUBE
Every 1-3,000 shots • Remove bolt
• Clean upper chamber and bolt
• Check bolt O-rings
• Lubricate trigger assembly
7500-25,000 shots • Remove striker
• Clean striker and lower chamber
• Check striker O-ring for wear
Storage • Unpressurize and Unload
• Clean and Dry
• Lube
In the event of a ball break within the gun, follow the Field Strip
procedure on page 7.
This schedule may need to be revised depending on the playing
conditions.
Lubrication
Lubrication affects recocking and velocity. AIRLUBE (provided)
works well at all temperatures.
DO NOT USE FIREARM LUBRICANTS. THEY CAN GET
STICKY WHEN CHILLED BY CO2 OR COLD WEATHER.
SERVICE HINTS
Bolt Pin
Anylon pin in the bolt prevents movement when the gun is fired.
If the cocking pin is loose, replace the nylon pin (supplied) by
pressing it out of the bolt.
O-rings
The valve body O-rings will last for years if not disturbed.
Improper O-rings can interfere with recocking or cause air leak-
age. Keep the O-rings on the bolt and striker clean; grit and dust
abrade them rapidly.
Trigger Assembly
Keep the assembly clean and the metal parts oiled to prevent rust.
There are no user-serviceable parts inside the trigger assembly.
Valve Body
To extend valve body life, DO NOT REMOVE IT! There is a
safety stop pin pressed into the main body to prevent the valve
body from moving backwards. If the valve body must be
removed, it should be pushed out the front of the gun with a long
nylon rod or equivalent to prevent damage to the inside of the
valve chamber. Make a note of orientation before removal of the
valve body to ensure proper assembly. Properly lube and inspect
O-rings before reinstalling valve body. (Refer to diagram on Pg 14)
11

Half the guns sent in for repair are dirty, poorly lubed, or have a damaged
striker O-ring Check these items first.
Double firing (2 or more firing cycles on a single trigger pull):
•Trigger mechanism is dirty - clean it.
•Recock force is too high - Adjust front valve spring.
•Striker is badly worn - inspect and replace if worn.
•Trigger is badly worn - remove (by airsmith); replace if needed.
• Sear is badly worn - remove (by airsmith); replace if needed.
• Sear spring has fallen off or is broken - fix or replace.
NOTE: Double firing when your gun beats down is normal; double firing
otherwise is a safety hazard and must be remedied immediately.
Gun “beats down” and fails to recock:
•Air supply is cold—give it time to warm up.
•Air supply is low—replenish it.
•Bolt and/or striker, are dirty or need lube - clean and lubricate.
•Sticky O-rings on bolt or striker (torn or too hard) - install new ones.
•Leaky O-rings on bolt or striker (torn or worn) - install new ones.
•Air bottle valve isn’t fully open - tighten bottle (don’t force it); replace
bottle.
•Air bottle is too tight - loosen it (don’t force it); replace bottle.
•Cup seal is partially unscrewed from valve pin - retighten it.
• Velocity adjustment screw is too far in causing spring bind - unscrew
and chronograph.
Velocity drops and gun “beats down” during rapid firing:
•Bottle valve isn’t fully open.
• Sliding parts need lubrication.
Velocity is very erratic (>20 fps between shots):
•O-rings on bolt or striker are nicked or torn - install new ones.
•Lube is sticky (including buildup) - clean gun and apply AIRLUBE.
•Cup seal is loose on valve pin - retighten it.
•There is liquid C02 in the gun - is your bottle over-filled?
•Air bottle valve isn’t fully open - screw bottle further (don’t force it);
replace bottle.
•Your paintballs are not round or they vary in diameter - get better paint.
•Barrel is dirty (residue can be very hard to see) - clean with swab.
•Striker spring is bent or binding - replace it.
Accuracy is degraded:
•Paint residue or other moisture somewhere in gun - clean.
•Paintball gelatin in the barrel - clean.
• Barrel is scratched or bent - replace.
Excessive paintball breakage:
•Too much recock force.
•Paintball gelatin in barrel - clean with swab.
•Defective paintballs - get better paint.
•Defective barrel - polish or replace barrel.
•Burr on end of bolt - polish it off.
Paintball chopped in chamber by bolt:
•Bad paintballs - get better paint.
•(during an isolated shot) Ball retention spring is dirty - remove side
plate, clean spring and plate and reinstall.
•(during rapid firing) Firing rate exceeded rate at which paintballs
entered gun - check that feed path is clear OR replace paintball loader
with one which will feed paintballs into gun faster.
TROUBLESHOOTING
12

TROUBLESHOOTING
Bolt is Jammed:
•Paintball chip beside bolt - field strip.
Two balls fire on a single shot:
•Gun was uncocked with a ball in the chamber - unload chamber first.
•Ball retention spring is stuck - Remove side plate, clean and reinstall.
Cocking pin won’t insert:
•Bolt and striker are not lined up.
Excessive striker O-ring damage:
•Rough area inside gun - smooth it.
• Striker is dirty - clean.
Very short bottle O-ring life:
•Bottle valve releases gas during more than last 1/2 turn of bottle instal-
lation, stressing O-ring - try a different bottle.
•O-ring and bottle threads are dry - lube them lightly.
Bottle won’t release air:
•Bottle valve is defective, or bottle is too loose or too tight.
Air is leaking:
•Air bottle is very loose - Remove it, then replace it and tighten until it
is snug.
•Bottle O-ring; cup seal; reservoir plug O-ring; or valve body O-ring is
defective or displaced by dirt - remove dirt or replace bad part.
•Forward lip of valve body is rough - replace.
Gun won’t fire when trigger is pulled (gun cocked and safety off):
• Air source low - refill tank.
• Trigger assembly may be defective—contact airsmith or ACI for ser-
vice.
Gun won’t fire a paintball, but recocks:
• Bolt in upside down
Air is leaking down the barrel:
• Gun is not cocked - cock it.
• Low air pressure - refill air supply.
• Cup seal defective - inspect and replace.
Air is leaking out the front reservoir plug:
• Reservoir plug O-ring defective - replace.
• Valve body was disturbed - call your dealer or ACI for possible service.
• Gun has too much pressure - check air source output pressure.
• Chamber wall scratched - call your dealer or ACI for possible service.
WARNING
Never attempt to perform maintenance ormake repairs on
your gun until you have removed the airsource.
13
2
3
45
67
8910
15
16
18
21
24
11
12
13
44 14
19
20
17
22
23
26 25
27
28
45
46
47
48
49
50
51
52
54 53
56 55
57
58
59
60
1
14

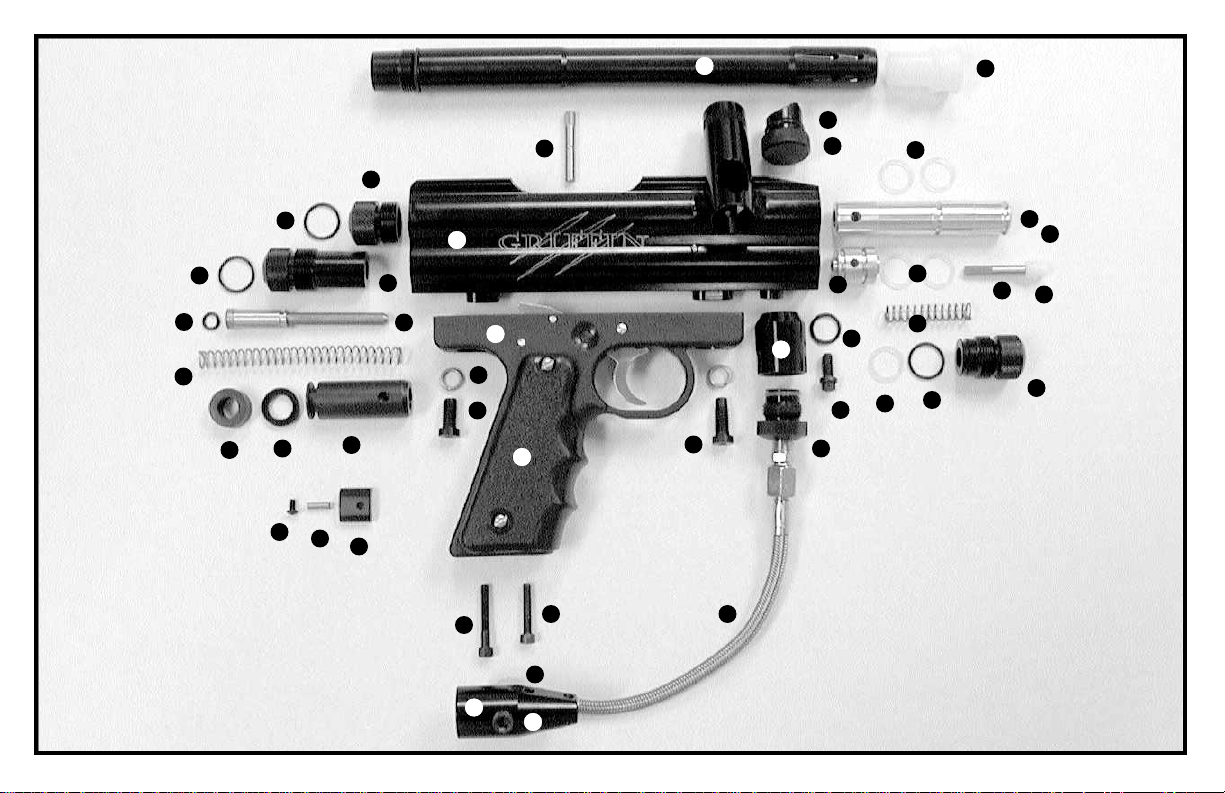
Barrel..............................................1
Barrel Plug......................................2
Powerfeed Plug..............................3
Powerfeed O-ring ...........................4
Bolt O-ring ......................................5
Bolt..................................................6
Bolt Body Lock Pin .........................7
Valve Body......................................8
Valve Body O-ring...........................9
Valve Stem......................................10
Cup Seal.........................................11
Valve Spring....................................12
Reservoir Plug................................13
Reservoir Plug O-ring.....................14
Reservoir Plug O-ring.....................15
Vertical Bottle O-ring.......................16
Vertical Bottle Adapter....................17
Vertical Adapter Bolt.......................18
Gun To Hose Adapter.....................19
8.5” Stainless Steel Hose With JIC
Fitting..............................................20
Front Frame Screw.........................21
Front Bottomline Screw..................22
Rear Bottomline Screw...................23
90° Nickel Plated Elbow.................24
NPT Plug ........................................25
Custom Two Hole Bottomline.........26
45 Grip ...........................................27
45 Grip Frame ................................28
Rear Frame Screw .........................44
Frame Screw Washer.....................45
Ball Retaining Spring Plate.............46
Ball Retaining Spring......................47
Retaining Plate Screw....................48
Striker .............................................49
Striker Seal.....................................50
Striker Buffer...................................51
Striker Spring..................................52
Velocity Adjustment Pin..................53
Velocity Pin O-ring..........................54
Striker Plug.....................................55
Striker Plug O-ring..........................56
Bolt Plug O-ring..............................57
Bolt Plug.........................................58
Griffin Receiver...............................59
Connecting Pin...............................60
Following Parts Not Shown
45 Trigger .......................................29
Trigger Spring.................................30
Trigger Pin......................................31
Trigger Shim...................................32
Safety..............................................33
Safety Ball ......................................34
Safety Spring..................................35
Safety Set Screw............................36
Sear Pin..........................................37
45 Sear...........................................38
Sear Spring Pin ..............................39
Sear Spring.....................................40
45 Grip Bottomline Square Nut ......41
45 Grip Screw.................................42
45 Grip Screw Stand-off.................43
PARTS LIST
15

WARRANTY INFORMATION
Limited Warranty Statement
Air Concepts Industries, Inc., warrants that your Griffin is free from
defects in materials and workmanship for a period of one year from the
original date of purchase by the initial owner. (For guns used for rental,
the warranty is limited to three months.) During this period, any defec-
tive parts will be repaired or replaced with new, or at the option of Air
Concepts Industries, Inc., refurbished parts. All parts replaced under this
warranty become the property of Air Concepts Industries, Inc.
User installable parts will be replaced upon receipt by us of the defective
part and proof of purchase identifying initial gun purchase date and serial
number. Otherwise, your gun must be shipped prepaid to us, with proof
of date of purchase. You are responsible for shipping your gun, or gun
parts to us, and for insuring against loss during shipping. For detailed
instructions on obtaining warranty service and an R.A. number call ACI
at 909-350-9176. Any return without a R.A. number will be refused.
Exclusion and Limitations
This warranty does not extend to the cup seal or O-rings, nor to any
parts, such as air bottles or adapters, which are not manufactured by Air
Concepts Industries, Inc., nor to any parts made defective by accident,
misuse, abuse, or modification.
Except as expressly stated herein, Air Concepts Industries, Inc., makes no
warranties, express or implied, including but not limited to any implied
warranties of merchantability or fitness for any purpose beyond that for
which the Griffin was designed. This warranty gives you specific legal
rights. You may have other rights which vary from state to state.
Air Concepts Industries, Inc., shall not be liable for any incidental or
consequential damages arising from the use of the Griffin or from the
breach of the warranty set forth herein.
THE SPORT OF PAINTBALL
The sport of paintball involves games in which opposing players attempt
to shoot each other with dye-filled projectiles called “paintballs”.
Paintball is a serious sport which makes rigorous demands on players’
physical and mental abilities. When played in a safe manner, it can pro-
vide a rewarding experience not available in any other sport.
There are hazards in any active sport such as paintball. Serious injuries
are rare, but do occur.
A0.68 caliber paintball moving at high velocity adds a special dimension
of hazard to paintball sports. At a minimum, it can cause pain and a
bruise. It can break the skin and cause bleeding. If it strikes an unprotect-
ed eye, ear, or mouth it can cause blindness, deafness, or even death. If it
strikes a young child in a sensitive body area, it can cause crippling or
death. This is why proper safety gear for players, isolation of spectators
from the play area, and proper handling of paintball guns are absolutely
essential.
The importance of always following safety rules, and the risk of serious
injury, require an adult level of maturity when using paintball guns. This
is why sale of the Griffin is limited to individuals 18 years of age and
older.
The information in this manual is subject to change without notice. It
is not a commitment on the part of Air Concepts Industries, Inc. We
reserve the right to improve and change products with no obligation
to modify products previously sold.
16
Table of contents


