MACDEV PRIME XTS User manual

www.macdevpaintball.com
(c) Copyright 2019 Mac Developments Pty Ltd (MacDev).
MacDev - Proudly Australian
The Prime paintball marker is covered by the following granted patents as well as internaonal pending patents:
U.S. Patent Nos. 5,228,427; 5,755,213; 5,957,119; 6,260,821; 6,349,711; 6,494,195; 6,644,295; 6,644,296; 6,823,857;
6,694,963; 6,810,871; 7,017,497; 7,044,119.

PRIME™XTS
Owners Manual
TM
PRIME

Prime XTS Owners Manual
V1.10
Copyright Mac Developments Pty. Ltd. 2019
All rights reserved
No part of this document may be copied or reproduced in any form or by any means without the prior wrien
consent of Mac Developments Pty. Ltd.
Noce is hereby given that this manual is part of the arcle owned in whole by Mac Developments Pty. Ltd., known
as indicated in this manual and drawings. All rights of manufacture and reproducon of such arcles or any part
thereof are reserved by Mac Developments Pty Ltd. Neither said arcle nor any part thereof may be manufactured or
reproduced without the wrien authorizaon from Mac Developments Pty. Ltd. All proprietary rights and informaon
are the sole property of Mac Developments Pty. Ltd.
MacDev, Prime, Conquest, Gladiator, MatchSck, Cyborg, Shi and Drone are all trademarks of Mac Developments
Pty Ltd.
Statement of Liability
Mac Developments Pty. Ltd. makes no warranes with respect to this documentaon and disclaims any implied
warranes of merchantability or tness for a parcular purpose. The informaon in this document is subject to
change without noce. Mac Developments Pty. Ltd. assumes no responsibility for its resale or safe handling. Mac
Developments Pty. Ltd. assumes no responsibility for physical injury or property damage resulng from its use.

MacDev Warranty
MacDev oers a 12 month limited warranty period on your MacDev manufactured electro-pneumac
marker. The MacDev electro-pneumac marker is warranted to be free from all manufacturing and
producon defects for a period of 12 months from the date of original purchase. If requested by MacDev,
an original proof of purchase must be provided. Warranty excepons include, but are not limited to,
accidental damage, misadventure, reasonable wear and tear and consumable components such as
O-rings, detents, baeries and eyes. Warranty work must be undertaken by an authorized MacDev tech
centre or at a MacDev sanconed tech support booth.
For assistance with your warranty, please visit www.macdevpaintball.com/warranty or contact customer
service on our website (www.macdevpaintball.com)
Warning!
This is not a toy. Misuse may cause serious injury or death. Eye protecon designed specically
for paintball must be worn by user and persons within range. Recommend 18 years or older
to purchase. Persons under 18 must have adult supervision. Do not use muzzle velocies
over 300fps. Do not use within 5m of target. READ OWNER’S MANUAL BEFORE USING. 2

CONTENTS
Know your Prime (Page 5)
All users should read this secon to learn the parts of your Prime and their names.
Quick Setup (page 7)
Learn how to set your marker up for use the rst me.
Assemble your barrel
Install and air system
Fit your loader
Turning on your marker
Understanding the OLED
Adjusng your velocity
Adjusng your trigger
Advanced Setup(Page 12)
Essenal reading on how to use your marker.
Tourney Lock
Entering program mode
Finding and changing sengs
Sengs in detail
Using the USB connector
Changing the front grip angle
Maintenance (Page 16)
Maintaining your purchase is essenal to long term product sasfacon.
Basic cleaning
Maintaining the drivetrain
Maintaining the inline regulator

Troubleshoong (Page 19)
Solving common dicules.
Common problems and soluons
Technical assistance
Specicaons (Page 22)
4

KNOW YOUR Prime® XTS
2
1
3
4
5
7
8
10
6
11
9

Congratulaons on your purchase of a new MacDev Prime XTS. Your marker uses a highly ecient spool valve
drive for a at, consistent and accurate shot. The drive is powered by a high precision, low power solenoid valve,
manufactured in house by MacDev. The enre system is controlled by a new generaon, robust microprocessor
running a proprietary operang system.
The latest features have been added around this powerful base core to bring you a marker with unrivalled usability,
quality and reliability.
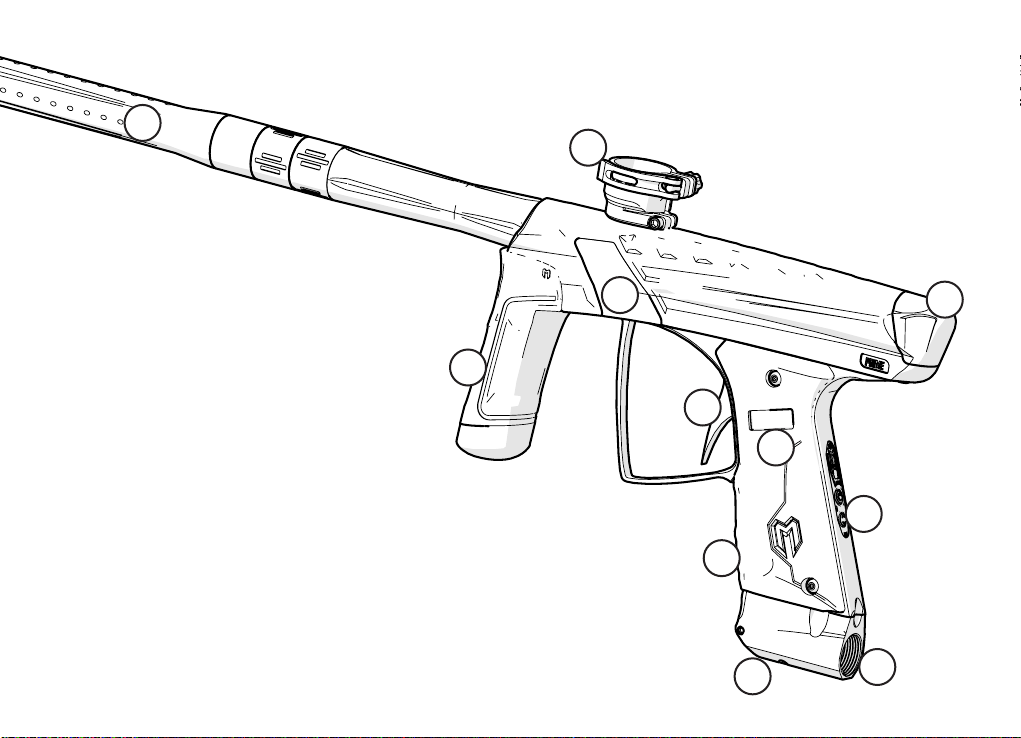
Please take the me to learn the parts of your Prime XTS, it will help you when reading this manual.
Numbered basic parts as shown in the gure on the le:
1. Shi 3 barrel
2. Feed clamp lever (used to ax your loader)
3. Drive cover (pull up and back to remove)
4. Velocity regulator adjustment (an clockwise to increase velocity)
5. Tool-less eye covers
6. OLED display used to view gun status/sengs
7. Trigger with screw adjustments
8. Membrane pad with power and programming buons
9. Venng ASA, screw your air system in here
10. Venng ASA on/o lever (used to turn the air on or o)
11. Front grip assembly
Please note, the features and included accessories are subject to change, and may vary from those show in this manual.
6

QUICK SETUP
Assemble your barrel
Your marker comes with a Shi 3 barrel system. Screw the two halves together, before screwing the barrel into
your marker. The barrel and back are reverse threaded.
1 2
Your marker is shipped with two inserts. Select the
best match to your paint. More Shi 3 inserts are
available from MacDev if you require more insert
sizes.

Install an air system
Your marker can accept any standard screw in air system. A
pressure of 450psi is preferred, however 300-800psi is acceptable.
1. Open the lever
2. Screw n an air system
3. Close the lever to engage the air.
WHEN SCREWING YOUR
AIR SYSTEM INTO THE ASA,
THE THREADS SHOULD BE
LOOSE. IF AT ANY POINT
THEY BECOME TIGHT, DO
NOT FORCE THE THREADS,
THIS MAY CAUSE DAMAGE
TO YOUR AIR SYSTEM OR
YOUR MARKER!
1
2
3
8

Fit your loader
1. Open the lever
2. Push in your loader
3. Close the lever
4. Make ne adjustments to the clamp force using the thumb adjuster
1
2
3
4
Use any loader you like with your Prime XTS, your
marker will use the beam sensor to wait for a ball
before ring. If you would like to re at a faster rate,
use a faster loader.

Turning on your marker
Tap the power buon to turn on. Long press the
power buon to turn o.
Long press the scroll buon to toggle the eyes on
and o.
Understanding the OLED display
Your OLED dislay indicates the baery level, eye
status, re mode and recent rate of re.
Ball loaded
No ball loaded
Bolt is not seen*
Eye system disabled
* Your marker looks for the bolt to move back and
forth during ring. If this is not seen, your display
will show a queson mark. This is common if the
marker does not have any air. 10
power buon
scroll buon

Adjusng velocity
Use a 1/8” allen key to adjust velocity as shown.
The arrow on the diagram is an clockwise, which
is increasing velocity. Always use a chronograph,
and use small adjustments.
Adjusng the trigger
Your trigger has four adjustment screws, they are located in the front face
of the trigger and also on the upper face. In order of top to boom, they
are the trigger rest point, spring tension, actuaon point and stop point.
You can easily adjust these screws to personalise the feel of your trigger.
DO NOT ADJUST YOUR VELOCITY
ABOVE 300FPS, AND ALWAYS OBEY
LOCAL LAWS AND REQUIREMENTS.
CAUTION! WHEN ADJUSTING THE SWITCH ACTUATION SCREW, MAKE
CERTAIN THAT YOU DO NOT ADJUST THE SCREW IN TOO FAR, AS THIS
MAY RESULT IN DAMAGE TO YOUR MICROSWITCH.

ADVANCED SETUP
Tourney lock
The marker board is equipped with a tourney lock system. When the
tourney lock system is acvated, the marker cannot be reprogrammed
on the eld - making it tournament legal.
If your board is in locked mode, you can view your sengs, but a
lock indicator will be shown on the right hand side of the screen,
indicang that your board will need to be unlocked before sengs
may be changed.
The lock status can be changed by opening the le hand side of the
marker wrap around grip to gain access to the circuit board. The
tournament lock is a black buon. Press and hold the tourney lock
buon unl an on screen indicaon of tourney lock status is shown.
lock buon
Entering program mode
To program the board, hold down the trigger whilst turning the marker on. When done correctly, you will see a message
on your display screen indicang that programming mode is loading. You must connue to hold the trigger unl the
program mode is loaded, then release the trigger.
Finding and changing sengs
Once in program mode, the OLED display will show a current seng. you can advance to the next seng by tapping
the scroll buon ( ). You can go back to the previous seng by tapping the power buon ( ).
12

Once you have found a seng you would like to change, press and hold the trigger unl the seng changes to red.
The seng can now be changed by tapping the scroll buon to increase its value (or change to a dierent opon), or
tapping the power buon to decrease its value.
Once you have adjusted the seng to a value you would like, press and hold the trigger again unl the seng returns to
white colour, it has now been saved.
If your tourney lock is on, sengs that can change the tournament legality of your marker will be locked. Their seng
can be viewed, but not changed. You will know if the tournament lock is blocking eding, because a red lock symbol will
show in the upper le hand corner of the screen, and the seng will not change to the usual red colour. If you would like
to change a locked seng, you must open the wrap around grip and hold in the tourney lock buon. This may be done
inside program or normal running mode.
Sengs in detail
Mode - The type of ring system used, semi auto, Millenium and PSP are common tournament modes. Ramp mode
allows the programming of custom ramping behaviour.
ROF - This is the maximum rate of re allowed by the marker. This seng is only observed if the nex seng, rate of re
cap is set on.
ROF cap - If the cap is enabled, the marker will be limited to the ROF seng. Otherwise, it will re as fast as the laws
of physics (and paint supply) will allow.
Dwell - the amount of me your solenoid is given power - the Prime should be set to a maximum of 12ms. If the
weather is very cold, or your marker requires it, you may set this a lile higher.
Debounce - the amount of bounce ltering applied by the soware. This seng may be increased to remove unwanted
trigger bounce.
Ball delay - this is a parameter used to give a paintball me to sele in the breach of the gun. If you have unexplained
ball breakage, then you may need to increase this seng.

Eye sensivity - the sensivity of the soware to changes in your eyes. Please do not change this parameter unless
directed (default 10).
Forced shot - when enabled, this will allow the user to force a shot by holding the trigger in - even if the eyes cannot
detect a ball. Set this to o, if you would not like to use this funcon.
FSDO me - FSDO stands for First Shot Drop O. If you leave your gun for some me, and the rst shot is lower than
it should be, then you can use this parameter to correct it. This parameter is the me that the soware waits before
correcng for FSDO.
FSDO dwell - this is the amount of extra dwell given to the solenoid to overcome FSDO - if directed to do so by the
above parameter.
Ramp semishots - this seng (and the other three below) is only used if you are using the Ramp remode. This is the
number of semi auto shots which must be red before ramping is allowed.
Ramp rate - this is the number of shots per trigger pull when in ramp mode.
Ramp ROF - this is the rate of re which must be achieved and maintained to stay in ramp mode.
Ramp meout - the amount of me the user can spend below the ramp ROF before ramping is exited.
Sound - turn sounds on or o.
Auto power o - save power by automacally turning the marker o aer 30 minutes.
Load/Save proles - Your marker has two prole save slots. Once you have your marker set up as you like it, go to
save prole and select one of the proles. Hold the trigger in on the prole number you would like, and the current
sengs will be save to that prole slot. You can reload them at any me using the load prole opon.
There is an opon under load prole, to load factory defaults.
Version informaon and shot counter is shown on the nal seng screen.
14

Using the USB connector
Your stock board has a USB connector under the display. Instrucons
and soware downloads are available at macdevpaintball.com.
Please note: USB is only used for rmware updates, not for everyday
sengs changes.
Changing the front grip angle
Your Prime XTS front grip can be used ina an 8 degree or vercal
posion. It is shipped in the 8 degree posion. To change it to vercal,
remove the frame completely, and follow these steps:
Remove the cap using
your allen key
Slide the grip
rubber o the
core.
Remove the core,
and the screws
holding the block.
Rotate the block by 180 degrees
and re-install the core in the new
posion
USB
locaon

MAINTENANCE
If you take 10 minutes aer every day of play to maintain your marker, you will be rewarded with consistent reliable
performance.
You should perform basic cleaning aer every day of play, and you should perform drivetrain maintenance every
5 cases. You should perform inline regulator maintenance every 20 cases. You can clean and maintain your marker
more oen, it is up to you.
When maintaining your marker, use only MacDev accessories. Your marker is packaged with an allen key set and a
small tube of MacDev Milia Lube, only use Milia Lube for lubricaon.
Basic cleaning
Aer using your marker, always clean old paint from the outside. Always clean your barrel using a barrel swab to
remove traces of dirt and paint. Use your barrel swab to clean the breech and feed tube in a similar way.
Your marker internal parts are quite well protected and sealed. However, when not in use, dirt can get into the
marker and cause problems - so storage of your marker is just as important as cleaning. When storing your marker,
ensure that it is stored a bag that is free of dirt, otherwise dirt may get into the venng ASA or breech.
16

Maintaining the drivetrain (every 10,000 shots)
To maintain your drive, ensure your marker is fully degassed and pull the drive cover up
to release the drive. Slide the drive out of your Prime. Unscrew the drive parts to access
the components shown in the diagram below.
Clean the old grease and dirt from the keg, bolt and valve. Apply fresh Milia Lube to the
keg inner o-rings (#17 and #19). Apply fresh lube to the #M16-2 o-ring on the bolt, as well
as the inside of the larger end of the bolt. Slide the bolt back into the keg. Apply fresh
lube to the #14 o-ring on the valve and slide it into the bolt, then screw the valve into
place. Complete the drive assembly by screwing the valve cap back onto the valve.Lightly regrease the outside of the
drive and slide it back into your Prime marker.
More detailed drawings of the sub assemblies are available from macdevpaintball.com/support.
#20 o-ring
Drive cover
#14 o-ring
Valve
#M16-2 o-ring
Bolt p
#14 o-ring
#19 o-ring
(Internal)
#20 o-ring
#17 o-ring
Keg
Bolt
Valve
Nose
Drive cap
Pullpin
Bumper
Valve Cap
#20 o-ring
#M17 o-ring
1
2

18
Drive cover
Maintaining the inline regulator
(40,000 shots)
Before working on your inline reg, make certain that
the air supply is turned o (via the venng ASA), and
safely re any gas out of the gun to ensure it does not
have any residual pressure.
To access the regulator, remove the le hand side of your wrap around grip. This will allow you to unscrew the body of
the regulator.
Clean the inside of the frame bore with a q-p, and remove old grease from the regulator piston. Apply new grease to
the piston sha, and the #11 o-ring on the piston, as well as the #8 o-ring.
Apply new grease to the inside of the frame bore before re-installing your regulator.
More detailed drawings of the sub assemblies are available from macdevpaintball.com/support.
#11 o-ring
Piston stem
(Lubricate here)
#12 o-ring
Unscrew regulator from frame
(degass marker rst)
The piston may not come out with the regulator
body. Never use pliers or any tool to grab the piston,
this can damage it. Use a 1/8” allen key pushed into
the centre hole of the allen key to help remove the
piston if it is lodged in the frame bore.
#8 o-ring
(inside)
Table of contents
Other MACDEV Paintball Equipment manuals