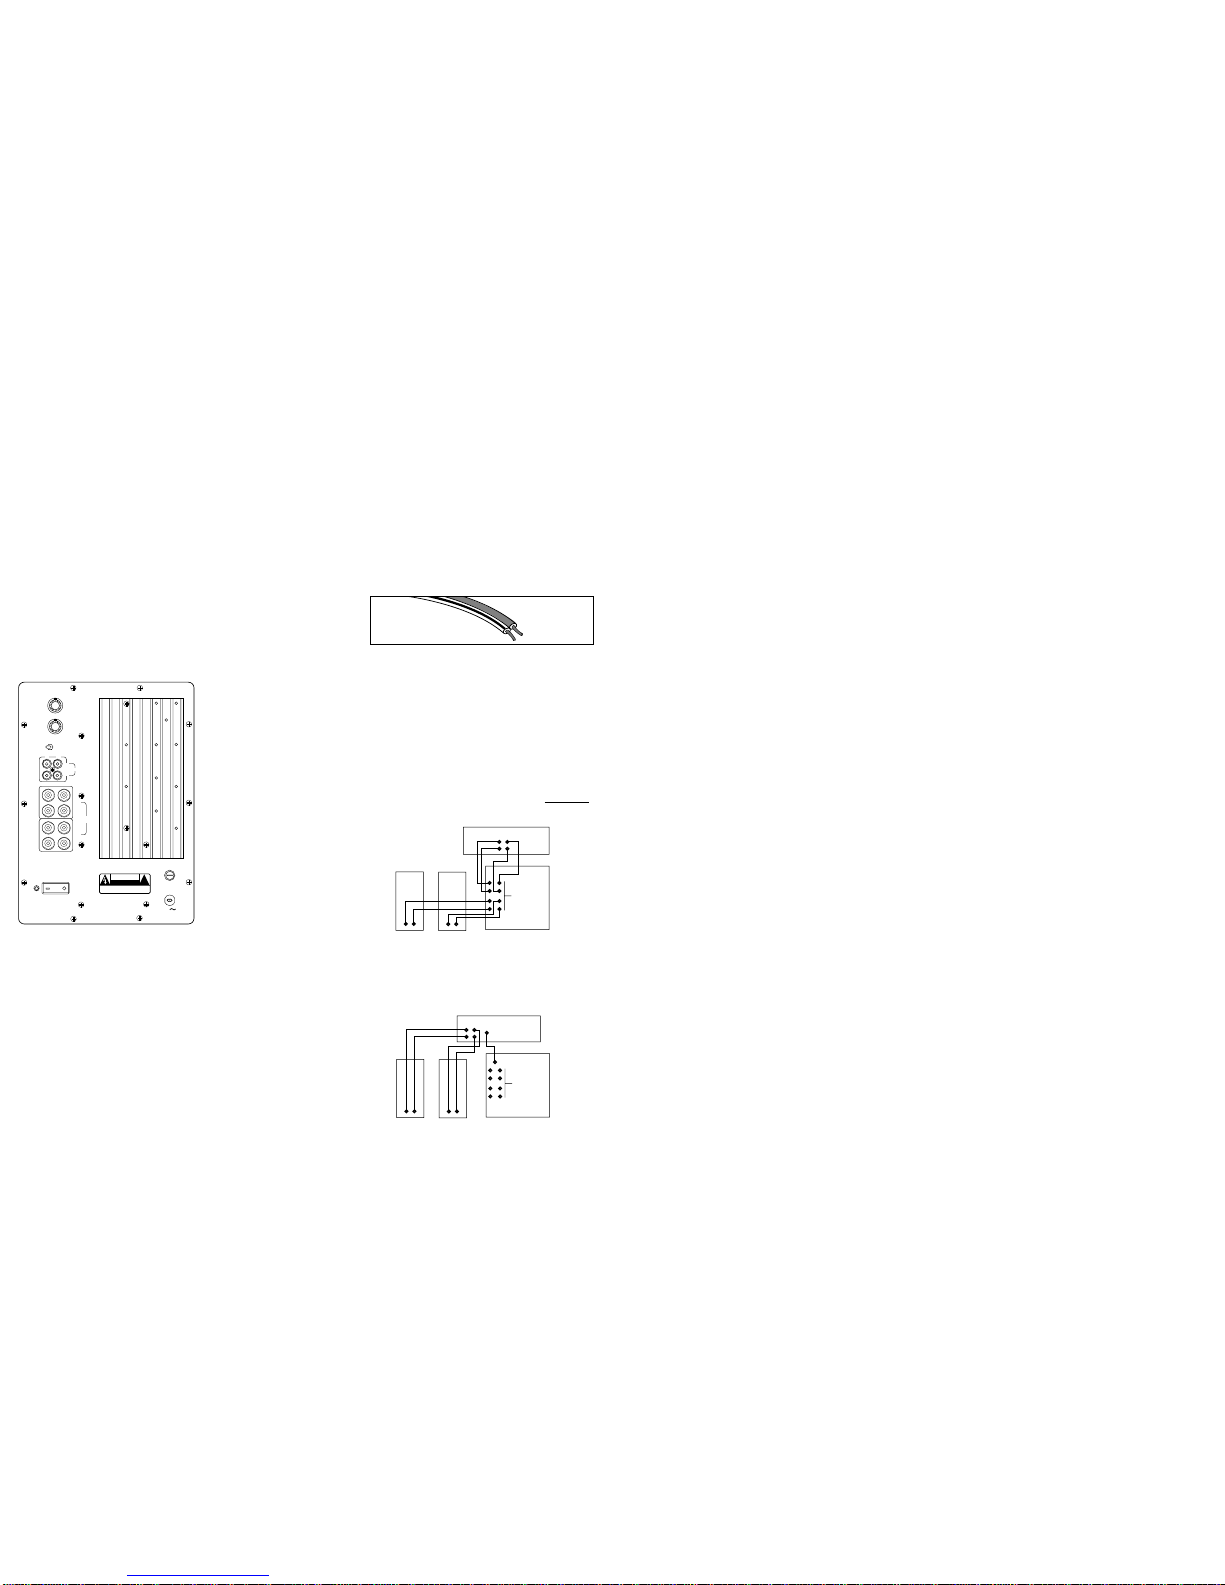
Acoustic Research ARS115PSB User manual

INTRODUCTION
Checkyoursystemcarefully.Ifithas
been damaged in transit, report the
damage immediately by calling your
AcousticResearchdealerand/orthe
trucking firm that delivered it.
Observe all warnings and cautions.
WARNING
To prevent fire or shock hazard, DO
NOT EXPOSE this subwoofer system
to rain or excessive moisture.
Werecommendthatyou notoperate
yourspeakersor subwoofer withthe
bass, treble and loudness controls
set to full boost. This will place
undue strain on the electronics and
speakers and could damage them.
The volume control setting on your
TV is not a specific indication of the
overall loudness level at which the
system can be played, regardless of
where the volume control is set.
Whenever changing cables, pulling
plugs, etc., ALWAYS TURN OFF ALL
EQUIPMENT including the Subwoofer.
This prevents transients from enter-
ing the speakers and prevents elec-
trical energy from reaching you.
Keep all connections out of the
reach of children.
To avoid electrical shock, DO NOT
OPEN THE SUBWOOFER! There
are no user serviceable parts inside.
S115PSB PERFORMANCE SERIES
CAUTION
RISK OF ELECTRICAL SHOCK
DO NOT OPEN
WARNING: SHOCK HAZARD - DO NOT OPEN
AVIS: RISQUE DE CHOC ELECTRIQUE - NE PAS OUVRIR.
CAUTION: TO REDUCE THE RISK OF ELECTRIC SHOCK, DO
NOT REMOVE THE COVER. NO USER SERVICEABLE PARTS
INSIDE. REFER SERVICING TO QUALIFIED
SERVICE PERSONNEL.
The lightning flash with arrowhead symbol, within an equilateral
triangle, is intended to alert the user to the presence of
uninsulated “dangerous voltage” within the product’s enclosure
that may be of sufficient magnitude to constitute a risk of
electrical shock to persons.
The exclamation point within an equilateral triangle is intended to
alert the user to the presence of important operating and
maintenance(servicing)instructionsintheliteratureaccompanying
the product.
AcousticResearchisa registeredtrademark ofRecoton Corporation. RecotonHome Audio,Inc. 1090Emma OaksTrail,Lake MaryFL. 32746
©2002 RecotonCorporation. All rightsreserved. All specificationsand pricessubject tochange withoutnotice.
www.acoustic-research.com
IMPORTANT SAFETY PRECAUTIONS
ATTENTION:
Please read these instructions thoroughly before attempt-
ing to operate your AR Subwoofer. Be sure to save this
manualfor future reference. Alsosaveyour bill ofsale,as
it may be required for warranty service.
CAUTION:
Please ensure that the correct plug is used on your AC
outlet.
CLEANING - Unplug the AR subwoofer from the wall
outlet before cleaning. Do not use liquid cleaners or
aerosol cleaners. Use a damp cloth for cleaning.
ATTACHMENTS - Do not place the AR Subwoofer on an
unstable cart, stand, tripod, bracket, or table. The product
may fall, causing serious injury to a child or adult, and
serious damage to the product. Use only with cart, stand,
tripod, bracket, or table recommended by Acoustic
Research, or sold with the AR Subwoofer. Any mounting
of the speakers should follow Acoustic Research’s
instructions and should use a mounting accessory recom-
mended by Acoustic Research.
VENTILATION - Slots and openings in the AR Subwoofer
are provided for ventilation, to ensure reliable operation
and to protect it from overheating, these openings must
not be blocked by placing the product on a bed, sofa rug,
or other similar surface. The AR Subwoofer should not be
placedin abuilt ininstallation such as abookcase orrack
unless proper ventilation is provided or Acoustic
Research’s instructions have been adhered to.
POWER SOURCES - The AR Subwoofer should be
operated only from the type of power source indicated on
the marking label. If you are not sure of power supply to
your home, consult your Acoustic Research dealer or local
power company.
GROUNDING OR POLARIZATION - The AR Subwoofer
may be equipped with a polarized alternating-current line
plug (a plug having one blade wider than the other). This
plug will fit into the power outlet only one way. This is a
safety feature. If you are unable to insert the plug fully
into the outlet, try reversing the plug. If the plug is still
unable to fit, contact your electrician to replace your
obsolete outlet.
POWER-CORD PROTECTION - Power-supply cords
should be routed so that they are not likely to be walked
on or pinched by items placed upon or against them,
paying particular attention to cords at plugs, convenience
receptacles, and the point where they exit from the
Subwoofer.
LIGHTNING - For added protection for the AR Subwoofer
during a lightning storm, or when left unattended and
unused for long periods of time, unplug it from the wall
outlet and disconnect the antenna or cable system. This
will prevent damage to the AR Subwoofer due to a light-
ning and power-line surges.
OVERLOADING - Do not overload wall outlets, extension
cords, or integral convenience receptacles as this can
result in a risk of fire or electric shock.
OBJECT AND LIQUID ENTRY - Never push objects of
any kind into this product through openings as they may
touch dangerous voltage points or short-out parts that
couldresult ina fireor electric shock. Neverspill liquidof
any kind on the AR Subwoofer.
SERVICING-Do not attempttoservicetheAR subwoofer
yourselfas openingor removing coversmay expose youto
dangerous voltage or other hazards. Refer all servicing to
qualified Acoustic Research service personnel.
DAMAGE REQUIRING SERVICE - Unplug the AR
subwooferfromthewalloutletandreferservicingtoqualified
service personnel under the following conditions:
A. When the power-supply cord or plug is damaged.
B. If liquid has been spilled, or objects have fallen into
the product.
C. If the product has been exposed to rain or water.
D. If the product does not operate normally by follow-
ing the operating instructions. Adjust only those
controls that are covered by the operating
instructions as an improper adjustment of other
controlsmay resultin damage andwill oftenrequire
extensive work by a qualified technician to restore
the AR subwoofer to its normal operation.
E. If the AR subwoofer has been dropped or damaged
in any way.
F. When the product exhibits a distinct change in a
performance - this indicates need for service.
REPLACEMENT PARTS - When replacement parts are
required, be sure the service technician has used replace-
ment parts specified by Acoustic Research or have the
same characteristics as the original part. Unauthorized
substitutions may result in fire, electric shock, or other
hazards.
SAFETY CHECK - Upon completion of any service or
repairs to this product, ask the service technician to
perform safety checks to determine that the product is in
proper operating condition.
WALL OR CEILING MOUNTING - The AR subwoofer
should be mounted to a wall or ceiling only as recom-
mended by Acoustic Research.
HEAT - The AR subwoofer should be situated away from
heat sources such as radiators, heat registers, stoves, or
other products (including amplifiers) that produce heat.
Owner’s Manual
SPK 110105 04

Your Acoustic Research Subwoofer delivers powerful, deep bass sound
output for a natural, life-like sonic experience. Please follow the direc-
tions in this manual to achieve the best performance from your system.
The hook-up and operation of the Subwoofer is the same for a Home
Theater surround sound system or a stereo music system. The
Subwoofer has its own built-in amplifier, so it works with any sound
system. The Subwoofer’s own crossover network sends bass-only
signalstothe Subwoofer’sbuilt-in amplifier. Thisletsthe Subwooferadd
extra bass to the output from your other speakers.
For simplicity, we call your Home Theater system’s or music system’s
main speakers the Front speakers. We call your AV receiver, stereo
receiver, or integrated amplifier the Receiver.
PLACEMENT
Your Acoustic Research Subwoofer must sit on the floor, in a corner to
workproperly. The floorandcorner areactuallya partofthe Subwoofer’s
design.
Place your Subwoofer in the corner nearest your system’s electronic
components to keep wire or cable runs short.
SUBWOOFER CONTROLS & CONNECTIONS
POWER CORD Plug the power cord into an
AC wall outlet or other AC outlet capable of
supplying at least 400 Watts.
POWER SWITCH Turns the AC supply com-
pletelyOFForsets the SubwoofertoAUTOON
operation. In AUTO ON, the Subwoofer is in
standby mode until it detects an audio signal
input, then the Subwoofer turns on automati-
cally. A few minutes after audio input signals
cease, the Subwoofer automatically returns to
standby mode.
POWER INDICATOR LED This LED is unlit
when the AC powerswitch is OFF. Itglows red
when the Subwoofer is in standby mode ad
green when the Subwoofer is on.
FUSE 250V 3A This fuse protects against
internal and external faults. If the POWER
switch is ON and the power indicator LED is
unlit, unplug the power cord from the AC
outlet and check the fuse by unscrewing the
center piece from the holder. IMPORTANT If
thefuseis blown, replaceitonly withafuseof
the same type and current rating.
L, R SPEAKER-IN TERMINALS - See Connection Option 1
These terminals are for making connections using speaker wire. If you
use this option, do not use Option 2.
LINE IN - See Connection Option 2
This jack is for connection using an audio cable. If you use this option,
do not use Option 1.
LOW PASS FREQUENCY CONTROL Adjusts the upper frequency limit
for audio signals going to the Subwoofer amplifier. This control helps
you adjust the system tonal balance.
LEVEL CONTROL Balances the loudness of the Subwoofer relative to
theFrontspeakers and compensatesforroom effects ontheSubwoofer’s
output.
PHASE SWITCH The Phase Switch controls the phase of the
Subwoofer’s output relative to the front speakers. Listen carefully to the
sound quality while playing a CD with low bass. Select the position of
the switch that produces the fullest deep bass without boominess. You
may need to readjust the Level and Low Pass Frequency controls after
setting the Phase Switch.
CONNECTING YOU SUBWOOFER
IMPORTANT When you make connections. make sure that the power
switches of all components, including the Subwoofer, are OFF.
AUDIO CABLES If you are connecting the Subwoofer into a system
made up of separate components (preamp & power amps), you will need
audio cables long enough to reach the Subwoofer from the preamplifier
and the power amplifier.
SPEAKER WIRE Typical speaker wirehasapair of separateconductors
with insulating jackets that are molded together. We recommend that
you use 16-gauge speaker wire for hooking your Receiver to your Front
speakers. To make connections to the Subwoofer in parallel with the
Front speakers easier, the speaker wire connecting the Receiver to the
Subwoofer can be smaller (higher gauge number), since the Subwoofer
does not draw large amounts of power through these wires.
POLARITY All speakers in a system must be connected with the same
polarity. Speaker wire is marked for polarity so that you can identify
which wire in the pair is which. Polarity is shown by a color strip on the
insulation, by ridged molded into the insulation, or by the colors of the
wires - one copper and one silver.
Striptheinsulationfrom speaker wireendstoreveal the bareconductors
before connecting to Receiver, Subwoofer or Speaker terminals.
IMPORTANT Always connect the red + terminal on the Receiver to the
red+terminal on theSubwoofer, and theblack- terminal ontheReceiver
to the black - terminal on the Subwoofer. The same is true for hooking
the Receiver outputs to the Front speakers: red + to red +, and black- to
black-.
IMPORTANT USE OPTION 1 OR OPTION 2, NOT BOTH.
OPTION 1 – CONNECTION WITH SPEAKER WIRE
Connect speaker wires from the Receiver’s front left and right speaker outputs to
the subwoofer’s left and right Speaker In terminals. Connect speaker wires from
the subwoofer’s left and right Speaker Out terminals to the left and right front
speakers being used in the system.
OPTION 2 – CONNECTION WITH AUDIO CABLE
Connect an audio cable from the Subwoofer Out or LFE Out on the back of your
Receiver to the Line In jack on the back of the subwoofer.
LEVEL
LOW PASS
FREQUENCY
• MAXMIN •
• 100HZ
PHASE0º180º
50HZ •
LR
OUT
IN
LINE
POWER
AUTO ON OFF
FUSE
250V T3A
120V
60HZ 300W
180º
+
+
RL
SERIAL NO.:
MODEL NO.: ARS115PSB
CAUTION
RISK OF ELECTRIC SHOCK
DO NOT OPEN
WARNING:SHOCK HAZARD-DO NOT OPEN
AVIS:RISQUE DE CHOC ELECTRIQUE-NE
PASOUVRIR
CAUTION:
TO REDUCE THE RISK OF FIRE,
REPLACE WITH ONLYTHE SAME
TYPE AND RATINGOF FUSE.
ATTENTION:
UTILISER UN FUSIBLE DE
RECHANGE DE MEME TYPE.
!
IN
OUT
-
-
SPEAKER
LEVEL
SUBWOOFER ADJUSTMENT & USE
Subwoofer initial control settings
• Set the LOW PASS FREQUENCY Control to its center position.
• Set the LEVEL Control fully counterclockwise to MIN. You’ll reset
this control after you make other adjustments.
Adjusting the Subwoofer controls
• Play a program on your system. For the following adjustments, use
the Dolby ProLogic Normal surround mode and select a movie that
has a Dolby Surround soundtrack with a lot of music, or play a music
CD. Adjust the Receiver’s volume control for a comfortable sound
level from the system speakers.
• Increase the Subwoofer’s LEVEL Control setting clockwise, so that
you hear the deep bass. Adjust the control for a natural, musical
balance that has plenty of deep bass sound when it is actually
present in the music.
• Listen carefully to bass voices and, if needed, adjust the LOW PASS
FREQUENCY Control so that they sound natural. Setting the
frequency too high will make deep voices sound excessively
“chesty” or resonant and will give the upper bass in music a “one-
note” quality. Setting the frequency too low will make deep voices
sound “thin” and will give music a lack of “warmth”.
• Make fine adjustments until the program has satisfying and natural
sound quality on both bass voices and music.
TROUBLESHOOTING
Subwoofer POWER Indicator LED does not light
• Check that the Subwoofer’s POWER Switch is in the AUTO ON position.
• If the POWER Switch is in the AUTO ON position, check the AC out
let the Subwoofer is plugged into to be sure that it is live. You can
use a tester or plug-in a lamp to check it.
• If the AC outlet is live, either the power cord or Subwoofer has a
problem. Unplug the power cord from the AC outlet and check the
fuse by unscrewing the center piece from the holder. If it is blown,
replace the fuse only with a fuse of the same type and rating. If this
doesn’t help, take the Subwoofer to your dealer for service – THERE
ARE NO USER SERVICEABLE PARTS INSIDE.
No sound from the Front speakers.
• Be sure the Receiver and Subwoofer POWER Switches are in the On
positions.
• Check the Receiver’s Volume Control Setting - if it is all the way
down, there won’t be any sound.
• Check that the Receiver’s Input Selector is set to an active source of
audio signals and that a Tape Monitor Loop is not engaged.
• Be sure that the Receiver’s Speaker Selector switch is turned on to
the terminals [A or B, 1or 2] that you have your Front speakers
connected to. If the Receiver has a headphone jack, you can use
headphones to check the Receiver for output.
• Check the wires and connections from the Receiver’s Front Speaker
Output terminals to the Subwoofer’s SPEAKER-IN terminals.
• Try removing the Subwoofer from the system, leaving your Front
speakers connected to the Receiver. If there still is no sound, take
the Receiver to your dealer for service.
No sound from the Subwoofer
• First, be sure there is sound from the Front speakers and that the
Receiver is working correctly as outlined above.
• Check the Subwoofer’s LEVEL Control. If it is all the way counter
clockwise, there may be no sound.
• The Subwoofer only reproduces deep bass sound. If the program
has no deep bass, the Subwoofer will not make any sound. Play a
program with plenty of bass, such as jazz or rock music, or an action
movie.
• If everything else checks OK, take the Subwoofer to your dealer for
service - THERE ARE NO USER SERVICEABLE PARTS INSIDE.
SPECIFICATIONS
Driver Complement and Enclosure
15” long throw woofer in a down-firing configuration.
Slot-loaded, Port Tuned enclosure design.
Frequency Response
30 Hz to 100 Hz +/- 3dB
Amplification
Poweroutput: 250Watts RMS into 8Ohmswith protective limiterenabled.
Total Harmonic Distortion
1% @ 200 Watts output
Signal-to-Noise Ratio
>90 dB
Crossover frequency (-3 dB)
50 Hz @ MIN 200 Hz @ MAX
Special Features:
2 pairs 5-way gold binding posts for high level out
2 pairs 5-way gold binding posts for high level in
1 pair RCA inputs for low level input
1 pair RCA inputs for low level output
Finish: Black ash laminate
Dimensions: 16 (40.64 cm) x 19" (48.26 cm) x 19" (48.26 cm)
Weight: 66 lbs (29.94 kgs)
LIMITED WARRANTY
This warranty remains in effect for five years from date of purchase for
speaker components, one year on subwoofer amplifiers and electronic com-
ponents.
This warranty protects the original owner providing that the product has
been purchased from an authorized Acoustic Research dealer in the United
States. Theoriginalbillof sale must bepresentedwhenever warranty serv-
ice is required. For warranty service outside the United States, contact the
authorized Acoustic Research distributor in the country where the product
was purchased.
Except as specified below, this warranty covers all defects in material and
workmanship. The following are not covered: Damage caused by accident,
misuse, abuse, product modification or neglect, damage occurring during
shipment, damage from failure to follow instructions contained in the own-
ers manual, damage resulting from the performance of repairs by someone
no authorized by Acoustic Research, or any claims based on misrepresenta-
tions by the seller. This warranty does not cover incidental or consequen-
tial damages. It does not cover the cost of removing or reinstalling the unit.
This warranty is void if the serial number has been removed or defaced.
Thiswarrantygives youspecificlegal rights. Youmay alsohaveother rights
which cary from state to state. Some states do not allow the exclusion or
limitationofincidental orconsequentialdamages orlimitationson howlong
an implied warranty lasts, so the above may not apply to you.
HOW TO OBTAIN SERVICE
Please call us at (800) 225-9847
We will promptly advise you of what action to take. We may direct you to
an authorized Acoustic Research Service Center or ask you to send your
speakertothefactory for repair. You will need topresenttheoriginal bill of
sale to establish the date of purchase. PLEASE DO NOT SHIP YOUR
ACOUSTIC RESEARCH PRODUCT FOR REPAIR WITHOUT PRIOR
AUTHORIZATION. PLEASE DO NOT RETURN PRODUCT TO THE
ABOVE ADDRESS, IT IS NOT A SERVICE LOCATION. You are respon-
sible for transporting your product for repair and for payment of any initial
shipping charges. However, we will pay the return shipping charges if the
repairs are covered under warranty.
RECEIVER
SUBWOOFER
SPEAKER
LEVEL
SPEAKERS
IN
OUT
+
+
–
–
++ –
–
+
–
L R
SPK OUT
L R
RECEIVER
SUBWOOFER
SPEAKER
LEVEL
SPEAKERS
IN
OUT
+
+
–
–
++ –
–
SPK OUT
L R
+
–LFE or SUBWOOFER
LINE IN
L R
-TO BLACK TERMINAL
(plain or silver)
+TO RED TERMINAL
(color stripe ridges
or cooper) 3/8”(9mm)
BARE WIRE
This manual suits for next models
1
Other Acoustic Research Subwoofer manuals

Acoustic Research
Acoustic Research ARPR808 User manual

Acoustic Research
Acoustic Research ARPR1212 Performance series User manual

Acoustic Research
Acoustic Research ARS115PSB User manual

Acoustic Research
Acoustic Research PL900 User manual

Acoustic Research
Acoustic Research PL900SUB User manual

Acoustic Research
Acoustic Research ARPR1212 Performance series User manual

Acoustic Research
Acoustic Research S112PS User manual

Acoustic Research
Acoustic Research ARPR1010 User manual

Acoustic Research
Acoustic Research S108PS User manual