ACOUSTIC SOLUTIONS KL-1 POP IDOL User manual

KL-1 POP IDOL KARAOKE MACHINE
CONTENTS
Congratulations on purchasing this Pop Idol Karaoke machine from Acoustic Solutions. It has been developed following an extensive research and
development program that has culminated in what we regard as an exceptional home entertainment product.
Our aim when designing this product was to produce a home entertainment machine which could be used for a variety of applications. The robustness
and quality of the construction is testament to our research and development program which established that cheaper karaoke machine are not always
up to the job.
Because of the features built into this product, the KL-1 is ideal for the following applications:
Karaoke
Disco
Aerobics- varispeed CD & tape cassette allow BPM adjustment
General PA applications
We trust that this product will give you hours of listening pleasure, and provide years of unparalleled performance. As with any new electrical product
please be patient and allow at least 36 hours use before all components have acclimatized themselves with your surroundings, and found their optimum
working temperature.
INTRODUCTION
1 Introduction
2 Safety instructions
3 Control locations: Front panel
4 Conection locations rear panel
5 Connections
6-7 Installation and position
8 Making the connections
9-12 Using the CD+Graphics player
12-15 Using the audio mixer
16 Using the tape player
17 Using the light sequencer
18 Care and maintenance
18-19 Troubleshooting
19 Contact details
1
CAUTION: To reduce the risk of electric shock, do not remove any cover. NO USER-SERVICEABLE PARTS INSIDE, REFER ANY SERVICING TO
QUALIFIED SERVICE PERSONNEL.
CAUTION: Always unplug the KL-1 from the mains before attempting to replace a lamp. Use R80 60 Watts ES Reector spotlight.
• Read and keep these instructions available for future reference.
• For indoor use only.
• The unit must only be connected to a suitable mains power supply using the mains power lead provided.
• To reduce the risk of re or electrical shock, do not expose this unit to rain or moisture.
• Unplug the unit from the wall socket during lightning storms and when it is not going to be used for a long period of time.
• Take care that foreign objects do not enter, or liquids are not spilled, into the enclosure through any openings. If this should happen, refer to qualied
service personnel before attempting to use.
• Ensure adequate ventilation - do not cover this unit with curtains, etc.
• Do not install near any heat source, such as radiators, or other equipment that produces heat.
• Protect the mains power cable from being damaged.
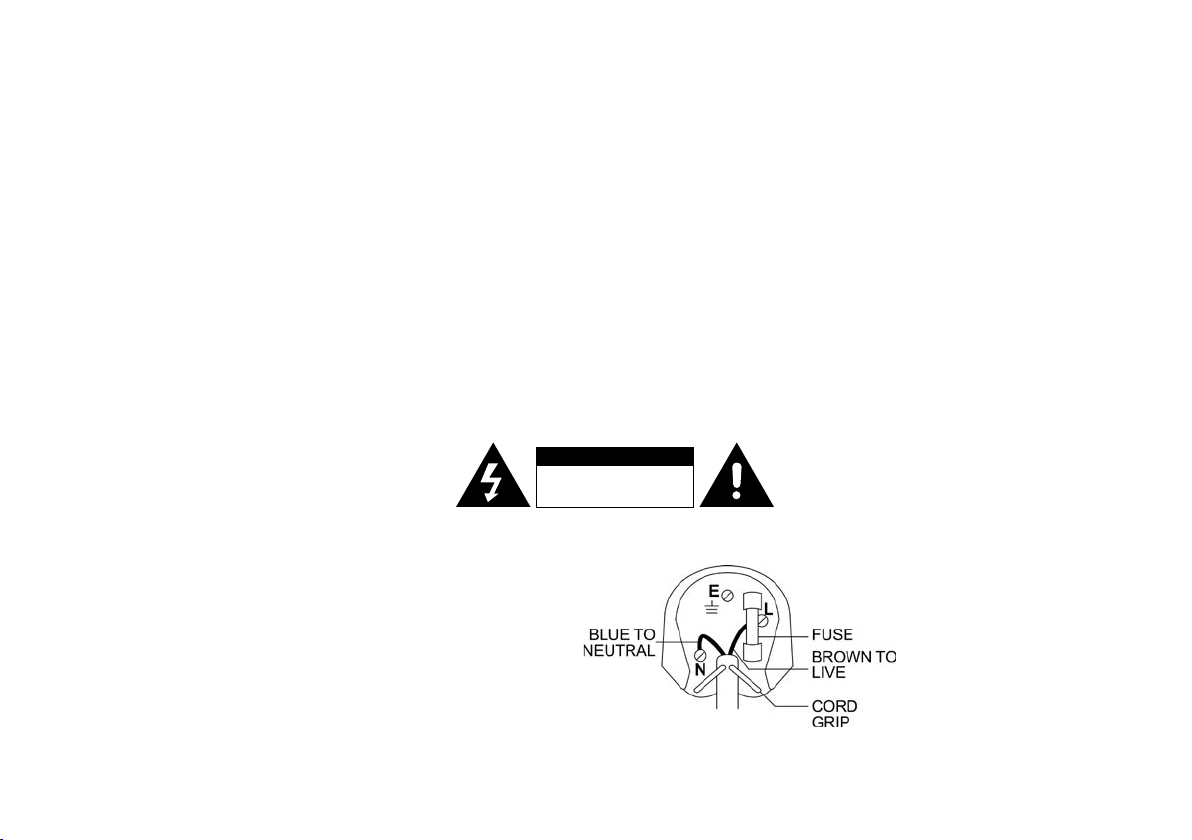
• The KL-1 system is double insulated and does not require an earth connection in the UK mains plug.
For your convenience a mains plug with a fuse (3 Amp) has been tted to
this appliance. For your safety please observe the following information.
• The KL-1 is designed to operate on AC mains supply between 220
and 240 volts, 50 Hz.
• The wires in the mains lead are coloured in accordance with the
following code:
BLUE -NEUTRAL
BROWN -LIVE
• Under no circumstances should the Neutral or Live wires be connected
to the ‘E’ (Earth) terminal.
SAFETY INSTRUCTIONS
The exclamation point within an equilateral
triangle is intended to alert the user of important
operating and maintenance instructions in the
service literature relevant to this appliance.
The lightening ash symbol with the arrowhead
within an equilateral triangle is intended to alert the
user to the presence of uninsulated ‘dangerous
voltage’ within the product’s enclosure that may
be sufcient to constitute a risk of electric shock to
persons
This product complies
with European low voltage
(73/23/EEC) and elec-
tromagnetic compatibility
(89/336/EEC) directives.
IMPORTANT SAFETY INSTRUCTIONS
UK MAINS PLUG DETAILS
2
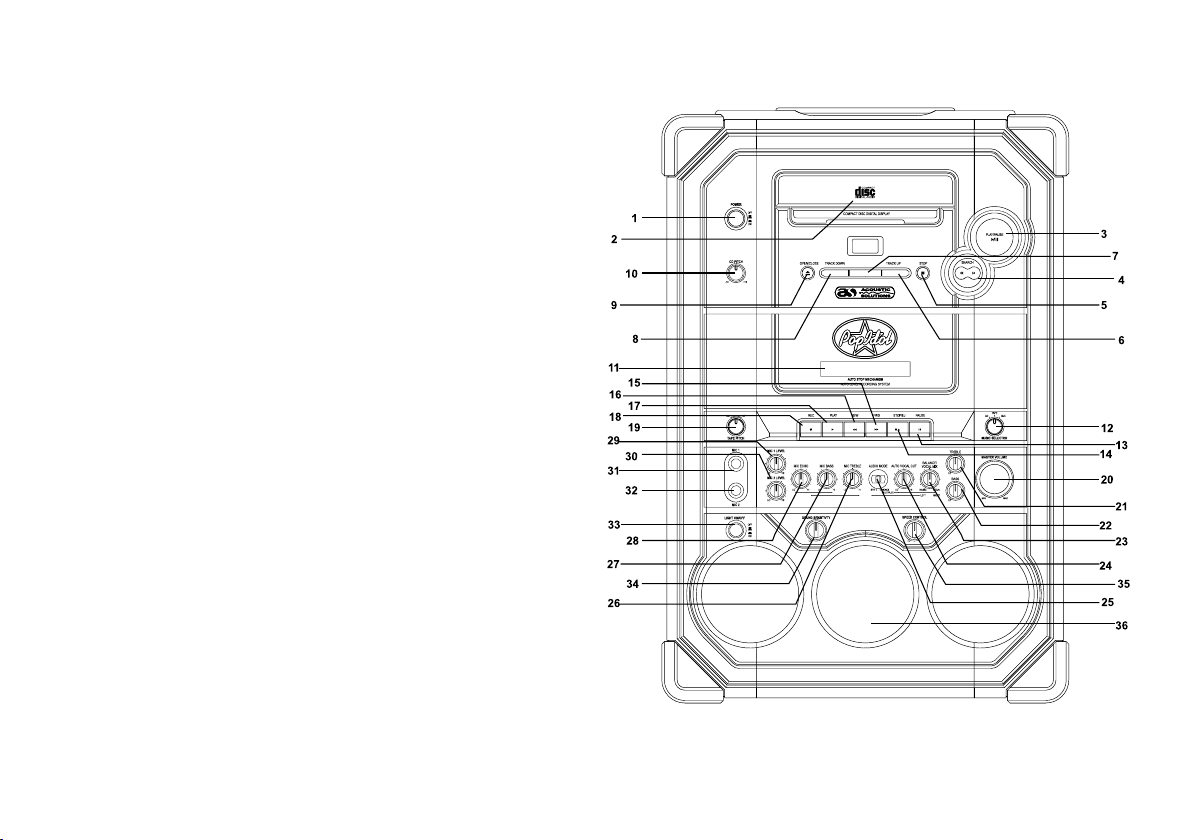
CONTROL LOCATIONS: FRONT PANEL
1) Main Power on/off button for audio system
2) CD drawer
3) Play/ pause button for CD
4) Fast search backwards and forwards for CD
5) Stop button for CD
6) Next track button for CD
7) Pitch control activation button for CD
8) Previous track button for CD
9) Open/close button for CD drawer
10) CD pitch control -/+ 10% (must have pitch control activation button (7) on)
11) Tape cassette door
12) Music selector switch (CD, Tape or AUX input)
13) Cassette pause key
14) Cassette stop/eject key
15) Cassette fast forward key
16) Cassette fast rewind key
17) Cassette play key
18) Cassette rec key
19) Cassette pitch control -/+5%
20) Master volume control
21) Music treble control
22) Music bass control
23) Balance control when in stereo, or vocal/ music mix control when in multiplex mode
24) Auto vocal cut depth control when in multiplex mode
25) Stereo / mono switch. Use in mono for multiplex mode
(For further details on multiplex operation please refer to page 12)
26) Mic treble control
27) Mic bass control
28) Mic echo control
29) Mic 1 level control
30) Mic 2 level control
31) Mic 1 input socket
32) Mic 2 input socket
33) Light sequencer power on/off button (this is independant from audio on/off button to allow
light show to be used independently)
34) Sound sensitivity control for light sequencer
35) Speed control for light sequencer
36) Lamps, R80 60 Watts ES reector spotlight, re order 01327 340601
3

CONNECTION LOCATIONS REAR PANEL
1) Speaker output connector left
2) Speaker output connector right
3) Speaker input connector left speaker
4) Speaker input connector right speaker
5) Video output to TV
6) CD direct outputs to bypass internal mixer controls
7) Aux line input sockets
8) Direct line input to add additional audio device to mix together with
audio output from main mixer controls. This feature allows an additional
mic mixer to add more mics if required, or any other audio source.
9) Line output RCA sockets to connect into higher powered amplication
10) Plug storage slot
11) AC mains cable inlet.
12) Ventillation holes (do not cover)
4

CONNECTIONS
5
USE DIRECT INPUTS TO ADD
ADDITIONAL MIXER OR AUDIO
SOURCE.

INSTALLATION AND POSITION
The KL-1 should be positioned on a at stable surface.
This product contains sensitive electronic circuitry, it is not recommended that excessive force or heavy handling be applied to this product as internal
damage may occur. Do not place this product in areas where direct sunlight is present, nor place it adjacent to a radiator or other heating appliances.
Like all electrical devices this unit will generate a modest amount of heat. The cooling of this device is reliant upon the ow of air within the cabinet. Care
should be taken not to cover this unit with such items as rugs, covers or curtains which will restrict this air ow and may cause over heating.
Never allow the KL-1 to come into contact with water or liquids, and ensure that small objects do not fall through the ventilation grills. In the event of this
happening, disconnect the wall plug from the mains supply immediately, and contact your local dealer for service advice.
Do not position the power cable such that it can be walked upon, or damaged by regular trafc. Ensure that all other interconnect cables are stowed
safely behind the unit, and cannot be easily snagged or kicked thus causing possible damage to the unit.
Ensure that all interconnetion cables have been made correctly, and that polarity has been maintained.
It is necessary to remove the protective foam which surrounds the light lamps during transit.
DO NOT OPERATE THE LIGHT SEQUENCER WITH THIS FOAM IN PLACE AS THE HIGH TEMPERATURES GENERATED BY THE LAMPS WILL
CAUSE THIS PACKAGING TO MELT.
1) Carefully pull the foam packaging outwards from the area around the
lamps. Check that lamps are secure, but do not over tighten them.
2) Test the lamps rst by pluging the AC power cord into the mains
wall plug, and pressing light sequencer power switch (33) to illuminate
the lamps. Check that all lamps are working before proceeding to next
instructions. Replacement lamps can be obtained:
R80 ES type, re order 01327 340601. Turn off light sequencer before
replacing lamps.
6
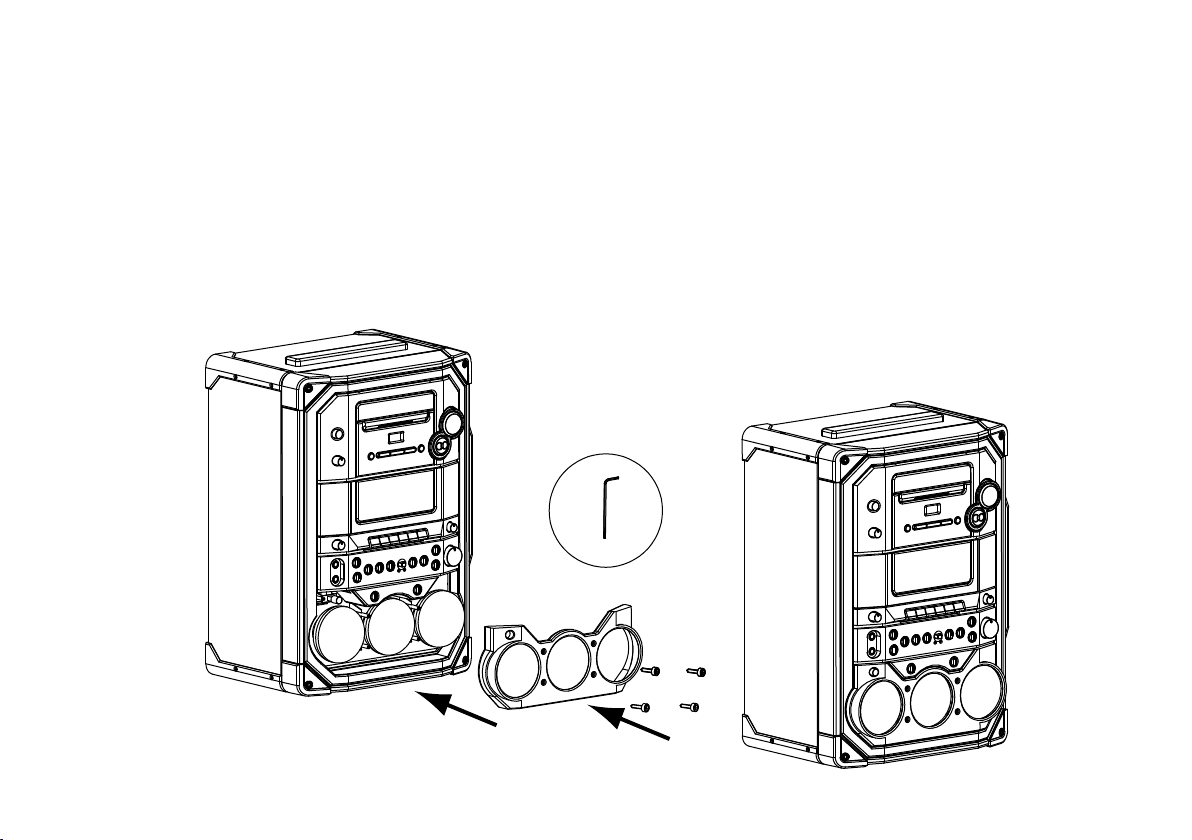
INSTALLATION AND POSITION cont’d
3) Remove the light sequencer facia panel and packet of screws from the
protective foam packaging which surrounds the main KL-1 in the box.
4) Carefully place the facia panel in the correct location around the lamps.
5) Using the screws and hex spanner supplied in the packet, secure the
facia in place taking care not to overtighten the screws.
6) Test the light sequencer once more by pressing the power button (33).
7

The following equipment should be included with your KL-1:
1) Main KL-1 mixer unit including CD, Tape, mixer and light sequencer.
2) 1 x facia panel to surround lamps as described in previous chapter.
3) 2 x external loudspeakers including speaker cables.
4) 2x Microphones.
5) 1 x AV connection lead to link KL-1 to TV with AV input.
5) 1 x CDG sampler disc.
6) 1 x instruction manual.
7) 1x warranty card.
To make the connections to and from the KL-1, please observe the following sequence:
1) Remove all packaging from around the main KL-1 unit and speakers, conserve this packaging for transportation in the future.
2) Check all components and ensure you have all parts as listed above.
3) Connect the loudspeakers rst. Place a loudspeaker either side of the main KL-1 unit allowing some distance between the speakers to allow for
stereo reproduction.
4) Using the speaker cables provided, connect the wires to the output speaker terminals on the rear of the KL-1 (1,2, page 4), and connect them to
the corresponding input sockets on the rear of the external speaker cabinets (3,4, page 4). Take care to ensure that the red and black terminals are
connected in the same way on both the rear of the KL-1 and the rear of the speakers. Failure to due this will result in the speakers being out of phase,
and a poor sound may result.
5) Next connect the microphones. Taking each microphone, push the 6.35mm jack plug into the corresponding mic input sockets on the front panel of the
KL-1 (31,32, page 3)
6) Finally connect the AV cable between the KL-1 and a suitable television, using the 75ohm lead supplied.
Connect one end of this lead to the rear of the KL-1 in the yellow AV socket ( 5, page 4), take the other end and insert into a corresponding video input
socket on your television. If your television is only tted with a scart connector it will be necessary to obtain a scart adaptor to allow the AV signal input.
These are available from most high street electrical retailers. You will need to select AV channel on your television to obtain karaoke graphics.
MAKING THE CONNECTIONS
8

USING THE CD + GRAPHICS PLAYER
The KL-1 is tted with a conventional CD player, but has been enhanced
with graphics output ability for playing karaoke discs, and a speed
adjustment of +/-10% for karaoke and aerobics applications.
Understanding the LCD display
The KL-1 is tted with an LCD display which will show track number, and
will indicate if CD pitch control has been activated by displaying the word
‘PITCH’ below the track number.
To load a CD
1) Press open/close (9, page 3), this will open the CD draw. Place CD with
label upermost into the carriage. Press open/close again to shut CD
loader.
2) The CD will automatically load, you will hear the CD spinning and the
LCD screen will ash “--”. When loaded the total number of tracks will
be displayed on the LCD screen.
3) If there is a problem loading the CD, or no CD is placed in the CD
loader, the following display will occur - ‘no’. Please check the integrity
of the CD, or if the problem persists, please contact your local dealer.
Press OPEN/CLOSE to open the CD loader.
9

TO PLAY A CD
To commence playing the CD press play/pause button (3, page 3) once.
This will start playing the CD at the rst available track.
The LCD screen will show the track number playing.
If you are using a CD+Graphics disc, you will be able to hear both audio
and view graphics on your television screen. Ensure your audio settings on
the mixer controls are correct (see pg 10), and ensure your TV is tuned to
the AV channel.
TO PAUSE A CD
To pause the CD press the play/pause button (3, page 3) once whilst the CD
is playing. This will temporarily stop the CD at this point.
To recommence play, press the play/pause button again.
TO STOP A CD
To stop the CD playing, press the stop button (5, pg 3) once.
The LCD display will show the total number of tracks on the CD.
All functions will be cancelled, to resume play from track one press
play/pause (3, page 3) again.
To commence a CD press PLAY/PAUSE.
To stop a CD press the STOP button.
10
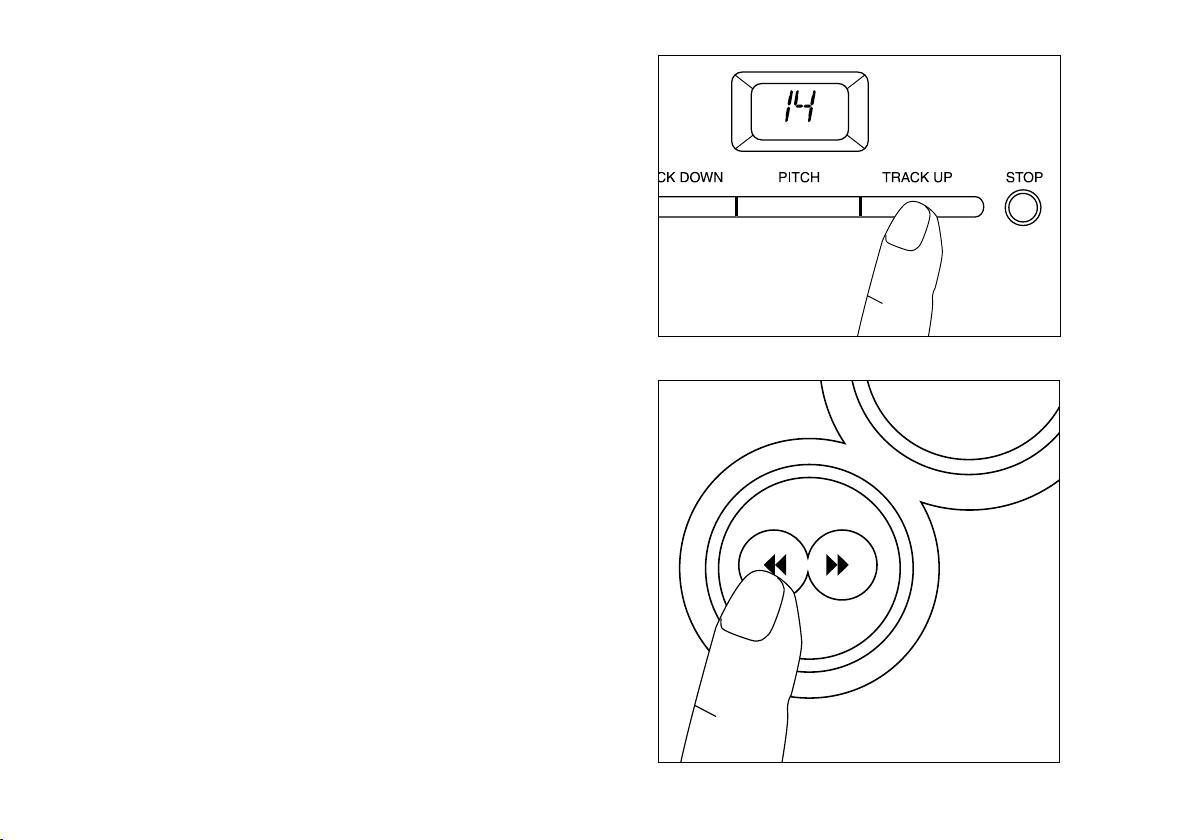
TO SKIP THROUGH TRACKS ON A CD
It is possible to change the track number which is being played either
forwards or backwards through the CD track listing.
To advance the track, press Track Up button (6, page 3) once, to advance
the track number again, repeatedly press this button until the desired track
is located.
To select a previous track press Track Down button (8, page 3) once, this
will return the current track being played to its start, or press this button
again to move the CD track back to the previous track. Continue this
operation until the desired track is located.
TO FAST SEARCH THROUGH CD TRACK
It is possible to search through the current track being played in order to
nd a desired position.
To search forward through the CD track press the right the Search Up
button (4, page 3), this will then activate a fast forward search, release this
button to stop this search when required. To reactivate this search hold
this button down again.
To search backwards through the CD track press the left Search Down
button (4, page 3), this will then activate a fast backwards search Release
this button to stop this search when required. To reactivate this search
hold this button down again.
Note: This search feature does not work when playing CD+Graphics
discs. This is due to the fact that the video signal becomes illegible during
the search operation.
The volume during search will be lower than the normal playing level.
To advance a CD track press TRACK UP. To go to the
previous track press TRACK DOWN.
11

1) It is possible to change the speed of the CD by +/-10% from the normal playing speed.
It is necessary to activate the pitch control by pressing the pitch button (7, page 3). The LCD display will
show the word pitch below the track number to indicate this function is on.
2) Using the rotary pitch control knob (10, page 3), turn anticlockwise to reduce the speed of the CD, or
clockwise to increase it.
Note that this speed setting will remain as set by the pitch control knob (10). The pitch control will be
cancelled when the power is removed from the KL-1.
3) To deactivate the pitch control, press pitch button (7, page 3), the word pitch on the LCD screen will be
removed and the CD will return to normal playing speed.
USING THE AUDIO MIXER
TO ACTIVATE THE PITCH CONTROL
The KL-1 has been designed with a comprehensive audio mixer to allow complete control over your performance.
The mixer has 3 main sections:
1) Music selector switch
2) Microphone section
3) Multiplex control for use with CD+Graphics discs recorded in multiplex format
4) Main audio output controls
Each of these sections are explained in detail over the next few chapters.
12

It is necessary to select which music input source you require. The Music
Selector rotary knob (12, page 3) allows the choice between CD, Tape and
AUX inputs.
USING THE INPUT SELECTOR SWITCH
UNDERSTANDING AND USING THE MIC SECTION
The mic mixer has been designed to allow 2 singers independant control
of the levels of their microphones.
Plug the mic to be used into the mic socket 1 or 2, ensure that the switch
on the body of the mic is pushed up to switch the mic on.
It will be necessary to have the master volume control (20, page 3) set up
to a reasonable level.
Mic level 1 can be increased by turning the Mic Level 1 knob (29, page
3) clockwise until the desired mic level is achieved. Similarly the same
procedure applis to mic 2.
The depth of echo which is applied to both mics can be adjusted by
turning the mic echo control (28, page 3) clockwise to increase the depth
of echo, or anti clockwise to reduce down to zero, as required.
The KL-1 is also tted with bass and treble controls for the microphones
which are independant from the main music tone controls. Turn the bass
and treble control knobs (26, 27 page 3) clockwise to increase the amount
of bass or treble, or anticlockwise to reduce it. The normal listening
position for bass and treble is straight up at 12 o’clock, however your
desired settings are a matter of personal listening tastes.
Take care not to turn mic levels too high when in close proximity to the
loudspeakers as feedback may occur. To reduce feedback, reduce the mic
level, or move further away from the loudspeakers.
13
The KL-1 has been designed to operate with both normal stereo CD discs,
and multiplex karaoke discs.
Multiplex is a term used to describe the separation of the background
music from the vocal track. By recording the background music on the
left channel of a sterero CD or tape, and the vocal track on the right, it
is possible to mix the two to gain a vocal version of a song, or play just
the backround music as you would normally expect to hear on a karaoke
track.
The KL-1 is tted with comprehensive controls which allow you to make
best use of both stereo or multiplex discs or tapes.
For playing normal stereo recordings ensure that the stereo/mono switch
(35, page 3) is set to stereo. This will allow you to enjoy the full advantage
of the stereo image provided by this format.
When playing multiplex discs or tapes set the stereo/mono switch (35,
page 3) to the right into mono.
This will then combine the left and right channels to effectively give you a
full vocal version of that track. At this point you have two opions:
1) Activate auto vocal cut which will reduce the vocal content of the track
when you sing into the microphone.
2) Use the balance control which will allow a manual mix between the
background and vocal content of the multiplex format.
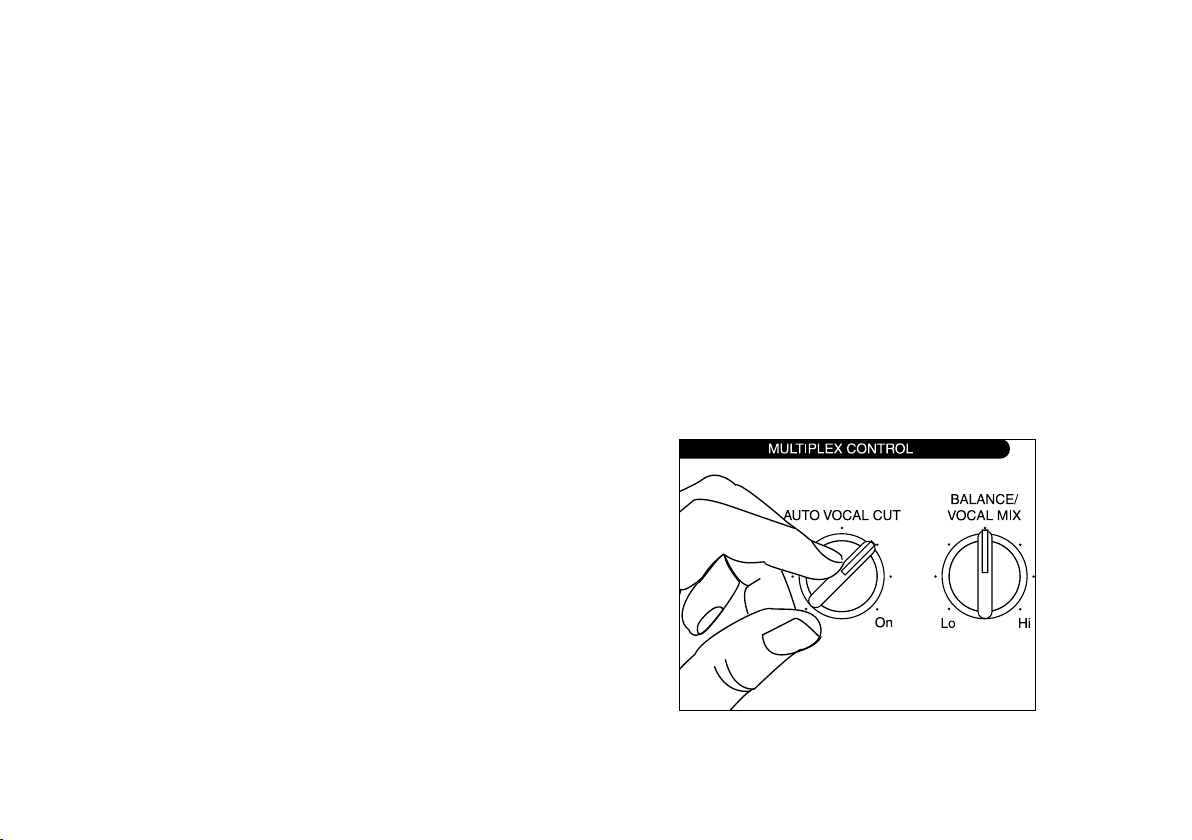
UNDERSTANDING AND USING THE
MULTIPLEX CONTROL
AUTO VOCAL CUT FUNCTION
14
Sometimes when singing karaoke it is easy to lose your place or become
embarrased. When using multiplex discs and the auto vocal cut feature,
it is possible to replace the singers voice with your own when you start
singing into the micrphone. If you then subsequently stop singing the
singer on the recording will resume to pick up from where you left off.
It is also possible to adjust the amount the singers voice is reduced so that
it does not leave all of the singing to you.
To operate this control ensure that the balance/vocal mix control (23, Page
3) is at the 12 o’clock position.
The control Auto Vocal cut (24, page 3), will vary the amount the vocals
are reduced, the more that it is turned clockwise.Turning it completely
anticlockwise will turn this feature off. The setting of this control is down to
preference and can be adjusted until the desired setting is acheived.
It is possible to mix the amount of vocals in the track manually by using
the Balance / vocal mix control (23, page 3).
To use this feature ensure that the auto vocal cut function is turned
completely anticlockwise and is off.
Ensuring that the Balance/ vocal mix control knob is at 12 o’clock, you will
hear a mix of both vocals and background music.
By turning the balance / vocal mix control knob anticlockwise you will
reduce the amount of vocals in the song to zero, once the control knob is
completely anticlockwise.
By turning the Balance / vocal mix control knob clockwise you will reduce
the amount of background music in the song to zero, once the control
knob is completely clockwise.
This control can be adjusted until your desired listening setting is
achieved.
BALANCE / VOCAL MIX FUNCTION
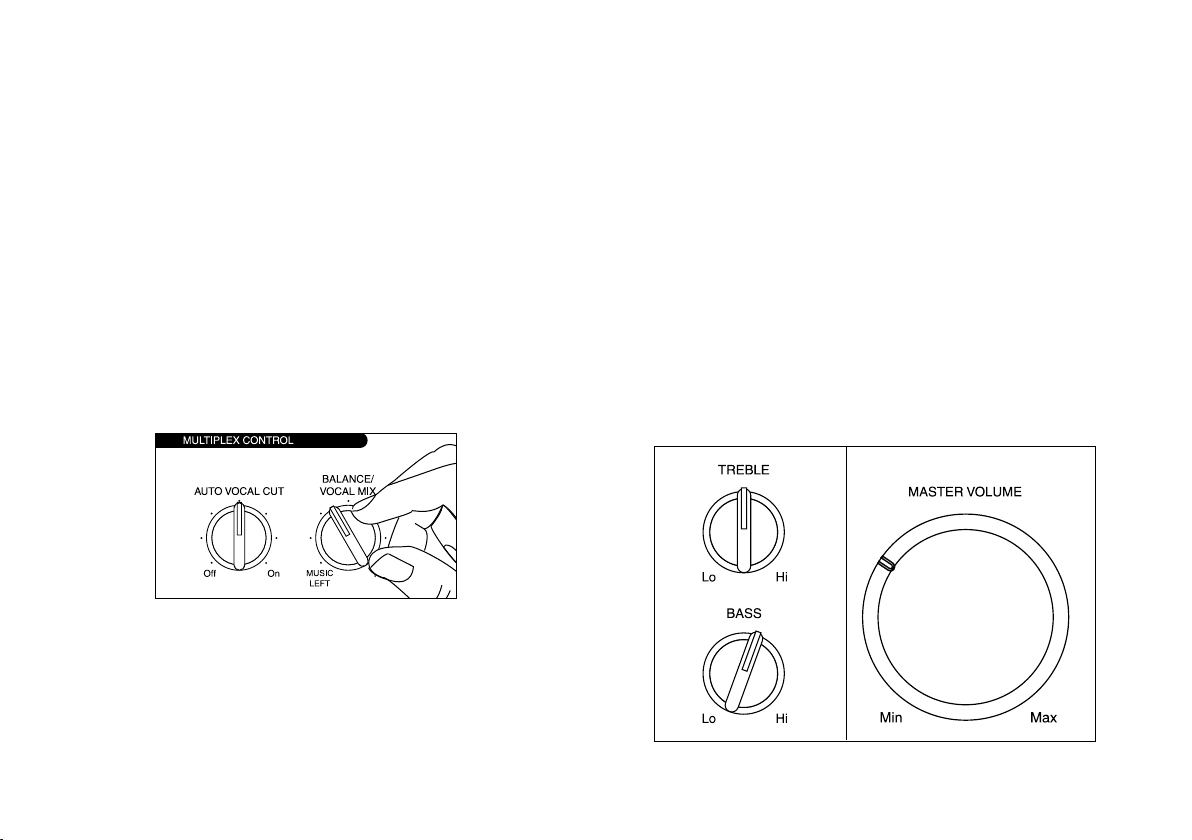
The last section of the KL-1 mixer is the main output controls.
These are
1) Bass
2) Treble
3) Master volume.
UNDERSTANDING THE MAIN AUDIO
OUTPUT CONTROLS
The main output controls
15
The bass and treble controls (21, 22 Page 3) work independantly from the
microphone bass and treble controls, and apply tone adjustment to the
music content only.
Adjust these by turning anticlockwise to cut the amount of bass or treble
applied to the music, or conversly clockwise to boost the amount of bass
or treble.
Note: It is possible to cause longterm damage to the speakers or other
equipment connected to the KL-1, if excessive volumes are maintained
with both bass and treble controls set to maximum.
The master volume control knob (20, page 3) is effective on both the
music content and microphones.
Turning this control clockwise will increase the overall volume of the
complete system. This will also effect the signal level which is supplied to
the line output sockets, and also the signal which is recorded by the tape
player.

The KL-1 is tted with a tape cassette player which accepts normal
magnetic compact cassettes.
We have added a +/- 5% pitch control to this standard mechanism to allow
it to be used for karaoke or aerobics applications.
The operations for this cassette are described below.
1) Press Stop/eject button (14, page 3) to open cassette door.
2) Place compact cassette into the cassette door with the magnetic strip
facing downwards. Close the door by rmly pushing it back into the
cabinet until a rm click is heard.
3) To play a cassette, ensure that music selector switch (12, page 3) is set
to tape.
4) Press play button (17, page 3) down to activate play sequence.
5) When the cassette has nished playing this side, it will auto stop. It
is necessary to open the tape door (by pressing eject), and remove the
compact cassette and turn it through 180 degrees to allow the otherside
to be played. Insert the cassette back into the cassette door, close the
door again as described above.
6) Repeat the above sequence to commence playing of this side of the
tape.
7) To advance the cassette using fast forward, rst press stop to stop the
tape playing.
8) Press FWD button (15, page 3), this will lock on and commence winding
the tape forward. To stop this action press stop button again.
9) To rewind the tape press stop.
10) Press REW button (16, page 3), this will lock on and commence
rewinding the tape backwards. To stop this action press stop button
again.
11) Both rewinding and fast forwarding will automatically stop when the
end of the tape is reached.
12) To pause the tape whilst playing, press pause button until it is locked
on. This will temporarily stop the tape in that position. To resume play
press the pause button again. Note it is not recommended to pause a
USING THE TAPE PLAYER
Press the Play and Rec buttons at the same time to activate recording
To adjust the speed of a tape, rotate the tape pitch knob.
tape for a long period of time as tape stretching may occur.
13) To record using the cassette tape, ensure that the music selector
switch (12, Page 3) is set to the required audio source. Insert a tape
into the cassette door as described. Ensure the tape has not had its
security tabs removed which then will not allow recording. Press the
Play and Rec buttons (18, 17 page 3) down at the same time to
activate recording. It is possible to use pause control whilst in Rec
mode, this will allow eaisier stopping and starting at desired recording
positions. The level of the recording signal can be altered by the
master volume control, a certain amount of trial may be necessary to
determine the best master output for your recording purposes.
14) To stop the tape recording press stop button (14, page 3)
15) To adjust the speed of the tape, rotate the Tape pitch knob (19, page
3) anticlockwise to reduce the speed or clockwise to increase it. The
pitch adjustment on the tape mechanism is +/-5%. Return the tape
pitch knob to the 12 o’clock position to play the tape at normal speed.
16

The KL-1 is tted with a 3 channel light sequencer. This can be used to
enhance any social occasion, and complements the audio functions of this
product.
The light sequencer is operated independantly from the main audio sytem
and can be switched on using the light sequencer power switch (33, page
3).
To change the speed of the ashing lights, adjust the speed control knob
(35, page 3), turning anticlockwise to decrease the speed, or clockwise to
increase it.
This light sequencer is also tted with a sensitive microphone which will
detect the presence of any sound, and make the lights ash in time with
it. To increase the sensitivity of this microphone, turn the sound sensitivity
control knob (34, page 3) clockwise, or alternatively turn this control fully
anticlockwise to deactivate this sound to light control.
CAUTION: THE LAMPS WILL BECOME HOT DURING OPERATION
AND DIRECT CONTACT WITH THE GLASS MUST BE AVOIDED. DO
NOT PLACE WHERE CHILDREN COULD TOUCH THE LAMPS.
USING THE LIGHT SEQUENCER
Switching the light
sequencer on/off
Changing the speed and sound sensitivity of the light sequencer
17

• Mains socket not switched on, or faulty.
• Plug not fully inserted into wall socket.
• Mains fuse has blown in plug.
• Internal mains fuse has blown inside unit, this will need to be replaced by a
qualied service technician.
• Power cord has become damaged, this should be replaced immediately by a
qualied service tecnician.
• Power not turned on.
• Music selector switch not set correctly.
• Speaker leads not connected.
• Mics not connected.
• Aux line input not connected.
• No CD loaded, or no tape in cassette holder.
• Check disc is not loaded upside down.
• Check disc is clean and not damaged.
• Check that the disc is not scratched, dirty or damaged.
• Ensure that the player is on a rm level service.
• Audio connect cables damaged or not correctly connected.
• Audio cables have become tangled with mains cables.
No power when switched on
No sound
The CD player will not load the disc
The CD is skipping
Loud buzz or hum
Symptom Possible cause
TROUBLE SHOOTING
To clean the KL-1, wipe its case with a slightly moist lint-free cloth. Do not use any cleaning uids containing alcohol, ammonia or abrasives. Do not
spray on aerosol an or near the CD or tape player.
Always use original packaging if it is necessary to transport the unit at any time.
If this unit is used in dusty environments, it may be necessary to have the unit serviced at your local dealer periodically. It is not advisable to allow large
deposits of dust to accumulate within this unit as it may prevent correct cooling. Similarly dust deposit which become damp can sometimes lead to elec-
trical problems which may cause severe damage to the delicate electronics within this unit.
CARE AND MAINTENANCE
18

CONTACT DETAILS
We trust you are completely satised with this product from Acoustic
Solutions Limited, however please feel free to contact us if you experience
any difculties, or if you would like to express your views regarding our
products.
Please write to:
Acoustic Solutions Limited.
Grand Union Buildings
54 High Street
Weedon Bec
Northampton
NN7 4QD
United Kingdom
Telephone +44 (0)1327 340601
Fax: +44 (0)1327 342298
www.acousticsolutions.co.uk
email: [email protected]
Through the process of continuous improvement, Acoustic Solutions
Limited reserves the right to change or alter specications without prior
notice. E&OE
• Mic not switched on, or faulty.
• Mic level control too low.
• Master volume level turned down.
• Audio mode switch set to mono.
• Pitch controls set incorrectly, reset to zero.
• Lights on/off switch not on.
• Sensitivity control too low.
Microphone does not work
Multiplex disc vocals and music in separate
speakers
Tape/CD running too slow/fast
Light sequencer not working
Symptom Possible cause
‘Pop Idol’ is a Trademark of 19 Television Ltd & FremantleMedia Operations BV. Based on the
television programme ‘Pop Idol’
co-produced by Thames Television and
19 Television Productions and licensed by Fremantle Brand Licensing.
www.popidoltv.com
19
Table of contents
Other ACOUSTIC SOLUTIONS Karaoke System manuals


