ACS Eubank EAA1020H User manual

IMPORTANT
This manual may include information for options and features which may not be
included on the unit being installed. Refer to the unit data label or Model Identication
to determine which features and options this unit is equipped with.
INSTALLER: Afx the instructions on the inside of the building adjacent to the thermostat.
END USER: Retain this manual for future reference.
Heat Pump Product Manual
Vertical Wall-Mount Heat Pumps
Eubank Wall Mount Heat Pump I&O Manual 06/2022 Rev.5
MODELS:
EAA1020H • EAA1024H • EAA1030H
EAA1036H EAA1042H • EAA1048H
Installation & Operation Manual
1.5 - 4 Ton Vertical Wall-Mount Heat Pumps
Manufactured By:
Eubank, An AirX Climate Solutions Brand
P.O. Box 400 • Cordele, Georgia 31010 • 156 Seedling Drive • Cordele, Georgia 31015
(229) 273-3636 • Fax (229) 273-5154
The most current version of this manual can be found at www.EubankWallMount.com.

2
Eubank Wall Mount Heat Pump I&O Manual
06/2022 Rev.5
How To Use This Manual
This manual is intended to be a comprehensive guide to the installation of the Eubank®EAA family of vertical packaged
heat pumps. It contains installation, troubleshooting, maintenance, warranty, and application information. The information
contained in this manual is to be used by the installer as a guide only. This manual does not supersede or circumvent
any applicable national or local codes. For information on the efciency, cooling and heating performance, please refer
to the Product Data Sheets. The most current version of all literature can be found on our website at www.Eubank.com.
If you are installing the heat pump unit, rst read Chapter 1 and scan the entire manual before beginning the installation
as described in Chapter 2. Chapter 1 contains general, descriptive information and provides an overview which can
speed up the installation process and simplify troubleshooting.
If a malfunction occurs, follow this troubleshooting sequence:
1. Make sure you understand how the heat pump unit works (Chapters 1 & 3).
2. Identify and correct installation errors (Chapter 2).
3. Refer to the troubleshooting information in Chapter 4.
4. Identify defective part(s). (Chapter 5).
If you are still unable to correct the problem, contact the Factory at 1-800-841-7854 for additional assistance.
Please read the following “Important Safety Precautions” before beginning any work. Failure to follow these rules
may result in death, serious bodily harm, property damage and damage to the equipment.
Important Safety Precautions
1. USE CARE when LIFTING or TRANSPORTING equipment.
2. TRANSPORT the UNIT UPRIGHT. Laying it down on its side may cause oil to leave the compressor and breakage
or damage to other components.
3. TURN ELECTRICAL POWER OFF AT THE breaker or fuse box BEFORE installing or working on the equipment.
LINE VOLTAGES ARE HAZARDOUS or LETHAL.
4. OBSERVE and COMPLY with ALL applicable PLUMBING, ELECTRICAL, and BUILDING CODES and ordinances.
5. SERVICE may be performed ONLY by QUALIFIED and EXPERIENCED PERSONS.
* Wear safety goggles when servicing the refrigeration circuit
* Beware of hot surfaces on refrigerant circuit components
* Beware of sharp edges on sheet metal components
* Use care when recovering or adding refrigerant
6. Use COMMON SENSE - BE SAFETY-CONSCIOUS
This is the safety alert symbol . When you see this symbol on the unit and in the instruction manuals be alert to
the potential for personal injury. Understand the signal word DANGER, WARNING, CAUTION and IMPORTANT.
These words are used to identify levels of the seriousness of the hazard.
DANGER Failure to comply will result in death or severe personal injury and/or property damage.
WARNING Failure to comply could result in death or severe personal injury and/or property dam-
age.
CAUTION Failure to comply could result in minor personal injury and/or property damage.
IMPORTANT Used to point out helpful suggestions that will result in improved installation, reliability
or operation.
© 06/2022 Eubank, An AirX Climate Solutions Brand
SPECIFICATIONS SUBJECT TO CHANGE WITHOUT NOTICE.

3Eubank Wall Mount Heat Pump I&O Manual
06/2022 Rev.5
Table of ConTenTs
Chapter 1 - Description & Specications
1.1 General Description................................................................................................................................. 5
1.2 Serial Number Date Code ....................................................................................................................... 5
1.3 Model Identication ................................................................................................................................ 6
1.4 Air Flow, Weights and Filter Sizes.......................................................................................................... 7
1.5 General Operation ................................................................................................................................... 7
1.6 Controls - Standard - PC Board............................................................................................................... 9
1.7 Options .................................................................................................................................................. 14
1.8 Economizer Opertation and Components ............................................................................................. 14
Chapter 2 - Installation
2.1 Equipment Inspection............................................................................................................................ 16
2.2 Installation Requirements...................................................................................................................... 16
2.3 Installation Materials ........................................................................................................................... 17
2.4 Porting and Duct Work ......................................................................................................................... 19
2.5 Fresh Air Hood Adjustment .................................................................................................................. 20
2.6 Bracket Installation .............................................................................................................................. 20
2.7 Mounting the Unit ................................................................................................................................ 21
2.8 Electrical Connections........................................................................................................................... 22
Chapter 3 - Start-Up
3.1 Check-Out of Cooling Cycle ................................................................................................................ 25
3.2 Check-Out of Heating Cycle................................................................................................................. 26
3.3 Discharge Air Adjustment for Modulating Hot Gas Reheat (HGR) Valve ........................................... 26
3.4 Ventilation System Set Up .................................................................................................................... 28
Chapter 4 - Troubleshooting
4.1 Overview ............................................................................................................................................... 3 0
4.2 Failure Symptoms Guide....................................................................................................................... 31
4.3 Compressor Troubleshooting ................................................................................................................ 32
4.4 Electric Heat Control............................................................................................................................. 33
Chapter 5 - Electrical Schematics
5.1 Electrical Schematics ............................................................................................................................ 34
WARNING
• If the information in these instructions are not followed exactly, a re may result
causing property damage, personal injury or loss of life.
• Read all instructions carefully prior to beginning the installation. Do not begin
installation if you do not understand any of the instructions.
• Improper installation, adjustment, alteration, service or maintenance can cause
property damage, personal injury or loss of life.
• Installation and service must be performed by a qualied installer or service
agency in accordance with these instructions and in compliance with all codes and
requirements of authorities having jurisdiction.
INSTALLER:
Afx the instructions on the inside of the building adjacent to the thermostat.
END USER: Retain these instructions for future reference.

4
Eubank Wall Mount Heat Pump I&O Manual
06/2022 Rev.5
Chapter 6 - Periodic Maintenance Requirements
6.1 Scheduled Maintenance......................................................................................................................... 38
Chapter 7 - Warranty Information
7.1 Standard Product Warranty...................................................................................................................... 39
Appendix A - Installation Instructions of Field Installed Electric Heat ......................................................... 40
figures
Figure 1 PC Control Board................................................................................................................... 13
Figure 2 Enthalpy Sensor Temperature Control Points ......................................................................... 15
Figure 3 Fresh Air Hood Damper .......................................................................................................... 20
Figure 4 Heat Pump Wall Mounting Detail........................................................................................... 21
Figure 5a Humidity Control Wiring Detail ............................................................................................. 24
Figure 5b Thermostat Connection Diagram ............................................................................................ 24
Figure 6 Temperature Sensor Wires - Modulating HGR Valve ............................................................ 27
Figure 7 Desired Temperature Set Point - Modulating HGR Valve ..................................................... 27
Figure 8 Damper Adjustment ................................................................................................................ 28
Figure 9 Damper Air Path...................................................................................................................... 29
Figure 10 Typical Configuration for Single Element Heater .................................................................. 33
Figure 11a Typical 1ø Electrical Schematic Diagram Heat Pump with Manual Outside Air Damper..... 35
Figure 11b Typical 208/230v. 3ø Heat Pump Electrical Schematic Diagram........................................... 36
Figure 11c Typical 460v. 3ø Heat Pump Electrical Schematic Diagram, with PC Control Board........... 37
Tables
Table 1 CFM @ External Static Pressure............................................................................................... 7
Table 2 Ship Weight ............................................................................................................................... 7
Table 3 Filter Sizes ................................................................................................................................. 7
Table 4 Minimum Clearances .............................................................................................................. 17
Table 5 Voltage Limitations.................................................................................................................. 17

5Eubank Wall Mount Heat Pump I&O Manual
06/2022 Rev.5
Description and Specications
1.1 General Description
Eubank® Wall Mount Heat Pumps are high efficiency, vertical wall mounted heat pumps that provide
heating, cooling and ventilation for a wide range of applications. Nominal cooling capacities range from
20,000 to 48,000 BTUH.
All models have EER's of 11.00 and feature quiet operation. Resistance heating is available in all models.
Please see appendix A for the installation instructions on field installing electric heaters.
Eubank heat pumps are designed for easy installation and service. All units have built-in side mounting
flanges and are shipped with a bottom support bracket. The unit has been factory charged. Service ports
have been provided for field service, if required. All internal wiring is complete.
Eubank EAA heat pump models are available in a wide variety of styles and configurations to meet the
various ventilation and cooling requirements. For school classrooms, models are available to comply
with the ASHRAE 62-1999 standard, “Ventilation for Acceptable Indoor Air Quality.” Where cooling
is required during cool or cold weather, e.g., telecommunication shelters, a factory-installed economizer
can be used. To insure proper operation and optimum performance, all outside air ventilation packages
and the economizer are non-removable, factory installed and tested. Instructions for the EAA models
with the GreenWheel® ERV are included in this manual.
All Eubank heat pumps are tested and certified for efficiency and capacity in accordance with the ANSI/
AHRI (Air-Conditioning, Heating and Refrigeration Institute) Standard 390-2017 (Single Package
Vertical Units). All EAA models meet or exceed the efficiency requirements of ANSI/ASHRAE/IESNA
90.1.2016. All heat pump models are listed by ETL and tested to UL standard 1995, 4th Edition. Eubank
heat pumps are commercial units and are not intended for use in residential applications.
1.2 Serial Number Date Code
20 = 2020 01 = January 05 = May 09 = September
21 = 2021 02 = February 06 = June 10= October
22 = 2022 03= March 07 = July 11 = November
23 = 2023 04 = April 08 = August 12 = December

6
Eubank Wall Mount Heat Pump I&O Manual
06/2022 Rev.5
1.3 Model Identification
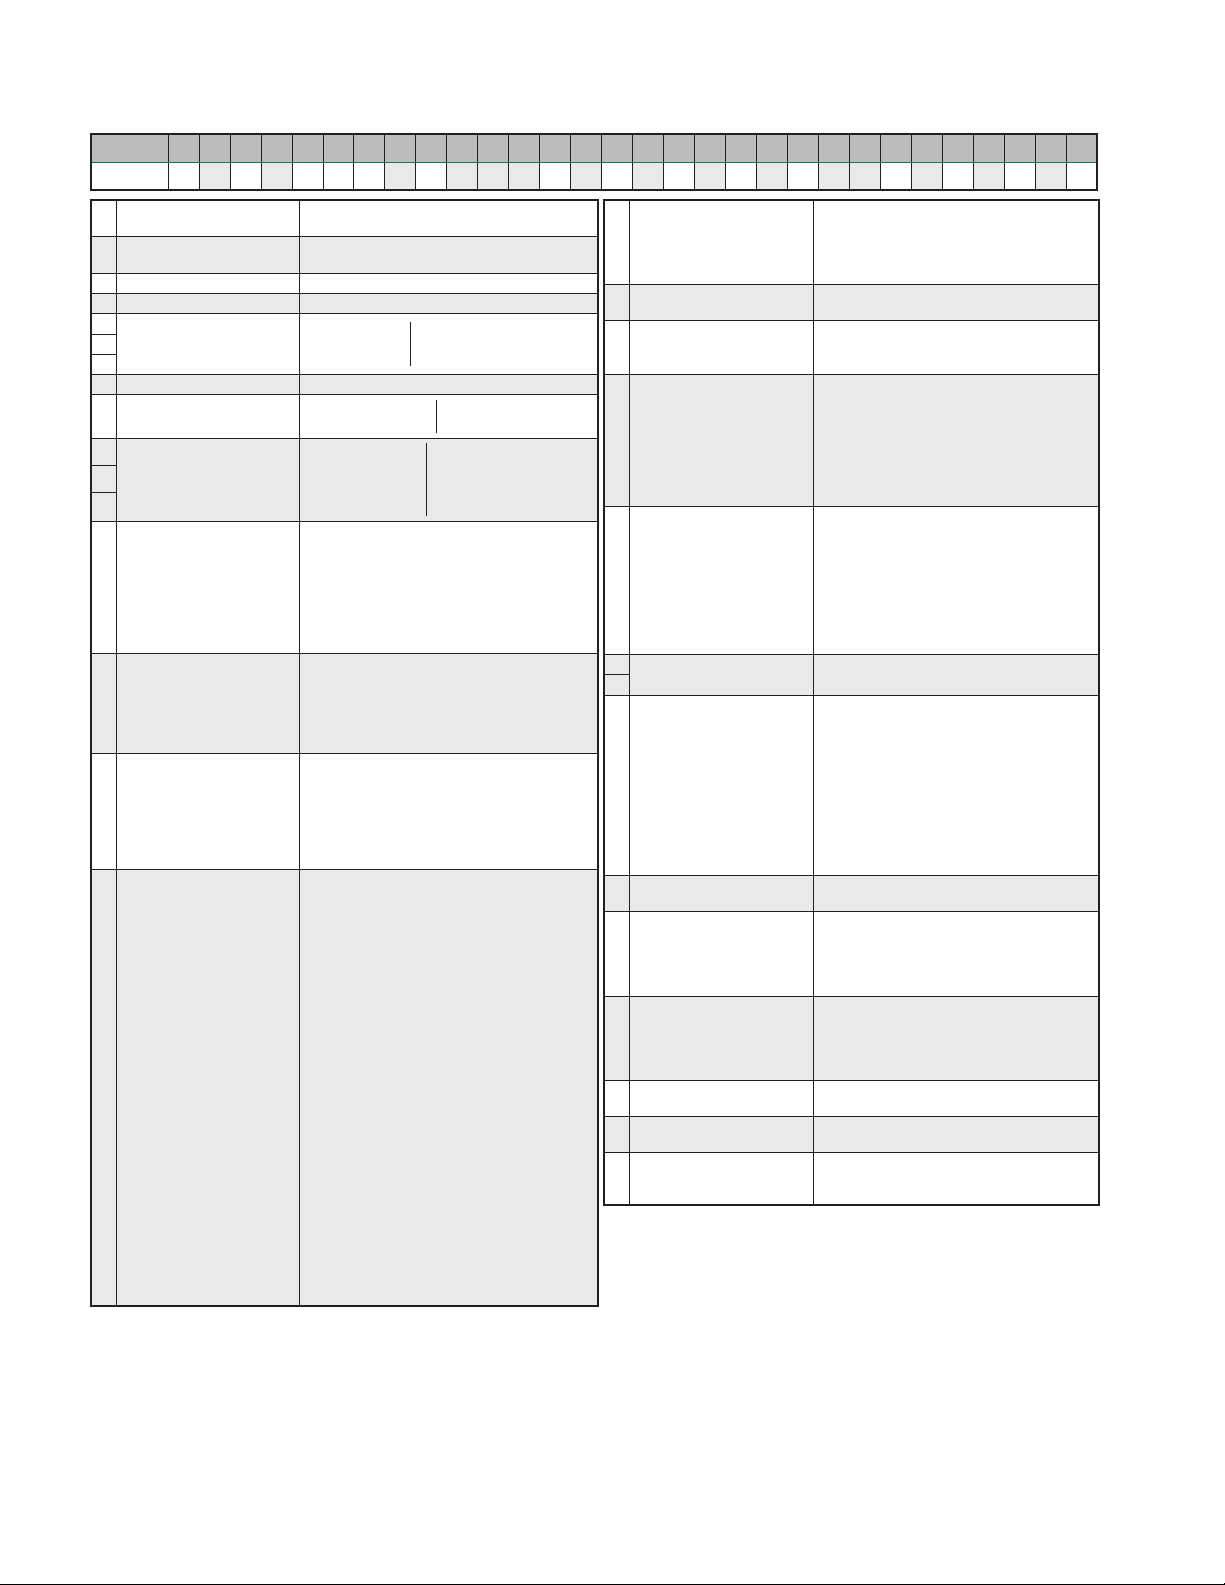
Example E A A 1 0 3 6 H A 0 5 0 C + + + + 1 E A + A 1 1 + + + + + +
Position 1234567891011 12 13 14 15 16 17 18 19 20 21 22 23 24 25 26 27 28 29 30
1Unit Designation/Family E = Eubank Wall Mount
S = Stock Unit
2Energy Efciency Ratio
(EER) A = 11
3Refrigerant Type A = R-410a
4Compressor Type/Quantity 1 = Single
5Unit Capacity/Nominal
Cooling (BTUH)
020 = 20,000 036 = 36,000
024 = 24,000 042 = 42,000
030 = 30,000 048 = 48,000
6
7
8System Type H = Heat Pump
9Power Supply
(Volts-Phase-Hz)
A= 208/230-1-60 D= 460-3-60
C= 208/230-3-60
10
Heat Designation
@ Rated Voltage
000 = No Heat 090 = 9KW
040 = 4KW 100 = 10KW
050 = 5KW 120 = 12KW
060 = 6KW 150 = 15KW
080 = 8KW
11
12
13 Ventilation
Conguration
N = Barometric Damper w/15% OSA
Y = Manual Damper w/No Pressure Relief
Z = Manual Damper w/Pressure Relief
D = Motorized Damper w/Pressure Relief
C = Economizer
H = GreenWheel®
+ = None
$ = Special
14 Dehumidication
G = Hot Gas Reheat
R = Electric Reheat
T = Electric Reheat w/Humidity Control
G = Hot Gas Reheat
+ = None
$ = Special
15 Controls
A = Power Fail Alarm w/Additional Lockouts
C = 24V EMS Relay Kit
D = 24V EMS Relay Kit w/Factory
Installed T-Stat
E = Factory Installed T-Stat
+ = None
$ = Special
16 Operating Condition
A = Evaporator Freeze Sensor (EFS)
C = EFS w/Hot Gas Bypass
D = Desert Duty
E = Extreme Duty
F = Desert Duty w/Hard Start
G = Desert Duty w/EFS
H = Desert Duty w/Hard Start & EFS
J = Extreme Duty w/Hard Start
K = Extreme Duty w/EFS
M = Extreme Duty w/Hard Start & EFS
N = Hard Start
P = Hard Start w/Low Ambient & CCH
Q = Hard Start w/Low Ambient &
Fan Cycle Control (FCC)
R = Crank Case Heater (CCH)
T = Hard Start w/EFS
U = Hard Start w/Hot Gas Bypass
V = Hard Start w/Low Ambient & CCH & EFS
W = Low Ambient w/CCH
X = Hot Gas Bypass
Y = Low Ambient w/CCH & FCC
Z = Low Ambient w/CCH & EFS
1 = Low Ambient w/FCC
2 = Low Ambient w/FCC & EFS
3 = CCH w/Hot Gas Bypass
+ = None
$ = Special
17 Indoor Air Quality Features
D = Dry Bulb Sensor
E = Dry Bulb Sensor w/Dirty Filter
G = Dirty Filter Sensor
+ = None
$ = Special
18 Air Flow 1 = Top Supply/Bottom Return
$ = Special
19 Compressor Location
C= Center - All 6 ton units and above
D= Left Hand - All 31/2 to 5 ton units
E= Right Hand - All 11/2 to 3 ton units
20 Filter Option
A = 2” Pleated (MERV 8, AC/HP-C)
C = 2” Charcoal
D = MERV 11 High Filtration Package
E = MERV 13 High Filtration Package
F = Filter Access Through Return Air Grille
W = Aluminum Washable
+ = None
$ = Special
21 Corrosion Protection
A = Condenser Coil Only
C = Evaporator Coil Only
D = Both Coils Condenser & Evaporator
E = All Coils Cond/Evap/Reheat
F = Coat All
G = Coastal Package & Evaporator Coil
K = Coastal Package
+ = None
$ = Special
22 Engineering Revision
Level A1
23
24 Cabinet Color
1 = Beige (Standard Eubank)
2 = Gray
3 = Carlsbad Canyon
4 = White
5 = Stainless Steel Exterior
6 = Dark Bronze
7 = .050 Aluminum Stucco
8 = Mesa Tan
9 = Pebble Gray
A = Stainless Steel - Unit
$ = Custom Color (Powder Coat)
25 Sound Attenuation 2 = Compressor Blanket
+ = None
26 Security Option
A = Lockable Access Plate/Tamper Proof
C = Tamper Proof Screws
D = Lockable Access Plate w/Tamper Proof
+ = None
$ = Special
27 Fastener/Drain Pan Option
A = Stainless Steel Fasteners
C = Stainless Steel Drain Pan
D = Stainless Steel Fasteners & Drain Pan
+ = None
$ = Special
28 Unused + = None
$ = Special
29 Unused + = None
$ = Special
30 Special Variation
+ = None
$ = Special Conguration Not Covered by
Model Nomenclature
Note: Not all options are available with all congurations.
Contact your Eubank sales representative for conguration
details and feature compatibility.
1.4 Air Flow, Weights and Filter Sizes.

7Eubank Wall Mount Heat Pump I&O Manual
06/2022 Rev.5
MODEL External Static Pressure (WET COIL)
0.10 0.20 0.25 0.30 0.40 0.50
EAA1020H/1024H 860 810 740 670
EAA1030H 1100 1000 960 920 810
EAA1036H 1310 1220 1185 1150 1060
EAA1042H 1650 1585 1520 1450 1360
EAA1048H 1900 1830 1760 1700 1620
EAA1060H 1900 1830 1760 1700 1620
Air flow ratings of 208-230v. Units are at 230v. Air flow ratings of 480 v. units are at 460 volts. Operation of units at a different
voltage from the rating point will affect air flow.
Note: Follow local codes and standards when designing duct runs to deliver the required airow. Minimize noise and excessive
pressure drops caused by duct aspect ratio changes, bends, dampers and outlet grilles in duct runs.
Table 1. Air Flow (Cubic Feet per Minute)
Model Weight Base w/Economizer w/3 Phase w/Economizer & 3 Phase
EAA1020H/EAA1024H Pounds (Kilograms) 337 (153) 357 (162) 356 (161) 376 (171)
EAA1030H/EAA1036H Pounds (Kilograms) 397 (180) 419 (190) 416 (189) 438 (199)
EAA1042H Pounds (Kilograms) 453 (205) 476 (216) 491 (223) 514 (233)
Table 2. Installed Weight (lbs (Kg)
Model FILTER TYPE INCHES MILLIMETERS PART
NUMBER
FILTERS
PER UNIT
MERV
RATING
EAA1020H/EAA1024H Return Air Filter 30 x 16 x 2 762 x 406 x 51 80138 1 8
EAA1030H/EAA1036H Return Air Filter 36½ x 22 x 2 927 x 559 x 51 80162 1 8
EAA1042H Return Air Filter 36½ x 22 x 2 927 x 559 x 51 80162 1 8
Table 3. Filter Size (inches)
1.5 General Operation
Refrigerant Cycle
Eubank heat pumps use R-410A refrigerant in a conventional vapor-compression refrigeration cycle to
transfer heat. In the cooling mode, a double blower assembly blows indoor air across the evaporator (indoor
coil). Liquid refrigerant passing through the evaporator is boiled into gas by heat removed from the air.
The warmed refrigerant gas enters the compressor where its temperature and pressure are increased. The
hot refrigerant gas condenses to liquid as heat is transferred to outdoor air blown across the condenser
(outdoor coil) by the condenser fan. Liquid refrigerant is metered into the evaporator through a metering
device to repeat the cycle. In the heating mode, the process is reversed.
Heating Mode
During heating mode a special reversing valve reverses the flow of refrigerant through the system
exchanging the roles of the condenser and evaporator. Now the outdoor coil becomes the evaporator and
the indoor coil becomes the condenser. The refrigerant then flows through the outdoor coil, picks up heat
and becomes vaporized. The vapor then enters the compressor where it is compressed to a higher pressure
and temperature. Next it is pumped to the indoor coil where the heat will be released into the room. The
compressed refrigerant vapor will condense to its liquid state as it gives up heat. Finally, liquid flows
through a metering device into the evaporator where the cycle will be repeated.
Optional electric strip heat is available for all models. Please see Appendix A for instructions on field
installation of electric heat.
Ventilation Options

8
Eubank Wall Mount Heat Pump I&O Manual
06/2022 Rev.5
Standard - Ventilation Configuration N: Manual damper capable of up to 15% of rated airflow of
outside air; field adjustable, no pressure relief.
Optional - Ventilation Configuration Y: Manual damper capable of 0 to 450 cfm (maximum of 40%
of rated airflow) of outside air; field adjustable, no pressure relief.
Optional - Ventilation Configuration Z: Manual damper capable of 0 to 450 cfm (maximum of 40%
of rated airflow) of outside air; field adjustable, includes pressure relief.
Optional - Ventilation Configuration D: Motorized, two position damper (open and closed) capable
of 0 to 450 cfm (maximum of 40% of rated airflow) of outside air; includes pressure relief. A 24-volt
actuated motor controls the damper from an external input such as: a time clock, CO2 sensor, energy
management system or manual switch.
Optional - Ventilation Configuration C: The economizer is a regulated damper system with controls.
The damper regulates the circulation of outside air into the enclosure (when the outdoor air conditions
are suitable) to reduce the need for mechanical cooling, save energy, and extend compressor life.
Depending upon the options selected, the damper responds to the enthalpy of the outdoor air. On a call
for cooling from a space thermostat, it operates as follows:
When the enthalpy of the outdoor air is below the set point, the outdoor air damper is proportionally open
(and return air damper is proportionally closed) to maintain between 50°F and 56°F (10°C to 13°C) at
the mixed/discharge air sensor. Integral pressure relief allows the indoor air to exit the shelter through
the air conditioner.
When the enthalpy of the outdoor air is above the set point, the outdoor air damper closes to its minimum
position. A call for cooling from the space thermostat brings on mechanical cooling.
Optional - Ventilation Configuration H: GreenWheel®ERV
The GreenWheel® ERV is a total energy (both sensible and latent) wheel that reduces both construction
and operating cost while ventilating the classroom to ASHRAE 62-1999 requirements. The use of the
GreenWheel ERV reduces the energy load of the outside air. Exhausting stale, inside air keeps indoor
pollutants and harmful gases to a minimum. The GreenWheel ERV has been tested and certified according
to ARI Standard 1060.
How It Works
During the summer, cool dry air from the classroom is exhausted through the GreenWheel® ERV to the
outside. As the air passes through the rotating wheel, the desiccant becomes cooler and drier. Simultaneously,
hot humid air is being pulled across the rotating wheel. The cool, dry desiccant absorbs moisture and
heat from the incoming air. The cooler, drier air is mixed with the return air from the classroom and
distributed throughout the room.
In the winter, warm moist air is exhausted through the GreenWheel® ERV to the outside. As the air passes
through the rotating wheel, the desiccant becomes warmer and absorbs moisture. Simultaneously, cold
dry air is being pulled across the rotating wheel. The cold, dry air absorbs heat and moisture from the
desiccant. The warmed air is mixed with the return air from the classroom and distributed throughout
the room.
Quality Components

9Eubank Wall Mount Heat Pump I&O Manual
06/2022 Rev.5
The GreenWheel®module consists of a desiccant wheel, two blowers and the drive motor and belt. The
two blowers simultaneously pull fresh air from outside and exhaust air from the classroom through the
rotating wheel. Two variable speed blowers ensure that up to 450 CFM of outside air can be brought into
the room and the indoor air is properly exhausted. Variable speed blowers permit that the desired quantity
of outside air is delivered into the room. Optional independent exhaust air blower control allows positive
pressurization of the classroom, i.e., more outside air can be introduced through the GreenWheel® ERV
than is exhausted.
Hot Gas Reheat (HGR) Dehumidification Mode (Special Option “G”)
When the HGR is in the dehumidification mode, the hot gas reheat (HGR) coil is energized. The cooled,
dehumidified air exits the evaporator coil and is blown through the HGR coil. This coil is sized to the
sensible capacity of the unit. The heat in the HGR coil is transferred to the air stream. The use of the HGR
coil allows the indoor humidity of the classroom to be maintained at or below a certain set humidity set
point without over cooling the classroom. These units can not add humidity to the classroom.
The operation of the HGR coil is controlled by a humidity controller. If the humidity rises above the set
point on the controller and the temperature in the classroom is satisfied, both mechanical cooling and
the HGR coil operate to temper the air and lower the humidity. If the temperature in the classroom rises
above or falls below the set point of thermostat and the unit is operating in the dehumidification mode,
the need for cooling or heating will override the call for dehumidification and the HGR coil is disengaged
until the thermostat is satisfied. This assures the classroom temperature is maintained as first priority
and humidity control is second.
The humidity controller or BAS control is required for proper operation of the HGR coil.
1.6 Standard Controls- PC Board
Description of Operation
The PC board controls the operation of the indoor blower, the compressor and the reversing valve while
providing high pressure, loss of charge protection with an integral defrost function. Upon a call for
mechanical cooling or heating, the controller will energize the compressor when a 24 VAC signal is
applied to the “Y” terminal provided that all time delays and fault conditions are satisfied. It will energize
the indoor blower when a 24 VAC signal is applied to the “G” terminal. The reversing valve will be
energized when a 24 VAC signal is applied to the “O” terminal. Electric heat (EH) will be energized
when a 24 VAC signal is applied to the “W2” terminal. The control will monitor the status of the loss
of charge switch and the high pressure switch. If either of these inputs recognize a fault, the compressor
will turn off and the anti-short cycle delay will be initiated. If any of these faults occur twice within a one
hour period, the control will lock the compressor out until the power is reset manually. Note: 24 VAC
power must be continuously applied to “R” and “C”.
The board will also monitor the defrost sensor. If the defrost sensor senses a temperature of 32°F while
in the heat mode, it will initiate a pin selectable 30, 60, or 90 minute delay period. (Factory set at 60
minutes). If the sensor is still calling for defrost at the end of this delay period, it will de-energize the
outdoor fan and energize the reversing valve through the RV terminals. The defrost cycle will terminate
on time or temperature. It will have a maximum defrost run time of 10 minutes, however, if the defrost
sensor registers a temperature of 50°F or higher before the 10 minute maximum run time, the defrost
cycle will terminate. The EH terminals will also be energized during a defrost cycle if the EHDD (Electric
Heat During Defrost) jumper is in the “Yes” position.
The board also provides the ability to vary the speed of the indoor blower motor (electronically commutated
motors excepted) and to select the number of seconds the blower will run after the compressor has turned
off (Post Purge). The user can select whether the compressor and electric heat operate simultaneously

10
Eubank Wall Mount Heat Pump I&O Manual
06/2022 Rev.5
(the S-Circuit) and if electric heat operates during the defrost mode (EHDD). The board can control
the operation of a two position motorized damper to provide fresh air for ventilation (DRO/DRC). In
conjunction with an optional temperature sensor, the board will modulate the speed of the outdoor fan
motor to allow cooling during low ambient temperatures.
LED’s indicate power, operating status and high pressure or loss or charge lockout.
Functions
Lockout Protection
If either of the fault conditions (LPS or HPS) occurs twice within one hour, the control board will enter
into and indicate the lockout mode. In the lockout mode, the compressor is turned off. If there is a call
for indoor air flow “G”, the blower remains energized, the alarm output is energized and the red LED
will blink to indicate which fault has occurred. When the lockout condition is cleared, the unit will reset
if the thermostat is turned “Off” and back to “On” or when the power to the heat pump is reset. With the
control board, the user can select either normally closed or normally open remote alarm dry contacts by
moving a wire on the control board. The heat pump is factory wired to be normally open.
Delay on Break
The board has an integral three minute delay on break (anti-short cycle) timer. This timer initiates every
time the compressor turns off to prevent a short cycle condition.
Loss of Charge (LPS) By-Pass Timer
The control includes a fixed, three minute Loss of Charge Switch (LPS) bypass timer. If the Loss of Charge
Switch is open on initial power up or while the compressor is running, the control will ignore the fault
for three minutes. If the fault still exists after three minutes, the control will de-energize the compressor,
register a loss of charge fault, and initiate the three minute anti-short cycle timer.
User Selectable Settings
The control board has three potentiometers (pots) that allow the user to select settings to optimize the
installation. See Figure 1 for location of the pots.
Delay on Make
The control has a pot settable 0.03 to10 minute delay on make timer that initiates upon initial power up
only. The factory set time is three minutes.
Post Purge Potentiometer
The board includes a pot settable 10-90 second post purge timer. When the signal at the “G” terminal is
removed, the indoor blower will remain energized for the amount of time selected by the pot. The pot
is factory set at ninety seconds.
Indoor Blower Motor Speed Control Potentiometer
The control has a speed control potentiometer for the indoor fan blower. The user can vary the speed of
the fan using this potentiometer from approximately 40% to 100% of rated air flow. Caution should be
used when slowing the speed of the indoor blower; sufficient air flow is critical to the proper operation
of the heat pump.
The control board has four operational modes that can be defined by the installer. These modes are
selected with jumpers. See Figure 1 for location of the jumpers. To change the factory setting, gently
pull the jumper and slide it onto the desired setting.

11 Eubank Wall Mount Heat Pump I&O Manual
06/2022 Rev.5
Damper Relay (Damper Relay Open-DRO /Damper Relay Closed-DRC)
The board has a two position, motorized fresh air damper (ventilation option “B”) from the “G” input
when this option is selected. It is pin selectable using a jumper to select “Yes” to enable it. When “Yes”
is selected, the control will energize the Damper Relay Open terminal when “G” is calling for the damper
to open. When the “G” signal is not present, the control will energize the Damper Relay Closed terminal
to close the damper. When “No” is selected, this feature is disabled. The factory setting for the damper
relay option is “No”.
Defrost Mode
The board has an integral defrost cycle that will be initiated by the Defrost Sensor (DS). If the defrost
sensor registers a temperature of 32°F while in the heat mode, it will initiate a pin selectable 30, 60, or
90 minute delay. The factory setting is 60 minutes. If the sensor is still calling for defrost at the end of
this delay, it will de-energize the outdoor fan, energize the reversing valve through the RV terminals, and
keep the compressor energized. The defrost cycle will terminate on time or temperature. It will have a
maximum defrost run time of 10 minutes, however, if the defrost sensor registers a temperature of 50°F
or higher before the 10 minute maximum run time, the defrost cycle will terminate. If “Yes” has been
selected for Electric Heat During Defrost (EHDD) and “No” selected for the S-Circuit, the electric heat
(EH) output will be energized during a defrost cycle to supply heat while the coil defrosts.
Electric Heat During Defrost (EHDD)
The board provides the option of running the electric heat (EH) during a defrost cycle. There are two
options for the EHDD, “Yes” and “No”. If “Yes” is selected, the board will energize the EH terminals
during a defrost cycle. If “No” is selected, the EH terminals will not be energized during a defrost cycle.
The factory setting for EHDD is “No”. If the S-circuit is in the “Yes” position, the EHDD function will
be disabled.
S-Circuit
The S-Circuit prevents the compressor and electric heat from operating simultaneously. The S-Circuit
is pin selectable using a jumper to select “Yes” to enable this feature or “No” to disable it. When “Yes”
is selected, the control will not allow the compressor to run when there is a call for electric heat at the
W2 input. It will turn the compressor off until the call for W2 is satisfied. The factory setting for the
S-Circuit is “No”.
Test Mode
A jumper selectable test mode can be used by technicians for trouble shooting purposes. The test mode
reduces the delay on make and anti-short cycle timers to ten seconds, and the LPS bypass becomes two
minutes.
Internal Head Pressure Control (Requires optional coil sensor)
The control has an internal, fixed set point head pressure control designed to maintain a constant head
pressure under low ambient conditions. It will monitor a coil sensor that is inserted into the condenser fan
coil and modulate the speed of the fan motor accordingly to maintain a constant coil temperature in turn
stabilizing the head pressure. The fixed set point that the control will maintain is 100°F. The motor will
have a minimum operating speed of 20%-30% of the full speed. It will also incorporate a fixed hard start
time of one second during which the condenser fan motor will turn on full speed for one second at start up.

12
Eubank Wall Mount Heat Pump I&O Manual
06/2022 Rev.5
High Pressure Switch (HPS)
The high pressure switch is mounted on the compressor liquid line. The HPS terminals are on the high
pressure switch input. This input monitors the status of the high pressure switch and determines when
this fault condition is present. If the HPS is open on the initial “Y” call, the control board will not allow
the compressor to operate. If the HPS opens while the compressor is running, the control board will turn
the compressor off, register the first HPS fault, and initiate the 3 minute anti-short cycle timer. If two
HPS faults occur within a one hour period, the control will enter a HPS lockout condition and energize
the alarm contacts. The RED status LED will blink once to indicate this condition. The lockout condition
will only be reset by manually cycling power to the control to prevent destructive short cycling. To reset
the switch, turn primary power off, then back on or turn thermostat system switch off, then back on.
The high pressure switch opens at 650 psig and closes at 450 psig.
Loss of Charge Switch (LPS)
The loss of charge switch is mounted on the compressor’s liquid line. The LPS terminals are the loss
of charge switch input. This input will be used to monitor the status of the loss of charge switch and
determine when a LPS fault is recognized. There is 3 minute loss of charge switch bypass timer. If the
LPS is open on the initial “Y” call or while the compressor is running, the control will ignore the status
of the LPS and not recognize a fault for 3 minutes. If the LPS is still open after 3 minutes, the control
will de-energize the compressor, register the first LPS fault, and initiate the 3 minute anti-short cycle
timer. If two LPS faults occur within a one hour period, the control will enter a LPS lockout condition
and energize the alarm contacts. The RED status LED will blink twice to indicate this condition. The
lockout condition will only be reset by manually cycling power to the control. To reset the switch, turn
primary power off, then back on or turn thermostat system switch off, then back on.
The loss of charge switch opens at 40 psig and closes at 60 psig.
Status LED Blink Codes
There are two LEDs on the board. The green LED is used as a power indicator. The red LED is used to
indicate the two fault lockout conditions. During a HPS lockout, the red LED blinks once. During a LPS
lockout, the red LED blinks twice.
Color Type Status Description
Green Power Constant On 24 VAC power has been applied
Green Status Constant On Normal Operation
Red Status 1 Blink High pressure switch has opened twice
Red Status 2 Blinks Loss of charge switch has opened twice
Red Status 3 Blinks Freeze Condition
Red Status 4 Blinks Faulty or disconnected defrost sensor
Led Color Type Status Description
Board Inputs
R and C. The R and C terminals are the input power terminals for the control. They will accept any
voltage between 19-32 VAC.
Y The “Y” terminal is the compressor input from the thermostat. Given that all time delay and fault
conditions are satised, the control will energize the compressor contactor through the “CC” terminals
when there is a 24 VAC signal present at the “Y” terminal.

13 Eubank Wall Mount Heat Pump I&O Manual
06/2022 Rev.5
W2 The “W2” terminal is the electric heat input from the thermostat. When the control receives a call for
“W2” from the thermostat, it will energize the EH terminal. When the S-Circuit is selected by placing the
jumper in the Yes position, the control will not allow the compressor to run simultaneously with electric
heat. The default setting for the S-Circuit is “No”. If “Yes” is selected for the S-circuit, the EH output
will not energize during defrost.
O The “O” terminal is the reversing valve input from the thermostat. When there is a 24 VAC signal
present at the “O” terminal, the control will energize the reversing valve through the “RV” terminals. The
control will also energize the “RV” terminals in heat mode during a defrost cycle.
G The “G” terminal is the indoor blower input from the thermostat. When there is a 24 VAC signal present
at the “G” terminal, the control will energize the indoor blower. When the signal at the “G” terminal is
removed, the fan will remain energized for the pot settable 10-90 second post purge period. When the
damper relay option is selected by placing the jumper in the “Yes” position, the control will energize the
DRO terminal with every “G” call to open the damper. When the “G” call is not present, the control will
energize the DRC terminal to close the damper. The default setting for the damper relay option is “No”.
HPS High Pressure switch terminals are the high pressure switch input.
LPS Loss of Charge switch terminals are the loss of charge switch input.
DS The DS terminals are the defrost sensor input.
CS The CS terminals are the coil sensor (optional) input. This input will monitor the condenser coil
temperature to allow the head pressure control to modulate the speed of the fan and maintain a constant
head pressure.
Red Status LED
Damper Open/Damper Close S-Circuit
Electric Heat During Defrost
Test
Defrost Time Delay
(30-60-90 Minutes)
Green Power LED
Delay on Make PotIndoor Blower Speed Control Pot
Post Purge Pot
FS DS CS
Indoor Fan
Line 1
Line 2
Condenser Fan
Line 1
Line 2
1NC
1COM
1NO
DRC
DRO
EH
RV
CC
HPS Y LPS W2 O G
1Contacts
for Remote
Alarms
Figure 1 - PC Control Board

14
Eubank Wall Mount Heat Pump I&O Manual
06/2022 Rev.5
1.7 Options
Low Ambient Control
The low ambient control permits mechanical cooling when outdoor ambient temperatures are low. The
control uses a reverse-acting high pressure switch to cycle the condenser fan motor according to liquid
refrigerant pressure conditions. Switch closure and fan operation occurs when the pressure reaches 400
PSIG. The switch opens again when the refrigerant pressure falls to 245 PSIG. Therefore, the outdoor
fan always starts after the compressor, and it will cycle frequently during normal operation at low
outdoor conditions.
Hard Start Kit
Used on single phase equipment to give the compressor higher starting torque under low voltage conditions.
Field installed only. (Not generally recommended for use on scroll compressor.)
Adjustable Outdoor Thermostat
Will not allow electric resistance heat to be energized unless the outdoor temperature is below the desired
set point. Field or factory installed. Available on all Eubank units. P/N 93934
Single Point Feed
When multiple internal disconnects are used, single point feed permits only one field power supply to
heat pump. Field installed only. Available on all Eubank H/P units.
Energy Management System (EMS)
Relay to control the heat pump. Available in 24, 120 or 240 VAC. Field or factory installed.
Electric Reheat for Dehumidification
Control provides simultaneous operation of compressor when in cooling mode and the electric elements
to provide dehumidification without over cooling the room. The electric element (kW) must be properly
sized for each model for proper operation. Factory installed. Available on all EAA units. Consult factory
for details.
Hot Gas Reheat (HGR)
Eubank® heat pumps equipped with the Hot Gas Reheat (HGR) allow the indoor humidity of the controlled
environment to be maintained at or below a certain humidity set point. These units do not have the ability
to add humidity to the classroom.
Dehumidification is achieved by operating mechanical cooling in conjunction with a hot gas reheat coil.
The coil is sized approximately to the sensible capacity of the total tonnage of the machine.
Speed Control for GreenWheel®ERV Exhaust Blower
For separate control of the exhaust blower. When used, the standard speed controller operates the intake
blower and the optional second controller the exhaust blower. Individual blower control allows positive
pressurization of the classroom. Can be factory or field installed.
1.8 Economizer Operation and Components
Damper Actuator
The damper actuator is a motor that modulates the position of the damper blade. It is controlled by the
enthalpy controller and powered by the 24 VAC control transformer. It is capable of driving a full 90
degrees within 90 seconds. The assembly has a spring return to close the damper during power outage.
Controls
The economizer is controlled by an enthalpy sensor or optional dry bulb sensor.

15 Eubank Wall Mount Heat Pump I&O Manual
06/2022 Rev.5
Economizer Changeover Control
The enthalpy sensor responds to the total heat content of the outdoor air to provide changeover to outside
air for free cooling. The change point is adjustable from 63°F @ 50% RH (full clockwise) to 73°F @
50% RH (full counterclockwise). Refer to Figure 3.
Once the enthalpy sensor has selected outside air, the mixed air sensor will limit the air temperature
delivered to the space by modulating the damper blade to "mix in" a quantity of inside air to provide a
constant 50° to 63°F. (Adjustable minimum potentiometer is optional.)
The sensor modulates the position of the outside air damper in response to input from the enthalpy and
mixed air sensors. The controller is designed to maintain the supply air temperature between 50o to 56oF
by mixing warm indoor air with cooler outdoor air.
On a call for cooling from the wall-mounted thermostat, if outdoor conditions are suitable, the sensor will
open the damper and admit outside air (i.e., economizer cooling). If the outdoor ambient is too hot or
humid, the sensor will place the actuator in the closed or minimum open position and activate mechanical
cooling. The compressor is locked out during the economizer cooling mode.
Figure 2 - Enthalpy Sensor Temperature Control Points
Mixed Air Sensor
The mixed air sensor is a thermistor mounted on a bracket adjacent to the right side of the blower
assembly. The thermistor senses the air temperature entering the structure, and provides a signal to the
economizer controller for modulating the position of the damper. Nominal resistance of the sensor at
77°F is 3000 ohms.

16
Eubank Wall Mount Heat Pump I&O Manual
06/2022 Rev.5
Installation
WARNING
Failure to observe and follow Warnings and Cautions and these Instructions could
result in death, bodily injury or property damage. Read this manual and follow its
instructions and adhere to all Cautions and Warnings in the manual and on the
Eubank unit.
2.1 Equipment Inspection
Concealed Damage
Inspect all cartons and packages upon receipt for damage in transit. Remove cartons and check for concealed
damage. Important: Keep the unit upright at all times. Remove access panels and examine component parts.
(Note: The bottom bracket is stored in the condenser air compartment. Remove them before replacing
the side screen). Inspect refrigerant circuit for fractures or breaks. The presence of refrigerant oil usually
indicates a rupture. If damage is apparent, immediately file a claim with the freight carrier.
Units that have been turned on their sides or tops may have concealed damage to compressor motor
mounts, to the oil system or to other components. If the unit is not upright, immediately file a claim for
concealed damages and follow these steps:
1. Set unit upright and allow to stand for 24 hours with primary power turned on.
2. Attempt to start the compressor after 24 hours.
3. If the compressor will not start, makes excessive noise, or will not operate, return the unit to the freight
carrier.
General
1. Inspect unit for completeness. Check for missing parts (e.g. hardware). Refer to the installation kit
information in section 2.3.
2. Remove access panels and check for loose wires. Tighten screw connections.
3. Complete and mail the warranty registration card.
2.2 Installation Requirements
You must consider all of the following when choosing the installation site:
1. Noise. Install the unit so that the least amount of noise will be transmitted to inhabited spaces.
2. Condensate Drainage. Condensate produced during operation must be discharged to a suitable drain.
3. Defrost Drainage. Ice build up sometime occurs during the heating cycle while in heat pump operation.
The automatic reversal (defrost control) of the heat pump cycle causes the ice to melt so that the heat
pump may operate efciently. Please keep this in mind while locating unit.
4. Placement.
A) Place the unit in a shaded area, if possible.
B) Install it above ground for protection against flooding.
C) The unit exhausts air. Be sure that the airflow is not impeded by shrubbery or other obstructions.
D) When installing multiple units, please note the recommended clearances noted in Table 4.

17 Eubank Wall Mount Heat Pump I&O Manual
06/2022 Rev.5
5. Airflow Requirements:
Note the minimum CFM requirements (section 2.4). Keep duct lengths as short as possible. Do not
obstruct airflow through the unit.
Applications using duct work should be designed and installed in accordance with all applicable safety
codes and standards. Eubank® strongly recommends referring to the current edition of the National Fire
Protection Association Standards 90A and 90B before designing and installing duct work. The duct
system must be engineered to insure sufficient air flow through the unit to prevent over-heating of the
heater element. This includes proper supply duct sizing, sufficient quantity of supply registers, and
adequate return and filter areas. Duct work must be of correct material and must be properly insulated.
Duct work must be constructed of galvanized steel with a minimum thickness of .019". Duct work
must be firmly attached, secured, and sealed to prevent air leakage. See section 2.4 for additional duct
work requirements.
6. Clearances:
When facing the unit from the outside, the minimum clearances are found below. Note the minimum
clearances required for proper operation and service (Tables 4a & 4b below).
MODEL Min. Clearance
From the Front
Min. Clearance
Around Sides
(Single Unit)
Min. Clearance
Between Sides
(Two Units)
Min. Space
Above Unit
1020H/1024H 42 inches 30 inches 18 inches 24 inches
1030H/1036H 42 inches 30 inches 18 inches 24 inches
1042H/1048H 42 inches 30 inches 30 inches 24 inches
Table 4 - Minimum Clearances
7. Codes:
Make sure your installation conforms to all applicable electrical, plumbing, building, and municipal
codes. Some codes may limit installation to single story structures.
8. Electrical Supply:
The power supply must have the appropriate voltage, phase, and ampacity for the model selected.
Voltage must be maintained above minimum specified values listed below. Refer to the unit data plate
for ampacity requirements.
Electrical Rating Designations* A C D
Nominal Voltage 208/230 208/230 460
Phase 133
Minimum Voltage 197 197 414
Maximum Voltage 253 253 506
* Letters refer to model number code designations. Refer to page 5.
Table 5 - Voltage Limitations
2.3 Installation Materials
Installation Kits
Eubank EAA Heat Pumps have built-in mounting flanges that function as side brackets. All models
require and are shipped with a bottom mounting bracket. On units with the "N" ventilation option, there
is a fresh air hood factory installed behind the lower front panel.

18
Eubank Wall Mount Heat Pump I&O Manual
06/2022 Rev.5
Standard Kit Components
1. One 12 Ga. “L”-shaped bottom bracket
Accessories:
The package may include other factory-supplied items (optional ) listed on this and the following page:
PART # DESCRIPTION
50107 Digital thermostat. 2 stage heat, 2 stage cool. 7 day programmable. Fan switch: Auto & On.
Auto-change over. Status LED’s. Backlit display. Programmable fan. Non-volatile program
memory. Title 24 compliant - no batteries needed.
50252 Digital thermostat. 2 stage heat, 2 stage cool. Non-programmable. Fan switch: Auto & On.
Manual or auto changeover system switch: Cool-Off-Heat-Emergency Heat. Status LED’s. °F
or °C. Permanent retention of settings on power loss. Field adjustable temperature calibration.
Adjustable maximum setpoint for heating and minimum adjustable set points for cooling.
Adjustable temperature differential. Keypad lockout.
50248 Digital, 7 day, 2 occupied & 2 unoccupied periods for each day of the week programmable
thermostat. Three stage heat/Three stage cool. Manual or auto changeover. Fan: Auto & On.
Ten year retention of programming settings and 48 hour clock and day settings on power loss.
Adjustable max. setpoint for heating and min. adjustable setpoints for cooling. Adjustable
temperature differential. Keypad lockout. Status LED. °F or °C selectable. Optional remote
sensors for outdoor air, supply air and humidity. Title 24 compliant.
50254 Humidity Controller is a wall mounted remote control used when the reheat dehumidification
option is chosen on the Heat Pump. The humidity controller controls the heat pump system
when cooling or heating requirements are satisfied, and the need exists to dehumidify the
conditioned space. When cooling or heating is required the thermostat controls the heat pump
system operation.
50092 Thermostat Guard. For use with the 50107 and the 50252.
Grilles:
Description Size Eubank P/N
For the EAA1020H/1024H
Double Deflection, Aluminum Supply Grille 20” x 8“ (509mm x 203mm) 80674
Aluminum Return Grille 20” x 12” (509mm x 305mm) 80677
Return Filter Grille 20” x 12” (509mm x 305mm) 80671
For the EAA1030H/1036H
Double Deflection, Aluminum Supply Grille 28” x 8“ (711mm x 203mm) 80675
Aluminum Return Grille 28” x 14” (711mm x 356mm) 80678
Return Filter Grille* 28” x 14” (711mm x 356mm 80672
For the EAA1042H/1048H
Double Deflection, Aluminum Supply Grille 30” x 10“ (762mm x 254mm) 80676
Aluminum Return Grille 30” x 16” (762mm x 406mm) 80679
Return Filter Grille 30” x 16” (762mm x 406mm) 80673
Note: Return filter grilles should be used when the 2” (51mm) filter in the EAA unit is not accessible from the exterior of the building. Filter
used in the return filter grille is a 1” (25mm) thick filter. The return filter grille is not recommended for use with the EAA II heat pumps with
economizers.
Additional Items Needed:
Additional hardware and miscellaneous supplies (not furnished by Eubank®) are needed for installation.
For example, the list below contains approximate quantities of items typically needed for mounting a
unit on a wood frame wall structure with standard full length mounting bracket or flanges. Concrete or
fiberglass structures have different requirements.

19 Eubank Wall Mount Heat Pump I&O Manual
06/2022 Rev.5
(10) 3/8" mounting bolts or lag screws for side brackets and anchors, if required for side brackets.
(20) 3/8" washers
(10) 3/8" hex nuts
(6) 3/8" x 2-1/2" lag screws for bottom bracket
• Silicone Sealer to seal around cracks and openings
• 7-conductor low voltage multi-colored wire cable (i.e. thermostat wire)
• Appropriate electrical supplies such as conduit, electrical boxes, fittings, wire connectors,
etc.
• High voltage wire, sized to handle the MCA (minimum circuit ampacity) listed on the data plate.
• Over-Current Protection Device sized in accordance with the MFS (maximum fuse size) listed on
the unit data plate.
Duct materials usually are also needed in addition to the mounting hardware. To save time, design the
duct work before mounting the unit.
2.4 Porting and Duct Work
WARNING
FIRE HAZARD
Improper adjustment, alteration, service, maintenance or installation could cause serious
injury, death and/or property damage.
Installation or repairs made by unqualied persons could result in hazards to you and
others. Installation MUST conform with local codes or, in the absence of local codes, with
codes of all governmental authorities have jurisdiction.
The information contained in this manual is intended for use by a qualied service
agency that is experienced in such work, is familiar with all precautions and safety
procedures required in such work, and is equipped with the proper tools and test
instruments.
General Information
Note: The following instructions are for general guidance only. Due to the wide variety of installation
possibilities, specific instructions will not be given. When in doubt, follow standard and accepted
installation practices, or contact Eubank®for additional assistance.
Wall Openings
Measure the dimensions of the supply and return openings on the heat pump unit.
WARNING
Cut the supply opening in the exterior wall for the supply and return. IMPORTANT: All units must
have one inch clearance on all four sides of the supply outlet duct ange on the unit. The
one inch clearance must extend on all sides of the supply duct for the rst three feet from
the unit. The duct must be constructed of galvanized steel with a minimum thickness of .019".
Minimum Airflow Requirements
WARNING
The duct system must be engineered to assure sufcient air ow through the Heat Pump, even
under adverse conditions such as dirty lters, etc. Proper engineering will insure longevity and
maximum performance from the Heat Pump unit.

20
Eubank Wall Mount Heat Pump I&O Manual
06/2022 Rev.5
Ducting
Extensions should be cut flush with the inside wall for applications without duct work.
Applications using duct work should be designed and installed in accordance with all applicable safety
codes and standards. Eubank® strongly recommends referring to the current edition of the National Fire
Protection Association Standards 90A and 90B before designing and installing duct work. The duct
system must be engineered to insure sufficient air flow through the unit to prevent over-heating of the
heater element. This includes proper supply duct sizing, sufficient quantity of supply registers, adequate
return and filter area. Ductwork must be of correct material and must be properly insulated. Ductwork
must be constructed of galvanized steel with a minimum thickness of .019". Ductwork must be firmly
attached, secured and sealed to prevent air leakage. Do not use duct liner on inside of supply duct within
four feet of the unit.
Galvanized metal duct extensions should be used to simplify connections to duct work and grilles. Use
fabric boots to prevent the transmission of vibration through the duct system. The fabric must be U.L.
rated (UL-181) to a minimum of 197oF.
2.5 Fresh Air Hood
The fresh air hood is located on the inside, behind the slots on the bottom front panel. To access the
hood, remove the screws that hold the front panel. The air flow can be adjusted from no (0%) fresh air
to approximately 15% of rated air flow of fresh air, in 5% increments. The hood is shipped from the
factory in the closed position (no fresh air). To provide fresh air, remove the two screws on either side
of the hood and reposition as desired.
Figure 3 - Fresh Air Hood Damper Adjustment
2.6 Bottom Bracket Installation
1. Remove and discard the 4 x 4 shipping boards attached to the base of the unit.
This manual suits for next models
5
Table of contents
Other ACS Heat Pump manuals
Popular Heat Pump manuals by other brands

COSMOGAS
COSMOGAS ECOTOWER 6 INSTALLATION, USE AND MAINTENANCE MANUA

Hussmann
Hussmann H Series Installation and operation manual

Zehnder Rittling
Zehnder Rittling ComfoClime 24 Quick user guide

Bryant
Bryant 542D060 Installation, operation and maintenance instructions

Galletti
Galletti MCI Installation, operation and maintenance instructions

Zodiac
Zodiac POWER FORCE 25 Instructions for installation and use