ACTISOL Perimeter Pro User manual

Perimeter Pro
B390100
OPERATING MANUAL

ACTISOL®PERIMETER PRO
OPERATING MANUAL
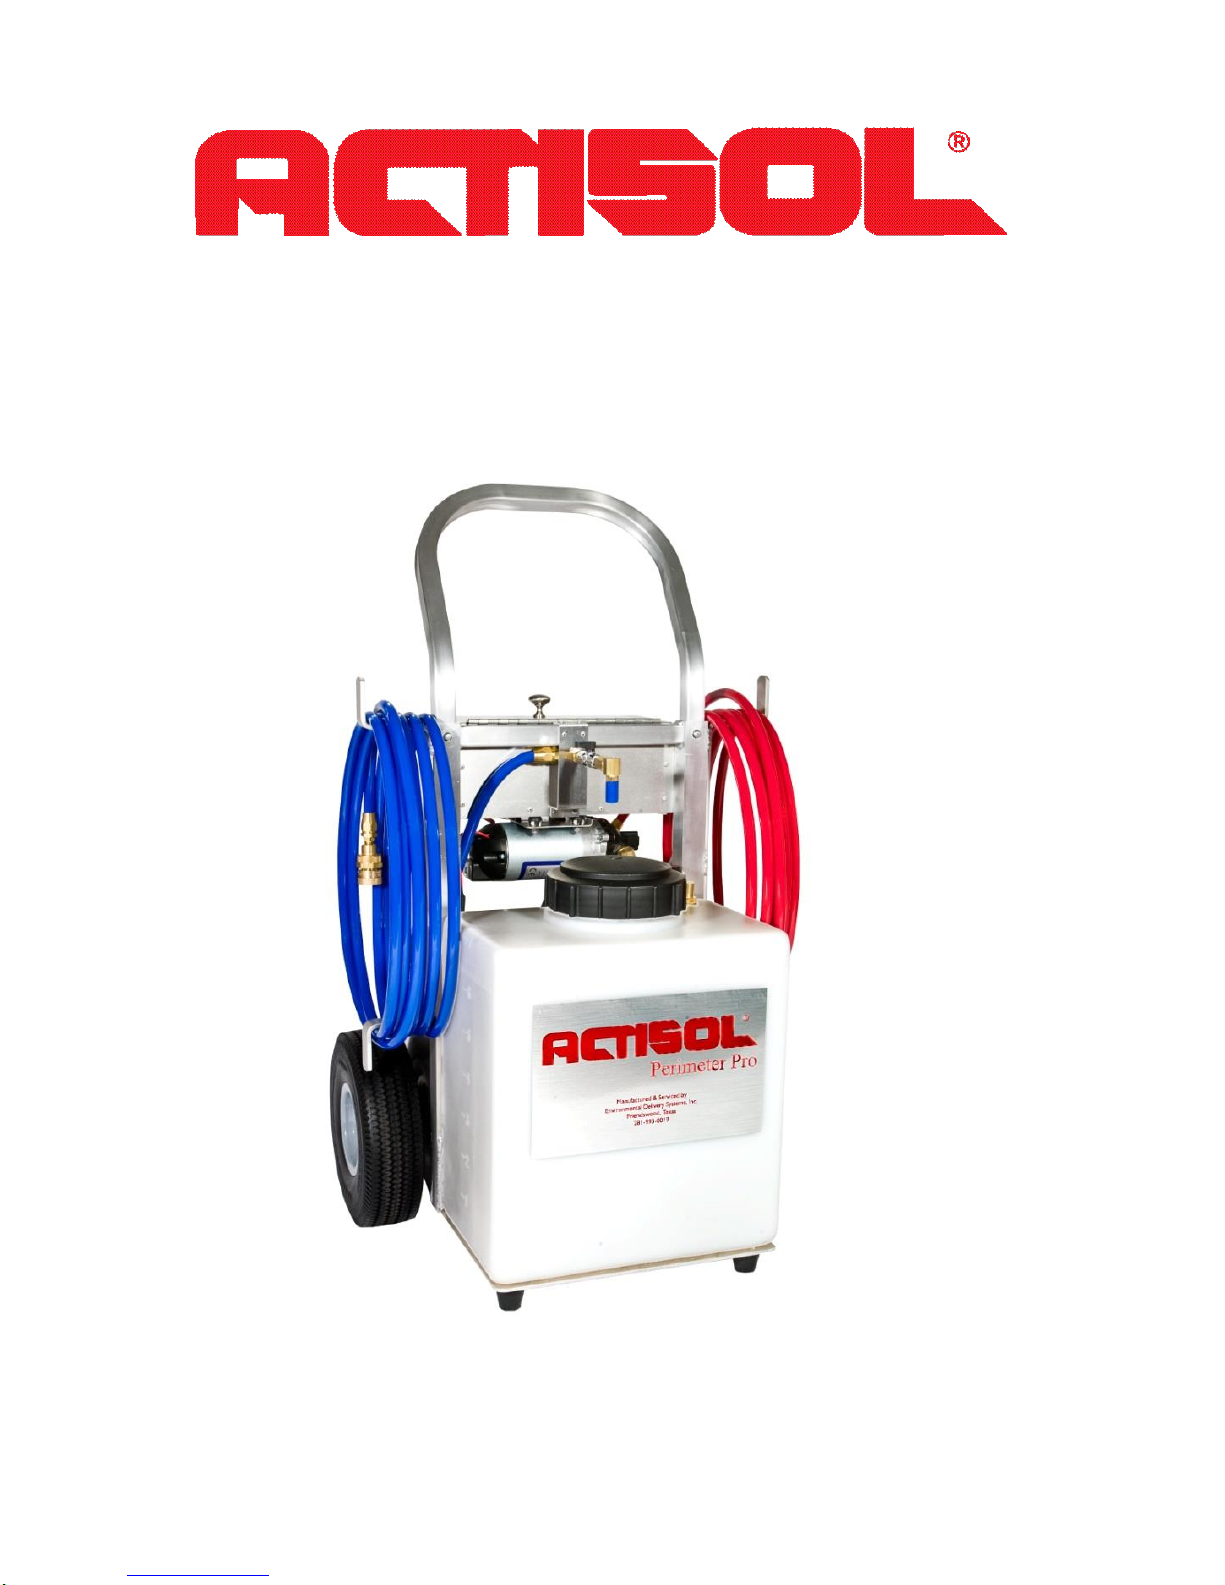
Thank you and Congratulations on your choice of the Actisol®
Perimeter Pro, a unique mobile delivery system designed to provide
today’s pest management professional with the ability to perform
precision exterior and perimeter applications, reduce costs, increase
productivity and enhance professional appearance.
The Actisol®Perimeter Pro can be refilled easily from any garden
hose spigot, which eliminates the need to travel back to the service
vehicle to refill, roll hoses, or re-circulate. This reduces fatigue and time
spent at each account. Results of field trials indicated that pest
management professionals favored the Actisol®Perimeter Pro over the
traditional hose tethered spray rig.
The Actisol®Perimeter Pro does not require gasoline or oil. To reduce
or eliminate the transportation spill risk this system is designed to be
emptied after each application. Its unique compact design also reduces
the risk of damaging your client’s exterior property, as you will no
longer drag a long, heavy hose around landscaping and other objects.
It’s mobile, practical, and durable design makes it a valuable tool for
all types of accounts. In addition, it gives you the flexibility of using a
variety of insecticides that are EPA approved for use in this type of
equipment.
Best of all, the Actisol®Perimeter Pro can be counted on to work
dependably on the job because of its durable, low maintenance design.
Using an Actisol®Perimeter Pro projects a professional high-tech image
to your residential and commercial accounts enhancing the value of your
service. The system is backed with a full one year warranty against
defects in material and workmanship.
Manufactured in the USA By:
Environmental Delivery Systems, Inc.
314 Morningside Drive
Friendswood, TX 77546

Table of Contents
OPERATING INSTRUCTIONS Page 1
SPRAY GUN Page 6
PUMP Page 7
BATTERY Page 11
TROUBLESHOOTING Page 18
SPRAY GUN
Exploded Parts Page 19
Item #’s, Product Codes and Descriptions Page 20
PERIMETER PRO
FRONT VIEW
Exploded Parts Page 21
Item #’s, Product Codes and Descriptions Page 22
REAR VIEW
Exploded Parts Page 23
Item #’s, Product Codes and Descriptions Page 24
PARTS AND SERVICE Page 25

OPERATING INSTRUCTIONS
Handle with care.
Do not place the unit where vibration and surface conditions would
allow it to fall. Keep the unit on the ground when in use.
Always wear personal protective equipment.
When filling these units always wear protective eyewear and
protective gloves. When operating this unit, always wear
protective clothing, eyewear, chemical resistant rubber gloves,
protective footwear, and a respirator. Refer to the insecticide label
for specific instructions and other precautions.
LOADING & UNLOADING
The Actisol®Perimeter Pro should be emptied of any product
and/or items to lighten the unit for loading into or out of service
vehicle. (Remember water is over 8 pounds per gallon.)
When loading or unloading the Actisol®Perimeter Pro, always
assure that the vehicle is parked at a level place to ensure proper
footing and good posture for lifting. Always lift straight in or out
of vehicle. Never lift and turn while loading and unloading.
Page 1

Unloading
1. Grip the Actisol®Perimeter Pro unit with both “slanted”
grips.
2. Pull unit against your body.
3. Slide unit out as you keep it firmly against your body.
4. Step backwards enough to clear vehicle.
5. Using your legs squat down while leaning forward slightly
and lower unit until it is on the ground.
Loading
1. Using your legs squat down while leaning forward slightly.
2. Grip unit with both “slanted” grips.
3. As you lift unit keep it firmly against your body.
4. Set unit in vehicle and roll forward.
5. Secure unit in vehicle.
ADJUSTING THE HANDLE
The Actisol®Perimeter Pro features an adjustable handle which
can be lowered to save on space and raised to improve mobility.
Raise the Handle
1. Push in on the two buttons located above the tank on the
frame.
2. With both buttons held in, pull up on the handle until the
second set of buttons snaps into place.
Lower the Handle
1. Push in on the two buttons located above the tank on the
frame.
Page 2

2. With both buttons held in, push down on the handle until
the second set of buttons stops against the frame.
3. Push in both buttons and push down further on handle until
the second set of button snaps into place.
INSECTICIDES
Observe Product label directions. Read the insecticide label to
determine if the insecticide is EPA approved for use in this type of
equipment. Contact your chosen distributor for information on
insecticides currently labeled for use in equipment such as the
ActisolPerimeter Pro.
Filling / Mixing
The Actisol®Perimeter Pro is designed to be filled and refilled
easily from any common hose spigot. Before adding water, be
sure the blue valve on the inlet gap fill assembly above the tank is
in the cross line (+) position and the 100m filter bag is in place,
covering the opening.
1. Follow label direction of product being used to mix concentrate.
Page 3

2. Calculate amount of mixed solution needed for the area to be
treated.
3. Attach inlet / fill hose to spigot or faucet using the vacuum
break / backflow prevent with screen.
NOTE: If the spigot or hose you are using already has a vacuum
break / backflow prevent it is best to remove one of them to allow
sufficient flow. It is recommended to remove the vacuum break /
backflow prevent from the inlet / fill hose of the Actisol®
Perimeter Pro.
4. Turn on water at spigot or hose.
5. Turn the blue valve on the inlet gap fill assembly to the inline
position to allow flow into the tank.
NOTE: Flow will not pass the blue valve on the inlet gap fill
assembly above the tank until valve is turned to the inline position.
The inlet flow of the water comes from the top of the tank and will
assist in the mixing of the product with the water.
6. Be sure to replace the vacuum break / backflow prevent
immediately when flow has been terminated and inlet / fill hose
has been disconnected from spigot.
NOTE: To recirculate or mix solution, remove lid on tank and
point wand into opening and squeeze trigger to full pin stream.
Page 4

7. Priming the System
Sometimes the pump will pick up air in the line from emptying the
tank. To achieve full pressure and volume the air must be
displaced out of the pump. After refilling this may be achieved by
following these steps:
1) Be sure the pump is on, using the on/off switch.
2) With the spray adjustment lever in the upper position (pin
stream), squeeze trigger to start liquid flow.
3) Using the spray adjustment lever, turn downward to a light
fan spray. You will hear a “spitting” noise as the air is
being discharged out of the end of the spray gun. Then
move the spray adjustment lever back to the upper position
on full pin stream, the pump should begin to build full
pressure. While pump is running, turn red priming valve on
top of the tank, in the cross line position (+) for
approximately one second then back to the in-line position.
This will also usually displace any remaining air in the line
and reacquire full pressure.
4) If needed, repeat steps 2 and 3. Also see the
TROUBLESHOOTING tips on page 16 of this manual.
Page 5

SPRAY GUN
Features:
1. The adjustable tip shroud is designed to protect the tip of the
gun.
2. The spray adjustment lever and the trigger lock can be activated
with just one hand.
3. The swivel connection prevents twisting and kinking of the
hose.
4. The flow is fully adjustable from cone misy to solid stream.
Pull the trigger to start the flow. With the spray adjustment lever,
adjust the flow to desired spary output from fine cone mist to solid
stream.
5. Release the trigger and the flow will stop.
6. The spray gun is rated at 250 psi.
Page 6
1/4” Inlet Compression
Trigger
Spray Adjustment Lever
Tip Shroud

PUMP
The Actisol®Perimeter Pro is equipped with a ShuRflo 8000 series
industrial pump. The information outlined by this manual is
general and not specific to all 8000 series pumps.
Caution: “Intermittent Duty” is defined as; operated and/or
frequently started within a period of time that would cause the
motor to reach its maximum thermal limits. Once the maximum
thermal limit is obtained, the motor must be allowed to return to
ambient temperature before resuming operation.
Caution: DO NOT use to pump flammable liquids. Never operate
the pump in an explosive environment. Arcing from the motor
brushes, switch or excessive heat from an improperly cycled motor
may cause an explosion.
Caution: DO NOT assume fluid compatibility. If the fluid is
improperly matched to the pumps’ elastomers, a leak may occur.
Pumps used to transfer hazardous or hot (max temperature 170°F
[76°C] Viton™ only) chemicals must be in a vented area to guard
against the possibility of injury due to harmful or explosive
liquid/vapors.
Caution: DO NOT operate the pump at pressures which cause the
motor to exceed the amperes rating indicated on the name plate.
Various pump models are equipped with thermal breakers to
interrupt operation due to excessive heat. Once the temperature of
the motor is within proper limits is will automatically reset, and the
pump will start operation without warning.
Caution: To prevent electrical shock, disconnect power before
initiating any work. In the case of pump failure, the motor housing
and/or the pumped fluid may carry high voltage to components
normally considered safe.
Page 7

Pressure Switch Operation
The pressure switch reacts to outlet pressure, and interrupts power
at the preset shut-off pressure indicated on the pump label. When
outlet pressure drops below a predetermined limit (*typically 15-
20 psi. [1-1.4 bar] less than the shut-off pressure) the switch will
close and the pump operates until the shut-off (high) pressure is
achieved. The shut-off pressure is set to factory calibrated
standards.
Caution: Improper adjustment of the pressure switch setting may
cause severe overload or premature failure. Refer to the SHURflo
Service Bulletin #1031 for the adjustment procedure. Failures due
to improper adjustment of the pressure switch setting will not be
covered under the limited warranty.
If the plumbing is restrictive or the flow rate is very low, the pump
may re-pressurize the outlet faster than the fluid is being released,
causing rapid cycling (*ON/OFF within 2 sec.). If the pump is
subjected to rapid cycling during normal operation, or for
infrequent periods, damage may occur. Application which exhibit
rapid cycling should have restrictions in the outlet minimized.
Page 8

Page 9

SERVICE KITS
Service kits are readily available to repair standard 8000 series
pumps. Repair kits include simple illustrated instructions allowing
easy installation. To insure that the correct kit is received the
model number and all name plate data must be included with order.
Contact Environmental Delivery Systems, Inc., a SHURflo
distributor, or SHURflo directly to order the necessary repair kit.
NO.
ITEM
DESCRIPTION
1
300226
Diaphragm Pump 12V DC 60 psi
2
300258
Pressure Switch Assembly
3
300259
Check Valve Assembly
4
300269
Upper Housing
5
300260
Bypass / Non Bypass Valve Assembly
6
300261
Diaphragm Assembly
7
300261
Drive Assembly
8
300270
Motor Assembly (less base plate)
Page 10

Page 11

BATTERY
Page 11

Page 12

BATTERY CHARGER –1202S CHARGER
This charger is a solid-state battery charger designed to charge
your 12-volt battery and maintain and hold it to a full charge.
This charger will keep your battery fully charged and will
never over charge your battery.
The conventional linear battery charger is an electrical device
whereas; the 1202S is a light weight sophisticated electronic
device. Most battery chargers use linear technology which
converts the 115VAC to 12VDC at 60Hz. This requires a large
transformer which has the disadvantage of lower efficiency,
larger size and weight resulting in higher heat generation.
The 1202S battery charger transforms the 115VAC into
12VDC at about 100,000 Hz (1667 times faster than
conventional chargers), which requires a much smaller
transformer and this results in a unit of smaller size, low
weight and improved efficiency.
Operating Instructions
1. Connect the charger to the battery.
2. Connect the charger to an AC outlet. The Green LED will
turn Orange.
3. When the LED is Orange your battery is charging.
4. When the LED turns Green your battery is fully charged.
Remember, you can leave your charger on after the battery
is fully charged.
IMPORTANT SAFETY INSTRUCTIONS
1. Before using any battery charger, read all instructions and
caution warnings on the battery you are charging, and the
item the battery is being used in.
Page 13

2. CAUTION-To reduce the risk of injury; charge only 12-
volt wet-lead-acid, sealed-lead-acid, gel, and absorbed matt
batteries.
3. Do not let charger get wet.
4. To reduce the risk of damage to the plug and cord, pull the
plug only to disconnect the charger.
5. Extension cords should not be used.
6. Do not operate the charger with a damaged plug or cord.
7. Do not use the charger if it has been damaged in any way.
8. Do not disassemble charger.
9. To reduce the risk of electrical shock, always unplug the
charger from the outlet and the battery before cleaning or
attempting any maintenance.
Features
1. Totally Automatic Switch-Mode Battery Charger –Suitable
for Gel, Sealed & Wet Lead Acid Batteries.
2. 12 Volts, 1 Amp Constant Current –Equivalent to 2 Amp
Tapered Charger in Charging time.
3. Input - 115VAC (Range - 90VAC to 132VAC).
4. Automatic Cut-off and then True Float charging. Can be
left connected indefinitely without harming the battery.
5. De-sulfation of battery –Increases battery life.
6. Both UL and cUL (CSA) listed.
7. Meets FCC Class B. High level of electro-magnetic
interference filtering.
8. Suitable for off-board application. Optional on-board
inhibit can be provided.
9. Very small size and light weight.
10. Uses sophisticated electronic circuitry with microchips. All
present day computers use switch-mode technology.
Page 14

Input Requirements
1. 90VAC to 132VAC
2. 47 to 63 Hz
Input AC tolerance +/- 20%. This means the charger will
operate satisfactorily in areas where the input voltage is low.
This charger is also suitable for every part of the world where
115VAC is used and for Japan where input is 100VAC.
Output
1. 1 Amp Constant Current @ 12 Volts DC. Equivalent to 2
Amps tapered charger in charging time.
2. Line regulation at Full Load = 1%
3. Load regulation @ 4%
4. Ripple Voltage –Very low 1%
The peak to peak ripple voltage into a resistive load is less
than 200mV for the output voltage above 12 VDC.
Charging Cycle
Stages
Condition
Mode*
Current
Voltage
LED
Indication
Stage 1
Charging Pulse
Mode
Pulse Mode
1 A
Pulsing
0.5 –5.0V
Flash
Stage 2
Constant
Current Mode
CC Mode
1A
5.0V –14.7V
Orange
Stage 3
Constant
Voltage Mode
CV Mode
Reduces
from
1A***
Holds @
14.7V
Orange
Stage 4
Standby Voltage
Mode
Standby
CV Mode
Reduces
to Zero
Maintains
13.6V
Green
Recharging
Mode
CC Mode
1A
12.5V
Orange
*CC Mode = Constant Current Charge
*CV Mode = Constant Voltage Charge
***See Stage 3 Description Below
Page 15

LED is used to show the charging status. When the LED is
ORANGE, the charger is in charging or recharging mode and
the current is at 1 Amp constant. When the LED is GREEN,
the charger is in Standby mode and no current (zero) is
flowing.
Stage 1: Deep Discharge Charging Pulse Mode: LED Flash
The charger starts charging at 0.5V and give pulse current up to
5V. This has effect of removing loose sulphation formed during
deep discharge state of the battery.
Stage 2: Constant Current Mode (CC): LED Orange
The charger changes to constant current 1A. When the battery
voltage reaches up to 14.7V the charging stage changes from CC
(Constant Current) to CV (Constant Voltage) mode.
Stage 3: Constant Voltage Mode (CV)” LED Orange
The charger holds the battery at 14.7V and the current slowly
reduces. When the current reaches 0.5CC, this point called the
Switch Point. The Switching Point is one of the great features of
this battery charger that can adjust the current automatically
according to the battery capacity. Other chargers are not capable
of adjusting the current automatically.
Stage 4: Standby Voltage Mode: LED Green
The charger maintains the battery voltage at 13.6V and the
current slowly reduces to zero. Charger can be left connected
indefinitely without harming the battery.
Recharging: LED Orange
If the battery voltage drops down to 12.5V the charger changes
from any mode to Constant Current Mode and will restart
charging. The charging cycle will go through Stage 2 to Stage 4.
Page 16
This manual suits for next models
1
Table of contents
Popular Paint Sprayer manuals by other brands

Graco
Graco ULTRA MAX 795 instruction manual

Graco
Graco 26A010 instructions

Central Pneumatic
Central Pneumatic 43760 Assembly and operating instructions

SnowEx
SnowEx Accuspray VSS-2000 Owner's manual and installation instructions

Silvan Selecta
Silvan Selecta TGS Operator's manual

wiwa
wiwa IRCOMBI PROFIT Series Operation manual