Activa BARBECUE 11245 User manual

Art. Nr.: 11245 Angular
Page 1 of 17
EN
Assembly and operating instructions
Item no.: 11245
Barbecue Trolley Angular
Before you start using this device, please read these installation and
instructions carefully.
Keep these operating instructions in a safe place for future reference.

Art. Nr.: 11245 Angular
Page 2 of 17
EN
1. Table of contents
1. Table of contents ............................................................................................2
2. Intended Use....................................................................................................2
3. Environment and disposal measures............................................................2
4. Safety instructions..........................................................................................3
5. Assembly Preparation ....................................................................................4
6. Exploded View.................................................................................................5
7. Parts List..........................................................................................................6
8. Assembly Material...........................................................................................6
9. Assembly.........................................................................................................7
10. Instructions for Lighting the Device............................................................16
11. Storage...........................................................................................................16
12. Disposal.........................................................................................................17
13. Warranty.........................................................................................................17
2. Intended Use
The grill may only be used for grillable food. All specifications in these operating instructions
must be observed.
The grill is for private use only!
Only use this grill as described in these operating instructions.
Any other use is considered improper and may result in property damage or personal injury.
The manufacturer accepts no liability for damage caused by improper use of the product!
3. Environment and disposal measures
•Pay attention to cleanness and safety when handling the grill and disposing of
leftovers.
•Always dispose of residual waste/ash only in designated containers made of metal or
non-combustible materials.

Art. Nr.: 11245 Angular
Page 3 of 17
EN
4. Safety instructions
Warning!
Do not operate the grill in enclosed and/or habitable spaces,
z. e.g., buildings, tents, caravans, mobile homes and boats.
Only use outdoors!
ATTENTION! There is a danger to life due to carbon monoxide poisoning.
Please note the following symbol hints:
General safety instructions:
Attention! This grill becomes very hot and must not be moved during operation! Do
not use in closed rooms, tent, boat or camper!
Attention! Do not use spirit or gasoline for lighting or relighting! Only use ignition
aids according to DIN-EN1860-3 from the trade!
Attention! Keep children and pets away
•Wear grill gloves when grilling, according to DIN-EN 407 or use suitable grill tongs!
•The grill must stand on stable and level ground during operation!
•Never use water to extinguish the charcoal!
•Do not use the device on roofed surfaces or in closed rooms!
•Do not leave the hot grill unattended!
•Do not place the grill near entrances and heavily trafficked areas!
•Do not wear clothing with wide sleeves when grilling!
•Do not let children play with packaging foils! Danger of suffocation!
•Do not use paint solvents or diluents to clean the unit!
•Carbon monoxide is formed when charcoal is burned. This gas is dangerous and can
cause poisoning in closed rooms!
•Do not operate the grill during thunderstorms and heavy rain!
Warning!
Attention!
Art. Nr.: 11245 Angular
Page 4 of 17
EN
5. Assembly Preparation
•Read the assembly instructions carefully and follow the assembly steps.
•Allow sufficient time for the assembly.
•Create a working area of approx. 2 - 3 m².
•Use a soft base, such as a cardboard box or carpet, for assembly so that the surfaces
are not damaged during assembly.
•Remove the parts from the packaging and check the completeness of the individual
parts before assembly.
•Every precaution has been taken at the manufacturing facility to avoid sharp edges on
this grill. Handle the parts with care to avoid accidents or injuries during assembly and
start-up.
•If necessary, work in pairs.
•Keep the required tools (cross-headed screwdriver and adjustable wrench) within
reach.
•Do not tighten all screw connections until the unit has been completely assembled.
•If, despite checking at the factory, something is missing, contact our customer service
department (last page).
•We reserve the right to make minor technical changes to the device, especially with re-
gard to the content of the mounting material.
•Some parts are already pre-assembled with other parts at the factory. Most of the fas-
tening material is screwed into the parts.
Unscrew first before assembly
Set-up time
ca. 60 min.

Art. Nr.: 11245 Angular
Page 5 of 17
EN
6. Exploded View

Art. Nr.: 11245 Angular
Page 6 of 17
EN
7. Parts List
Nr.
Description
Pcs.
Nr.
Description
Pcs.
1
Thermometer
1
2
Lid
1
3
Regulation Valve
4
4
Handle for Lid
1
5
Warming Grid
1
6
Round Cooking Grid
1
7
Grill Grids Exterior
2
8
Grill Charcoal Tray
1
9
Support for Charcoal Tray
1
10
Connection Hand Crank
1
11
Crank for Grill Charcoal Tray
1
12
Side Rack
1
13
Shutter for Charcoal Door
1
14
Side Wall Right
1
15
Cover for Charcoal Door
1
16
Front Wheel Support
1
17
Handle for Charcoal Door
1
18
Rear Wheel Support
1
19
Wheels
2
20
Shaft
1
21
Handle for Ash Box
1
22
Wheel Caps
2
23
Ash Box
1
24
Bottom Shelf
1
25
Caps for Support Leg
2
26
Front Leg
1
27
Back Leg
1
28
Bottle Opener
1
29
Transportation Handle
1
30
Hinge for Grill Body
2
31
Hinge for Lid
2
32
Back Wall
1
33
Front Plate with Door
1
34
Side Wall Left
1
8. Assembly Material
Nr.
Description
Pcs.
Picture
Nr.
Description
Pcs.
Picture
A
Screw
M6 x 12
34
B
Screw
M6 x 35
8
C
Screw
M6 x 70
2
D
Screw
M5 x 10
4
E
Nut
M5
4
F
Wing Nut
M6
1
G
Nut
M10
2
H
Washer Ø6
1
I
Stud
2
J
Split Pin
2
K
Collar Screw
M6 x13
4
Please note that we must reserve the right to make minor factory
changes regarding the mounting material.

Art. Nr.: 11245 Angular
Page 7 of 17
EN
9. Assembly
Assemble the side panels (14 and 34) with the front panel (33) and the back panel (32).
Screw the regulation valves (3) into both side walls. It should still be possible to turn the
valves.
Step 1
A: M6x12 4 Pieces
Step 2
D: M5x10 2 Pieces
E: Nut M5 2 Pieces
Art. Nr.: 11245 Angular
Page 8 of 17
EN
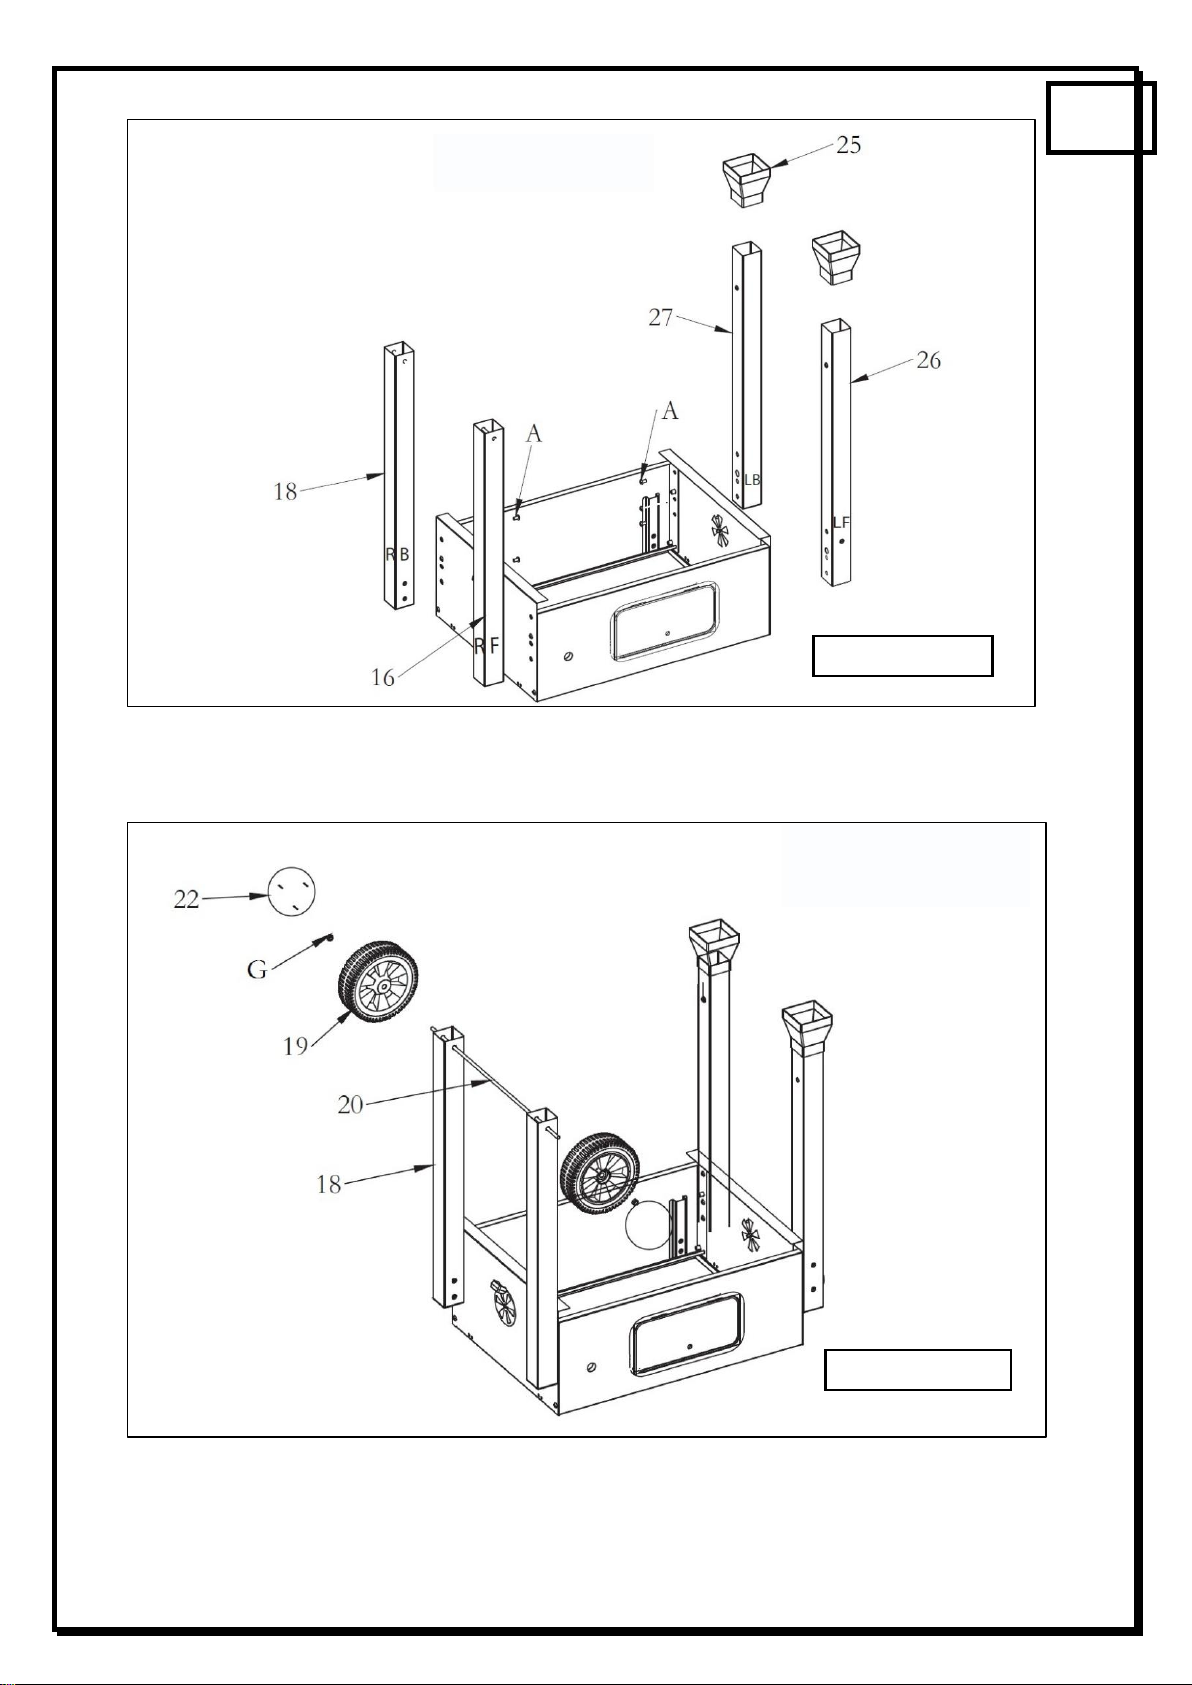
Mount the two wheel supports (16 and 18) and the two support legs (26 and 27) on the grill
body. Make sure that the holes are correctly positioned and aligned.
Insert the shaft (20) through the wheel supports (16 and 18). Put on the wheels (19) and se-
cure them with the nuts.
Complete this step by clipping the two wheel caps (22) onto the two wheels and putting the
cover caps (25) onto the support legs.
Step 3
A: M6x12 8 Pieces
Step 4
B: Nut M10 2 Pieces

Art. Nr.: 11245 Angular
Page 9 of 17
EN
Mount the bottom shelf (24) between the support legs and wheel supports.
Place the grill in the upright position and attach the transport handle (29) to the stand legs.
Step 5
A: M6x12 4 Pieces
Step 6
C: M6x70 2 Pieces
Art. Nr.: 11245 Angular
Page 10 of 17
EN
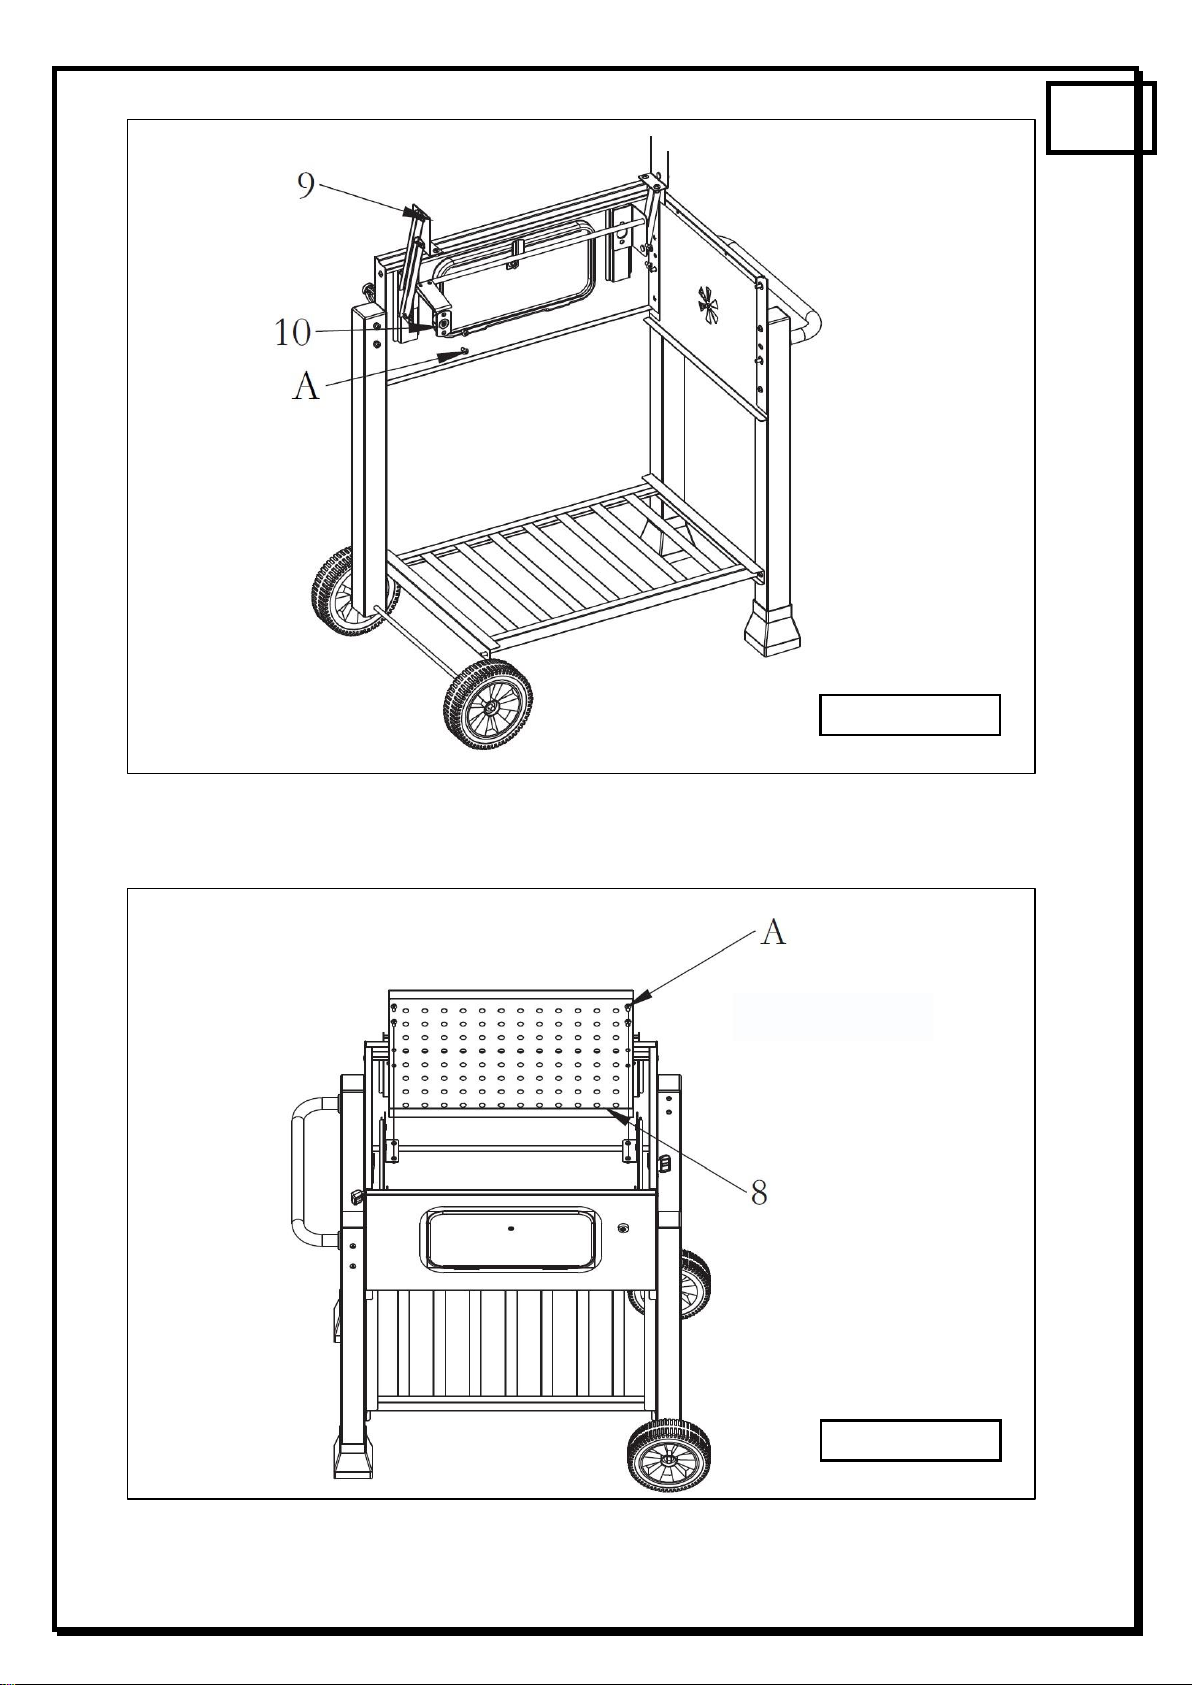
Attach the support for the grill charcoal tray (9), as well as the connection for the hand crank
(10) to the front panel,
screw the charcoal tray (8) to the support.
Step 7
A: M6x12 4 Pieces
Step 8
A: M6x12 4 Pieces
Art. Nr.: 11245 Angular
Page 11 of 17
EN
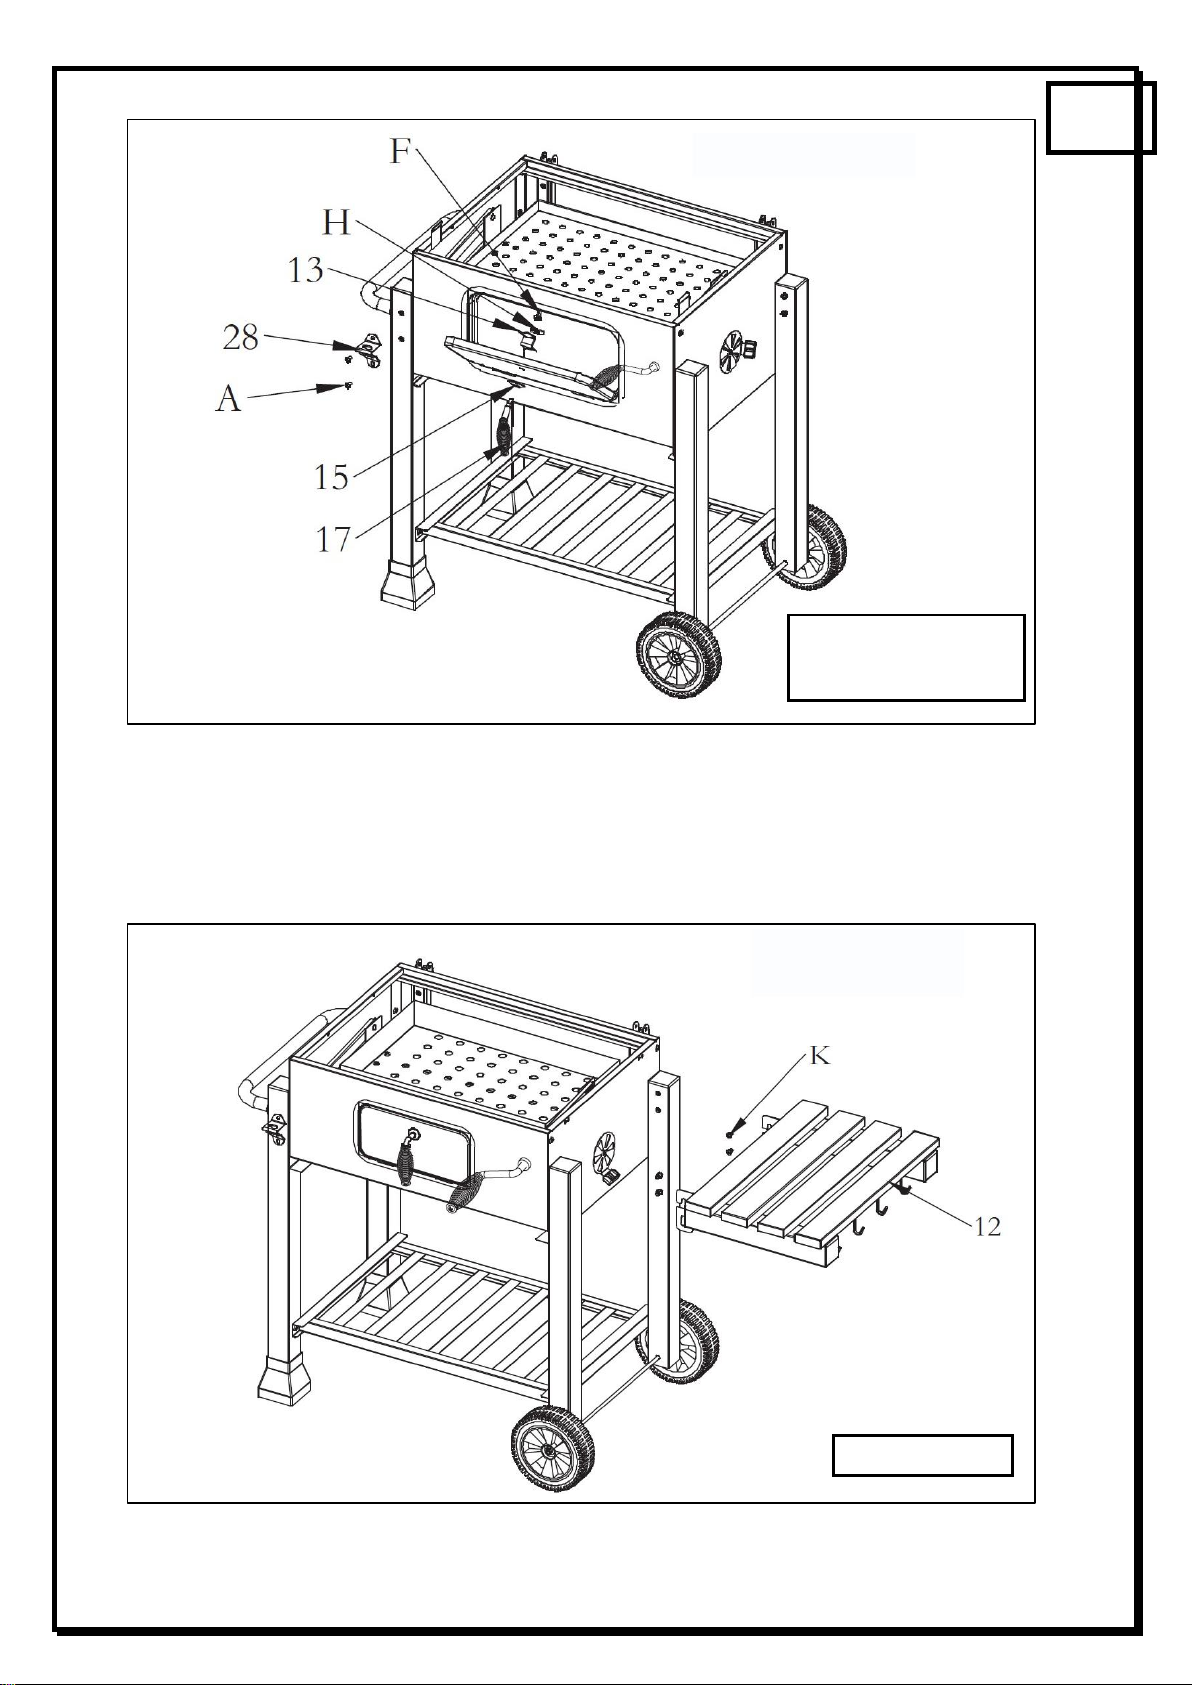
Guide the crank handle (11) through the hole to the connection.
Screw the hinges (30) to the grill body.
Step 9
Step 10
B: M6x35 4 Pieces
Art. Nr.: 11245 Angular
Page 12 of 17
EN
Slide the cover (15) onto the handle (17).
Insert both through the opening in the door.
Use the wing screw and the washer to mount the lock (13) on the handle.
Make sure that it is aligned correctly.
Mount the bottle opener (28) on the left support leg.
Mount the side rack (12) between the two wheel supports.
Step 11
H: Washer Ø6 2 Pieces
F: Wing Nut M6 1 Piece
A: M6x12 2 Pieces
Step 12
K: M6x13 4 Pieces
Art. Nr.: 11245 Angular
Page 13 of 17
EN
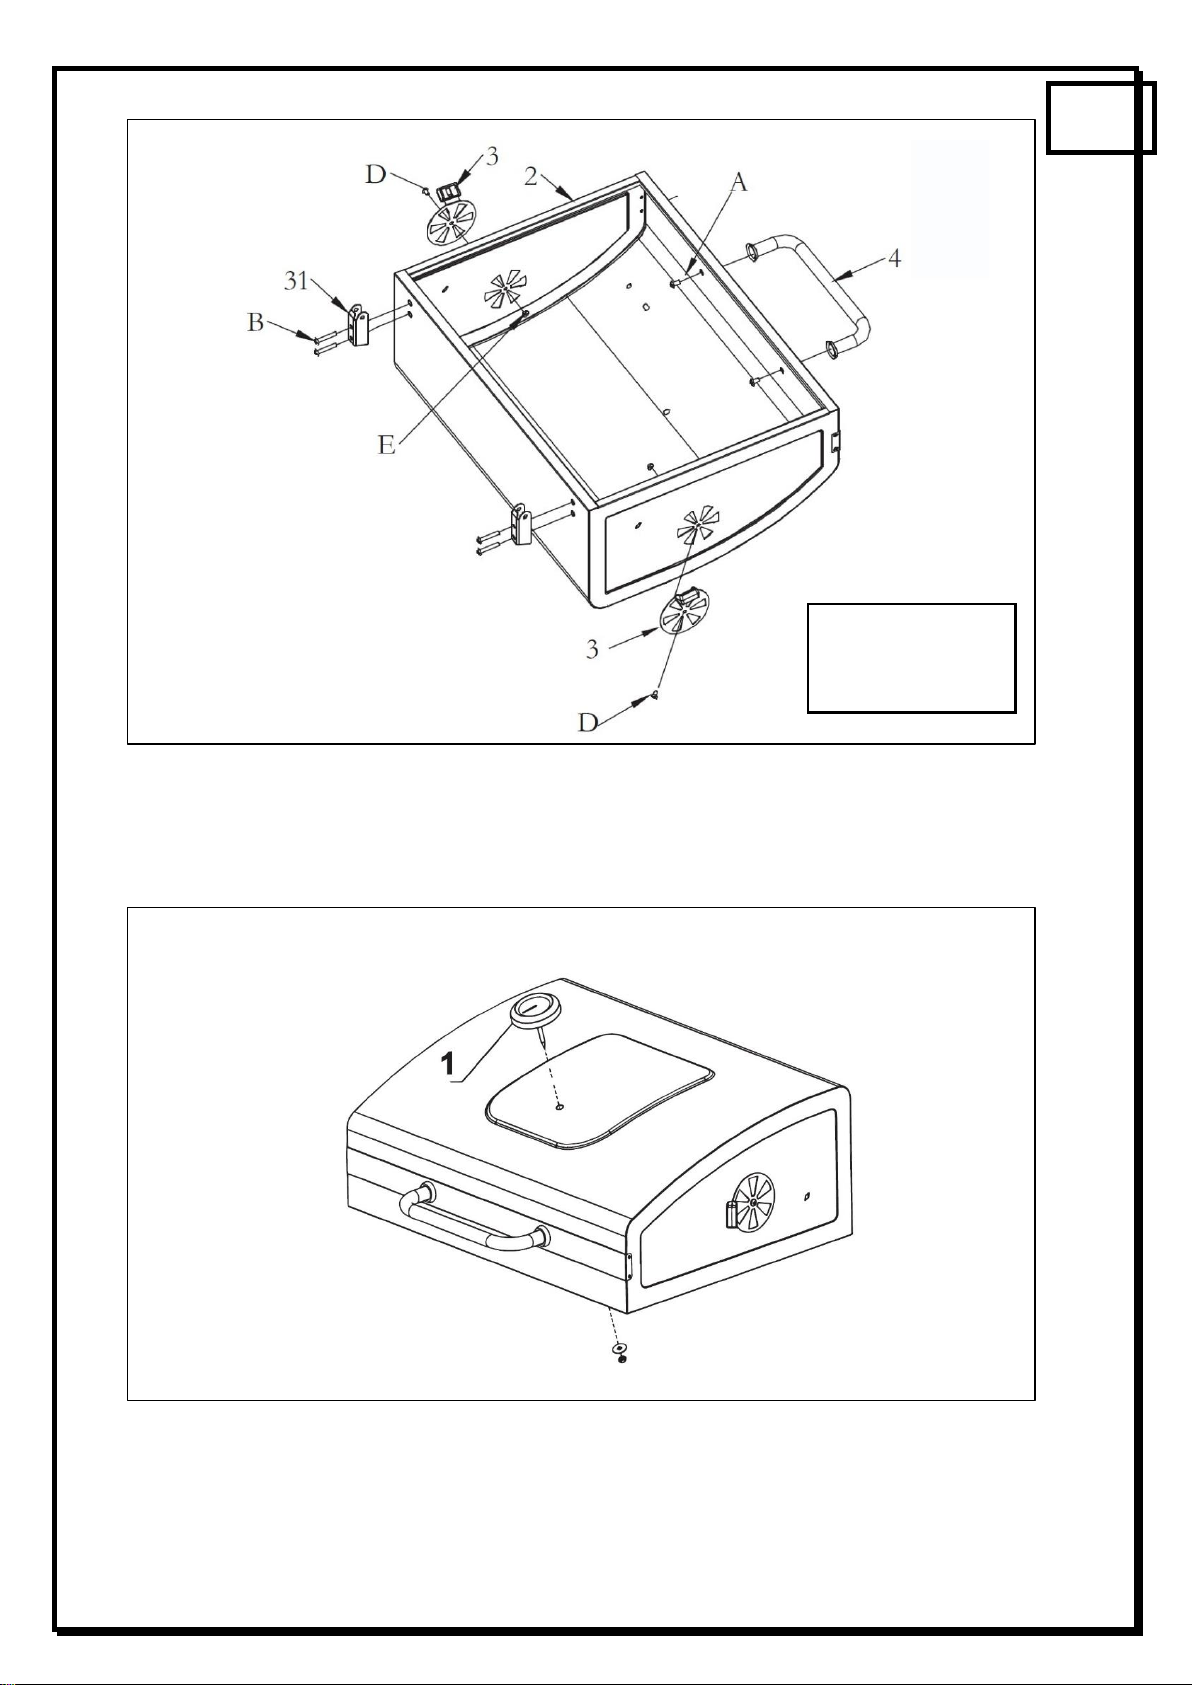
Mount the regulating valves (3) in the lid as well.
Screw the handle (4) to the front of the lid.
Attach the hinges (31) to the back of the lid.
Loosen the nut and washer from the thermometer (1), insert it into the lid and screw it back in
place.
Step 13
A: M6x12 2 Pieces
B: M6x35 4 Pieces
D: M6x10 2 Pieces
E: Nut M5 2 Pieces
Step 14
Art. Nr.: 11245 Angular
Page 14 of 17
EN
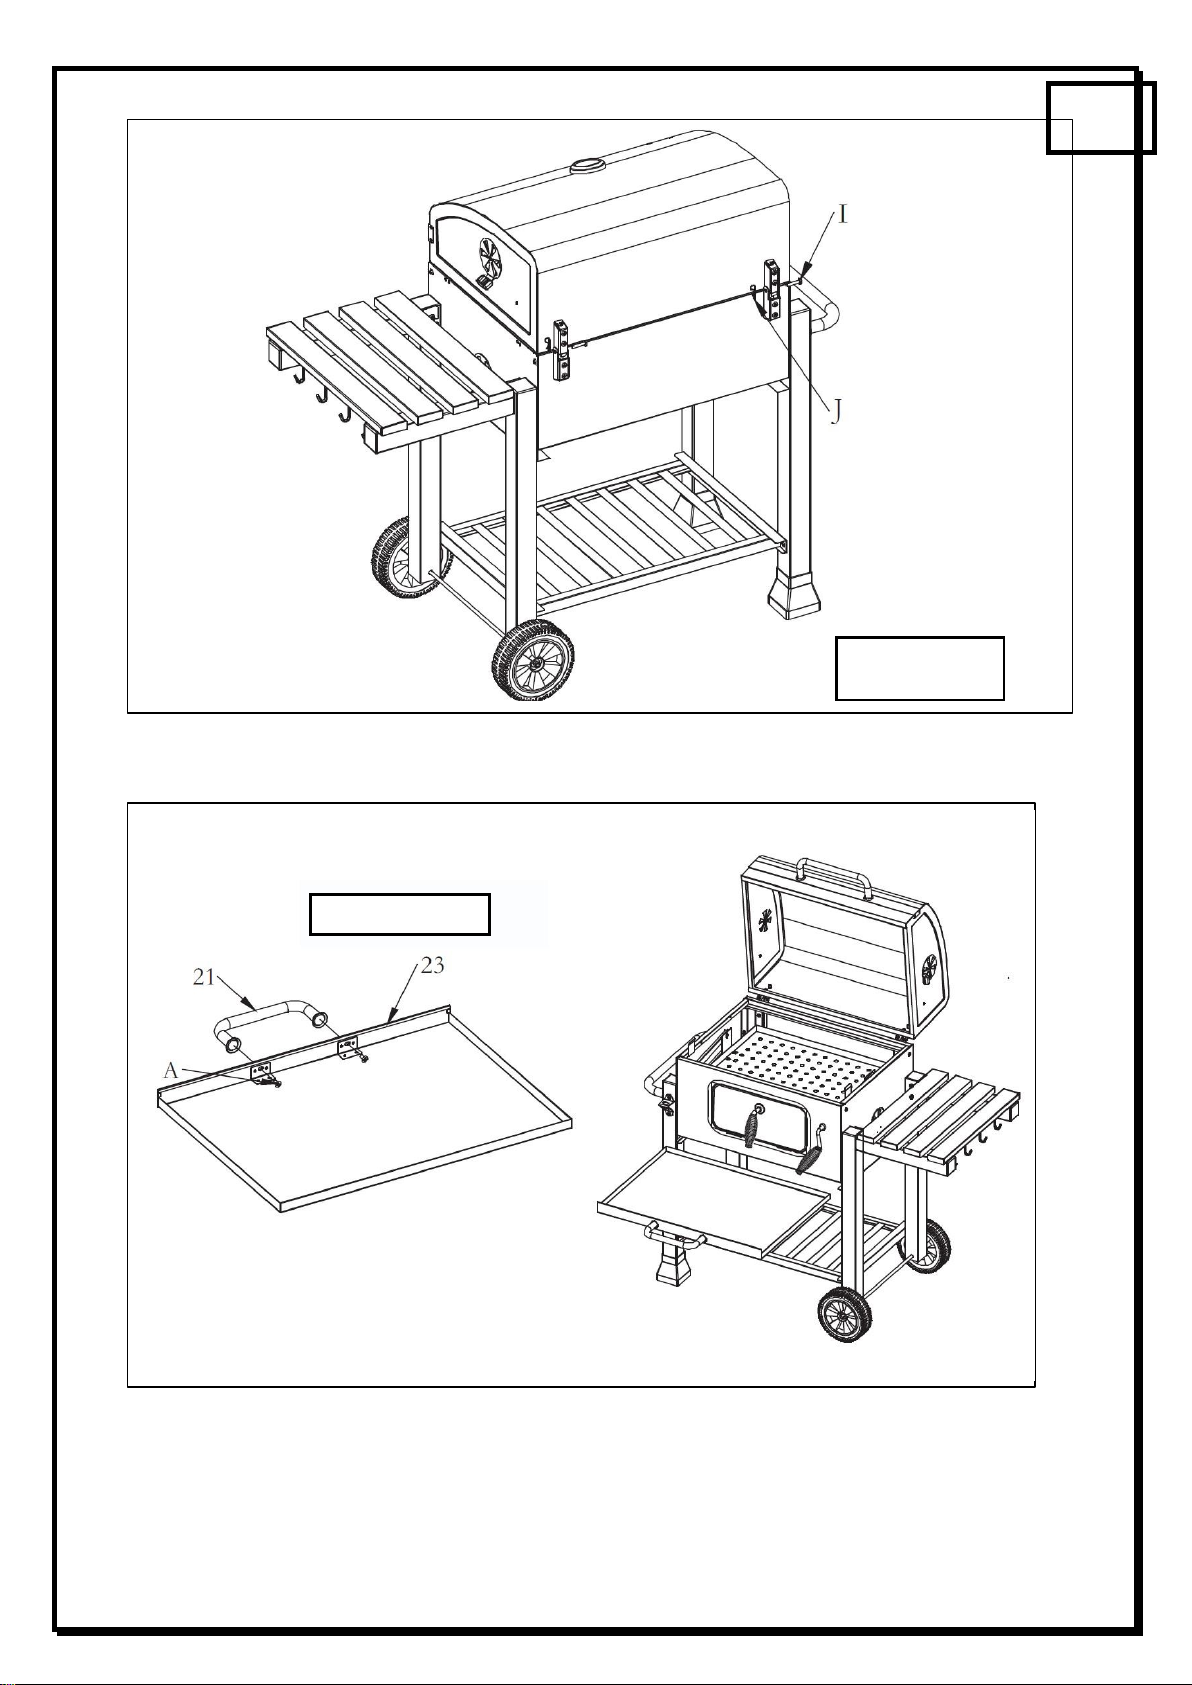
Place the lid on the grill body and connect the hinge with pin and split pin.
Screw the handle for ash boxes (21) to the ash box (23).
Then slide the ash box into the track below the grill body.
Step 15
I: Stud 2 Pieces
J: SplitPin2 Pieces
Step 16
A: M6x12 2 Pieces

Art. Nr.: 11245 Angular
Page 15 of 17
EN
First insert the warming rack (5) into the holes in the lid at the top.
Then insert the two brackets at the bottom into the grill body.
Finally, place the grill grids (7) and the round grill grid (6) in the grill.
The grill is now ready for operation!
Carefully read the safety instructions and directions for
lighting the grill before operating the unit!
Please note that we must reserve the right to make minor factory
changes regarding the mounting material
Step 17
Step 18

Art. Nr.: 11245 Angular
Page 16 of 17
EN
10. Instructions for Lighting the Device
Before Grilling:
•Before first use, wash the grill grid with warm rinse water.
•Always wear grill or kitchen gloves when grilling.
•Use only suitable long grill accessories (tongs, turner).
•The grill igniter (dry or liquid) must comply with DIN-EN 1860-3.
•Keep sufficient distance from hot parts, as any contact can cause burns.
After Grilling:
•Wait until the charcoal has burned out and the grill has cooled down completely.
•Empty the cold ash and clean the grill preferably before each use.
•Remove grill residues with a suitable grill brush from the market.
•Always clean the grill with warm rinse water.
11. Storage
•Protect the device from moisture and bad weather.
•If necessary, cover the device with a suitable cover after it has cooled down com-
pletely.
1. The fuel container has a capacity of approx. 2.0 kg.
2. Before first use, the grill must be heated up and the fuel must glow for
at least 30 minutes.
Place the charcoal or briquettes in the charcoal bowl to form a pyramid.
Pour DIN ignition aid according to DIN-EN 1860-3 evenly over the pyramid.
After approx. 60 seconds, light the pyramid preferably with a match.
Do not place barbecue food on the pyramid until the fuel is covered with a
layer of ash.
Put the greased grill grate in place and start grilling

Art. Nr.: 11245 Angular
Page 17 of 17
EN
12. Disposal
After decommissioning the device, it must be disposed of in an environmentally friendly
manner.
Follow the local regulations for disposal.
The device is mainly made of steel and various other materials.
Metallic materials are generally considered to be recyclable without restriction. Separate com-
ponents for recycling by the following categories, for example:
➢Steel and Iron, Aluminum, Non-Ferrous metals
➢Plastics
•For the packaging materials, contact a specialist disposal company if necessary.
13. Warranty
We warrant the grill cart for a period of 1 year from the date of purchase. The warranty covers
defects in workmanship and defective parts.
Costs for freight, assembly, replacement of worn parts and other are not part of the warranty.
The warranty expires and all responsibility is transferred to the person performing the work:
•If the barbecue trolley is not used as intended.
•If the barbecue trolley is put into operation despite visible damage or incomplete as-
sembly.
•If technical modifications are made to the barbecue trolley.
•If accessories are used which are not expressly approved for this barbecue trolley (in
case of doubt, please contact the customer service).
•If original spare parts are not used.
Service Hotline: ACTIVA Grillküche GmbH –Wilhelmstraße 10 –95100 Selb
Tel.: 09287 9560970
Monday –Friday from 9:00 to 17:00
Table of contents
Other Activa BARBECUE Grill manuals


Popular Grill manuals by other brands


Twin Eagles
Twin Eagles TEPG36G Installation, use & care manual

Members Mark
Members Mark 720-0582B Assembly & operating instructions

Life Smart
Life Smart SCS-P760 manual

R/Evolution
R/Evolution 263518 user manual

Magic Chef
Magic Chef MCCCB24 user manual

Char-Griller
Char-Griller King-Griller Smokin' Ace 3018 owner's manual