New Age 65900 User manual
1
www.newageproducts.com
33”Grill -INSTL-01-Rev.01
OUTDOOR KITCHEN 33”GRILL
Installation and Operation Manual
STOP
Use two or more people to move, assemble,
or install the grill to avoid back injury. Do not
leave children unattended near grill or cabinets.
For assistance, call 1.877.306.8930; for U.K
0800.031.4069: e-mail at info@newageproducts.
com.
PLEASE RETAIN THIS MANUAL FOR FUTURE REFERENCE.
THIS INSTRUCTION MANUAL CONTAINS IMPORTANT INFORMATION NECESSARY FOR THE PROPER ASSEMBLY
AND SAFE USE OF THE APPLIANCE.
READ AND FOLLOW ALL WARNINGS AND INSTRUCTIONS BEFORE ASSEMBLING AND USING THE APPLIANCE.
FOLLOW ALL WARNINGS AND INSTRUCTIONS WHEN USING THE APPLIANCE. FAILURE TO OPERATE THIS
PRODUCT IN A WELL VENTILATED AREA CAN CAUSE PROPERTY DAMAGE, INJURY OR DEATH.
ATTENTION: Is your grill damaged?
Need help or spare parts? For fastest service,
contact NewAge Products at 1-877-306-8930;
Do not return to the retailer.
Warning!: Excessive weight
hazard!
!
33”STAINLESS STEEL INSERT GRILL - MODEL 65900
NEWAGE INSERT GRILL CABINETS ;
65004- 33”STAINLESS STEEL INSERT GRILL CABINET
65204- 33”GREY ALUMINUM GLASS INSERT GRILL CABINET
65404- 33”COASTAL GRAY ALUMINUM INSERT GRILL CABINET
65604- 33”STAINLESS STEEL GROVE INSERT GRILL CABINET
ALL CABINETS LISTED ABOVE WERE DESIGNED
SPECIFICALLY TO FIT THE 33”INSERT GRILL.
SEE SHOPNEWAGE.COM FOR MORE INFORMATION.
NEWAGE PRODUCTS INC.
111 CREDITVIEW ROAD, 2nd FLOOR ,VAUGHAN, ONTARIO,
CANADA L4L-9T1

2 3
www.newageproducts.com www.newageproducts.com
!
1. Shut o all gas supply lines to the grill.
2. Extinguish any open ames.
3. Open the lid to the grill.
4. If gas odor persists, vacate the area near the grill and contact your gas
supplier or your re department immediately.
DANGER
IF YOU SMELL GAS:
Failure to follow these instructions could result in re or explosion which
could cause property damage, personal injury, or death.
!
The installation must conform with local codes or, in the absence of local codes, with either the
National Fuel Gas code, ANS Z223.1/NFPA 54 or the National Gas and Propane installation code,
CSA B149.1, or the Propane Storage and Handling Code, CSA B149.2, or the Standard for Recre-
ational Vehicles, ANS A119.2/ NFPA, and CSA Z240 RV Series, Recreational Vehicle Code as appli-
cable.
The Outdoor cooking gas apppliance,when installed, must be electrically grounded in accor-
dance with local codes or, in the absence of local codes, with the National Electrical Code, ANS/
NFPA 70, or the Canadian Electrical code, Part 1, CSA C22.1.
It is essential to maintain proper clearances from combustionable construction, see diagram
page 10 for dimensions.
Do not leave grill unattended when grill is in use.
Failure to follow these instructions could result in re, explosion or burn
hazard which could cause property damage, personal injury or death
WARNING
!
!
!
DANGER
DANGER
Read and follow the instructions in this manual fully and completely
before installing, servicing or operating the grill to reduce the risk of :
1. Fire
2. Personal injury or property damage
3. Improper installation
THIS PRODUCT IS DESIGNED FOR OUTDOOR USE ONLY. Do not install
or operate indoors, in a garage, in a screened in porch, gazebo, or any
other enclosed area. This outdoor cooking gas appliance is not intended
to be installed in or on recreational vehicles , boats or in a non-ventilated
room. Failure to operate this product in a well ventilated area can cause
property damage, injury or death. Keep the area surrounding the grill
clear and free from combustionable materials, gasoline and other
ammable vapors and liquids. Do not obstructed ventilation openings
of the cylinder enclosure. Keep openings free from debris!
1. DO NOT store or use products with ammable liquids or vapors in the
vicinity of the NEWAGE Grill Cabinet,NEWAGE Outdoor Kitchen cabinets
or any appliances.
2. DO NOT store a spare LP cylinder in or near the NEWAGE Grill
, NEWAGE Outdoor Kitchen Cabinets, or any other appliances.
3.Follow all warnings and instructions when using the appliance.
1. The burning of gas cooking fuel generates some by-products which are
on the list of substances which are known by the State of California to cause
cancer or reproductive harm.
2. California law requires businesses to warn customers of potential exposure
to such substances. To minimize exposure to the substances, always operate
this unit according to the use and care instructions found in this manual. Be
certain to provide adequate ventilation when cooking.
3. California Proposition 65 lists“Silica, crystalline” which is used in one of the
components of the IR burner, as an agent known to the state of California to
cause cancer.
WARNING! CALIFORNIA PROPOSITION 65
This instruction manual contains important information necessary for the
proper assembly and safe use of the appliance
1. Do not store or use gasoline or other ammable liquids or
vapors in the vicinity of this or any other appliance.
2. An LP cylinder not connected for use shall not be stored in
the vicinity of this or any other appliance.
4 5
www.newageproducts.com www.newageproducts.com
!
!
!
WARNING
WARNING
1. Always maintain the required clearances from combustible
construction as detailed. The grill is designed for outdoor use only.
Never use in a garage, building, shed, breezeway or other
enclosed area. This grill shall not be used under any unprotected
overhead combustible construction.
2. Gas grills are not design certied for and are not to be installed in
or on recreational vehicles, portable trailers, boats or any
other moving installation.
3. Keep any electrical supply cord and the fuel supply hose away from
any heated surfaces. Electrical cords should be placed away
from walkways to avoid creating a tripping hazard.
4. Do not repair or replace any part of the grill unless specically
recommended in this manual. Other service should be performed by
a qualied technician.
5. All gas lines must have a shut-o that is readily and easily accessible.
Be sure the owner knows where the shut-o is located. If you smell
gas, check for gas leaks immediately. Check only with a soap and
water solution. Never check for gas leaks with an open ame.
(See INDEX: “Leak Testing”for further details.)
1. The outdoor cooking gas appliance and its individual shuto valve
must be disconnected from the gas supply piping system during any
pressure testing of that system at test pressures in excess of 0.5 psi
(3.5 kPa).
2. The outdoor cooking gas appliance must be isolated from the gas
supply piping system by closing its
individual manual shuto valve during any pressure testing of the
gas supply piping system at test pressures equal to or less than
1/2 psi (3.5 kPa).
1. Massachusetts requires all gas be installed using a plumber or gas
tter carrying the appropriate Massachusetts license.
2. All permanently-installed natural gas or propane installations require
a“T” handle type manual gas valve be installed in the gas supply line
to this appliance.
3. This does not apply to portable propane installations using a 20 pound
cylinder.
WARNING! STATE OF MASSACHUSETTS
TABLE OF CONTENTS
WARNINGS 2-4
TABLE OF CONTENTS 5
UNPACKING 6
GUIDELINES/ TOOLS NEEDED 7
PARTS SUPPLIED 8
WARRANTY 9
INSTALLING NATURAL GAS 10
CONVERTING FROM NATURAL GAS TO PROPANE 11-13
INSTALLING PROPANE 14
INSTALLING BRIQUETTES, GRATES, AND ROTISSERIE 15-16
CUT-OUT DIMENSIONS 17
CARE AND MAINTENANCE 18
GAS CONNECTIONS 19
GENERAL INFORMATION 20
LP PROPANE CONNECTIONS 21-22
NATURAL GAS CONNECTIONS 23
INSTRUCTIONS FOR INSTALLERS 24-25
OPERATION OF GRILL
SAFE OPERATING PRACTICES 26 -28
PRE-GRILL CHECKLIST 28
LEAK TESTING 29-30
ELECTRICAL CONNECTIONS 20-31
LIGHTING THE GRILL 32-34
GENERAL COOKING PROCEDURES 34-35
GRILL MAINTENANCE AND CLEANING 36-38
REPLACINING LIGHTBULBS 39
TROUBLESHOOTING 40-44
FAQ
SPARE PARTS 45
NEWAGE CUSTOMER SERVICE 46

6 7
www.newageproducts.com www.newageproducts.com
Unpacking NewAge 33”Grill
Remove the grill from pallet and place it on
a protected at surface. Rotate the left side
of the grill o the surface to remove end
foam packaging.
Cut the two straps that secure the packaging
to the shipping pallet.
Remove the top and side cardboard corner
posts. Then remove the surrounding
cardboard box.
3
Then rotate the right side of the grill o the
surface in order to remove the remaining
piece of foam packaging.
1
4
2
5
Gather all nested packaging, rotisserie rod,
and warming rack before removing foam
packaging from the grill hood.
3
33”Grill
Dimensions
33 Inches
Guidelines
(Optional)
#2 Phillips Bit
Flashlight Box Cutter
6mm
Open Wrench
Gas Line
Pipe Dope
#2 Phillips head
screwdriver
(Optional)
Cordless Power Drill
Pipe Dope -
Thread Sealant
6mm Nut Driver
Tools Needed

8 9
www.newageproducts.com www.newageproducts.com
3 x Tube
Burners
3 x Ceramic Trays
1 x Natural Gas
Hose
4 x Injector Orifaces 1 x QCC1 Type
Regulator and hose
3x SS Grates
1 x Rotisserie Kit
1 x SS Warming
Rack
Parts Supplied
Quantity
Tube Burner 3
Injector Orifaces 4
Stainless Steel Grates 3
Stainless Steel Warming Rack 1
Ceramic Briquette Tray 3
Rotisserie Kit 1
Natural Gas Hose with Disconnect 1
QCC1 Regulator and Hose 1
Warranty
All products must be installed, operated, and maintained in accordance with the instructions included with the products.
If a product is properly installed, operated, and maintained; and fails to meet the below specied warranty, NewAge
Products, Inc (“NewAge”) will replace the defective product or parts.
Newage is proud to oer a complete product warranty for a period of (one year from the date of purchase. )Subject to the
limitations and disclaimers set forth below or in other product documentation, NewAge provides the following additional
warranties to the initial customer;
Length of
Warranty from
date of purchase
Warranty Covered Items Cost to NewAge Cost to Customer
10 year Stainless steel grill hood / burner box/ Interior Brackets Materials Shipping
5 years Rotisserie Forks and Stake, Rotisserie Rollers, Grill grates,
Grease Trays, Ceramic Rotisserie Burner, Ceramic Sear Burner, U
shaped Burner and Side Burners
Materials Shipping
This warranty is limited to product replacement only. In no event will NewAge be liable for special, indirect, or
consequential damages.
This warranty is available to the initial purchaser only and is not transferable. Proof of purchase and additional information
regarding the defect may be required at NewAge’s discretion. The warranty is made only to products sold in the United
States, Canada.
ALL OTHER WARRANTIES DISCLAIMED:
ALL OTHER WARRANTIES ARE DISCLAIMED TO THE MAXIMUM EXTENT PERMITTED BY APPLICABLE LAW. WITHOUT
LIMITING THE GENERALITY OF THE FORGOING, NEWAGE EXPRESSLY DISCLAIMS ANY IMPLIED WARRANTIES OF
MERCHANTABILITY OR FITNESS FOR A PARTICULAR PURPOSE.
NEWAGE PRODUCTS INC. WILL NOT PAY FOR:
1. Service calls or labor costs.
2. Products damaged by accident, misuse, abuse, re, ood, improper installation, acts of God, neglect,
corrosion, improper maintenance or cleaning, modication, mishandling or not following
care instructions.
3. Products damaged by improperly loading beyond the specied maximum weight capacity outlined
in the instructions provided with the product.
4. Defects results from use in excess of normal residential use.
5. Cosmetic damage that occurs after customer purchasing the product, including scratches, dings,
dents, corrosion, or stains in the material that does not aect the structural or functional capability
of the product.
6. Loss of product contents.
OTHER NOTES TO CONSUMER:
Discoloration due to the high heat, for example beside a grill, is a trait of stainless steel and is not covered. Surface rust
resulting from acid rain or environmental chemicals are not covered. (Please see maintenance information to combat
surface rust). NewAge outdoor powder coated nishes are designed to withstand weathering and are UV stable.
The 304 stainless steel material used in the construction of NewAge Outdoor Kitchen Cabinets is highly rust resistant,
however, chlorine in the air from swimming pools or the salt from sea air may cause surface rust to appear and even create
some pitting corrosion if left on the product. We suggest cleaning all stainless steel surfaces at least every two weeks to
keep your cabinets in prime condition. The chemical reaction from salt is easy to prevent however it is more dicult when
left on the surface.
Additional product information is available at
http://www.newageproducts.com/outdoor-kitchen-warranty

10 11
www.newageproducts.com www.newageproducts.com
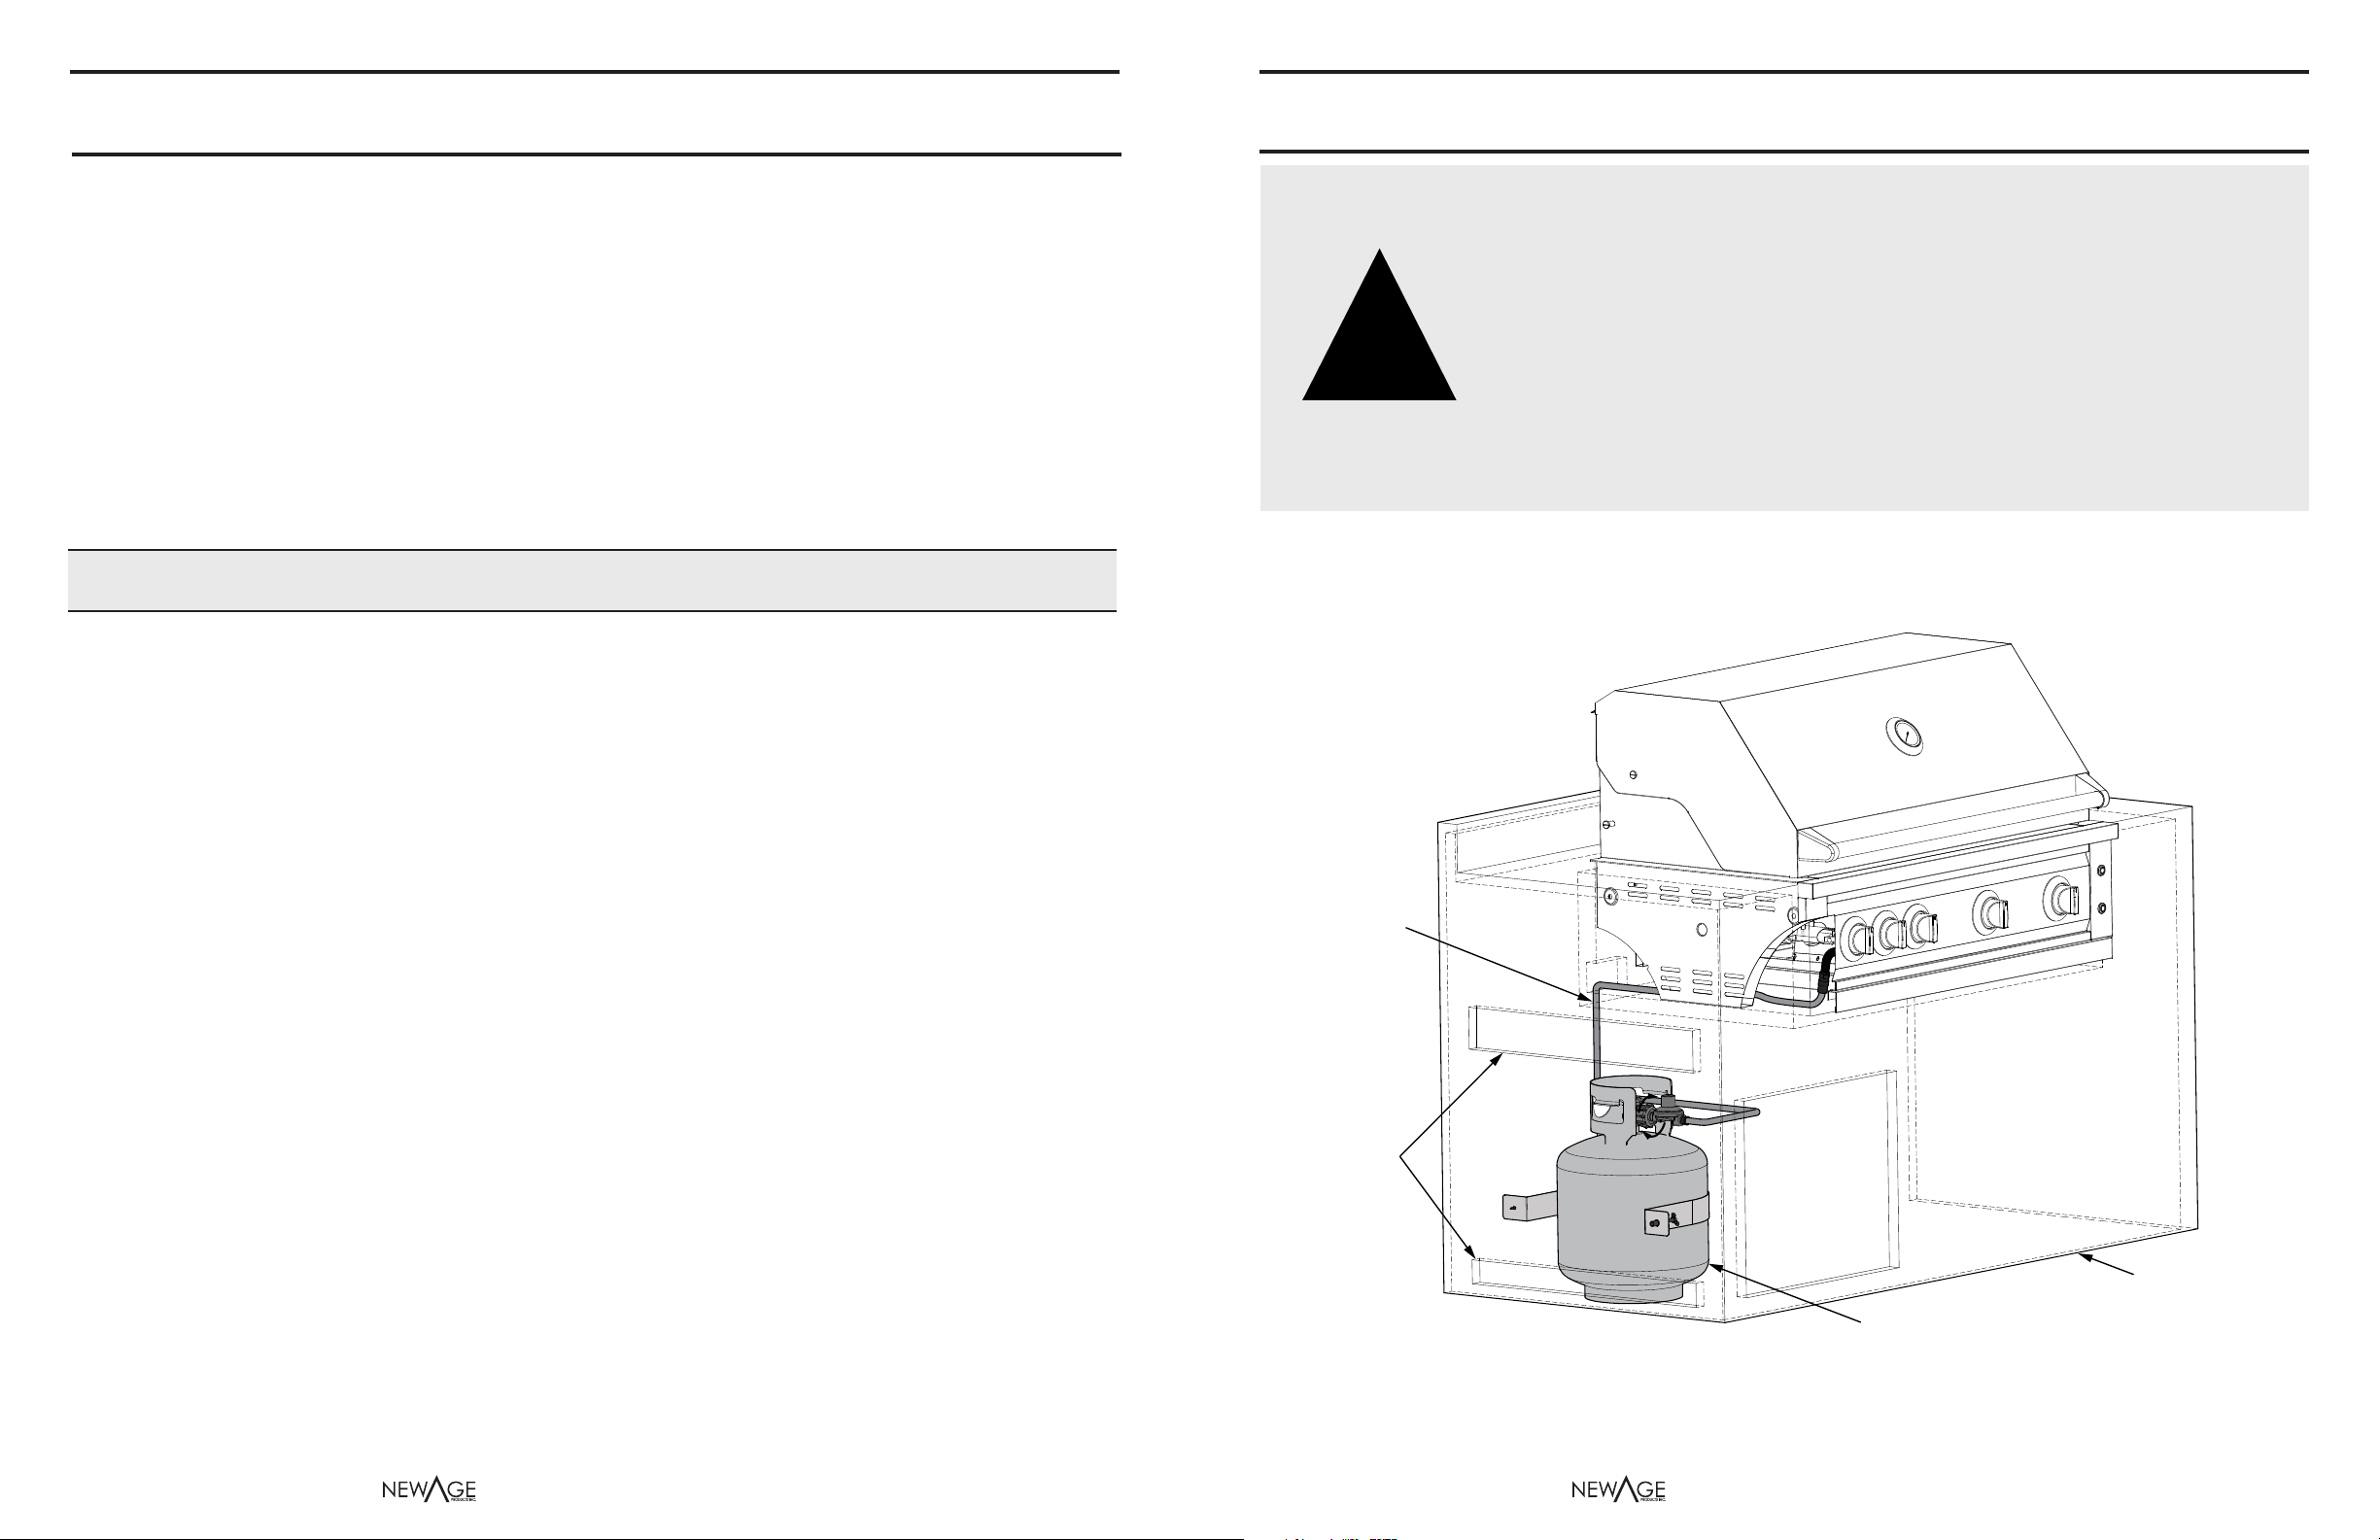
Installing Natural Gas in NewAge Cabinet
3
12
Grill is pre installed for Natural Gas and includes
a pre assembled hose.
** Grease tray removed for ease of explaination.
WARNING! The grill and cabinet must have a
minimum clearance from combustible materials.
Refer to below gure for dimensions.
Side - 10”Clearance
Rear - 18”Clearance
18 Inches 10 Inches
* The outdoor cooking gas appliance
shall not be used under overhead
combusible construction
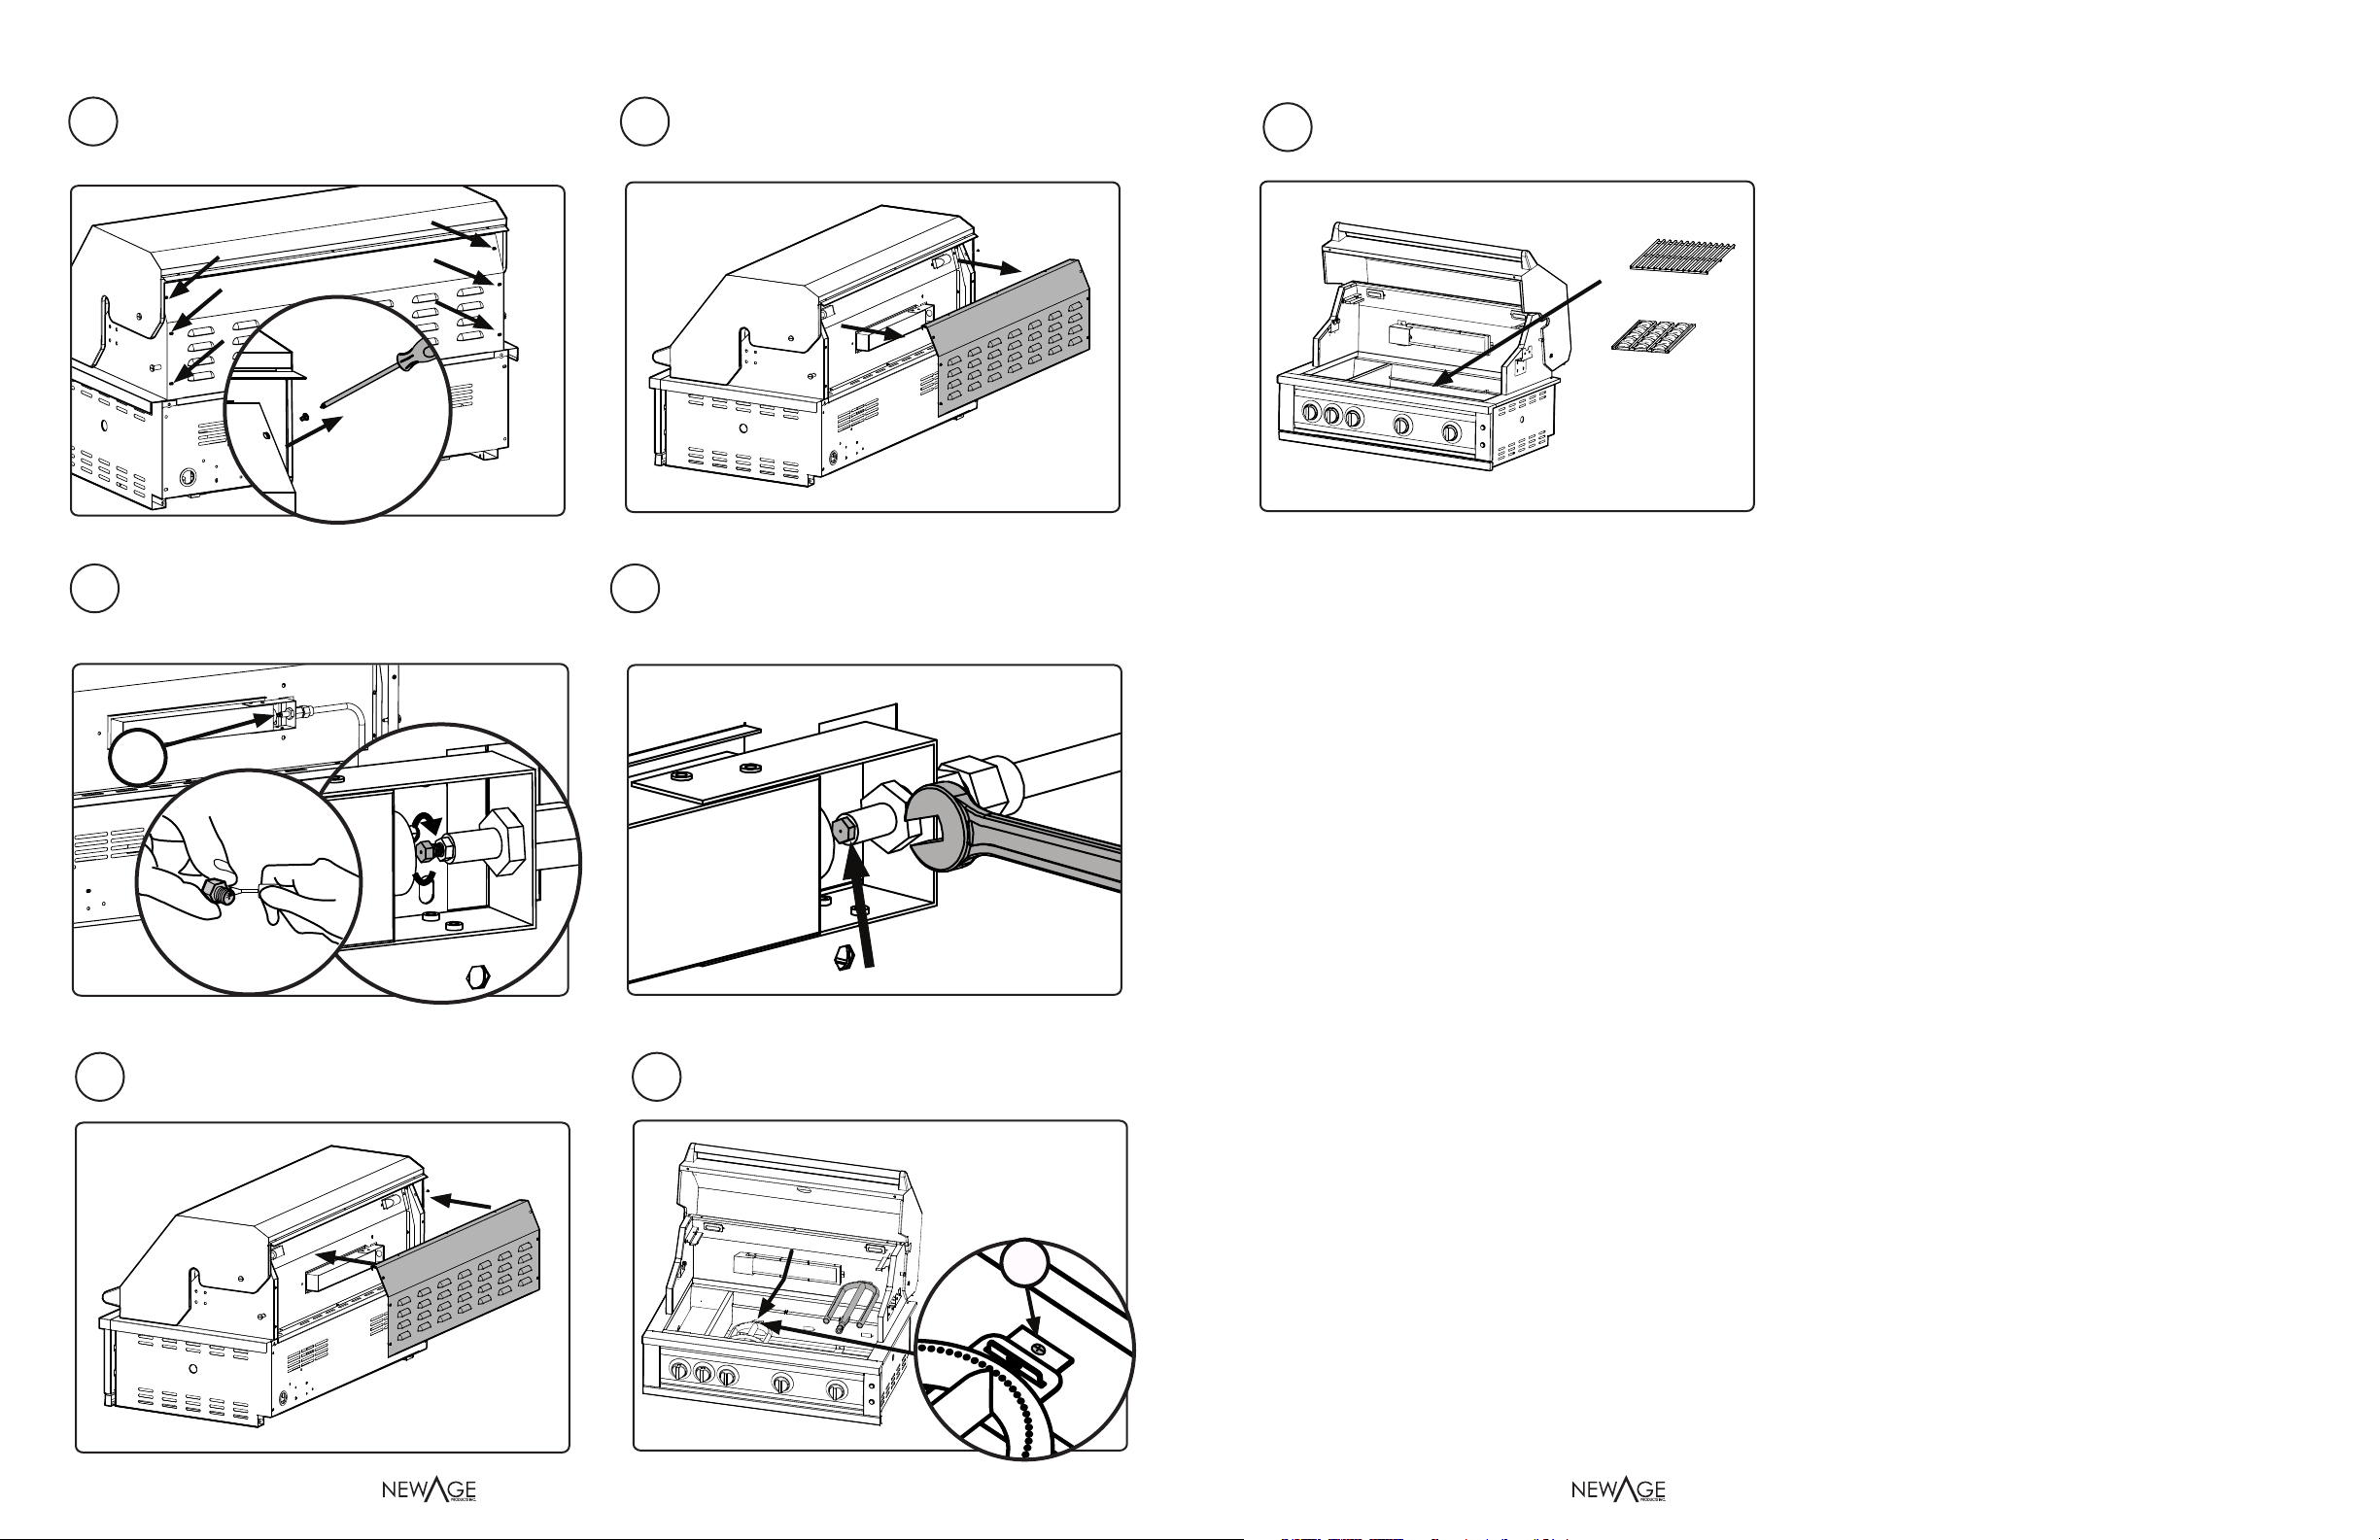
Converting from Natural Gas to Propane
It is important to understand that wherever there is
a burner (B), there is a propane orice that will need
to be added (do not forget the sear burner or the
rotisserie). The back access panel must be removed
to replace injector oriface for rotisserie.
This process is as simple as screwing in the
propane orifaces (included with purchase) into
the existing valve end.
Remove the grill grates, ceramic briquette
trays, and rotisserie.
Unscrew the bolt (A) at the end of each burner,
and tilt and lift out from the grill.
3
1
34
2
B
A
B
6
Begin by applying pipe dope to the propane
oriface threads. Hand thread the propane orice
in and using a 6 mm nut driver tighten the
injector nut.
5To access the injector orifaces for the burners,
there are holes located on the front inside of
the re wall.
!
• Never install this product into a combustible enclosure without an
insulated jacket. Doing so could result in re, property damage
and personal injury.
• Never locate the grill under a roof or overhang, in a building, garage,
shed or other such enclosed area.
• Never locate the grill under unprotected combustible construction.
• Installation must conform with local codes or, in the absence of local
codes, with either the National Fuel Gas Code, ANS Z223.1/NFPA 54,
Natural Gas and propane Installation Code, CSA B149.1, or Propane
Storage and Handling Code, B149.2, in Canada.
WARNING!
Connect to Natural Gas supply using the
quick connect tting.
Pull back collar on
connector
3
12 13
www.newageproducts.com www.newageproducts.com
5
5 5
8
910
7To access the rotisserie injector, begin by
removing the 6 bolts holding on the back panel
on rear of grill.
Remove the back panel and set aside.
5 5
11 12
Locate the orice location inside back of
rotisserie (C). Apply pipe dope to the propane
injector thread and hand tighten into position.
C
Finish tightening using a 6mm open wrench.
5
13
Re-attach back panel following reverse order
of Step 9 and 10.
Re-insert the burners and attach the bolts (A)
securing the burners with the bolts.
A
Reinstall the grill grates, ceramic briquette
trays, and rotisserie.
3

14 15
www.newageproducts.com www.newageproducts.com
Propane Cylinder Installation
Remove the grease tray.
3
1
3
2Remove pre installed Natural Gas Hose and
replace with Propane / regulator assembly.
Attach type 1 regulator hand wheel to the
tank. Clockwise to tighten, counter clockwise
to loosen.
WARNING! The grill and cabinet must have
a minimum clearance from combustible
materials. Refer to below gure for
dimensions.
Side - 10”Clearance
Rear - 18”Clearance
18 Inches 10 Inches
shall not be used under overhead
combusible construction
5
!
!
• Never connect a gas line directly to the grill. A pressure regulator must
be installed on all gas equipment. All local codes require it and NEWAGE
supplies the correct regulator with your grill. Removing or failing to install
the pressure regulator can result in re and serious personal injury and will
void the warranty
• Do not change the regulator/hose assembly or use any other assembly than
the one supplied with your NEWAGE grill.
• Do not store a spare LP-gas cylinder under or near this appliance.
• Never fill the cylinder beyond 80 percent full.
WARNING!
Installing Briquettes, Grill Grates and Rotisserie
Install the warming rack, making sure that the
longest grate rod gets inserted into slots in
support shelves. Figure (A).
Install the three briquette trays as shown below. Install the grill grates as shown.
3
1
3
2
Insert the squared end fully into into the hole
on motor mount. Drop the notched endcap of
the skewer onto the rollers, (B).
Slide the rotisserie motor down onto the
mount clips on side of grill.
3
6
5
B
Assemble the rotisserie by sliding the forks
and handtighen the nger bolts. Slide
the counterweight and end piece on and
handtighten.
4
A

16 17
www.newageproducts.com www.newageproducts.com
Note: In order for the rotisserie, LED and halogen
lights to work the grill must be plugged into a GFCI
outlet installed by an electrician.
Drop the notched endcap of the skewer
onto the rollers(B) . The notched slot on the
skewer needs to align with rollers mounted
on grill housing. Figure (C). 5
8
7
GFCI
Installing Briquettes, Grill Grates and Rotisserie cont.
B
C
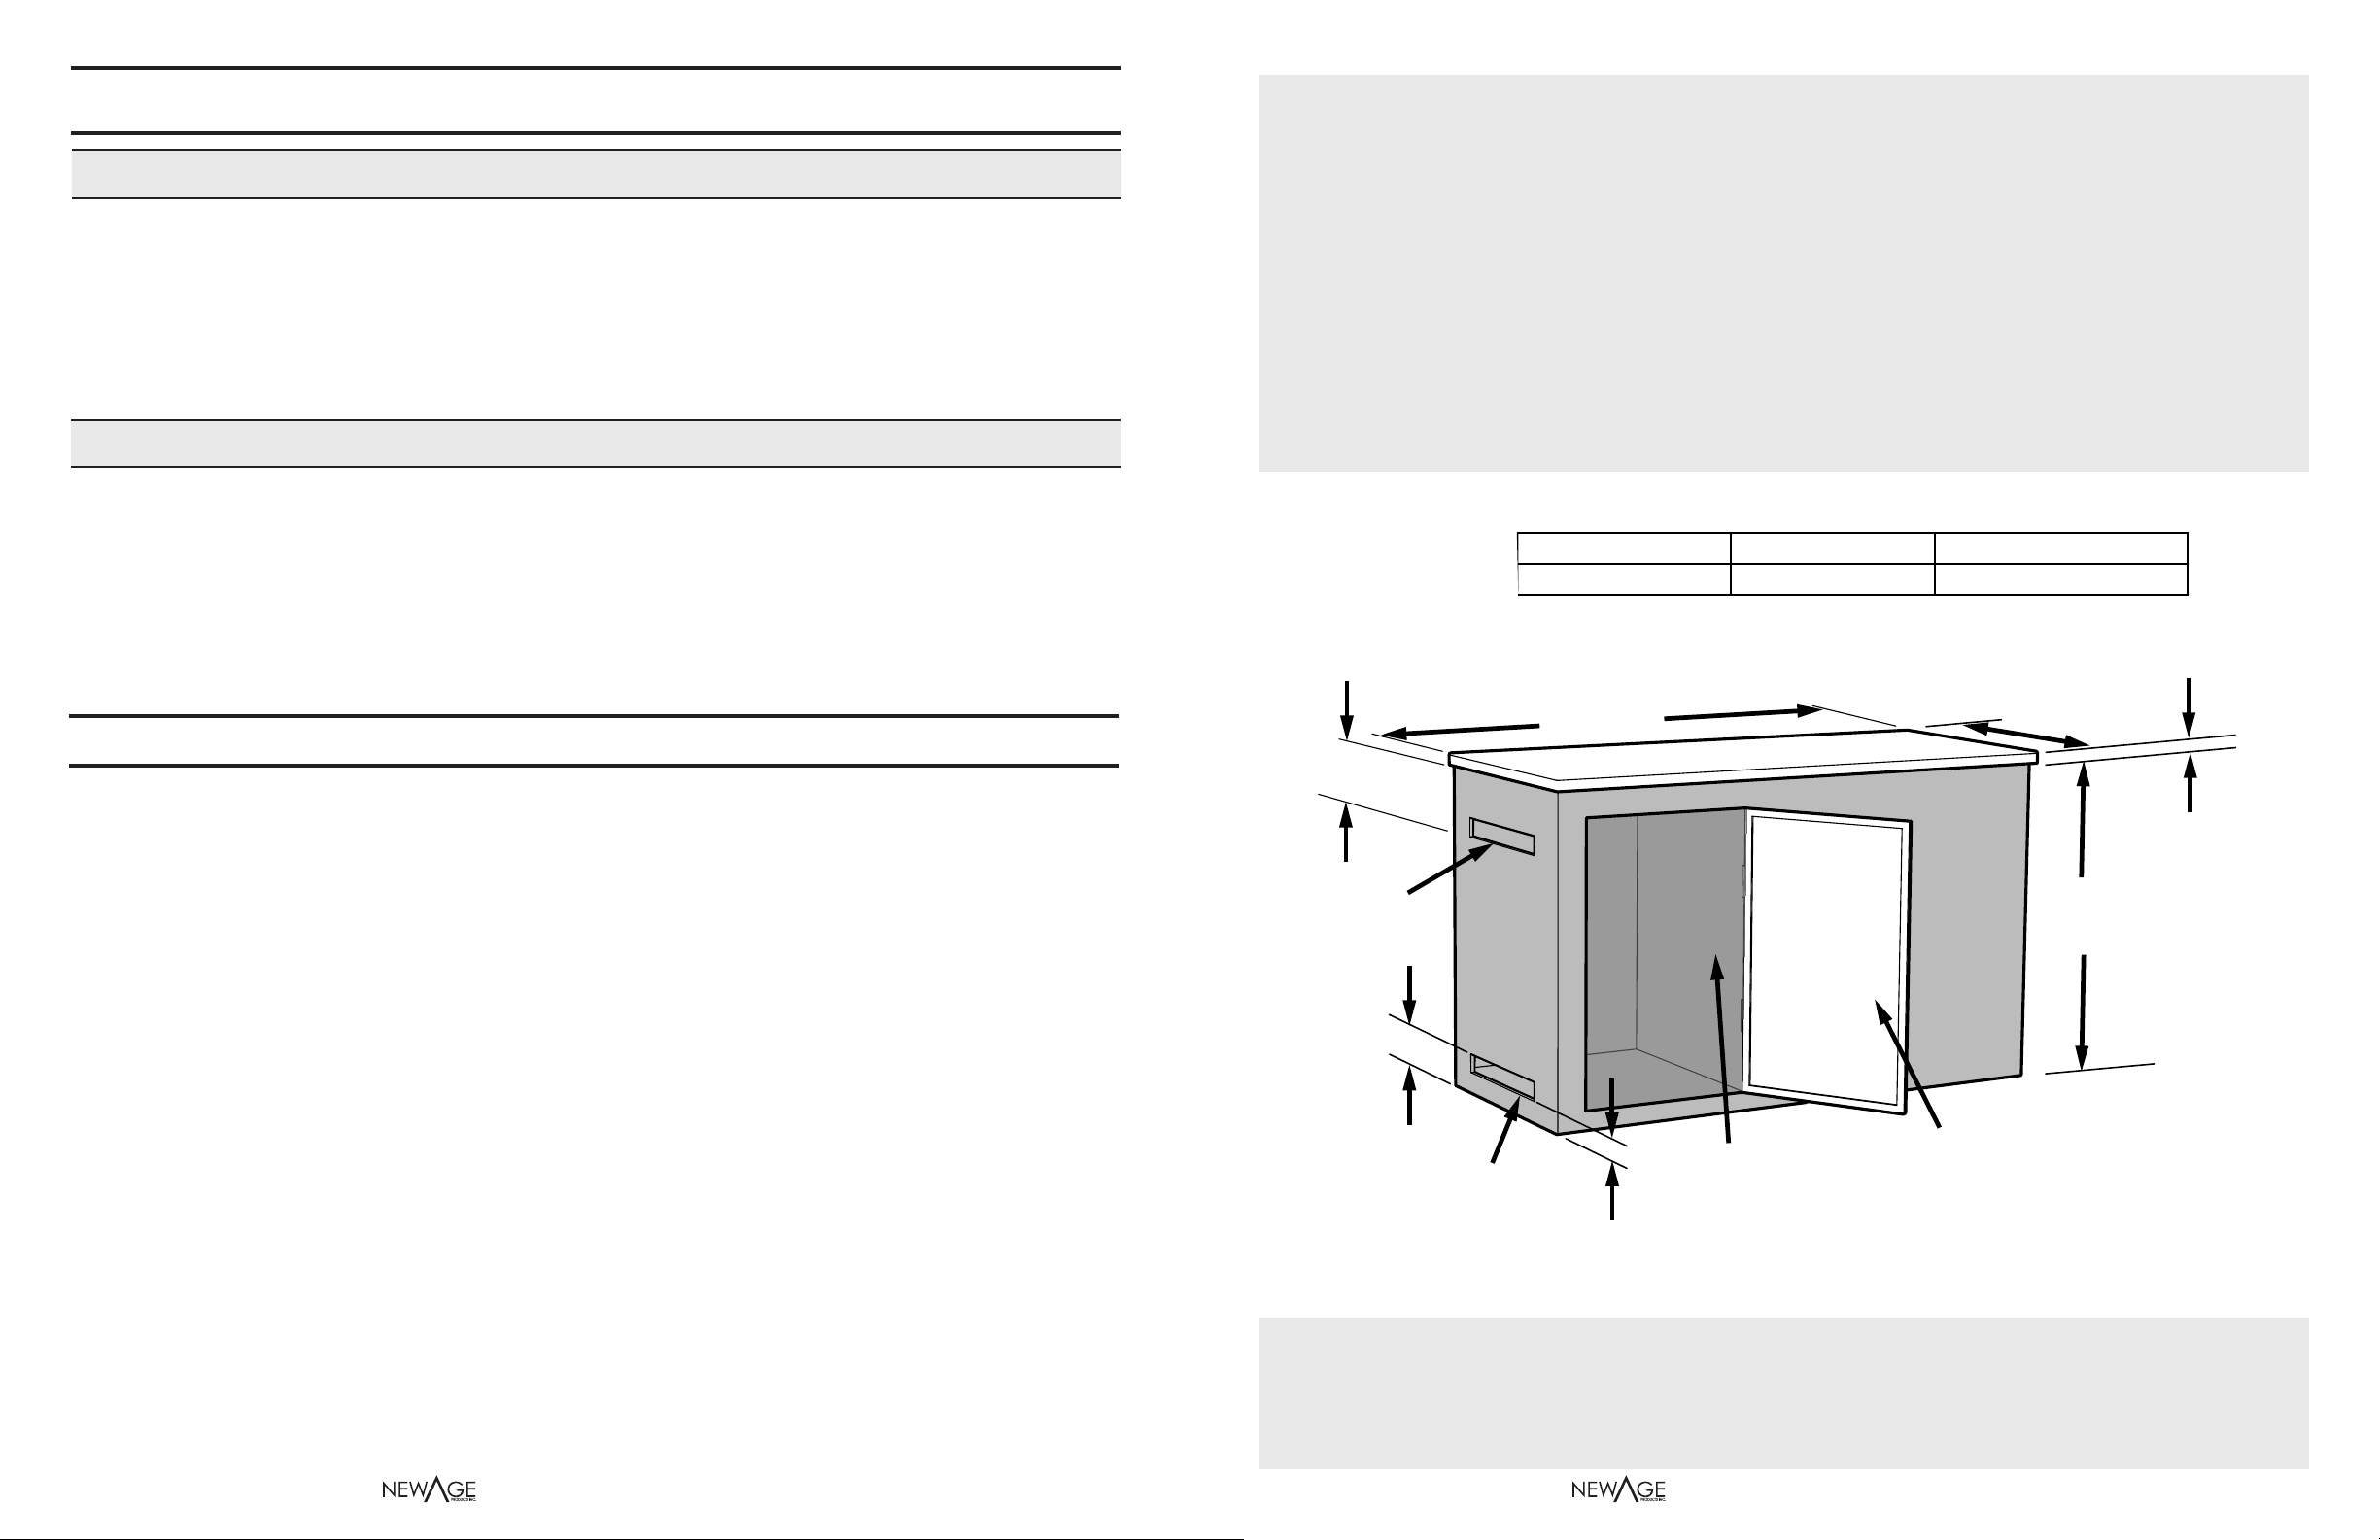
Cutout Dimensions for Built-in
!
•Product installation must
meet local electric codes or,
in the absence of local codes,
the latest edition of the
National Electrical Code ANS/
NFPA No. 70 or the
Canadian Electrical Code CGA
1.6b2005.
• Use only a Ground Fault Interrupter (GFI) protected
circuit with this outdoor cooking gas appliance.
• IMPORTANT: When connecting your rotisserie motor,
rst connect the motor to the grill and then plug the
grill into the outlet.
• This grill is equipped with a three prong (grounding)
electric plug for your protection against shock hazard and must be plugged directly into a properly grounded
three prong outlet. Never cut or remove the grounding prong from this plug.
• Use only extension cords with a 3 prong grounding plug, rated for the power of the equipment, and
approved for outdoor use with a“W-A” MARKING.
• To protect against electric shock, do not immerse any part of the power cord, an extension cord or any
plugs in water or other liquid.
• Unplug the product from the outlet when not in use and before cleaning. Allow it to cool before putting
on or taking o parts.
• Do not let the cord hang over the edge of a table or touch hot surfaces.
• Do not use an outdoor cooking gas appliance for purposes other than intended.
• Do not operate any outdoor cooking gas appliance with a damaged cord, plug, or after the appliance
malfunctions or has been damaged in any manner. Contact the manufacturer for repair.
WARNING!
ELECTRICAL GROUNDING
The appliance, when installed, must be
electrically grounded in accordance with
local codes or, in the absence of local
codes, with the National Electrical Code,
ANS/NFPA 70, or the Canadian Electrical
Code, CSA C22.1.
!
WARNING
!
WARNING
!
WARNING
Cabinet frame, cabinet side panels and
counter top must be made from
non-combustionable material.
A propane tank can not
be stored below the gas grill.
Only 1 max 20 lbs tank in service
should be used with the grill.
Note to Installer:
A built-in appliance for use with
a remote LP gas supply system
where the installer constructs the
propane cylinder enclosure. The
installer must provide detailed
instructions and diagrams that
comply with clauses 4.6.1-4.6.5
of the ANS Z223.1 Code.
All built-in appliances must use
rigid pipe, semi-rigid tubing, or a
connector complying with the
standard for Connectors for Gas
Appliances, ANS Z21.24. CSA 6.10,
or Standard for Connectors for
Outdoor Gas Appliances and
Manufactured homes, ANS Z21.75.
CSA 6.27, for the appliance which
are connected to fixed fuel piping
system (Natural Gas).
W
H
D
65901 - 40” Grill
38.5" (978mm)
11.125" (283mm)
22.5" (572mm)
65900 - 33” Grill
31.5" (800mm) 22.5" (572mm)
11.125" (283mm)
The installation must conform with local codes or, in the absence of local
codes, with the National Fuel Gas Code, ANS Z223.1/NFPA 54, Storage
and Handling of Liquefied Petroleum Gases, ANS/NFPA 58; or Natural Gas
and Propane Installation Code, CSA B149.1; Propane Storage and Handling.
If you are connecting an appliance to a fixed fuel piping system specifying
the use of a rigid pipe, semi-rigid tubing, and/ or a connector that complies
with the standard for Connectors for Outdoor Gas Appliances and
Manufactured Homes, ANS Z21.75 CSA 6.27.
W
5"
127mm
MAXIMUM
D
H
4"
102mm
2"
51mm
36"
915mm
RECOMMENDED
NON-COMUSTABLE MATERIAL
MINIMUM 10 SQ IN (65 SQ CM)
OF VENTILATION REQUIRED ON
EACH END OF CABINET.
GAS INLET OPENING
ELECTRICAL OPENING
INSULATION JACKET
MAY BE REQUIRED
OUTDOOR GFI ELECTRICAL OULET
RECOMMENDED - LOCATE ON SAME SIDE
OF GRILL AS ROTISSERIE BRACKET.
1"
25.4mm
MAXIMUM
5"
127mm
MAXIMUM
MINIMUM 20 SQ IN (130 SQ
CM) OF VENTILATION
REQUIRED ON EACH END OF
CABINET.
Secure 20 lbs propane tank to
interior of built in cabinet.
Allow access in order to
connect or disconnect
propane hose regulator to
propane tank.
18 19
www.newageproducts.com www.newageproducts.com
Care and Maintenance of your
Stainless Steel Grill
Perform Regular Maintenance
Wash regularly with clean fresh water, mild detergent and a micro ber cloth. After washing rinse in clean
water and wipe the surface dry with your cloth remembering to go with the grain on brushed stainless steel.
Generally you should wash your stainless steel every three months. Coastal areas or next to a chlorine pool
more frequently every 2 weeks. Do not use abrasive cleaners or a scouring pad of any type as they will cause
excessive wear and dull the nish. Stainless steel nishes in coastal environments may show tea staining if
not washed regularly. For better protection use a thin coating of protectant on the surface.
List of common conditions that cause corrosion or discoloration of
stainless steel and should be avoided:
1. Chloride containing cleansers – this includes bleach and any cleaners containing bleach
2. Muriatic acid (hydrochloric acid) – commonly used to clean up after tile/concrete installation
3. Concentrated soap residue – chemical additives will cause discoloration and some dried soaps
actually look like rust
4. Water with high iron content – can leave a rusty residue, especially if allowed to drip continuously
5. Contact with iron materials – including steel wool, iron residue/dust from installation or cleaning of other
steel products
6. Dont’allow trapped moisture between the product and cover – rubber mats, metal cans or cleaning
products trapped moisture - allow cabinets to completely dry before covering.
7. Salts – contain chlorides
8. Extreme Heat by Flame
9. Do not permit citrus or tomato juice to remain on stainless steel surfaces.
10. No abrasive cleaners, steel wool pads, or abrasive cloths as they will scratch the finish.
!
WARNING
Gas Connections
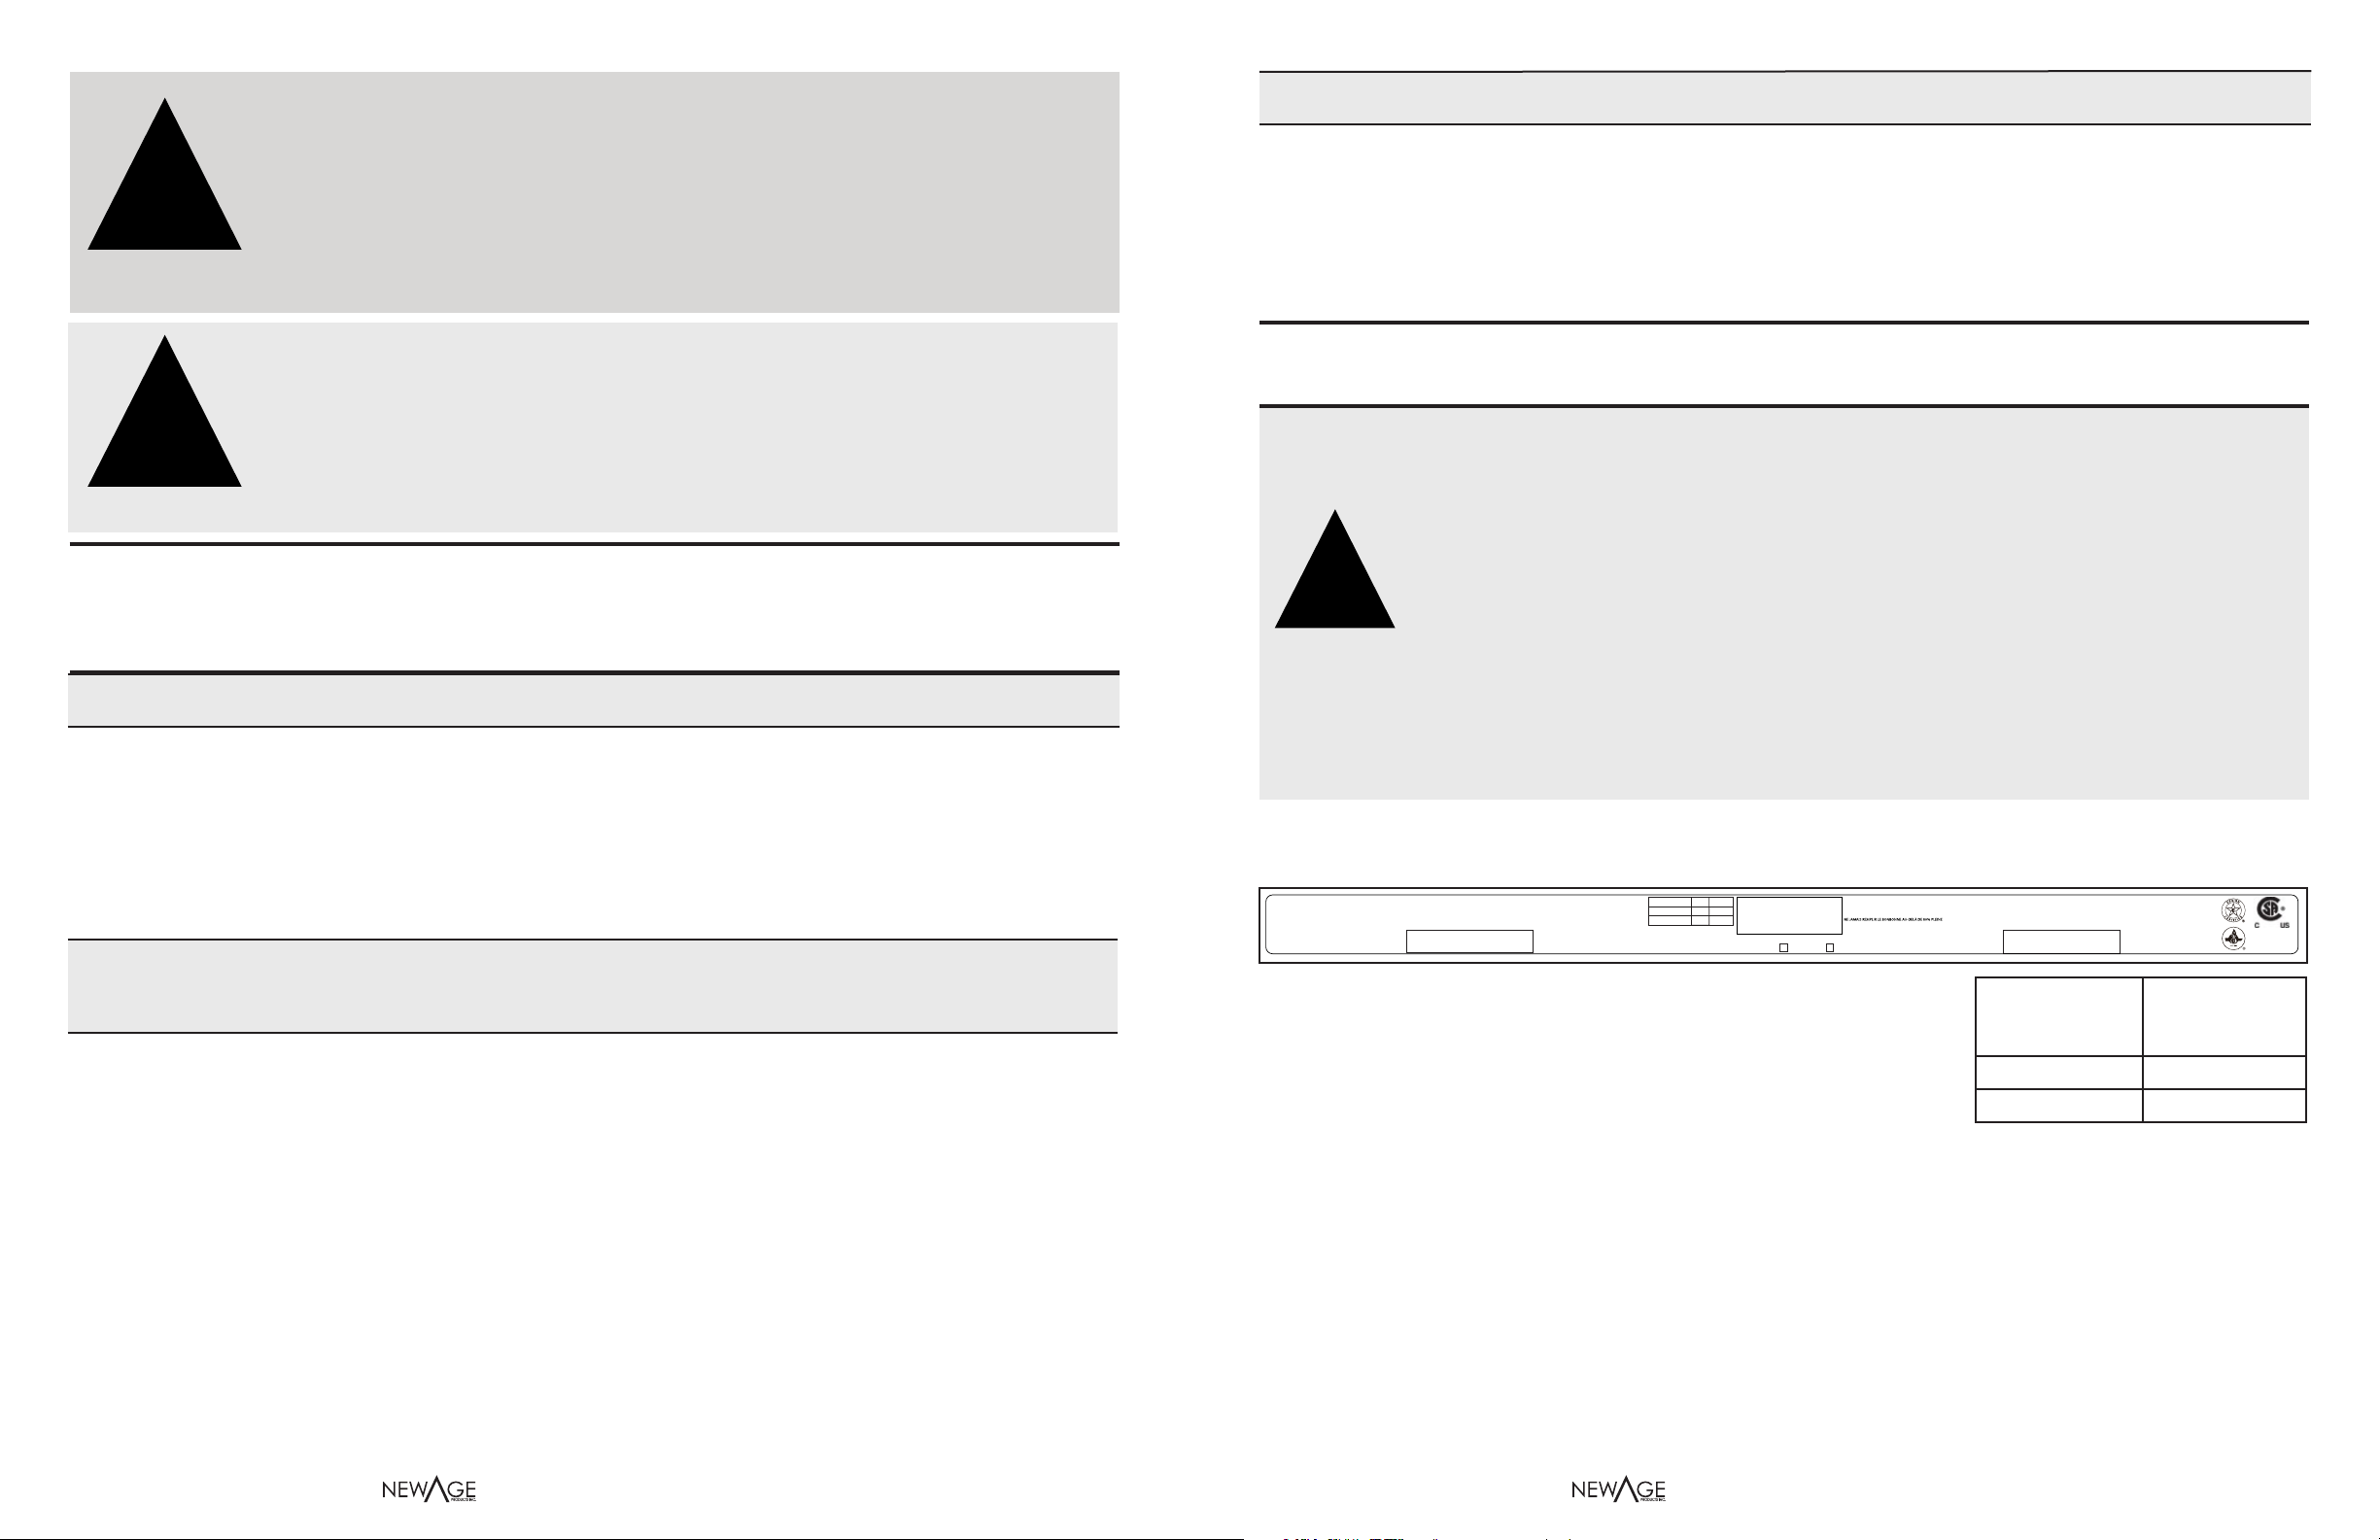
The grill is factory set to use natural gas (NG) To use Propane, a conversion kit must be installed. It is critical
that the gas you use matches that which the grill was set up for. You can verify that by checking the rating
plate.
The rating plate is located in one or more of the following places:
• On the back of BBQ
Ensure that the gas supplied meets with the minimum pressure requirements. Do not operate the grill on
any gas other than that for which the grill has been set.
Both the regulator and the manifold orices have been tuned for the type of gas specied on the rating
plate. Converting to a dierent type of gas requires a conversion kit, supplied from NewAge and must be
installed by a qualied technician.
All installation and all installation parts must conform to local codes with the National Electrical Code,
ANS Z223.1/ NFPA 70 latest edition and the National Fuel Gas Code, ANS Z223.1/NFPA 54 in the U.S. and
CGA-B149.1/.2 in Canada. Canadian installations must conform to CGA-B149.1/.2 natural gas/propane
installation code. (Canada)
CAN/CSA- 1.6-2015
ANS Z21.58-2015
OUTDOOR COOKING
GAS APPLIANCE
MODEL/ MODÈLE 33”
CLASS NO / CATÉGORIE #: 2711 04
- 65900
3 X 16,000 BTU/ U MAIN BURNERS / BRÛLEUR PRINCIPAL
1 X 12,000 BTU/ IR REAR BURNER /
BRÛLEUR ARRIÈRE
MINIMUM CLEARANCE TO ADJACENT COMBUSTABLES:
EQUIPPED FOR USE WITH
DÉGAGEMENT MINIMUM AUX COMBUSTIBLES ADJACENTS
INCHES FROM SIDES 10 POUCES DES CÔTÉS
INCHES FROM REAR 18 POUCES DE L’ARRIÈRE
OUTDOOR COOKING APPLIANCE- FOR OUTDOOR USE ONLY. IF STORED INDOORS,
DETACH AND STOREGAS CYLINDER OUTSIDE. DO NOT USE THIS APPLIANCE
UNDER OR CLOSE TO UNPROTECTED OVERHEAD COMBUSTABLE SURFACES.
SEE INSTRUCTIONS FOR CLEARANCES. ONLY FOR INSTALLATION IN A BUILT-IN
ENCLOSURE CONSTRUCTED OF NON-COMBUSTIONABLE MATERIALS.
WARNING: GASSUPPLY MUST BE TURNED OFF AT SOURCE/ CYLINDER
WHEN APPLIANCE NOT IN USE. DO NOT STORE A SPARE LP GAS CYLINDER UNDER
OR NEAR THIS APPLIANCE. NEVER FILL THE CYLINDER BEYOND 80% FULL.
IF THESE INSTRUCTIONS ARE NOT FOLLOWED EXACTLY, A FIRE CAUSING DEATH
OR SERIOUS INJURY MAYOCCUR.
CAUTION: USE ONLY THE GAS PRESSURE REGULATOR(LP ONLY)
PROVIDED WITH THIS APPLIANCE. THIS REGULATOR IS SET FOR AN OUTLET
PRESSURE OF 11 INCHES OF WATER COLUMN (2.74 kPa). THE APPLIANCE CAN
BE USED WITH LP GAS AND NATURAL GAS. THIS APPLIANCE IS ADJUSTED AND
SHIPPED FOR USE WITH NATURAL GAS. TO CONVERT TO LP GAS, USE ONLY A
SUPPLIED LP GAS CONVERSION KIT. REFER TO INSTRUCTION MANUAL FOR HELP
NATURALGAS / GA Z LPG
MFG DATE DE FABRICATION :
NO01-MAR2018A
APPAREIL DE CUISINE DE PLEIN AIR- UTILISE À L'EXTÉRIEUR SEULEMENT.SI
MAINTENU À L'INTÉRIEUR,DÉCHARGEZ ET CONSERVEZ LE BONBONNE AU GAZ
À L'EXTÉRIEUR.N'UTILISEZ PAS CET APPAREIL SOUS OU À PROXIMITÉ D’UNE
CONSTRUCTION COMBUSTIBLE.
ATTENTION: L'ALIMENTATIONDE GAZ DOIT TOUJOURS ÊTRE FERMEZ À LA SOURCE /
BONBONNE QUAND L'APPAREIL N'EST PASUTILISÉ
NE GARDER PAS UN BONBONNE AUGAZ LP EN RÉSERVE DESOUS OU À PROXIMITÉ DE CET
APPAREIL.
SI L’INFORMATION PRÉCÉDENTE N’EST PAS SUIVIE EXACTEMENT,UN INCENDIE PROVOQUANT
UNE MORT OU DES BLESSURES GRAVES PEUVENT PRODUIRE.
AVERTISSEMENT :
UTILISEZ UNIQUEMENT LE RÉGULATEUR DE PRESSION DE GAZ
(LP SEULEMENT) QUI EST FOURNI AVEC CET APPAREIL.
CE RÉGULATEUR EST RÉGLÉ POUR UNE PRESSION DE PRISE DE 11 POUCES DE COLONNE
D'EAU(0.39 PSI)
.C
N
I
STC
U
D
ORP
EGA
WE
N
ADANAC
,O
IRA
TNO
,NAHGUA
V
EN
IHCN
E
EUQ
IRBA
F
/ANIHCN
I
EDAM
Class IIIA-2
111 CREDITVIEW ROAD, 2nd FLOOR
L4L-9T1
X
ONLY FOR INSTALLATION IN A BUILT-IN ENCLOSURE
CONSTRUCTED OF NON-COMBUSTIONABLE MATERIALS OR
NEWAGE CSA APPROVED GRILL CABINETS. SEE MODELS.
UNIQUEMENT POUR L'INSTALLATION DANS UN BOÎTIER
INTÉGRÉ CONSTRUIT DE MATÉRIAUX NON COMBUSTIBLES
OU POUR APPAREIL DE GRILLE ET D'ARMOIRES NEWAGE,
APPROUVÉ CSA.
ORIFICE SIZES/
GRANDEUR DES ORIFICS
PROPANE NATURAL GAS
GAZ NATURAL
MAIN BURNER/
BRÛLEUR PRINCIPAL
BACK BURNER/
BRÛLEUR A L’ARRIÈRE
1.61MM
1.03MM 1.39MM
1.18MM
GRILL ELECTRICAL REQUIREMENTS:
INPUT- 110 VAC 60 Hz 0.25A
ROTISSERIE ELECTRICAL REQUIREMENTS:
INPUT- 110 VAC 60 Hz 0.04A
MANIFOLD PRESSURE INCHES OF WATER COLUMN
11” LPG / 7”NG
PRESSION AU COLLECTEUR (DE POUCES COLONNE D’EAU)
11 po GPL/ 7 po GN
Rating Plate - Lists serial numbers, model numbers,
and gas type
Water Column Requirements
Fuel WC Min Under
Full Load
NATURAL GAS 7 in wc (NG)
LP 11 in wc (LPG)
Never connect a gas line directly to the grill. A pressure regulator must be installed
on all gas equipment. All local codes require a pressure regulator and NewAge
supplies the correct regulator with your grill. Removing or failing to install the
pressure regulator can result in re, and serious personal injury and will void the
warranty. This grill is designed for non-combustible enclosures only, and must be
installed and serviced by a qualied installer to local codes.
As indicated on the rating plate, this gas grill is designed to operate with gas
supply pressures of 11”WC for Propane and 7”WC for Natural Gas. For installations
where the gas supply pressure exceeds these requirements, a regulator must be
installed upstream of the grill’s components. If the gas supply pressure is lower than
these requirements, the unit will be under-red and will not reach the maximum
temperatures. Ensure that the supply line size complies with local and/or national
installation codes.
OXIDIZATION Removal
If you have oxidation there are a few steps to take to bring your stainless steel cabinets back to “as new”
condition. Apply clean water with a cleaning sponge and rub gently in the direction of the grain. If the mark
won’t shift, it may be necessary to use a stainless steel cleaner, in which case apply the cleaner and rub
gently. After cleaning it is important to rinse the stainless steel with clean fresh water and buff with a soft
cloth. Remember to always rub with the grain, NEVER across as you will ruin the finish, and the stainless can
lose its shine.
!
1. DO NOT store or use products with ammable liquids or vapors in the
vicinity of the NEWAGE Grill Cabinet,NEWAGE Outdoor Kitchen cabinets or
any appliances.
2. DO NOT store a spare LP cylinder in or near the NEWAGE Grill Cabinet,
NEWAGE Outdoor Kitchen Cabinets, or any other appliances.
WARNING!
WARNING!This grill is designed for non-combustible enclosures only, and must be
installed and serviced by a qualified installer to local codes.
WARNING! As indicated on the rating plate, this gas grill is designed to operate with
supply pressures of 11”WC for Propane and 7”WC for Natural Gas. For installations where
the gas supply pressure exceeds these requirements, a regulator must be installed
upstream of the grill’s components. If the gas supply pressure is lower than these require-
ments, the unit will be under-fired and will not reach the maximum temperatures. Ensure
that the supply line size complies with local and/ or national installation codes.
!
WARNING!
20 21
www.newageproducts.com www.newageproducts.com
General Information
This Gas Barbecue Is Certied Under Canadian And American National Standards, CSA 1.18-2017 and ANS
Z21.89-2017 respectively for Outdoor Gas Grills and should be installed to conform with local codes. In
absence of local codes, install to the current CAN B149.2 Natural Fuel Gas Code and the Propane Installation
Code, CSA B149.1 Propane Installation Code in Canada or to the National Fuel Gas Code, ANS Z223.1/NFPA
54 the National Fuel Gas Code the Natural Gas and Propane Installation Code, CSA B149.2.
If a rotisserie motor is used, it must be electrically grounded in accordance with local codes or, in absence
of local codes, with the current CSA C22.1 Canadian Electrical Code in Canada or the National Electrical
Code, ANS/NFPA 70 the Canadian Electrical Code, Part 1, CSA 22.1.
California proposition 65: The burning of gas fuel creates by-products, some of which are on the list as
substances known by the State of California to cause cancer or reproductive harm. When cooking with
gas, always ensure adequate ventilation to the grill.
Propane Cylinder Specications
If the gas grill is being supplied with propane from a portable cylinder, a regulator specied by the
manufacturer must be used. The regulator must supply a pressure of 11 inches water column (0.39 PSI) to
the gas grill and have a QCC1 type tting. Cylinders to be used with this unit must be supplied with a QCC1
cylinder valve. A QCC1 cylinder has a positive seating connection, which will not allow gas ow until a
positive seal has been achieved. It is also equipped with an excess ow device. In order to attain full ow
to the grill, the valves on the grill must be in the o position when the cylinder valve is turned on.
A dented or rusty cylinder may be hazardous and should be checked by your propane supplier. Never
use a cylinder with a damaged valve. Use only a propane supply cylinder constructed and marked in
accordance with the specications for LP-gas cylinders of the National Standard of Canada, CAN/CSA-b339,
Cylinders, Spheres and Tubes for Transportation of Dangerous Goods; and Commission, as applicable or
the Specications for LP-Gas Cylinders of the U.S. Department of Transportation (D.O.T.).
The propane cylinder must be provided with a cylinder connection device compatible with the connection
for outdoor cooking appliances. The propane cylinder must be provided with a shut-o valve terminating
in a propane cylinder valve type QCC1, and a safety relief device having direct communication with the
vapor space of the cylinder. The cylinder supply system must be arranged for vapor withdrawal and the
cylinder shall include a collar to protect the cylinder valve. The cylinder shall incorporate a listed OPD
(overll protection device). Do not store a spare LP-gas cylinder under or near this appliance. Never ll
the cylinder beyond 80 percent full. If the preceding information is not followed exactly, a re causing
death or serious injury may occur.
Do not change the regulator/hose assembly or use any other assembly than
the one supplied with your NewAge grill.
Do not attempt to use a 5LP-A equipped regulator/hose assembly with a
standard 510 POL cylinder/valve assembly.
Do not store a spare LP-gas cylinder under or near this appliance.
Never ll the cylinder beyond 80 percent full.
If the information above is not followed exactly, a re causing death or serious
injury may occur.
!
WARNING
LP Gas Connection
Propane Tank
(Not Supplied)
Non-Combustible
Construction
Propane Line
With Regulator
(Supplied)
Venting

22 23
www.newageproducts.com www.newageproducts.com
Note for Gas Installers : Permanently plumbed LP connections, such as those in line with a bulk cylinder,
require a 4/11 regulator.
When using the 4/11 regulator you must ensure that it is set for the proper fuel type. This is done by
removing the regulator cap and gasket and looking at the bottom of the plunger to see what fuel type is
visible. This is the regulator fuel setting. NAT is for natural gas and LP is for propane gas. The LP setting can
be further identied by the large diameter disk on the bottom of the plunger. To change from one gas to the
other simply push the plunger to the side to snap it out of the cap, turn the plunger so it reads the desired
gas type on the bottom, and push the plunger until it snaps back into place in the cap then replace the cap
into the regulators.
LP Gas connection cont.
LP connections
Make sure the LP cylinder valve is fully closed. It is possible for the valve to be open without releasing gas
but, as soon as you start connecting the regulator, gas will leak from the connection.
Insert the regulator inlet into the cylinder valve and turn the black coupler nut clockwise until the coupler
nut is hand tight. Do not over-tighten this connection. See Figure 1 & 2.
To disconnect the coupler nut, rst make sure the main cylinder valve is turned o. Grasp the coupler nut
and turn counter clockwise. The inlet will then disengage.
Always leak-test the connection after relling or exchanging LP cylinders. (See Leak Testing on Page 31.)
Dust Cap - Place dust cap on cylinder valve outlet whenever the cylinder is not in use. Only install the type
of dust cap on the cylinder valve outlet that is provided with the cylinder valve. Other types of caps or plugs
may result in leakage of propane.)
Propane cylinder must include a collar to protect the cylinder valve
Coupling Nut
Figure 1.
Figure 2.
Cylinder Valve Pressure Relief Valve
Valve Protection Collar
LP Tank (not included)
LP Dust Cap
(used when in storage
or transportation.)
LP Regulator
(included)
Hand tighten to ensure proper
seal for correct gas flow.
LP cylinder requirements
The LP cylinder must be constructed and marked in accordance with the specications for LP gas cylinders
of the U.S. Department of Transportation (DOT) and designed for use with a Type 1 system only.
Cylinders of free standing grills must be secured using the provided cylinder retention system to avoid
accidental movement.
When exchanging your cylinder for a rell, exchange only for a Type 1 -20lb cylinder with an over-ll
protection device. Never use a cylinder with a damaged valve.
A dented or rusty LP cylinder may be hazardous and should be avoided. If in doubt, have it checked by your
LP supplier.
Always check for leaks after every LP cylinder change. (See Leak Testing instructions on Page 31.)
Always shut o the LP-gas supply at the cylinder when the grill is not in use.
Cylinders must be stored outdoors in a well-ventilated area out of the reach of children. If your grill is stored
indoors, the LP cylinder must be detached from grill and stored outside.
Grills set up for LP gas come equipped with an LP hose/ regulator assembly for connection to a standard 20
lb. LP cylinder. (Type 1). All ttings necessary to attach the assembly to the grill are included.
Never connect an unregulated gas line to the grill.

24 25
www.newageproducts.com www.newageproducts.com
Grill Intake
Manifold
Threaded
nipple
Flexible Gas
Hose
Quick
disconnect
Threaded
nipple
Quick
Disconnect
Coupler
Tee Fitting Main shut-off valve
Gas supply line
from meter
To side burner
NewAge recommends that only qualied professionals perform the required gas
tting on this product.
To ensure satisfactory performance, the gas supply line must be sized to
accommodate the total BTU/h requirements of all the gas-red equipment that will
be connected to that line.
In no case should pipe less than 3/4” inside diameter or 1” outside diameter ever be
used to connect this product.
• Calculate the total BTU output of all equipment and refer to Gas Supply Line Runs for allowable run
distances for ¾ inch pipe. Failure to meet these minimum requirements may reduce performance of the grill
and any other appliances running on that supply line.
• Always keep supply line runs as short as possible.
• A gas shut-o valve must be installed in an easily accessible location by a qualied licensed gas tter.
• The outdoor cooking gas appliance and its individual shut-o valve must be disconnected from the gas
supply piping system during any pressure testing of that system at test pressures in excess of 0.5 psi (3.5
kPa).
•The outdoor cooking gas appliance must be isolated from the gas supply piping system by closing its
individual manual shut-o valve during any pressure testing of the gas supply piping system at test
pressures equal to or less than 1/2 psi (3.5 kPa).
• Keep threading compound o of the rst two pipe threads to avoid having any small pieces of compound
break loose and clog a burner valve or orice. Do not use threading compound on any are ttings.
For built-in installations, it is recommended that any exible pipe used be kept as short as possible.
For freestanding units using natural gas, NewAge strongly recommends using a quick disconnect kit.
This Quick Disconnect kit, is included with purchase.
NOTE:This product must be installed by a licensed plumber or gas tter when installed within the State of
Massachusetts.
Natural Gas Connection
!
WARNING
Natural Gas connections
Rigid Connection in a Built in Enclosure
!
WARNING
The grill can be connected to the gas supply by means of a exible hose
connector complying with the current standard for elastomeric composite
hose and couplings CAN/ CGA-8.1 or withThe Standard for thermoplastic
Hose and Hose couplings Standard for Propane or N atural Gas, CAN1-8,3,
listed hose assembly if the grill is to be be connected to a cylinder other
than a No. 600 connection.
Grill Propane
Flexible Tubing
(Not Supplied)
Grill Natural Gas
Flexible Tubing
(Supplied)
Side Burner Hose
(Additional)
(Supplied with DSB)
Rigid Piping
for Propane
(Alternative to NG)
(Not Supplied)
Rigid Piping for
Natural Gas
(Not Supplied)
Rigid Piping
for Propane
(Alternative)
(Not Supplied)
All Other Components
Are Not Supplied
Natural Gas Line
(Supplied)
Non-Combustible
Construction
Venting
Venting
26 27
www.newageproducts.com www.newageproducts.com
The NewAge grill comes factory set for use with Natural Gas. To use Propane, a conversion kit must be
installed. It is critical that the gas you use matches that which the grill was set up for. The gas conversion
kit should be installed by a qualied technician. The kits come with complete installation instructions.
These instructions should be read completely and fully understood before installing the conversion kit. Any
other kit or orices used that are not of NewAge brand, will automatically void any warranty on the unit.
Furthermore, it is important to understand that where ever there is a burner, there is an orice that will need
to be changed (do not forget the rotisserie).
Gas Conversion Kits
You should purge the gas line of air before attempting to light the grill.
• Make sure all grill controls are in the“OFF”position.
• Slowly turn on the main gas supply.
• Open the lid for the entire purging procedure.
• Push in the control knobs (do not turn)for the rotisserie burner and the burner on the furthest right for
about 20 seconds to allow the air in the system to purge. These are furthest from the fuel source and will
completely purge the lines. Release the control knobs.Wait at least 5 minutes after releasing the control
before attempting to light the burners.
Gas Line Purging
Gas Hook-Up Instructions
Instructions for Installer (Gas Fitter)
BUILT IN PROPANE GAS HOOK-UP: The piping up to the gas grill is the responsibility of the installer
and piping should be located as shown in the built-in instructions. Do not use a hose to connect the unit
except to connect the cylinder regulator to the piping system. It must be connected with rigid pipe, copper
tube or an approved flexible metal connector which complies with Z21.24/ CSA 6.10 or ANS Z21.75/CSA
6.27.
The installation must comply with CAN B149.1 Natural Gas and Propane installation code in Canada, or
to the National Fuel Gas code, ANS Z223.1 in the United States. The gas supply pipe must be suciently
sized to supply the BTU/h specied on the rating plate, based on the length of the piping run. If installing
a side burner, a separate line must be branched o to the side burner unit and enter the side burner
opening at the specied location. If the enclosure is to house a propane cylinder, the tank portion of the
enclosure must be ventilated according to local codes, and must not have communication with the cavity
used to enclose the gas grill. A propane cylinder can not be stored below the gas grill.
BUILT IN CYLINDER ENCLOSURES: Built in cylinder enclosures which completely enclose the cylinder
must have both of the following:
1. At least one unobstructed ventilation opening on the exposed exterior side of the enclosure located
within 5 in (127mm) of the top of the enclosure. The opening must have a total free area of more than 20
in (130 cm2) for a 20 lb (9.1 kg) cylinder and 30 in(195 cm2) for a 30 lb (13.6 kg) cylinder.
2. At least one ventilation opening on the exposed, exterior side of the enclosure located 1 in (25.4 mm) or
less from the oor level. The opening must have a total free area of more than 10 in
(65 cm2) for a 20 lb(9.1 kg) cylinder and 15 in2(100 cm2) for a 30 lb (13.6 kg) cylinder. The upper edge must
be no more than 5 in (127 mm) above the oor level.
Every opening must be large enough to permit the entrance of a 1/8 in (3.2 mm) rod.
PARTITION WALL
TO ISOLATE CYLINDER
FROM GRILL
NON LOCKING DOOR
36”(914mm)
RECOMMENDED
OPENING (A)
OPENING (B)
5”(127mm)
MAXIMUM
5”(127mm)
MAXIMUM
1”(25.4mm)
MAXIMUM
CYLINDER
OPENING(A) AREA
OPENING (B) AREA
20 lb (9.1kg) MAX 20in2(130cm2) 10in2(65cm2)
1-1/4”(31.8mm)
MINIMUM
23”(584mm)
MINIMUM
33”(838mm)
MINIMUM
• The cylinder valve(s) must be readily accessible for hand operation. A door on the enclosure to
gain access to the cylinder valves is acceptable, provided it is non-locking and can be opened
without the use of tools.
• The enclosure for the LP-gas cylinder must isolate the cylinder from the burner compartment
to provide shielding from radiation, a flame barrier, and protection from foreign material, such
as hot drippings. The enclosure cannot be located directly below the grill.
• There must be a minimum clearence of 2 in(51 mm) between the floor of the LP-gas
encloseure and the ground.
• The enclosure must be designed so that the LP-gas cylinder can be connected, disconnected
and the connections inspected and tested outside the cylinder enclosure. Any connections
that can be disturbed when installing the cylinder in the enclosure must be accessible for
testing inside the enclosure.
• Only 1 max 20 lbs tank in service should be used with the grill.
• WARNING! The upper vent opening must be at least 20 square inches for a 20 lb (9.1 kg)
propane cylinder.
• The lower vent opening must be at least 10 square inches for a 20 lb (9.1 kg) propane cylinder.

28 29
www.newageproducts.com www.newageproducts.com
• Newage Grill must be assembled and installed according to the instructions in the manual.
• Read the entire instruction manual prior to operating grill.
• NewAge Grill must be used outdoors in a well ventilated area, and cannot be used indoors, in a enclosed
area such as a garage, gazebo, screened in porch or other similar enclosed area.
• The NewAge Grill cannot be installed in or on a recreational vehicle, or boat.
• Face the front of the grill towards the prevailing wind. High winds can cause ame blowouts.
• Do not modify the NewAge Grill.
• Do not operate the NewAge Grill under, or near combustible construction.
• Maintain proper clearance to combustibles, 18”(457 mm)to rear of unit, 10”(254mm) to sides. Additional
clearance of 32”(810mm) is recommended near vinyl siding or panes of glass.
• When not in use turn o the gas at the supply valve.
• If using a L.P cylinder (propane tank) always shut o the main valve on the L.P. cylinder after each use.
• Never use dented, rusty or damaged propane cylinders.
• A spare LP propane tank cannot be stored below the gas grill.
• Never attach or disconnect an LP cylinder, or move or alter gas ttings when the grill is in operation or is
hot.
• Use only propane cylinders with a QCC1 type connection.
• When the propane cylinder is connected to the appliance, the gas grill and cylinder must be stored
outdoors in a well-ventilated space.
• When the gas grill is to be stored indoors, the connection between the propane cylinder and the gas grill
must be disconnected and the cylinder removed and stored outdoors in a well ventilated space out of
reach of children. Disconnected cylinders must not be stored in a building, garage or any other enclosed
area.
• Natural gas units must be disconnected from the supply when being stored indoors.
• Inspect the fuel supply hose before each use. If there is evidence of excessive abrasion or wear or the
hose is cut, it must be replaced prior to using the gas grill with a replacement hose assembly specied by
the grill manufacturer.
• Leak test the unit before initial use, annually, and whenever any gas components are replaced.
• Use only a Ground Fault Interrupter (GFI) protected circuit with this outdoor cooking gas appliance.
• Follow lighting instructions carefully when operating grill.
Safe Operating Practices
• Burner controls must be o when turning supply cylinder valve on.
• The grill hood must be fully opened while lighting the grill. Failure to do so will risk an explosion, and
personal injury or death.
• Never lean over the grill and keep face away from grill when lighting.
• Always use a covered hand when opening the grill lid and only do so slowly to allow heat and steam to
escape.
• Do not leave grill unattended when operating.
• Do not use aluminum foil to line drip pans or grill grates or radiants. This can severely upset combustion
air ow or trap excessive heat in the control area. The result of this can be melted knobs or damaged
ignition components.
• Adults and children should be instructed on the hazards of high surface temperatures. Never leave
children unsupervised around the NewAge Grill.
• Never touch the grill racks, hood or immediate surronding metal surfaces with your bare hands while
grilling.
• The NewAge Grill must be cooled before it is covered. Never place the cover on when cooking or while
hot.
• Keep all electrical cords and gas supply lines away from heated surfaces.
• Never grill without the drip pan installed. Hot grease can leak down and produce a re or explosion.
• Clean grease trays regularly to prevent grease res.
• Spiders and insects like to nest in the burners, venturis, valves and orices of a grill, disrupting the gas
ow. This very dangerous condition can cause a re behind the control panel, damaging the grill and
risking personal injury. If your grill has been unused for a long time, inspect and clean the burners,
venturis, valves and orices.
• Clean the grill with caution. Avoid steam burns; do not use a wet sponge or cloth to clean the grill while
it is hot. Some cleaners produce noxious fumes or can ignite if applied to a hot surface.
• Do not locate, store or operate the grill on an inclined plane. Make sure you lock the castor wheels before
operating the grill.
• Do not use charcoal or lighter uid in the outdoor grill.
• Do not move the appliance during use.
• Do not use a power washer to clean the NewAge Grill.
• Always have an ABC Fire Extinguisher accessible — never attempt to extinguish a grease re with water
or other liquids.
Safe Operating Practices cont.

30 31
www.newageproducts.com www.newageproducts.com
Safe Operating Practices cont.
• If the grill is installed by a professional installer or technician, be sure that he/she shows you where your
gas supply shut-o is located. All gas lines must have a shut-o that is readily and easily accessible. If you
smell gas, check for gas leaks immediately. Check only with a soap and water solution.
• Never remove the grounding prong from the plug or use this product with an ungrounded, 2-prong
adapter.
THIS MANUAL MUST REMAIN WITH THE PRODUCT OWNER FOR FUTURE REFERENCE
Pre-Grill Checklist
Before FIRST use ensure that:
Before Each Use:
1. All packaging, and packing materials have been removed from the Grill and burners
2. You have a fuel supply connected.
3. All electrical parts are connected.
4. A qualied gas tter has performed a leak test on all the ttings that supply the fuel to the grill.
5.If your Grill does not light in 4-5 seconds you may need to purge the line. (refer to purging the line)
6. Before cooking on your gas grill for the rst time a burn-o needs to be done. This is a one time only
procedure and gets rid of any odors or foreign matter caused by the manufacturing process.To do this open
the lid and ignite the burners, close the lid and operate on“MAX”for 5-10 minutes.You may then either set
the controls to “OFF”or cook on your grill immediately by turning the control knobs to a lower setting.
1. Never attempt to light a burner if you smell gas.
2. Always keep the lid open when lighting your grill.
3. Releasing fuel into a closed grill before lighting will increase the risk of explosion,
property damage, personal injury or death.
4. Keep your face and body as far from the grill as possible when lighting. Any time a
burner doesn’t light within 5 seconds, turn off the control, wait 5 minutes for gas to
dissipate, and repeat the lighting procedure.
5. NEVER LEAVE THE GRILL UNATTENDED WHILE COOKING.
Aways make sure that:
1. You do not smell gas before you light the grill. If you do smell gas, shut everything off and have a qualified
fitter check for leaks.
2. The cooking area is free and clear of any combustibles, that might ignite.
4. If you are using a refillable propane cylinder, it is securely connected and leak tested. (See Leak testing on
page 28)
5. You know where the main gas supply shut-off is located.
6. The burners are seated properly in the grill. The main burners must sit level and firmly on the burner
mounting support frame.
7. Wind is not blowing too strongly or blowing on the back of grill.
!
WARNING
Once a Season
At the start of each new grilling season remove the grilling racks and check the burners, venturis, orifices
and valves for obstructions.
Spiders and insects often nest in these areas of the grill and can disrupt air flow, causing damage to the grill
and personal injury.
Also, check all hoses and fittings for damage, abrasion, wear and tear.
WARNING
Leak Testing Instructions
This must be done before initial use, annually, and whenever any gas components
are replaced or serviced. Do not smoke while performing this test, and remove all
sources of ignition. See Leak Testing Diagram for areas to check. Never conduct a
leak test using re or ame. Sparks or open ames will result in a re or explosion,
damage to property, serious bodily injury, or death.
STOP
!
Testing for a Gas Leak:
Ensure all control knobs are in the o position.
Turn on the fuel supply.
-For natural gas, turn the valve handle 1/4 turn to align with the gas ow.
-For L.P turn the cylinder valve knob counter clockwise one full rotation.
Brush or spray a half-and-half solution of liquid soap and water onto all joints and
connections of the regulator, hose, manifolds and valves.
Bubbles will indicate a gas leak. IMMEDIATELY turn off the gas supply.
See next page (29) for“Fixing a Gas Leak”.
Leak Testing Diagram
50% WATER
50% LIQUID
SOAP
Natural Gas Spray
or
Brush

32 33
www.newageproducts.com www.newageproducts.com
Leak Testing Diagram
LP Propane
50% WATER
50% LIQUID
SOAP
Spray
or
Brush
Fixing a Gas Leak:
Shut o the gas supply.
Turn all grill controls to the “ON”position to purge the grill of any gas build-up, then turn the controls back
“OFF”.
Wash o the soapy solution with cold water and dry.
Tighten the loose joint, or replace the faulty part with manufacturer-recommended replacement parts.
DO NOT attempt to repair the L.P. cylinder valve if it is damaged. The only way to safely resolve a damaged
cylinder is to REPLACE IT.
Repeat the leak test to ensure that no leaks are present.
If the leak cannot be stopped, immediately shut o the gas supply, disconnect it, and have the grill
inspected by a certied gas installer or dealer. Do not use the grill until the leak has been corrected.
WARNING: ELECTRICAL GROUNDING
• Product installation must meet local electric codes or, in the absence of local
codes, the latest edition of the National Electrical Code ANS/NFPA No. 70 or the
Canadian Electrical Code CGA 1.6b2005.
• Use only a Ground Fault Circuit Interrupter (GFCI) protected circuit with this outdoor
cooking gas appliance.
• IMPORTANT: When connecting your rotisserie motor, rst connect the motor to the grill
and then plug the grill into the outlet.
!
Electrical Connections
WARNING: ELECTRICAL GROUNDING
!
Electrical Connections cont.
Connection to AC
Installation requires an outdoor 120VAC 15A GFCI (Ground Fault Circuit Interrupter) electrical outlet
adjacent to the grill.
The GFCI outlet features an internal breaker that reduces shock hazard. This type of outlet should
be installed by a qualied electrician either inside the island enclosure for built-in units, or near the
location where a free-standing unit will be used.
If the electrical system fails to operate, a connection may have come loose in shipping or the GFCI may have
tripped, requiring a reset.
• Product installation must meet local electric codes or, in the absence of local
codes, the latest edition of the National Electrical Code ANS/NFPA No. 70 or the
Canadian Electrical Code CGA 1.6b2005.
• Use only a Ground Fault Circuit Interrupter (GFCI) protected circuit with this outdoor
cooking gas appliance.
• This gas apliance is equipped with a three prong (grounded) electric plug for your
protection against shock hazard and must be plugged directly into a properly
grounded three prong outlet. Never cut or remove the grounding prong from this plug.
• Use only extension cords with a 3 prong grounding plug, rated for the power of the
equipment, and approved for outdoor use with a “W-A” marking.
• To protect against electric shock, do not immerse any part of the power cord, an
extension cord or any plugs in water or other liquid.
• Unplug the product from the outlet when not in use and before cleaning. Allow it to
cool before putting on or taking o parts.
• Do not let the cord hang over the edge of a table or touch hot surfaces.
• Do not use an outdoor cooking gas appliance for purposes other than intended.
• Do not operate any outdoor cooking gas appliance with a damaged cord, plug, or
after the appliance malfunctions or has been damaged in any manner. Contact the
manufacturer for repair.
34 35
www.newageproducts.com www.newageproducts.com
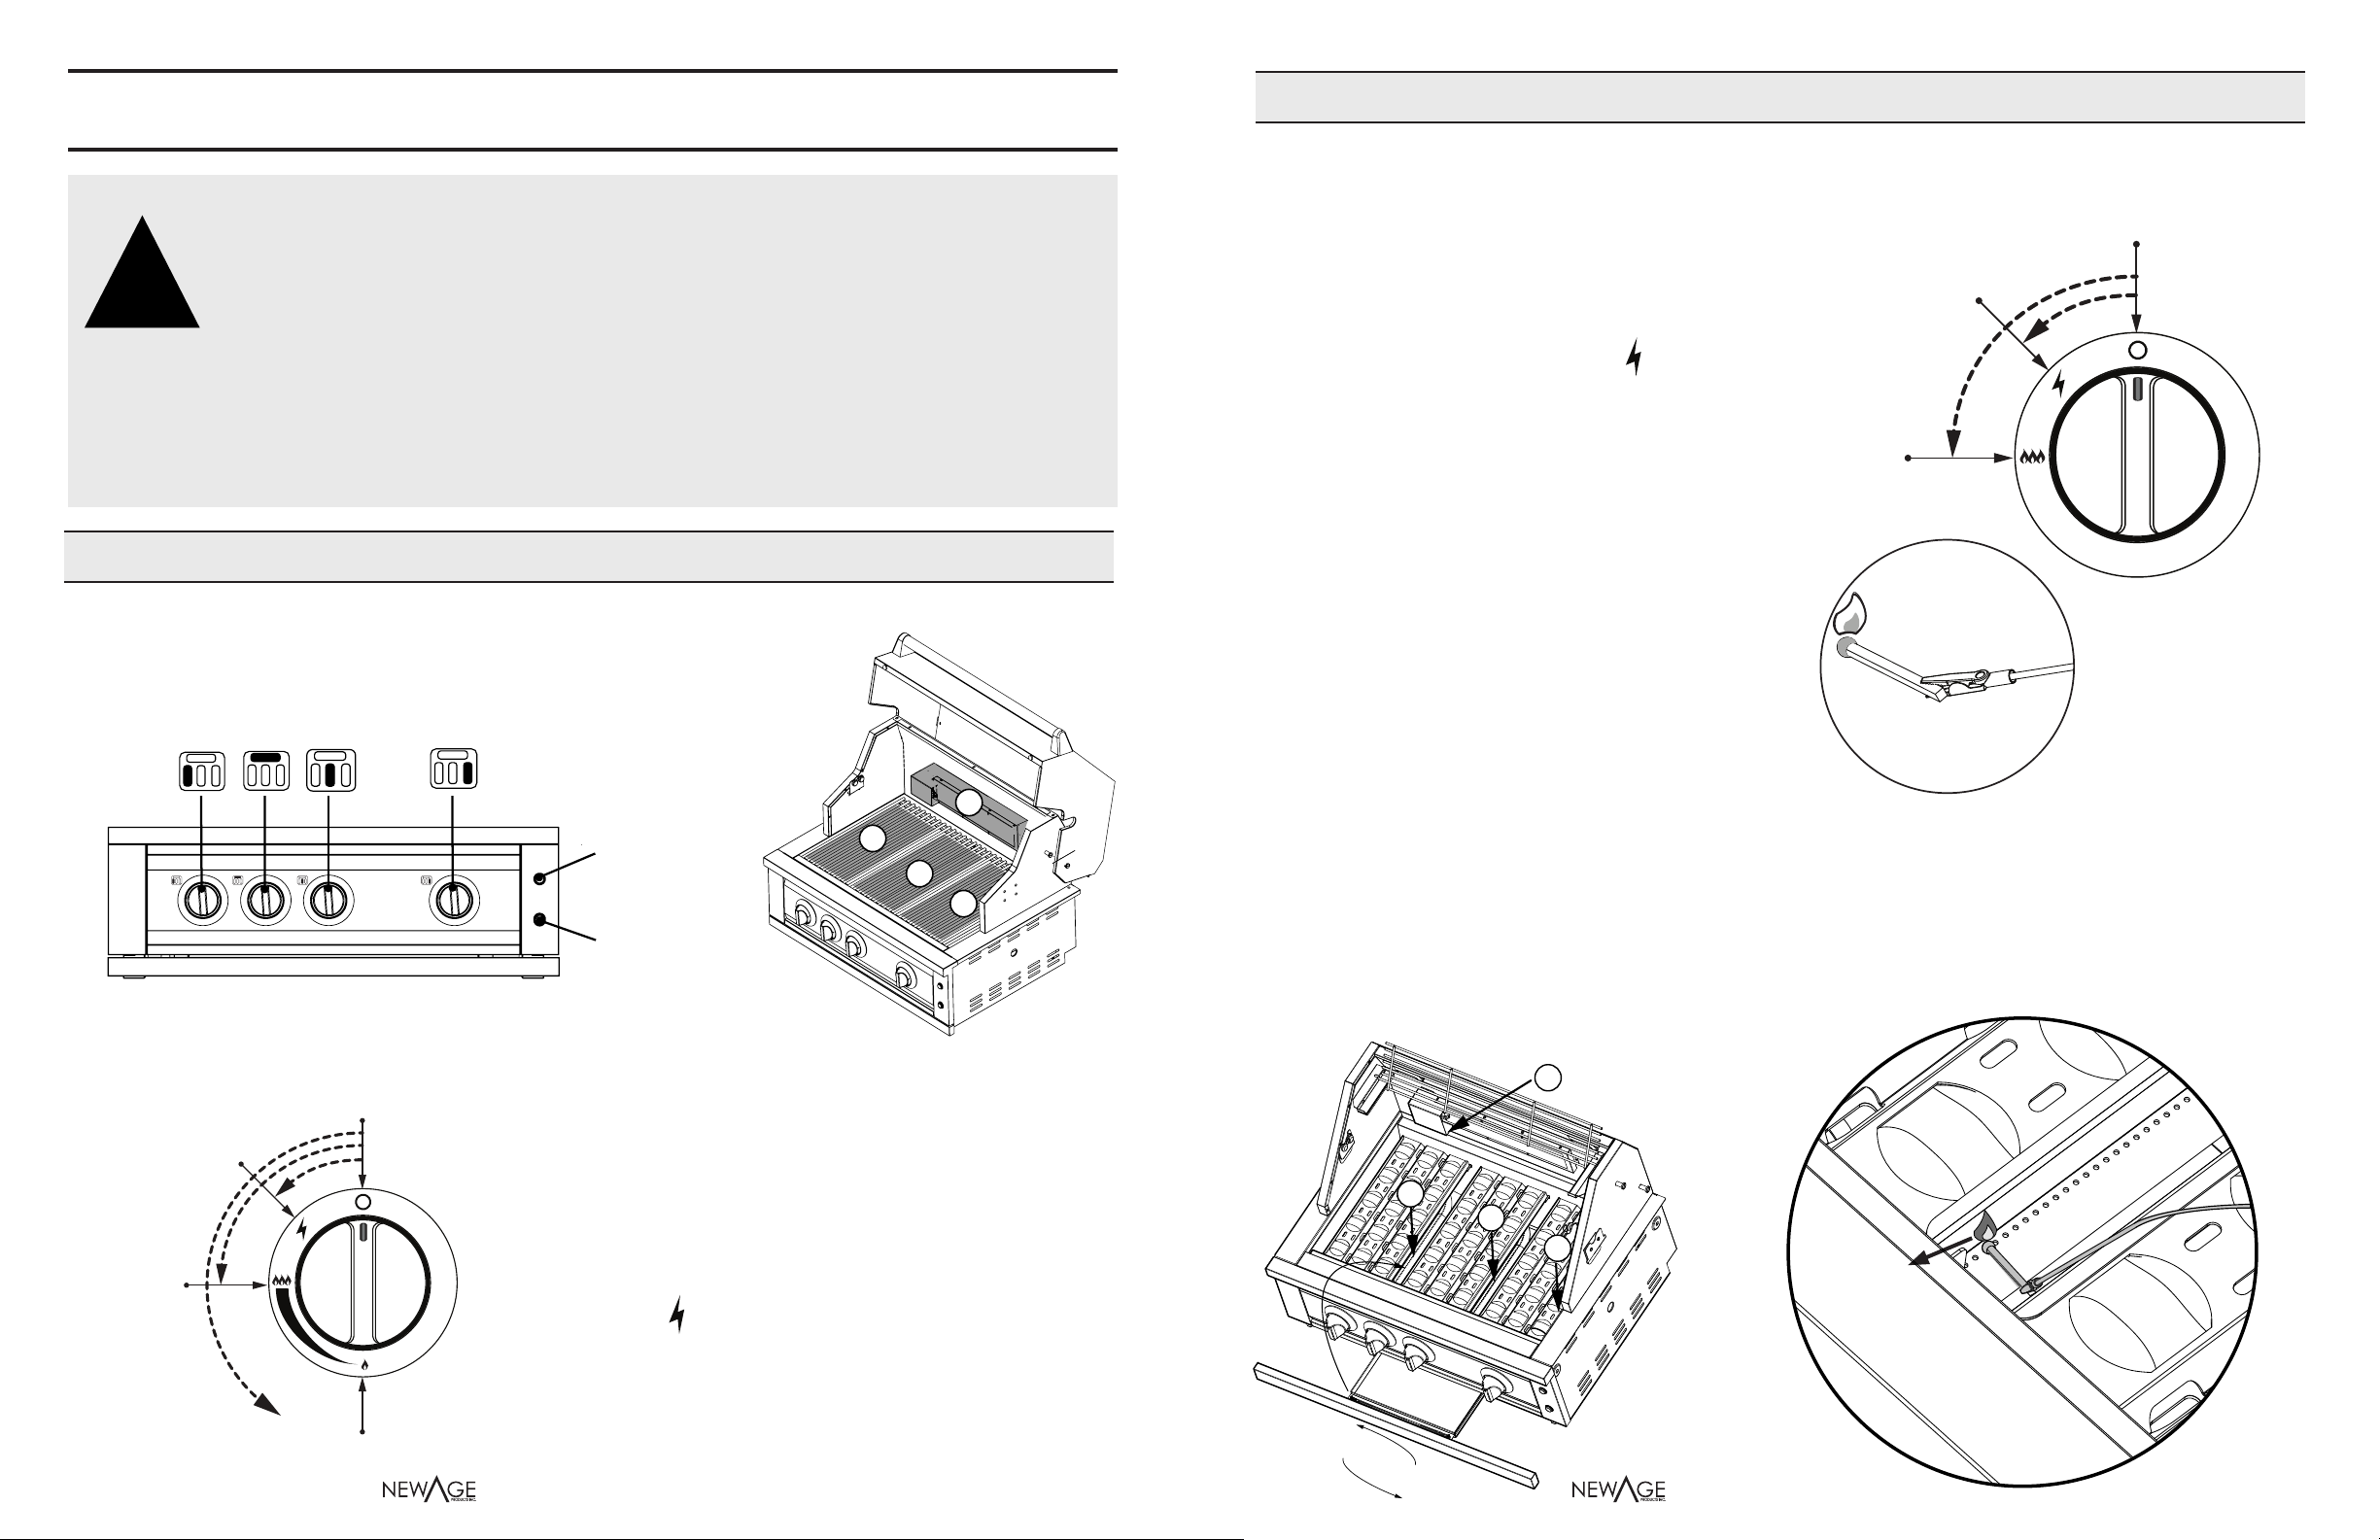
Lighting the Grill
CAUTION: Do not leave the grill unattended.
WARNING: Never leave children unsupervised around the NewAge grill. Do
not store items of interest to children around or below the grill, or in the
cabinet. Never allow children to crawl inside a cabinet or enclosure.
CAUTION: Never light the grill if you smell gas.
CAUTION: Keep face and body parts away from the grill when lighting.
If burner fails to light after 5 seconds, turn o the burner, wait 5 minutes
then repeat the lighting procedure.
WARNING: Always keep the lid open when lighting the grill.
!
33”Version
LED Accent
Lights
Grill Task
Lighting
1 2 3 4
1
34
2
Grill Control Layout
1. Left Burner | 2. Rotisserie Burner | 3. Middle Burner | 4. Right Burner
OFF
Ignition
Point
High
Temperature
Low
Temperature
ELECTRIC IGNITION for MAIN BURNERS(3,4,and 5):
1. Read and complete PRE-GRILL checklist.
2. Make sure all control knobs are set to o.
3. Always light grill with lid open.
4. Turn fuel supply on.
5. Push in, turn the control knob counter-clockwise to the
ignition point ( )and. hold in for 5 seconds until the
burners ignite. It will immediately be on high.
6. Once the grill is lit, adjust the temperature using the Max
-to- Min settings.
ELECTRIC IGNITION for ROTISSERIE Burner:
1. Read and complete PRE-GRILL checklist.
2. Make sure all control knobs are set to o.
3. Always light grill with lid open.
4. Turn fuel supply on.
5. Push in, turn the control knob counter-
clockwise to the ignition point ( )and.
hold in for 5 seconds until the burners
ignite. It will immediately be on high.
MANUAL LIGHTING:
If the burners fail to light after a couple of
attempts, it can be lit using the supplied
match lighting stick. Follow the steps below
for manual grill lighting.
1. Read and complete PRE-GRILL checklist.
2. Make sure all control knobs are set to o.
3. Always light grill with lid open.
4. Turn fuel supply on.
5. Place a match in the aligator clip on the match holder and light the match.
6. Guide the match holder, with lit match, through the access holes the ceramic briquette tray and
adjacent to the left burner.
7. Push the left control in and turn it to HIGH to ignite the left burner. Check that the ame is lit
by looking through the cooking grates. You should see a ame.
8. Repeat steps 4 through 6 for the remaining burners. If any of the burners fails to ignite during
the lighting process, within ve seconds, stop, turn the burner control knob to OFF and wait ve
minutes to allow the gas to clear before you try again.
OFF
Ignition
Point
High Temperature
Grill Control Knob and Manual Lighting
UNWIND
FROM TWO
STANDOFFS
1
2
2
2
Figure 1.
A.

36 37
www.newageproducts.com www.newageproducts.com
General Grill Operation and Cooking Procedures
Preheating: It is necessary to preheat the grill for a short time before cooking certain foods, depending
on the type of food and the cooking temperature. Pre-heating allows the briquettes to properly heat up,
providing more even and more consistent cooking results. Allow the grill to pre-heat on “HI”until desired
temperature is reached. Use the hood thermometer to achieve required preheating temperature. There is no
need to preheat for casseroles or other foods that require slow cooking.
Cooking Temperatures
HIGH Setting - Use this setting only for fast warm-up, for searing steaks and chops, and for burning food
residue from the cooking grids after the cookout is over.
MEDIUM Setting - Use this setting for most grilling, roasting or baking, and for cooking hamburgers and
vegetables.
LOW Setting - Use this setting for all smoke cooking, rotisserie cooking, and when cooking very lean cuts
such as sh.
These temperatures vary with the outside temperature and the amount of wind.
CAUTION: Do not leave the grill unnattended.
WARNING: Never leave children unsupervised around the NewAge grill.
WARNING: Never cover slots, holes, or passages in the grill re box
or cover an entire rack with material such as aluminum foil. Doing so
blocks air ow through the oven and may cause carbon monoxide
poisoning.
Aluminum foil linings may trap heat causing a re hazard
Pre-heating for more than 15 minutes may overheat and cause
damage to the grill.
DANGER: Do not put grill in storage immediately after use. Allow grill
to cool to touch before moving or storing.
!
!
Figure 2.
Grill Control Knob and Manual Lighting
Insert BBQ lighter
inbetween grill
grates, briquette
trays to burner.
Direct Cooking: This method involves placing the food directly over the lighted burners. This is a common
way to cook foods that take less than 20 minutes or to sear larger foods at the beginning of the cooking
process. Turning too soon and too often is one of the most common grilling mistakes. Never spray water on
the grill or into grease. Use a meat thermometer to achieve desired doneness and remove items one degree
below how you would like to enjoy them, as the resting period before carving or consuming will raise the
temperature.
Indirect Cooking: You can cook larger foods slowly to perfection on one side of the grill by using indirect
heating technique. This can be achieved by leaving the burners directly below the food“OFF”and igniting
the burners to the side of the food. The heat from the lighted burner circulates gently throughout the
grill, cooking the food without any direct ame touching it. This method greatly reduces are-ups when
cooking extra fatty cuts, because there is no direct ame to ignite the fats and juices that drip down during
cooking. Place a drip pan slightly smaller than the cut of meat on the cooking grids or ceramic briquettes
under the meat being cooked. This will allow you to catch meat juices for making gravy. Flare-Ups: The fats
and juices that drip from the meat cause are-ups. Since are-ups impart the distinctive taste and color for
food cooked over an open ame, they should be expected and encouraged within reason. Nevertheless,
uncontrolled aring can result in a ruined meal. To control excessive are- ups caused by too high a heat
setting, turn the heat control knob to a lower setting.
CAUTION:If burners go out during operation, close gas supply at source, and turn all gas valves o.
Open lid and wait ve minutes before attempting to re-light (this allows accumulated gas fumes to
clear).
CAUTION: Should a grease re occur, close gas supply at source, turn o all burners and leave lid
closed until re is out.
CAUTION:Do not attempt to disconnect any gas tting while your barbecue is in operation.
Rotisserie Cooking
Rotisserie is mostly used to cook large pieces of meat and poultry to assure slow, even cooking. The constant
turning provides a self-basting action, making food cooked on a rotisserie exceptionally moist and juicy.
Rotisserie cooking generally requires 1 ½ to 4½ hrs to cook depending on the size and type of meat being
cooked. You can have rotisserie cooking with indirect heat as shown or with infrared rotisserie burner.
For successful rotissering, the meat should be centered and balanced as evenly as possible on the spit rod
to avoid overworking the rotisserie motor.
Since indirect heat is often used in cooking on a rotisserie, a foil or aluminum drip pan is advisable to
prevent excessive are-ups. Generally, the cooking grills are removed to allow for the swing of the rotisserie.
A basting pan is placed under the rotisserie area on top of the ceramic briquettes to catch the drippings.
WARNING: Warming Rack must be tilted back when Rotisserie
Burner is being used.
Grill Operations cont.
38 39
www.newageproducts.com www.newageproducts.com
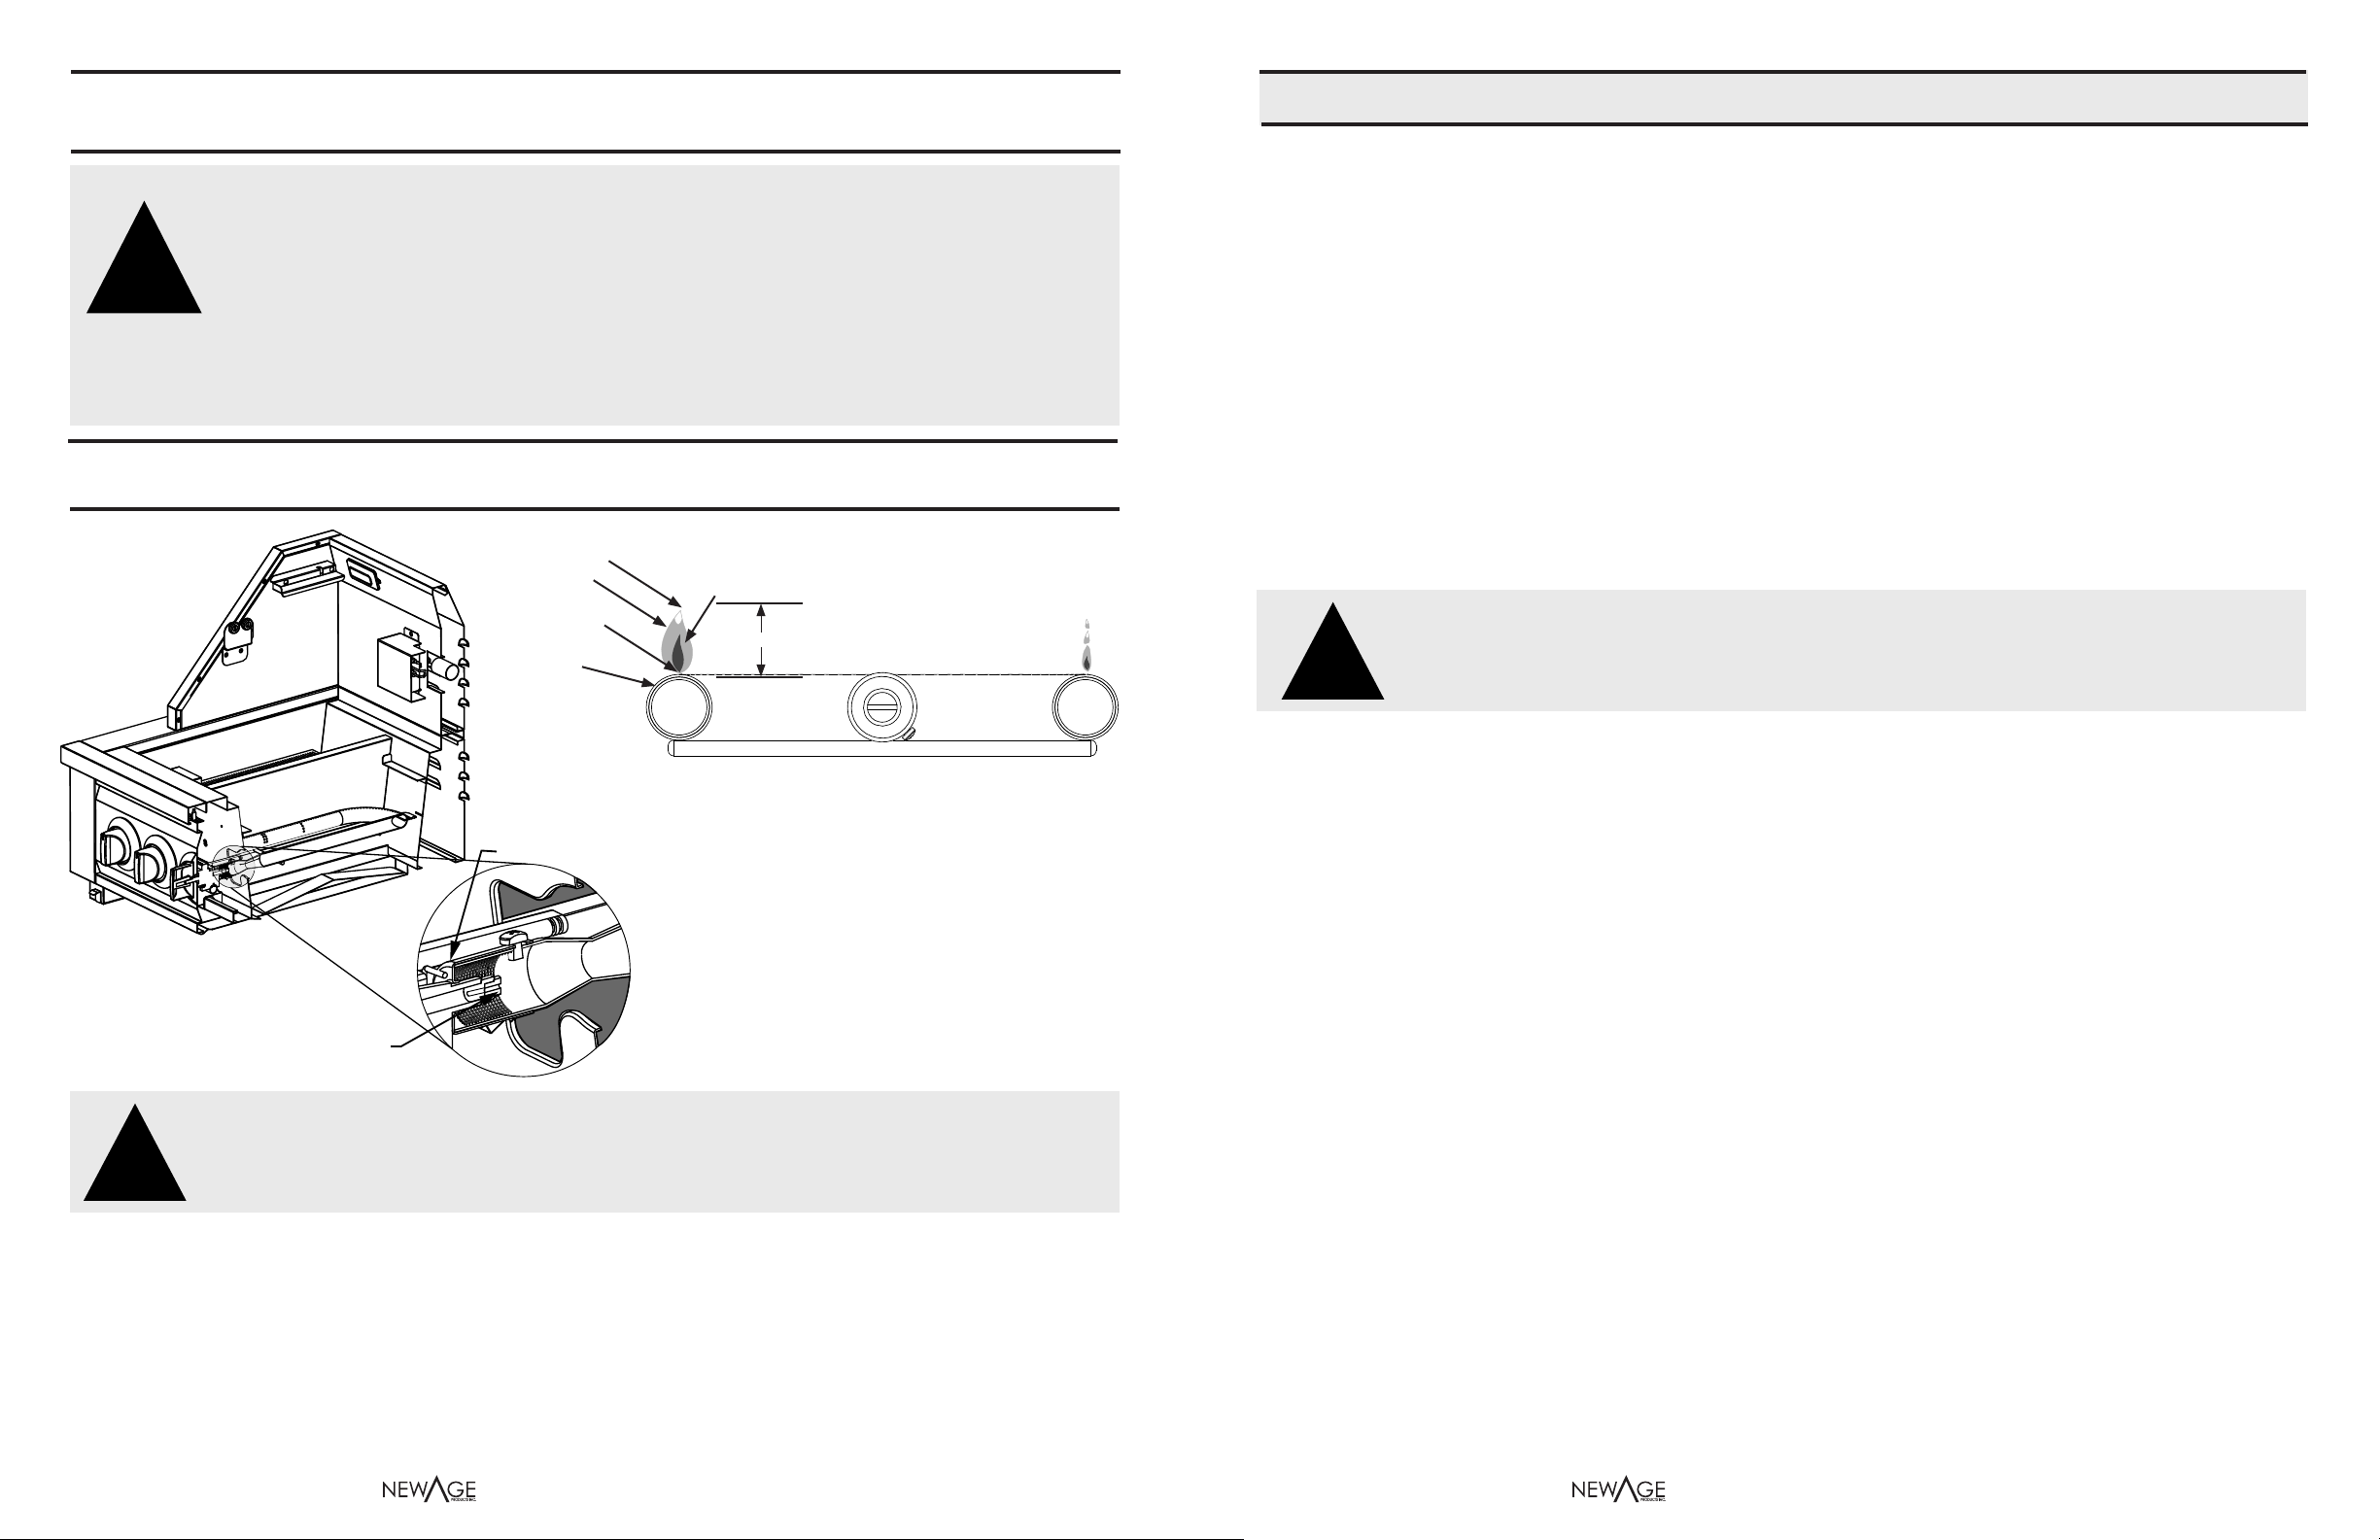
Proper Burner Position and Operation
Valve with Orifice
Burner Position
Proper Flame Improper Flame
1/2” (13mm) Flame Height
YELLOW TIPPING
LIGHT BLUE DARK BLUE
SPUTTERING
FLAME
BURNER
BURNER PORT
1. Check burner installation by insuring
that the valve orifice body is securely
inserted into the end opening of the
burner tube. (see Image 1)
2. To check for proper flame. Turn burner
on high and compare to (image 2) for
proper flame consistancy.
CAUTION: Turn o gas at source and disconnect the unit before servicing.
To avoid the possibility of burns, maintenance should be done only when
the grill is cool. A leak test must be performed anually and whenever any
component of the gas train is replaced or gas smell is present.
!
Grill Maintenance and Cleaning
Cleaning the cooking grids:
After cooking, turn control knobs to“OFF”and let grill cool before attempting to clean your cooking grates.
Before rst use and periodically it is suggested that you wash the cooking grids in a mild soap and warm
water solution. You can use a washcloth or a vegetable brush to clean your cooking grates.
CAUTION: Proper placement of each burner is critical after cleaning they must be
centured on the brass orice, resting level without any rocking.Failure to meet
these conditions may cause a very dangerous condition that can cause personal
injury and property damage.
IMPORTANT: Gas control knobs should be in the‘OFF” position, and fuel
line should be disconnected from gas valve manifold. To reduce the chance
of FLASHBACK, the procedure below should be followed at least once a month or
when your grill has not been used for an extended period of time.
!
Cleaning the drip trays:
The drip tray should be cleaned after each use. After the grill is completely cool, remove the drip tray by
pulling it out until it comes free.
Clean it with hot soapy water or an oven-style cleaning product and re-install. When using an oven-style
cleaning product be sure to carefully follow the manufacturer’s instructions. Many of these cleaners are toxic
and can damage the stainless steel nish if not used properly. Test on a non-visible area of stainless steel
before using on full area.
Also, check the tray after rain. If you’ve left the grill uncovered, you may need to remove the drip tray to
drain the water from the tray.
Grill Maintenance and Cleaning cont.
Ceramic Briquettes:
The ceramic briquettes normally burn o any accumulated food drippings. But you may
occasionally experience larger spills that don’t burn o under normal use.
When this happens:
1. Let the grill cool completely. Remove the racks and then the briquette trays by lifting the front
edge and lifting them upward.
2. Flip the trays over and put them back in place over the burner.
3. Light the burners and set them to“MAX” for 5 - 10 minutes to burn the briquettes clean. Be sure
the trays have completely cooled before reinstalling them. Any remaining food items can be
brushed o using a soft brush.
Replacement briquette trays can be ordered from ShopNewAge.com
CAUTION: Do not allow excess grease or liquids to accumulate in the drip
tray as they may create a re hazard
Never use the grill without the drip tray installed.
!
Remove the Burners:
1. Remove the grill racks and briquette trays.
2. Unscrew the fasteners securing the burners to the tray.
3. Lift the burner up.
4. Then pull to the rear of the grill so the burner head comes o the brass orice at the front.
Cleaning the Burner:
• To maximize grill performance, clean the exterior of the burner with a abrasive scouring pad. Remove
stubborn scale with a metal scraper.
• Clear any clogged ports with a straightened paper clip. Never use a wooden toothpick as it may break o
and clog the port.
• Shake out any debris through the air shutter.
• Use a ashlight to inspect the burner inlet to ensure it is not blocked. If obstructions can be seen, clean it
with a paper clip or a pipe cleaner.
This manual suits for next models
1
Table of contents
Languages:
Other New Age Grill manuals


Popular Grill manuals by other brands


LotusGrill
LotusGrill CLASSIC instruction manual

Kusina
Kusina 600 Series Instruction and maintenance manual

Metos
Metos 263501 Installation and operation manual

Julien
Julien HOME REFINEMENTS KAMADO Installation and maintenance guide

Proluxe
Proluxe Progrill TW1520 Operation manual

RevoAce
RevoAce GBC1768WB owner's manual


