Active 5400 SVH Guide
Manuale di istruzioni per l’uso e la manutenzione
Safety and operation instruction
Manuel d’instructions et de mise en route
Bedienungsanleitung
Manual de instrucciónes y de mantenimiento
Gebruiks - en onderhoudshandleiding

2

3
ITALIANO .......................................... pag. 04
ENGLISH.............................. ........... pag. 14
FRANÇAIS........................................ pag. 24
DEUTSCH ....................................... pag. 34
ESPAÑOL .........................................pag. 44
NEDERLANDS ............................... pag. 54
Grazie per aver acquistato un rasaerba ACTIVE!
I rasaerba ACTIVE sono stati progettati e costruiti in modo da offrire ottime prestazioni. Leggete attenta-
mente questo manuale per poter capire le caratteristiche ed il corretto uso del Vostro raserba.
Particolare attenzione va prestata alle informazioni circa l’uso corretto in conformità ai requisiti essenziali
di sicurezza richiesti dalle vigenti Direttive Europee.
Fate attenzione ai simboli che incontrerete leggendo il manuale. Stanno ad indicare punti particolarmente
pericolosi ed aiutano a prevenire qualsiasi incidente.
Thank you for buying a ACTIVE product!
Your ACTIVE mower has been carefully designed, enginnered and manufactured to give good and
satisfactory performance. Review this manual to familiarize yourself with the unit, its features, its operation.
Pay particular attention to the European security rules. The symbols you find here in this manual indicate
particular dangerous points and help you to prevent accidents.
Nous vous félicitons d’avoir choisi une tondeuse ACTIVE!
Les tondeuses ACTIVE ont été conçues et réalisées pour offrir des performances de travail exceptionnelles.
Nous vous recommandons de lire attentivement ce manuel d’instructions pour prendre connaissance des
caractéristiques d’utilisation de votre tondeuse. Lisez attentivement les conseils de sécurité conformes
aux normes Européenes avant d’utiliser la tondeuse.Les symboles mentionnés dans ce manuel indiquent
un éventuel danger et vous aident à prévenir les accidents.
Wir danken lhnen für den Kauf eines ACTIVE Rasenmähers.
Der ACTIVE Rasenmäher ist für einen sicheren und zuverlässigen Betrieb konstruiert, wenn er gemäß
der Bedienungsanleitung verwendet wird. Lesen Sie diese Anleitung gründlich durch, bevor Sie den
Rasenmähers in Betrieb nehmen. Beachten Sie insbesondere die europäischen Sicherheitsvorschriften.
Die Symbole in dieser Anleitung weisen auf bestimmte Gefahrenpunkte hin, um Unfälle zu vermeiden.
Gracias por comprar un producto ACTIVE!
Su cortacésped ACTIVE ha sido cuidadosamente diseñado, motorizado y montado para proporcionar un
rendimiento óptimo. Revise este manual para familiarizarse con este aparato.
Ponga especial atencion en las normas de seguridad Europeas. Los simbolos que aparecen en este
manual le indican los puntos especialmente peligrosos y le ayudan a evitar accidentes.
U heeft een ACTIVE gazonmaaier gekozen, wij feliciteren u daarmee.
Wij weten dat u een veeleisende gebruiker bent, die geïnteresseerd is in de betrouwbaarheid en de
stevigheid, in het vermogen en de duur van het materiaal waarmee u werkt.
De handleiding met de Europese veiligheidsvoorschriften aandachtig doorlezen. Neem vooral de symbolen
van deze handleiding goed in acht. Zij duiden op gevaar en helpen ongelukken te voorkomen.
ITALIANO
ENGLISH
FRANÇAIS
DEUTSCH
ESPAÑOL
NEDERLANDS
ITALIANO
4
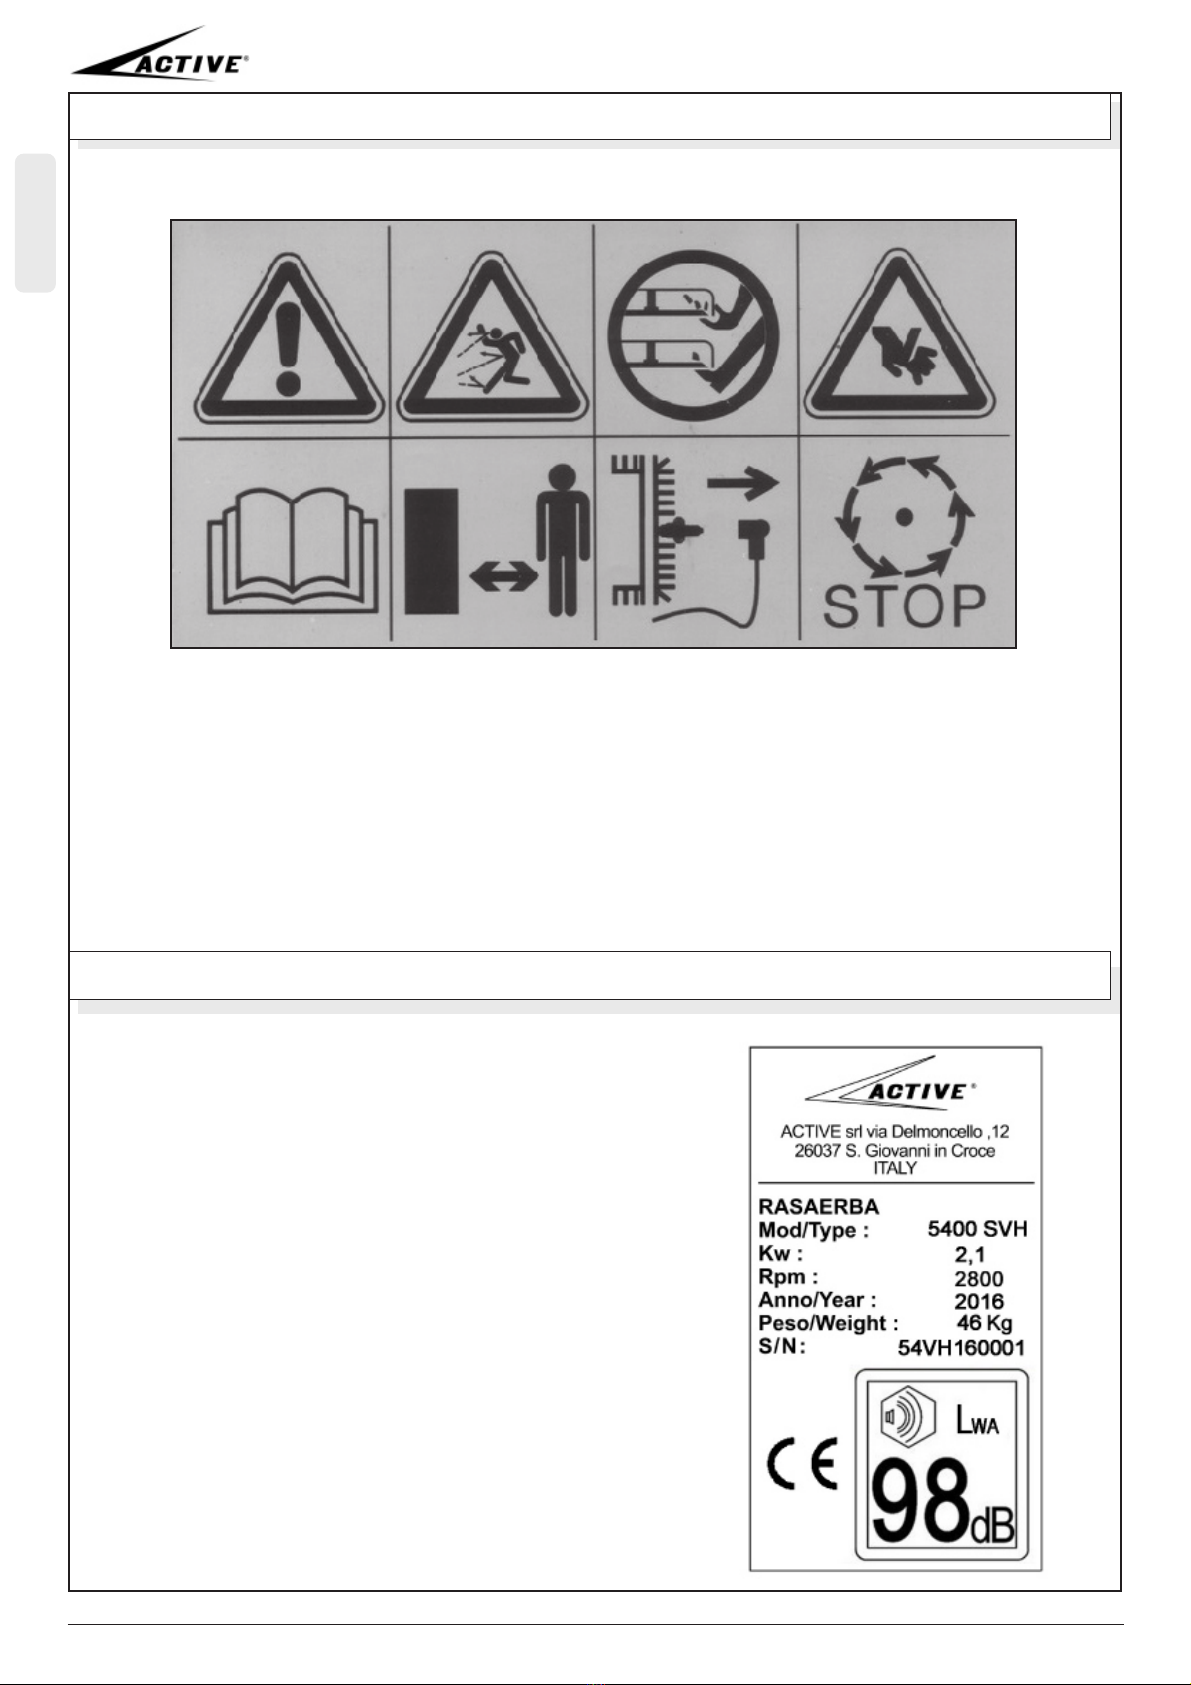
1) ETICHETTE DI SICUREZZA
1 2 3 4
5 6 7 8
1) Pericolo
2) Pericolo di proiezioni. Non utilizzare senza deflettore e cestello raccoglitore.
3) Pericolo gravi lesioni.
4) Pericolo di tagli.
5) Leggere il libretto di uso e manutenzione prima dell’utilizzo.
6) Tenere lontano terzi o animali durante l’utilizzo.
7) Scollegare la candela prima di ogni intervento di riparazione o manutenzione.
8) Fermare la rotazione della lama prima di svuotare il cestello.
2) ETICHETTA DI CONFORMITA’
L’etichetta di conformità riporta le principali carat-
teristiche di ogni modello di rasaerba, così come
previsto dalla normativa 2000/14/CE.
- nome e indirizzo del costruttore
- modello del rasaerba
- potenza netta
- n° giri
- anno di costruzione
- peso complessivo
- n° seriale
- marchio CE
- livello massimo di potenza acustica garantita

ITALIANO
5
Mod. 5300 SB Mod. 5850 SCH
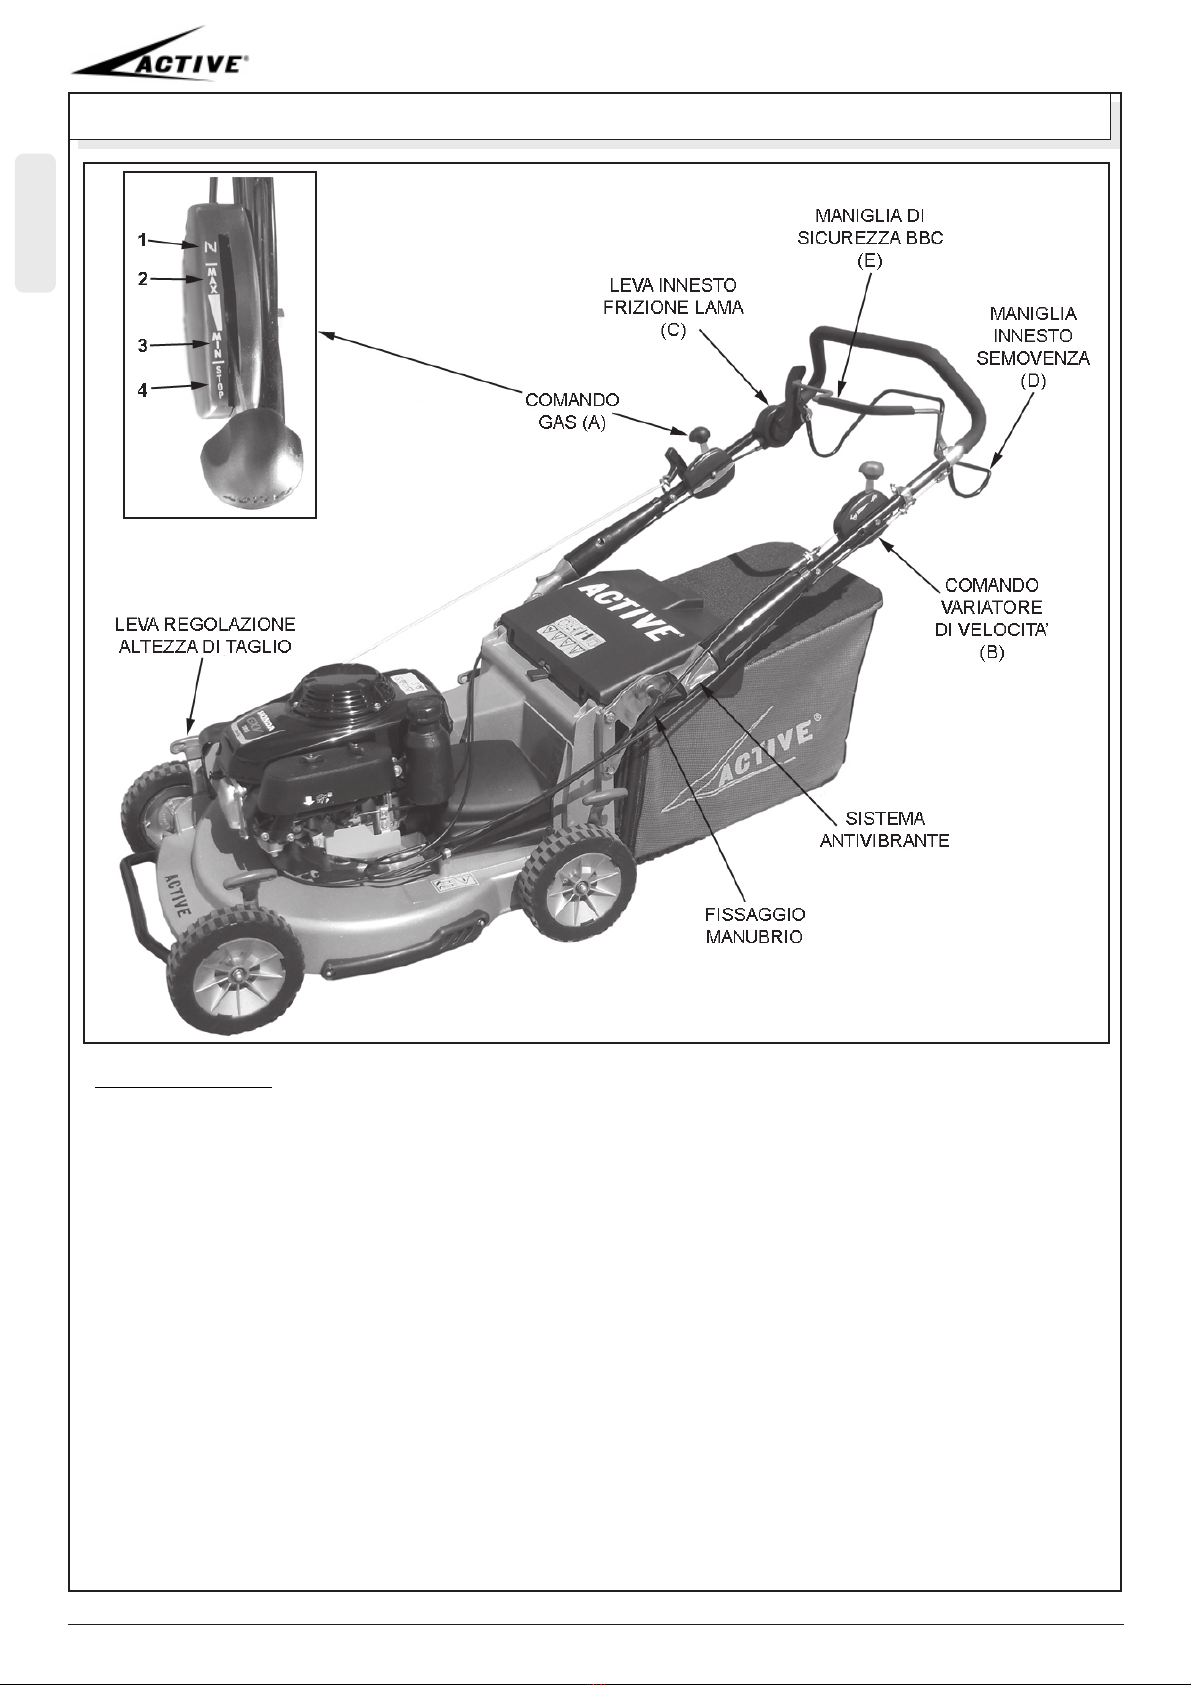
3) DESCRIZIONE DELLE PARTI
1 - Manubrio superiore
2 - Manubrio inferiore
3 - Comando gas
4 - Maniglia freno motore
5 - Maniglia semovenza
6 - Maniglia fissaggio manico
7 - Impugnatura avviamento
8 - Deflettore
9 - Ruota posteriore
10 - Ruota anteriore
11 - Carter
12 - Motore
13 - Lama
14 - Cestello raccoglierba
15 - Trasmissione
16 - Leva regolazione altezza taglio
17 - Comando cambio
4)
MONTAGGIO DEI COMPONENTI
Dopo aver sballato il rasaerba, aprire il
manubrio e avvitare a fondo le manopole
per bloccarlo. Per i modelli 5800 con manu-
brio fisso, utilizzare le viti presenti.
Montare il cestello di raccolta, facendo
scivolare il telaio nel sacco di tela, tenendo
l’impugnatura all’esterno. La maniglia del
telaio deve essere nella parte alta del
cestello,la base in plastica della tela sarà in
basso. Fissare i 4 lati del sacco aggancian-
do la guaina di plastica al telaio metallico.

ITALIANO
6
Briggs&Stratton Honda
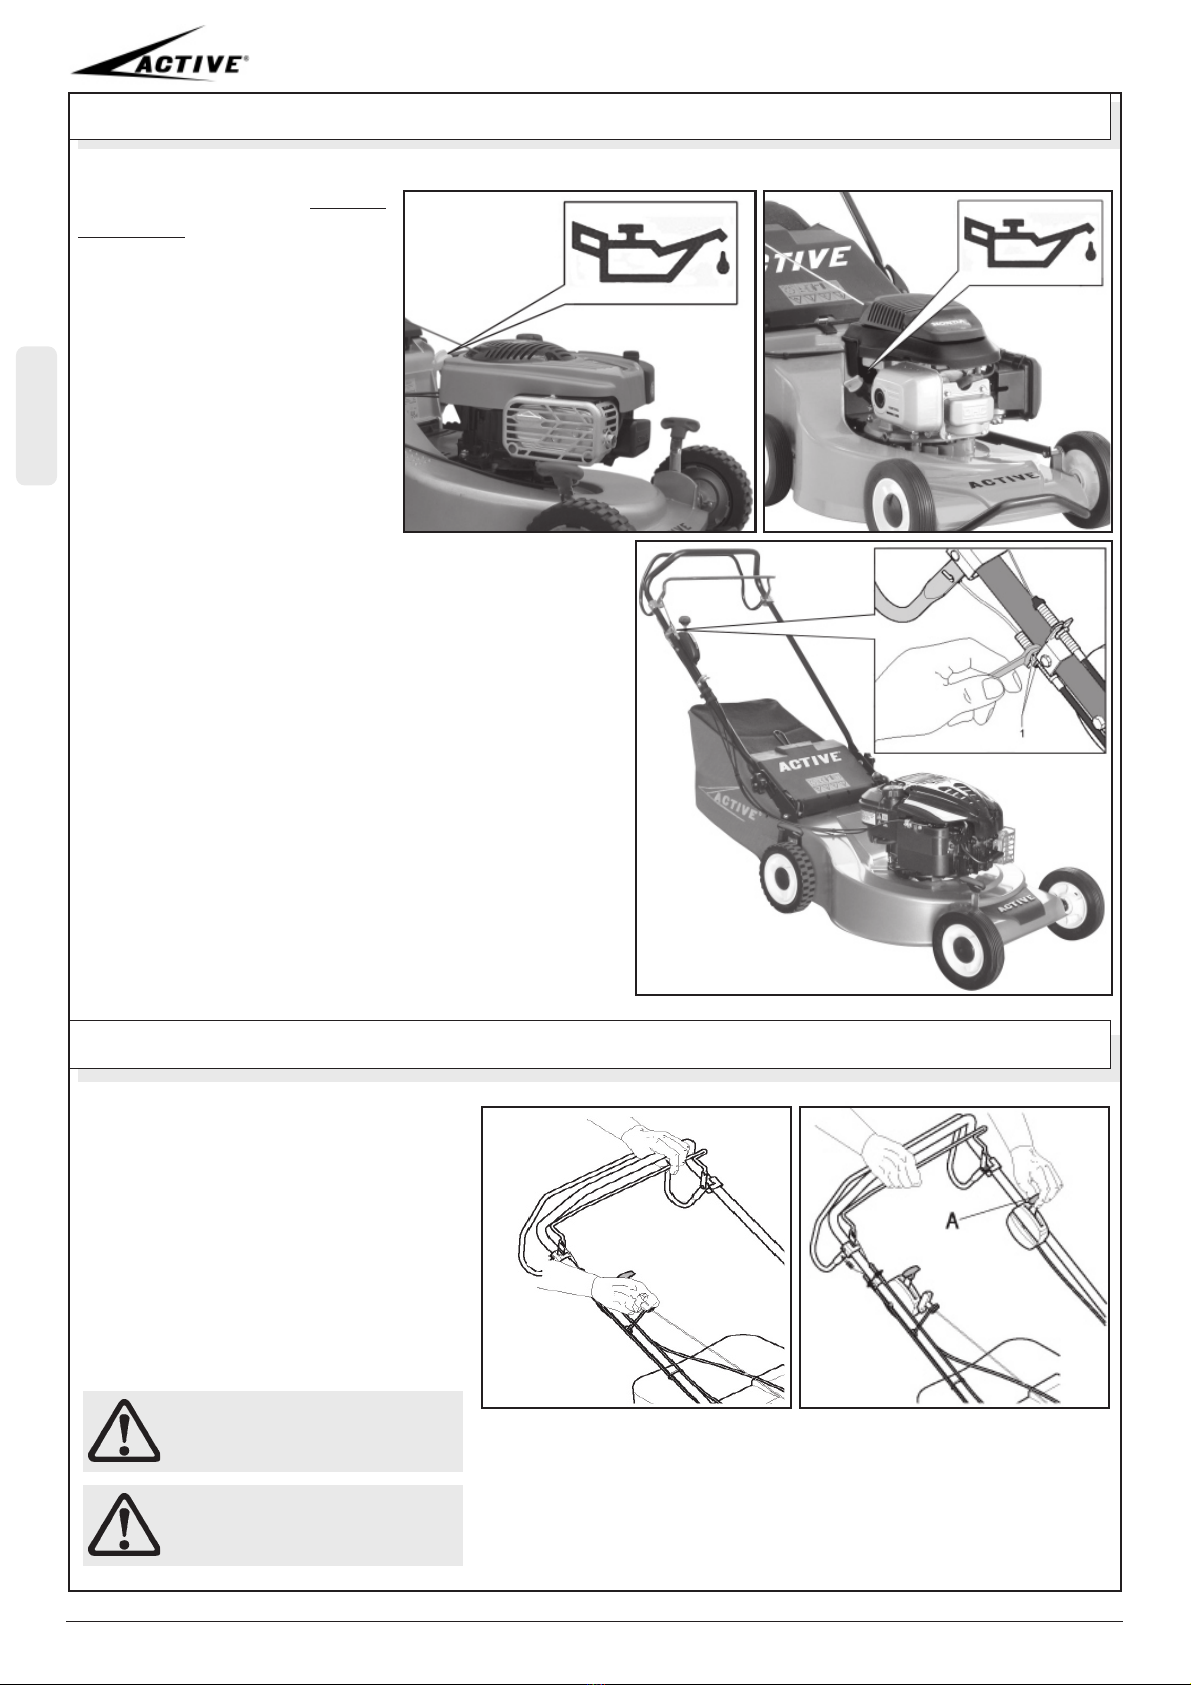
5)
MESSA IN FUNZIONE
Il rasaerba viene spedito
senza olio nel motore.
Aggiungere olio nel serbatoio
dedicato, seguendo le
specifiche di tipologia e
quantità presenti sul libretto di
uso e manutenzione proprio di
ciascun motore. Utilizzare
l’astina posta sul tappo del
serbatoio per controllare il
livello corretto.
Aggiugere poi benzina verde
dal serbatoio dedicato.
Regolare il cavo freno e il cavo della semovenza
agendo sui registri dei cavi posti sul manubrio,
utilizzando due chiavi n°13. Il cavo freno deve
essere abbastanza teso, in modo che azionando
la maniglia rossa possa sbloccare il meccanismo
sul motore.
Il cavo semovenza va registrato in modo tale che
azionando la maniglia nera si innesti bene la
trazione. Tensionando troppo il cavo, la trazione
può restare innestata; tensionando poco il cavo, la
trazione può trascinare a fatica il rasaerba.
Portare la fune di avviamento del motore sul
manubrio, fissandola nell’apposito occhiello, in
una posizione più comoda per l’utilizzo.
6)
AVVIAMENTO E UTILIZZO
Controllare che il rubinetto benzina
del motore sia aperto. Portare il
comando gas sulla posizione MAX
(per i motori Honda GXV160 sulla
posizione START).
Tenere azionata la maniglia rossa
con la mano sinistra e tirare con forza
la fune di avviamento con la mano
destra. Azionare la maniglia nera per
innestare la semovenza.
Per i modelli con variatore o cambio, è possibile regolare la
velocità di trazione agendo sul comando dedicato (A) mo-
strato in figura.Rilasciando la maniglia rossa di sicurezza, il
motore si spegne e la rotazione della lama si arresta entro 3
secondi. Per i modelli BBC il motore si arresta portando il
comando GAS nella posizione STOP.
ATTENZIONE ! La lama entra in
funzione quando si avvia il motore.
(tranne per i modelli BBC)
ATTENZIONE ! Agire sul variatore
della velocità di avanzamento solo
a motore funzionante.
ITALIANO
7
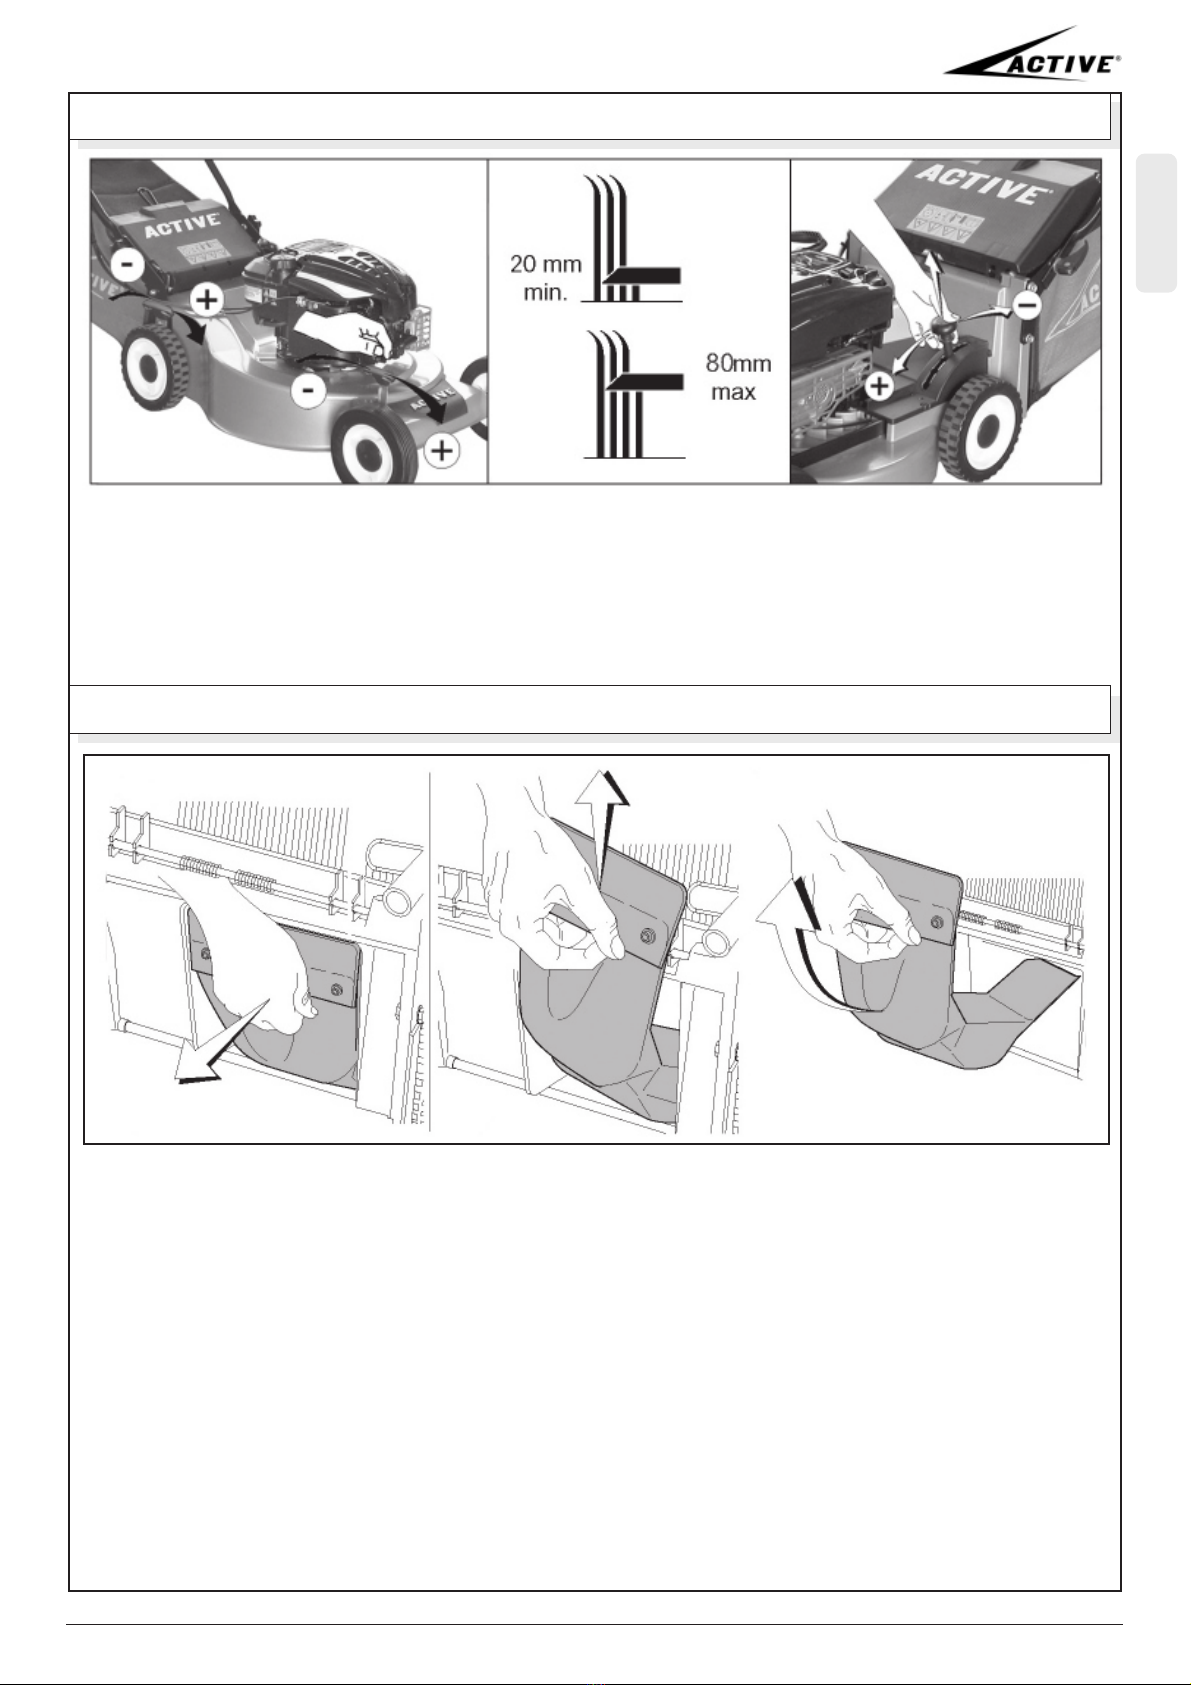
7)
REGOLAZIONE DELL’ALTEZZA DI TAGLIO
La regolazione dell’altezza di taglio sui modelli in acciaio, si effettua agendo sulla leva anteriore e
posteriore, come mostrato nella prima figura. In questo caso si abbassa o si alza indipendente-
mente l’assale anteriore e posteriore.
Sui modelli con sollevamento centralizzato, è necessario impugnare la leva, sollevare il canotto
scorrevole e portarla in una delle sette posizioni disponibili, come mostrato nella seconda figura.
Per i modelli 5800/5850 è come per i modelli in acciaio, ma agendo su ciascuna ruota.
8)
MULCHING
1) Per poter tagliare l’erba nella modalità Mulching, bisogna verificare che l’altezza dell’erba non sia
superiore a 20 cm, altrimenti è necessario tagliare montando il sacco di raccolta.
2) Qualora si stia procedendo nella modalità Mulching è necessario accertarsi che l’erba sia asciut-
ta e la lama ben affilata per evitare che l’erba tagliata si accumuli sotto la chiocciola della scocca.
3) Posizionare la chiusura Mulching nel vano di espulsione dell’erba come mostrato in figura. Per i
modelli in alluminio montare anche la lama mulching.
4) Posizionare l’altezza del taglio non inferiore a 50 mm, avviare il motore e procedere al normale
taglio dell’erba.
5) Dopo il funzionamento nella modalità Mulching è buona norma procedere ad una accurata pulizia
per rimuovere i residui del taglio dell’erba. Per questa operazione collegare una canna dell’acqua
all’innesto rapido presente sulla scocca. Aprire il rubinetto dell’acqua ed accendere il rasaerba. La
rotazione della lama ed il getto d’acqua puliscono l’interno della scocca del rasaerba.
Si può procedere con la stessa operazione di pulizia anche dopo il taglio con raccolta. In questo caso
si consiglia di togliere il cestello.

ITALIANO
8
9)
CONSIGLI PER IL TAGLIO
I risultati migliori si ottengono quando si taglia non più di un terzo dell’altezza dell’erba. Quando l’erba
è alta, usate la posizione di taglio più alta per il primo taglio. Se volete tagliare l’erba più bassa,
ripassate con una posizione di taglio inferiore. Se tagliate l’erba ad un livello troppo basso, invece
d’irrobustirsi, dovrà impegnare più energia per lo sviluppo di nuove foglie e sarà più soggetta alla
possibilità di bruciarsi in caso di siccità. Se lasciate che l’erba cresca troppo, la parte inferiore si
indebolirà e ingiallirà. L’erba lasciata a terra forma uno strato che impedisce la ricrescita; la raccolta
dell’erba tagliata è raccomandata, tranne nel caso di taglio mulching. Tutti i rasaerba ACTIVE sono
studiati per avere diverse funzioni: taglio con raccolta, taglio con scarico a terra (raccomandato quan-
do l’erba è molto alta) o taglio mulching.
10)
MANUTENZIONE
1) Controllate ad intervalli frequenti lo stato della lama e la sua
vite di fissaggio, come mostrato in figura. Fermate il motore.
Staccate il cavo della candela per evitare avviamenti improvvisi
e non voluti del motore. Piegate sempre il rasaerba sul lato
della marmitta con il filtro verso l’alto per evitare problemi
d’ingolfamento. Ancor meglio sarebbe alzarlo davanti.
Controllo : esaminate con cura il grado di affilatura e di usura
della lama, specialmente in corrispondenza delle pieghe.
Poichè la sabbia o altro materiale possono essere causa di
usura, si consiglia di controllare frequentemente la lama. Se si
notano delle anomalie, si deve provvedere subito alla sostitu-
zione.
Smontaggio: impugnate energicamente un terminale della
lama, per evitare tagli si consiglia d’indossare i guanti, svitare
il bullone, togliete la rondella e quindi la lama.
Affilatura : affilate la lama se i taglienti sono deteriorati e la lama è in buone condizio-
ni. Utilizzate una mola per l’affilatura, controllate che, dopo questa operazione, la
lama sia ancora bilanciata. Se non fosse bilanciata, si avranno delle vibrazioni ecces-
sive. Montate la lama centrandola sul supporto e stringete il bullone.
(Coppia di serreggio = 55 Nm)
2) Controllate che tutti i dadi e le viti siano strette in modo da avere il rasaerba sempre
in condizioni ottimali di lavoro.
3) Controllate frequentemente lo stato del cestello di raccolta dell’erba. Sostituite il
cestello con uno nuovo, qualora si riscontrino dei difetti. Usate solo parti di ricambio
originali. Per prolungare la vita del cestello bisogna svuotarlo ogni volta che si finisce
il taglio e pulirlo bene prima dell’immagazzinamento.
4) Non immagazzinate il rasaerba in un luogo chiuso con il serbatoio pieno di benzina.
Lasciate raffreddare il motore dopo l’uso in un luogo aperto.
5) Controllate ad intervalli frequenti lo stato della cinghia. Nel caso di segni evidenti di
usura, sostituirla subito.
6) Dopo un urto accidentale con un corpo estraneo come
sassi o radici, esaminate con cura la lama e il mozzo porta-
lama. Se si notano crepe o anomalie, sostituire subito il com-
ponente.
7) Fate revisionare dal rivenditore ACTIVE il vostro rasaerba
al termine di ogni stagione. Questo vi permetterà di avere il
vostro rasaerba in perfetta efficienza all’inizio della stagione
successiva.
8) Accertatevi che nelle riparazioni vengano usate parti di
ricambio originali ACTIVE, questo Vi permetterà di mante-
nere la qualità del vostro rasaerba allo stesso livello di quan-
do lo avete acquistato.
9) Per la manutenzione del motore, fare riferimento al libretto
di uso e manutenzione del motore stesso.
ATTENZIONE !
Per ogni intervento di manutenzione, ricordatevi di
spegnere il motore e di staccare il connettore della
candela di accensione.
ATTENZIONE ! L’usura eccessiva della lama può
portare alla formazione di profonde crepe ed al di-
stacco di alcuni pezzi che possono creare serio
pericolo all’operatore e a chi gli sta intorno.
ATTENZIONE !
L’urto con un corpo estraneo provoca la rottura del
mozzo porta-lama per salvaguardare l’integrità del-
l’albero motore.

ITALIANO
9
MOBILFLUID 424 / API GL 4
45 ml = 500 h
Sostituzione olio trasmissione
11)
IMMAGAZZINAMENTO INVERNALE
Seguite le seguenti istruzioni per la preparazione del vostro rasaerba per l’immagazzinamento a fine
stagione. Per quanto riguarda il motore, seguite le istruzioni fornite dal costruttore del motore sul libret-
to di uso e manutenzione. Staccare il cavo candela.Pulire bene tutte le superfici del rasaerba e lascia-
te asciugare. Controllate che il cestello per la raccolta dell’erba sia vuoto; lavatelo e lasciatelo asciu-
gare. Immagazzinare in un luogo asciutto e protetto dalle intemperie.
12)
NORME DI SICUREZZA
- Adattate la velocità alle condizioni dell’erba. Regolate la velocità del motore al massimo quando
l’erba è bassa oppure a mezzo gas quando è alta.
- L’uso del rasaerba è proibito alle persone con età inferiore ai 16 anni.
- L’operatore è responsabile verso terzi nella zona di lavoro. Assicurarsi che non ci siano bambini o
animali domestici nella zona di lavoro.
- Prima di iniziare il lavoro è indispensabile ispezionare l’area che deve essere lavorata e rimuovere
tutti i sassi e ogni altro oggetto estraneo che si trova in quella zona. Controllare inoltre dove sono
sistemati eventuali irrigatori o ogni altro ostacolo nascosto che potrebbe creare situazioni di pericolo
durante il taglio.
- Utilizzate delle robuste scarpe chiuse durante il taglio; non usare sandali e non tagliate a piedi nudi.
Usate scarpe che abbiano una buona aderenza anche quando il terreno è bagnato; usate inoltre
guanti da lavoro per avere una presa più sicura.
- Assicurarsi prima di iniziare la falciatura che la lama sia ben fissata e le protezioni di sicurezza siano
montate. Non utilizzare il rasaerba senza che il raccoglierba o il deflettore siano montati.
- Non aggiungete carburante quando vi trovate in un locale chiuso, quando il motore è ancora in moto
o quando il motore è ancora caldo. Non fumate durante le operazioni di rifornimento del carburante.
- Non fate funzionare il rasaerba in ambienti chiusi. I gas di scarico emessi dal motore in funzione
sono velenosi se respirati, possono essere asfissianti e quindi mortali.
- Non regolate l’altezza di taglio quando il motore è in funzione.
ATTENZIONE! Quando il motore è acceso, non mettere le mani o i piedi sotto il rasaerba o nel
condotto di scarico, la lama è in movimento.
- Tagliate il prato solo quando le condizioni di luce sono buone.
- Non correte. Non fatevi influenzare dalla premura di finire il lavoro; tenete un’andatura adatta al tipo
di lavoro che dovete svolgere.
- Non Usate il rasaerba quando non è in buone condizioni. Qualora vengano riscontrati dei difetti,
provvedere alla sostituzione o alla riparazione prima dell’uso.
- Non permettere l’uso del vostro rasaerba ad alcuna persona se prima non gli avete fornito delle
precise istruzioni e non gli avete fatto leggere questo manuale.
- Quando dovete tagliare su terreni in pendenza procedete di traverso, mai dall’alto verso il basso o
viceversa. Prestate particolare attenzione quando cambiate direzione.
- Non tagliate su terreni molto scoscesi.
- Spegnete sempre il motore quando non tagliate o quando dovete attraversare un marciapiede, un
viale o una strada (tranne per i modelli con sistema BBC)
- Nel caso urtiate un ostacolo, arrestate il motore, staccate il cavo candela e controllate se si sia
verificato qualche danno. Riparate l’eventuale danno prima di usare nuovamente il rasaerba; qualora
il danno fosse grave rivolgetevi al più vicino rivenditore ACTIVE.
ITALIANO
10
13)
UTILIZZO FRIZIONE LAMA BBC
Funzionamento :
1) Portare la manopola giri motore (A) in posizione START I\I (1), avviamento a freddo ;
2) Tirare l’avviamento del motore ;
3) Acceso il motore, tirare indietro la manopola giri motore (A) in posizione MAX (2);
4) Tenendo azionata la leva di sicurezza BBC(E), spostare verso il basso la leva innesto frizione lama(C) fino all’innesto
della frizione;
5) Aquesto punto azionare la leva avanzamento (D) e spostare la manopola variatore (B)per ottenere la velocità
desiderata;
6) Nel caso in cui ci si volesse fermare per qualsiasi motivo (es. svuotare il cesto, bere, oltrepassare un marciapiede,
ecc.) basta lasciare la leva sicurezza BBC (E). In questo caso la lama si blocca, ma il motore rimane acceso;
7) Per ripartire, azionare la leva sicurezza BBC (E), spostare verso in basso la leva
innesto frizione lama (C) e azionare la leva avanzamento (D).
8) Per spegnere il motore, invece, lasciare tutte le leve e portare la manopola giri motore(A) nella posizione STOP (4).

ITALIANO
11
14)
CERTIFICATO DI GARANZIA
Questa macchina è stata concepita e realizzata attraverso le più moderne tecniche produttive.
La Ditta costruttrice garantisce i propri prodotti per un periodo di 24 mesi dalla data di acquisto ad ecce-
zione dei prodotti per servizio professionale continuo, adibiti a lavori per conto terzi, per i quali la garanzia
è di 12 mesi dalla data di acquisto.
CONDIZIONI DI GARANZIA
1) La Ditta costruttrice sostituisce gratuitamente le parti difettose nel materiale, nelle lavorazioni, nella produ-
zione. La garanzia ACTIVE non contempla la sostituzione della macchina.
2) Il personale tecnico interverrà nei limiti di tempo concessi da esigenze organizzative e in ogni caso il più
presto possibile. L'eventuale ritardo non potrà determinare richieste di risarcimento dei danni, nè il prolunga-
mento del periodo di garanzia.
3) Per richiedere l'assistenza in garanzia è necessario esibire al personale autorizzato il certificato di garan-
zia timbrato dal rivenditore, compilato in tutte le sue parti e corredato di fattura d'acquisto o scontrino fiscale
o altro documento reso fiscalmente obbligatorio comprovante la data di acquisto.
4) La garanzia decade in caso di:
- Assenza palese di manutenzione
- Utilizzo non corretto del prodotto o manomissione
- Utilizzo dei lubrificanti o combustibili non adatti
- Utilizzo di parti di ricambio o accessori non originali.
- Interventi effettuati da personale non autorizzato
5) Non verranno sostituite in garanzia le parti che sono normalmente soggette ad usura (come cinghie,
guarnizioni, lame ecc..), salvo evidenti difetti di produzione.
6) La garanzia ACTIVE non garantisce i motori a scoppio montati sulle sue macchine perchè gli stessi sono
coperti dalla garanzia del loro produttore, come da documenti allegati alla macchina.
7) Le spese di spedizione, trasporto e manodopera sono a carico del cliente.
8) Eventuali danni causati durante il trasporto, devono essere immediatamente segnalati al trasportatore,
pena il decadere della garanzia.
9) Se guasti o rotture dovessero accadere nel periodo di garanzia o dopo di esso, il cliente non ha diritto di
sospendere il pagamento nè ad alcuno sconto sul prezzo.
10) La ditta costruttrice non risponde di eventuali danni diretti o indiretti, causati a persone o cose da guasti
della macchina o conseguenti alla forzata sospensione prolungata nell'uso della stessa.
S.N. n.°
DATA:
...........................
MOD.
ACQUISTATO DA :
RIVENDITORE:
ITALIANO
12
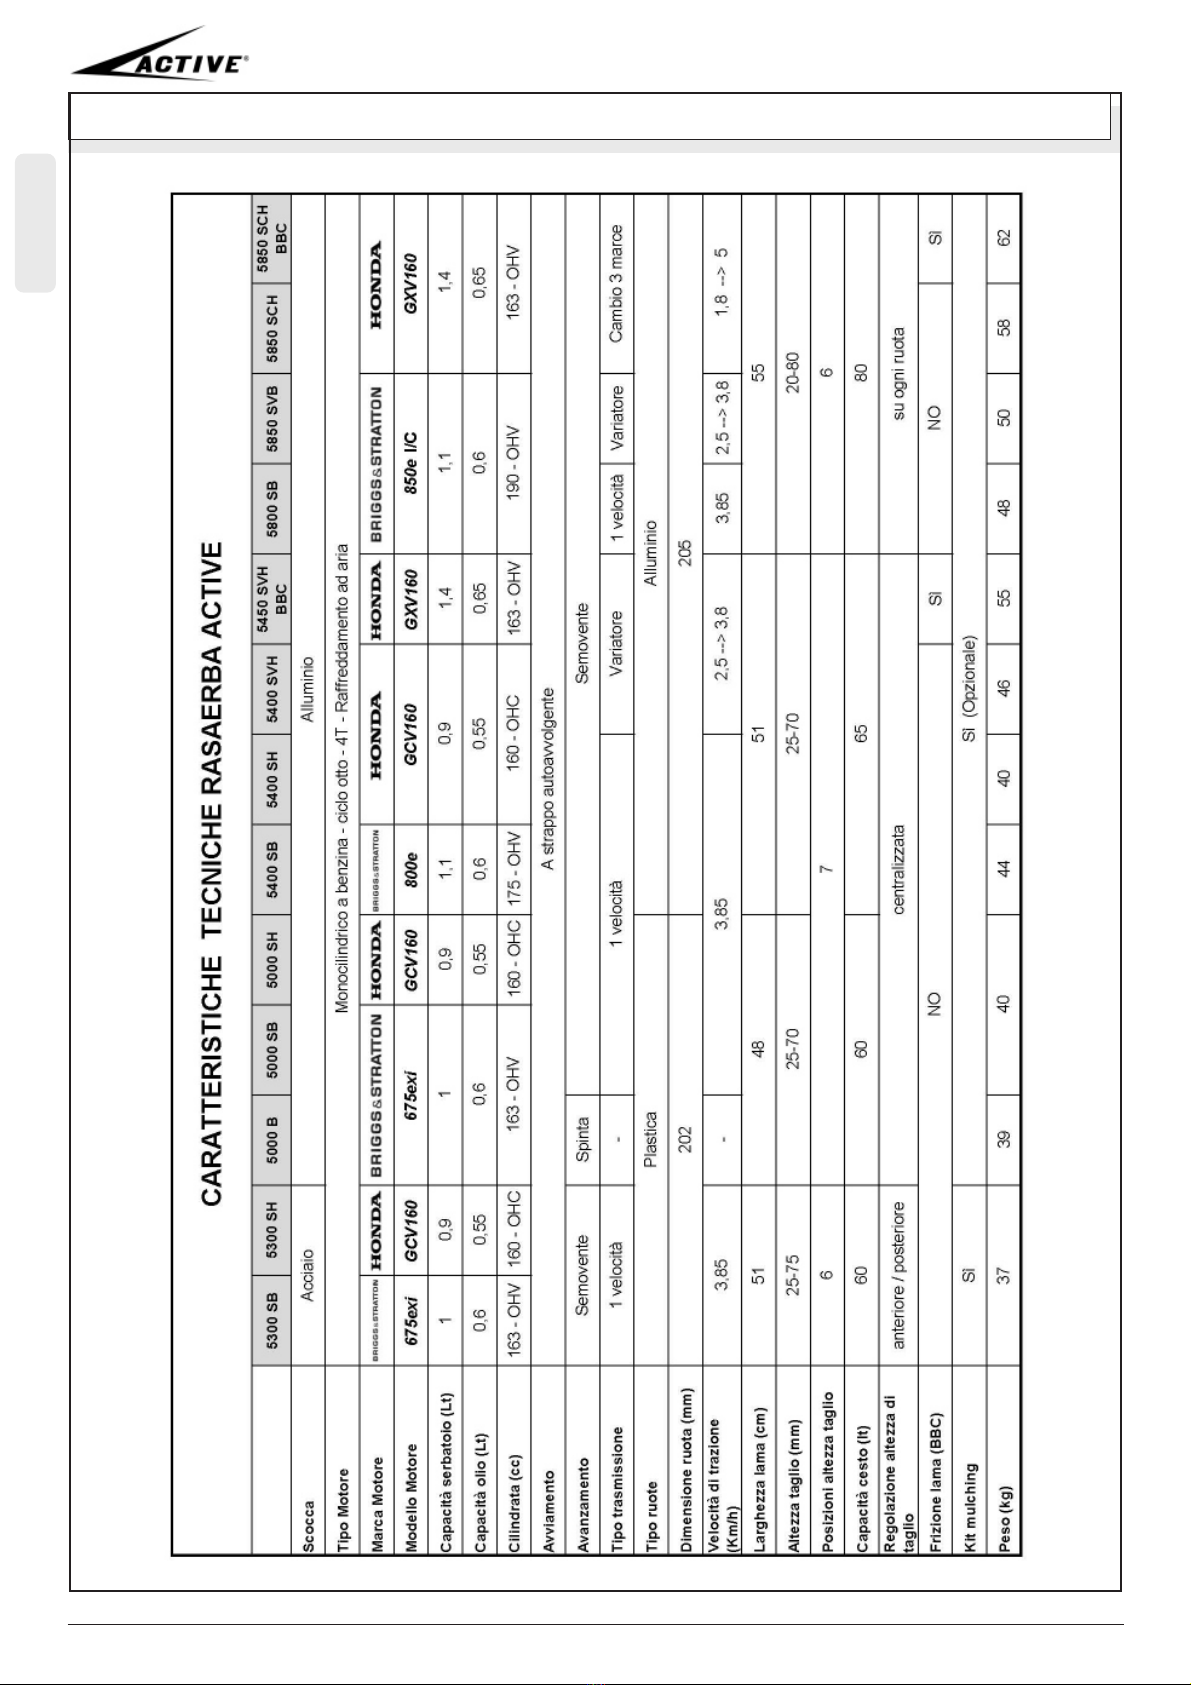
15)
CARATTERISTICHE TECNICHE

ITALIANO
13
16)
CERTIFICATO DI CONFORMITA’

ENGLISH
14
1) SAFETY LABELS
1 2 3 4
5 6 7 8
1) Danger
2) Danger thrown objects. Do not use without deflector and collector.
3) Danger of serious injury.
4) Danger cuts.
5) Read the owner’s manual before the use.
6) Keep persons or animals away from the mower.
7) Stop the engine and disconnect the spark plug wire before reparing.
8) Stop the engine and the blade before emptying the grass catcher.
2) CONFORMITY LABEL
The conformity label shows the main features of
each mower model, as required by legislation
2000/14/CE.
- manufacturer’s name and address
- lawnmower type
- net power
- rpm
- costruction’ year
- total weight
- serial number
- CE trademark
- maximum sound level guaranteed

ENGLISH
15
Mod. 5300 SB Mod. 5850 SCH
3) DESCRIPTION OF THE PARTS
1 - Upper handle
2 - Lower handle
3 - Throttle
4 - Engine brake handle
5 - Driving handle
6 - Handle rod
7 - Start handle
8 - Deflector
9 - Back wheel
10 - Front wheel
11 - Deck
12 - Engine
13 - Blade
14 - Grasscatcher
15 - Gearbox
16 - Adjusting levers for cutting height
17 - Variable speed
4)
ASSEMBLY
After unpacking the lawn mower, open the
handlebar and tighten the knobs to lock
down. For 5800 models with fixed
handlebars, using the screws.
Assemble the basket, sliding the frame in the
canvas sack, holding the handle on the
outside. The the handle of the chassis must
be in the upper part of the basket, the plastic
base of the canvas will be at the bottom.
Secure the 4 sides of the bag by hooking the
plastic sheath to the metal frame.
ENGLISH
16
Briggs&Stratton Honda
5)
PREPARING THE MOWER
The mower is shipped without
engine oil.
Add oil in the dedicated tank.
Specifications and quantity of
oil are specified in the user
manual or each engine.
Use the rod on the tank cap to
check the correct level.
Add unleaded gasoline in the
dedicated tank.
Adjust the brake cable and the self-propelled
cable using the cables registers placed on the
handlebar with two wrenches n°13. The brake
cable should be enough text so that pressing the
red handle will unlock the motor mechanism.
The self-propelled cable should be recorded in
such a way that by actuating the black handle
engages with good traction. Tensioning the cable
too, the drive may be grafted; tensioning the cable
not enough, the drive may drag badly the mower.
Bring the starter rope of the motor on the
handlebar, using the special clip, in a more
comfortable position for the user.
6)
STARTING AND USE
Check that the petrol valve is open.
Bring the throttle to position MAX (for
Honda engines GXV160 on the
STARTposition).
Keep activated the red handle with
your left hand and pull hard the starter
cord with your right hand.
Use then the black handle to engage
the self-propelled.
For models with the drive or return, you can adjust the speed
of the traction using of the control dedicated (A) shownd in
the picture.Releasing the red security handle, the engine
switches off and the rotation of the blade stops within 3
seconds. On the BBC models, the engine stops bringing the
throttle to STOP position.
ATTENTION ! The blade starts
turning as soon as the engine
started. (except BBC models)
ATTENTION ! Use the variable
speed only when the engine is
running.

ENGLISH
17
7)
CUTTING HEIGHT ADJUSTMENT
The cutting height adjustment on steel models, is carried out by acting on the lever front and rear,
as shown in the first figure. In this case it is raised or lowered independently of the front and rear
axle. On models with centralized lifting , you need to grasp the lever, lift the sliding sleeve and take
it to one of seven positions, as shown in the second figure.
For 5800/5850 models it‘s as for steel models, but acting on each wheel.
8)
MULCHING
1) In order to cut the grass in the Mulching mode, check that the grass height is not more than 20 cm,
otherwise it is necessary to cut by mounting the collection bag.
2) If it is moving in the mulching mode you must make sure that the grass is dry and sharp blade to
prevent the cut grass from collecting under the spiral of the shell.
3) Position the mulching closure in the grass expulsion compartment as shown in figure. For
aluminum models also fit the mulching blade.
4) Place the height of cut not less than 50 mm , start the engine and proceed with a normal grass
cutting.
5) After working in the Mulching mode it is highly recommended to perform a thorough cleaning to
remove grass clippings. For this operation, use the quick water connection, placed on the body. Turn
on the water tap and start the engine. The blade rotation and the water spray clean the inside of the
mower deck.
You can proceed with the same cleaning operation even after cutting with collection. In this case it is
advisable to remove the basket.

ENGLISH
18
9)
MOWING TIPS
Best results are achieved when no more than 1/3 of the height of the grass is cut off. The cutting deck
shoulde be level under all conditions; if long grass must be cut, use highest cutting height for first
mowing. If you want the grass shorter, then recut to the lower height. If cut too short, the grass will
expend more energy for development of new leaves and less for root strengthening and will be more
subjected to burning. On the other hand, if allowed to grow too long, the lower part will be shaded and
will discolor. Dispersed clippings mat to form thatch which prevents proper growth; to prevent grass
disease from thatch, bagging is always recommended,except in the case of mulching. All ACTIVE
mower are designed to allow immediate change of function: cutting and bagging at the same time or
cutting only (this is recommended only when grass is high) or mulching.
10)
MAINTENANCE
1) Check the blade and the engine mounting bolts at frequent
intervals for proper tighness, as showned in the picture. Stop
the engine and disconnect the spark plug wire before reparing.
Tip mower on its left side or opposite side from spark plug, so
plug will not be fouled (which causes starting problems).
Inspecting : carefully examine blade for sharpness and wear,
especially where flat and curved parts meet. Since sand and
abrasive material can wear away the metal that connects the
flat surface to the upturned lift, check blade before using the
mower. If a slot or wear is noticed replace blade. Replace blade
if badly chipped, bent or out of balance.
Disassembly: Firmly grip an edge of the blade, to avoid the
risk of cuts it advisable to wear gloves; unscrew the bolt, remove
the washer and then the blade.
Sharpening : Sharpen blade when the cutting edges become dull if the blade is in
otherwise good condition. For best results, remove the blade and sharpen it on grinding
wheel. Check blade after sharpening to determine that it is still balanced. It will cause
excessive vibration if unbalanced. Be careful to avoid cutting yuorself on sharp blade!
Assemble the blade centering it on the support and tighten the bolt at 55 Nm.
2) Keep all nuts, bolts and screws tight to be sure the equipment is in safe working
conditions.
3) When the grasscatcher is used on your mower, check the catcher often for damage.
Used only recommended catcher. Replace with new bag if loose seams or tears are
evident. To extend the life of the basket it is necessary to empty it each time the cut
is terminated and before the winter storage.
4) Never store the equipment with gasoline in the tank inside a building where fumes
may reach an open flame or spark. Allow the engine to cool before storing in any
enclosure.
5) Frequently check the condition of the belt. If it’s damaged, replace it immediately.
6) After an accidental collision with foreign objects such as
rocks or roots, carefully examine the blade and the hub blade
holder. If you notice cracks or faults, immediately replace
the component.
7) Have your mower inspected and serviced each year by an
authorizedACTIVE dealer. Determine if any additional devices
are available which might upgrade the safety of your mower.
8) Factory specifiedACTIVE replacement parts must be used
to assure adequate protection against injury.
9) For the maintenance of the engine, check the
manufacturer’s manual.
ATTENTION!
Srop the engine and disconnect the spark plug wire
before reparing.
ATTENTION! If blade is allowed to wear, a slot may
form near the sail. Eventually a piece of blade may
break off resulting in serious injury to yourself or a
bystander.
ATTENTION!
The collision with a foreign body causes the
breakage of the blade-bearing hub to safeguard
the integrity of the motor shaft.

ENGLISH
19
MOBILFLUID 424 / API GL 4
45 ml = 500 h
Replacement transmission oil
11)
WINTER STORAGE
Take the following steps to prepare your mower for storage at the end of the mowing season. Refer to the engine manual
for directions for preserving the engine. With the spark plug wire disconnected from plug, turn the mower on its side and
thoroughly clean underside of deck. Scrape away accumulation of grass with putty knife and/or wire brush first, then wash
down with water from a hose. Avoid spraying water into exhaust or air intake while washing deck - tape openings closed to
prevent this. Clean external surfaces of mower and allow to dry, then lubricate all exposed metal surfaces with a light
coating of oil to prevent corrosion. The grass catcher may be washed in detergent; allow to dry thoroughly after washing.
Store mower during off season in a storage shed or dry area protected from weather.
12)
SAFETY RULES
- Adapt your speed to the grass conditions. Adjust the motor speed to the maximum when the grass is
low or half throttle when it is high.
- Person under 16 years of age must not use the lawn mower.
- The operator is responsable for the safety of other people in the working area. Keep children and
domestic animals at a safe distance when the lawn mower is in use.
- Thoroughly inspect the area where the mower has to be used, remove all sticks, stones, wires cans
and other foreign objects from the area to be mowed.Also note the location of holes, stumps, and other
possible hazards.
- Wear only solid shoes when mowing. Do not operate mower when barefoot, or wearing open sandals.
Wear sensible clothing-long-pants, boots or heavy shoes that will grip even in wet weather, and gloves
(like golfers) for a sure grip.Also, don’t wear anything that’s so loose that it might get caught on something.
- Check the blade bolts for proper tighness. Never use lawn mower without either grasscatcher or
deflector.
- Do not fill the gasoline tank indoors, when engine is running or while the engine is still hot. Never
smoke during the filling of the gasoline tank.
- Do not start the engine indoors. Exhaust gases coming fom the engine can be poison when repired,
and can therefore be suffocating and mortal.
- Never attempt to make a wheel height adjustment while the engine is running.
CAUTION! Do not put hands or feet under mower or in the discharge chute, nor make any adjustment.
- Mow only in daylight or good artificial light.
- Do not run with the mower. Do not allow hurry or panic to influence your better judgement. Take time
to do job in the safest manner. Always be sure of your footing; keep a firm hold on the handle and walk.
- Do not use damaged mower. Always have damaged repaired before mowing.
- Do not allow anyone to operate your lawn mower without proper instructions and have them to read
these safety instructions.
- Never pull mower towards you, always follows mower to cut grass.
- Do not mow excessively steep slopes.
- Always stop engine or blade when not cutting grass or when crossing gravel drive, sidewalk, or
roadway (except for models with BBC system)
- After striking a foreign object, stop the engine, remove the wire from the spark plug, thoroughly
inspect the mower for any damage, and repair the damage before restarting the engine and operating
the mower.

ENGLISH
20
13)
USE BLADE CLUTCH BBC
Operation :
1) Put the throttle lever (A) in the STARTposition (1) for cold start of engine.
2) Pull the engine starter.
3) When the engine is running, pull back the throttle lever in the MAX position (2).
4) Operate the handle release BBC (E) and put down the BBC clutch lever (C) until it engages the clutch. The blade
start to rotate.
5) Operate the handle pull plug (D) and adjust the speed by the control (B).
6) Releasing the handle (E), the clutch stops the blade, but the engine is always on.
7) To start again, repeat operation 4 and 5.
8) To stop the engine, release all the handle and put the throttle lever (A) in the STOP position (4).
This manual suits for next models
12
Table of contents
Languages:
Other Active Lawn Mower manuals


