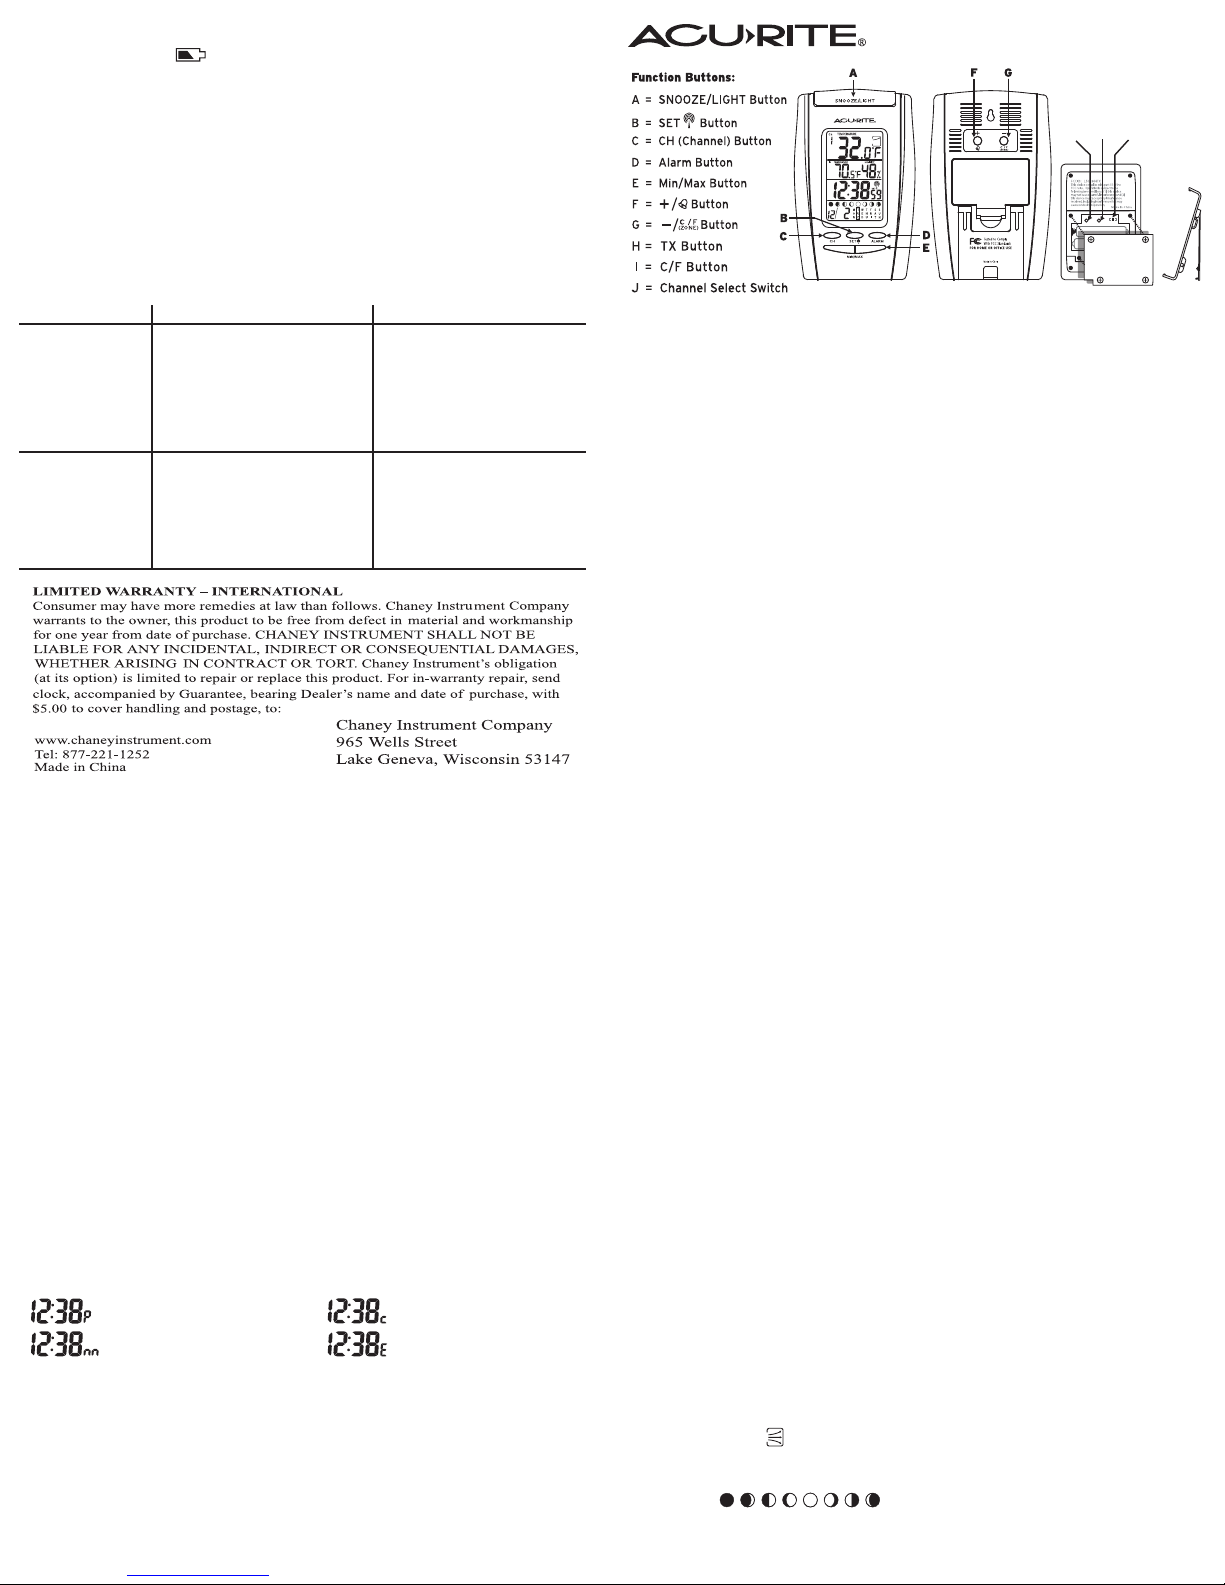
Home Receiver Remote
Sensor Bracket
Stand
Home Receiver Set Up:
For the initial installation, always insert batteries in the home unit first, and then the remote
sensor. Remove the battery cover on the back and install 2 “AA” batteries (not included)
according to the polarity indicated. Replace the battery cover.
Setting the Alarm:
Press and hold the “ALARM” button for 3 seconds.
• The display will show the alarm set time and the letters “AL” appear to the right of the
minute digits. The hour digits will be flashing.
• Press the “+” or “-” buttons on the back of the case to set the hours to your desired time.
Please be sure to note that the AM/PM idicator is set properly. Press the “ALARM” button to
confirm the hour setting and to proceed to the minute setting.
• The minute digits will be flashing. Press the “+” or “-” buttons to set the minutes to the
desired setting.
• Press the “ALARM” button again to exit the setting procedure.
To stop the alarm, press any button when the alarm sounds. This will automatically reset the
alarm to sound agian the next day at the same time. To turn off the alarm completely, press
the “+” button on the back of the case. To turn the alarm back on for use, press the “+” again.
Snooze / Light:
Press the “snooze/Light” button to activate the 8 minute snooze alarm. Each press will also
activate the green backlight which will remain illuminated for 3 seconds before turning itself
off to conserve the batteries.
Temperature Trend:
Small arrow icons displayed in boxes will indicate: Rising, Steady, Falling. Refresh rate for the
outdoor temperature trend is once every hour.
MIN / MAX Memory:
Press the “MIN/MAX” button to view the maximum indoor and outdoor temperature and
indoor humidity values for 5 seconds. Press again to view the minimum values. The min/max
memory will automatically clear every day at midnight.
Moon Phase:
Moon Phase is shown by the scrolling of the moon icon from left to right. The icon will stop at
the existing moon phase for 5 seconds, and then resume scrolling.
Remote Sensor Set Up:
Remove the bracket stand and remove the 4 screws with a small phillips head screwdriver.
Insert 2 “AAA” alkaline or lithium batteries (not included) according to the polarity indicated.
Set channel 1 for the first remote sensor. To enable the weather forcastfeature, you must set
to Ch 1 if only one sensor is in use. One sensor is included with the base unit. Additional
sensors may be purchased seperately. Set channel 2 if using a second sensor, or channel 3
if using a third sensor. To purchase additional sensors call 1-800-KLOCKIT and ask for
wireless remote sensor model 00911. You can also order via the web at
www.chaneyinstrument.com. Click on “Where to Find” and then click on the images of the
Acu>Rite weather instruments. Enter 32266 in the search box at the top of the next page.
• To verify transmission of a signal press the “TX” button inside the battery compartment
of the remote sensor. The red LED on the front of the remote sensor will flash when it
successfully transmits a signal. Temperature and humidity of the remote sensor will be
updated and displayed on the remote sensor.
• Select Celsius or Fahrenheit by pressing the “C/F” button inside the battery compartment.
• Replace the cover and tighten the 4 phillips head screws.
Press and hold the “SET” button for 3 seconds:
• The setting sequence is:
Year > Month > Date > Hr > Min > 12/24 hr > DST on/off > Weather Offset > EXIT Settings
• Press the “+” or “-” buttons on the back of the Receiver to set each function to the correct
setting. Once the display is showing the correct setting, press the “SET” button to confirm
your settings and to advance to the next function.
• The corresponding digits will be flashing during the setting procedure.
• After completing the setting sequences pressing the “SET” button will return the display to
the standard view.
• Press & hold “C/F ZONE” button on the back of the home reciever for 3 seconds, press
“C/F ZONE” button to select P/M/C/E time zones. The letters appear in the area where the
seconds are shown in the time display. When you select thecorrect time zone, press the
“SET” button to confirm your choice and exit the selection mode.
STEP ONE: SETTING UP THE WIRELESS THERMOMETER
About The Atomic Clock:
The National Institute of Standards and Technology (NIST) in Fort Collins, Colorado broadcasts
the time signal (WWVB at 60kHz AM radio signal) with an accuracy of one second per every
3,000 years. The signal covers a distance of up to 2,000 miles from the source.
Selecting the ideal location:
Like a typical AM radio, the Atomic Clock will not receive the WWVB signal in places
surrounded by heavy concrete or metal panels. For best reception, please install the home
reciever near a window. The time signal reception is also greatly affected by electrical or
electronic interference. If the home receiver location you selected does not work, change to
a location in another part of the room or building.
Radio Controlled Time Reception Set Up:
The clock attempts to synchronize with the Atomic time signal AUTOMATICALLY right after
the first sensor is registered. The unit will start synchronizing the clock after registering the
remote sensor thermometer reading. An antenna icon appears in the upper right hand of the
time section. The clock will not respond to any manual settings while attempting to receive
the Radio Control Time Signal. This reception cycle lasts from 2 to 5 minutes. The antenna
icon remains fixed after the clock is synchronized.
Daylight Saving Time (DST) Feature :
The DST feature is enabled when the batteries are installed. The DST icon appears as a
flashing “D.” For areas not using DST in summer, select DST off mode as described under
Step Three: Manually Adjusting Clock & Calendar Setting.
The clock will not respond to any manual settings while attempting to receive the Radio
Control Time Signal. Press the “SET” button to turn the reception off and to enable manual
settings.
Entering The Time Zone:
After the unit successfully synchronizes withthe atomic time signal, the time zone must be
entered.
STEP TWO: SETTING THE ATOMIC CLOCK STEP THREE: MANUALLY SETTING THE CLOCK & CALENDAR
ADDITIONAL FEATURES
Low Battery Indicator:
Low Battery indication is shown for the home unit itself and all of the remote sensors (up to 3).
When the low battery indicator is displayed, replace the batteries and follow the setup
procedure as shown in this instruction manual.
PRESS BUTTON ONCEBUTTON
SET Start or stop radio controlled
time signal search Enter clock & calender set mode
ALARM Read alarm time for 5 seconds Enter alarm set mode
CHANNEL Select channel 1 to 3 for viewing Delete current channel reading
SNOOZE / LIGHT Activates snooze / backlight (3 sec.) N/A (no function)
+ Advance in settings by one step
Turn the alarm on or off Fast forward through settings
_ Move back in settings by one step
Switch thermometer reading
between C and F
Fast backwards through settings
Time zone selection (P/M/C/E)
MIN/MAX Read Maximum / Minimum record
for 5 seconds N/A (no function)
PRESS & HOLD FOR 3 SECONDS
SPECIFICATIONS:
Range of temperature measurement:
Indoor unit : 32º F to 122º F (0º C to 50º C), 20% - 99% RH
Remote sensor : -4º F to 140º F (-20º C to 60º C)
Transmission : up to 100 feet (30 M) in an open area
Resolution : 0.1 degree for temperature, 1% for RH
Moon phase : 8 resolutions
Battery : 2- “AA” for the main unit, 2 “AAA” for each remote sensor.
Alkaline batteries are recommended.
BUTTON FUNCTIONS:
ADDITIONAL FEATURES (continued)
1
3
4
2
P = Pacific Standard Time
M = Mountain Standard Time
C = Central Standard Time
E = Eastern Standard Time
FRONT BUTTONSBACK BUTTONS
00786 Wireless Indoor/outdoor Weather Station
TX C/F
HI J


