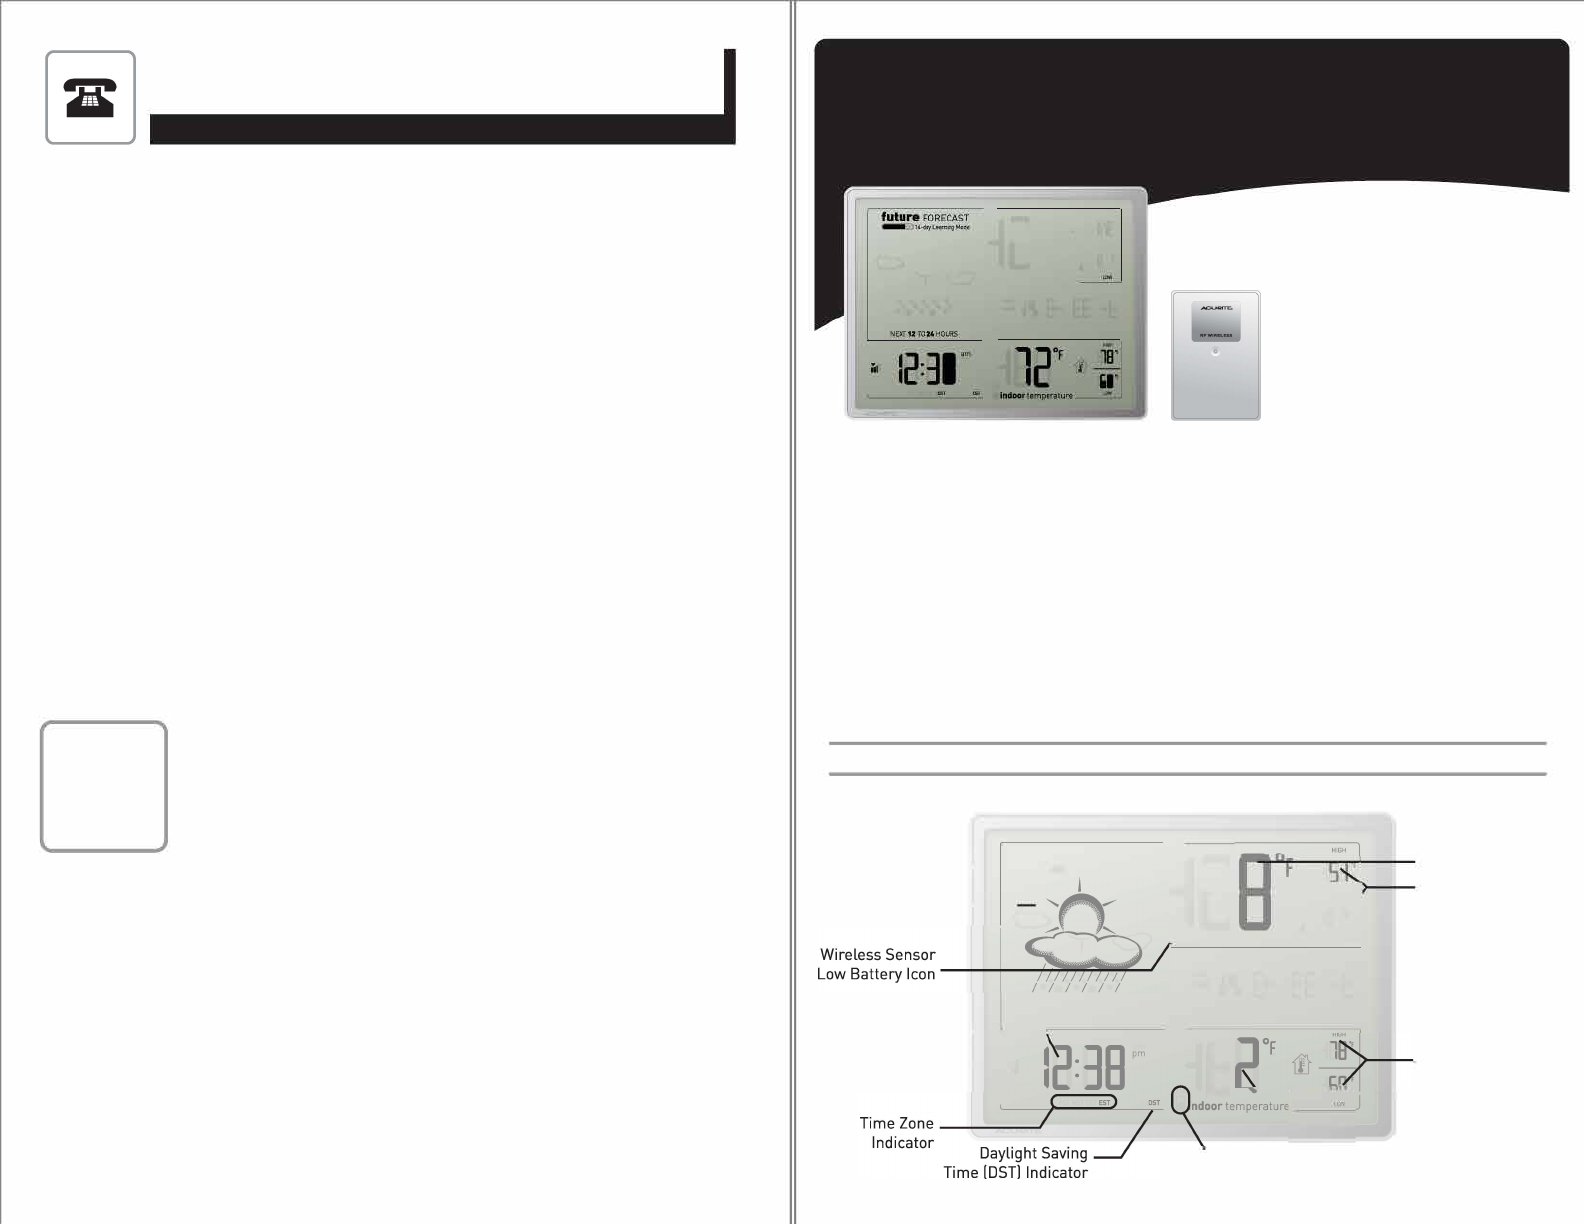
manuals.online logo
Brands
  1. Home
  2. •
  3. Brands
  4. •
  5. ACU-RITE
  6. •
  7. Weather Station
  8. •
  9. ACU-RITE 75077 User manual

ACU-RITE 75077 User manual

Wireless Se
L nsor
ow Battery Icon
7
nm,.zooe
~:3~~
""
~
~
2•,lit le{__
Indicator --- _/ ndoorte i:;i,7."
Da . mperature
T' yl1ghtSaving
ime [DST] Indicator

Please DO NOT return product to the retail store.
  
    



 
 

 
 





 



 

 
 



For in-warranty repair, please contact: Chaney Customer Care
 877-221-1252
 Mon-Fri 8:00 a.m. to 4:45 p.m. CST

  


  
 


 
CU►RITE® Wireless Weather Station
 

Instruction Manual
-Y8°Fa
.,
,-
5"
36'
8 
   

      WED IOt I Ital  
DAY TE  
I 
I ,I
 

    
 


 

 
 


[ 1 • OVERVIEW OF FEATURES ]
  
 

 
 

  

 low]
   
I 
 DAY DATE
 NEXT 12 TO 24 HOURS
 
 
 
 
 7   


  

 - 1 -
About the Atomic Clock
A clock is considered atomic if it has an accuracy of one second in a million
years. Consumer clocks are considered atomic if they attain this accuracy by
receiving a signal from an atomic clock. In North America, the National Institute
of Standards and Technologies operates an atomic clock in Colorado which
transmit the time codes via the the radio station WWVB.The signal is
transmitted in a very low frequency [60,000 Hz]. The Acurite® clock you have
purchased includes a built-in receiver which picks up the signal from the WWVB
station. Dueto solar radiation in the atmosphere, the atomic clock signal is
weak during the day. Most synchronization with the WWVBatomic clock signal
happens at night when there is less interference.
(2 • SETUP )
Install Batteries
NOTE:Install all batteries in both 0
units within a 6 minute period to ABC
,• [§
ensure proper wireless functionality. , , Iii
A.WirelessSensor
1] Removethe 4 battery
compartment screws. <t>, /(t)
2] Removethe battery REMOVE4 SCREWS
compartment cover and 0 TOOPENBATTERY 2 "AA"
COMPARTMENT
install 2 fresh '"AA" BATTERIES
,/ \.
(t) (t)
batteries as shown here.
Alwaysinstall batteries
intothewireless unit
FIRSTto ensure proper INSTALL
3 "AA"
wireless synchronization BATTERIES
with the main unit.
B.MainUnit
Remove the battery
compartment cover and Table Stand
install 3 fresh "AA"
batteries as shown here.
Operating Range of Batteries Extended periods of cold temperatures ( below -4°F / -20°c )
can cause alkaline batteries to function improperly. This will
cause the outdoor wireless sensor to stop transmitting
temperature readings. Use lithium batteries in these low
temperature conditions to ensure continued operation for
wireless sensors placed outdoors.
PLEASEDISPOSEOFOLDORDEFECTIVEBATTERIESINANENVIRONMENTALLY
SAFEWAYANDIN ACCORDANCEWITHYOURLOCALLAWSANDREGULATIONS.
BATTERYSAFETY:Followthepolarity(+/·)diagram Promptly deadbatteriesfromthedevice.inthebatterycompartment. remove
Disposeofusedbatteries Onlybatteries orequivalent aretobeused. incinerateusedproperly. ofthesame typeasrecommended DONOT
batteries.DONOTdisposeofbatteriesinfire,asbatteriesmayexplodeorleak.DONOTmixoldandnewbatteriesortypesofbatteries
DO userechargeable DO recharge(alkaline/standard).NOT batteries. NOT non-rechargeablebatteries.DONOTshort-circuitthesupplyterminals.
- 2 -
Select Celsius (°C]
or Fahrenheit (°F]
Toselect either °For °C, push
the "°F/°C" button located on
the back to the desired
measurement unit. select °C or °F temperature display
Main Unit : Basic Setup
After installing batteries, set the timezone, time, and DST[daylight saving time)
preferences. After the initial manual time setting, the atomic clock will maintain
ifs accuracy and adjust for DSTautomatically.
The main unit will automatically enter into
setup mode for 30 seconds after the "SET"to
ENTERsetup
batteries are installed. After 30 seconds,
you may enter into setup mode by pressing iii
the "SET" button at any time.
"SET"
When first entering basic setup mode, the
time zone will be flashing [default is PST]. pm
Adjust the time zone using the"+" or .._.. nam
a
buttons on the back of the main unit, then ....
press the "SET" button to confirm your "SET"
time zone selection and move on. ...
iii
~~
Now select DST[daylight saving time) "on" 12:38
or "off' by pressing the"+" or .._..buttons .... ..,
on the back of the main unit. Press the
"SET" button to confirm your DST
selection.
Next, adjust the HOURby pressing the 111' ""
"+"or .._..buttons on the back of the main "SET"
unit. Press the "SET" button to confirm
your HOURselection and to move on to
■
:io111jtito
DAY !J'Dl~
MINUTEsetting. Again, adjust the MINUTE "SET"
by pressing the"+" or .._..buttons.
Finally, adjust the DATEusing the"+" or
..-" buttons on the back of the main unit.
Press the "SET" button to move through
setting each DATEnumber [month/date/ EXITsetup
year].
Press the "SET" button one more time to exit basic setup mode. Youmay
enter basic setup mode at any time by pressing the "SET" button.
- 3 -
(3 • PLACEMENT )
Now that setup is complete, you must choose a location to place the wireless
sensor and the main unit. The wireless sensor MUSTbe placed less than 100
feet away from the main unit.
This wireless thermometer uses radio frequency for communication, which is
susceptible to interference from other electronic devices and large metallic
items or thick walls. Always place both units at least 3 feet away from
appliances ITV, microwave, radios, etc. Ior objects Ilarge metal surfaces, thick
stone walls, etc. Ithat may interfere with the wireless communication.
....
'o'
✓.,.
--
/ I \'
100 feet maximum
Placement of Main Unit
Place the main unit in a dry area free of dirt and dust. To help ensure
an accurate indoor temperature measurement, be sure to place the
main unit out of direct sunlight, and away from any heat sources or
vents in your home.
There are 2 placement options for the the main unit. Youmay hang
the main unit on a wall using the integrated hang hole on the back.
Alternatively, you may use the fold out "table stand" to place the
main unit on a table top or other flat surface.
Placement of Sensor
The wireless sensor MUSTBE PLACEDOUTDOORSto observe
outdoor temperatures and relay the outdoor temperature to the main
unit display. The wireless sensor must be placed less than 100feet
from the main unit.
The wireless sensor is water resistant and is designed for outdoor
use. However, to extend the life of the product, place the wireless
sensor in an area protected from direct weather elements. Toensure
an accurate outdoor temperature measurement, be sure the wireless
sensor is placed out of direct sunlight and away from any heat
sources.
- 4 -
Wireless Reception
The main unit has a wireless signal reception
icon in the temperature display area and in the
clock display area. If there are a low number of
"bars" present, you may experience no
temperature display I..__..Ior clock inaccuracy.
In either case, you may need to relocate one or
both of the units. If most or all 4 of the bars are
present, wireless reception is good and no action
wireless sensor temperature
~;~~~';2
8
111111/1111
I I I I I I
rrF y °F. 51'
;outdoortempe
w~o1a,!J'Dl
is required. Atomic clock reception
TIIII TIii TIIII
noreception • • • • • • • • • • •• ••••••.... _ greatreception
(4 • OPERATION )
After the main unit and the wireless sensor are both powered on and wirelessly
synchronized, no further input is required. The atomic clock will automatically
re-synchronize occasionally to ensure the clock is accurate.
14 Day Learning future FORECAST
~14-dayLearningMode
Mode Icon 8
l
Forecast Icon
/11111/111/
I I I I I I
NEXT12 TO24 HOURS
High/Low
1 5~ [outdoor]
~e•F~
LON Ill 3
.iioutdoor temperature __ u,w
WED
10,11,01
DAY DATE
""
ul 1' l~
12:38 l20F
am 6 .
L__
014 Day Learning Mode
This weather station has a patent pending
fourteen day learning mode calibration
process. During this learning mode the
weather station will make altitude
calculations that may affect the accuracy of
the forecast. Oncethe 14 day learning
mode process is complete, the learning
mode icon will disappear and the weather
forecast should be ready for superior
operation.
indoor temperature
0 Forecast Icon
This feature givesyou the
predicted weather forecast for
the next 12to 24 hours based
on an advanced algorithm that
includes barometric pressure
and temperature. This weather
station will provide the most
accurate forecast that a single
station weather instrument can
provide.
- 5 -
High/Low
[indoor]
(9 Daily High/Low
This feature givesyou
the recorded highest &
lowest temperatures
since 12:00am
[midnight] for the
indoor temperature
and the outdoor
temperature.
Troubleshooting
Problem Possible Solution
Bad Temperature Relocate the main unit and/or the wireless
sensor. Both units must bewithin 100feet
Reception from each other. Make sure both units are
placed at least 3 feet from other electronic
T Ill appliances and devices that may interfere
no bars with the wireless communication [such as
TVs, microwaves, computers etc]. NOTE:It
may take up to 20 minutes for the main unit
to resynchronize with the sensor when
batteries are replaced.
Bad Atomic Clock Relocate the main unit. Make sure main unit
is placed at least 3 feet from other electronic
Reception appliances and devices that may interfere
T Ill with the wireless communication [such as
TVs, microwaves, computers etc]. Large
no bars metallic surfaces will also interfere with the
atomic clock signal.
No Outdoor If wireless reception is bad [no bars]. see
Temperature or "Bad Reception··section above.The wireless
Humidity Display ID setting on each unit must match for both
units to communicate properly. See "Set
(no communication] Wireless 10··on the next page.
Main Unit
Display Not Working Make certain that the batteries are installed
correctly. The batteries may need replacing.
ACU
►
RITE.
Product Registration
DESIGNEDTOWORKFORYOU"
To receive product information, register
your product online. It's quick and easy!
Logon to http://www.chaneyinstrument.com/product_reg.htm
- 6 -
Set Wireless ID
This wireless thermometer
uses long range 433mhz
radio frequency for
communication.
In the event that you have
reception problems due to
interference, both the main
unit and the wireless sensor
have a selectable wireless
ID. The ID switches are
located within the battery
compartments of the main
unit and the wireless
sensor.
You may choose A, B or C;
but both the main units' and
the wireless sensors' IDs
must match for successful
synchronization.
(5 • PRODUCT SPECIFICATIONS
both wireless ID's
must match
)
Measurement Ranges
Temperature
Main Unit: 32°F to 122°F / o0cto 50°C
Wireless Sensor: -40°F to 158°F / -40°C to 70°C
Specifications
Power Requirements
Main Unit: 3 x ··AA"alkaline or lithium batteries
Wireless Sensor: 2 x "AA""alkaline or lithium batteries
Wireless Communication
Radio Frequency: 433 mhz
Transmission Intervals: every 16seconds
Atomic Clock
Frequency: WWVB6oKhz
Synchronizes Daily
-7 -

Other manuals for 75077

1

Other ACU-RITE Weather Station manuals

ACU-RITE 607 User manual

ACU-RITE

ACU-RITE 607 User manual

ACU-RITE 00613 User manual

ACU-RITE

ACU-RITE 00613 User manual

ACU-RITE 00787 User manual

ACU-RITE

ACU-RITE 00787 User manual

ACU-RITE 00594W User manual

ACU-RITE

ACU-RITE 00594W User manual

ACU-RITE 01121 User manual

ACU-RITE

ACU-RITE 01121 User manual

ACU-RITE 00828BPDI User manual

ACU-RITE

ACU-RITE 00828BPDI User manual

ACU-RITE 02081 User manual

ACU-RITE

ACU-RITE 02081 User manual

ACU-RITE 00899 User manual

ACU-RITE

ACU-RITE 00899 User manual

ACU-RITE 01010 User manual

ACU-RITE

ACU-RITE 01010 User manual

ACU-RITE 01021 User manual

ACU-RITE

ACU-RITE 01021 User manual

ACU-RITE 06058 User manual

ACU-RITE

ACU-RITE 06058 User manual

ACU-RITE 06022 User manual

ACU-RITE

ACU-RITE 06022 User manual

ACU-RITE 1035 User manual

ACU-RITE

ACU-RITE 1035 User manual

ACU-RITE 01525 User manual

ACU-RITE

ACU-RITE 01525 User manual

ACU-RITE 75077 User manual

ACU-RITE

ACU-RITE 75077 User manual

ACU-RITE 01021 User manual

ACU-RITE

ACU-RITE 01021 User manual

ACU-RITE 02085 User manual

ACU-RITE

ACU-RITE 02085 User manual

ACU-RITE 01518 User manual

ACU-RITE

ACU-RITE 01518 User manual

ACU-RITE 1036 User manual

ACU-RITE

ACU-RITE 1036 User manual

ACU-RITE Iris 06106 User manual

ACU-RITE

ACU-RITE Iris 06106 User manual

ACU-RITE 02036WB User manual

ACU-RITE

ACU-RITE 02036WB User manual

ACU-RITE 00639W User manual

ACU-RITE

ACU-RITE 00639W User manual

ACU-RITE Iris 06014 User manual

ACU-RITE

ACU-RITE Iris 06014 User manual

ACU-RITE 01123 User manual

ACU-RITE

ACU-RITE 01123 User manual

Popular Weather Station manuals by other brands

Eurochron 2203062 operating instructions

Eurochron

Eurochron 2203062 operating instructions

Hyundai 2005 Elantra instruction manual

Hyundai

Hyundai 2005 Elantra instruction manual

Hyundai WS 1728 instruction manual

Hyundai

Hyundai WS 1728 instruction manual

SE Controls Stand Alone Rain Sensor Technical information and operating instructions

SE Controls

SE Controls Stand Alone Rain Sensor Technical information and operating instructions

La Crosse Technology WS9090 instruction manual

La Crosse Technology

La Crosse Technology WS9090 instruction manual

Denver TRC-1480 MK2 instruction manual

Denver

Denver TRC-1480 MK2 instruction manual

La Crosse Technology WS-2310TWC Quick setup manual

La Crosse Technology

La Crosse Technology WS-2310TWC Quick setup manual

La Crosse Technology 308-179OR manual

La Crosse Technology

La Crosse Technology 308-179OR manual

UPM WS928 owner's manual

UPM

UPM WS928 owner's manual

Tesla MS360 user manual

Tesla

Tesla MS360 user manual

Ventus W831 user manual

Ventus

Ventus W831 user manual

Oregon Scientific THGN122N user manual

Oregon Scientific

Oregon Scientific THGN122N user manual

Youshiko YC9444 manual

Youshiko

Youshiko YC9444 manual

Clas Ohlson IW003 quick start guide

Clas Ohlson

Clas Ohlson IW003 quick start guide

Gogen ME 3900 quick start guide

Gogen

Gogen ME 3900 quick start guide

Pacific Data Systems Feedlot Weather Station Assembly instructions

Pacific Data Systems

Pacific Data Systems Feedlot Weather Station Assembly instructions

SwitchDoc Labs SkyWeather2 manual

SwitchDoc Labs

SwitchDoc Labs SkyWeather2 manual

TLC CKC8105 User instructions

TLC

TLC CKC8105 User instructions

manuals.online logo
manuals.online logoBrands
  • About & Mission
  • Contact us
  • Privacy Policy
  • Terms and Conditions

Copyright 2025 Manuals.Online. All Rights Reserved.