Acumen AiS-S32L User manual

AiS HD Series
Speed Dome Camera
INSTRUCTION MANUAL

2/89
Safety Precaution
Make sure to turn off the power before installing camera.
Do not install under the direct sunlight or in dusty areas.
Make sure to use the product within the temperature and humidity specified in the
specification.
Do not operate the product in presence of vibrations or strong magnetic fields.
Do not put electrically conducting materials in the ventilation hole.
Do not open the top cover of the products. It may cause a failure or electric shock on the
components.
To prevent from overheating, make sure to keep the distance at least 10cm from the
ventilation hole.
Make sure proper voltage before connecting the power.
We appreciate your purchasing Megapixel IP PTZ camera.
Before installing the product, please read the following with care.

3/89
Table of Content
Chapter 1 Production........................................................................................................................................ 6
1.1 Introduction............................................................................................................................................ 6
1.1.1 About this manual........................................................................................................................ 6
1.1.2 Features...................................................................................................................................... 6
1.1.3 Product and Accessories............................................................................................................. 8
1.1.4 Part Names and Functions.......................................................................................................... 9
1.1.5 System Connections ................................................................................................................. 10
1.2 Installation ............................................................................................................................................ 12
1.2.1 Installation Camera with Brackets............................................................................................. 12
1.2.2 Installation using Wall Mount Bracket ....................................................................................... 13
1.2.3 Check if it works........................................................................................................................ 14
Chapter 2 Network Connection..................................................................................................................... 15
2.1 Setting the Network Zoom Camera over the LAN................................................................................ 15
2.1.1 Wiring over the LAN................................................................................................................... 15
2.1.2 Detecting and Changing the IPAddress.................................................................................... 16
2.2 Setting the Network Zoom Camera over the WAN........................................................................ 17
2.2.1 Static IP Connection ................................................................................................................ 17
2.2.2 Dynamic IP Connection........................................................................................................... 18
Chapter 3 Access to the Network .............................................................................................................. 21
3.1 Accessing by Web Browsers............................................................................................................. 21
3.2 Accessing by Client Software............................................................................................................ 23
Chapter 4 Live View ...................................................................................................................................... 25
4.1 Live View Page .................................................................................................................................. 25
4.2 Starting Live View............................................................................................................................... 26
4.3 Recording and Capturing Pictures Manually.................................................................................... 27
4.4 Operating PTZ Control....................................................................................................................... 27
4.4.1 PTZ Control Panel................................................................................................................... 27
4.4.2 Setting / Calling a Preset ....................................................................................................... 27
4.4.3 Setting / Calling a Patrol ........................................................................................................ 28
4.4.4 Configuring Power Off Memory .............................................................................................. 29
4.4.5 Configuring Park Actions......................................................................................................... 30
4.5 Configuring Live View Parameters.................................................................................................... 31
Chapter 5 Camera Configuration................................................................................................................. 32
5.1 Configuring Local Parameters ........................................................................................................... 32
5.2 Configuring Time Settings.................................................................................................................. 33
5.3 Configuring Network Settings ............................................................................................................ 36

4/89
5.3.1 Configuring TCP/IP Settings.................................................................................................... 36
5.3.2 Configuring Port Settings......................................................................................................... 37
5.3.3 Configuring PPPoE Settings.................................................................................................... 37
5.3.4 Configuring DDNS Settings..................................................................................................... 38
5.3.5 Configuring SNMP Settings..................................................................................................... 41
5.3.6 Configuring 802.1X Settings.................................................................................................... 42
5.3.7 Configuring QoS Settings........................................................................................................ 43
5.3.8 Configuring FTP Settings......................................................................................................... 44
5.3.9 Configuring UPnP™ Settings.................................................................................................. 45
5.3.10 Configuring NAT (Network Address Translation) Settings.................................................. 46
5.3.11 Configuring Email Settings..................................................................................................... 46
5.4 Configuring Video and Audio Settings ............................................................................................. 48
5.4.1 Configuring Video Settings...................................................................................................... 48
5.4.2 Configuring Audio Settings...................................................................................................... 49
5.4.3 Configuring ROI........................................................................................................................ 50
5.5 Configuring Image Settings................................................................................................................ 51
5.5.1 Configuring Display Settings ................................................................................................... 51
5.5.2 Configuring OSD Settings ....................................................................................................... 56
5.5.3 Configuring Text Overlay Settings .......................................................................................... 57
5.5.4 Configuring Privacy Mask........................................................................................................ 58
5.6 Configuring and Handling Alarms..................................................................................................... 59
5.6.1 Configuring Motion Detection .................................................................................................. 59
5.6.2 Configuring Video Tampering Alarm....................................................................................... 62
5.6.3 Handling Exception................................................................................................................... 64
Chapter 6 Record Settings........................................................................................................................... 65
6.1 Configuring NAS Settings.................................................................................................................. 65
6.2 Configuring Recording Schedule....................................................................................................... 66
6.3 Configuring Snapshot Settings .......................................................................................................... 69
Chapter 7 Playback........................................................................................................................................ 72
Chapter 8 Log Searching.............................................................................................................................. 75
Chapter 9 Others............................................................................................................................................ 76
9.1 Managing User Accounts................................................................................................................... 76
9.2 Configuring RTSPAuthentication......................................................................................................... 78
9.3 Configuring Anonymous Visit............................................................................................................. 78
9.4 Configuring IPAddress Filter................................................................................................................ 79
9.5 Viewing Device Information ............................................................................................................... 79
9.6 Maintenance........................................................................................................................................ 80
9.6.1 Rebooting the Zoom camera.................................................................................................. 80

5/89
9.6.2 Restoring Default Settings....................................................................................................... 80
9.6.3 Importing/Exporting Configuration File.................................................................................... 81
9.6.4 Upgrading the System............................................................................................................. 81
9.6.5 Enabling/Disabling Telnet......................................................................................................... 82
Appendix .......................................................................................................................................................... 83
Appendix 1 SADP Software Introduction ................................................................................................ 83
Appendix 2 Port Mapping......................................................................................................................... 84

6/89
Chapter 1 Production
1.1 Introduction
1.1.1 About this manual
This User Manual provides information on operating and managing the megapixel IP PTZ camera. The
Manual includes instructions of installation, operation and configuration of megapixel IP PTZ camera as well
as how to make troubleshooting.
1.1.2 Features
This product is a megapixel PTZ network-based camera with remote live monitoring, audio monitoring and
control via an IP network such as LAN, ADSL/VDSL, and Wireless LAN.
Video
Highly efficient compression algorithm, H.264 & MJPEG support
Wide range of transmission rates: 32kbps ~ 16mbps
Various transmission modes: CBR, VBR
Motion
detection
Audio
Multi-transmission mode: Simplex (IP PTZ camera Client PC or Decoder, Client PC or Decoder IP
PTZ camera), Full Duplex
Network
Fixed IP & Dynamic IP (DHCP) support
1:1, 1:N support
Multicasting
Various types of Protocol support : TCP/IP, UDP, Multicast, DHCP, SMTP, HTTP, SNMP, RTP, RTSP
OnVIF, PSIA compliant
Serial Data
Data pass-through mode : Serial data communication between megapixel IP PTZ camera and Decoder
Event Alarm
Event Alarm notification, camera can be set to move to the corresponding Preset position.

7/89
User Interface
Diagnose and upgrade through dedicated program called ACUMEN INT.CORP
System configuration using Internet Explorer
High Reliability
Reliable embedded system
Powerful Pan/Tilt Functions
Max. 150/sec high speed Pan/Tilt Motion
Using Vector Drive Technology, Pan/Tilt motions are accomplished in a shortest path. As a result, time to
target view is reduced dramatically and the video on the monitor is very natural to watch.
For jog operation using a controller, since ultra slow speed 0.05/sec can be reached, it is very easy to
locate camera to desired target view. Additionally it is easy to move camera to a desired position with
zoom-proportional pan/tilt movement.
Preset, Pattern, Swing, Group
MAX. 128 Presets are assignable and characteristics of each preset can be set up independently,
Max. 8 set of Swing action can be stored. This enables to move camera repetitively between two preset
positions with designated speed.
Max. 1 of Patterns can be recorded and played back. This enables to move camera to follow any
trajectory operated by joystick as closely as possible.
PTZ(Pan/Tilt/Zoom) Control
Pelco-D or Pelco-P protocol can be selected as a control protocol in the current version of firmware..
Easy Installation and Perfect Outdoor Environment Compatibility
Fans is built-in in camera for hot temperature environment. Also idealistic mechanical design protects
camera from water and dust
It is easy to install and maintain camera with terminal for cable connection in brackets.

8/89
1.1.3 Product and Accessories
Note: Mount Brackets are optional.
Wall Mount Bracket Ceiling Mount Bracket
[Screws :Allen Screw HM612, Hex Lag #1450] [Screws : Allen Screw M612,Anchor Bolt 3/8"70]
Main body Accessories
H
exKey:CRV5.0MM Straight screwdriver
CRV2.5MM
Power Supply Installation manual

9/89
1.1.4 Part Names and Functions
A. 3/4'' Silicone Knockout Plug
B. Safely Rope
C. Camera Assembly
D. Water Joint
E. Connecter
F. Wall Mount
G. I/O Cable
H. 5.0 mm Hex Key
2.5 mm Hex Key
•Dome CoverDo not detach protection vinyl from dome cover before finishing all
installation process to protect dome cover from scratches or dust.
•Drop Prevention
Spring This part keeps the camera from dropping during installation and
maintenance. After install the Bracket, please, hang the spring to
the drop prevention hook of main body as shown in picture for
further tasks.
•Mounting Screw
Hole This hole is for screws that assembles the main body with a
bracket.
•LAN Port Used for the Ethernet connection
•Audio Port Used for the audio in/out connection.
•Video (BNC) Used for the composite video out connection
•Power Connector Used for the power wire connection cable.
C
F
D
B
E
G
A
H

10/89
or
or
or
1.1.5 System Connections
IP Camera can be connected in either 1 to 1 connection where one camera is connected to one PC client or a
decoder system or 1 to many connections where one camera can be connected to several PCs and decoder
systems. (video server can work as a video decoder which takes the data from a video server or IP camera,
decodes and outputs analog video.)
Topology
Generally, megapixel IP Camera and PC or a decoder is connected in 1-to-1 mode or 1-to many configuration.
1:1 Connection .
One camera is installed at a site where video images are transmitted. A PC or a decoder is installed at a
central location to receive and view the video images on an analog monitor. Audio and serial data are
transferred in either direction.
1:N Connection .
Site Remote Center (Decoder) Remote Center
Site Remote Center (PC SW)
Site Remote Center

11/89
In this configuration, a site can be monitored from many remote central locations. Although up to 64 PCs or
decoders can be connected to one camera, in the real network environment, network bandwidth can limit the
maximum connections. Functionally, the central monitoring system (CMS) software provided can replace the
decoder.
Multicast Mode
If the network supports multicasting, a large number of decoders can be used to receive video effectively from
a camera using a single streaming of video and audio. However, multicast mode is possible only when
network environment supports multicast.
Relay
Video and audio data can be retransmitted from a center to another center. The arrangement is useful when
the network bandwidth to the site is limited while there are more than one center want to monitor the site.
iVMS-4200 (Video Management System)
iVMS-4200 (Central Monitoring System) is a Window-based remote monitoring program in order to monitor or
control video, audio, and events in real time from several IP cameras or video servers. Please refer to the
iVMS-4200 User Manual for more in detail.
Site Remote Center
Site Center 1(Decoder) Center 2 (Decoder)
Site Remote Center (Decoder) CMS

12/89
1.2 Installation
1.2.1 Installation Camera with Brackets
Installation using Ceiling Mount Bracket
①Remove the ceiling tile from the ceiling and cut a
hole whose diameter is 30~40mm on the ceiling tile
to pass the wire(s) and cable(s) through to the
upside of the ceiling. (In case of the wiring and
cabling through the mounting surface only) Then
prepare the ceiling mount bracket. Pull the wire(s)
for the system as below. (Anchor Bolt 3/8"×70)
②Hook up “Drop Prevention Spring” on main body
to prevent camera from unexpected drop and pull
the wire(s) and cable(s) for the system as below
③Line up the mold lines and assemble main body
to mount adaptor and turn it. And assemble the
main both with the camera mount adaptor with
the screws. (Torx screw M4X18). Please make
sure the screws are tightly assembled for
waterproof.
Notice
To adjust the installation height from the mounting surface, the pipe and coupler should be needed
between the surface mount part of the ceiling mount bracket and the camera mount part of the ceiling
mount bracket. Note that they are not supplied by the manufacturer.
13/89
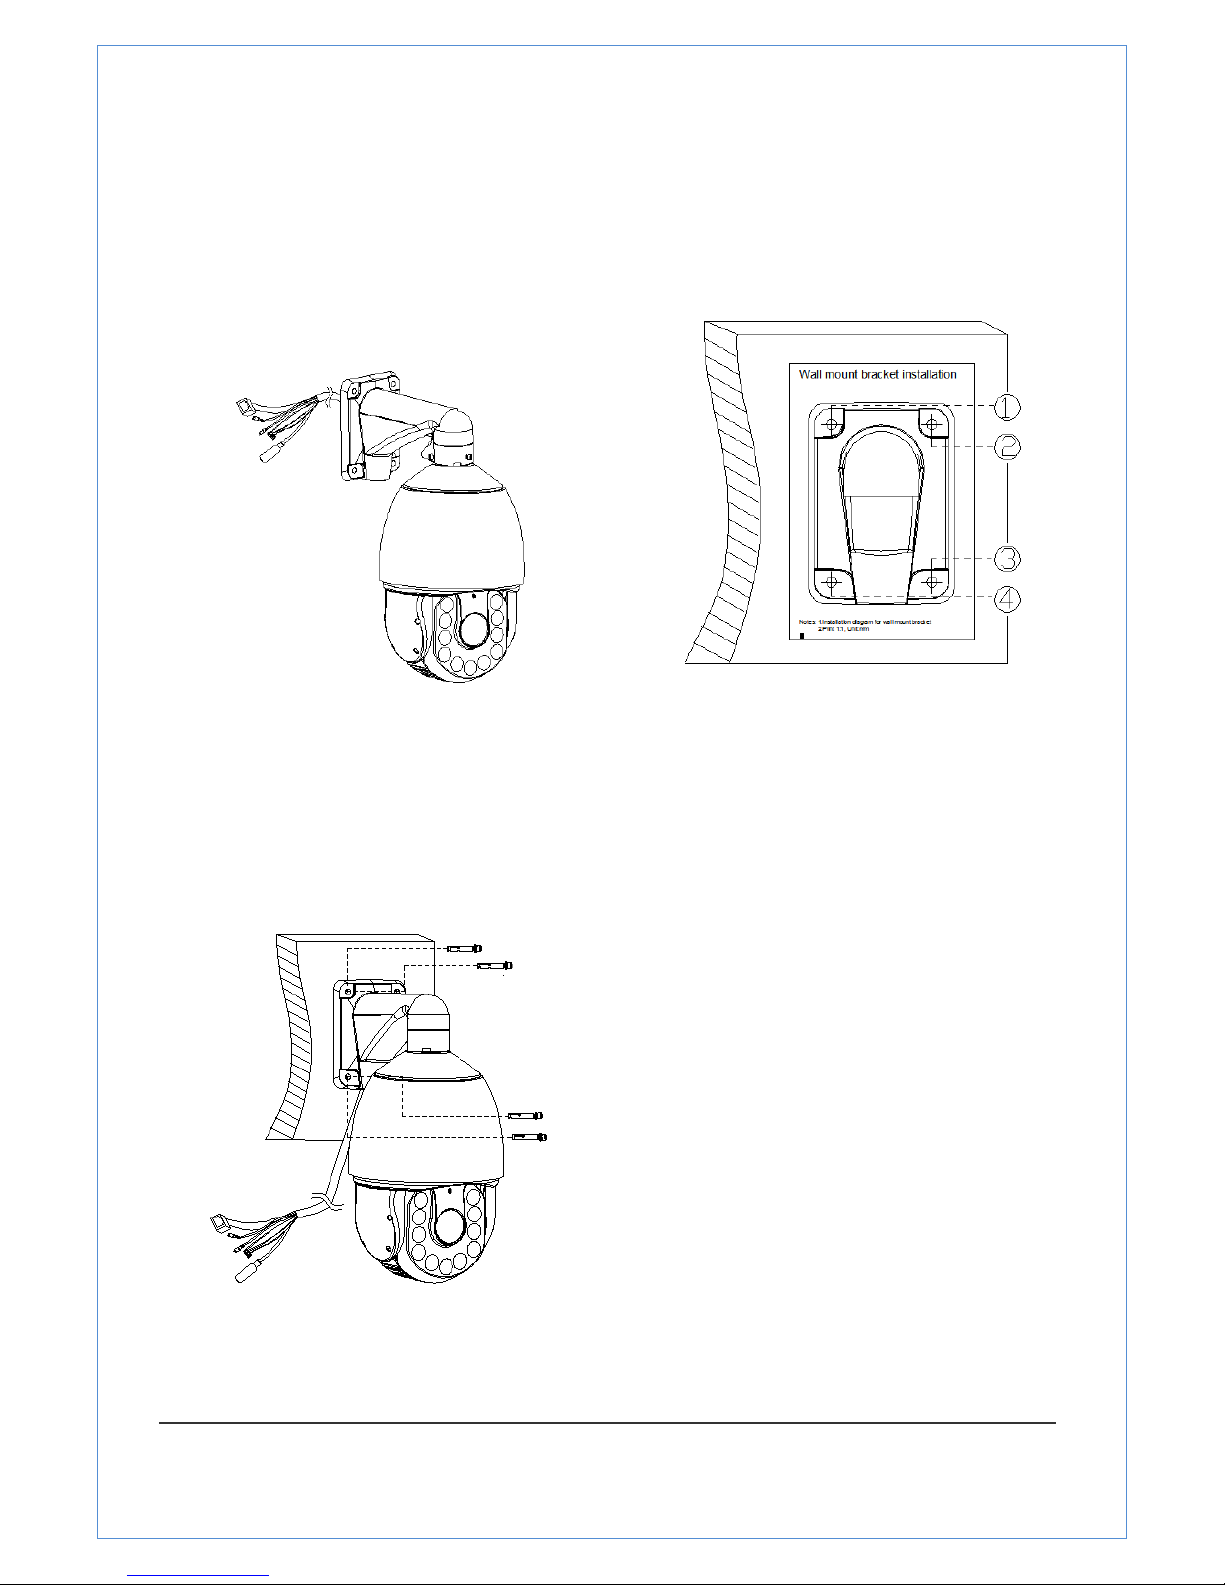
1.2.2 Installation using Wall Mount Bracket
①Make a hole whose diameter is 30~40mm on the
mounting surface to pass the wire(s) and cable(s)
through the mounting surface. (In case of the wiring
and cabling through the mounting surface only) Then
prepare the wall mount bracket. Pull the wire(s) and
cable(s) for the system as below. Attach the wall mount
bracket to the mounting surface. (Hex Lag #14×50)
②Hook up “Drop Prevention Spring” on main
body to prevent camera from unexpected drop
and pull the wire(s) and cable(s) for the
system as below.
③Line up the mold lines and assemble main body to
mount adaptor and turn it. And assemble the main
both with the camera mount adaptor with the screws.
(Torx screw M5X12). Please make sure the screws
are tightly assembled for waterproof.
④Screw the dome cover to the main body and
remove the protection vinyl from the dome
cover.

14/89
1.2.3 Check if it works
Once the power is supplied to the camera, it will start booting. The system will boot up to an operating mode
after approximately 30-40 seconds.
The software provided in the CD called (iVMS-4200)Video Manager allows you to check the IP address and
other network details of the camera. Please refer to the ACUMEN INT.CORP manual for instructions on how
to find the IP address of the camera and change it if required.

15/89
Chapter 2 Network Connection
Before you start:
●IfyouwanttosetthenetworkzoomcameraviaaLAN(LocalAreaNetwork),
pleaserefertoSection4.1SettingtheNetworkZoomcameraovertheLAN.
●IfyouwanttosetthenetworkzoomcameraviaaWAN(WideAreaNetwork),
pleaserefertoSection4.2SettingtheNetworkZoomcameraovertheWAN.
2.1 Setting the Network Zoom Camera over the LAN
Purpose:
ToviewandconfigurethezoomcameraviaaLAN,youneedtoconnectthenetwork
zoomcamerainthesamesubnetwithyourcomputer,andinstalltheSADPor
iVMS‐4200softwaretosearchandchangetheIPofthenetworkzoomcamera.
Note:ForthedetailedintroductionofSADP,pleaserefertoAppendix1.
2.1.1 Wiring over the LAN
Thefollowingfiguresshowthetwowaysofcableconnectionofanetworkzoom
cameraandacomputer:
Purpose:
●Totestthenetworkzoomcamera,youcandirectlyconnectthenetworkzoom
cameratothecomputerwithanetworkcableasshowninFigure2‐1.
●RefertotheFigure2‐2tosetthenetworkzoomcameraovertheLANviaa
switchorarouter.
Figure2‐1ConnectingDirectly
Network Camera Computer

16/89
Figure2‐2ConnectingviaaSwitchoraRouter
2.1.2 Detecting and Changing the IP Address
YouneedtheIPaddresstovisitthenetworkzoomcamera.
Steps:
1. TogettheIPaddress,youcanchooseeitherofthefollowingmethods:
◆UseSADP,asoftwaretoolwhichcanautomaticallydetecttheonline
networkzoomcamerasintheLANandlistthedeviceinformationincluding
IPaddress,subnetmask,portnumber,deviceserialnumber,deviceversion,
etc.,showninFigure2‐3.
◆Usetheclientsoftwaretolisttheonlinedevices.Pleaserefertotheuser
manualofclientsoftwarefordetailedinformation.
2. ChangetheIPaddressandsubnetmasktothesamesubnetasthatofyour
computer.
3. EntertheIPaddressofnetworkzoomcameraintheaddressfieldoftheweb
browsertoviewthelivevideo.
Notes:
●ThedefaultIPaddressis192.0.0.64.Thedefaultusernameisadmin,and
passwordis12345.
●Foraccessingthenetworkzoomcamerafromdifferentsubnets,pleasesetthe
Gatewayforthenetworkzoomcameraafteryouloggedin.Fordetailed
information,pleaserefertoSection5.3.1ConfiguringTCP/IPSettings.
Network Camera Com
p
uter

17/89
Figure2‐3SADPInterface
2.2 Setting the Network Zoom Camera over the WAN
Purpose:
ThissectionexplainshowtoconnectthenetworkzoomcameratotheWANwitha
staticIPoradynamicIP.
2.2.1 Static IP Connection
Beforeyoustart:
PleaseapplyastaticIPfromanISP(InternetServiceProvider).WiththestaticIP
address,youcanconnectthenetworkzoomcameraviaarouterorconnectittothe
WANdirectly.
●Connectingthenetworkzoomcameraviaarouter
Steps:
1. Connectthenetworkzoomcameratotherouter
2. AssignaLANIPaddress,thesubnetmaskandthegateway.RefertoSection4.1.2
DetectingandChangingtheIPAddressfordetailedIPaddressconfigurationof
thezoomcamera.
3. SavethestaticIPintherouter.
4. Setportmapping,E.g.,80,8000and554ports.Thestepsforportmappingvary
Dependingondifferentrouters.Pleasecalltheroutermanufacturerforassistance
withportmapping
Note:RefertoAppendix2fordetailedinformationaboutportmapping.
5. Visitthenetworkzoomcamerathroughawebbrowserortheclientsoftware
overtheinternet.

18/89
Figure2‐4AccessingtheZoomcamerathroughRouterwithStaticIP
●ConnectingthenetworkzoomcamerawithstaticIPdirectly
YoucanalsosavethestaticIPinthezoomcameraanddirectlyconnectittothe
internetwithoutusingarouter.RefertoSection4.1.2DetectingandChangingtheIP
AddressfordetailedIPaddressconfigurationofthezoomcamera.
Figure2‐5AccessingtheZoomcamerawithStaticIPDirectly
2.2.2 Dynamic IP Connection
Beforeyoustart:
PleaseapplyadynamicIPfromanISP.WiththedynamicIPaddress,youcanconnect
thenetworkzoomcameratoamodemorarouter.
●Connectingthenetworkzoomcameraviaarouter
Steps:
1. Connectthenetworkzoomcameratotherouter.
2. Inthezoomcamera,assignaLANIPaddress,thesubnetmaskandthegateway.
RefertoSection4.1.2DetectingandChangingtheIPAddressfordetailedLAN
configuration.
3. Intherouter,setthePPPoEusername,passwordandconfirmthepassword.
4. Setportmapping.E.g.80,8000and554ports.Thestepsforportmappingvary
dependingondifferentrouters.Pleasecalltheroutermanufacturerforassistance
withportmapping.
Note:RefertoAppendix2fordetailedinformationaboutportmapping.
5. Applyadomainnamefromadomainnameprovider.
6. ConfiguretheDDNSsettingsinthesettinginterfaceoftherouter.
7. Visitthezoomcameraviatheapplieddomainname.
Network Camera Com
p
uter
Network Camera with Static IP Computer

19/89
●Connectingthenetworkzoomcameraviaamodem
Purpose:
ThiszoomcamerasupportsthePPPoEautodial‐upfunction.Thezoomcameragetsa
publicIPaddressbyADSLdial‐upafterthezoomcameraisconnectedtoamodem.
YouneedtoconfigurethePPPoEparametersofthenetworkzoomcamera.Referto
Section6.3.3ConfiguringPPPoESettingsfordetailedconfiguration.
Figure2‐6AccessingtheZoomcamerawithDynamicIP
Note:TheobtainedIPaddressisdynamicallyassignedviaPPPoE,sotheIPaddress
alwayschangesafterrebootingthezoomcamera.Tosolvetheinconvenienceofthe
dynamicIP,youneedtogetadomainnamefromtheDDNSprovider(E.g.
DynDns.com).Pleasefollowbelowstepsfornormaldomainnameresolutionand
privatedomainnameresolutiontosolvetheproblem.
◆ NormalDomainNameResolution
Figure2‐7NormalDomainNameResolution
Steps:
1. Applyadomainnamefromadomainnameprovider.
2. ConfiguretheDDNSsettingsintheDDNSSettingsinterfaceofthenetworkzoom
camera.RefertoSection6.3.4ConfiguringDDNSSettingsfordetailed
configuration.
3. Visitthezoomcameraviatheapplieddomainname.

20/89
◆PrivateDomainNameResolution
Figure2‐8PrivateDomainNameResolution
Steps:
1. InstallandruntheIPServersoftwareinacomputerwithastaticIP.
2. AccessthenetworkzoomcamerathroughtheLANwithawebbrowserorthe
clientsoftware.
3. EnableDDNSandselectIPServerastheprotocoltype.RefertoSection6.3.4
ConfiguringDDNSSettingsfordetailedconfiguration.
Table of contents
Other Acumen Security Camera manuals


