Intelliconn incontrol VERSA Cam PTZ Wi-Fi User manual

1
Page1
VERSA Cam PTZ Wi-Fi
Quick Start Guide
1. What’s in the Box
Allen Wrench 12V power adaptor
3 mounting screws 3 wall anchors
Ethernet cable PTZ Camera
Wi-Fi antenna 32GB Memory card
2. Open the panel on the back w/screwdriver, insert
memory card into slot. Do not force card, it should
slide in with a springy click. Card Logo toward front
lens of camera, narrow end with gold contacts goes in
first.
3. Attach antenna.
Plug in camera (AC
adapter) & connect
camera to the
network router
(using ethernet
cable).
4. Make sure your mobile device (phone) is
connected to the same router (home Wi-Fi LAN)
as the camera. Search for iSmCam in the App
Store (IOS) or Google Play (Android). Download
and install the app.
5. Open the app. Click “Add Camera.
6.
9. Click “Scan QR code, add UID”, then scan the QR
code on camera
10. The code will auto-fill the
form. Edit the name if
desired.
Click checkmark (or
“Done” on iOS)
upper right.
The camera will
attempt to connect
8. Select the settings “gear”, scroll down list and
select the Time Setting menu.
Tap “Sync with phone time”, then
choose your Device Time Zone, and
tap “Save Time Zone to Device”
9. Device will reboot.
10. Exit the menu, and choose “Change Password”
off settings menu.
11. Enter old PW (admin), then new PW (your
choice) and confirm. Click apply.

2
Page2
General Settings –Wi-Fi Setup
General Settings –Email Notifications
1. To set up Wi-Fi, open the App, select the camera
setting screen. (select the gear icon)
2. Select the Wi-Fi Setting Menu, then click on Wi-
Fi Manager
3. Select Wi-Fi network you want to connect to. If
using a Hub network, set that up first in order to
be able to see that
Wi-Fi signal and
connect to it.
4. On the next screen
you will be
prompted for the
Wi-Fi’s password.
Enter and choose
“Apply”
5. When settings are saved. App displays “Wi-Fi Setting
Success” message. Remove ethernet cable and verify
it reconnects.
6. If Wi-Fi connection is
not successful (ie wrong
password), reconnect
cable and repeat Wi-Fi
setup.
You can now disconnect
the ethernet cable, mount
and repower the camera
where it will be installed to
test the Wi-Fi connection.
You should now be able to view a live stream of your
camera. Tap the thumbnail image of your camera to
open a full screen view.
See screen controls later in this procedure.
Next up: Email Notifications
A secure 2-step authentication process will be
detailed.
An alternative is to simply use the password for your
Gmail account, rather than setting up “2-step
authentication”. However, you will need to change
the security settings in your Gmail account to allow
“less secure app access” to do this.
If you want email notifications, we recommend you
set up a new Gmail account specifically for cameras.
4. Open Google, and create a new Gmail address.
Here is a link to a good tutorial.
https://www.lifewire.com/how-to-create-a-gmail-
account-1171924
5. After creating the address, go to Google account
settings. Click the round icon for your account, in
the upper right corner. Then click blue button
labelled Google Account.
3. This will open a new page. Click “Security” either
along the top or the Left-hand side of the page.
3
Page3
General Settings –Email Notifications, cont.
15. Scroll down and click on 2-Step Verification
16. Follow the steps. Enter the password for your
account. It will ask you to use a phone as your
second sign-in step. You can use “Google
Prompt” or alternatively, set up a text msg or
phone call. If using a text msg, wait for the text
to arrive, then enter it where asked. Then “Turn
On 2-step Verification.
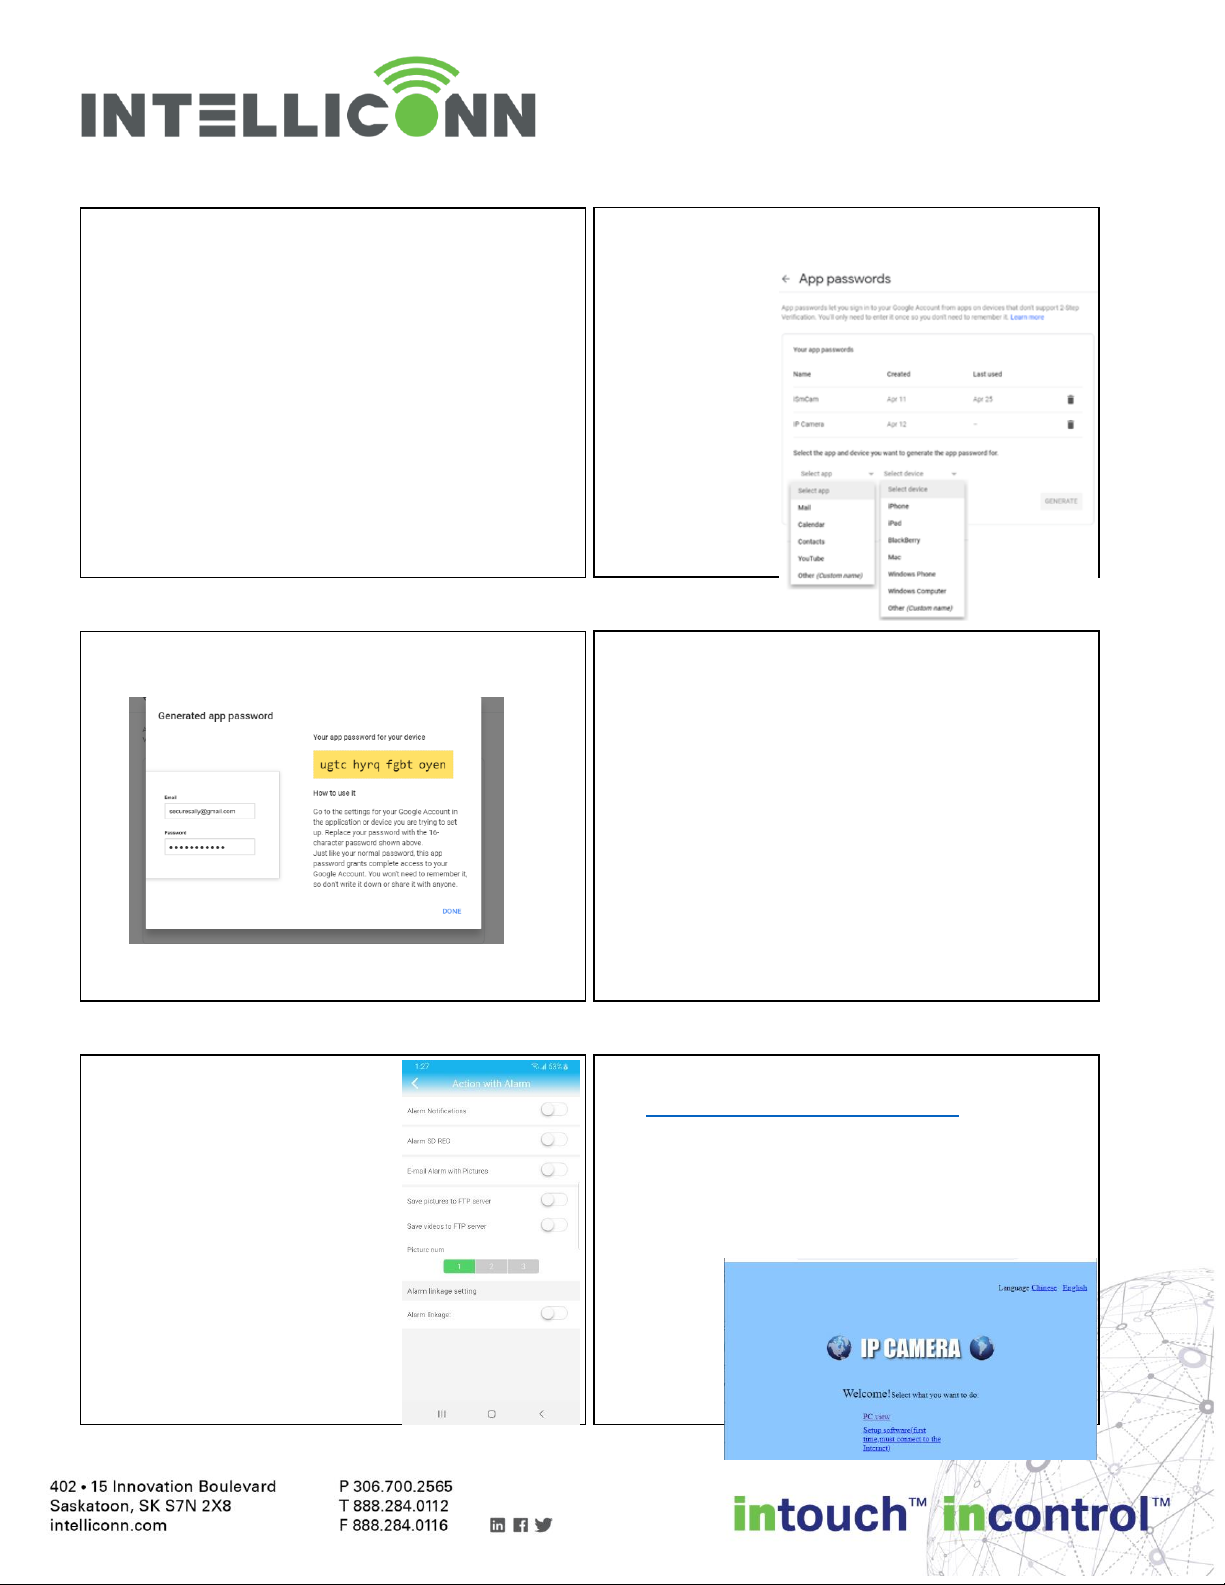
17. Return to the main Security menu. Scroll down
to Signing in to Google. Now the option of “App
Passwords” is available. Click on it.
6. Once again enter your password. This will open a
new page. Confirm your account and enter in
the text msg
code.
7. The App
Passwords
screen will
appear. Use
either “app” or
device. Select
“Other” and
“Generate”.
9. Copy the password down. This is a unique
password that will only work for one app login.
And return to iSmCam. Go to Email Settings.
7. Enter the following information:
SMTP Server: smtp.gmail.com
Server Port: 465
Encrypt Type: SSL
Username: {your full Gmail address}
Password: {App password just generated}
Send to: (an email address to receive notices}
Sender: {a camera identifier, ie “Barn Cam”}
Subject: {ie. “alarm”, “motion detected”}
Message: {your choice, ie “Motion was detected”}
Tap TEST. If Successful, tap APPLY
11. Exit to the camera settings,
and choose Action with
Alarm. Turn on the “E-mail
Alarm with Pictures”. Also
choose between 1 to 3
pictures to attach.
12. The mobile app defaults to
24/7 alarm. To get alarm
emails only at certain times,
set up a schedule through
either a web browser, or use
the PC software.
13. PC software may be downloaded at
https://intelliconn.com/downloads
To use a web browser, check “Device
information” for the IP address, then open a
browser on a PC and type the IP address into the
address bar. A pop-up login screen will appear.
Type in “admin” and your password.
14. Click on
PC View.

4
Page4
General Settings –Email Notifications, schedule
Pan Tilt Zoom –Moving, Focusing and adding shortcuts
Once you have selected a PTZ equipped camera you will have access to the pan tilt and zoom functions of the
camera. One of the best features is marking points that you can quickly go to.
15. Click on “Settings” tab. Then “ALARM”, then
“schedule”
16. Click the green squares for times you don’t want
alerts. Or clear the list and then select squares to turn
green for times you do want alerts. Click “Apply”.
17.
17. Or, to use PC software, download, install, open,
and add the camera (see supplemental
instructions). Open “Settings”→ “Parameter
Settings” →“Alarm Settings” →“Alarm
Schedule”
18. Click and drag the mouse left to right or up to
down to block sections of the schedule to
activate (green) or deactivate those times. Click
“OK”
And return to iSmCam. Go to Email Settings.
19. Please note that when alarm schedule is
deactivated, the camera will not detect or
record motion. To cover those times, set the
camera for scheduled recording.
20. An additional alarm trigger can be set through
the browser or PC software interface that is not
available in the mobile app interface. A “Sound
Alarm”. If turned on, a loud sound can trigger
recording and an email.
1. Open the iSmCam app and
select a PTZ camera.
To move the camera focus,
swipe your finger across the
screen in the direction you wish
it to move.
2. To zoom, tap the magnifying
glass icon. The zoom menu will
appear. Press and hold to zoom
continuously, or tap for small
increments. Camera will auto
refocus, after a long zoom.
3. To manually focus, tap on the
Zoom icon to open menu. Tap
on “Focus in” or “Focus out” to
adjust focus in small
increments, if required. Press
and hold for larger adjustments.
Direction of:
Finger swipe = Camera motion
5
Page5
Operation –Playback and Export
To find and play back a video recording is very easy using the ISmCam app. The following procedure will show
you how to find, play back and export your video clips.
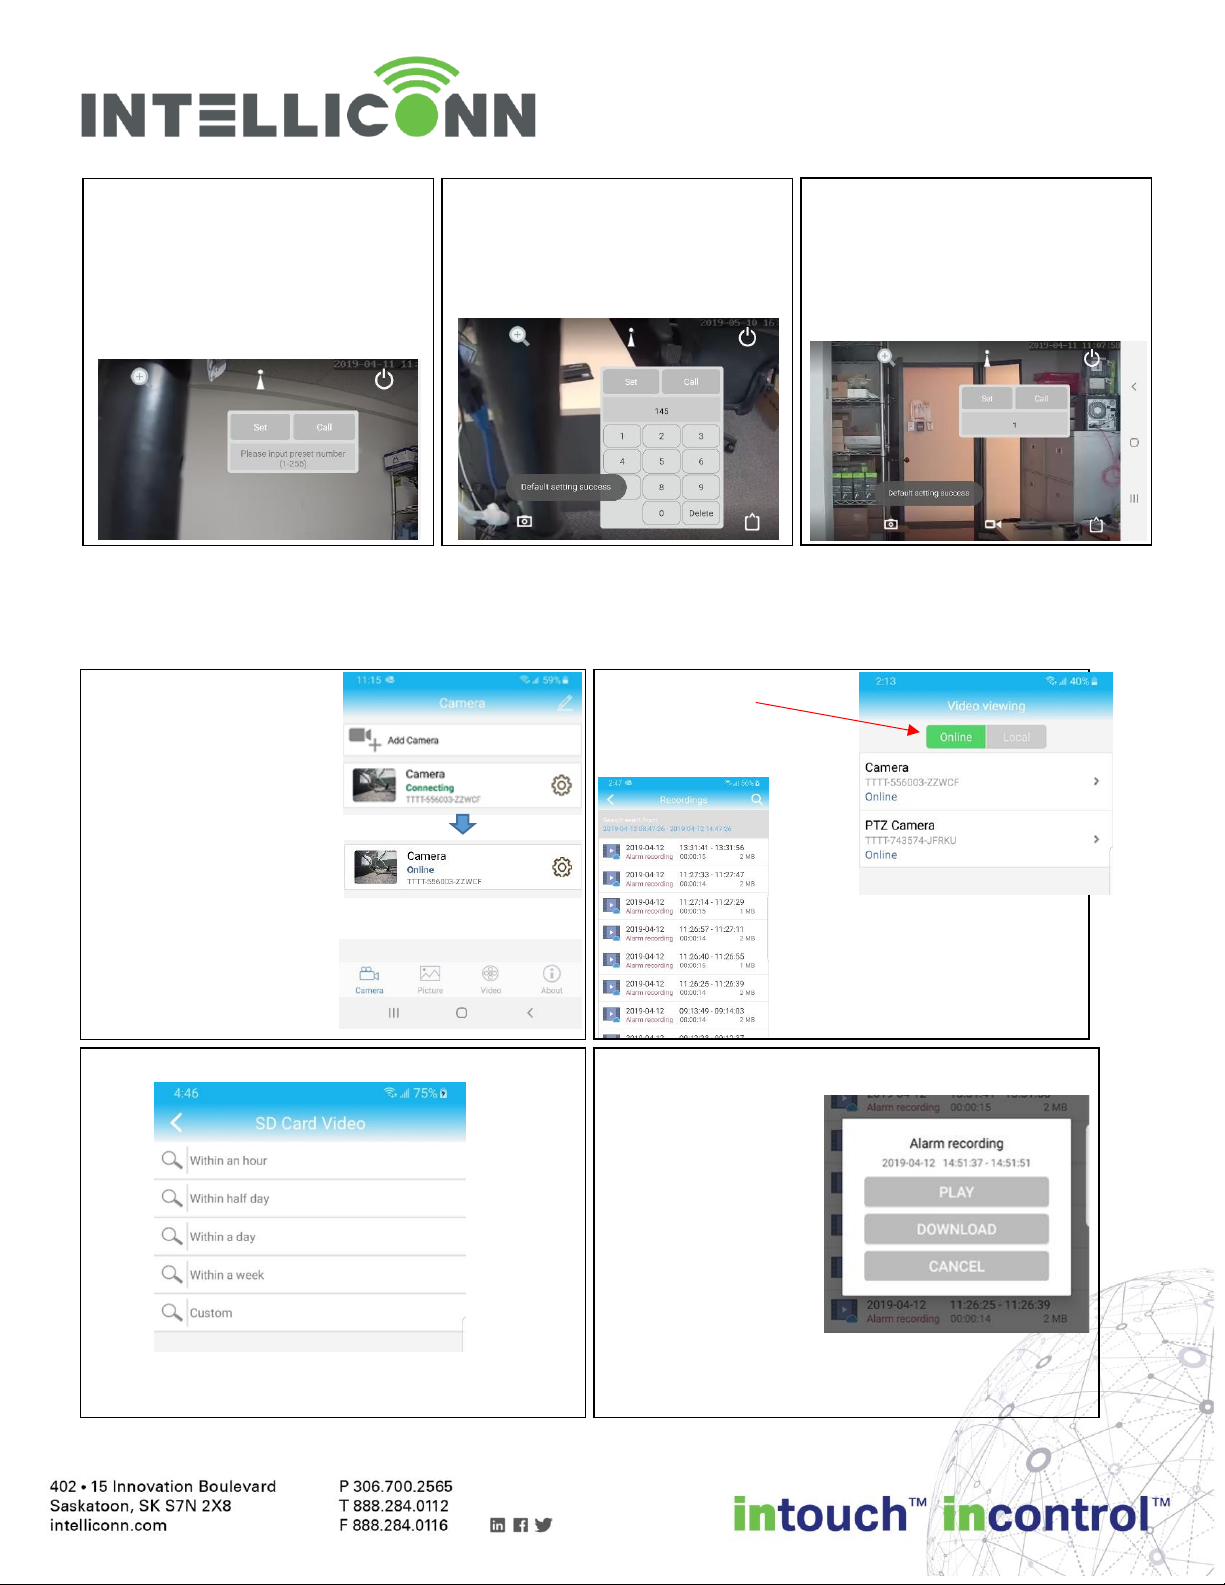
4. You can save the position of
the camera so that you can
quickly return to it. Tap
“Preset” icon, then tap “Please
input…”. Tap number on
keypad, then “Set”.
5. If you need to save more than 9
positions, just type larger
numbers using the keypad, (up
to 255 positions)
6. To call the camera to a saved
position, type the number on
the keypad and tap “Call”. To
clear number, tap “Delete” or
tap number display area.
1. Open the iSmCam app.
Wait for the camera to
connect.
2. On the bottom toolbar,
tap “Video”.
And return to iSmCam. Go to Email Settings.
3. Ensure “Online” is
selected, then tap the
camera.
4. Scroll through the list of videos
and tap the one to play, or
select “Search” icon to view a
different time period.
5. Search for videos in different time period:
On the next window, choose your timeframe to
search.
6. When you have selected a video off the list:
‘Play’ will start video
playing automatically.
‘Download’ will save it
to your device in a
format playable in the
app.
‘Cancel’ returns to
previous screen.

6
Page6
Operation –Playback and Export, cont.
Other Functions
7. Playback screen. Select “Off” button to return to
previous screen.
To watch a downloaded
video, exit back to main
screen. Tap video…
8. … and choose local
this time. Tap your
camera….
9. Then choose Download. Tap the video to play it,
or tap to save
it in MP4 format
for export.
10. If a recording is captured manually from the live
feed, the resulting recorded video will be visible
in the “Record” tab.
11. If a snapshot is captured from the live feed,
choose “Picture” to view them
And return to iSmCam. Go to Email Settings.
Saved snapshots from live feed
1. Set up Scheduled Recording
Go to Settings then
Recording Schedule.
Choose a desired max
length ie. 600 sec (10min).
Enable record, pick a
stream and a schedule.
Tap “Apply”.
Memory and Video Setting Considerations
If Scheduled recording overlaps motion recording,
when motion is detected scheduled recording stops
and alarm recording starts. Then scheduled
recording resumes when motion ends.
This is the best way to catch all motion. However, it
fills your memory card faster.
To use less memory, adjust the video settings for the
stream you record.
Start with reducing the frame rate. Then try reducing
the Bit rate.
Also, remember to change video setting to 60Hz.
7
Page7
Additional options avail thru PC software:
A. Trigger recording on a “Sound Alarm”.
B. Set up multiple (up to 4) different window zones for alarm trigger, with different sensitivity for each.
C. More detailed image optimization settings for tricky light areas.
D. Set up a timed snapshot capture to be saved to memory card.
2. Set up Alarm Sound Linkage.
The camera can be set up to emit a sound every
time motion is detected. Sound options: siren,
dog barking, or a custom recording.
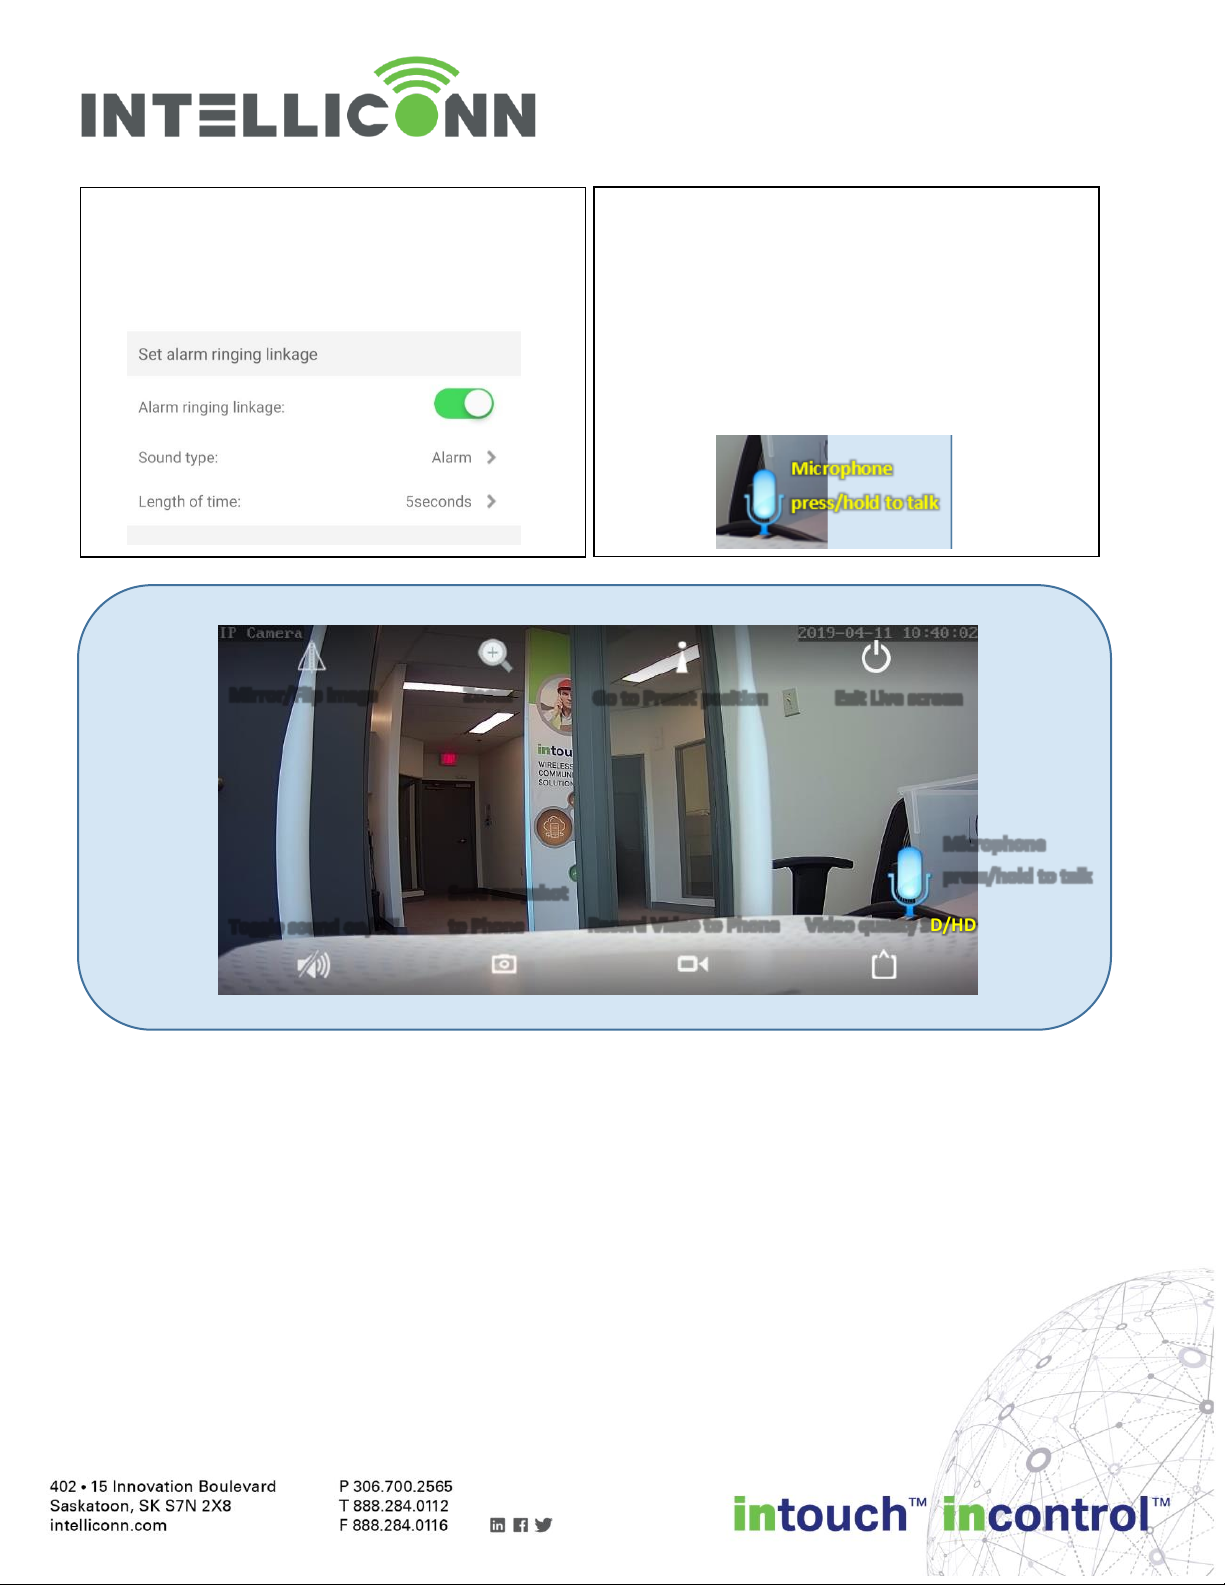
3. Intercom Function
The camera has a built-in microphone and speaker.
Toggle sound on for the live display, to activate the
microphone icon.
Press and hold to activate the microphone (turns
blue), then speak while holding finger on icon.
Release icon when done.
The sound will be transmitted to the camera
speaker.
Zoom
Save snapshot
to Phone
Record Video to Phone
Video quality SD/HD
Mirror/Flip image
Exit Live screen
Go to Preset position
Toggle sound on/off
Microphone
press/hold to talk
Live Screen Functions and Settings
Tap the screen to make icons disappear or reappear
Table of contents
Other Intelliconn Security Camera manuals


