Adena Rada Duo User manual

RADA DUO
QUICK INSTALLATION GUIDE
CLIP, WALK AND
TALK WITH RADA DUO

RADA Duo is a lavalier wireless microphone de-
fined by its miniature and lightweight design,
high-quality audio, long battery life and precise
noise cancellation with LCF mode for especially
loud environments. Duo is focused on flexibility
and thus features clips on the receiver and trans-
mitters that can be attached to a jacket, shirt, or
belt.
The system relies on UHF wireless transmission
– it ensures outstanding signal stability and a
professional-level audio quality. RADA Duo is de-
signed as a dual-channel system, able to record
two microphone transmitters simultaneously, and
also supporting volume monitoring and adjust-
ment via hotkeys.
Duo is primarily designed for usage with AREC
Media Stations, allowing users to record present-
ers’ and guests’ voices. However, there are other
applications for it – you can also use it with cam-
eras and tablets, mobile devices, such as phones,
as well as PCs, AV audio mixers and other record-
ing and streaming devices.
RADA Duo Quick Installation Guide

WARNINGS
1. Some amount of ambient noise is unavoidable in particularly
noisy environments
2. Store in dry and clean place when not in use. Avoid storing in
hot and humid locations, as it can affect the product’s sensitivity
and tone
3. Avoid pulling by the cables and bumping them, since that can
cause the microphone sensitivity to drop or damage the cables.
4. Keep the devices dry and avoid touching them with wet hands.
RADA Duo is not waterproof, therefore do not expose it to rain or
water
PRECAUTIONS
1. Check that all cables are properly inserted when using the
devices
2. RADA Duo is equipped with rechargeable lithium batteries
that have a certain life limit as is normal for batteries. Over time
the maximum working hours will be reduced. You can take the
following steps to extend the battery life:
• Pull out the power cord after the device finishes charging.
• Fully discharge and fully recharge the batteries at least once
every three months

Product Package Includes
x1 Receiver
x2 Transmitter microphone
x1 TRRS to TRRS audio cable
x1 TRRS to TRS audio cable
x1 1-to-3 USB Type-C to USB A charging cable
x2 Lavalier microphones with clips
x2 Windshields for microphones
x1 Cold shoe mount for installation on cameras
x1 Carry bag

RADA Duo Transmitter Microphone
1. Transmission : UHF
2. Voltage : 3.7V lithium battery
3. Current : 100mA@3.8VDC
4. Microphone type : omni-directional
5. Frequency : 650~690MHz
6. Frequency stability : <15ppm
7. Transmission power level : 13dBm/3.8VDC
8. Frequency response : 50Hz~15K Hz
9. Operating distance : 50 meters, depending on the
environment
10. Battery capacity : 3.7V/480mAh
11. Time to full charge : 1.5 hours
12. Endurance rating : approximately 4 hours
13. Net weight : approximately 70g
14. Dimensions : 71mm X 37mm X 14mm

RADA Duo Receiver
1. Frequency : 650~690MHz
2. Frequency stability : < ± 15ppm
3. Distortion : < 0.5%
4. Audio Delay : < 2.5ms
5. Frequency response : 50Hz~15K Hz
6. Sensitivity : < -105dBm
7. Dynamic range : >85dB
8. Operating distance : 50 meters, depending on
the environment
9. Battery capacity : 3.7V/800mAh
10. Time to full charge : 2 hours
11. Endurance rating : approximately 6 hours
12. Net weight : approximately 86g
13. Dimensions: 62mm X 42mm X 16mm

1. Microphone
2. Microphone input : Designed for a 3.5 TRS connector
3. “+” Function key and coding key : Tap to increase
when configuring settings or press 3 times in a row to
enter coding mode
4. Power button and function key : Press for 2 seconds
to turn on or off or tap to scroll through customizable
settings
5. “–“ Function key : Tap to decrease when configuring
6. Charging port : Designed for USB Type-C, input 5V1A
3
1
2
4
5
6
Icon Description
6
1
2 3
4
5
7
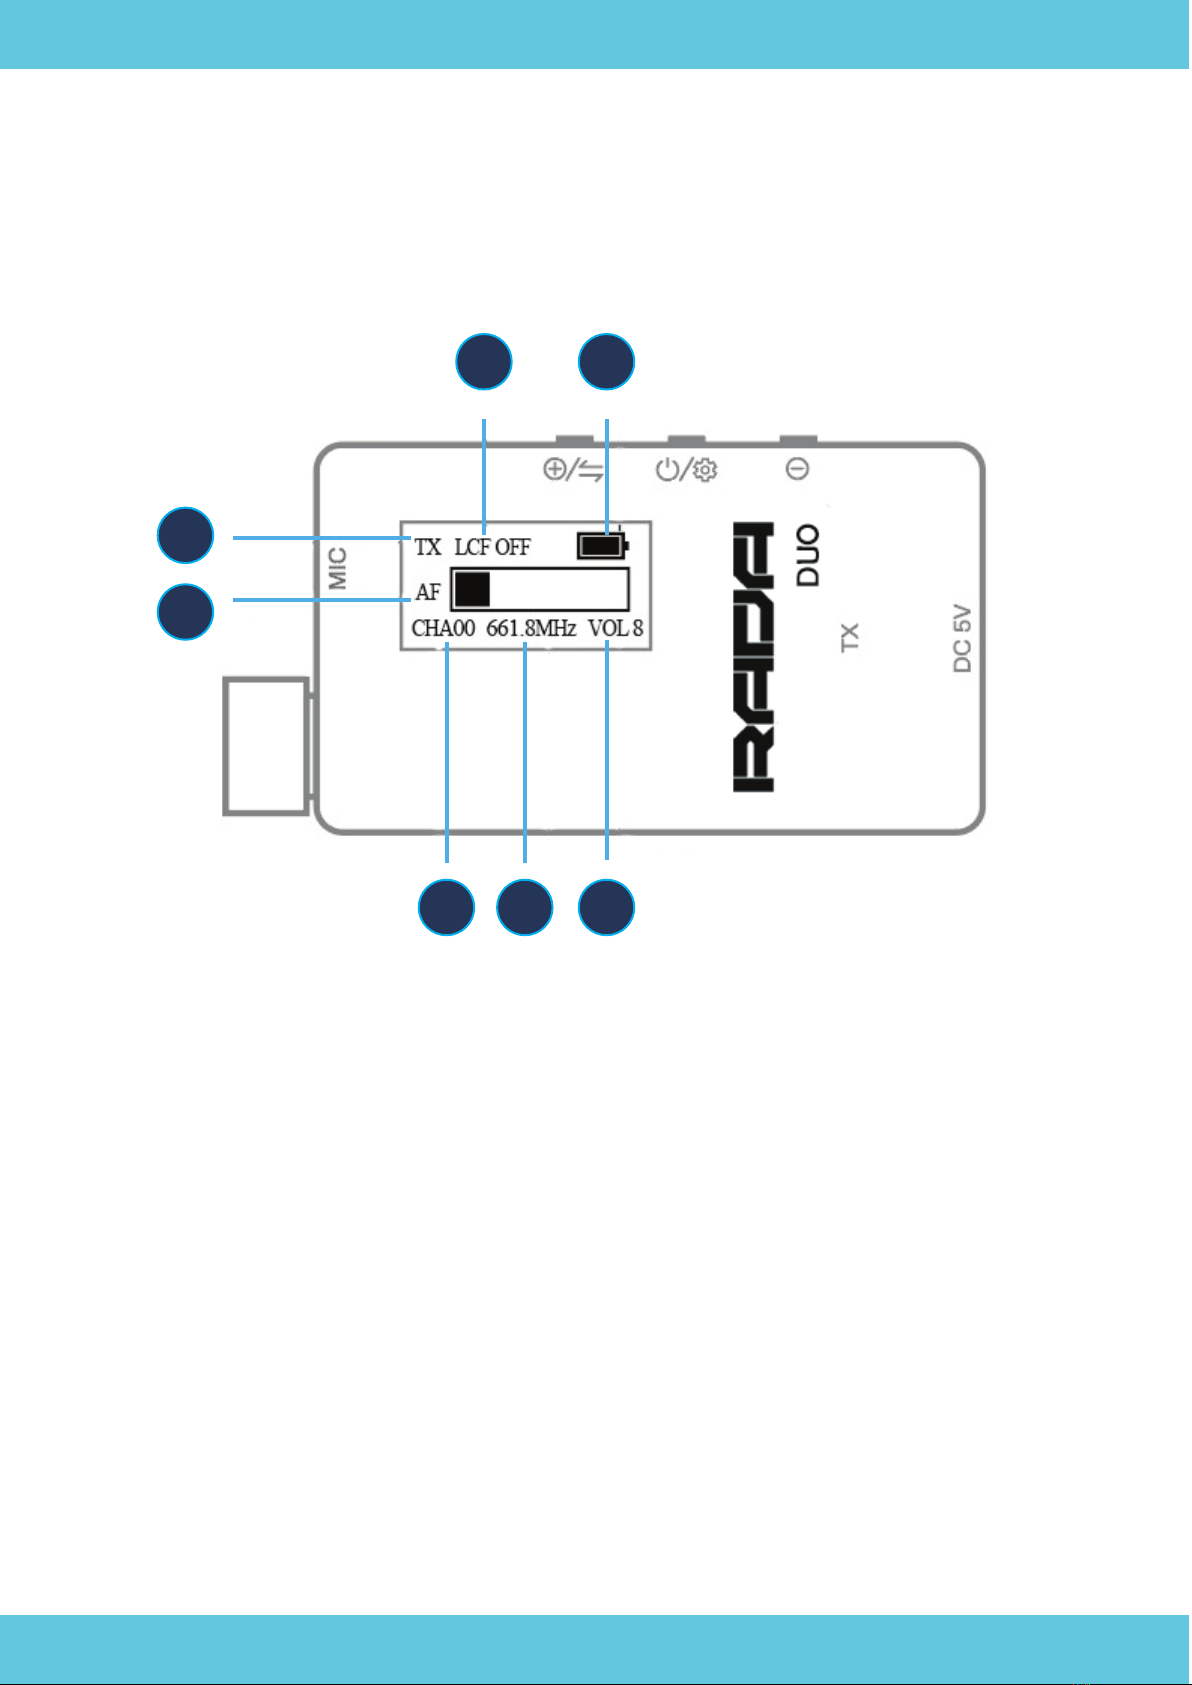
Icon Description (Launcher TX)
1. TX transmitter icon
2. LCF (low cut filter) : Enable it when in a
particularly noisy environment
3. Battery charge indicator : Indicator flashes
when charging and stops when fully charged
4. Volume level : You can set it from 0 to 8
5. Frequency : 650 to 690 MHz are supported
6. Channel : 0 to 20 are available
7. Audio Frequency : Dynamically shows
audio level

12
3
4
5
6
Icon Description
1. Monitoring port : Designed for 3.5 TRS or TRRS
headphones
2. Audio output port : Connect to other devices for
audio recording via 3.5 TRRS connector
3. Volume “+” control key : When powered on, press
to increase volume
4. Power button / coding key : Press for 2 seconds to
turn on or off or press 3 times when powered on to
enter coding mode
5. Volume “-“ control key : When powered on, press
to decrease volume
6. Charging port : Designed for USB Type-C, input
5V1A

Icon Description (Receiver RX)
1
2
3
4
5
6
1. Signal strength
2. RX receiver icon
3. Battery charge indicator : Indicator flashes when
charging and stops when fully charged
4. Volume level : You can set it from 0 to 8
5. CHA (Channel A) and CHB (Channel B) indicators :
0 to 20 are available
6. Audio Frequency : Dynamically shows audio level

1. 3.5 TRS to 3.5 TRRS for connection to cameras
2. 3.5 TRRS to 3.5 TRRS for connection to cellphones
3. 3.5 TRRS to USB Type-C for connection to computers
and mobile devices
4. USB Type C to USB Type A adapter for connection to
all standard devices

3.5 TRS
Transmitter
The transmitter can be used with the inbuilt micro-
phone or with an external 3.5 TRS microphone. If you
would like to use an external microphone, input it into
the “MIC” port as indicated on the device.
Quick Installation Guide

3.5 TRRS
3.5 TRS
12
3
Receiver
The receiver can be connected to a camera using the provided
cold shoe like this :
1. Secure the receiver on the cold shoe mount
2. Secure the cold shoe mount on the camera and tighten it
3. Connect the receiver to your camera using the provided
3.5 TRS to 3.5 TRRS cable

3.5 TRRS
3.5 TRRS
Type-C
Lightning
When connecting the receiver to a cellphone,
use either the provided 3.5 TRRS to 3.5 TRRS
or 3.5 TRRS to USB Type-C depending on your
device.
When using with a phone

USB A to USB Type-C
audio adapter
Type-C
3.5 TRRS
When using with a computer
When connecting the receiver to a computer or
other devices, use either the provided 3.5 TRRS
to USB Type-C or USB Type-C to USB A adapter.

For the transmitter – press power button for 2 seconds to
turn on or turn off the device. When powered on, press
power button to cycle through options for setting up chan-
nels, volume, or LCF. Adjust these settings using “+” or “-“
buttons. Settings are automatically saved after 2 seconds.
You can also save manually by pressing the power button.
For the receiver – increase the volume by pressing “+”
button and decrease by pressing “-“.
Configuring the devices

Devices are shipped already paired. In case you need to pair
the devices again or fix channel misalignment, follow this
procedure :
1. Power on the devices
2. On the receiver, press power button 3 times to enter
pairing (coding) mode
3. On the transmitters, press “+” button three times to do
the same

Troubleshooting
1. Objects and walls can block the devices and reduce
effective range. In crowded environments particularly,
human bodies attenuate radio waves, and thus it is im-
portant to keep the devices free from obstruction. If you
are getting interference or low signal, try clearing the ob-
stacles
2. When using outdoors or speaking directly into the
microphone, it is recommended to use the windshield to
prevent distortion and wind background noise
3. If you are experiencing audio issues, check that the
cables are properly connected
4. If you are not getting audio, make sure that the devic-
es are properly paired (coded). Follow the pairing guide
above if needed
5. It is possible to mute the devices. If you are not get-
ting audio, please check the volume level on the devices
6. Try switching to a different channel if you are still ex-
periencing interference
7. If your problem is not resolved by any of the above
suggestions, please contact a-dena.com for further tech-
nical support
www.a-dena.com
Table of contents


