Adexa PNH-2000DI User manual

QUARTZ PATIO
HEATER
Model: PNH-2000DI
INSTRUCTION MUANUAL
Thank you for purchasing this infrared heater. We hope you will be completely satisfied
with this product. To ensure this, please read these instructions carefully before use
and keep them in a safe place.
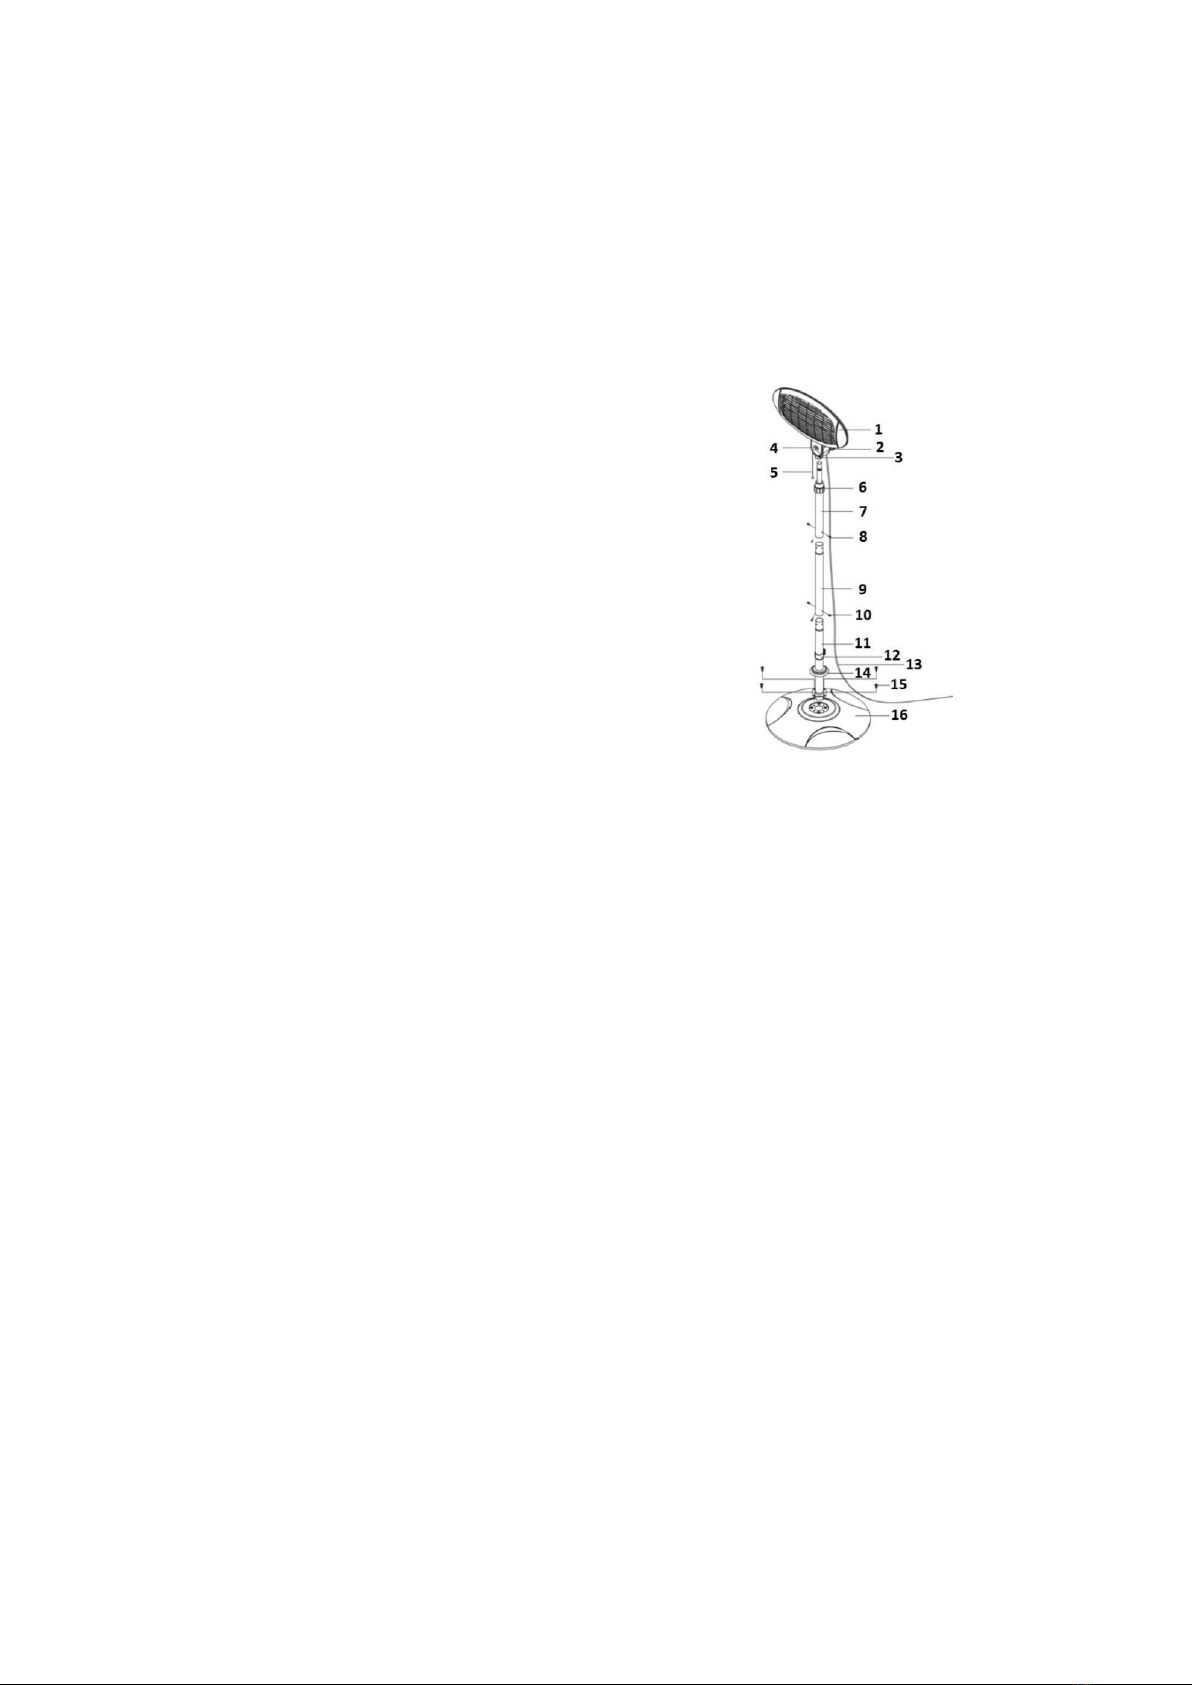
Part Description
1 Heating Element Assembly
2 Knob
3 Body
4 Position Indication Plate
0=Off
1=Low (650W)
2=Medium (1300W)
3=High (2000W)
5 Pull Switch
6 Tube Cover
7 Upper Post Assembly
8 3 -M5 X 6 Screw
9 Middle Post
10 3-M5 X 6 Screw
11 Lower Post Assembly
12 Clamp
13 Power Cord
14 Base Cover
15 4-M6 X 30 Screw
16 Base Assembly
WARNINGS
■ This electrical appliance complies with technical safety and electromagnetic
compatibility standards.
■ Never touch your heater when in operation (risk of burns).
■ Never touch it with wet hand.
■ Never rotate the heating part of the appliance during operation. To change the tit angle of
the heating part, we advise you to wait for 15 minutes after the appliance has been
switched off.
■ Never place anything on your heater's safety guard as this may cause overheating (e.g.
towels)
Never use your appliance to dry washing.
■ Although the heating element has stopped glowing, it may still be live and potentially
dangerous. Check that the selection indicator (5) is in position off before taking any
action.
■ Switch off your appliance:
-After use
-In the event of malfunction

-Before cleaning it.
■ Never operate your appliance if it has fallen over.
■ Never dismantle your appliance. An incorrectly repaired appliance maybe dangerous to
the user. If you encounter any problems, please take it to one of the Approved Service
Centers in our customer service network
■ The warranty will be void in the event of damage arising from improper use.
■ Do not use this heater in the immediate surrounding of a bath, a shower or a swimming
pool.
■ This movable appliance is designed for use in gardens, and can be used indoor and
outdoor. The warranty will not apply to appliances used for professional usage.
Although the heater may be used outdoors, the main plug must only be connected to
the supply indoors.
■ The heater is provided with an anti-tilt switch will switch off the heater if it is overturned,
and will switch it on again automatically when it is restored to its upright position.
■ The instruments in the minimum installation height 1.8 meters
VOLTAGE
Before using the appliance at the first time, ensure that your mains voltage
corresponds to voltage indicated on the appliance. It is a class I appliance and must
be earthed.
SAFETY
CAUTION: Before fitting or removing the appliance, ensure that the heater's
power line supplying the heater is disconnected. Check that the power line
is connected to a 30mA differential circuit breaker.
■ This appliance is designed for use in gardens ,and any room in your house,
including those where there is a risk of splashing. The installation and use of your
appliance must comply with the applicable standards in your country.
■ When it is switch on, an electrical heating appliance reaches very high temperature
libel to cause burns. Make sure that all other users are aware of the risks.
■ If you have any doubts concerning installation possibilities for this heater, please
consult a qualified electrician.
■ Children, the elderly and the infirm may not always be aware of the danger involved
in using electrical appliances. Never allow this appliance to be used without
supervision.
■ The appliance must be positioned so that the plug is accessible.
■ If the supply cord is damaged, it must be replaced by the manufacturer or its
service agent or similar qualified person in order to avoid a hazard
■ The heater must not be located immediately below a socket-outlet
■ Do not use this heater with a programmer, timer or any other device that switches
the heater on automatically, since a fire risk exists if the heater is covered or
positioned incorrectly.
■ Do not place the appliance close to curtains and other combustible materials.
4Base Assembly
Heating Element Assembly
Knob
Upper Post Assembly
Middle Post
Lower Post Assembly
Tube Cover
Clamp
Power Cord
Power Cord
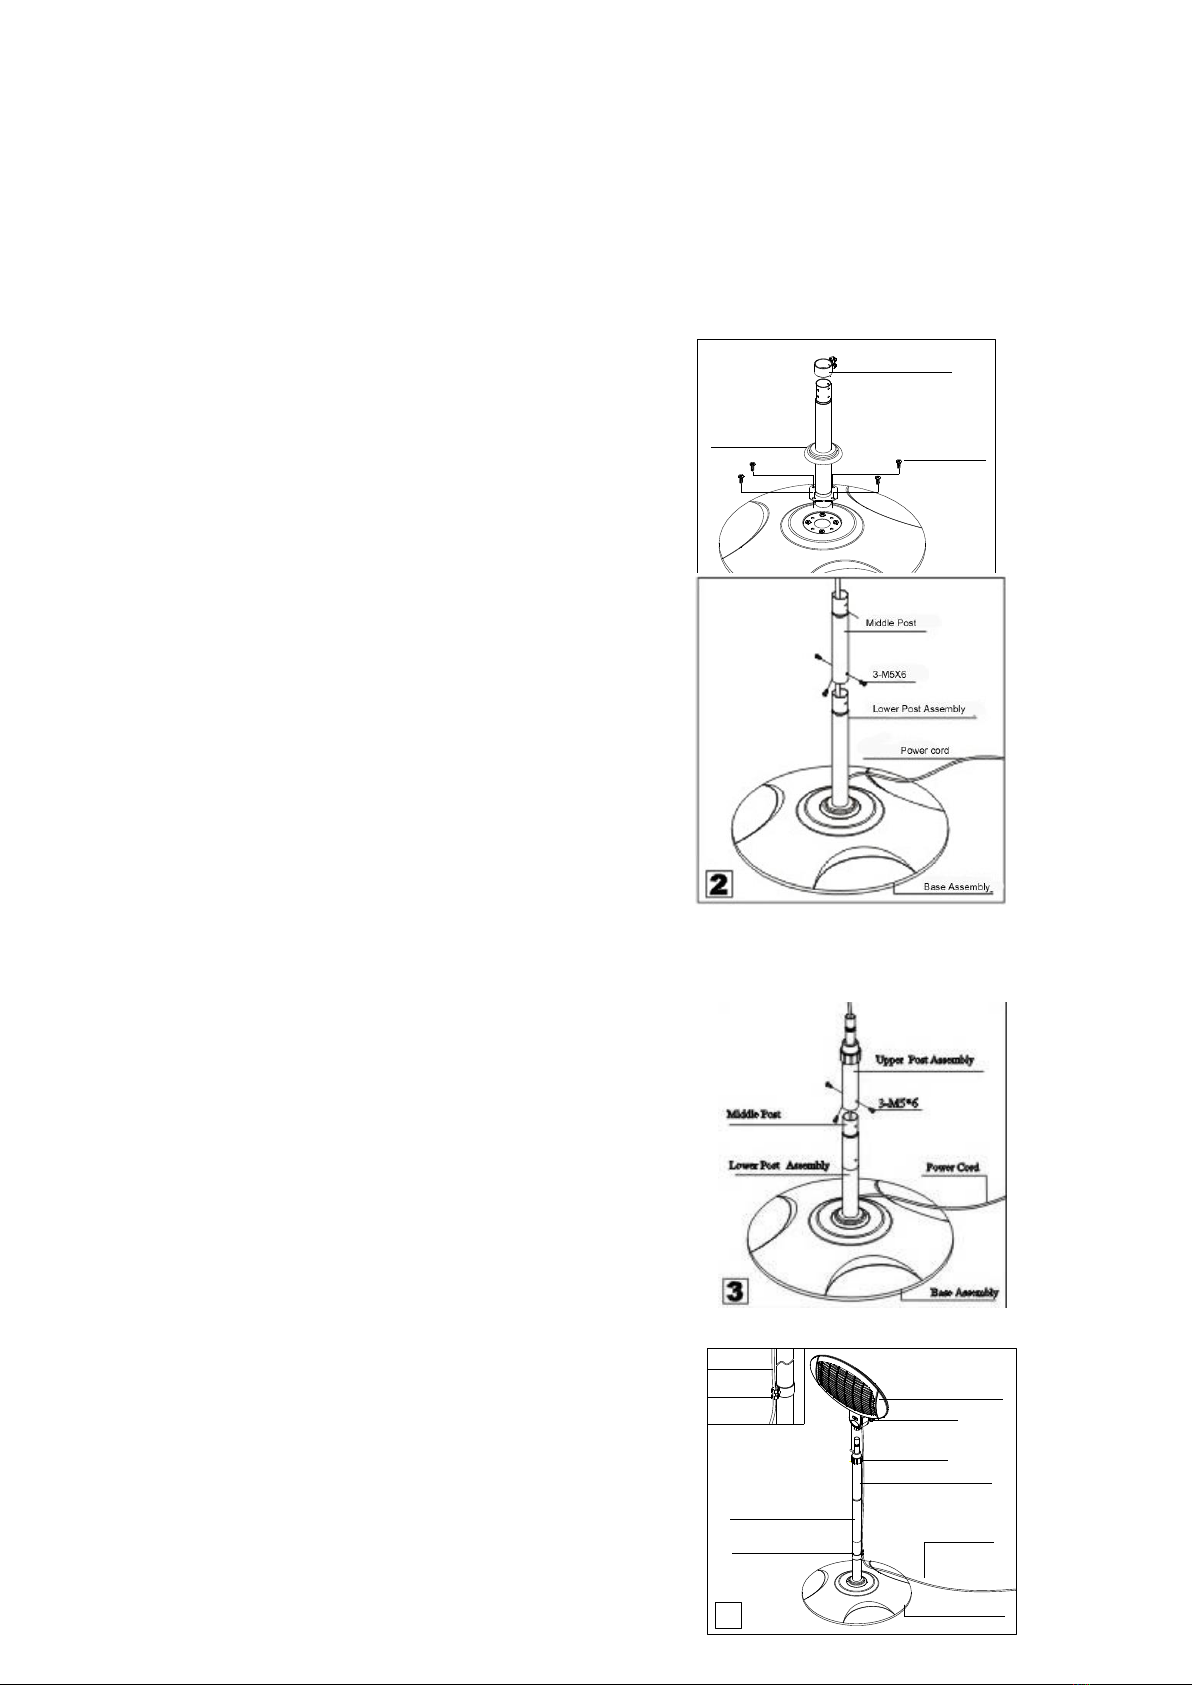
HOW TO ASSEMBLE
■Before installing your appliance, you must disconnect the electrical supply at the
circuit breaker.
FREE STANDING
1> Insert the lower post assembly
(11) into the base assembly (16)
and then fix it tightly by means
of 4-M6X30 screw, and insert
the clamp (12) into the lower post
(11). (fig.1)
2> Join the Lower Post Assembly
(11) and the Middle Post (9)
together with 3-M5X6 screw
(fig.2)
3>Join the Upper Post Assembly
(7) and the Middle Post (9)
together with 3-M5X6.screw
(fig.3)
4>Join the Heating Element Assembly
(1) and the Upper Post Assembly (7)
together, then fix them tightly by
rotating the Knob, and put the power
cord supply into the clamp. (fig.4)
1
Clamp
4-M6 X 24 Screw
Lower Post Assembly
Base Assembly
5
Heating Element Assembly
Body
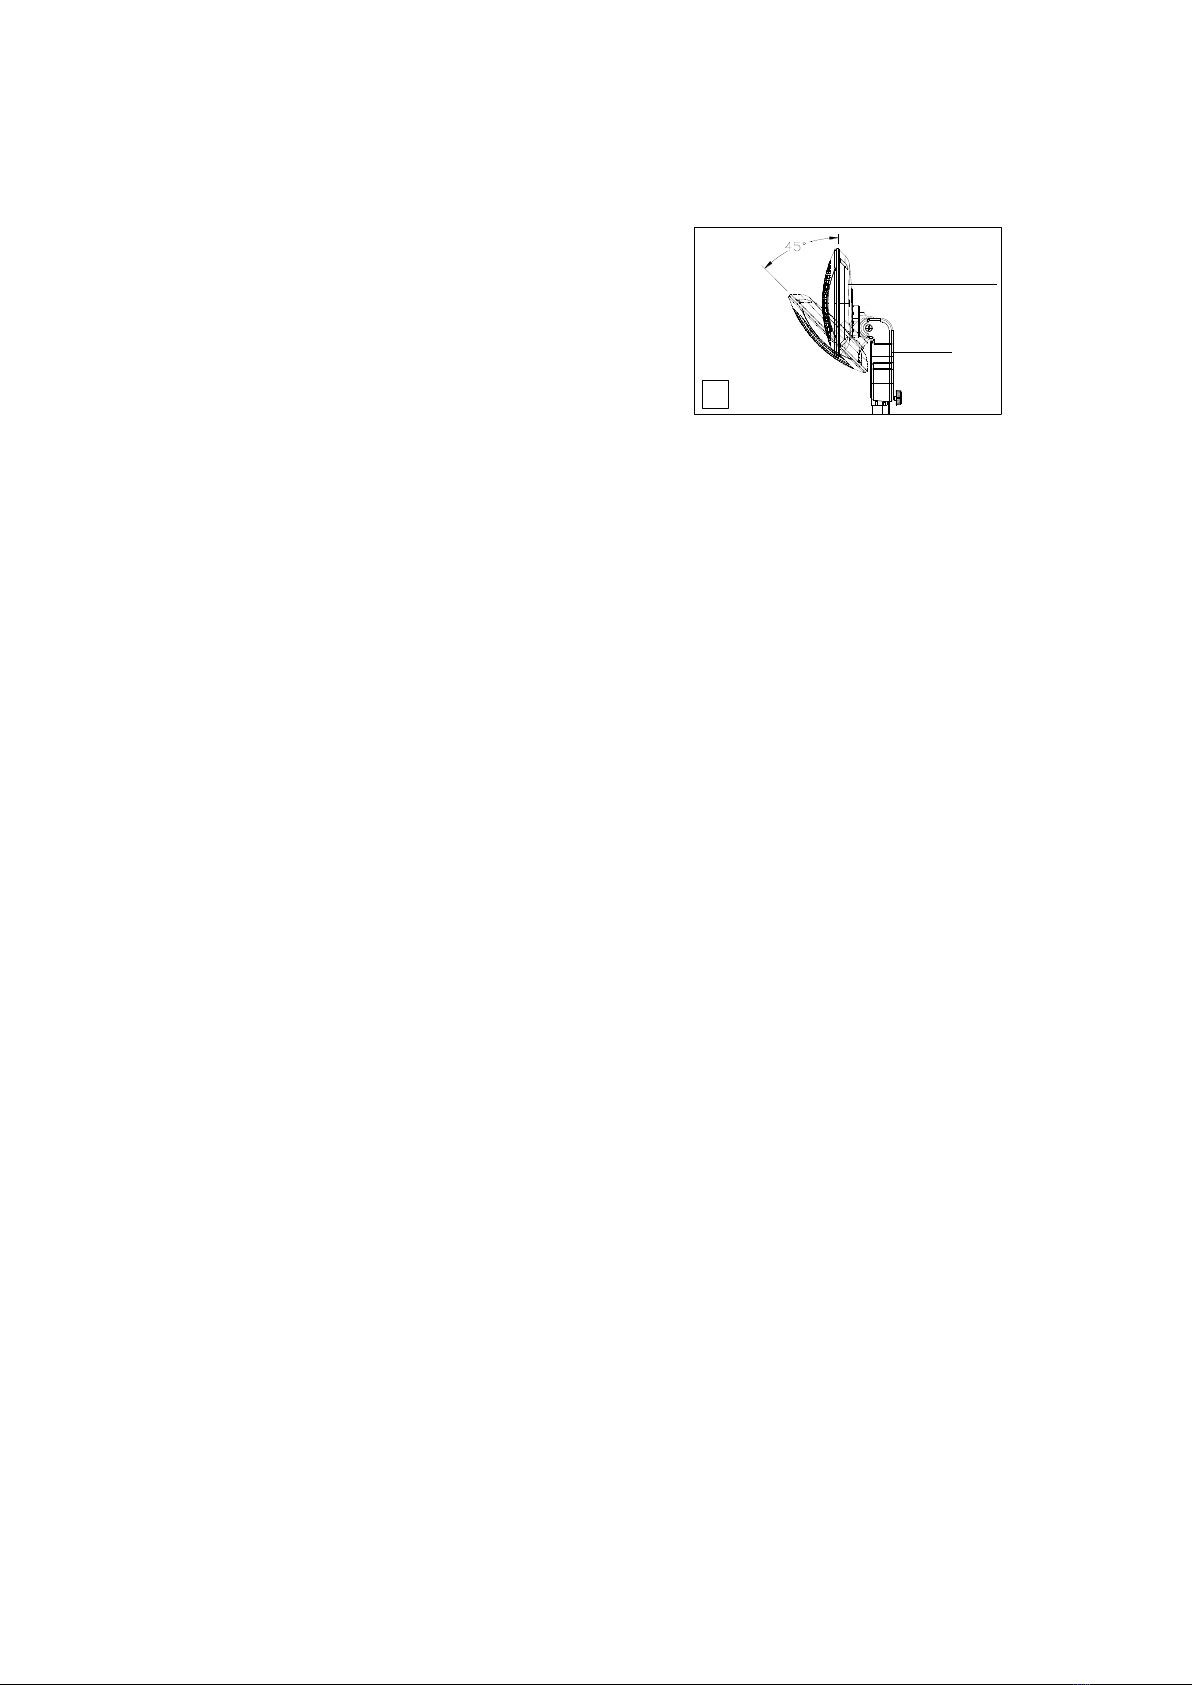
5>. According to the request of use angle,
Heating Element Assembly can adjust
Angle at 0º~45º. (Fig.5)
WALL MOUNTED
1.Take out the black screw from control panel box,then fixed with the body with that black
screw tightly.
2.To mounting in the wall to use the 4 screws (package in sperate). Drill the holes on the wall,
insert the plastic expanded plugs and install each screws.
3.Raise the heater and assembly it on the holes on back of itself.
4.Move the heater smoothly on the right to catch steady.
OPERATION
The appliance is switched on by means of the pull switch (5). The slight vibration
noticeable when the appliance is switched on will stop after a few seconds.
OUTPUT
-Position 0: Stop
-Position 1: 650W (lower power)
-Position 2: 1300W (medium power)
-Position 3: 2000W (high power)
MAINTENANCE
Your appliance does not requires any particular maintenance. However, in the event of
a malfunction, please consult an Approved Service Center.
1,This appliance is not intended for use by persons (including children) with reduced
physical,sensory or mental capabilities.or lack of experience and knowledge,unless they
have been given supervision or instruction concerning use of the appliance by a person
responsible for their safety.
2,Children should be supervised to ensure that they do not play with the appliance.
Table of contents
Other Adexa Heater manuals


